Stardom SR2-BA31 は、ハードディスクを 2 基搭載できる RAID ストレージデバイスです。データの冗長化とパフォーマンスの向上が可能です。付属の USB ケーブルでパソコンと接続し、データの保存やバックアップに使用できます。また、RAID モードの変更やハードディスクの交換も簡単にできます。
Stardom SR2-BA31 は、ハードディスクを 2 基搭載できる RAID ストレージデバイスです。データの冗長化とパフォーマンスの向上が可能です。付属の USB ケーブルでパソコンと接続し、データの保存やバックアップに使用できます。また、RAID モードの変更やハードディスクの交換も簡単にできます。

SOHORAID
User Manual
SR2 Series

» SafeTANK SR2 Series User Manual ..........................1
1. Environmental Requirements ....................................................................................1
2. Package Contents and Product Views ......................................................................1
3. Hardware Requirements and Precautions ................................................................3
4. Hardware Installation Procedure ...............................................................................4
5. How to Switch the RAID Mode ..................................................................................5
6. Hard Drive Replacement Instructions ........................................................................6
7. Data Rebuild ..............................................................................................................6
9. Additional Display Messages of System and Operation Procedures ........................7
11. Install The Operation System Into This Device .......................................................11
12. Frequently Asked Questions ...................................................................................16
» SafeTANK SR2 Series 產品使用說明 ................. 17
1. 環境需求 ....................................................................................................................17
2. 產品外觀及包裝內容 ..................................................................................................17
3. 硬體需求與注意事項 ..................................................................................................19
4. 硬體安裝 ....................................................................................................................20
5. 如何切換 RAID 模式 ..................................................................................................21
6. 硬碟更換步驟說明 ......................................................................................................22
7. 資料重建功能說明 ......................................................................................................22
8. 系統過熱與風扇故障狀況排除 ....................................................................................23
9. 其它螢幕訊息顯示及操作說明 ....................................................................................23
11. 外接磁碟安裝作業系統 ............................................................................................. 27
12. 常見問題 ..................................................................................................................32
SR2 Series User Manual
V1.0

SR2 Series User Manual
1
2. Package Contents and Product Views
Introduction
Open the package and you shall nd the following parts:
SR2-BA31 product x 1
(with removable drive tray enclosed x 2)
SR2-B31 product x 1
(with removable drive tray enclosed x 2)
SR2-B31A product x 1
(with removable drive tray enclosed x 2)
USB 3.2 C to C cable x1 USB 3.2 C to C cable x1 ― ―
USB 3.2 C to A cable x1 ― ― USB 3.2 C to A cable x1
Power Cable x1 Power Cable x1 Power Cable x1
Quick Installation Guide x1 Quick Installation Guide x1 Quick Installation Guide x1
Screws & Ejector pins Screws & Ejector pins Screws & Ejector pins
Thank you for choosing the STARDOM product. This manual will familiarize you with the STARDOM
SR2 product. We recommend reading through this manual before using the STARDOM SR2 product.
The information provided in this manual was checked before publication, but the actual product
specications may have changed before shipping; Latest product specications and updates can be
found at www.STARDOM.com.tw. No separate notications will be provided by our company. If you
would like to receive the latest STARDOM product information, manuals, and rmware, or have any
questions regarding STARDOM products, please contact your local supplier or visit www.STARDOM.
com.tw for more information.
All product-related content in this manual are copyrighted by STARDOM TECHNOLOGY, INC.
• Please check the product and accessories for any defect or missing parts. If you have any questions,
please contact your product supplier.
• Please visit the official website - Download page (http://www.stardom.com.tw/STARDOM2016/
download.php) to download drivers and other related resources.
1. Environmental Requirements
Operating Temperature: 0 ~ 40 ℃ (32 ~ 104 ℉ )
Storage Temperature : -20 ~ 47℃ (-4 ~ 116 ℉ )
Line Voltage : 100 ~ 240V AC

SR2 Series User Manual
2
Product View
Front View
Rear View
G
H
I
J
K
Before switch on, please ensure
all plugs are properly and
securely attached.
L
P
M
O
N
A. LCM display
B. Power touch switch
C. UP button
D. DOWN button
E. ESC button
F. ENTER button
G. Alarm indicator
H. Mute button
I. HDD enclosure handle
J. HDD access light
K. HDD enclosure pin release
L. Power socket
M. Main power switc
N. Fan
O. USB 3.2 Gen2 Type-C port
(10Gbps)
P. Anti-theft lock

SR2 Series User Manual
3
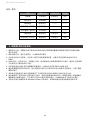
LED Indicators :
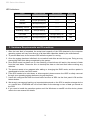
3. Hardware Requirements and Precautions
1. After the hard disk is formatted, the actual total capacity of the SR2 detected by the computer
operating system will vary from the sum of all hard disk capacities stated by the manufacturer.
2. To prevent data loss, do not remove SR2 while the system is running.
3. Once the system has been initialized, do not switch hard disks around during use. Doing so may
prevent the RAID from being recognized by the system.
4. Once RAID mode has been set up, the switching of hard drives will lead to the removal of data
from the hard disks. Please be sure to backup the data on the hard disk before making any
switches.
5. The product needs to be restarted after adding or changing the RAID mode, and the update is
guaranteed to be the new RAID mode.
6. If the SR2 needs to be shut down or disconnected, please ensure the HDD is safely removed
through your operating system before turning o the power.
7. Users can congure the RAID level and basic functions of SR2 via the front panel LCM and the
bottom button.
8. We strongly recommend backing up important data stored on the SR2 to another storage device
or a remote site. STARDOM will not be held liable for the damage or loss of data you stored on
the SR2.
9. If you need to install the operation system such like Windows or macOS into this device, please
refer to the user manual for details.
Status HDD access light Alarm indicator Buzzer
No HDD Red light always on Red light always on YES
Access Purple light flashing — — — —
Disk Idle Blue light always on — — — —
Rebuilding - Source Blue light always on — — — —
Rebuilding - Target Red light flashing — — — —
Fan Failed Blue light always on Red light always on YES
Over Temp ( ≧ 50℃ ) Blue light always on Red light always on YES

SR2 Series User Manual
4
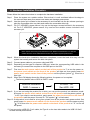
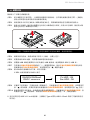
4. Hardware Installation Procedure
Please follow the instructions below to complete the hardware installation.
Place the system on a stable surface. Ensure that it is well ventilated without blockage to
the vent and kept away from areas near water and damage prone areas.
Use the ejector pin included in the accessory kit and inserted into the pin release opening to
eject the removable drive tray latch and extract the removable drive tray.
For 3.5" HDD/SSD, please secure it by use six the larger screws included in the accessory
kit. For 2.5" HDD/SSD, please secure it by use four the smaller screws included in the
accessory kit.
Step 1
Step 2
Step 3
Step 4
Step 5
Step 6
Step 7
Step 8
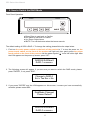
When the hard drive installation has been completed, insert the hard drive tray into the
system horizontally and secure the latch into place.
Connect power cable to your power outlet and SR2.
Depending on the type of computer USB port, select the corresponding USB cable in the
accessory to connect the computer to the USB port on the SR2.
First turn the main power switch on the back of the product to “I” to turn the power on,
the power touch switch on the front of the product will light red, then gently press the
power touch switch on the front of the product until the power symbol “
” turns into a
blue light.
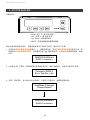
When the LCM display shows the following picture, the power on is complete.
Note: Please avoid using hard disk drives from dierent manufacturers or dierent
models from the same manufacturer as this may impact system performance.
※
The factory default value of SR2 is RAID 1 mode.
RAIDON RAIDbox2
RAID-1 vxxxxxx.x
Pri HDD : OK
Sec HDD : OK
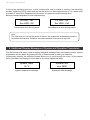
If you are not using the product for a while, you can put the product into shutdown mode:
rst press the power touch switch on the front of the product until the power symbol “
” is o; if you want to use the product, gently press the power touch switch on the front of
the product until the power is turned on. The symbol “ ” is illuminated.
If the product is not used for a long time, please turn o the product main power switch: rst
gently press the power touch switcth on the front of the product until the power symbol
“
” is o, then turn the power main switch on the back of the product to “ O ” to turn o
the power.
Step 9
Step 10
※ If you are using a USB 3.2 C to A cable, the Type-A on the host side needs to be USB 3.2 Gen2
for best access performance.

SR2 Series User Manual
5
Front Panel Operation:
● Enter: Enter to next level or Conrm
● Esc: Back to next level or Cancel
● Up / Down: Select Items
● MUTE: Turn o the buzzer when the buzzer sounds
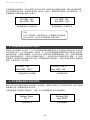
5. How to Switch the RAID Mode
Change to RAID-0
Ent = Yes Esc = No
The default setting of SR2 is RAID 1. To change the setting, please follow the steps below:
1. First turn the main power switch on the back of the product to “I” to turn the power on, the
power touch switch on the front of the product will light red, then gently press the power
touch switch on the front of the product until the power symbol “
” turns into a blue light. After
the LCM appears on the power-up screen, press "UP".
2. The following screen will appear, if you are sure you want to switch the RAID mode, please
press "ENTER", if not, press "ESC".
3. If you press "ENTER" and the LCM appears on this screen, it means you have successfully
switched, please restart SR2.
RAIDON RAIDbox2
RAID-1 vxxxxxx.x
RaidMode Changed
Please Reboot
RAIDON RAIDbox2
RAID-0 vxxxxxx.x

SR2 Series User Manual
6
6. Hard Drive Replacement Instructions
RAID-1 degraded
Pri : X Sec : O
RAID-0 failed
Pri : O Sec : M
In normal operational state, if the LCM "Pri: X" or "Sec: M" and the audio alarm activates, this would
indicate that the hard drive may be malfunctioning.
When this happens, you may choose to disable the audio alarm by pressing the MUTE button
located at the front of the system and continue to operate the system normally.
When nished, you may restart the SR2 to double check and see if the drive is in fact malfunctioning.
If you are certain that the drive is in fact malfunctioning, follow the instructions below to complete the
replacement of the malfunctioning drive.
Step 1
Step 2
Shut o the SR2 power. Extract the driveing "X/M" on the LCM from the corresponding drive
position and replace it with the new replacement drive. Do not switch the positions of the
drives.
Once the replacement is complete, turn on the power of the SR2. When the system
completes initialization, the LCM will ask you if you wish to initiate the rebuilding procedure.
Primary drive damage
Secondary drive lost
Pri : HDD Insert
Sec HDD : OK
Pri : HDD Insert
Sec HDD : OK
Rebuilding
Sec → Pri 32%
Rebuilding
Sec → Pri 32%
OR
7. Data Rebuild
During the use of SR2, if you are required to replace a malfunctioning drive refer to chapter 6 "Hard
Drive Replacement Instructions".Once drive replacement is complete and you power on the SR2, the
system will perform data reconstruction.
The data rebuild processing time is based on the capacity of the drive. During procedures, we
suggest to not use the system until the procedure(s) is complete as use of the system during
procedures may cause delays to the processing time.Please wait until the procedure(s) has been
completed to continue use.
During the data rebuilding process, the LCM panel will display the percentage progression rate of the
rebuild. Below are sample diagrams.

SR2 Series User Manual
7
Pri HDD : Fail
Sec HDD : OK
Pri HDD : OK
Sec HDD : Fail
Primary drive error during rebuild Secondary drive error during rebuild
If during the rebuilding process, a drive malfunctions and is unable to continue the rebuilding
process, restart the SR2 to check and see that the drive is in fact malfunctioning. If it is, please refer
to chapter 6 "Hard Drive Replacement Instructions" to replace the malfunctioning drive.
Below are sample diagrams of drive malfunctioning.
Note :
The next time you turn on the power of the unit, the system will automatically continue
to process the remains. Please do not switch position of the drive at any time.
System Temp.
50 ℃
System FAN
xxxx RPM
System temperature message System fan RPM message
9. Additional Display Messages of System and Operation Procedures
The SR2 frontal LCM panel is able to display additional messages such as rmware version, system
temperature and fan status by pressing the Up or Down buttons to make your selection.
Continuously pressing the selection buttons allows you to scroll through the menu. If not pressed
within 3 seconds, the display will revert back to its normal operational state.

SR2 Series User Manual
8
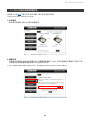
Users can download the GUI software from the website to monitor the status of the product.
※
The HDD1 equals to Pri HDD and HDD2 equals to Sec HDD.
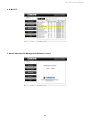
1. System Status
This GUI will auto detects the connected SR2 and reveals relative information accordingly.
2. Firmware Upgrade
You may update the Firmware via this GUI, simply click on “Load” button to locate the rmware
le to proceed. After update is nished, you may restart the power properly to operate with newly
updated rmware.
※
Caution : Any random rmware updates may cause device in malfunction, it is strongly suggested not to update device rmware if
device is operating properly.
10. GUI Monitoring Software and Firmware Update

SR2 Series User Manual
9
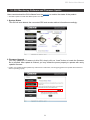
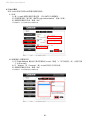
3. E-Mail Notify
Conguring an e-mail address for notication of drive malfunctioning or being removed.
3-1 Setup
1). Insert “Outgoing” SMTP and e-mail name and address.
2). If it is passwords required, select the option “SMTP Login Authentication” and insert the
passwords.
3). When the conguration completed, click on the “OK” button to save.
※
Device must be connected in operational states during congurations to take eects.
3-2 HDD Fail / Device Removed
1). Insert the e-mail address of the receiver for notication and click on “+” to add the inserted
e-mail address onto the notifying list. (Maximum up to 10 e-mail addresses)
2). Insert the error message and descriptions from the columns of “Subject” and “Contents”.
3). When the conguration completed, click on the “OK” button to save.
※
Device must be connected in operational states during congurations to take eects.

SR2 Series User Manual
10
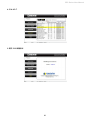
4. S.M.A.R.T.
5. About Indicates GUI Management Software version

SR2 Series User Manual
11
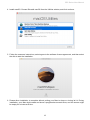
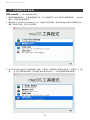
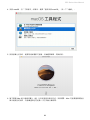
11. Install The Operation System Into This Device
1. Need to have network online capabilities. If a wireless network is available, you can choose it
from the Wi-Fi menu in the menu bar. This menu is also available in macOS Recovery.
2. Turn on your Mac and immediately press and hold Command (
⌘
)-R. Continue holding until you
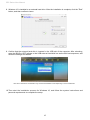
see the Apple logo or a spinning globe. Startup is complete when you see the utilities window:
3. If you need to erase your disk before installing macOS, select Disk Utility from the Utilities window,
then click Continue. You probably don't need to erase, unless you're selling or giving away your
Mac or have an issue that requires you to erase.
Install macOS
(Use macOS Mojave 10.14 for example)

SR2 Series User Manual
12
4. Install macOS. Choose Reinstall macOS from the Utilities window, and click continue.
5. Follow the onscreen instructions, select agree to the software license agreement, and then select
the disk to start the installation.
6. Please allow installation to complete without putting your Mac to sleep or closing its lid. During
installation, your Mac might restart and show a progress bar several times, and the screen might
be empty for minutes at a time.

SR2 Series User Manual
13
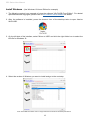
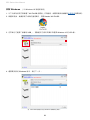
Install Windows
1. The following content is an example of using the software "WinToUSB Free Edition". For related
specications and copyrights, please refer to the software official website for details.
2. After the software is installed, press the shortcut icon of the desktop twice to open Hasleo
WinToUSB.
3. On the left side of the interface, select "Mirror to USB" and click the right folder icon to select the
ISO le for Windows 10.
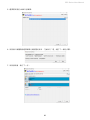
4. Select the version of Windows you want to install and go to the next step.
Note: WinToUSB Free Edition does not support Windows Professional and Enterprise editions.
(Use Windows 10 Home Edition for example)

SR2 Series User Manual
14
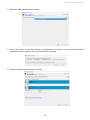
5. Select the USB external drive to install.
6. Select the version of the disk partition configuration according to your personal hardware
specications, then execute "Yes" to proceed to the next step.
7. Follow the default and follow the next step.

SR2 Series User Manual
15
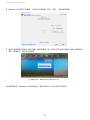
8. Windows 10 is installed to an external hard drive. After the installation is complete, click the "End"
button, and then conrm to leave.
9. Conrm that the external hard disk is inserted in the USB slot of the computer. After rebooting,
enter the BIOS or UEFI adjusts to the USB external hard disk box as the rst boot sequence, and
saves the settings and leaves.
10. Then start the installation process for Windows 10, and follow the system instructions and
personal requirements to complete the setup.
Note: The screenshot is for illustration only, and the actual situation varies depending on each motherboard.

SR2 Series User Manual
16
Q1. Which drive format should I choose to format the hard drives in the SR2?
A: It depends on the computer system you most often use. See the below suggestions:
1. Use NTFS format for Windows 2000/XP/Vista/7/8/10 system
2. Use HFS+ (Mac OS Extended) format for a Mac OS X system
3. Choose FAT32 format if you’ll use the SR2 in both Windows and Mac environments (the
maximum size of one single le may not exceed 4 GB).
12. Frequently Asked Questions

SR2 Series User Manual
17
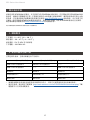
2. 產品外觀及包裝內容
關於這份手冊
打開包裝外盒後,包裝內容應包含下列組件:
SR2-BA31 本體 X1( 內含抽取盒 x2) SR2-B31 本體 X1( 內含抽取盒 x2) SR2-B31A 本體 X1( 內含抽取盒 x2)
USB 3.2 C to C 連接線 x1 USB 3.2 C to C 連接線 x1 — —
USB 3.2 C to A 連接線 x1 — — USB 3.2 C to A 連接線 x1
電源線 x1 電源線 x1 電源線 x1
快速安裝導引 x 1 快速安裝導引 x 1 快速安裝導引 x 1
螺絲及頂針 螺絲及頂針 螺絲及頂針
感謝您使用 STARDOM 的產品。本手冊將介紹 STARDOM SR2 產品。在您開始使用 STARDOM SR2
產品前,建議您先閱讀過本手冊。手冊裡的資訊在出版前雖已被詳細確認,實際產品規格仍將以出貨
時為準;任何產品規格或相關資訊更新請您直接到 www.STARDOM.com.tw 網站查詢,本公司將不另
行通知。若您想獲得 STARDOM 最新產品訊息、使用手冊、韌體 , 或對 STARDOM 產品有任何疑問,
請您聯絡當地供應商或到 www.STARDOM.com.tw 取得相關訊息。
本手冊相關產品內容歸銳銨科技股份有限公司版權所有
1. 環境需求
工作溫度:0 ~ 40 ℃ (32 ~ 104 ℉ )
儲存溫度:-20 ~ 47 ℃ (-4 ~ 116 ℉ )
相對濕度:5% 至 95% 非冷凝狀態
工作電壓:100~240V AC
• 請確認相關配件與產品本身是否有受損或配件缺少,若有任何疑問請與本產品供應商聯絡。
• 請前往官網 - 產品資料下載頁面 (http://www.stardom.com.tw/STARDOM2016/download.php) 下載
驅動程式以及其餘相關資源。

SR2 Series User Manual
18
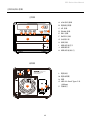
正面與背面示意圖
正面圖
背面圖
G
H
I
J
K
Before switch on, please ensure
all plugs are properly and
securely attached.
L
P
M
O
N
A. LCM 顯示螢幕
B. 電源觸控開關
C. UP 按鍵
D. DOWN 按鍵
E. ESC 按鍵
F. ENTER 按鍵
G. 系統警示燈
H. 靜音按鍵
I. 硬碟抽取盒把手
J. 硬碟讀取燈
K. 硬碟抽取盒頂針孔
L. 電源插座
M. 電源總開關
N. 風扇
O. USB 3.2 Gen2 Type-C 埠
(10Gbps)
P. 防竊鎖孔
ページが読み込まれています...
ページが読み込まれています...
ページが読み込まれています...
ページが読み込まれています...
ページが読み込まれています...
ページが読み込まれています...
ページが読み込まれています...
ページが読み込まれています...
ページが読み込まれています...
ページが読み込まれています...
ページが読み込まれています...
ページが読み込まれています...
ページが読み込まれています...
ページが読み込まれています...
ページが読み込まれています...
-
 1
1
-
 2
2
-
 3
3
-
 4
4
-
 5
5
-
 6
6
-
 7
7
-
 8
8
-
 9
9
-
 10
10
-
 11
11
-
 12
12
-
 13
13
-
 14
14
-
 15
15
-
 16
16
-
 17
17
-
 18
18
-
 19
19
-
 20
20
-
 21
21
-
 22
22
-
 23
23
-
 24
24
-
 25
25
-
 26
26
-
 27
27
-
 28
28
-
 29
29
-
 30
30
-
 31
31
-
 32
32
-
 33
33
-
 34
34
-
 35
35


Stardom SR2-BA31 は、ハードディスクを 2 基搭載できる RAID ストレージデバイスです。データの冗長化とパフォーマンスの向上が可能です。付属の USB ケーブルでパソコンと接続し、データの保存やバックアップに使用できます。また、RAID モードの変更やハードディスクの交換も簡単にできます。
他の言語で
- English: Stardom SR2-BA31 User manual