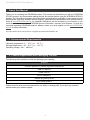
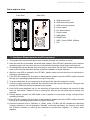
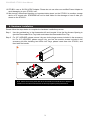
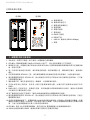
Stardom sohoraid ST2-B31は、2つのハードディスクを備えたRAIDストレージデバイスです。RAID 0、RAID 1、JBOD、BIGの4つのRAIDモードをサポートしています。RAID 0モードでは、2つのハードディスクの容量を1つの大きなボリュームとして使用できます。RAID 1モードでは、2つのハードディスクに同じデータをミラーリングして保存するため、どちらかのハードディスクが故障してもデータが失われません。JBODモードでは、2つのハードディスクを別々のボリュームとして使用できます。BIGモードでは、2つのハードディスクの容量を1つの大きなボリュームとして使用できますが、データはミラーリングされません。
Stardom sohoraid ST2-B31は、USB 3.1 Gen2ポートを備えており、最大10Gbpsのデータ転送速度を実現します。また、ファンを搭載しており、ハードディスクを冷却して故障を防ぎます。
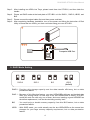


-
 1
1
-
 2
2
-
 3
3
-
 4
4
-
 5
5
-
 6
6
-
 7
7
-
 8
8
-
 9
9
-
 10
10
-
 11
11
-
 12
12
-
 13
13


Stardom sohoraid ST2-B31 ユーザーマニュアル
- タイプ
- ユーザーマニュアル
- このマニュアルも適しています
Stardom sohoraid ST2-B31は、2つのハードディスクを備えたRAIDストレージデバイスです。RAID 0、RAID 1、JBOD、BIGの4つのRAIDモードをサポートしています。RAID 0モードでは、2つのハードディスクの容量を1つの大きなボリュームとして使用できます。RAID 1モードでは、2つのハードディスクに同じデータをミラーリングして保存するため、どちらかのハードディスクが故障してもデータが失われません。JBODモードでは、2つのハードディスクを別々のボリュームとして使用できます。BIGモードでは、2つのハードディスクの容量を1つの大きなボリュームとして使用できますが、データはミラーリングされません。
Stardom sohoraid ST2-B31は、USB 3.1 Gen2ポートを備えており、最大10Gbpsのデータ転送速度を実現します。また、ファンを搭載しており、ハードディスクを冷却して故障を防ぎます。
他の言語で
- English: Stardom sohoraid ST2-B31 User manual