
© 2002 Sony Corporation
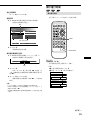
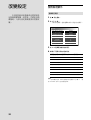
DVD Changer
3-244-518-11(1)
For installation and connections, see the supplied installation/connections
manual.
Operating Instructions
GB
CT
DVX-100S

2
Welcome!
Thank you for purchasing this Sony DVD Changer. Before
operating the unit, please read this manual thoroughly and retain
it for future reference.

3
Features................................................................. 4
Precautions............................................................ 4
About This Manual ............................................... 4
This Unit Can Play the Following Discs ............... 5
Notes on handling discs ....................................... 7
Location of controls.............................................. 8
Wireless remote commander.............................................8
Getting Started
Preparing the wireless remote commander ..... 10
Replacing the battery........................................................10
Preparing the DVD changer ............................... 11
How to load discs into the disc magazine..................... 11
How to install the disc magazine to start up the DVD
changer ........................................................................... 11
How to remove the disc magazine .................................12
Playing Discs
Playing a disc ................................ 14
How to play back ..............................................................14
Resuming Playback ..........................................................15
Turning off this unit..........................................................15
Display Screen (Audio CD)
....................................16
Using repeat functions ................ 17
Repeat Playback ................................................................17
A-B-Repeat playback ........................................................ 18
Playing discs at various slow speeds
.......................................................... 19
Slow playback ...................................................................19
Frame by frame .................................................................19
Playing tracks in various functions ............ 20
Playing tracks in random order
—Shuffle Playback ........................................................ 20
Playing start of tracks in sequence
—Intro Scan Playback...................................................20
Playing your own programme
—Programme Playback................................................21
Other Functions
Using a disc list ............................. 24
Displaying a disc list ....................................................... 24
Displaying a Running Time ......... 25
Displaying a running time..............................................25
Searching from items .......................... 26
Searching Methods (Title/Chapter/Track/elapsed time
of playback).................................................................... 26
Changing the Subtitle Language ............... 27
Using the menus for DVD ........................... 28
Using a Title Menu............................................................28
Using a DVD Menu ..........................................................28
Table of contents
Changing Audio Language ......................... 29
Changing Angles ......................................... 29
Changing the Audio Output Method
.......................................................... 30
Stereo/Monaural left/Monaural right ..........................30
Using the PBC (playback control) functions
.................................................................. 31
Using the PBC functions ..................................................31
Stopping the PBC functions ............................................31
Activating the PBC functions from normal playback..32
Changing Setup
Using the Setup Display..................................... 34
Selecting items for setup ..................................................34
Completing setup changes ................................ 35
DVD Menu Language .............................................35
Audio Language
......................................................36
Subtitle Language
....................................................37
Digital Output
........................................38
Display (Aspect Ratio —horizontal/vertical
screen image ratio)
...............................................39
Parental (initial setup)
.............................................40
Parental setup (Changing the parental
level)
.......................................................................42
Parental setup (Changing your password)
..........42
OSD message
...................................................44
Player Language
....................................45
Additional Information
Troubleshooting.................................................. 46
Power ..................................................................................46
Picture.................................................................................46
Sound ..................................................................................47
Operation ...........................................................................47
Message Display ...............................................................49
Specifications ...................................................... 50
Index.................................................................... 51

4
Features
Thank you for purchasing this Sony DVD changer. Here
are some of the features you will enjoy.
The DVX-100S is a DVD changer system comprised of a
wireless remote commander, a connection adaptor, and a
DVD changer. You can enjoy playing DVDs, Video CDs,
and Audio CDs with your car audio.
• 10 discs DVD/Video CD/Audio CD changer
• CD-Extra (Audio)/Mixed CD (Audio)/CD-R (Digital
Audio)/CD-RW (Digital Audio) compatibility
• Support dts/Dolby digital*
1
through optical digital
output terminal
• Expandable with the Sony Bus*
2
control system
*
1
Manufactured under license from Dolby Laboratories.
“DOLBY” and the double-D symbol are trademarks of Dolby
Laboratories.
*
2
The connected master unit recognizes this unit as a CD
changer.
Precautions
• Do not watch the monitor, while you are driving. If you
want to watch a DVD or Video CD, stop your car first,
park in a safe place, and enjoy yourself.
•You cannot use this unit unless your car audio has a
Sony bus control input.
• If the unit does not work, check the connections first. If
everything is in order, check the fuse of the master unit.
• If you leave your car in direct sunlight, the temperature
inside the car may become very hot. Allow the unit to
cool off before you use it.
•Avoid installing the DVD changer in places:
— subject to temperature exceeding 55 °C
— subject to direct sunlight
— near heat sources (such as heaters)
— exposed to rain or moisture
— exposed to excessive dust or dirt
— subject to excessive vibration
If you have any questions or problems concerning your
unit, please counsult your nearest Sony dealer.
Icon Meaning
Indicates a DVD function.
Indicates a Video CD function.
Indicates an Audio CD function.
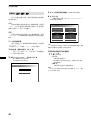
About This Manual
Conventions
• Instructions in this manual describe how to use this unit by
using the controls on the supplied wireless remote commander.
• The icons on the right are used in this manual:

5
DVD
A DVD disc contains both audio and visual data. A 12
centimetre disc can hold 7 times the amount of data
contained in a CD-ROM, which translates to 4 consecutive
hours of playing time (8 hours for double-sided discs).
DVD discs are divided into 4 types: single sided single
layer, single sided double layer, double sided single layer,
and double sided double layer.
Video CD
A Video CD can contain both audio and visual data on a
disc the same size as a regular Audio CD. The playing
time is 74 minutes for a standard 12 centimetre CD.
Audio CD
An Audio CD containing audio data. The playing time is
74 minutes for a standard 12 centimetre CD.
CD-Recordable (CD-R) for audio use
With a CD-R for audio use, you can edit audio data. You
can write information on a CD-R only once.
CD-Rewritable (CD-RW) for audio use
With a CD-RW for audio use, you can edit audio data. You
can write information on a CD-RW again and again.
CD-Extra
A CD-Extra has two sections containing audio and data.
You can only play the section of audio on this unit.
Mixed CD
A Mixed CD has one section containing both audio and
data. You can only play the part of audio on this unit.
Region code of DVDs you can play on this unit
Your DVD changer has a region code printed on the back
of the unit and will only play DVDs that are labelled with
identical region codes.
DVDs labelled
ALL
will also play on this unit.
If you try to play any other DVD, the message “This disc
can’t be played.” will appear on the screen.
Depending on the DVD, the region code indication may
not appear even if the DVD is prohibited by area
restrictions.
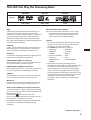
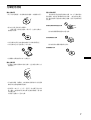
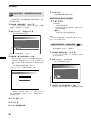
This Unit Can Play the Following Discs
DVD VIDEOs
Disc logo
Contents
Video CDs Audio CDs
Audio + Video Audio + Video
Audio
The “DVD VIDEO” logo is a trademark.
continue to next page t
Note on the TV colour systems
The colour system differs, depending on your country.
— Your DVD changer conforms to the NTSC colour
system. You cannot play discs recorded in other
colour systems such as SECAM and PAL.
Caution
• You can play CD-Rs and CD-RWs designed for audio
with this unit, however, depending on the recorded
conditions, you can’t play some discs.
• You CANNOT play these discs on this unit.
— DVD-Audio — DVD-RAM
— DVD-ROM — 8 cm discs
— DVD-RW — DVD-R
— Active-Audio (Data) — CD-G
— Photo-CD — VSD
— CD-Extra (Data) — MixedCD (DATA)
— CD-ROM
• This product incorporates copyright protection
technology that is protected by method claims of certain
U.S. patents and other intellectual property rights
owned by Macrovision Corporation and other rights
owners. Use of this copyright protection technology
must be authorized by Macrovision Corporation, and is
intended for home and other limited viewing uses only
unless otherwise authorized by Macrovision
Corporation. Reverse engineering or disassembly is
prohibited.

6
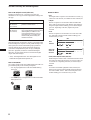
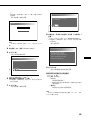
This Unit Can Play the Following Discs
Note on PBC (Playback Control) (Video CDs)
This player conforms to Ver. 1.1 and Ver. 2.0 of Video CD
standards. You can enjoy two kinds of playback according to the
disc type.
Disc type
Video CDs without
PBC functions
(Ver. 1.1 discs)
Video CDs with
PBC functions
(Ver. 2.0 discs)
Note on DTS-encoded CDs
When playing DTS*-encoded CDs, excessive noise will be heard
from the analog stereo outputs. To avoid possible damage to the
audio system, the consumer should take proper precautions
when the analogue stereo outputs of this DVD changer are
connected to an amplification system. To enjoy DTS Digital
Surround™ playback, an external 5.1-channel DTS Digital
Surround™ decoder system must be connected to the digital
output of this DVD changer.
* “DTS,” “DTS Digital Surround” and “DTS Digital Out” are
trademarks of Digital Theater Systems, Inc.
Note on CD-R/CD-RW
You can play certain CD-Rs and CD-RWs designed for audio use
(provided the quality of the recording is adequate).
— You can play Digital Audio CD-Rs and CD-RWs bearing
these icons:
— You CANNOT play (non-digital audio) CD-Rs and CD-RWs
bearing these icons:
Terms for discs
• Title
The longest section of a picture or music feature on a DVD, e.g.,
a movie for video software, or an album for audio software, etc.
• Chapter
Sections of a picture or a music feature that are smaller than
titles. A title is composed of several chapters. Each chapter is
assigned a chapter number enabling you to locate the chapter
you want. Depending on the disc, chapters may not be
recorded.
• Track
Sections of a picture or a music feature on a Video CD/Audio
CD. Each track is assigned a track number enabling you to
locate the track you want.
• Index (Audio CD)/Video Index (Video CD)
Numbered points within a track. A number that divides a track
into sections to easily locate the point you want on a Video CD
or an Audio CD. Depending on the disc, no indexes may be
recorded.
• Scene
On a Video CD with PBC (playback control) functions, the
menu screens, moving pictures and still pictures are divided
into sections called “scenes.” Each scene is assigned a scene
number enabling you to locate the scene you want.
You can
Enjoy video playback (moving
pictures) as well as music.
Play interactive software by using
menu screens displayed on the monitor
(PBC Playback), in addition to the
video playback functions of Ver. 1.1
discs. Moreover, you can play high-
resolution still pictures if they are
included on the disc.
DVD
structure
Video CD/
Audio CD
structure
Disc
Title
Chapter
Disc
Track
Index

7
Notes on handling discs
On handling discs
•To keep the disc clean, handle the disc by its edge. Do
not touch the surface.
• Do not stick paper or tape on the disc.
If there is a sticky residue, glue etc., on the disc, remove
it completely before using the disc.
• Do not expose discs to direct sunlight or heat sources
such as hot air ducts.
• Do not leave discs in a car parked in direct sunlight.
• After playing a disc, store it in its case.
On cleaning
• Before playing a disc, clean it with a cleaning cloth.
Wipe the disc from the centre out.
• Do not use solvents such as benzine, thinner,
commercially available cleaners or anti-static spray
intended for vinyl LPs.
• Discs with non-standard shapes (e.g., heart, square,
star) cannot be played on this unit. Attempting to do so
may damage the unit. Do not use such discs.
You cannot play 8 cm discs.
Notes on discs
Do not use discs with sticky residue on the surface (e.g.,
second-hand or rental discs with sticky seals, ink, or
peeling stickers). If you use such a disc, the sticky residue
could cause the disc to stop spinning and may cause a
malfunction or ruin the disc.
Discs with sticky residue
or ink
Do not use rental discs with old labels that are beginning
to peel off.
Discs with peeling stickers
Do not use discs with labels or stickers attached.
Discs with labels attached

8
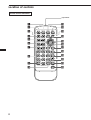
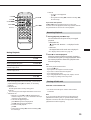
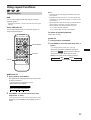
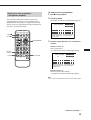
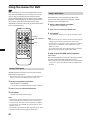
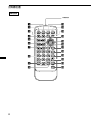
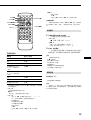
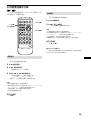
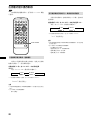
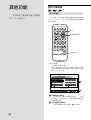
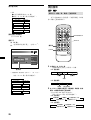
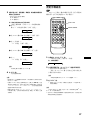
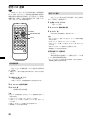
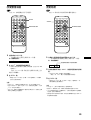
Location of controls
Wireless remote commander
Light emitter
0
O
789
456
123
STOP ANGLE
SUB TITLE
AUDIO
PLAY PAUSE MENU LIST
PREV NEXT
DISC
SCAN
SEARCH
TITLE
ENTER
CLEAR
RETURN PLAY MODE
SET UP
REPEAT
TIME
A B
7
6
5
1
4
9
0
8
3
2
qg
qj
qf
qk
ql
w;
wa
ws
qd
qs
qa
qh

9
1 ANGLE button 29
Press ANGLE to select the pictures of a scene viewed
from the multiple angle during a DVD playback.
2 STOP x button 14, 15, 21, 31, 32, 34
Press STOP to stop playback.
3 PAUSE X button 14, 15, 19
Press PAUSE to pause playback.
4 PLAY N button 14, 15, 19, 21, 22, 31, 32, 35-39,
41-45
Press PLAY to play a disc.
5 SCAN buttons 15, 19
Press M for fast forward playback.
Press m for fast rewind playback.
• DVD/Video CD 19
Press X (PAUSE), then press M/m for slow
playback.
6 PREV/NEXT button 14, 15, 19
Press > to go to the next chapter, track, or scene.
Press . to go back to the previous chapter, track or
scene.
• DVD/Video CD 19
Press X (PAUSE), then press > to play pictures
frame by frame.
7 DISC (+/–) buttons 14
Press + or – to select your favorite disc.
8 Number buttons 21, 26, 27, 31, 40, 42, 43
Press the number buttons to input numbers.
9 CLEAR button 21, 26, 27, 31, 40, 42, 43
Press CLEAR to clear the wrong number you entered.
0 RETURNO button 24, 25, 34-37, 39, 41-45
Press RETURN to come back to the normal playback
mode.
qa SUB TITLE button 27
Press SUBTITLE to change the subtitle languages
while playing a DVD.
qs AUDIO button
• DVD 29
Press AUDIO to change the Audio Language.
•Video CD/Audio CD 30
Press AUDIO to change the Audio Output Method.
qd MENU button 28, 31, 32
Press MENU to display the recorded DVD and Video
CD menu.
qf LIST button 24, 25
Press LIST to display the list of discs contained in the
magazine.
qg ENTER/V/b/v/B button 17, 21, 22, 24-31, 34-45
Press ENTER to execute the items or settings or to
select the items.
qh SEARCH button 26, 27
Press SEARCH to specify a desired point on a disc by
title, chapter, track , or time.
qj TITLE button 28
Press TITLE to display the title menu.
qk TIME button 25, 26
Press TIME to display the elapsed/remaining time of
items such as title, chapter, track, and disc.
ql REPEAT button
• DVD 17
Press REPEAT to play a title or a chapter repeatedly.
•Video CD/Audio CD 17
Press REPEAT to play the entire tracks of a disc or a
track.
w; AyB (A-B repeat) button
• DVD/Video CD 18
Press AyB to play your favorite scene repeatedly.
• Audio CD 18
Press AyB to play your favorite passage of songs.
wa PLAY MODE button 20-22
• Audio CD
Press PLAY MODE to select your favorite playback
mode.
ws SET UP button 34-37, 39, 41-45
Press SET UP when you want to change the settings,
such as DVD Menu Language, Audio Language,
Subtitle Language, and so on.
Caution
When you want to turn on the unit, select this unit at the
master unit. Refer to the Operating Instructions of the
master unit for details.

10
Preparing the wireless
remote commander
The wireless remote commander already contains a
lithium battery (CR2025). Pull out the insulation film to
start using the unit.
To operate the system, point the commander at the
receptor window on the supplied remote control sensor.
Notes
• Do not leave the remote commander in an extremely hot or
humid place.
• Do not drop any foreign object into the remote commander,
particularly when replacing the battery.
• If you do not intend to use the remote commander for an
extended period of time, remove the battery to avoid possible
damage from battery leakage and corrosion.
Replacing the battery
Under normal conditions, battery will last approximately
1 year. (The service life may be shorter, depending on the
conditions of use.)
When the battery becomes weak, the range of the wireless
remote commander becomes shorter.
Replace the battery with a new CR2025 lithium battery.
Use of any other battery may present a risk of fire or
explosion.
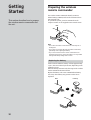
Getting
Started
This section describes how to prepare
the wireless remote commander and
the unit.
Rear
Rear
+ side up

11
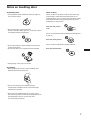
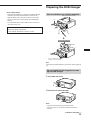
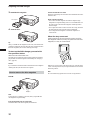
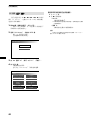
Preparing the DVD changer
How to load discs into the disc magazine
x
Note
When playing a double-sided disc, put the disc side to be played
up.
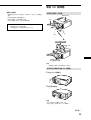
How to install the disc magazine to start
up the DVD changer
1 Hold OPEN and unlock.
2 Slide the door toward the right.
Notes
• Open the door fully until you hear the door click.
•To prevent injury, do not insert your hand into the DVD
changer.
There are 10 trays in the magazine:
put only one disc in each tray.
Tab
With the arrow side facing up
Tray
Labelled side down
continue to next page t
Notes on lithium battery
• Keep the lithium battery out of the reach of children. Should
the battery be swallowed, immediately consult a doctor.
•Wipe the battery with a dry cloth to assure a good contact.
• Be sure to observe the correct polarity when installing the
battery.
• Do not hold the battery with metallic tweezers, otherwise a
short-circuit may occur.
WARNING
Battery may explode if mistreated.
Do not recharge, disassemble, or dispose of in fire.

12
Use the unit with the door closed
Otherwise, foreign objects could enter and contaminate the lenses
inside the unit.
Notes on the disc magazine
• Do not leave the disc magazine in locations subject to high
temperature or high humidity, such as on a car dashboard or in
the rear window where the disc magazine will be exposed to
direct sunlight.
• Do not place more than one disc at a time onto a tray, otherwise
the DVD changer and/or the discs may be damaged.
• Do not drop the disc magazine or otherwise subject it to a
violent shock.
When the tray comes out
Under normal use, the trays should not come out of the
disc magazine. However, if they are pulled out of the disc
magazine, it is easy to re-insert them.
With the cut -away portion of the tray facing you, insert the right
corner of the tray into the slot, then push the left corner in until it
clicks into position.
Note
Do not insert the tray upside down or in the wrong direction.
Preparing the DVD changer
3 Install the disc magazine.
4 Close the door.
Tip
After you install the disc magazine in the unit, wait until the unit
completes creating the disc list. When the unit completes the disc
list in the magazine, the sound of checking discs stops.
To start up the DVD changer, proceed with
the operation below.
Select this unit at the master unit.
The start-up screen appears on the monitor and the unit starts to
play the first disc in the magazine automatically. See “Playing a
disc” (page 14).
Caution
If you select this unit at the master unit before the unit completes
checking the discs, the disc list is not complete.
How to remove the disc magazine
Press Z.
Note
To prevent injury, withdraw your hand, after you press Z. The
disc magazine is ejected swiftly.
If the disc magazine does not lock properly
Press Z to take out the disc magazine, and reinsert it.
Disc magazine
Z (EJECT)

13

14
Playing a disc
Playing Discs
This chapter describes how to play a
DVD/Video CD/Audio CD.
How to play back
Make sure to complete the preparations below:
— preparing the wireless remote commander (page 10)
— loading discs into the disc magazine, then installing
the magazine in the unit (page 11)
1 Select this unit at the master unit for start-up*.
After you select this unit at the master unit, the start-
up screen will appear on the monitor.
* The connected master unit recognizes this unit as a CD
changer.
The unit automatically starts to play the first disc in
the magazine. If you want to enjoy another disc* in the
magazine, follow the step 2.
* If you want to select a disc from the disc list, see “Using a
disc list” (page 24).
2 Press DISC (+/–) to select the desired disc.
Press +: to proceed to the next disc.
Press –: to return to the previous disc.
“Changing disc---,” then “Reading disc---” are
displayed on the monitor. The selected disc starts to
play.
Note
The master unit is limited to certain functions only. For more
advanced operations, use the wireless remote commander.

15
During Playback
To
Stop
Pause
Resume playback after pause
Go to the next chapter, track, or scene in
continuous play mode
Go back to the preceding chapter, track, or scene
continuous play mode
Fast forward
Fast rewind
Stop playback and remove the disc
*
1
If the resume playback function is activated, you can resume
playback later by pressing N. For details, see “Resuming
playback.”
*
2
DVD/Video CD
Both the picture and sound stop during pause.
Audio CD
The sound stops and the elapsed time flashes on the screen.
*
3
DVD/Video CD
— Each time you press M or m, the playback speed
switches in steps of 2-, 4-, 8-, 16-, and 32 times. The steps
of speed are rough estimates.
— To decrease the playback speed:
press m during fast forward playback.
press M during fast rewind playback.
— To resume normal playback:
press N.
— During fast forwarding (M) and fast rewinding (m),
the sound stops.
Audio CD
— To resume normal playback:
press N.
— During fast forwarding (M) and fast rewinding (m),
the sound stops.
Tip on master unit operation
If . or > is kept pressed during play or pause, fast
forward/ fast reverse playback (2 times only) will start. Release
the pressed button to return to the normal playback.
Resuming Playback
1 During playback, press x to stop.
The unit memorizes the point where you stopped
playback.
• DVD/Video CD
“x” flashes and “Resume---” is displayed on the
screen.
• Audio CD
The elapsed time of the Audio CD is displayed.*
* See “Display Screen (Audio CD)” (page 16).
2 Press N to resume playback.
When the resume playback is activated, playback is
resumed from the point you stopped playback. When
the resume playback is deactivated, playback starts
from the beginning.
Note
The resume playback is deactivated:
- If you press x twice.
- If you eject the disc magazine and insert it again.
- If you remove a disc from the disc magazine.
- If you change the play mode.
- If you start playback after selecting a title, chapter, or track.
- If you change any settings on the setup screen.
Turning off this unit
Press OFF* on the master unit.
* You cannot turn off the power with the wireless remote
commander.
Note
If you press OFF, and then select this unit at the master unit,
playback starts from the point you pressed OFF (Resuming
Playback is activated). When the resume playback is deactivated,
playback starts from the beginning.
0
O
789
456
123
STOP ANGLE
SUB TITLE
AUDIO
PLAY PAUSE MENU LIST
PREV NEXT
DISC
SCAN
SEARCH
TITLE
ENTER
CLEAR
RETURN PLAY MODE
SET UP
REPEAT
TIME
A B
PAUSEX
NEXT>
STOPx
PLAYN
PREV.
SCANm/M
DISC+/–
Operation
Press x*
1
Press X*
2
Press X or N
Press >
Press .
Press M*
3
Press m*
3
Press Z

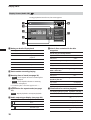
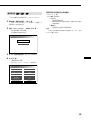
16
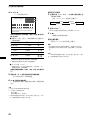
1 During an Audio CD playback
Icon display: Operation:
“H” Play
“s” Stop/Suspend resume
playback
“J” Fast forward
“j” Fast reverse
“L/l” Skip
“S” Pause
2 Track number currently playing
3 Running time of track (see page 25)
•
DISC
: while elapsed disc time or remaining disc
time* is displayed.
•
TRACK
: while elapsed track time or remaining
track time* is displayed.
* The remaining disc or track time appears with “–”
(minus).
4 Illumination for repeat mode (see page
17)
REPEAT
: Repeat playback or A-B-repeat playback.
5 Audio output-type display (see page 30)
Icon display: Operation:
“
L R
” Stereo
“
L R
” Monaural (left)
“
L R
” Monaural (right)
6 List of discs contained in the disc
magazine
The disc tray you currently selected:
tray number black
background yellow
The Audio disc trays currently not selected:
tray number green
background blue
The disc trays currently containing other-type discs (eg.
DVDs or Video CDs):
tray number white
background blue
The disc trays currently containing no discs or discs not-
playable by this unit:
tray number not displayed
background blue
7 Illumination for various playback
Icon display: lights up in yellow Operation: (see page –)
“DISC” Disc-repeat playback (17)
“TRACK” Track-repeat playback
(17)
“A-B” A-B-repeat playback (18)
“SCAN” Scan playback (20)
“SHUFFLE” Shuffle playback (20)
“PROGRAM” Programme playback (20,
21)
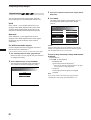
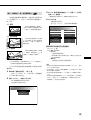
Display Screen (Audio CD)
During playback of an Audio CD, this screen appears.
Playing a disc
-
00
:
00
:
18 02
TRACK
REPEAT L
4
6 7 8
10
5
R
DISC
DISC
TRACK
A-B
SCAN
SHUFFLE
PROGRAM
1
2
4
5
6
7
3

17
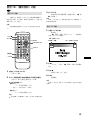
Using repeat functions
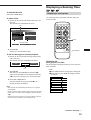
Repeat Playback
DVD
You can repeat a playing title (Title repeat) or chapter
(Chapter repeat).*
1
*
1
Depending on the disc, you may not be able to use the repeat
function.
Video CD/Audio CD
You can repeat all the tracks of a disc (Disc repeat) or a
single track (Track repeat).
DVD/Video CD
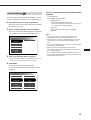
1 During playback, press REPEAT.
The repeat mode is displayed at the top of the screen
for about 5 seconds.*
2
*
2
The selected mode is highlighted in yellow.
• DVD repeat-mode display
• Video CD repeat-mode display
2 Press REPEAT*
3
to select the repeat mode (Title,
Chapter, Disc, or Track).
*
3
You can also press B/b to select the repeat mode in step 2.
Each time you press REPEAT, the highlight (yellow)
moves.
Notes
•To hide the repeat-mode display immediately after step2,
press CLEAR.
• Depending on the disc or scene, if “You can’t operate this
command now” appears in the display, you cannot use the
repeat function.
• Repeat playback of this unit can only be operated with the
wireless remote commander, not at the master unit.
• Repeat playback is canceled in the following cases:
- If you remove the disc magazine.
- If you select another disc in the disc magazine.
To return to normal playback
Select “Off” in step 2.
Audio CD
1 During playback, press REPEAT.
2 Press REPEAT to select the repeat mode (Disc, or
Track)*
4
.
*
4
See “Display Screen (Audio CD)” (page 16).
The repeat type (DISC or TRACK) lights up in
yellow, and
REPEAT
lights up in blue under the
running time of track. Each time you press
REPEAT, the repeat mode switches as follows:
B DISC B TRACK
Normal playback b
Repeat Off Disc Track
Repeat Off Title Chapter
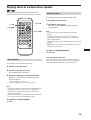
0
O
789
456
123
STOP ANGLE
SUB TITLE
AUDIO
PLAY PAUSE MENU LIST
PREV NEXT
DISC
SCAN
SEARCH
TITLE
ENTER
CLEAR
RETURN PLAY MODE
SET UP
REPEAT
TIME
A B
REPEAT
ENTER/V/b/v/B
CLEAR

18
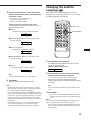
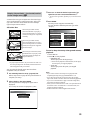
A-B-Repeat playback
You can repeat a specified segment of a title or track.
DVD/Video CD
You can repeat a specific scene, for example. Depending
on the disc, you may not be able to use the repeat
function.
Audio CD
You can repeat a part of a song, for example.
1 When you reach the desired starting point (point
A) of the segment you want to repeat, press AyB.
• DVD/Video CD
“A-” is displayed at the top of the screen.
• Audio CD
The “A-” indicator lights up in yellow.*
1
*
1
See “Display Screen (Audio CD)” (page 16).
2 When you reach the desired ending point (point B)
of the segment you want to repeat, press AyB
again.
• DVD/Video CD
The display changes to “A-B.”
• Audio CD
The indicator “A-B” lights up in yellow, and
REPEAT
lights up in blue under the running time.*
2
*
2
See “Display Screen (Audio CD)” (page 16).
Using repeat functions
Notes
• The starting and ending points must occur within the same title
(for DVD) or track (for Video CD/Audio CD). They cannot
span two or more titles or tracks.
• The “A-B” display for DVD/Video CD will disappear after
about one second, then the scene or song returns to the starting
point.
• If you set “A-B-Repeat playback,” previous settings such as
“Intro Scan Playback,” and “Disc/Track-Repeat playback” are
set to off.
• A-B repeat playback of this unit can only be operated with the
wireless remote commander, not at the master unit.
• A-B repeat playback is canceled in the following cases:
- If you remove the disc magazine.
- If you select another disc in the disc magazine.
To stop A-B repeat
Press AyB again.
• DVD/Video CD
“ A-B Off” is displayed at the top of the screen for about
1 second.
• Audio CD
The indicator “A-B” retrurns in white, and
REPEAT
disappears. The normal playback starts.*
3
*
3
See “Display Screen (Audio CD)” (page 16).
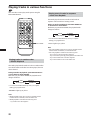
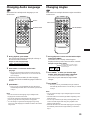
0
O
789
456
123
STOP ANGLE
SUB TITLE
AUDIO
PLAY PAUSE MENU LIST
PREV NEXT
DISC
SCAN
SEARCH
TITLE
ENTER
CLEAR
RETURN PLAY MODE
SET UP
REPEAT
TIME
A B
A B

19
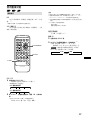
You can play the pictures of DVDs and Video CDs at
various slow speeds. You can enjoy the scene as a picture.
Slow playback
You can play a disc at various slow speeds.
1 Press X to pause the picture.
2 Press M to play slowly forward.
Slow playback starts at 1/16 first.
3 Press M or m again to select playback speed.
Each time you press a button, the playback speed
changes as follows:
1/16* y 1/8 y 1/4 y 1/2
* If you press m at 1/16 speed, the picture freezes.
Notes
•You cannot hear audio, while using the slow-playback function.
• Depending on the disc or scene, if “You can’t operate this
command now” appears in the display, you cannot use the
slow-playback function.
• Pictures in some discs may be distorted during slow playback.
•You cannot use the reverse slow playback function.
To return to normal playback
Press N.
Playing discs at various slow speeds
0
O
789
456
123
STOP ANGLE
SUB TITLE
AUDIO
PLAY PAUSE MENU LIST
PREV NEXT
DISC
SCAN
SEARCH
TITLE
ENTER
CLEAR
RETURN PLAY MODE
SET UP
REPEAT
TIME
A B
PAUSEX
NEXT>
PLAYN
SCANm/M
Frame by frame
You can play freeze frame pictures frame by frame.
1 Press X to pause the picture.
2 Press > to show a frame.
Each time you press >, the images advances by
frame by frame.
Notes
•You cannot hear audio, while using the frame-by-frame
function.
• Depending on the disc or scene, if “You can’t operate this
command now” appears in the display, you cannot use the
frame by frame function.
• Pictures in some discs may be distorted during frame-by-frame
playback.
• . is inactive. You cannot use reverse playback, while using
the frame-by-frame function.
To return to normal playback
Press X or N.
Caution for DVD/Video CD playback
If you want to play a disc at various slow speeds, or frame-by-
frame, use the controls of the wireless remote commander. You
cannot perform these functions by using the master unit.

20
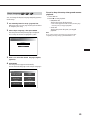
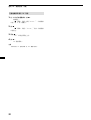
Playing start of tracks in sequence
—Intro Scan Playback
This mode plays the first 10 seconds of each track in
sequence. This is useful for locating a track.
During an Audio CD playback, press PLAY MODE one
or more times to select SCAN.
Each time you press PLAY MODE, the playback mode
changes as follows:
B SCAN B SHUFFLE
Normal playback b PROGRAM* b
* You can switch to PROGRAM only when you complete
making your programme list.
“SCAN” lights up in yellow.
Notes
• Intro scan playback of this unit can only be operated with the
wireless remote commander, not at the master unit.
• Intro scan playback is canceled in the following cases:
- If you remove a disc from the disc magazine.
- If you turn off the system by pressing OFF on the master unit.
- If you select another disc in the disc magazine.
- If you select another source on the master unit.
Playing tracks in various functions
This unit offers various play mode options using the
PLAY MODE button.
Playing tracks in random order
—Shuffle Playback
This mode plays back the tracks of a disc in random order.
Once all the tracks on the disc have been played, the next
disc is selected.
During an Audio CD playback, press PLAY MODE one
or more times to select SHUFFLE.
Each time you press PLAY MODE, the playback mode
changes as follows:
B SCAN B SHUFFLE
Normal playback b PROGRAM* b
* You can switch to PROGRAM only when you complete
making your programme list.
“SHUFFLE” lights up in yellow.
Notes
• Shuffle playback of this unit can only be operated with the
wireless remote commander, not at the master unit.
• Shuffle playback is canceled in the following cases:
- If you remove the disc magazine.
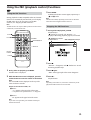
0
O
789
456
123
STOP ANGLE
SUB TITLE
AUDIO
PLAY PAUSE MENU LIST
PREV NEXT
DISC
SCAN
SEARCH
TITLE
ENTER
CLEAR
RETURN PLAY MODE
SET UP
REPEAT
TIME
A B
PLAY MODE
ページが読み込まれています...
ページが読み込まれています...
ページが読み込まれています...
ページが読み込まれています...
ページが読み込まれています...
ページが読み込まれています...
ページが読み込まれています...
ページが読み込まれています...
ページが読み込まれています...
ページが読み込まれています...
ページが読み込まれています...
ページが読み込まれています...
ページが読み込まれています...
ページが読み込まれています...
ページが読み込まれています...
ページが読み込まれています...
ページが読み込まれています...
ページが読み込まれています...
ページが読み込まれています...
ページが読み込まれています...
ページが読み込まれています...
ページが読み込まれています...
ページが読み込まれています...
ページが読み込まれています...
ページが読み込まれています...
ページが読み込まれています...
ページが読み込まれています...
ページが読み込まれています...
ページが読み込まれています...
ページが読み込まれています...
ページが読み込まれています...
ページが読み込まれています...
ページが読み込まれています...
ページが読み込まれています...
ページが読み込まれています...
ページが読み込まれています...
ページが読み込まれています...
ページが読み込まれています...
ページが読み込まれています...
ページが読み込まれています...
ページが読み込まれています...
ページが読み込まれています...
ページが読み込まれています...
ページが読み込まれています...
ページが読み込まれています...
ページが読み込まれています...
ページが読み込まれています...
ページが読み込まれています...
ページが読み込まれています...
ページが読み込まれています...
ページが読み込まれています...
ページが読み込まれています...
ページが読み込まれています...
ページが読み込まれています...
ページが読み込まれています...
ページが読み込まれています...
ページが読み込まれています...
ページが読み込まれています...
ページが読み込まれています...
ページが読み込まれています...
ページが読み込まれています...
ページが読み込まれています...
ページが読み込まれています...
ページが読み込まれています...
ページが読み込まれています...
ページが読み込まれています...
ページが読み込まれています...
ページが読み込まれています...
ページが読み込まれています...
ページが読み込まれています...
ページが読み込まれています...
ページが読み込まれています...
ページが読み込まれています...
ページが読み込まれています...
ページが読み込まれています...
ページが読み込まれています...
ページが読み込まれています...
ページが読み込まれています...
ページが読み込まれています...
ページが読み込まれています...
ページが読み込まれています...
ページが読み込まれています...
ページが読み込まれています...
ページが読み込まれています...
-
 1
1
-
 2
2
-
 3
3
-
 4
4
-
 5
5
-
 6
6
-
 7
7
-
 8
8
-
 9
9
-
 10
10
-
 11
11
-
 12
12
-
 13
13
-
 14
14
-
 15
15
-
 16
16
-
 17
17
-
 18
18
-
 19
19
-
 20
20
-
 21
21
-
 22
22
-
 23
23
-
 24
24
-
 25
25
-
 26
26
-
 27
27
-
 28
28
-
 29
29
-
 30
30
-
 31
31
-
 32
32
-
 33
33
-
 34
34
-
 35
35
-
 36
36
-
 37
37
-
 38
38
-
 39
39
-
 40
40
-
 41
41
-
 42
42
-
 43
43
-
 44
44
-
 45
45
-
 46
46
-
 47
47
-
 48
48
-
 49
49
-
 50
50
-
 51
51
-
 52
52
-
 53
53
-
 54
54
-
 55
55
-
 56
56
-
 57
57
-
 58
58
-
 59
59
-
 60
60
-
 61
61
-
 62
62
-
 63
63
-
 64
64
-
 65
65
-
 66
66
-
 67
67
-
 68
68
-
 69
69
-
 70
70
-
 71
71
-
 72
72
-
 73
73
-
 74
74
-
 75
75
-
 76
76
-
 77
77
-
 78
78
-
 79
79
-
 80
80
-
 81
81
-
 82
82
-
 83
83
-
 84
84
-
 85
85
-
 86
86
-
 87
87
-
 88
88
-
 89
89
-
 90
90
-
 91
91
-
 92
92
-
 93
93
-
 94
94
-
 95
95
-
 96
96
-
 97
97
-
 98
98
-
 99
99
-
 100
100
-
 101
101
-
 102
102
-
 103
103
-
 104
104


