
ZH-T 使用手冊 65
92 FA
106 AR
EN User manual 2
KO 사용 설명서 18
MS Manual pengguna 33
ZH-S 用户手册 50
SCF358


3ENGLISH
Important
Read this user manual carefully before you use the appliance and save it for future
reference.
Danger
- Do not immerse the cord, plug or appliance in water or
other liquid.
Warning
- Only use the appliance indoors.
- Do not let the power cord hang over the edge of a table
or worktop. Store excess cord in the base of the bottle
warmer.
- Keep the power cord away from hot surfaces.
- Only connect the appliance to a grounded wall socket.
Always make sure that the plug is inserted into the wall
socket properly.
- Before you connect the appliance, check that the voltage
indicated on the bottom of the appliance corresponds to
the local voltage .
- If you need to use an extension cord, make sure it is
a grounded extension cord with a rating of at least
13 amperes.
- Do not use the appliance if the plug, the power cord
or the appliance itself is damaged. If the power cord is
damaged, you must have it replaced by Philips, a Philips
authorized service centre or similarly qualied persons in
order to avoid a hazard.
- Do not place the appliance on or near a hot gas or
electric cooker, or in a heated oven.
- This appliance can be used by persons with reduced
physical, sensory or mental capabilities or lack of
experience and knowledge if they have been given
supervision or instruction concerning use of the
appliance in a safe way and understand the hazards
involved.

4 ENGLISH
- This appliance can be used by children aged from
8 years and above if they have been given supervision or
instruction concerning use of the appliance in a safe way
and if they understand the hazards involved. Cleaning
and user maintenance shall not be made by children
unless they are older than 8 and supervised. Keep the
appliance and its cord out of reach of children aged less
than 8 years.
- Children must not play with the appliance.
- Do not spill water on the power plug.
- Only use the appliance as described in the user manual
to avoid injury due to misuse.
- Do not preheat the appliance.
- Always place a fully assembled bottle with cap in the
bottle warmer before you add water.
- Make sure you add water before you switch on the bottle
warmer.
- Hot water can cause serious burns. Be careful when the
bottle warmer contains hot water.
- The accessible surfaces of the appliance may become
hot during use and are subject to residual heat after use.
- Do not move the appliance when it contains hot water.
- When the food or milk has reached the required
temperature, remove the bottle or container from the
bottle warmer. If you leave food or milk in the bottle
warmer, the temperature of the food or milk increases.
Caution
- This appliance is intended for use in household and
similar applications such as farm houses, bed and
breakfast accommodations, sta kitchen areas in stores,
oces and other work environments, and by guests in
hotels, motels and other residential type environments.
- The food should not be heated for too long.

5ENGLISH
- Always check the food temperature before you feed
your child. Gently swirl the bottle and check by sprinkling
a few drops on the inside of your wrist. (Follow the
instructions in section ‘‘Feed your baby the milk’’.)
- Unplug the appliance when it is not in use.
- The surface of the heating element is subject to residual
heat after use.
- Let the appliance cool down before you clean it.
- Follow the descaling instructions to avoid irreparable
damage.
- Do not try to open or repair the appliance yourself.
Contact the Philips Consumer Care Centre in your
country (see www.philips.com/support).
The production date code YYWW is located in the cord storage compartment in the
base of the bottle warmer.
Electromagnetic elds (EMF)
This Philips appliance complies with all applicable standards and regulations
regarding exposure to electromagnetic elds.
Introduction
Congratulations on your purchase and welcome to Philips Avent! To fully benet
from the support that Philips Avent oers, register your product at
www.philips.com/welcome.
With this bottle warmer, you can safely warm and defrost milk in Philips Avent and
other most common branded feeding bottles and baby food in containers.
To help preserve the quality of your breast milk, it is important to warm the milk
in a safe and controlled way. The built-in sensor tracks the temperature to avoid
overheating.

6 ENGLISH
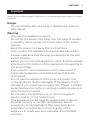
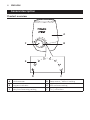
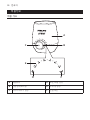
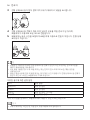
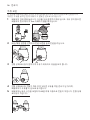
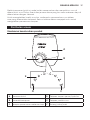
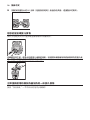
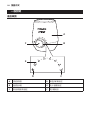
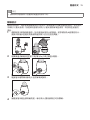
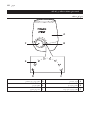
General description
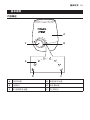
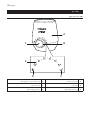
Product overview
A
B
CD
F
E
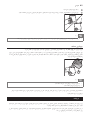
A Bottle warmer D Keep warm / defrost setting
B Progress indicator E Milk volume setting
C Baby food warming setting F On / o button

7ENGLISH
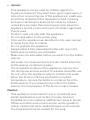
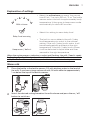
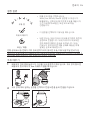
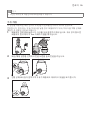
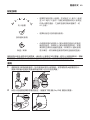
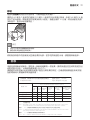
Explanation of settings
Milk volume
• Select the milk volume you warm. You can set
from 30 ml / 1 oz up to 330 ml / 11 oz. The bottle
warmer warms the milk to approximately body
temperature. It then goes to keep warm mode
automatically for about 60 minutes.
Baby food warming
• Select this setting to warm baby food.
Keep warm / defrost
• The built-in sensor detects the milk / baby
food temperature to switch to the optimal
setting. If the milk / baby food is warm, it will
be warmed gradually and kept at the right
temperature. If the milk / baby food is frozen,
it will be defrosted to liquid state and then
warmed to the right temperature.
When the entire progress indicator is on but not ashing, the milk / food is ready
for feeding. Feed your baby when the milk / food is warmed. Do not rewarm the
milk / food after it has cooled down, as bacteria may start to develop in it.
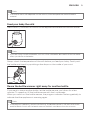
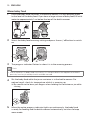
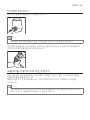
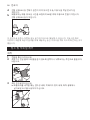
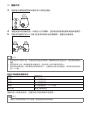
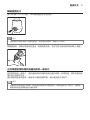
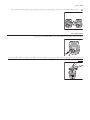
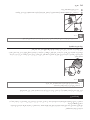
Warm milk
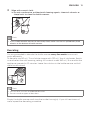
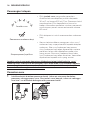
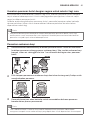
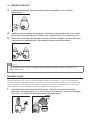
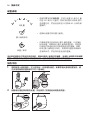
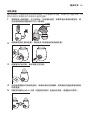
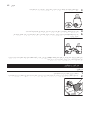
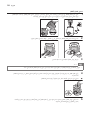
1
Place the bottle in the bottle warmer. Fill with drinking water to the level of
the milk. If you have a large volume of milk, ll with water to approximately
1 cm below the top of the bottle warmer.
2
Select the desired setting based on the milk volume and press the on / o
button to switch on.
7
210
7oz
210ml

8 ENGLISH
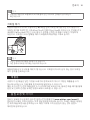
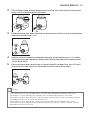
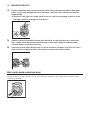
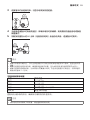
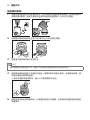
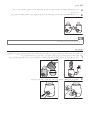
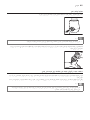
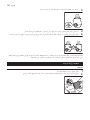
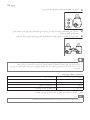
3
The progress indicator ashes gradually to show the progress of milk
warming.
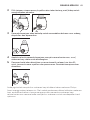
4
When the entire progress indicator lights up continuously, the milk is ready
for feeding and the bottle warmer automatically switches to keep warm
mode.
5
The bottle warmer switches o automatically after about 60 minutes,
including warming time. The progress indicator turns o.
60 min
Tip
• If you want the milk warmer, keep the bottle in the appliance until it reaches the desired
temperature after the entire progress indicator lights up.
• If you are using a milk bag, select the keep warm / defrost setting because it takes less
power to warm milk bags.
• If you are using a silicone bottle, it takes longer time to warm milk. Keep it in the bottle
warmer for 3-4 minutes after the entire progress indicator lights up.
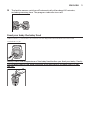
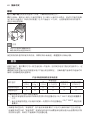
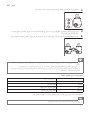
Recommended setting for dierent containers
Container Recommended Setting
Plastic Milk volume setting
Glass Milk volume setting
Silicone Milk volume setting + 3-4 minutes
Milk bag Keep warm/ Defrost setting
Check the instructions of your milk bag and make sure it can be warmed in a bottle
warmer.

9ENGLISH
Note
• The time to warm milk depends on the volume, initial temperature and milk bottle
material.
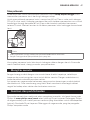
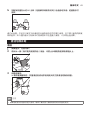
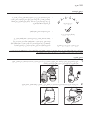
Feed your baby the milk
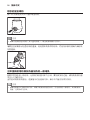
Press the on / o button to switch o the appliance and take out the milk bottle.
Note
• If you are using a small milk bottle, such as a 2 oz milk bottle, be careful of the hot water
when you take out the bottle.
Always check the temperature of the milk before you feed your baby. Gently swirl
the bottle and check by sprinkling a few drops on the inside of your wrist.
Reuse the bottle warmer right away for another bottle
If you want to warm another bottle, let the bottle warmer cool down for a few
minutes. To speed up, ll the bottle warmer with fresh cold water.
When you switch on the bottle warmer, the progress indicator ashes gradually to
indicate that the appliance is warming again.
Note
• If the progress indicator is on but not ashing, the bottle warmer is still too hot to warm
another bottle. Switch o the bottle warmer and let it cool down for a few minutes.

10 ENGLISH
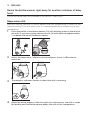
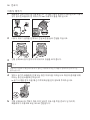
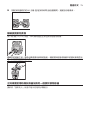
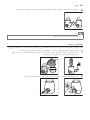
Warm baby food
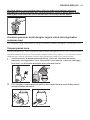
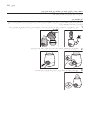
1
Place the baby food container in the bottle warmer. Fill with drinking water
to the level of the baby food. If you have a large volume of baby food, ll with
water to approximately 1 cm below the top of the bottle warmer.
2
Select the baby food warming setting and press the on / o button to switch
on.
3
The progress indicator ashes to show it is in the warming process.
Note
• Due to variations in baby food consistency, it is not possible for the appliance to detect
precisely how long the baby food should be warmed.
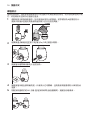
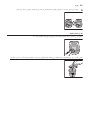
4
Stir the baby food while the jar or container is in the bottle warmer. For
optimal result, check its temperature while it is warming up.
» Be careful not to burn your ngers when holding the container or jar while
stirring.
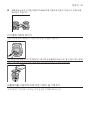
5
When the entire progress indicator lights up continuously, the baby food
is ready for feeding and the bottle warmer automatically switches to keep
warm mode.

11ENGLISH
6
The bottle warmer switches o automatically after about 60 minutes,
including warming time. The progress indicator turns o.
60 min
Feed your baby the baby food
Press the on / o button to switch o the appliance and take out the food
container or jar.
Always check the temperature of the baby food before you feed your baby. Gently
stir the baby food in the food container or jar and taste it to make sure it is not
too hot.

12 ENGLISH
Reuse the bottle warmer right away for another container of baby
food
Follow the same steps as indicated in the section “Warm milk”
Keep warm milk
With this setting, the built-in sensor detects the milk temperature to switch to the
optimal setting. If you put warm milk, it is warmed gradually and kept at the right
temperature.
1
Place the bottle in the bottle warmer. Fill with drinking water to the level of
the milk. If you have a large volume of milk, ll with water to approximately
1 cm below the top of the bottle warmer.
2
Select the keep warm / defrost setting and press the on / o button to
switch on.
3
The progress indicator ashes to show that milk is warming.
4
When the entire progress indicator lights up continuously, the milk is ready
for feeding and the bottle warmer keeps the milk at this temperature.

13ENGLISH
5
The bottle warmer switches o automatically after about 60 minutes,
including warming time. The progress indicator turns o.
60 min
Note
• The time may vary depends on the milk volume and starting temperature.
Defrost milk
With this setting, the built-in sensor detects the milk / food temperature to switch
to the optimal setting. If you put frozen milk / baby food, the bottle warmer defrosts
the milk / baby food to liquid state and then warms it to the right temperature.
1
Place the bottle in the bottle warmer. Fill with drinking water to the level of
the milk. If you have a large volume of milk, ll with water to approximately
1 cm below the top of the bottle warmer.
2
Select the keep warm / defrost setting and press the on / o button to
switch on.

14 ENGLISH
3
The progress indicator ashes to show that milk is defrosting and warming.
4
When the entire progress indicator lights up continuously, the milk / baby
food is ready for feeding.
5
The bottle warmer switches o automatically after about 60 minutes,
including defrosting and warming time. The progress indicator turns o.
60 min
You can also defrost baby food in the Philips Avent food container with this
setting. Due to variations in baby food consistency, it is strongly recommended to
continuously stir and check the baby food while you are defrosting it for optimal
result.
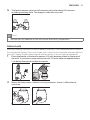
Cleaning and descaling
Cleaning
1
Unplug and let it cool down.
2
Pour out water sideways rather than forwards or backwards to keep water
from spilling onto the knob or main plug.

15ENGLISH
3
Wipe with a moist cloth.
» Do not use abrasive, antibacterial cleaning agents, chemical solvents or
sharp tools to clean the bottle warmer.
Note
• If you used the bottle warmer to warm baby food, make sure that no spilled baby food
remains at the bottom of bottle warmer.
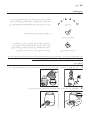
Descaling
It is recommended to descale the bottle warmer every four weeks to ensure it
works eciently.
To descale, mix 60 ml / 2 oz of white vinegar with 120 ml / 4oz of cold water. Switch
on and select the milk warming setting for contents under 180 ml / 6 oz and let the
appliance operate for 10 minutes. Leave the solution in the bottle warmer until all
scale has dissolved.
10 min
180ml
6oz
Note
• You can also use citric acid based descalers.
• Do not use other types of descalers.
Empty the bottle warmer and rinse the inside thoroughly. If you still see traces of
scale, repeat the descaling procedure.

16 ENGLISH
Recycling
Do not throw away the product with the normal household waste at the end of its
life, but hand it in at an ocial collection point for recycling. By doing this, you help
to preserve the environment.
Follow your country’s rules for the separate collection of electrical and electronic
products. Correct disposal helps prevent negative consequences for the
environment and human health.
Guarantee and service
If you need information or if you have problems, please visit the Philips website
at www. philips. com / avent or contact the Philips Customer Care Center in your
country (refer to the enclosed worldwide guarantee leaet for details). If there is no
Customer Care Center in your country, go to your local Philips dealer.
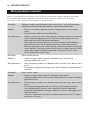
Troubleshooting
This chapter summarizes the most common problems you could encounter with
the appliance. If you are unable to resolve the problem with the information below,
contact the Consumer Care Center in your country.
Problem After switching on the bottle warmer, the entire progress indicator
blinks fast and switches o.
Cause
•
The temperature of water in the bottle warmer is too hot or too
cold.
•
The boil-dry protection is activated.
Solution
•
Switch o and and unplug. Let it cool down for a few minutes.
Make sure you ll it with fresh room temperature water.
•
The bottle warmer automatically switches o if it is on and there
is no water or not enough water in it. Switch o and unplug. Let
it cool down rst. Make sure you ll it with enough fresh room
temperature water. The bottle warmer is ready to use again.
Problem The milk is too hot.
Cause
•
You may have selected an incorrect setting or are using a milk bag.
Solution
•
Select the milk volume setting based on the milk volume, not the
bottle size.
•
If you are using a milk bag, select the keep warm / defrost setting.

17ENGLISH
Problem The milk is still cold.
Cause
•
You may have selected an incorrect setting, are using a silicone
bottle, or have lled the bottle warmer with warm water.
Solution
•
Select the milk volume setting based on the milk volume, not the
bottle size.
•
If you are using a silicone bottle, select the milk volume setting
based on the milk volume. When the entire progress indicator is
on, wait for 3-4 minutes for the milk to warm.
•
Fill the bottle warmer with fresh room temperature water. Do not
use warm water.
Problem After switching on the bottle warmer, the entire progress indicator is
on but not ashing.
Cause
•
The bottle warmer is still too hot to warm another bottle. You may
have just nished warming a bottle. Switch o and let it cool down
for a few minutes.
Solution
•
To speed up, rell the bottle warmer with fresh cold water. When
you switch on the bottle warmer, the progress indicator lls up
gradually to indicate that the appliance is warming again.
Problem The entire progress indicator ashes when warming baby food.
Cause
•
Due to variations in baby food consistency, it is not possible for
the appliance to detect precisely how long the baby food should
be warmed.
Solution
•
Stir the baby food while the jar or container is in the bottle warmer.
For optimal result, check its temperature while it is warming .
•
When the entire progress indicator lights up continuously, the
baby food is ready for feeding.


19
한국어
주의 사항
제품을 사용하기 전에 본 사용자 매뉴얼을 주의 깊게 읽고 나중에 참조할 수 있도록
보관하십시오.
위험
- 코드나 플러그 또는 제품을 물이나 다른 액체에 담그지
마십시오.
경고
- 제품은 실내에서만 사용하십시오.
- 식탁이나 조리대의 가장자리로 전원 코드가 흘러내리지
않도록 하십시오. 여분의 전 원 코드는 보틀워머 하단에
보관하십시오.
- 전원 코드가 제품의 뜨거운 표면에 닿지 않도록 하십시오.
- 제품은 반드시 접지된 벽면 콘센트에 연결하십시오. 항상
플러그가 벽면 전원 콘센트에 올바르게 꽂혀 있는지
확인하십시오.
- 제품을 연결하기 전에 제품의 하단에 표시된 전압과 사용
지역의 전압이 일치하는지 확인하십시오.
- 연장 코드를 사용해야 하는 경우 정격이 13암페어 이상인
접지형 연장 코드인지 확인하십시오.
- 만약 플러그나 전원 코드 또는 제품이 손상되었을 경우에는
제품을 사용하지 마십시오. 전원 코드가 손상된 경우, 안전을
위해 필립스 공인 서비스 센터 또는 필립스 서비스 지정점에
의뢰하여 교체하십시오.
- 제품을 가열된 오븐 안이나 뜨거운 가스, 전기 밥솥 위 또는
근처에 두지 마십시오.
- 신체적인 감각 및 정신적인 능력이 떨어지거나 경험과
지식이 풍부하지 않은 성인이 이 제품을 사용하려면 제품
사용과 관련하여 안전하게 사용할 수 있도록 지시사항을
충분히 숙지한 사람의 도움을 받아야 합니다.

20
한국어
- 8세 이상의 아이들이 이 제품을 사용하려면 제품 사용과
관련하여 안전하게 사용할 수 있도록 지시사항을 충분히
숙지한 사람의 도움을 받아야 합니다. 8세 이하 및 관리 하에
있지 않은 어린이가 제품을 청소 및 관리할 수 없습니다.
제품 및 코드를 8세 이하 어린이의 손이 닿지 않는 장소에
보관하십시오.
- 어린이가 제품을 가지고 놀지 않도록 하십시오.
- 전원 플러그에 물이 닿게 하지 마십시오.
- 부상의 위험이 있으므로 제품을 이 사용 설명서에 나와 있는
이외의 용도로 사용하지 마십시오.
- 제품을 예열하지 마십시오.
- 보틀워머 안에 물을 붓기 전, 뚜껑까지 완전히 조립한 젖병을
먼저 넣습니다.
- 보틀워머에 물을 부은 뒤에 전원을 켭니다.
- 뜨거운 물은 심각한 화상을 일으킬 수 있습니다. 보틀워머에
뜨거운 물이 있을 경우에는 주의하십시오.
- 사용 중에는 제품의 표면이 뜨거울 수 있으며 사용 후에도
잔열이 남아있을 수 있습니다.
- 뜨거운 물이 들어 있는 경우 제품을 옮기지 마십시오.
- 음식이나 우유가 원하는 온도에 도달한 경우 병 또는 용기를
보틀워머에서 제거하십시오. 음식이나 우유를 보틀워머에
그대로 둘 경우 음식이나 우유의 온도가 올라갑니다.
주의
- 본 제품은 가정 및 유사 환경(예: 농가, 민박 시설, 매장과
사무실 및 기타 작업장의 직원용 탕비실, 호텔 및 기타 숙박
시설의 객실 등)에서 사용하도록 설계되었습니다.
- 음식을 너무 오래 가열하지 마십시오.
- 모유/분유를 먹이기 전에 아기가 먹기에 적당한 온도인지
항상 확인하십시오. 병을 부드럽게 돌리고 안쪽 손목에
몇 방울 떨어뜨려 확인하십시오. (‘‘아기에게 우유 먹이기’’
섹션의 지침을 따르십시오.)
- 사용하지 않을 때는 전원 플러그를 뽑아 놓으십시오.
ページが読み込まれています...
ページが読み込まれています...
ページが読み込まれています...
ページが読み込まれています...
ページが読み込まれています...
ページが読み込まれています...
ページが読み込まれています...
ページが読み込まれています...
ページが読み込まれています...
ページが読み込まれています...
ページが読み込まれています...
ページが読み込まれています...
ページが読み込まれています...
ページが読み込まれています...
ページが読み込まれています...
ページが読み込まれています...
ページが読み込まれています...
ページが読み込まれています...
ページが読み込まれています...
ページが読み込まれています...
ページが読み込まれています...
ページが読み込まれています...
ページが読み込まれています...
ページが読み込まれています...
ページが読み込まれています...
ページが読み込まれています...
ページが読み込まれています...
ページが読み込まれています...
ページが読み込まれています...
ページが読み込まれています...
ページが読み込まれています...
ページが読み込まれています...
ページが読み込まれています...
ページが読み込まれています...
ページが読み込まれています...
ページが読み込まれています...
ページが読み込まれています...
ページが読み込まれています...
ページが読み込まれています...
ページが読み込まれています...
ページが読み込まれています...
ページが読み込まれています...
ページが読み込まれています...
ページが読み込まれています...
ページが読み込まれています...
ページが読み込まれています...
ページが読み込まれています...
ページが読み込まれています...
ページが読み込まれています...
ページが読み込まれています...
ページが読み込まれています...
ページが読み込まれています...
ページが読み込まれています...
ページが読み込まれています...
ページが読み込まれています...
ページが読み込まれています...
ページが読み込まれています...
ページが読み込まれています...
ページが読み込まれています...
ページが読み込まれています...
ページが読み込まれています...
ページが読み込まれています...
ページが読み込まれています...
ページが読み込まれています...
ページが読み込まれています...
ページが読み込まれています...
ページが読み込まれています...
ページが読み込まれています...
ページが読み込まれています...
ページが読み込まれています...
ページが読み込まれています...
ページが読み込まれています...
ページが読み込まれています...
ページが読み込まれています...
ページが読み込まれています...
ページが読み込まれています...
ページが読み込まれています...
ページが読み込まれています...
ページが読み込まれています...
ページが読み込まれています...
ページが読み込まれています...
ページが読み込まれています...
ページが読み込まれています...
ページが読み込まれています...
ページが読み込まれています...
ページが読み込まれています...
ページが読み込まれています...
-
 1
1
-
 2
2
-
 3
3
-
 4
4
-
 5
5
-
 6
6
-
 7
7
-
 8
8
-
 9
9
-
 10
10
-
 11
11
-
 12
12
-
 13
13
-
 14
14
-
 15
15
-
 16
16
-
 17
17
-
 18
18
-
 19
19
-
 20
20
-
 21
21
-
 22
22
-
 23
23
-
 24
24
-
 25
25
-
 26
26
-
 27
27
-
 28
28
-
 29
29
-
 30
30
-
 31
31
-
 32
32
-
 33
33
-
 34
34
-
 35
35
-
 36
36
-
 37
37
-
 38
38
-
 39
39
-
 40
40
-
 41
41
-
 42
42
-
 43
43
-
 44
44
-
 45
45
-
 46
46
-
 47
47
-
 48
48
-
 49
49
-
 50
50
-
 51
51
-
 52
52
-
 53
53
-
 54
54
-
 55
55
-
 56
56
-
 57
57
-
 58
58
-
 59
59
-
 60
60
-
 61
61
-
 62
62
-
 63
63
-
 64
64
-
 65
65
-
 66
66
-
 67
67
-
 68
68
-
 69
69
-
 70
70
-
 71
71
-
 72
72
-
 73
73
-
 74
74
-
 75
75
-
 76
76
-
 77
77
-
 78
78
-
 79
79
-
 80
80
-
 81
81
-
 82
82
-
 83
83
-
 84
84
-
 85
85
-
 86
86
-
 87
87
-
 88
88
-
 89
89
-
 90
90
-
 91
91
-
 92
92
-
 93
93
-
 94
94
-
 95
95
-
 96
96
-
 97
97
-
 98
98
-
 99
99
-
 100
100
-
 101
101
-
 102
102
-
 103
103
-
 104
104
-
 105
105
-
 106
106
-
 107
107


