
AJ260
Clock Radio
QUICK START
快速指南
Thanks for buying Philips AJ260 clock radio.
Our Quick Start guides you through just some of the features on the set.
Please read our instruction booklet to really rise & shine!
Register your product and get support at
www.philips.com/welcome
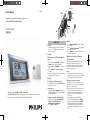
C
A
B/3
3
R
B
DC 7.5V
R
ENGLISH
Step
A
Connect the supplied mains adapter to
the set
’
s 7.5V DC jack and the plug
into a wall outlet.
Step
B
How to set the Clock & Alarm
time
Press and hold
TIME SET
or
ALM1 /
ALM2
until the time digits flash.
Press and hold
TUNING +/-
to adjust
time.
Press
TIME SET
or
ALM1 / ALM2
to
confirm.
Repeat the
steps
2-3
to complete all the
other time items setting.
Step
C
Selecting the Alarm mode
In standby mode, slide the RADIO/BUZ to
select desired mode
Helpful hints:
If you have selected
RADIO
,
make sure
you have properly tuned to a station before
turning off the set.
3 ways to switch off the alarm
Either press briefly:
SLEEP/ALARM
RESET
or
REPEAT ALARM/
BRIGHTNESS CONTROL
.
Press
ALM1
or
ALM2
.
•
1.
2.
3.
4.
–
•
•
Radio
Press
RADIO ON/OFF
once to switch
on the radio.
Press
AUTO SCAN/DATE
to program
all available stations.
Press
PRESET
until the desired preset
station is displayed.
Weather forecast and Indoor
thermometer
The unit can auto detect and measure
atmospheric pressure changes to
graphically display the weather forecast
in the next 12 to 24 hours, and current
indoor temperature.
Note:
The weather forecast based on the
atmospheric pressure may vary slightly
from the actual weather situation.
Using the outdoor sensor
The outdoor sensor is supplied to work
with the main unit to measure and display
the outdoor temperature.
Place the sensor in a desired open area.
The place must be within 50 meters
away from the main unit. (Make sure
that the sensor is loaded with 2 AA
batteries.)
For the first
time using the outdoor
sensor and the main unit, press
RESET
located on the sensor back, and
RESET
located in the battery compartment of
the main unit. Then, the main unit will
begin to receive transmission from the
sensor.
1.
2.
3.
–
1.
•
AJ260_QSG.indd 1 2007-07-26 11:19:34 AM

To update the outdoor temperature
from the sensor any time, press and hold
AUTO SCAN/DATE
for 5 seconds.
Note:
Refer to the supplied User Manual for
more information about the outdoor
sensor.
中文
步骤
A
将电源适配器连接到本机的
7.5V DC
插口
上
,
将插头插到墙上的插座上
。
步骤
B
如何设置时钟和闹钟时间
按住
TIME SET
键或
ALM1 / ALM2
键
。
直至时间数字闪烁
。
按住
TUNING +/-
键调整时间
。
按
TIME SET
键或
ALM1 / ALM2
键确认
。
重复
步骤
2-3
完成其它时间项设置
。
步骤
C
选择闹铃模式
在待机模式下
,
推动
RADIO/BUZ
键选择想
要的模式
。
提示
:
如果选择了
RADIO
,
关机前务必调谐好电台
。
关掉闹钟的
3
种模式
可以轻按
SLEEP/ALARM RESET
键
或
REPEAT ALARM/BRIGHTNESS
CONTROL
键
。
•
–
•
1.
2.
3.
4.
–
•
按
ALM1
或
ALM2
键
。
收音机
在收音机上按
RADIO ON/OFF
键一次或
多次
。
按
AUTO SCAN/DATE
键编辑所有可用
电台
。
按
PRESET
键直至想要的预设电台显示
。
天气预报和室内温度
本机能自动检测气压变化
,
用图示显示未来
12
到
24
小时内的天气形势和当前的室内温度
。
注意
:
天气预报基于气压变化
,
可能会与实际的天
气状况稍有差异
。
使用传感器检测户外温度
户外传感器配合主机工作
,
检测并显示户外的
温度
。
把传感器安置在所选的户外区域
。
该区域与
主机的距离应小于
50
米
。
务必确保在传感
器上装有
2
节
AA
型号电池
。
第一次
使用传感器和主机时
,
按下位于传感
器后部的
RESET
键和位于主机电池盒内的
RESET
键
,
然后主机开始接收传感器传输
。
任何时候需要更新传感器检测的户外温度
,
按住
AUTO SCAN/DATE
键
5
秒
。
注意
:
有关户外传感器的更多信息
,
请参阅随机附
送的
《
使用说明
》。
•
1.
2.
3.
–
1.
•
•
–
C
A
B/3
3
R
B
DC 7.5V
R
Note
AJ260_QSG.indd 2 2007-07-26 11:19:35 AM
-
 1
1
-
 2
2


他の言語で
- English: Philips AJ260/93 Quick start guide
その他のドキュメント
-
Freestyle The Cadence 取扱説明書
-
Yamaha TSX-100 取扱説明書
-
Timex Expedition Shock Chrono/Alarm/Timer ユーザーガイド
-
-
-
Shark CLIP-AG8584-INST-R01 取扱説明書
-
-
Freestyle Precision 2.0 取扱説明書
-
-
Omega DP606A/DP612A 取扱説明書