
使用产品前请仔细阅读本使用说明书,并请妥善保管
立即
在MyBosch上
为您的电器注册,
免费获得以下福利:
bosch-home.cn/
welcome
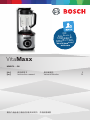
MMBF2....CN
VitaMaxx
[zh] 使用说明书
[en] Instruction manual
真空破壁机 3
VacuumBlender 13


3
zh
主要用途
主要用途
本电器仅供家庭及家庭型环境使用。本电器仅用于加工满足家庭所需
用量的食材和加工时间。请勿超出允许的最大加工量。
本电器适用于混合搅拌液体(如冰沙、饮料等),制作冷/热食物泥,打碎
冷冻水果,以及打碎冰块。本电器适用于真空料理或真空储存的使用目
的。本电器不得用于加工其他物品或物质。
仅限在室温及海拔2000米以下的室内使用本电器。
重要安全信息
请仔细阅读并遵循使用说明书并妥善保管,以备将来使用!在将本电器
转让给其他人时请附上说明书。
若未遵守正确使用电器的说明,制造商对造成的任何损害概不承担责
任。
本电器可供身体、感官、精神障碍或缺乏使用经验和/或使用知识的人使
用,前提是操作时必须有人在场监督并指导他们如何安全地使用本电
器,而且还要让他们了解操作时可能面临的危险。请勿让儿童靠近本电
器和电源线,且不得让儿童操作本电器。严禁儿童将本电器用于玩耍。儿
童不得对本电器进行清洁和用户保养。
W 电击和着火危险!
■ 务必按照铭牌上的技术规范连接和操作本电器。若电源线和/或电
器损坏,请勿使用本电器。电器只能由我们的客户服务部门进行维修
(如更换电源线),以免造成伤害。
■ 切勿将电器连接到定时开关或遥控插座上。电器开启时必须有人看
管 !
■ 请勿将电器置于或靠近灼热的表面,如灶具。电源线不得接触高温零
件,也不得在锐利边缘上拖拽。
■ 切勿将底座装置浸入水中或者放入洗碗机清洗。请勿使用蒸汽清洁
本电器。请勿以湿手来操作本电器。
■ 每次使用后,无人照看本电器时,以及在装配、拆卸和清洁之前以及
出现故障时,都必须断开本电器与电源的连接。
W 受伤的危险!
■ 如需更换附件、操作过程中运动的附加零件,必须关断电器电源,并
将电器从电源上断开。
■ 在接触尖锐刀片、清空容器以及清洁过程中要小心。
■ 将旋转选择钮设置为0可关闭电器。
■ 在关闭后,驱动装置仍会继续运行一段时间。等待驱动装置完全停
止 。
■ 电器必须完全组装好才能使用。
■ 搅拌杯、随行杯和真空保鲜盒仅限与本电器一起搭配使用。
W 窒息危险!
切勿让儿童玩耍包装材料。

4
zh
重要安全信息
感谢您购买新的博世电器。您可以在我们的网
站上找到更多关于产品的信息。
www.bosch-home.cn
如需要使用本说明书,可以将本说明书的封面
摊开。您可以在此查看有字母和数字标示的插
图。这些插图将在本说明书中不断重复引用
(例如X图B)。
制造商:
博西家用电器(中国)有限公司
南京市中山路129号中南国际大厦20、21楼
执行标准:
GB4706.1-2005
家用和类似用途电器的安全第1部分:通
用要求
GB4706.30-2008
家用和类似用途电器的安全厨房机械的特
殊要求
全国统一客户服务热线:
4008855888
客户服务电子邮箱:
公司网站:
www.bosch-home.cn
技术规格:
电气连接
(电压–频率)
220-240 V~
50-60 Hz
额定功率 1000W
尺寸
(高x宽x深)
438x191x195
mm
W 警告!
■ 不要加入60°C以上的液体或食物。
■ 检查搅拌杯里是否有异物。
■ 建议切勿让电器开启的时间超过加工食物所需的时间。切勿空载运
行。
■ 请勿超出允许的最大加工量。
■ 电器只能与许可使用的原装部件和附件一同使用。
W 重要信息!
每次使用后或长时间未使用又重新使用之前,务必彻底清洁本机器。
X“清洁和维护”参见第9页
内容
主要用途................................................ 3
重要安全信息.......................................... 3
概述....................................................... 5
初次使用电器之前................................... 5
部件和操作控件...................................... 5
准备....................................................... 7
用途....................................................... 7
清洁和维护............................................. 9
附件..................................................... 10
安全系统.............................................. 10
食谱..................................................... 10
环保型处理........................................... 11
保修..................................................... 11
故障排除.............................................. 12

5
zh
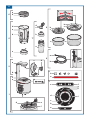
概述
9 真空软管
a 连接真空阀
b 连接容器
*此附件配置取决于具体机型
初次使用电器之前
使用新电器之前,必须完全拆除包装并进行清
洁 、检 查 。
警告!
切勿使用已损坏的电器!
■ 从包装中取出底座和所有附件,处理掉所
有包装材料。
■ 检查部件是否齐全,以及是否有明显损坏。
X图 A
■ 在首次使用前要彻底清洁并擦干所有部
件 。 X“清洁和维护”参见第9页
说明:在首次或第二次使用新的破壁机时可能
会有轻微的异味。这不是任何故障现象。
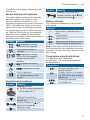
部件和操作控件
高性能电机装置
此款真空破壁机配有高性能电机,转速可达每
分钟37000转。
开关
用于开启、关断电器。
带盖帽的真空单元
真空破壁机配有一个真空泵,可以在加工前为
搅拌杯抽真空。这样可以减少食物在加工过
程中和加工后的氧化。其好处是,真空搅拌后
的饮品显得更均匀一致、颜色更自然,同时更
长久地保留维生素C和其他易氧化的营养物
质。也可以为随行杯和真空保鲜盒抽真空,保
持食物新鲜,延长食物保质期。
盖帽用于为搅拌杯抽真空。
状态显示和图标
状态显示通过LED灯带展现旋钮调速的状
态或抽真空的进度,或显示自动程序的进度
状态。速度越快,或者随着真空或程序的进
行,LED灯带点亮的长度会变长。当LED灯
带所有的部分都亮起时,表示已达到最高速度
或已完成选定的程序。发光的图标也显示其
他信息。
概述
X 图 A
1 底座装置 / 马达装置
a 驱动装置
b 标记
c 出风口
d 绕线盘设计
e 线束固定装置
f 吸盘撑脚(4)
2 真空单元
a 盖帽
b 真空软管夹
c 湿度传感器
d 真空阀
e 过滤器
3 控制面板
a 开/关按键
b 带标记的旋转选择钮
c 按键
d 按键
e 按键
f 按键
g
标记
h 归零位置
i
/ 标记
4 状态显示面板
a 状态显示
b 状态图标
5 搅拌杯
a Tritan™材质搅拌杯
b 带3个上限容量标记的刻度
c 标记
d 盖子凸耳槽口
e 带刀头的刀座部件
6 盖子
a 真空密封部件
b 凸耳
7 随行杯*
a 杯体
b 饮口盖
c 盖子
d 真空密封部件
8 真空保鲜盒 (0.75 升 / 1.5 升)*
a 盒体
b 盖子
c 真空密封部件
d 日期设置拨环(日/月)

6
zh
部件和操作控件
显示 含义
程序正在运行。
正在抽真空。
正在通过手动操作调速旋钮搅
拌食物。
程序正在运行。
正在抽真空,随后进行自动搅拌。
程序正在运行。
程序正在运行。
错误操作提示X“故障排除”
参见第12页
图标和标记
图标 含义
Max 60°C
盖子上的警告
■ 不要加工60°C以上的
食材。
定位搅拌杯的标记。
搅拌杯对准 放置到位
,
然后
向 拧紧。
盖帽上的标记。
真空阀上的标记。真空阀对位好
此标记 ,向此标记方向拧紧 。
旋转选择钮
用于连续调节搅拌机刀头转速。
设置
0 归零位置-搅拌机将不会启动。
最低速度
最高速度
旋钮旋停在这个位置则机器始终
以最高速转速运行。
注意:如果旋转选择钮在电器开启时未设置为
零,则电器无法操作。首先将旋转选择钮转至
归零位置。
程序选择按键
本电器有4种自动程序。可以选择下列程序:
程序
先抽真空再自动搅拌
仅用于抽真空(配合搅拌杯、
随行杯和真空保鲜盒使用)
自清洁程序
用于碎冰
请注意:
– 如要使用该程序,将旋转选择钮调到归零
位置。
– 在使用
、 或 时转动旋转选
择钮将使相关自动程序停止。
– 按下另一个程序选择按键将停止当前程
序。
– 短暂按压程序选择按键将暂停一个程序。
再次短暂按压则重新开启。
– 按下并按住 或 (约2秒)将停
止相关程序。要重新启动程序,请关断机
器,然后再重新接通。
搅拌杯
用于加工最多1.5升食材。搅拌杯材料为
Tritan™材质。Tritan™是一种无气味、无味道
的安全牢固材质。
警告!
– 不要加入60°C以上的液体或食物。
– 如不加入足够的液体,就不能搅拌固体食
物。
– 将粉状食物(例如糖粉、可可粉、烤大豆、面
粉或蛋白粉)与足够的液体混合或将其料
理之前充分溶解在液体中。
在添加食材时,注意搅拌杯上的下列数值和
标记。
最大加工量
X
液体
最大容量
1.5升
X
抽真空时,牛奶和奶制品与其
他食材的混合物的体积会迅
速膨胀。
容量上限
1.0升

7
zh
准备
最大加工量
X
抽真空时,牛奶和奶制品等液体
的体积会迅速膨胀
容量上限
0.75升
随行杯和真空保鲜盒
抽真空存储食物
容量
随行杯* 0.5升
真空保鲜盒(小)* 0.75升
真空保鲜盒(大)* 1.5升
*附件配置取决于具体机型X“附件”参见
第10页
带真空密封部件的盖子
用于密封搅拌杯、随行杯和真空保鲜盒。若要
在抽真空后打开盖子,首先抓住真空密封的一
端,然后向上拉。必须先让充足的空气进入容
器内才能把盖子打开。保鲜盒的盖子上装配有
日期设置拨环。装入食物后,转动两个环即可
设定日期和月份。
安全系统
电器有多套安全机制。X“安全系统”参见
第10页
准备
W 受伤的危险
– 请勿用手接触搅拌刀头。只能握持刀头底
座的塑料部分。
– 应先完成所有使用电器的准备工作,并将
搅拌杯正确安装在底座上,方可插入电源
插头。
警告!
当组装好真空破壁机后,不要握住搅拌杯的把
手来提起破壁机。要提起整机,务必通过双手
搬起底座装置/电动机装置来操作。
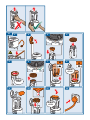
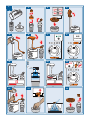
X 图 B
1. 将电缆松开,使其达到所需长度。.
重要说明:确保电源线正确地穿过电器下方设
计的电缆限位缺口。
2. 将底座装置放在稳定的水平工作台上。完
全打开机器的上盖。
3. 如图所示:把搅拌杯倒置过来,装上带有密
封圈的刀座部件。
4. 可以借助搅拌杯的盖子来辅助安装刀座
部件。
5. 借助盖子,将刀座部件顺时针方向旋转至
停止位置拧紧。
6. 取下盖子。
重要说明:刀座部件上的凹槽必须与搅拌杯上
的凹槽对齐。
7. 如图所示,将搅拌杯沿着正确的方向转至
驱动器上的正确位置。标记
指向 。
8. 顺时针旋转搅拌杯至停止位置。标记
指
向 。
9. 准备食物,加入搅拌杯。不要超过
刻
度标记。
说明:务必将食物与足够的液体混合,因为这
样会产生更好的效果。在添加牛奶和奶制品等
在抽真空时易膨胀的食材时,不要超过上限标
记
。
10. 盖上搅拌杯盖子,按紧。此时,观察把手上
的凹槽。
注意:盖子只能对准这个位置才会被正确安
装。
11. 盖上机器上盖帽,按压到位。
12. 插上电源插头。
注意:只有满足以下条件才能使用破壁机。
– 刀座部件和盖子必须正确地安装到搅拌
杯 。
– 搅拌杯必须正确地连接到底座。
– 盖子必须完全盖紧。
用途
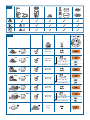
说 明 : K表显示了使用破壁机的示例。可以
使用自动程序进行加工,或在各个步骤过程中
(1、2、3)手动操作。
使用说明:
– 本电器不可用于制作蛋黄酱。
– 本电器不适合用于单独打碎半固态和
固态食物(欧芹、洋葱、肉类、坚果、帕尔
马奶酪),但当食材与液体混合时可以使
用。X表格K
– 本电器不可用于制作坚果酱(榛子仁糊、
巧克力酱等)。
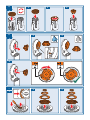
使用“自动”程序真空破壁的步骤
X 图 C
1. 将旋转选择钮设置为0。使用 按键开启
电器。所有的指示灯都短暂地亮起一次,发
出一声短信号声。 按键点亮。
2. 按下
按钮。
和 图标点亮。

8
zh
用途
3. 真空泵将空气从搅拌杯中抽出。LED状态
显示灯逐个亮起。
注意:如果未达到预设的真空度,则
图标会
亮起,并响起2声短促的信号声。X“故障排
除”参见第12页
4. 状态显示灯亮起一半。达到预设的真空度。
5. 搅拌机会自动开始搅拌,以脉动节奏搅拌
食材。另一半状态显示灯逐渐亮起。
6. 机器自动结束加工。等待电器停止。
7. 使用
按键关闭电器。拔下电源插头。
8. 完全打开机器的上盖。
9. 逆时针转动搅拌杯,将其取下。
10. 抓住真空密封部件的一端,然后向上拉。必
须先让充足的空气进入搅拌杯内才能把
盖子打开。
11. 拉动盖子凸耳,取下盖子。
12. 将料理好的食物倒入另一个容器。
■ 清洁所有部件。X“清洁和维护”参见
第9页
注意:为了保持食物新鲜,加工结束后,把食物
倒入随行杯或真空保鲜盒中再次抽真空存储。
X“抽真空存储”参见第8页
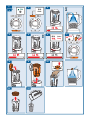
手动操作真空破壁的步骤
X 图 D
1. 将旋转选择钮设置为0。使用 按键开启
电器。所有的指示灯都短暂地亮起一次,发
出一声短信号声。 按键点亮。
2. 按下 按钮。 图标点亮。
3. 真空泵将空气从搅拌杯中抽出。LED状态
显示灯逐个亮起。
注意:如果未达到预设的真空度,则 图标会
亮起,并响起2声短促的信号声。X“故障排
除”参见第12页
4. 所有LED状态显示灯亮起。达到预设的
真空度。
5. 将旋转选择钮设置到所需转速或 。速
度越快,亮起的LED状态显示灯越多。
6. 加工食材,直到达到所需细腻度。
7. 将旋转选择钮调到0。等待电器静止。
■ 使用 按键关闭电器。拔下电源插头。
■ 然后参照图8开始的示意图操作。
X“使用“自动”程序真空破壁的步骤”参
见第7页
使用脉冲功能
■ 逆时针转动旋转选择钮至位置 ,然 后
保持住。
■ 只要一直保持旋钮在脉冲位置,则电器始
终以最高转速运行。
■ 释放旋转选择钮。
不抽真空的破壁步骤
按照上述说明准备破壁机。X“准备”参见
第7页
X 图 E
1. 将旋转选择钮设置为0。使用
按键开
启电器。
2. 将旋转选择钮设置到所需转速或
。
图标点亮。速度越快,亮起的LED状态显
示灯越多。
注意:在加工过程中,将一只手放在机器盖帽
上,稳稳地扶住搅拌机。
3. 加工食材,直到达到所需细腻度。
4. 将旋转选择钮调到0。等待电器静止。
5. 使用 按键关闭电器。拔下电源插头。
6. 完全打开机器的上盖。
7. 逆时针转动搅拌杯,将其取下。
8. 拉动盖子凸耳,取下盖子。将料理好的食物
倒入另一个容器。
■ 清洁所有部件。X“清洁和维护”参见
第9页
制作碎冰
按照上述说明准备破壁机,加入冰块。
X“准备”参见第7页
■ 将旋转选择钮设置为0。使用 按键开
启电器。
■ 按下 按钮。 图标点亮。
■ 搅拌机会自动开始加工,以脉动节奏碎
冰。LED状态显示灯逐个亮起。
■ 机器自动结束加工。等待电器停止。
■ 使用 按键关闭电器。拔下电源插头。
■ 然后参照图8开始的示意图操作。
X“使用“自动”程序真空破壁的步骤”参
见第7页
抽真空存储
可以使用破壁机主机为随行杯和真空保鲜盒
抽真空,保持食物新鲜,延长食物保质期。
W 警告!
真空不会产生抗菌效果。把抽真空食物保存在
冰箱里,并经常检查是否仍然新鲜!
X 图 F
1. 将准备好的或煮好的食物放进要用的容
器里。

9
zh
清洁和维护
2. 随行杯:装上带有饮口盖的盖子,然后盖
紧。
3. 真空保鲜盒:装上盖子,盖紧。使用盖子上
的两个拨环设定日期。
4. 完全打开机器的上盖。
5. 将真空软管接在真空阀上。
6. 翻下盖帽。将软管适配头接到随行杯盖上
或保鲜盒盖上。
7. 将旋转选择钮设置为0。使用
按键开
启电器。
8. 按下
按钮。
9. 真空泵将空气从容器中抽出。
图标点
亮。LED状态显示灯逐个亮起。
注意:如果未达到预设的真空度,则
图标会
亮起,并响起2声短促的信号声。X“故障排
除”参见第12页
10. 所有LED状态显示灯亮起。达到预设的
真空度。
11. 使用
按键关闭电器。拔下电源插头。
12. 从随行杯上或真空保鲜盒上拆下软管。一
手抓住机器盖帽,从真空阀上拆下软管。
13. 抓住真空密封部件的一端,然后向上拉。必
须先让充足的空气进入搅拌杯内才能把
盖子打开。
14. 然后打开杯子的饮口盖或保鲜盒的上盖。
清洁和维护
每次使用后都必须彻底清洁本电器和用过的
各个部件。
W 电击的危险!
– 清洁电器之前请拔掉电器电源。
– 切勿将底座装置浸入液体中,不得将其放
入洗碗机清洗。
– 请勿使用蒸汽清洁设备清洗。
W 受伤的危险!
请勿赤手触碰搅拌刀片。请使用刷子。
警告!
– 请勿使用任何含酒精或烈性成分的清洁
剂。
– 请勿使用任何锋利、尖锐或金属的物体。
– 请勿使用砂布或清洁剂。
说明:
– 在使用后立即清洁所有部件。这可防止残
留食材(如香草中的精油)干结而可能损
坏杯体材质。
– 加工某些食材时可能会使杯体材质变色,
如胡萝卜,但只要滴入几滴食用油就可以
消除。
图 J中总结了各个部件的清洁方法。
使用自清洁程序
用于快速、方便地进行预清洗。
■ 将空的搅拌杯装在电器上。
■ 倒入0.25升的温水和2滴洗洁精。
警告!
不得超出0.25升的指定量。
■ 盖上搅拌杯盖子,按紧。
■ 盖上机器上盖帽,按压到位。
■ 将旋转选择钮设置为0。使用
按键开
启电器。
■ 按下
按钮。 图标点亮。LED状态
显示灯逐个亮起。
■ 电器将自动执行预清洁,包括在程序开始
时的短暂真空应用阶段。程序自动结束。
■ 使用
按键关闭电器。拔下电源插头。
■ 连同盖子一起取下搅拌杯。
■ 抓住真空密封部件的一端,然后向上拉。必
须先让充足的空气进入搅拌杯内才能把
盖子打开。
■ 请彻底冲洗所有零部件,必要时重复清洁。
■ 为了更轻松地清洁搅拌杯,应从手柄上取
下盖子,等晾干后再盖上。
■ 清洁主机。
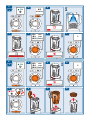
拆卸刀座部件
X 图 G
1. 取下盖子。将搅拌杯翻转。
2. 将盖子安装到刀座部件上。
3. 沿逆时针方向旋拧杯盖,将其拆下。
4. 取下刀座部件。
拆下真空阀
X 图 H
可拆下真空阀进行清洁。
1. 沿逆时针方向旋转真空阀,将其拆下。
2. 彻底清洁盖帽、两个湿度传感器、阀门和阀
门上的过滤器。
3. 必须彻底晾干所有部件。
4. 如图示意安装阀门。标记 指向 。顺 时
针旋转阀门至停止位置。标记 指向 。

10
zh
附件
拆卸日期置拨环
X 图 I
为了彻底清洗,可以拆除真空保鲜盒盖子中的
设置拨环。
1. 将小螺丝起子插入安全环两个凹槽中的
一个,并通过施加轻微压力小心地将环撬
出来。
2. 按照图示拆下安全环和日期设置拨环。彻
底清洁并擦干所有部件。
3. 按照如图顺序先装入日期设定拨环。然后
装入安全环并稍微用力按压,直至卡入到
位。
附件
可向授权零售商或向售后服务部门咨询购
买附件或备件。由于产品范围不断扩大,可
能还有其他配件未在此列出。为此请访问
www.bosch-home.cn了解最新可用附件。
附件
MMZV0BT1 随行杯(0.5升)
MMZV0SB0 1个真空保鲜盒
(0.75升)
MMZV0SB1 1个真空保鲜盒(1.5升)
MMZV0SB2 2个真空保鲜盒
(0.75升和1.5升)
安全系统
启动锁定 / 自动切断
只有将搅拌杯及其盖子正确装上,并且盖子完
全盖紧后,才可以使用电器。如果盖子在使用
过程中打开,电器会自动关闭。
防水
真空上盖部件内置两个湿度传感器。如果水
分进入真空单元,真空泵会自动关闭运行。
X“故障排除”参见第12页
过载保护
如果电器过热,电动机自动关断。X“故障排
除”参见第12页
注意:启动过热保护时,会略有异味散发。这不
是任何故障现象。
食谱
说明:
– K表显示了更多应用示例。可以使用自
动程序进行加工,或在各个步骤过程中
(1、2、3)手动操作。
– 在加工前清洗、切碎食材。去除果核、果皮
等硬材料。
– 食谱和应用实例也可不在自动程序中使
用。为此,用旋转选择钮将速度从 增
加至 ,然后将所有食材搅拌在一起,直
到达到理想的均匀度。
草莓薄荷思慕雪
– 650克草莓
– 6枝薄荷
– 300毫升苹果汁
– 100毫升水
■ 草莓洗净,去除茎,切成两半。清洗薄荷并
甩干水分,摘掉叶片。
■ 将所有食材放入搅拌杯。装好盖子。盖上盖
帽,向下按压到位。
■ 按下 按钮。自动程序会自动抽真空并
自动料理所有食材。
■ 制备好食材后,自动程序自动结束。将加
工好的水果思慕雪倒入四个玻璃杯中,即
可享用。
提示:根据草莓的成熟度,也可以用微甜的果
汁或无糖椰汁来制作这道思慕雪。
菠萝-芒果冰沙
– 300 克去皮菠萝
– 1/2个芒果
– 150毫升冷椰子汁
– 150克冰块
– 1根香蕉
■ 将菠萝切成小大块。芒果去皮。从果核上切
下果肉,切成小块。香蕉去皮、切块。
■ 将所有食材放入搅拌杯。装好盖子。盖上盖
帽,向下按压到位。
■ 按下 按钮。自动程序会自动抽真空并
自动料理所有食材。
■ 制备好食材后,自动程序自动结束。将加
工好的水果思慕雪倒入四个玻璃杯中,即
可享用。
提示:肉桂、小豆蔻、甘椒或多香果粉等香料可
用于给这款异国情调的水果冰沙带来别样的
风味。

11
zh
环保型处理
猕猴桃绿色思慕雪
– 1个牛油果
– 5个猕猴桃
– 200克嫩菠菜叶
– 400毫升水
– 4大勺枫糖浆
■ 菠菜洗净、沥干、粗切。将牛油果切成两半,
去核,挖出果肉。猕猴桃去皮、切块。
■ 将所有食材放入搅拌杯。装好杯盖。盖上盖
帽,向下按压到位。
■ 按下 按钮。自动程序会自动抽真空
并自动料理所有食材。
■ 制备好食材后,自动程序自动结束。将加
工好的水果思慕雪倒入四个玻璃杯中,即
可享用。
提示:配在冰沙上享用更美味。
环保型处理
J
请以环保方式处置包装。
对本设备根据有关电气和电子设备报
废的欧洲规定 2012/19/EU
(wasteelectrical and electronic
equipment — WEEE)进行标记。该
规定管理在欧洲范围内对报废设备的
回收和再生。
请 咨 询 专 业 零 售 商 ,了 解 可 用 的 处 置
方式。
保修
该设备的保修条款将由售出国的销售代表来
确定。 您可向售出此设备的经销商详细了解
这些条款。
当根据保修条款进行任何索赔时、 必须出具
销售凭证或收据。
如有更改、 恕不另行通知。

12
zh
故障排除
故障排除
在下表中,您可以找到问题或错误的解决方案,进而容易地进行纠正。若故障无法消除,请与客
服联系。
问题 可能原因 解决办法
电器无法启动或无法
在使用过程中关断。
图标点亮。
搅拌杯未正确安装或
已脱开。
正确安装搅拌杯和杯盖。
机器盖帽没有盖好。 按紧机器盖帽。
真空泵正常运行,但未
达到预设的真空度。
图标亮起,并响起2
声短促的信号声。
盖子或真空密封部件
被弄脏或损坏。
■ 关闭电器。
■ 检查盖子、真空密封部件和刀座部件的密
封圈是否损坏。
■ 彻底清洁擦干,然后更换。
■ 将刀座正确地安装到搅拌杯上并拧紧到
位。注意观察标记。
■ 正确盖上搅拌杯盖子,按紧。此时,观察把
手上的凹槽。
■ 按紧机器盖帽。
■ 开启电器,再试一次。
盖子未正确/完全盖
好。
机器盖帽没有盖好。
刀座部件的密封圈被
弄脏或损坏。
刀座部件未正确/完
全装好。
真空泵不运行或在使
用过程中关闭。
图
标点亮。
真空单元潮湿 拆除真空阀。彻底清洁、擦干真空阀和盖子。
超过最大容量 根据具体食材,加注量不要超过搅拌杯上的
标记。
电器无法启动或无法
在使用过程中关断。
过载保护装置被激活。 ■ 将旋转选择钮调到0。等待电器静止。
■ 使用
按键关闭电器。拔下电源插头。
■ 让电器冷却15-20分钟左右,然后再次
开启。
■ 如果电器仍然不启动,让电器进一步冷却,
然后再试一次。

13
en
Intended use
Intended use
This appliance is intended for domestic use and the household
environment only. Use the appliance only for processing normal
amounts of food and for normal amounts of time in domestic use.
Do not exceed the permitted maximum quantities.
This appliance is suitable for mixing liquids (smoothies, drinks, ...),
for puréeing hot and cold food and for chopping up frozen fruit or
crushing ice cubes. This appliance is suitable for applying a vacuum
for processing or storage purposes. The appliance must not be used
for processing other substances or objects.
Only use the appliance indoors at room temperature and up to
2000 m above sea level.
Important safety notices
Read and follow the instruction manual carefully and keep for later
reference! Enclose these instructions when you give the appliance
to someone else.
If the instructions for correct use of the appliance are not observed,
the manufacturer’s liability for any resulting damage will be
excluded.
This appliance can be used by persons with reduced physical,
sensory or mental capabilities or lack of experience and/or
knowledge if they are given supervision or instruction concerning
safe use of the appliance and if they understand the hazards
involved. Keep children away from the appliance and connecting
cable and do not allow them to use it. Do not let children play
with the appliance. Cleaning and user maintenance must not be
performed by children.
W Risk of electric shock and fire!
■ Connect and operate the appliance only in accordance with the
specifications on the rating plate. Do not use the appliance if the
power cord and/or appliance are damaged. Only our customer
service may repair the appliance, e.g. by replacing a damaged
power cord, in order to avoid hazards.
■ Never connect the appliance to timer switches or remote-
controllable sockets. Never leave the appliance unattended while
it is switched on!
■ Do not place the appliance on or near hot surfaces, e.g. hobs.
The power cord must not come into contact with hot parts or be
pulled across sharp edges.
■ Never immerse the base unit in water or place it in the
dishwasher. Do not steam-clean the appliance. Do not use the
appliance with damp hands.

14
en Important safety notices
■ It must always be disconnected from the mains after each use,
whenever the appliance is unsupervised, prior to assembly,
disassembly or cleaning and in the event of an error.
W Risk of injury!
■ Before replacing accessories or additional parts which move
during operation, the appliance must be switched off and
disconnected from the power supply.
■ Care should be taken when handling the sharp cutting blades,
emptying the container and during cleaning.
■ To switch off the appliance, set the rotary selector to 0.
■ After switching off, the drive continues running for a short time.
Wait until the drive has come to a standstill.
■ The appliance must be completely assembled before use.
■ The blender jug, ToGo bottle and vacuum container should only
be used with this appliance.
W Risk of suffocation!
Do not allow children to play with the packaging material.
W Warning!
■ Do not add liquids or foods above 60 °C.
■ Check that there are no foreign objects in the blender jug.
■ We recommend that the appliance is never switched on for longer
than necessary to process food. Do not operate at no-load.
■ Do not exceed the maximum permitted capacities.
■ Only use the appliance with approved genuine parts and
accessories.
W Important!
It is essential to clean the appliance thoroughly after each use
or after it has not been used for a long period. X “Cleaning and
maintenance” see page 21

15
en
Contents
Congratulations on the purchase of
your new Bosch appliance. You can find
further information about our products
on our website.
www.bosch-home.com
When using this instruction manual, you can
unfold the cover pages of these instructions.
There you will find illustrations marked with
letters and numbering. Reference will be
made to these illustrations throughout the
manual (e.g. X Image sequence B).
Contents
Intended use ............................................. 13
Important safety notices ...........................13
Overview...................................................16
Before using for the first time....................16
Parts and controls.....................................16
Preparation ...............................................18
Use ...........................................................19
Cleaning and maintenance ....................... 21
Accessories ..............................................22
Safety systems .........................................22
Recipes.....................................................23
Disposal .................................................... 24
Guarantee.................................................24
Troubleshooting ........................................ 25
Manufacturer:
BSH Home Appliances (China) Co., Ltd.
20/F,21/F, CN International Mansion,
129 Zhongshan Road, Nanjing,
Jiangsu Province, PRC.
Applicable standards:
GB 4706.1-2005
Household and similar electrical appliances
—Safety— Part 1: General requirements
GB 4706.30-2008
Household and similar electrical appliances
—Safety— Particular requirements for
kitchen machines
Careline:
4008855888
Service E-mail:
Company website:
www.bosch-home.com
Technical specifications:
Electrical connection
(voltage – frequency)
220-240 V~
50-60 Hz
Power rating 1000 W
Dimensions
(H x W x D)
438 x 191 x 195 mm

16
en Overview
9 Vacuum hose
a Connection to vacuum valve
b Connection to container
* Depending on model
Before using for the first time
Before the new appliance can be used,
it must be fully unpacked, cleaned and
checked.
Warning!
Never operate a damaged appliance!
■ Remove the base unit and all
accessories from the packaging and
dispose of the packing materials.
■ Check that all parts are present and
examine them for obvious damage.
X Fig. A
■ Thoroughly clean and dry all parts
before using for the first time.
X “Cleaning and maintenance” see
page 21
Note: There may be a slight foreign smell
when using the new blender for the first
or second time. This is not a sign of any
malfunction.
Parts and controls
High-performance motor block
The blender is equipped with a high-perfor-
mance motor, enabling up to 37000 revolu-
tions per minute.
On/off switch
To switch the appliance on and off.
Vacuum unit with cap
The blender is equipped with a vacuum
pump that can apply a vacuum to the
blender jug before processing. This reduces
the oxidation of food during and after
processing. The result is a more homo-
geneous consistency and a more natural
colour to food while preserving vitamin C
and other nutrients that react to oxygen for
longer. A vacuum can also be applied to
the ToGo bottle and storage containers to
maintain freshness and extend the shelf life
of food contained in them.
Overview
X Fig. A
1 Base unit / Motor block
a Drive
b Marking
c Outlet opening
d Cord tidy
e Cord fastening
f Supporting feet (4)
2 Vacuum unit
a Cap
b Clip for vacuum hose
c Moisture sensors
d Vacuum valve
e Filter
3 Control panel
a button (On/Off)
b Rotary selector with marking
c button
d
button
e
button
f button
g Marking
h 0 zero position
i Marking /
4 Display panel
a Status display
b Symbols
5 Blender jug
a Container made of Tritan
b Scale with 3 markings
c Marking
d Recess for lid lug
e Blade insert with blender knife
6 Lid
a Vacuum seal
b Lug
7 ToGo bottle *
a Container
b Drinking cap
c Lid
d Vacuum seal
8 Storage container (0.75 l / 1.5 l) *
a Bowl
b Lid
c Vacuum seal
d Setting rings for date (day/month)

17
en
Parts and controls
The cap is used to apply a vacuum to the
blender jug.
Status display and symbols
The status display indicates the manually
selected speed or the progress of the
vacuum application process or of an
automatic programme by means of several
LEDs. The higher the speed, or the more
advanced the vacuum application process
or a programme, the more LEDs will light
up. When all LEDs light up, the maximum
speed has been reached or the selected
programme completed. Illuminated symbols
also show other information.
Display Meaning
programme running.
Vacuum is being applied.
Food is being blended
manually.
programme running.
Vacuum is being applied,
followed by automatic
blending.
programme running.
programme running.
Fault in appliance
X “Troubleshooting” see
page 25
Symbols and markings
Symbol Meaning
Max 60°C
Warnings on lid
■ Do not process ingredients
hotter than 60 °C.
Marking for positioning
blender jug.
Position blender jug
a
nd
screw on securely
.
Marking on cap.
Symbol Meaning
Marking on vacuum valve.
Position vacuum valve and
screw on securely .
Rotary selector
For continuous adjustment of the blender
knife speed.
Settings
0 Zero position - Blender will not
start.
Lowest speed
Highest speed
Highest speed, as long as rotary
selector is held in this position.
Note: If the rotary selector is not set to zero
when switched on, the appliance cannot be
operated. First turn the rotary selector to the
zero setting.
Programme selection buttons
The appliance has 4 automatic
programmes. The following programmes
can be selected:
Programmes
Automatic blending with
vacuum applied
To apply vacuum (for blender
jug, ToGo bottle and storage
containers)
Cleaning programme
For crushed ice

18
en Preparation
Please note:
– To use the programmes, the rotary
selector must be set to zero.
– Turning the rotary selector while using
, or will stop the relevant
programme.
– Pressing another programme selection
button will stop the current programme.
– Briefly pressing the programme
selection button will pause a
programme. Press briefly again to
restart.
– Pressing and holding or
(approx. 2 seconds) will stop the
relevant programme. To start the
programme again, switch the appliance
off and back on.
Blender jug
For processing up to 1.5 litres of food. The
blender jug is made of Tritan. Tritan is an
unbreakable plastic with no discernable
taste or smell.
Warning!
– Do not add liquids or foods above 60 °C.
– Do not blend solid food without adding
sufficient liquid.
– Mix powered food (e.g. icing sugar,
cocoa powder, roasted soybeans,
flour or protein powder) with sufficient
liquid or fully dissolve it in liquid before
blending it.
When adding ingredients, observe the
following values and markings on the
blender jug.
Maximum processing quantities
X
Liquids
max. 1.5 l
X
Ingredients such as milk and
dairy products liable to froth
up with other ingredients
max. 1.0 l
X
Ingredients such as milk and
dairy products liable to froth up
max. 0.75 l
ToGo bottle and storage
containers
To store food with vacuum applied.
Capacities
ToGo bottle * 0.5 l
Container, small * 0.75 l
Container, large * 1.5 l
* Depending on model X “Accessories”
see page 22
Lid with vacuum seal
For an air-tight seal on the blender jug,
ToGo bottle and storage containers. To
remove a lid with vacuum applied, first
grip the vacuum seal at one end and pull
it up. Sufficient air has to get inside for the
lid to be removed. The lids of the storage
containers are equipped with a date
indicator. Turn the two rings to set the day
and month when the food was added.
Safety systems
The appliance has various safety systems.
X “Safety systems” see page 22
Preparation
W Risk of injury
– Do not reach into the blender knife. Grip
the blade insert by the plastic only.
– Do not insert the mains plug until
all preparations for working with the
appliance are complete and the blender
jug has been correctly positioned on to
the base unit.
Warning!
When the blender is assembled, do not lift
it by the handle of the blender jug. To lift
the blender, always grip it by the base unit/
motor block.
X Image sequence B
1. Unwind the power cord to the required
length. .
Important: Make sure that the power cord
runs through the cable opening on the
underside of the appliance.

19
en
Use
2. Place the base unit onto a stable and
level work surface. Open the cap
completely.
3. Turn the blender jug upside down and fit
the blade insert with the sealing ring in it
as shown.
4. Fit the lid of the blender jug onto the
blade insert.
5. Rotate the blade insert clockwise to the
stop with the help of the lid.
6. Remove the lid.
Important: The recesses on the blade
insert must be aligned with those on the
blender jug.
7. Turn the blender jug up the right way
and position on the drive as shown.
Marking
pointing to .
8. Rotate the blender jug clockwise to the
stop. Marking pointing to .
9. Prepare the food and add to the blender
jug. Do not exceed the marking .
Note: Always blend food with sufficient
liquid as this will produce a better result.
When adding ingredients liable to froth up
such as milk and dairy products, do not
exceed the marking
.
10. Fit the lid and press on firmly. Observe
the recess on the handle when doing so.
Note: The lid can only be fitted in this
position.
11. Close the cap and press down to the
stop.
12. Insert the mains plug.
Note: The blender can only be used if the
following conditions are met.
– The blade insert and lid must be
properly connected to the blender jug.
– The blender jug must be properly
connected to the base unit.
– The cap must be completely closed.
Use
Note: Table K shows examples for use of
the blender. Processing can be performed
using an automatic programme or manually
in individual steps (1, 2, 3).
Information on use:
– This appliance is not suitable for making
mayonnaise.
– This appliance is not suitable for cutting
or chopping up semi-solid and solid food
(parsley, onions, meat, nuts, Parmesan),
although it can be used in combination
with liquids. X Table K
– This appliance is not suitable for making
nut-based spreads (hazelnut cream,
Nutella, ...).
Blending with automatic
programme
X Image sequence C
1. Set the rotary selector to 0. Switch
on the appliance with button. All
indicators light up briefly once and a
short signal tone sounds. The button
lights up.
2. Press button. The and
symbols light up.
3. The vacuum pump draws the air out of
the blender jug. The status display LEDs
light up one by one.
Note: If the preset vacuum level is
not reached, the symbol then lights
up and 2 short signal tones sound.
X “Troubleshooting” see page 25
4. The status display lights up halfway. The
preset vacuum level is reached.
5. The blender starts processing
automatically and blends the ingredients
in a pulsing rhythm. The second half of
the status display gradually lights up.
6. The blender ends processing
automatically. Wait until the appliance
comes to a standstill.
7. Switch off the appliance using button.
Disconnect the mains plug.
8. Open the cap completely.
9. Turn the blender jug anticlockwise and
remove.

20
en Use
10. Grip the vacuum seal at one end and
pull it up. Sufficient air has to get inside
the blender jug for the lid to be removed.
11. Pull the lid by the lug to remove.
12. Pour the blended food into another
container.
■ Clean all parts. X “Cleaning and
maintenance” see page 21
Note: To keep the food fresh, put it in the
ToGo bottle or storage containers after
processing and apply a vacuum again.
X “Storage with vacuum” see page 21
Manual blending with vacuum
function
X Image sequence D
1. Set the rotary selector to 0. Switch
on the appliance with button. All
indicators light up briefly once and a
short signal tone sounds. The button
lights up.
2. Press button. The symbol lights
up.
3. The vacuum pump draws the air out of
the blender jug. The status display LEDs
light up one by one.
Note: If the preset vacuum level is
not reached, the symbol then lights
up and 2 short signal tones sound.
X “Troubleshooting” see page 25
4. All status display LEDs are lit. The
preset vacuum level is reached.
5. Set the rotary selector to the required
level or . The higher the speed, the
more status display LEDs are lit.
6. Process the ingredients until the desired
consistency is achieved.
7. Set the rotary selector to 0. Wait until
the appliance comes to a standstill.
■ Switch off the appliance using button.
Disconnect the mains plug.
■ Perform steps from 8. as described.
X “Blending with automatic
programme” see page 19
Using the Pulse function
■ Turn the rotary selector anticlockwise to
the position and hold.
■ The appliance will run at maximum
speed for as long as the rotary selector
is held.
■ Release the rotary selector.
Blending without vacuum
function
Prepare blender as described.
X “Preparation” see page 18
X Image sequence E
1. Set the rotary selector to 0. Switch on
the appliance with
button.
2. Set the rotary selector to the required
level or . The symbol lights up.
The higher the speed, the more status
display LEDs are lit.
Note: During processing hold the blender
securely by putting one hand on the cap.
3. Process the ingredients until the desired
consistency is achieved.
4. Set the rotary selector to 0. Wait until
the appliance comes to a standstill.
5. Switch off the appliance using button.
Disconnect the mains plug.
6. Open the cap completely.
7. Turn the blender jug anticlockwise and
remove.
8. Pull the lid by the lug to remove. Pour
the blended food into another container.
■ Clean all parts. X “Cleaning and
maintenance” see page 21
Making crushed ice
Prepare the blender as described and add
ice cubes. X “Preparation” see page 18
■ Set the rotary selector to 0. Switch on
the appliance with button.
■ Press button. The symbol lights
up.
■ The blender automatically starts
processing and crushes the ice cubes
in a pulsing rhythm. The status display
LEDs light up one by one.
■ The blender ends processing
automatically. Wait until the appliance
comes to a standstill.
ページが読み込まれています...
ページが読み込まれています...
ページが読み込まれています...
ページが読み込まれています...
ページが読み込まれています...
ページが読み込まれています...
ページが読み込まれています...
ページが読み込まれています...
ページが読み込まれています...
ページが読み込まれています...
ページが読み込まれています...
ページが読み込まれています...
ページが読み込まれています...
ページが読み込まれています...
ページが読み込まれています...
ページが読み込まれています...
ページが読み込まれています...
ページが読み込まれています...
ページが読み込まれています...
-
 1
1
-
 2
2
-
 3
3
-
 4
4
-
 5
5
-
 6
6
-
 7
7
-
 8
8
-
 9
9
-
 10
10
-
 11
11
-
 12
12
-
 13
13
-
 14
14
-
 15
15
-
 16
16
-
 17
17
-
 18
18
-
 19
19
-
 20
20
-
 21
21
-
 22
22
-
 23
23
-
 24
24
-
 25
25
-
 26
26
-
 27
27
-
 28
28
-
 29
29
-
 30
30
-
 31
31
-
 32
32
-
 33
33
-
 34
34
-
 35
35
-
 36
36
-
 37
37
-
 38
38
-
 39
39


