X
iXZ
MIC & GUITAR INTERFACE
取扱説明書取扱説明書
このたびは、TASCAM iXZ Mic & Guitar Interfaceをお買い上げ
いただきまして、誠にありがとうございます。ご使用になる前に、
この取扱説明書をよくお読みになり、正しい取り扱い方法をご理解
いただいたうえで、末永くご愛用くださいますようお願い申しあげ
ます。お読みになったあとは、いつでも見られるところに保管して
ください。また取扱説明書は、TASCAMのウェブサイト(https://
tascam.jp/jp/)からダウンロードすることができます。
安全にお使いいただくために
製品を安全に正しくお使いいただき、あなたや他の人々への危害や
財産への損害を未然に防止するために、以下の注意事項をよくお読
みください。
V警告
以下の内容を無視して誤った取り扱いをすると、人が
死亡または重傷を負う可能性が想定される内容を示し
ています。
V
注意
万一、異常が起きたら
煙が出たり、変なにおいや音がするときは
機器の内部に異物や水などが入ったときは
この機器を落としたり、カバーを破損したときは
異常状態のまま使用すると、火災・感電の原因となり
ます。お買い上げの販売店またはティアック修理セン
ターに修理をご依頼ください。
Y
分解禁止
この機器のカバーは絶対に外さない
カバーを開けたり改造すると、火災・感電の原因とな
ります。内部の点検・修理は販売店またはティアック
修理センターにご依頼ください。
この機器を改造しない
火災・感電の原因となります。
V注意
以下の内容を無視して誤った取り扱いをすると、人が
傷害を負う可能性が想定される内容および物的損害の
みの発生が想定される内容を示しています。
N
指示
ヘッドホンを使うときは、電源を入れる前に音量を最
小にする
突然大きな音が出て聴覚障害などの原因となることが
あります。
ヘッドホンを使うときは、音量を上げすぎないようにする
耳を刺激するような大きな音量で長時間続けて聴くと、
聴覚障害などの原因となることがあります。
=
禁止
ぐらついた台の上や傾いた所など不安定な場所に置かない
湿気やほこりの多い場所に置かない。風呂、シャワー室で
は使用しない
調理台や加湿器のそばなど油煙や湯気があたる場所に置か
ない
火災・感電やけがの原因となることがあります。
電池の取り扱いについて
本製品は、電池を使用しています。誤った使用による発熱、発火、
液漏れなどを避けるため、以下の注意事項を必ず守ってください。
V警告 乾電池に関する警告
=
禁止
乾電池は、絶対に充電しない
乾電池の破裂、液漏れにより、火災・けがの原因とな
ります。
指定以外の電池は使用しない
新しい電池と古い電池、または種類の違う電池を混ぜ
て使用しない
破裂、液漏れにより、火災、怪我や周囲を汚損する原
因となることがあります。
炎天下の車内や暖房器具のそばなど、温度が高くなる
ところで保管しない
本体の変形によるショートや発火、故障、電池の劣化
の原因となります。
N
強制
電池を入れるときは、極性表示(プラスとマイナスの向
き)の向きに注意し、電池ケースの表示されている通り
に正しく入れる
間違えると電池の破裂、液漏れにより、火災・けがや
周囲を汚損する原因となることがあります。
長時間使用しないときは電池を取り出しておく
液が漏れて火災、けが、周囲を汚損する原因となるこ
とがあります。
もし液が漏れた場合は、電池ケースについた液をよく
拭き取ってから新しい電池を入れてください。また、
万一漏れた液が身体についたときは、水でよく洗い流
してください。
V注意 電池に関する注意
=
禁止
金属製の小物類と一緒に携帯、保管しない
ショートして液漏れや破裂などの原因となることがあ
ります。
Y
分解禁止
分解しない
電池内の酸性物質により、皮膚や衣服を損傷する恐れ
があります。
V
注意
保管や廃棄をする場合は、他の電池や金属の物と接触
しないようにテープなどで端子を絶縁してください。
使い終わった電池は、電池に記載された廃棄方法、もし
くは各市町村の廃棄方法にしたがって捨ててください。
その他の注意
0本製品を寒い場所から暖かい場所へ移動したときや、寒い部屋を
暖めた直後など、気温が急激に変化すると、結露を生じることが
あります。結露したときは、約1 ~ 2時間放置した後、電源を入
れてお使いください。
0パワーアンプなど熱を発生する機器の上に本製品を置かないでく
ださい。
本機の概要
0本機は、iOS / Androidの各種スマートフォン/タブレット*と
接続して、マイク入力対応アプリケーションで録音できるマイク
&ギターインターフェイスです。
* 4極端子(CTIA規格)を搭載した端末に限ります。
0ファントム電源内蔵のXLR /標準コンボジャックを装備してい
ます。
0アルカリまたはニッケル水素単3形電池2本で動作し、小型で持
ち運びができます。
本製品の構成
本製品の構成は、以下の通りです。
開梱は、本体に損傷を与えないよう慎重に行ってください。梱包箱
と梱包材は、後日輸送するときのために保管しておいてください。
付属品が不足している場合や輸送中の損傷が見られる場合は、お買
い上げの販売店にお問い合わせください。
0iXZ 本体 ........................................................................................... x1
0取扱説明書(本書、保証書付き) ......................................................x1
0単3形アルカリ乾電池 ..................................................................... x2
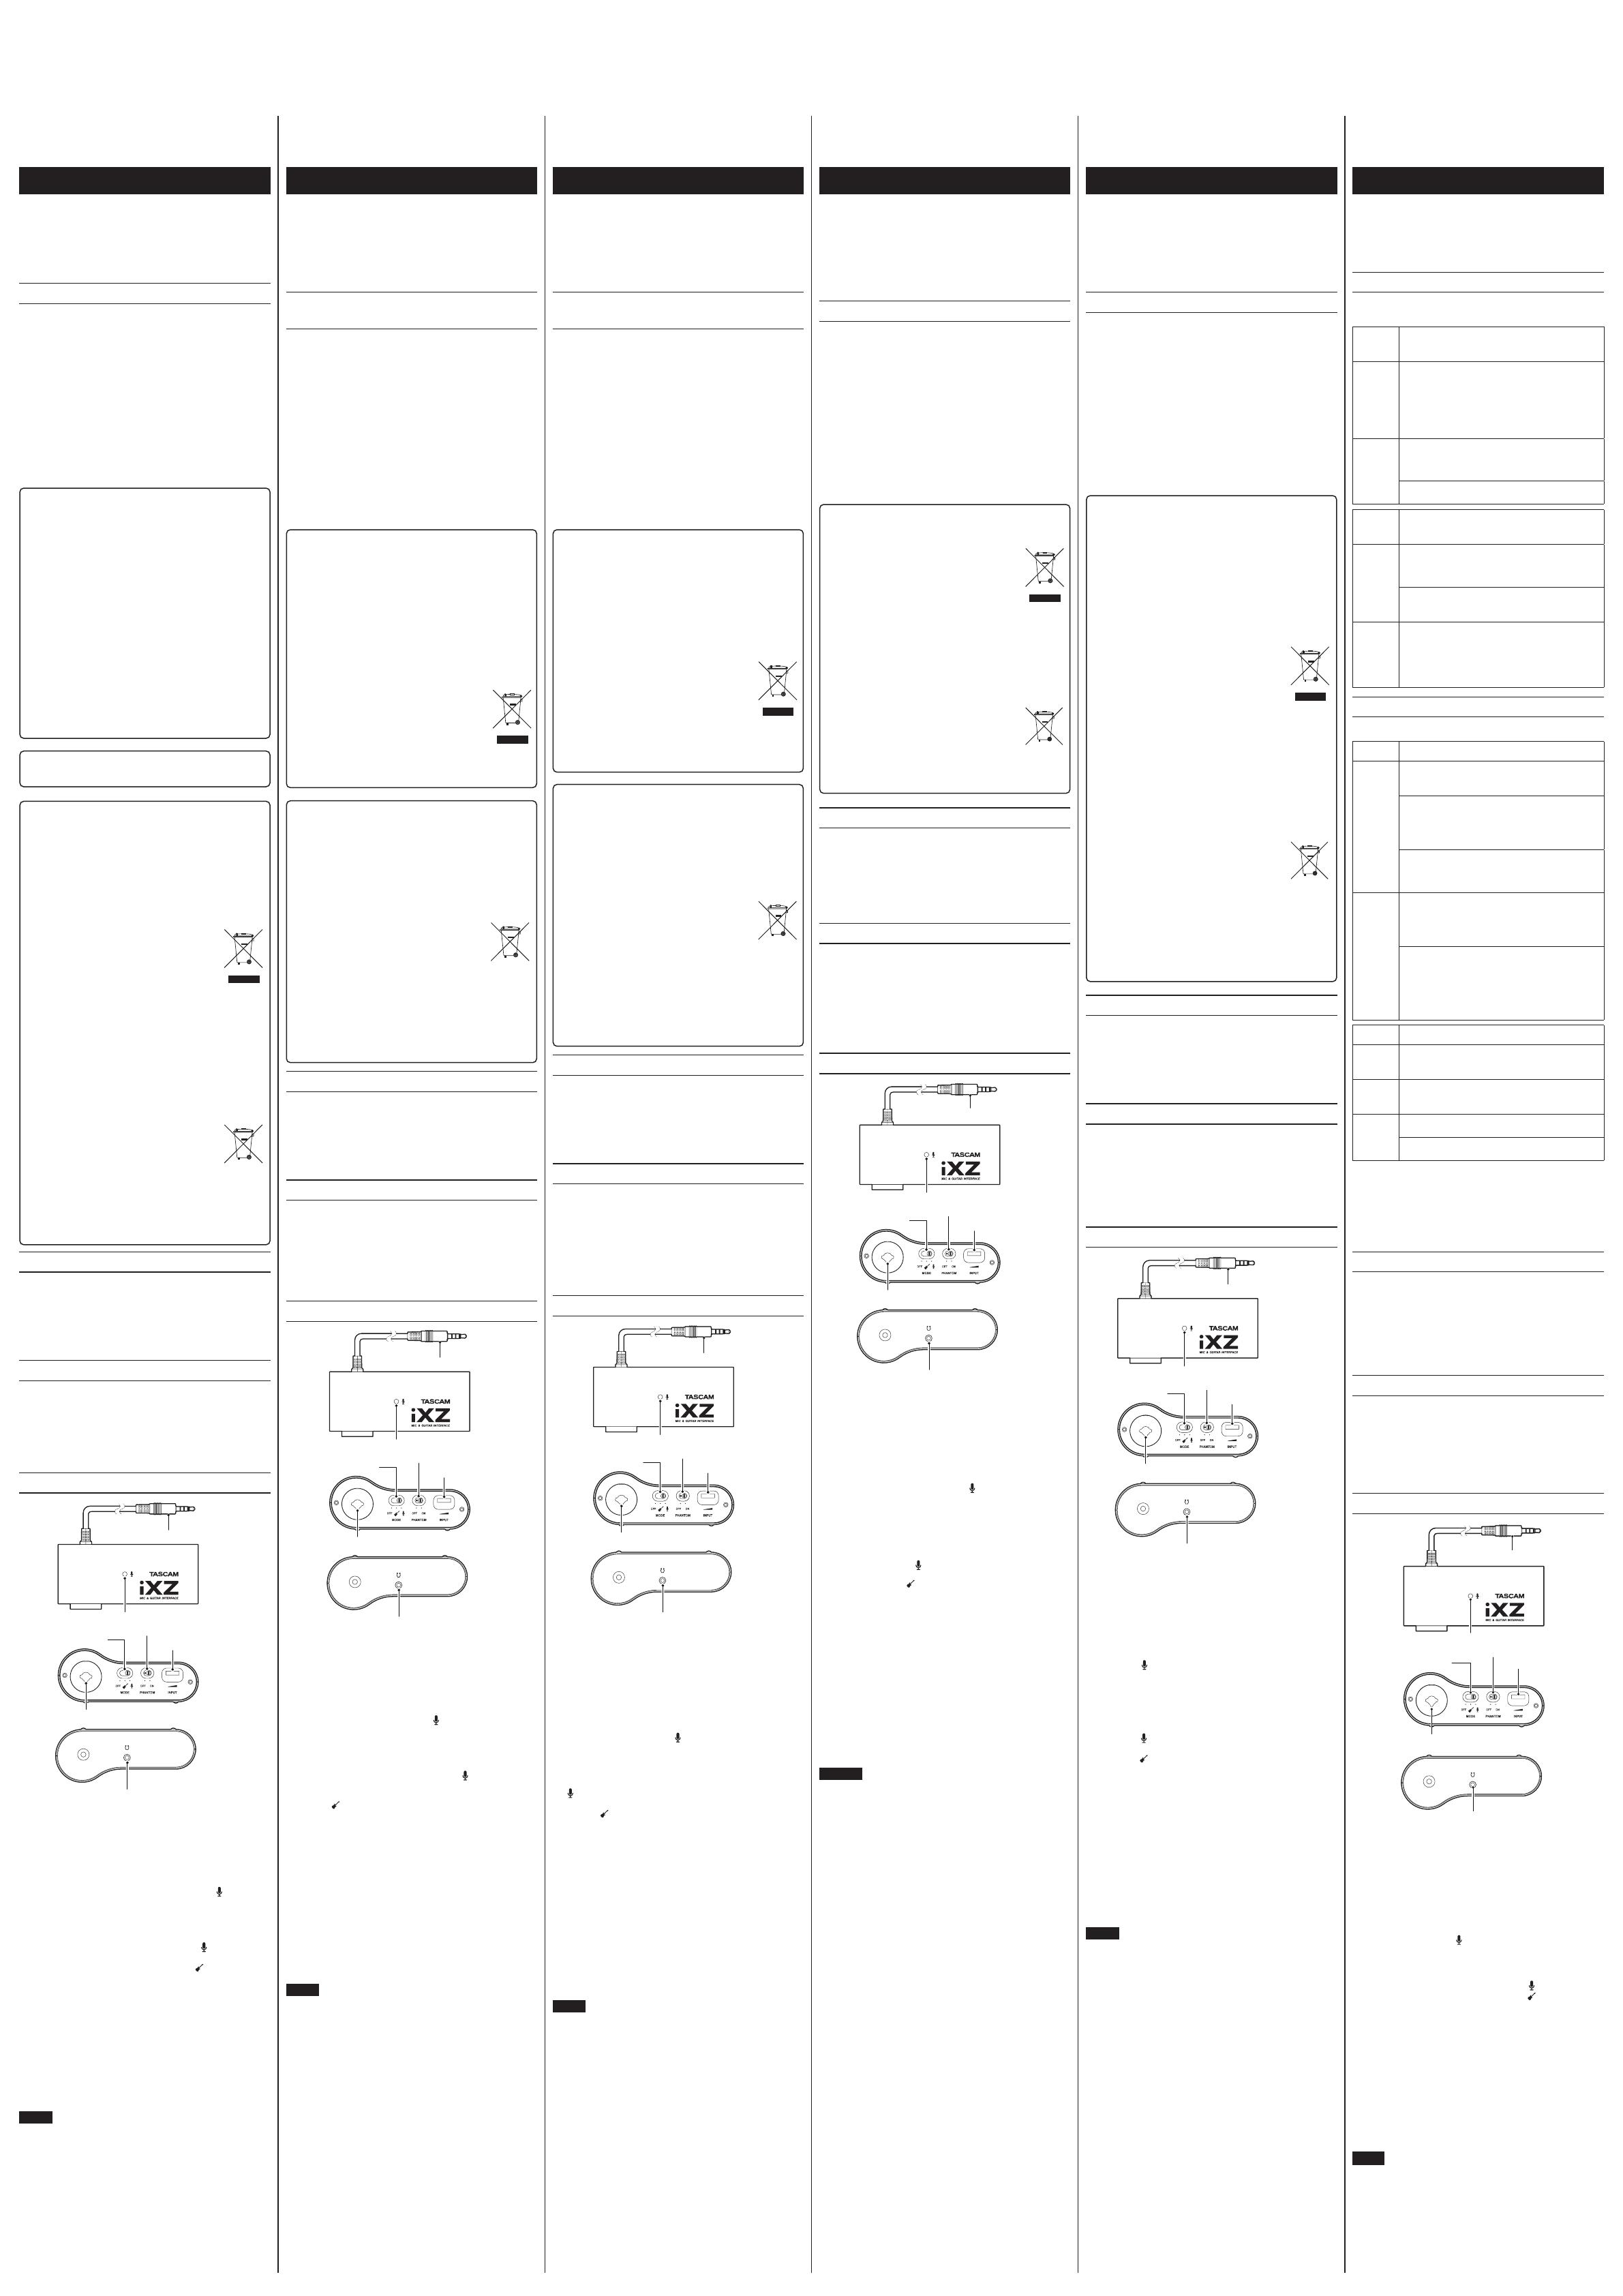
各部の名称
䐠㻌
䐡㻌
䐢㻌
䐣㻌
䐟
䐤㻌
䐥㻌
14Pミニプラグケーブル
3.5mm 4Pプラグ 付 ケーブル(長さ約 500mm) です。
iOS / Android の各種 スマートフォン/タブレット* のヘッドホン
端子に接続します。
本機からのモノラル 音声をスマートフォン/タブレットに出力し、
スマートフォン/タブレットのヘッドホン 音声出力が本機に入力さ
れます。
* 4極端子(CTIA 規格 ) を搭載した端末に限ります。
2マイクインジケーター
MODE(入力 ) をマイク [ ] に切り換えると点灯します。
マイクインジケーターが暗くなったら、電池を交換してください。
3MODEスイッチ
入力に合わせて切り換えます。
マイクのXLRプラグを接続したときは、マイク[ ]を選んでください。
ギターの標準プラグを接続したときは、ギター [ ]を選んでください。
使用しないときはOFFにしてください。
4PHANTOMスイッチ
コンデンサーマイクを接続したときにON にします。
コンデンサーマイクを動作させる電源を供給します。
ON にするとスイッチの奥に赤いマークが現れます。
コンデンサーマイクを使用しないときはOFF にしてください。
5INPUTボリューム
接続したマイクの音声の入力 レベルを調節し、スマートフォン/
タブレットへ出力します。
6マイク/ギター入力端子
XLR と標準 モノラルのコンボジャックです。ギターなどのモノ
ラル 標準 プラグと、マイクなどのXLRプラグのどちらでも接続
することができます。
メモ
ファントム 電流 5.0mA以下のマイクを推奨します。
( この端子で6.3mm プラグのマイクは、使用できませんのでご注
意ください。)
7ヘッドホン端子
ヘッドホンを接続して、スマートフォン/タブレットのヘッドホン
音声出力をモニターすることができます。
D01160200H
MIC & GUITAR INTERFACE
OWNER'S MANUALOWNER'S MANUAL
Thank you for your purchase of the TASCAM iXZ Mic & Guitar Interface.
Before connecting and using the unit, please take time to read this
manual thoroughly to ensure you understand how to properly set up
and connect the unit, as well as the operation of its many useful and
convenient functions. After you have finished reading this manual, please
keep it in a safe place for future reference.
You can also download this Owner’s Manual from the TEAC Global Site
(https://teac-global.com/).
IMPORTANT SAFETY INFORMATION
• Do not use this apparatus near water.
• Clean only with dry cloth.
• Refer all servicing to qualified service personnel. Servicing is
required when the apparatus has been damaged in any way, such
as powersupply cord or plug is damaged, liquid has been spilled
or objects have fallen into the apparatus, the apparatus has been
exposed to rain or moisture, does not operate normally, or has been
dropped.
• Do not expose this apparatus to drips or splashes.
• Do not place any objects filled with liquids, such as vases, on the
apparatus.
• Avoid installing this unit on top of any heat-generating electrical
device such as a power amplifier.
• If the unit is moved from a cold to a warm place, or used after a
sudden temperature change, there is a danger of condensation; vapor
in the air could condense on the internal mechanism, making correct
operation impossible. To prevent this, or if this occurs, let the unit sit
for one or two hours at the new room temperature before using.
ªFOR U.S.A.
INFORMATION TO THE USER
This equipment has been tested and found to comply with the limits
for a Class B digital device, pursuant to Part 15 of the FCC Rules. These
limits are designed to provide reasonable protection against harmful
interference in a residential installation.
This equipment generates, uses, and can radiate radio frequency
energy and, if not installed and used in accordance with the instruction
manual, may cause harmful interference to radio communications.
However, there is no guarantee that interference will not occur
in a particular installation. If this equipment does cause harmful
interference to radio or television reception, which can be determined
by turning the equipment off and on, the user is encouraged to try to
correct the interference by one or more of the following measures.
a) Reorient or relocate the receiving antenna.
b) Increase the separation between the equipment and receiver.
c) Connect the equipment into an outlet on a circuit different from that
to which the receiver is connected.
d) Consult the dealer or an experienced radio/TV technician for help.
CAUTION
Changes or modifications to this equipment not expressly approved by
TEAC CORPORATION for compliance could void the user’s authority to
operate this equipment.
THIS CLASS B DIGITAL APPARATUS COMPLIES WITH CANADIAN ICES-
003. CET APPAREIL NUMÉRIQUE DE LA CLASSE B EST CONFORME À LA
NORME NMB-003 DU CANADA.
ªFor European customers
Disposal of electrical and electronic equipment
(a) All electrical and electronic equipment should be disposed of
separately from the municipal waste stream via collection facilities
designated by the government or local authorities.
(b) By disposing of electrical and electronic equipment correctly,
you will help save valuable resources and prevent any potential
negative effects on human health and the environment.
(c) Improper disposal of waste electrical and electronic equipment can
have serious effects on the environment and human health because
of the presence of hazardous substances in the equipment.
(d) The Waste Electrical and Electronic Equipment (WEEE)
symbol, which shows a wheeled bin that has been
crossed out, indicates that electrical and electronic
equipment must be collected and disposed of
separately from household waste.
(e) Return and collection systems are available to end
users. For more detailed information about the
disposal of old electrical and electronic equipment,
please contact your city office, waste disposal service or the shop
where you purchased the equipment.
Disposal of batteries and/or accumulators
(a) Waste batteries and/or accumulators should be disposed of
separately from the municipal waste stream via collection facilities
designated by the government or local authorities.
(b) By disposing of waste batteries and/or accumulators correctly,
you will help save valuable resources and prevent any potential
negative effects on human health and the environment.
(c) Improper disposal of waste batteries and/or accumulators can have
serious effects on the environment and human health because of
the presence of hazardous substances in them.
(d) The WEEE symbol, which shows a wheeled bin that
has been crossed out, indicates that batteries and/
or accumulators must be collected and disposed of
separately from household waste.
If a battery or accumulator contains more than the
specified values of lead (Pb), mercury (Hg), and/
or cadmium (Cd) as defined in the Battery Directive
(2006/66/EC), then the chemical symbols for those
elements will be indicated beneath the WEEE symbol.
(e) Return and collection systems are available to end users. For more
detailed information about the disposal of waste batteries and/or
accumulators, please contact your city office, waste disposal service
or the shop where you purchased them.
, Hg,
Summary of this device
• This device is a microphone/guitar interface for recording sound using
software compatible with a microphone input by connecting an iOS
or Android device*.
* 4 pole terminal (CTIA) required.
• This device is equipped with XLR with an internal phantom power
supply and a standard combo jack.
• This device is compact and portable, and can operate with only two
alkaline or nickel hydride “AA” batteries.
Included items
This product includes the following items.
Take care when opening the package to avoid damaging the items. Keep
the packing materials for transportation in the future.
Please contact the store where you purchased this unit if any of these
items are missing or have been damaged during transportation.
• iXZ Package ...............................................................................................................x1
• Owner’s Manual (this manual) including warranty ..................................... x1
• AA alkaline batteries............................................................................................... x2
Names and function of parts
Microphone Indicator
4P mini-plug cable
MODE Switch
Phantom Switch
INPUT Volume
Microphone / Guitar Input Terminal
Headphone terminal
Upper side
Front
side
Rear
side
1 4P mini-plug cable
A cable with 3.5mm 4P jack plug (about 500mm in length).
For connecting to the headphone jack of an iOS or Android device*.
Monophonic sound from this device is output to an iOS or Android
device, and headphone sound output from the iOS or Android device
is input to this device.
* 4 pole terminal (CTIA) required.
2 Microphone Indicator
When converting the MODE (input) into microphone, [ ] this
Indicator starts blinking.
If the Indicator becomes dim, replace the batteries with new ones.
3 MODE Switch
Change according to the input.
When connecting the XLR plug of a microphone, [ ] select
“Microphone”.
When connecting the standard plug of a guitar, [ ] select “Guitar”.
When not in use, leave the switch off.
4 Phantom Switch
Switch on when a condenser microphone is connected.
Provides a power supply to operate a condenser microphone.
When switched on, a red mark appears on the back of the switch.
When a condenser microphone is not used, leave the switch off.
5 INPUT Volume
This is for adjusting the input level of sounds from the connected
microphone, and will output to an iOS or Android device.
6 Microphone / Guitar Input Terminal
This is combo jack for XLR and standard mono. The mono standard
plug of a guitar or the XLR plug of a microphone can be connected.
Note
It is recommended to use a microphone working with under 5.0mA
phantom current.
(Please note that microphones with 6.3 mm-plug cannot be used with
this terminal.)
7 Headphone terminal
You can monitor the output of headphone sounds from an iOS or
Android device by connecting to the headphone jack.
INTERFACE MICROPHONE
& GUITARE
MODE D'EMPLOIMODE D'EMPLOI
Merci pour avoir acheté interface microphone & guitare TASCAM iXZ.
Avant de connecter et d'utiliser l'appareil, veuillez prendre le temps de
lire attentivement ce mode d'emploi afin de bien comprendre comment
installer et raccorder l'appareil correctement ainsi que l'emploi de ses
fonctions pratiques et variées. Après avoir lu ce mode d'emploi, veuillez
le conserver dans une endroit sûr afin de pouvoir vous y référer dans le
future.
Vous pouvez aussi télécharger ce mode d’emploi depuis le site mondial
de TEAC (https://teac-global.com/).
INSTRUCTIONS DE SÉCURITÉ
IMPORTANTES
• N'utilisez pas cet appareil avec de l'eau à proximité.
• Nettoyez-le uniquement avec un chiffon sec.
• Confiez toute réparation à des techniciens de maintenance qualifiés.
Une réparation est nécessaire si l'appareil a été endommagé d'une
quelconque façon, par exemple si le cordon ou la fiche d'alimentation
est endommagé, si du liquide a été renversé sur l'appareil ou si des
objets sont tombés dedans, si l'appareil a été exposé à la pluie ou à
l'humidité, s'il ne fonctionne pas normalement, ou s'il est tombé.
• N'exposez pas cet appareil aux gouttes ni aux éclaboussures.
• Ne placez pas d'objet rempli de liquide sur l'appareil, comme par
exemple un vase.
• Évitez d’installer cet appareil sur un autre appareil électrique générant
de la chaleur tel qu’un amplificateur de puissance.
• Si l’appareil est déplacé d’un endroit froid dans un endroit chaud, ou
utilisé après un changement brusque de température, il y a risque de
condensation d’humidité ; la vapeur dans l’air peut se condenser sur le
mécanisme interne, rendant tout fonctionnement correct impossible.
Pour éviter ceci, ou si de la condensation se produit, laissez l’appareil
pendant une ou deux heures à la nouvelle température de la pièce
avant de l’utiliser.
ªPour les consommateurs européens
Mise au rebut des équipements électriques et
électroniques
(a) Tout équipement électrique et électronique doit être traité
séparément de la collecte d’ordures ménagères municipales
dans des points de collecte désignés par le gouvernement ou les
autorités locales.
(b) En vous débarrassant correctement des équipements électriques
et électroniques, vous contribuerez à la sauvegarde de précieuses
ressources et à la prévention de potentiels effets négatifs sur la
santé humaine et l’environnement.
(c) Le traitement incorrect des déchets d’équipements électriques et
électroniques peut avoir des effets graves sur l’environnement et la
santé humaine car ils contiennent des substances dangereuses.
(d) Le symbole de déchets d’équipements électriques et
électroniques (DEEE), qui représente une poubelle à
roulettes barrée d’une croix, indique que l’équipement
électrique et électronique doit être collecté et traité
séparément des déchets ménagers.
(e) Des systèmes de retour et de collecte sont disponibles
pour l’utilisateur final. Pour des informations plus
détaillées sur la mise au rebut des vieux équipements
électriques et électroniques, veuillez contacter votre mairie, le
service d’ordures ménagères ou le magasin auprès duquel vous
avez acquis l’équipement.
Mise au rebut des batteries et/ou accumulateurs
(a) Les batteries et/ou accumulateurs hors d’usage doivent être traités
séparément de la collecte d’ordures ménagères municipales
dans des points de collecte désignés par le gouvernement ou les
autorités locales.
(b) En vous débarrassant correctement des batteries et/ou
accumulateurs hors d’usage, vous contribuerez à la sauvegarde
de précieuses ressources et à la prévention de potentiels effets
négatifs sur la santé humaine et l’environnement.
(c) Le traitement incorrect des batteries et/ou accumulateurs hors
d’usage peut avoir des effets graves sur l’environnement et la santé
humaine car ils contiennent des substances dangereuses.
(d) Le symbole de déchets d’équipements électriques et
électroniques (DEEE), qui représente une poubelle à
roulettes barrée d’une croix, indique que les batteries
et/ou accumulateurs doivent être collectés et traités
séparément des déchets ménagers.
Si une batterie ou un accumulateur contient plus
que les valeurs de plomb (Pb), mercure (Hg) et/ou
cadmium (Cd) définies dans la directive sur les batteries (2006/66/
EC), alors les symboles chimiques de ces éléments seront indiqués
sous le symbole DEEE.
(e) Des systèmes de retour et de collecte sont disponibles pour
l’utilisateur final. Pour des informations plus détaillées sur la mise
au rebut des batteries et/ou accumulateurs, veuillez contacter votre
mairie, le service d’ordures ménagères ou le magasin auprès duquel
vous les avez acquis.
, Hg,
Présentation de cet appareil
• Cet appareil est une interface de microphone/guitare pour
l’enregistrement audio sur un appareil iOS ou Android* à l’aide d’un
logiciel compatible avec une entrée microphone.
* Terminal 4 pôles (CTIA) requis.
• Cet appareil est muni d'une prise XLR avec une alimentation fantôme
interne et une prise mixte XLR/jack standard.
• Cet appareil est compact et portable, et peut fonctionner avec
seulement deux piles alcalines ou hydrure de nickel «AA».
Éléments fournis
Ce produit est livré avec les éléments suivants.
Ouvrez l’emballage avec soin pour ne pas endommager ces éléments.
Conservez les matériaux d’emballage pour de futurs transports.
Si un élément quelconque est manquant ou a été endommagé durant
le transport, veuillez contacter le magasin dans lequel vous avez acheté
cette unité.
• Emballage iXZ ........................................................................................................... x1
• Mode d’emploi (ce document) incluant la garantie .................................... x1
• Piles alcalines AA ....................................................................................................x2
Nomenclature et fonctions des parties
Indicateur de microphone
Câble à che mini-jack 4 points
Commutateur MODE
Commutateur Phantom
Volume d'entrée (INPUT)
Prise d'entrée microphone / guitare
Prise pour casque d'écoute
Face avant
Face arrière
1 Câble à fiche mini-jack 4 points
Câble à fiche mini-jack 4 points de 3,5mm (environ 500 mm de long).
À connecter à la prise casque d’un appareil iOS ou Android*.
Le son monophonique de cet appareil est envoyé à un appareil iOS ou
Android et le son de la sortie casque de l’appareil iOS ou Android est
reçu par cet appareil.
* Terminal 4 pôles (CTIA) requis.
2 Indicateur de microphone
Si le MODE (entrée) sur le microphone, [ ] cet indicateur clignote.
Si l'indicateur devient moins brillant, remplacez les piles par des
neuves.
3 Commutateur MODE
Changez le réglage de ce commutateur en fonction de l'entrée.
Si vous branchez la fiche XLR d'un microphone, [ ] sélectionnez
“Microphone”.
Si vous branchez la fiche standard d'une guitare, sélectionnez «
Guitare » [ ].
Quand il n'est pas utilisé, laissez-le en position OFF.
4 Commutateur Phantom
Réglez ce commutateur sur ON quand un microphone à condensateur
est connecté.
Fournit une alimentation pour un microphone à condensateur.
Quand ce commutateur est réglé sur ON, une marque rouge apparaît à
l'arrière du commutateur.
Quand aucun microphone à condensateur n'est utilisé, laissez ce
commutateur sur OFF.
5 Volume d'entrée (INPUT)
Il sert à ajuster le niveau d’entrée des sons captés par le microphone
connecté, qui seront envoyés à un appareil iOS ou Android.
6 Prise d'entrée microphone / guitare
C'est une prise mixte pour XLR et jack 6,35mm mono standard. Vous
pouvez y connecter la fiche standard d'une guitare ou la fiche XLR
d'un microphone.
Note
Il est recommandé d'utiliser un microphone fonctionnant avec une
alimentation fantôme de moins de 5,0 mA.
Veuillez noter que les microphones munis d'une fiche jack 6,35mm ne
peuvent pas être utilisés avec cette prise.
7 Prise pour casque d'écoute.
Vous pouvez contrôler les sons de la sortie casque d’un appareil iOS
ou Android en branchant un casque à cette prise.
INTERFACE PARA MICRÓ-
FONO Y GUITARRA
MANUAL DE INSTRUCCIONESMANUAL DE INSTRUCCIONES
Gracias por su compra de este interface TASCAM iXZ para Micrófono y
Guitarra.
Antes de conectar y utilizar el aparato, lea este manual atentamente
para comprender completamente cómo configurar y conectar el aparato
adecuadamente, así como para saber cómo operar las diversas funciones
útiles y convenientes. Después de leer este manual, guárdelo en un lugar
seguro para futuras consultas.
También puede descargarse este Manual de instrucciones desde la página
web global de TEAC (https://teac-global.com/).
INSTRUCCIONES IMPORTANTES DE
SEGURIDAD
• No utilice este aparato cerca del agua.
• Limpie este aparato solo con un trapo seco.
• Consulte cualquier posible avería al servicio técnico oficial. Este
aparato deberá ser revisado cuando se haya dañado de alguna forma,
como por ejemplo si el cable de corriente o el enchufe se ha roto,
si se ha derramado cualquier líquido o se ha introducido un objeto
dentro de la unidad, si el aparato ha quedado expuesto a la lluvia o la
humedad, si no funciona normalmente o si se ha caído al suelo.
• No permita que este aparato quede expuesto a salpicaduras de
ningún tipo.
• No coloque objetos que contengan líquidos, como jarrones, encima
de este aparato.
• Evite instalar este aparato por encima de cualquier dispositivo
eléctrico que genere calor como un amplificador de potencia.
• Si se desplaza el aparato de un lugar frío a un lugar caliente, o se
lo utiliza después de un cambio súbito de la temperatura, existe el
peligro de condensación; el vapor en el aire podría condensarse en el
mecanismo interno, imposibilitando el funcionamiento correcto. Para
prevenir esto, o si esto ocurre, deje el aparato durante una o dos horas
en el nuevo entorno antes de utilizarlo.
ªPara los usuarios de la Unión Europea
Eliminación de aparatos eléctricos y electrónicos
(a) Cualquier aparato eléctrico/electrónico debe ser eliminado
separado del resto de basura orgánica y únicamente en los “puntos
limpios” especificados por el Ayuntamiento/empresa de limpieza.
(b) Con la eliminación correcta de este tipo de aparatos estará
ayudando a conservar recursos muy valiosos y a evitar los posibles
efectos negativos en la salud y en el medio ambiente.
(c) La eliminación incorrecta de este tipo de aparatos puede producir
efectos muy dañinos en el medio ambiente y en la salud producidos
por las sustancias peligrosas que pueden contener.
(d) El símbolo de Eliminación de Aparatos Eléctricos y
Electrónicos (WEEE en inglés), identificado por un
cubo de basura tachado, indica que este tipo de
aparatos debe ser eliminado de forma totalmente
independiente con respecto a la basura orgánica.
(e) Existen “puntos limpios” a disposición del usuario final
para la eliminación de este tipo de aparatos. Si necesita
más información acerca de la forma de eliminar
aparatos eléctricos y electrónicos antiguos, póngase en contacto
con su Ayuntamiento, con la empresa de limpieza correspondiente
o con el comercio en el que adquirió ese aparato.
Eliminación de pilas y/o acumuladores
(a) Las pilas y/o acumuladores gastados deben ser eliminados
separados del resto de basura orgánica y únicamente en los “puntos
limpios” especificados por el Ayuntamiento/empresa de limpieza.
(b) Con la eliminación correcta de este tipo de aparatos estará
ayudando a conservar recursos muy valiosos y a evitar los posibles
efectos negativos en la salud y en el medio ambiente.
(c) La eliminación incorrecta de este tipo de elementos puede producir
efectos muy dañinos en el medio ambiente y en la salud producidos
por las sustancias peligrosas que pueden contener.
(d) El símbolo WEEE, identificado por un cubo de basura
tachado, indica que este tipo de elementos deben ser
eliminados de forma totalmente independiente con
respecto a la basura orgánica.
Si una pila o acumulador contiene una cantidad de
plomo (Pb), mercurio (Hg) y/o cadmio (Cd) superior a
las fijadas en la Directiva relativas a las pilas (2006/66/
EC), aparecerán también los símbolos químicos de
esos elementos debajo del símbolo WEEE.
(e) Existen “puntos limpios” a disposición del usuario final para la
eliminación de pilas y/o acumuladores gastados. Si necesita más
información acerca de la forma de eliminar estos elementos,
póngase en contacto con su Ayuntamiento, la empresa de limpieza
correspondiente o con el comercio en el que adquirió dichas pilas/
acumuladores.
, Hg,
Resumen de este dispositivo
• Este dispositivo es un interface de micrófono/guitarra para la
grabación de sonidos a través de software compatible con una
entrada de micrófono conectado a un dispositivo iOS o Android*.
* Se requiere una terminal de 4 polos (CTIA).
• Este dispositivo provee una conexión XLR con suministro de energía
fantasma interno y toma combinada estándar.
• Este dispositivo es compacto y portátil, y puede funcionar solamente
con dos pilas alcalinas o de níquel-hidruro metálico de tamaño AA.
Elementos incluidos
Dentro del embalaje encontrará los siguientes elementos.
Tenga cuidado de no dañar estos objetos al abrir el embalaje.
Conserve la caja y las protecciones por si alguna vez necesita transportar
el aparato.
Póngase en contacto con su distribuidor si echa en falta alguno de estos
elementos o si observa que alguno de ellos ha resultado dañado durante
el transporte.
• Embalaje iXZ .............................................................................................................. x1
• Manual de instrucciones (este documento) incluyendo garantía ......... x1
• Pilas alcalinas AA ......................................................................................................x2
Nombres de los componentes
Indicador de micrófono
Cable con clavija mini 4P
Interruptor MODE
Interruptor de alimentación fantasma
Volumen INPUT
Terminal de entrada de micrófono/guitarra
Terminal de auriculares
Lado superior
Lado frontal
Lado trasero
1 Cable con clavija mini 4P
Cable con enchufe 4P de 3,5 mm (aprox. 500 mm de largo).
Para la conexión a la toma de auriculares de un dispositivo iOS o
Android*.
El sonido monofónico de este dispositivo es emitido a un dispositivo
iOS o Android, y el sonido de auriculares emitido desde el dispositivo
iOS o Android es recibido por esta unidad.
* Se requiere una terminal de 4 polos (CTIA).
2 Indicador de micrófono
Cuando se cambia el interruptor MODE (entrada) a micrófono, este
indicador empieza a parpadear [ ].
Si el indicador se pone oscuro, reemplace las pilas por nuevas.
3 Interruptor MODE
Cambie de acuerdo a la entrada.
Para conectar el enchufe XLR de un micrófono, seleccione “Micrófono”
[ ].
Para conectar el enchufe estándar de una guitarra, seleccione
“Guitarra” [ ].
Cuando no utilice, deje el interruptor apagado.
4 Interruptor de alimentación fantasma
Encienda cuando conecte un micrófono de condensador.
Provee un suministro de energía para utilizar un micrófono de
condensador.
Cuando encendido, aparece una marca roja en la parte posterior del
interruptor.
Cuando utilice un micrófono de condensador, deje el interruptor
apagado.
5 Volumen INPUT
Esto permite el ajuste del nivel de entrada del sonido procedente
del micrófono conectado y que será emitido a un dispositivo iOS o
Android.
6 Terminal de entrada de micrófono/guitarra
Para la toma combinada para XLR y mono estándar. Se puede
conectar el enchufe estándar mono de una guitarra o el enchufe XLR
de un micrófono.
Nota
Se recomienda utilizar un micrófono que funcione con corriente
fantasma inferior a 5,0 mA.
(Tenga en cuenta que no se pueden utilizar micrófonos con un enchufe
de 6,3 mm con este terminal.)
7 Terminal de auriculares
Puede monitorizar la salida del sonido de auriculares de un dispositivo
iOS o Android conectando unos auriculares a esta salida.
INTERFACE FÜR MIKRO-
FON UND GITARRE
BEDIENUNGSANLEITUNGBEDIENUNGSANLEITUNG
Vielen Dank, dass Sie sich für das Mikrofon-/Gitarren-Interface TASCAM
iXZ entschieden haben.
Bevor Sie das Gerät benutzen, lesen Sie sich diese Anleitung bitte
aufmerksam durch. Nur so ist sichergestellt, dass Sie das Interface
ordnungsgemäß anschließen und bedienen und alle Merkmale nutzen
können. Bewahren Sie diese Anleitung gut auf, und geben Sie sie immer
zusammen mit dem Interface weiter, da sie zum Gerät gehört.
Diese Bedienungsanleitung steht auch auf der globalen TEACWebsite
unter https://teac-global.com/ oder auf der deutschen Website (https://
www.tascam.eu/de/) zum Download zur Verfügung.
Wichtige Sicherheitshinweise
• Halten Sie das Gerät von Wasser und anderen Flüssigkeiten fern.
• Stellen Sie das Gerät niemals so auf, dass es nass werden kann.
• Trennen Sie das Gerät von der Stromversorgung bei Gewitter oder
wenn Sie das Gerät längere Zeit nicht benutzen.
• Stellen Sie das Gerät nicht auf einen Leistungsverstärker oder andere
Geräte, die Wärme abgeben.
• Lassen Sie Wartungsarbeiten und Reparaturen nur vom qualifizierten
Fachpersonal des Kundendienstes ausführen. Bringen Sie das Gerät
zum Kundendienst, wenn es beschädigt ist, Regen oder Feuchtigkeit
ausgesetzt war, wenn Flüssigkeit oder Fremdkörper hinein gelangt
sind, wenn es heruntergefallen ist oder nicht normal funktioniert.
• Wenn Sie das Gerät aus einer kalten Umgebung in eine warme
Umgebung bringen, in einem schnell beheizbaren Raum einsetzen
oder anderen plötzlichen Temperaturschwankungen aussetzen,
besteht die Gefahr, dass sich Kondenswasser bildet. Um dies zu
vermeiden, lassen Sie das Gerät ein bis zwei Stunden stehen, bevor Sie
es einschalten.
• Reinigen Sie dieses Gerät nur mit einem trockenen Tuch.
ªFür Kunden in Europa
Entsorgung von Altgeräten und Batterien
a) Wenn ein Symbol einer durchgestrichenen Abfalltonne
auf einem Produkt, der Verpackung und/oder der
begleitenden Dokumentation angebracht ist, unterliegt
dieses Produkt den europäischen Richtlinien 2012/19/
EU und/oder 2006/66/EG sowie nationalen Gesetzen
zur Um setzung dieser Richtlinien.
b) Diese Richtlinien und Gesetze schreiben vor, dass
Elektro- und Elektronik-Altgeräte sowie Batterien und Akkus nicht
in den Hausmüll (Restmüll) gelangen dürfen. Um die fachgerechte
Entsorgung, Aufbereitung und Wiederverwertung sicherzustellen,
sind Sie verpflichtet, Altgeräte und entladene Batterien/Akkus über
staatlich dafür vorgesehene Stellen zu entsorgen.
c) Durch die ordnungsgemäße Entsorgung solcher Geräte und
Batterien/Akkus leisten Sie einen Beitrag zur Einsparung wertvoller
Rohstoffe und verhindern potenziell schädliche Auswir kungen auf
die Gesundheit der Allgemeinheit und die Umwelt, die durch falsche
Abfallentsorgung entstehen können. Die Entsorgung ist für Sie
kostenlos.
d) Enthalten Batterien/Akkus mehr als die in der Richtlinie
festgelegte Menge an Blei (Pb), Quecksilber (Hg) oder
Cadmium (Cd), so ist zusätzlich zur Mülltonne die
entsprechende chemische Abkürzung angegeben.
e) Weitere Informationen zur Wertstoffsammlung und
Wiederver wertung von Altgeräten und Batterien/
Akkus erhalten Sie bei Ihrer Stadtverwaltung, dem
für Sie zuständigen Abfallent sorgungsunternehmen oder der
Verkaufsstelle, bei der Sie das Produkt erworben haben.
Überblick über das Interface
• Das iXZ ist ein Audio-Interface, das Sie mit einem iOS- oder Android-
Gerät und geeigneter Aufnahme-Software verwenden können, um
Tonaufnahmen mit einem Mikrofon oder einer Gitarre zu erstellen.
Das iOS- oder Android-Gerät muss über eine 4-polige Klinkenbuchse
entsprechend CTIA-Standard verfügen.
• Die Kombi-Eingangsbuchse kann mit XLR- und Klinkensteckern
verwendet werden (XLR mit Phantomspeisung).
• Das Gerät ist kompakt und transportabel und kann mit nur zwei Alkali-
Batterien oder NiMH-Akkus des Typs AA (R03) betrieben werden.
Auspacken/Lieferumfang
Zum Lieferumfang dieses Produkts gehören die folgenden Bestandteile :
Achten Sie beim Öffnen der Verpackung darauf, dass Sie nichts
beschädigen. Bewahren Sie das Verpackungsmaterial für einen
eventuellen zukünftigen Transport auf.
Sollte etwas fehlen oder auf dem Transport beschädigt worden sein,
wenden Sie sich bitte an Ihren Händler.
• iXZ ................................................................................................................................ x1
• Benutzerhandbuch (das vorliegende Dokument)
Garantiehinweis ....................................................................................................... x1
• Alkali-Batterien des Typs AA (R03)..................................................................... x2
Bedienelemente und ihre Funktionen
Mikrofonanzeige
MODE-Schalter
Phantom-Schalter
INPUT-Regler
Eingangsbuchse für Mikrofon/Gitarre
Kopfhörerbuchse
Oberseite
Vorderseite
Rückseite
Verbindungskabel mit
4-poligem Miniklinkenstecker
1 Verbindungskabel mit 4-poligem Miniklinkenstecker
Verbindungskabel mit 4-poligem 3,5-mm-Miniklinkenstecker (etwa
500 mm lang).
Verbinden Sie dieses Kabel mit der Kopfhörerbuchse eines iOS-
oder Android-Geräts. Das andere Gerät muss über eine 4-polige
Klinkenbuchse entsprechend CTIA-Standard verfügen.
Das Interface leitet ein Mono-Signal an das iOS- oder Android-Gerät,
und das iOS- oder Android-Gerät leitet sein Kopfhörersignal zurück in
das Interface.
2 Mikrofonanzeige
Wenn der MODE-Schalter auf Mikrofon ( ) gestellt ist, beginnt dieses
Lämpchen zu blinken.
Wenn das Lämpchen nur schwach leuchtet, ersetzen Sie die Batterien
durch neue.
3 MODE-Schalter
Stellen Sie diesen Schalter entsprechend dem am Eingang
angeschlossenen Gerät ein:
• Wählen Sie Mikrofon ( ), wenn Sie ein Mikrofon mit XLR-Stecker
anschließen.
• Wählen Sie Gitarre ( ), wenn Sie eine Gitarre mit Standard-
Klinkenstecker anschließen.
• Wählen Sie OFF, wenn Sie das Interface nicht verwenden.
4 Phantom-Schalter
Stellen Sie diesen Schalter auf ON (ein), wenn Sie ein
Kondensatormikrofon angeschlossen haben, das eine
Stromversorgung für den Betrieb benötigt. In Schalterstellung ON
erscheint eine rote Markierung im Schalter.
Wenn Sie kein Kondensatormikrofon verwendet wird, stellen Sie den
Schalter auf OFF (aus).
5 INPUT-Regler
Hiermit passen Sie den Eingangspegel des angeschlossenen
Mikrofons an, bevor das Signal an das iOS- oder Android-Gerät geleitet
wird.
6 Mikrofon/Gitarre-Eingangsbuchse
Dies ist eine Kombibuchse für XLR- und Standard-Mono-
Klinkenstecker. Schließen Sie hier ein Mikrofon mit XLR-Stecker oder
eine Gitarre mit Standard-Klinkenstecker (6,3 mm) an.
Wichtig
• Sie können kein Mikrofon mit Klinkenstecker mit dieser Buchse
verwenden.
• Es ist ratsam, ein Mikrofon zu verwenden, das weniger als 5 mA
Phantomstrom benötigt.
7 Kopfhörerbuchse
Schließen Sie hier einen Kopfhörer an, um das vom iOS- oder Android-
Gerät ausgegebene Signal mitzuhören.
INTERFACCIA PER MICRO-
FONO E CHITARRA
MANUALE DI ISTRUZIONIMANUALE DI ISTRUZIONI
Innanzi tutto la ringraziamo per avere acquistato questa interfaccia
TASCAM iXZ per microfono e chitarra.
Prima di collegarla, e quindi usarla, la preghiamo di leggere a
fondo questo manuale per apprendere le modalità di impostazione
e collegamento nonché le molte utili e comode funzioni. Le
raccomandiamo inoltre di tenerne il manuale a portata di mano per
qualsiasi necessità futura.
È possibile scaricare questo manuale dal sito TEAC Global Site (https://
teac-global.com/).
IMPORTANTI NORME DI SICUREZZA
• Non usare l’apparecchio vicino all’acqua.
• Pulire solo con un panno asciutto.
• Riferirsi solo a personale qualificato. La riparazione è richiesta quanto
l’apparecchio è stato danneggiato in qualunque modo, come nel caso
che il cordone dell’alimentatore o la spina siano stati danneggiati,
l’apparecchio sia stato esposto a pioggia o umidità, non funzioni
correttamente o sia stato lasciato cadere.
• Non esporre questo apparecchio a gocciolamenti o schizzi.
• Non appoggiare alcun contenitore o vaso pieno d’acqua sopra
l’apparecchio.
• Non collocare l’interfaccia su uno strumento elettronico che genera
calore, ad esempio un amplificatore di potenza.
• Se si sposta l’interfaccia da un ambiente freddo a uno caldo, o
comunque la si usa dopo un repentino cambio di temperatura, vi
è il pericolo di formazione di condensa sui meccanismi interni e, di
conseguenza, che essa cessi di funzionare correttamente. Per impedire
che ciò accada, prima di usarla la si deve lasciare una o due ore nel
nuovo ambiente.
ªPer gli utenti europei
Smaltimento delle apparecchiature elettriche ed
elettroniche
(a) Tutte le apparecchiature elettriche ed elettroniche devono essere
smaltite separatamente dai rifiuti urbani mediante impianti di
raccolta designati dal governo o dalle autorità locali.
(b) Con lo smaltimento corretto di apparecchiature elettriche ed
elettroniche, si contribuisce a risparmiare preziose risorse ed evitare
potenziali effetti negativi sulla salute umana e l’ambiente.
(c) Gli impianti di smaltimento improprio di rifiuti elettrici ed elettronici
possono avere gravi conseguenze sull’ambiente e sulla salute
umana a causa della presenza di sostanze pericolose nelle
apparecchiature.
(d) Il simbolo RAEE (Rifiuti Apparecchiature Elettriche
ed Elettroniche), che mostra un bidone con ruote
barrato, indica che le apparecchiature elettriche
ed elettroniche devono essere raccolte e smaltite
separatamente dai rifiuti domestici.
(e) I centri di raccolta sono disponibili per gli utenti
finali. Per informazioni più dettagliate circa lo
smaltimento delle vecchie apparecchiature elettriche
ed elettroniche, contattare il negozio dove è stato acquistato
l’apparecchio o l’autorità locale.
Smaltimento delle pile e/o accumulatori
(a) I rifiuti di pile e/o accumulatori devono essere smaltiti
separatamente dai rifiuti urbani mediante impianti di raccolta
designati dal governo o dalle autorità locali.
(b) Lo smaltimento corretto dei rifiuti di pile e/o accumulatori
contribuisce a risparmiare preziose risorse ed evitare potenziali
effetti negativi sulla salute umana e l’ambiente.
(c) Lo smaltimento non corretto dei rifiuti di pile e/o accumulatori
possono avere gravi conseguenze sull’ambiente e sulla salute
umana a causa della presenza di sostanze pericolose in essi.
(d) Il simbolo RAEE, che mostra un contenitore con ruote
barrato, indica che le pile e/o accumulatori devono
essere raccolti e smaltiti separatamente dai rifiuti
domestici.
Se una pila o accumulatore contiene più dei valori
specificati di piombo (Pb), mercurio (Hg) e/o di
cadmio (Cd) come definito nella direttiva 2006/66/CE,
i simboli chimici di questi elementi verranno indicati
sotto il simbolo RAEE.
(E) I centri di raccolta sono disponibili per gli utenti finali. Per
informazioni più dettagliate circa lo smaltimento dei rifiuti di pile
e/o accumulatori, contattare il negozio dove è stato acquistato
l’apparecchio o l’autorità locale.
Pb, Hg, Cd
Descrizione dell’apparecchio
• Questo dispositivo è un’interfaccia per microfono/chitarra in grado
di registrare il suono utilizzando un software compatibile con un
ingresso microfonico collegando un dispositivo iOS o Android*.
* Richiesto un terminale a 4 poli (CTIA).
• È provvisto di un connettore XLR con alimentazione fantasma interna
e di una presa combo standard.
• È compatto e portatile e funziona con solo due batterie "AA" alcaline o
al nichel-metallo idruro.
Articoli inclusi con questo prodotto
Questo prodotto include i seguenti articoli.
Fare attenzione quando si apre la confezione per evitare di danneggiare
gli articoli.
Conservare il materiale di imballaggio per il trasporto in futuro.
Si prega di contattare il negozio dove è stata acquistata l’unità se uno di
questi articoli manca o è stato danneggiato durante il trasporto.
• iXZ ................................................................................................................................. x1
• Manuale di istruzioni (questo manuale) compresa la garanzia .............. x1
• Batterie alcaline AA .................................................................................................x2
Nomi e funzioni delle parti
Indicatore del microfono
Cavo con mini spinotto da quattro contatti
Regolatore di volume INPUT
Lato superiore
Lato anteriore
Lato posteriore
1 Cavo con mini spinotto da quattro contatti
Cavo lungo circa 500 mm provvisto di spinotto da 3,5 mm a quattro
contatti
Per il collegamento alla presa delle cuffie di un dispositivo iOS o
Android*.
Il suono monofonico di questo dispositivo viene emesso su un
dispositivo iOS o Android e l’audio in cuffia proveniente dal dispositivo
iOS o Android viene immesso in questo dispositivo.
* Richiesto un terminale a 4 poli (CTIA).
2 Indicatore del microfono
L'indicatore [ ] lampeggia quando s’imposta il selettore MODE (il
selettore dell'ingresso) nella posizione microfono.
Quando la sua intensità luminosa si riduce significa che è necessario
sostituire tutte le batterie con altrettante completamente cariche.
3 Selettore MODE
Seleziona il tipo d’ingresso desiderato.
In caso di collegamento della spina XLR di un microfono occorre
selezionare [ ] (microfono).
In caso di collegamento della spina standard di una chitarra occorre
selezionare [ ] (chitarra).
Quando non è necessario usarlo lo si deve lasciare nella posizione OFF.
4 Interruttore alimentazione fantasma
Va spostato nella posizione ON in caso d’uso di un microfono
elettrostatico.
Fornisce l’alimentazione elettrica al microfono elettrostatico collegato.
Quando lo s’imposta nella posizione ON sul suo lato posteriore è
visibile un segno rosso.
Quando non s'intende collegare un microfono elettrostatico deve
essere lasciato nella posizione OFF.
5 Regolatore di volume INPUT
Serve per regolare il livello di ingresso audio dal microfono collegato e
verrà emesso su un dispositivo iOS o Android.
6 Presa d’ingresso per microfono e chitarra
È la presa combo per il connettore XLR di un microfono e per la spina
monofonica standard di una chitarra.
Note
Si raccomanda di usare un microfono funzionante con corrente
fantasma inferiore a 5,0 mA.
(A questa presa non è possibile collegare i microfoni con spinotto da
6,3 mm.)
7 Presa per cuffie
È possibile monitorare l’uscita audio delle cuffie da un dispositivo iOS
o Android collegandosi alla presa delle cuffie.

