
Cordless Reciprocating Saw
CR 18DV
HANDLING INSTRUCTIONS
Read through carefully and understand these instructions before use.
304
Code No. C99118421
Printed in China
1
12
34
56
78
910
5
1
0
A
0
C
B
C
D
0
0
B
2
6
1
9
7
8
B
3
4
1
2

Cordless Reciprocating Saw
CR 18DV
HANDLING INSTRUCTIONS
Read through carefully and understand these instructions before use.
304
Code No. C99118421
Printed in China
1
12
34
56
78
910
5
1
0
A
0
C
B
C
D
0
0
B
2
6
1
9
7
8
B
3
4
1
2

2 3
20
11 12
13 14
15 16
17 18
19 20
I
H
L
J
M
0
G
21 22
23 24
25 26
27 28
29
O
F
E
K
J
M
Q
N
11.5 mm
3
mm
P
ABC D
1 318-481 1
2 318-483 1
3 318-478 1
4 318-479 1
5 959-149 2 D4.76
6 318-480 1
7 318-477 1
8 318-487 1
9 318-482 1
10 318-484 1
11 318-485 1
12 318-486 1
13 318-453 1
14 319-854 1
15 996-401 1
16 996-400 1
17 996-407 1 1AP-12
18 956-589 2
19 305-574 4 M5×16
20 319-853 1 “18”
21 319-866 1
22 951-039 5 M4×12
23 319-868 1
24 319-867 1
25 993-244 3 M4×12
26 319-849 1
27 690-1ZZ 1 6901ZZCMPS2L
28 319-848 1
29 954-789 1
30 996-399 1 M5×12
31 986-011 4 D5×30
32 319-844 1 “29”
33 319-875 2 M5×12
34 319-851 1 M6×16
35 319-856 1
36 319-874 1
37 983-567 1
38 996-405 1
39 983-541 1
40 983-560 1 H-7108
ABC D
41 319-852 1
42 319-850 1
43 670-514 1
44 600-1VV 1 6001VVCMPS2L
45 319-843 1
46 360-555 1 “43, 44, 45, 47”
47 608-VVM 1 608VVC2PS2L
48 319-788 1
49 319-846 1
50 960-108 2 D4×60
51 319-956 2
52 319-808 1
53 ———— 1
54 319-814 1
55 318-247 1
56 319-861 1
57 319-855 1
58 ———— 1
59 305-490 4 D5×30
60 319-790 1
61 304-035 2 D4×25
62 ———— 1
63 319-847 2
64 999-058 2
65 319-813 1
66 319-865 1
67 319-812 1
68 993-963 1 M3×12
69 319-894 1
70 1 319-871 1 EB2420
70 2 319-872 1 EB2430H
501 318-613 1 #103 150L P.14
502 319-875 1
503 319-815 1
504 UC24YFB 1

4
1
2
3
4
5
6
7
8
9
0
A
B
C
D
E
F
G
H
I
J
K
L
M
N
O
P
Q
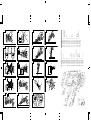
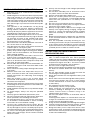
Rechargeable battery
Latch
Pull out
Insert
Handle
Push
Insert
Pilot lamp
Hole for connecting the rechargeable battery
Holder sleeve
Front cover
Blade
Plunger slit
Another blade
Semicircular slit
Machine oil
Hexagonal bar wrench
Base
Set screw 12 mm
Lock-off button
Free
Lock
Stroke
Wear limit
Nail of carbon brush
Protrusion of carbon brush
Contact portion outside brush tube

5
°
°
°
°
°

6
12 3
4
1
2
3
4

7
䡬
䡬
䡬
䡬
䡬
䡬

8
°
䡬
䡬
䡬
° °
° °

9
䡬
䡬
䡬
䡬
䡬

10
䡬
䡬
䡬
䡬
䡬
䡬
䡬
䡬
䡬

11

12
°

13
GENERAL OPERATIONAL PRECAUTIONS
1. Keep work area clean. Cluttered areas and benches
invite accidents.
2. Avoid dangerous environment. Don’t expose power
tools and charger to rain. Don’t use power tools
and charger in damp or wet locations. And keep
work area well lit. Never use power tools and charger
near flammable or explosive materials. Do not use
tool and charger in presence of flammable liquids
or gases.
3. The appliance is not intended for use by young
children or infirm persons without supervision.
Young children should be supervised to ensure
that they do not play with the appliance. All visitors
should be kept safe distance from work area.
4. Store idle tools and charger. When not in use, tools
and charger should be stored in dry, high or locked-
up place-out of reach of the children and infirm
persons. Store tools and charger in a place where
the temperature is less than 40°C.
5. Don’t force tool. It will do the job better and safer at
the rate for which it was designed.
6. Use right tool. Don’t force small tool or attachment
to do the job of a heavy duty tool.
7. Wear proper apparel. Do not wear loose clothing or
jewelry. They can be caught in moving parts. Rubber
gloves and non-skid footwears are recommended
when working outdoor.
8. Use eye protection with most tools. Also use face
or dust mask if cutting operation is dusty.
9. Don’t abuse cord. Never carry charger by cord or
yank it to disconnect from receptacle. Keep cord
from heat, oil and sharp edges.
10. Secure work. Use clamps or a vise to hold work. It’s
safer than using your hand and it frees both hands
to operate tool.
11. Don’t overreach. Keep proper footing and balance
at all times.
12. Maintain tools with care. Keep tools sharp at all
times, and clean for best and safest performance.
Follow instructions for lubricating and changing
accessories.
13. When the charger is not in use, or when being
maintained and inspected, disconnect its power
cord from the receptacle.
14. Remove chuck wrenches and wrenches. Form habit
of checking to see that wrenches are removed from
tool before turning it on.
15. Avoid accidental starting. Don’t carry tool with finger
on switch.
16. To avoid danger, always use only the specified
charger.
17. Use only genuine HITACHI replacement parts.
18. Do not use power tools for applications other than
those specified in the Handling Instructions.
19. To avoid personal injury, use only the accessories
or attachment recommended in these handling
instructions or in the HITACHI catalog.
20. Let only the authorized service center do the
repairing. The Manufacturer will not be responsible
for any damages or injuries caused by repair by the
unauthorized persons or by mishandling of the tool.
21. To ensure the designed operational integrity of
power tools and charger, do not remove installed
covers or screws.
22. Always use the charger at the voltage specified on
the nameplate.
23. Do not touch movable parts or accessories unless
the power source has been disconnected.
24. Always charge the battery before use.
25. Never use a battery other than that specified. Do
not connect a usual dry cell, a rechargeable battery
other than that specified or a car battery to the
power tool.
26. Do not use any transformer that has a booster.
27. Do not charge the battery from an engine electric
generator or DC power supply.
28. Always charge indoors. Because the charger and
battery heat slightly during charging, charge the
battery in a place not exposed to direct sunlight;
where the humidity is low and the ventilation is
good.
29. Before starting to work in a high place, pay attention
to the activities below to make sure there are no
people below.
30. Use the exploded assembly drawing on this
handling instructions only for authorized servicing.
31. If the supply cord is damaged, it must be replaced
by the manufacture or its service agent or a similarly
qualified person in order to avoid a hazard.
PRECAUTIONS ON USING CORDLESS
RECIPROCATING SAW
1. Always charge the battery at a temperature of 0–
40°C. A lower temperature than these specified
ranges will result in overcharging which will shorten
the battery life. The battery cannot be charged at a
temperature higher than 40°C. The most suitable
temperature for charging is that of 20–25°C.
2. Do not use the charger continuously.
When one charging is completed, leave the charger
for about 15 minutes before the next charging of
battery.
3. Do not allow foreign matter to enter the hole for
connecting the rechargeable battery.
4. Never disassemble the rechargeable battery and
charger.
5. Never short-circuit the rechargeable battery. Short-
chircuiting the battery will cause a great electric
current and overheat. It results in burn or damage
to the battery.
6. Do not dispose of the battery in fire.
If the battery is burnt, it may explode.
7. When using this unit continuously, the unit may
overheat, leading to damage in the motor and
switch. Please leave it without using it for
approximately 15 minutes.
8. Do not insert object into the air ventilation slots of
the charger.
Inserting metal objects or inflammables into the
charger air ventilation slots will result in electrical
shock hazard or damaged charger.
9. Using an exhausted battery will damage the charger.
10. Prior to cutting into walls, ceillings or floors, ensure
there are no electric cables or conduits inside.
11. Bring the battery to the shop from which it was
purchased as soon as the post-charging battery life
becomes too short for practical use. Do not dispose
of the exhausted battery.

14
SPECIFICATIONS
POWER TOOL
Model CR18DV
No-Load Speed 0 – 2100/min
Stroke 28 mm
Capacity Mild Steel Pipe: O.D. 90 mm
Vinyl Chloride Pipe: O.D. 90 mm
Wood: Depth 90 mm
Mild Steel Plate: Thickness 10 mm
Rechargeable battery EB1820 (2.0 Ah) Ni-Cd battery, 18 V
EB1830H (3.0 Ah) Ni-MH battery, 18 V
Weight 3.9 kg
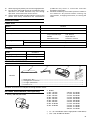
OPTIONAL ACCESSORIES (sold separately)
1. Battery (EB1820, EB1830H)
2. Blades
(1) No. 1 Blade (10) No. 101 Blade
(2) No. 2 Blade (11) No. 102 Blade
(3) No. 3 Blade (12) No. 103 Blade
(4) No. 4 Blade (13) No. 104 Blade
(5) No. 5 Blade (14) No. 105 Blade
(6) No. 8 Blade (15) No. 106 Blade
(7) No. 9 Blade (16) No. 107 Blade
(8) No. 95 Blade (17) No. 108 Blade
(9) No. 96 Blade (18) No. 121 Blade
(19) No. 131 Blade
(20) No. 132 Blade
䡬 (1) – (9) : HCS Blades (HCS : Highspeed Carbon Steel)
䡬 (10) – (20) : Bl-METAL Blades
CHARGER
Model UC24YFA
Charging voltage 7.2 – 24 V
Weight 0.6 kg
STANDARD ACCESSORIES
1 Blade (No. 103) .................................................................................................................1
2 Hexagonal bar wrench ..................................................................................................... 1
3 Charger (UC24YFA) .......................................................................................................... 1
4 Plastic case ........................................................................................................................ 1
12 3
4
Standard accessories are subject to change without notice.
CR18DV
12. Wear earplugs to protect your ears during operation.
13. Do not touch the blade during or immediately after
operation. The blade becomes very hot during
operation and could cause serious burns.
14. Always hold the body handle and front cover of the
power tool firmly. Otherwise the counterforce
produced may result in inaccurate and even
dangerous operation.
15. Remove the battery from tool or place the switch in
the locked or off position before making any
adjustments, changing accessories, or storing the
tools.

15
Refer to Table 4, 5 and 6 for use of the blades.
Optional accessories are subject to change without notice.
APPLICATIONS
䡬 Cutting pipe and angle steel.
䡬 Cutting various lumbers.
䡬 Cutting mild steel plates, aluminum plates, and copper
plates.
䡬 Cutting synthetic resins, such as phenol resin and
vinyl chloride.
For details refer to the section entitled “SELECTION OF
BLADES”.
BATTERY REMOVAL/INSTALLATION
CAUTION
Be sure to keep the switch turned off and the lock-off
button moved to right position (lock position). (See
Fig. 13)
1. Battery removal
Hold the handle tightly and push the battery latches
to remove the battery (see Figs. 1 and 2).
CAUTION
Never short-circuit the battery.
2. Battery installation
Insert the battery while observing its polarities (see
Fig. 2).
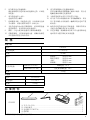
CHARGING
Before using the reciprocating saw, charge the battery
as follows.
1. Connect the charger’s power cord to a receptacle.
When the power cord is connected, the charger’s
pilot lamp will blink in red. (At 1-second intervals).
2. Insert the battery into the charger.
Firmly insert the battery into the charger till it contacts
the bottom of the charger and checking the polarities
as shown in Fig. 3.
3. Charging
When inserting a battery in the charger, charging will
commence and the pilot lamp will light up
continuously in red.
When the battery becomes fully recharged, the pilot
lamp will blink in red. (At 1-second intervals.) (See
Table 1)
(1) Pilot lamp indication
The indications of the pilot lamp are shown in
Table 1, according to the condition of the charger or
the rechargeable battery.
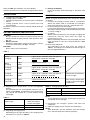
Table 1
Indications of the pilot lamp
Lights for 0.5 seconds. Does not light for
0.5 seconds. (off for 0.5 seconds)
Lights continuously
Lights for 0.5 seconds. Does not light for
0.5 seconds. (off for 0.5 seconds)
Lights for 0.1 seconds. Does not light for
0.1 seconds. (off for 0.1 seconds)
Lights continuously
Before
charging
While
charging
Charging
complete
Charging
impossible
Charging
impossible
Blinks
(RED)
Lights
(RED)
Blinks
(RED)
Flickers
(RED)
Lights
(GREEN)
Malfunction in the battery
or the charger
The battery temperature
is high, making recharging
impossible.
(2) Regarding the temperatures of the rechargeable
battery.
The temperatures for rechargeable batteries are as
shown in the table 2, and batteries that have become
hot should be cooled for a while before being
recharged.
Table 2
(3) Regarding recharging time
Depending on the type of battery, the charging time
will become as shown in Table 3.
Table 3 Charging time (At 20°C)
NOTE
The charging time may vary according to temperature
and power source voltage.
4. Disconnect the charger’s power cord from the
receptacle.
5. Hold the charger firmly and pull out the battery.
NOTE
After operation, pull out batteries from the charger
first, and then keep the batteries properly.
Battery type Recharging time
EB1820 Approx. 50 min.
EB1830H Approx. 70 min.
Temperatures at
Battery type which the battery
can be recharged
EB1820 –5°C – 60°C
EB1830H 0°C – 45°C

16
Regarding electric discharge in case of new
batteries, etc.
As the internal chemical substance of new batteries
and batteries that have not been used for an extended
period is not activated, the electric discharge might
be short when using them the first and second time.
This is a temporary phenomenon, and normal time
required for recharging will be restored by recharging
the batteries 2 – 3 times.
How to make the batteries perform longer.
(1) Recharge the batteries before they become completely
exhausted.
When you feel that the power of the tool becomes
weaker, stop using the tool and recharge its battery.
If you continue to use the tool and exhaust the electric
current, the battery may be damaged and its life will
become shorter.
(2) Avoid recharging at high temperatures.
A rechargeable battery will be hot immediately after
use. If such a battery is recharged immediately after
use, its internal chemical substance will deteriorate,
and the battery life will be shortened. Leave the battery
and recharge it after it has been cooled for a while.
CAUTION
䡬 If the battery is charged while it is heated because it
has been left for a long time in a location subject to
direct sunlight or because the batetery has just been
used, the pilot lamp of the charger lights up green. In
such a case, first let the battery cool, then start
charging.
䡬 When the pilot lamp flickers in red quickly (at 0.2-
second intervals), check for and take out any foreign
objects in the charger’s battery installation hole. If
there are no foreign objects, it is probable that the
battery or charger is malfunctioning. Take it to your
authorized Service Center.
䡬 Since the built-in micro computer takes about 3
seconds to confirm that the battery being charged
with UC24YFA is taken out, wait for a minimum of 3
seconds before reinserting it to continue charging. If
the battery is reinserted within 3 seconds, the battery
may not be properly charged.
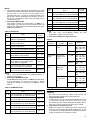
PRIOR TO OPERATION
1. Mounting the blade
This unit employs a detachable mechanism that
enables mounting and removal of saw blades without
the use of a wrench or other tools.
(1) Turn on and off the switching trigger several times so
that the holder sleeve can jump out of the front cover
completely. Thereafter, turn off the switch and remove
the battery. (Fig. 4)
CAUTION
Be absolutely sure to keep the switch turned off and
the the battery removed to prevent any accident.
(2) Turn the holder sleeve in the direction of the arrow
mark shown in Fig. 5 marked on the holder sleeve. If
you turn the holder sleeve halfway you will be able to
secure it automatically. (Fig. 5)
(3) Insert the saw blade all the way into the small slit of
the plunger tip. You can mount this blade either in
the upward or downward direction. (Fig. 6,
Fig. 7)
(4) Pull the holder sleeve back slightly in the direction of
the arrow mark shown in Fig. 8 (in the direction
opposite to the arrow marked on the holder sleeve).
When you do this, the spring force will return the
holder sleeve to the correct position automatically.
There is no need to fasten the holder sleeve at this
time. (Fig. 8)
(5) Pull the back of the saw blade two or three times by
hand and check that the blade is securely mounted.
When pulling the blade, you will know it is properly
mounted if it clicks and the holder sleeve moves
slightly. (Fig. 9)
CAUTION
When pulling the saw blade, be absolutely sure to
pull it from the back. Pulling other parts of the blade
will result in an injury.
2. Dismounting the blade
(1) Turn on and off the switching trigger several times so
that the holder sleeve can jump out of the front cover
completely. Thereafter, turn off the switch and remove
the battery. (Fig. 4)
CAUTION
Be absolutely sure to keep the switch turned off and
the battery removed to prevent any accident.
(2) After you have turned the holder sleeve in the
direction of the arrow mark shown in
Fig. 5 and secured it, turn the blade so it faces
downward. The blade should fall out by itself. If the
blade doesn’t fall out, pull it out by hand.
CAUTION
Never touch the saw blade immediately after use.
The metal is hot and can easily burn your skin.
WHEN THE BLADE IS BROKEN
Even when the saw blade is broken and remains
inside the small slit of the plunger, it should fall out if
you turn the holder sleeve in the direction of the
arrow mark, secure the holder sleeve, and face the
blade downward. If it doesn’t fall out itself, take it out
using the procedures explained below.
(1) If a part of the broken saw blade is sticking out of the
small slit of the plunger, pull out the protruding part
and take the blade out.
(2) If the broken saw blade is hidden inside the small slit,
hook the broken blade using a tip of another saw
blade and take it out. (Fig. 10)
MAINTENANCE AND INSPECTION OF SAW BLADE
MOUNT
(1) After use, blow away sawdust, earth, sand, moisture,
etc., with air or brush them away with a brush, etc., to
ensure that the blade mount can function smoothly.
(2) Periodically lubricate the saw blade mount with
machine oil through the small slit at a state where the
holder sleeve is turned in the direction of the arrow
mark shown in Fig. 5. (Fig. 11)
NOTE:
䡬 If the saw blade mount is used without proper cleaning
and lubrication, the rotation of the holder sleeve may
be hampered by sawdust and particles of dust,
disabling you to remove the saw blade with your
fingers.
In such a case, hold the periphery of the holder
sleeve lightly using a pair of pliers and the like, and
turn the holder sleeve to left and right little by little.

17
After the saw blade has been successfully removed,
be absolutely sure to clean it up with air, etc., carry
out proper lubrication, and then check and see if the
saw blade mount can function smoothly.
3. Moving the base
Loosen the set screw and move the base forward, as
shown in Fig. 12. Tighten the set screw slightly, ensure
the base does not move back and forth, and firmly
tighten the set screw. Ensure that the base does not
contact the blade.
4. Confirm that the battery is mounted correctly.
HOW TO USE
CAUTION
䡬 Do not carry tools with your finger on the switch. A
sudden startup can result in an unexpected injury.
䡬 Be careful not to let sawdust, earth, moisture, etc.,
enter the inside of the machine through the plunger
section during operation. If sawdust and the like
accumulate in the plunger section, always clean it
before use. (refer to Fig. 4)
䡬 Do not remove the front cover.
Be sure to hold the body from the top of the front
cover. (refer to Fig. 4)
䡬 During use, press the base against the material while
cutting.
Vibration can damage the saw blade if the base is not
pressed firmly against the workpiece.
Furthermore, a tip of the saw blade can sometimes
contact the inner wall of the pipe, damaging the saw
blade.
䡬 Select a saw blade of the most appropriate length.
Ideally, the length protruding from the base of the
saw blade after subtracting the stroke quantity should
be larger than the material (see Fig. 14 and
Fig. 16).
If you cut a large pipe, large block of wood, etc., that
exceeds the cutting capacity of a blade; there is a risk
that the blade may contact with the inner wall of the
pipe, wood, etc., resulting in damage. (Fig. 15, Fig.
17)
1. Switch operation
(1) Lock-off button
The tool is equipped with a lock-off button. To acivate
the trigger lock, move the button to the right positon.
Move the button to the left to operate the tool. (Fig.
13)
Always lock the switch when carrying or storing the
tool eliminate unintentional starting.
(2) Trigger switch
This tool is equipped with a variable speed controlled
trigger switch. The tool can be turned "ON" or "OFF"
by squeezing or releasing the trigger. The blade
plunger stroke rate can be adjusted from the minimum
to maximum nameplate stroke rate by the pressure
you apply to the trigger. Apply more pressure to
increase the speed and release pressure to decrease
speed.
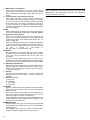
2. Cutting metallic materials
CAUTION
䡬 Press the base firmly against the workpiece.
䡬 Never apply any unreasonable force to the saw blade
when cutting. Doing so can easily break the blade.
䡬 The motor can be locked sometimes, depending on
the combination of the material to be cut and the
blade. Whenever the motor gets locked, switch it off
immediately.
(1) Fasten a workpiece firmly before operation. (Fig. 18)
(2) When cutting metallic materials, use proper machine
oil (turbine oil, etc.). When not using liquid machine
oil, apply grease over the workpiece.
CAUTION
The service life of the saw blade will be drastically
shortened if you don’t use machine oil.
3. Cutting lumber
When cutting lumber, make sure that the workpiece
is fastened firmly before beginning. (Fig. 19)
CAUTION
䡬 Never apply any unreasonable force to the saw blade
when cutting. Also remember to press the base
against the lumber firmly.
4. Sawing curved lines
We recommend that you use the BI-METAL blade
mentioned in Table 5 (Page 18) for the saw blade
since it is tough and hardly breaks.
CAUTION
Delay the feed speed when cutting the material into
small circular arcs. An unreasonably fast feed may
break the blade.
5. Plunge cutting
With this tool, you can perform plunge cutting on
plywood panels and thin board materials. You can
carry out pocket cutting quite easily with the saw
blade installed in reverse as illustrated in Fig. 21, Fig.
23, and Fig. 25. Use the saw blade that is as short and
thick as possible. We recommend for this purpose
that you use BI-METAL Blade No. 132 mentioned in
Page 18, Table 5. Be sure to use caution during the
cutting operation and observe the following
procedures.
(1) Press the lower part (or the upper part) of the base
against the material. Pull the switch trigger while
keeping the tip of the saw blade apart from the
material. (Fig. 20, Fig. 21)
(2) Raise the handle slowly and cut in with the saw blade
little by little. (Fig. 22, Fig. 23)
(3) Hold the body firmly until the saw blade completely
cuts into the material. (Fig. 24, Fig. 25)
CAUTION
䡬 Avoid plunge cutting for metallic materials. This can
easily damage the blade.
䡬 Never pull the switch trigger while the tip of the saw
blade tip is pressed against the material. If you do so,
the blade can easily be damaged when it collides
with the material.
䡬 Make absolutely sure that you cut slowly while holding
the body firmly. If you apply any unreasonable force
to the saw blade during the cutting operation, the
blade can easily be damaged.
NOTE
The use of the battery EB1830H in a cold condition
(below 0 degree Centigrade) can sometimes result in
the weakened cutting torque and reduced amount of
work. This, however, is a temporary phenomenon,
and returns to normal when the battery warms up.
SELECTION OF BLADES
To ensure maximum operating efficiency and results, it
is very important to select the appropriate blade best
suited to the type and thickness of the material to be cut.

18
NOTE:
䡬 Dimensions of the workpiece mentioned in the table
represent the dimensions when the mounting position
of the base is set nearest to the body of the
reciprocating saw. Caution must be exercised since
dimensions of the workpiece will become smaller if
the base is mounted far away from the body of the
reciprocating saw.
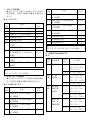
1. Selection of HCS blades
The blade number of HCS blades in Table 4 is
engraved in the vicinity of the mounting position of
each blade. Select appropriate blades by referring to
Table 4 and 6 below.
Table 4: HCS blades
NOTE
No. 1 – No. 96 HCS blades are sold separately as
optional accessories.
2. Selection of BI-METAL blades
The BI-METAL blade numbers in Table 5 are described
on the packages of special accessories. Select
appropriate blades by referring to Table 5 and 6
below.
Table 5: Bl-METAL blades
NOTE
Nos. 101 – No. 132 Bl-METAL blades are sold
separately as optional accessories.
3. Selection of blades for other materials
Table 6
MAINTENANCE AND INSPECTION
CAUTION
Be sure to turned off the switch and remove the
battery before maintenance and inspection.
1. Inspecting the blade
Continued use of a dull or damaged blade will result
in reduced cutting efficiency and may cause
overloading of the motor. Replace the blade with a
new one as soon as excessive abrasion is noted.
2. Inspecting the mounting screws:
Regularly inspect all mounting screws and ensure
that they are properly tightened. Should any of the
screws be loose, retighten them immediately. Failure
to do so could result in serious hazard.
Blade Thickness
No.
Uses
(mm)
No. 1 For cutting steel pipe less than
100 mm in diameter
2.5 – 6
No. 2 For cutting steel pipe less than
30 mm in diameter
2.5 – 6
No. 3 For cutting steel pipe less than
30 mm in diameter
Below 3.5
No. 4 For cutting and roughing lumber 50 – 70
No. 5 For cutting and roughing lumber Below 30
No. 8 For cutting vinyl chloride pipe less
than 100 mm in diameter
2.5 – 15
For cutting and roughing lumber Below 100
No. 9 For cutting mild steel pipe less
than 100 mm in diameter when 2.5 – 6
used with cut off guide
No. 95 For cutting stainless steel pipe
less than 100 mm in diameter
Below 2.5
No. 96 For cutting stainless steel pipe
less than 30 mm in diameter
Below 2.5
Blade Thickness
No.
Uses
(mm)
No. 101
For cutting steel and stainless pipes
less than 60 mm in outer diameter
2.5 – 6
No. 102
For cutting steel and stainless pipes
less than 100 mm in outer diameter
2.5 – 6
No. 103
For cutting steel and stainless pipes
less than 60 mm in outer diameter
2.5 – 6
No. 104
For cutting steel and stainless pipes
less than 100 mm in outer diameter
2.5 – 6
No. 105
For cutting steel and stainless pipes
less than 60 mm in outer diameter
2.5 – 6
Blade Thickness
No.
Uses
(mm)
No. 106
For cutting steel and stainless pipes
less than 100 mm in outer diameter
2.5 – 6
No. 107
For cutting steel and stainless pipes
less than 60 mm in outer diameter
Below 3.5
No. 108
For cutting steel and stainless pipes
less than 100 mm in outer diameter
Below 3.5
No. 121
For cutting and roughing lumber 100
No. 131
For cutting and roughing lumber 100
No. 132
For cutting and roughing lumber 100
Meterial Material Thickness
Blade No.
to be cut quality (mm)
Iron plate Mild steel 2.5 – 10 No. 1, 2, 101,
plate 102, 103, 104,
105, 106, 131
Below 3.5 No. 3, 107,
108
Nonferrous Aluminium, 5 – 20 No. 1, 2, 101,
metal Copper and 102, 103, 104,
Brass 105, 106, 131,
132
Below 5 No. 3, 107,
108
Systhetic Phenol resin, 10 – 50 No. 1, 2, 4,
resin Melamine 101, 102, 103,
resin, etc. 104, 131, 132
5 – 30 No. 3, 5, 8,
105, 106, 107,
108
Vinyl chloride,
10 – 60 No. 1, 2, 4,
Acrylic resin, 101, 102, 103,
etc. 104, 131, 132
5 – 30 No. 3, 5, 8,
105, 106, 107,
108

19
3. Maintenance of the motor
The motor unit winding is the very “heart” of the
power tool. Exercise due care to ensure the winding
does not become damaged and/or wet with oil or
water.
4. Inspecting the carbon brushes (Fig. 26)
The motor employs carbon brushes which are
consumable parts. Since and excessively worn carbon
brush can result in motor trouble, replace the carbon
brush with new ones when it becomes worn to or
near the "wear limit". In addition, always keep carbon
brushes clean and ensure that they slide freely whthin
the brush holders
NOTE:
When replacing the carbon brush with a new one, be
sure to use the Hitachi Carbon Brush Code No. 999058.
5. Replacing carbon brushes
Take out the carbon brush by first removing the
brush cap and then hooking the protrusion of the
carbon brush with a flat head screw driver, etc., as
shown in Fig. 28.
When installing the carbon brush, choose the direction
so that the nail of the carbon brush agrees with the
contact portion outside the brush tube. Then push it
in with a finger as illustrated in
Fig. 29. Lastly, install the brush cap.
CAUTION:
Be absolutely sure to insert the nail of the carbon
brush into the contact portion outside the brush tube.
(You can insert whichever one of the two nails
provided.)
Caution must be exercised since any error in this
operation can result in the deformed nail of the carbon
brush and may cause motor trouble at an early stage.
6. Cleaning of the outside
When the reciprocating saw is stained, wipe with a
soft dry cloth or a cloth moistened with soapy water.
Do not use chloric solvents, gasoline or paint thinner,
as they melt plastics.
7. Storage
Store the reciprocating saw in a place in which the
temperature is less than 40°C, and out of reach of
children.
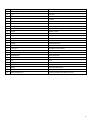
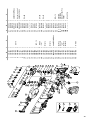
8. Service parts list
A : Item No.
B : Code No.
C : No. Used
D : Remarks
CAUTION:
Repair, modification and inspection of Hitachi Power
Tools must be carried out by an Hitachi Authorized
Service Center.
This Parts List will be helpful if presented with the
tool to the Hitachi Authorized Service Center when
requesting repair or other maintenance.
In the operation and maintenance of power tools, the
safety regulations and standards prescribed in each
country must be observed.
MODIFICATIONS:
Hitachi Power Tools are constantly being improved
and modified to incorporate the latest technological
advancements.
Accordingly, some parts (i.e. code numbers and/or
design) may be changed without prior notice.
NOTE
Due to HITACHI’s continuing program of research and
development, the specifications herein are subject to
change without prior notice.
ページが読み込まれています...
ページが読み込まれています...
-
 1
1
-
 2
2
-
 3
3
-
 4
4
-
 5
5
-
 6
6
-
 7
7
-
 8
8
-
 9
9
-
 10
10
-
 11
11
-
 12
12
-
 13
13
-
 14
14
-
 15
15
-
 16
16
-
 17
17
-
 18
18
-
 19
19
-
 20
20
-
 21
21
-
 22
22


Hikoki CR 18DV ユーザーマニュアル
- カテゴリー
- パワーツール
- タイプ
- ユーザーマニュアル
他の言語で
- English: Hikoki CR 18DV User manual
関連論文
その他のドキュメント
-
Hitachi CR 18DMR Handling Instructions Manual
-
Bosch GSA 120 Professional ユーザーマニュアル
-
Nero 330008 ユーザーマニュアル
-
Roland TD-30KV 取扱説明書
-
-
-
Roland SRX-08 取扱説明書
-
-
3M 98044051516 データシート
-