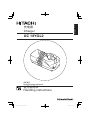
Hitachi UC 18YGL2 Handling Instructions Manual
- カテゴリー
- パワーツール
- タイプ
- Handling Instructions Manual

English
Handling instructions
Charger
UC 18YGL2
Keep for future reference

2

3

4
○

5

6

7

8
○
○

9

10
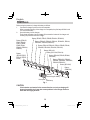
1 329-634 1
2 –––––––– 1
3 329-637 1 230V-240V
“4, 5”
4 326-285 7
5 329-635 1
6 326-358 3 D3×8
7 –––––––– 1
2
1
3
4
5
6
7

English
11
GENERAL OPERATIONAL PRECAUTIONS
1. Keep work area clean. Cluttered areas and benches invite accidents.
2. Avoid dangerous environment. Don’t expose power tools and charger to rain. Don’t
use power tools and charger in damp or wet locations. And keep work area well lit.
Never use power tools and charger near fl ammable or explosive materials.
Do not use tool and charger in presence of fl ammable liquids or gases.
3. The appliance is not intended for use by young children or infi rm persons without
supervision. Young children should be supervised to ensure that they do not play
with the appliance. All visitors should be kept safe distance from work area.
4. Store idle tools and charger. When not in use, tools and charger should be stored
in dry, high or locked-up place — out of reach of children. Store tools and charger
in a place in which the temperature is less than 40°C.
5. Don’t abuse cord. Never carry charger by cord or yank it to disconnect from
receptacle. Keep cord from heat, oil and sharp edges.
6. When the charger is not in use or when being maintained and inspected,
disconnect the power cord of the charger from the receptacle.
7. To avoid danger, always use only the specifi ed charger.
8. Use only genuine HITACHI replacement parts.
9. Do not use power tools and charger for applications other than those specifi ed in
the Handling Instructions.
10. To avoid personal injury, use only the accessories or attachment recommended in
these handling instructions or in the HITACHI catalog.
11. If the supply cord is damaged, it must be replaced by the manufacture or its
service agent or a similarly qualifi ed person in order to avoid a hazard.
Let only the authorized service center do the repairing. The Manufacture will not
be responsible for any damages or injuries caused by repair by the unauthorized
persons or by mishandling of the tool.
12. To ensure the designed operational integrity of power tools and charger, do not
remove installed covers or screws.
13. Always use the charger at the voltage specifi ed on the nameplate.
14. Always charge the battery before use.
15. Never use a battery other than that specifi ed. Do not connect a usual dry cell, a
battery other than that specifi ed or a car battery to the power tool.
CONTENTS
GENERAL OPERATIONAL PRECAUTIONS ...............................................11
PRECAUTIONS FOR CHARGER .................................................................12
SYMBOL .......................................................................................................12
SPECIFICATION ..........................................................................................13
APPLICATION ..............................................................................................13
CHARGING ..................................................................................................14
MAINTENANCE AND INSPECTION ............................................................ 17
SERVICE PARTS LIST .................................................................................19

English
12
16. Do not use a transformer containing a booster.
17. Do not charge the battery from an engine electric generator or DC power supply.
18. Always charge indoors. Because the charger and battery heat slightly during
charging, charge the battery in a place not exposed to direct sunlight; where the
humidity is low and the ventilation is good.
19. Use the exploded assembly drawing on this handling instructions only for
authorized servicing.
PRECAUTIONS FOR CHARGER
1. Always charge the battery at an ambient temperature of 0–40°C. A temperature of
less than 0°C will result in over charging which is dangerous. The battery cannot
be charged at a temperature greater than 40°C.
The most suitable temperature for charging is that of 20–25°C.
2. Do not use the charger continuously.
When one charging is completed, leave the charger for about 15 minutes before
the next charging of battery.
3. Do not allow foreign matter to enter the hole for connecting the battery.
4. Never disassemble the battery or charger.
5. Never short-circuit the battery.
Short-circuiting the battery will cause a great electric current and overheat. It
results in burn or damage to the battery.
6. Do not dispose of the battery in fi re.
If the battery is burnt, it may explode.
7. Using an exhausted battery will damage the charger.
8. Bring the battery to the shop from which it was purchased as soon as the post-
charging battery life becomes too short for practical use. Do not dispose of the
exhausted battery.
9. Do not insert objects into the air ventilation slots of the charger.
Inserting metal objects or fl ammable into the charger air ventilation slots will result
in an electrical shock hazard or damage to the charger.
SYMBOL
WARNING
The following show symbols used for the machine. Be sure that you understand their
meaning before use.
Read all safety warnings and all instructions.

English
13
SPECIFICATION
CHARGER
Charging time Approx. 35 – 90 minutes
Charging voltage 7.2 – 18 V
Weight 0.4 kg
APPLICATION
For charging the HITACHI BATTERY
○
EB712S, EB7S, EB714S, FEB7S, EB7B,
EB912S, EB9S, EB914S, EB914, FEB9S, EB9B, EB924, EB926H, EB930H, EB933X,
EB1212S, EB12S, EB1214S, EB1214L, FEB12S, EB12B, EB1220BL, EB1224, EB1226H,
EB1230H, EB1230HL, EB1230X, EB1233X,
EB1412S, EB1414S, EB1414, EB14B, EB1424, EB1426H, EB1430H, EB1430X, EB1433X,
BCL1415, BCL1430, EBL1430,
EB1812S, EB1814SL, EB18B, EB1820, EB1820L, EB1824L, EB1826HL, EB1830H,
EB1830HL, EB1830X, EB1833X, BCL1815, EBM1830

English
14
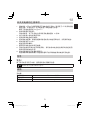
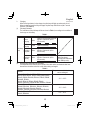
CHARGING
Before using the power tool, charge the battery as follows.
1. Connect the charger’s power cord to the receptacle.
When connecting the plug of the charger to a receptacle, the pilot lamp will blink in red
(At 1-second intervals).
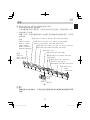
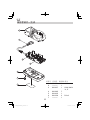
2. Insert the battery into the charger.
Firmly insert the battery into the charger till it contacts the bottom of the charger and
checking the polarities as shown in Fig. 1.
Battery
(EB712S, EB7S,
EB714S, FEB7S,
EB7B)
Battery (EB912S,
EB9S, EB914S ,
EB914, FEB9S,
EB9B, EB924,
EB926H, EB930H,
EB933X)
Battery (EB12S, FEB12S, EB12B, EB1226H, EB1230H)
Battery (EB1212S, EB1214S, EB1214L, EB1220BL, EB1224,
EB1230HL, EB1230X, EB1233X)
Battery (EB1412S, EB1414S, EB1414, EB14B, EB1424,
EB1426H, EB1430H, EB1430X, EB1433X)
Battery (BCL1415)
Battery (BCL1430, EBL1430)
Battery (EB1812S, EB18B, EB1820,
EB1830H)
Battery (EB1814SL, EB1820L,
EB1824L, EB1826HL, EB1830HL,
EB1830X, EB1833X)
Battery (BCL1815)
Battery
(EBM1830)
Hole for
connecting the battery
Pilot lamp
Nameplate
Fig. 1
CAUTION
If the batteries are inserted in the reverse direction, not only recharging will
become impossible, but it may also cause problems in the charger such as a
deformed recharging terminal.

English
15
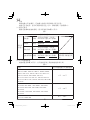
3. Charging
When inserting a battery in the charger, the pilot lamp will light up continuously in red.
When the battery becomes fully recharged, the pilot lamp will blink in red (At 1-second
intervals). (See Table 1)
(1) Pilot lamp indication
The indications of the pilot lamp will be as shown in Table 1, according to the condition of
the charger or the battery.
Table 1
Indications of the pilot lamp
Pilot lamp
(red)
Before
charging
Blinks
Lights for 0.5 seconds. Does not
light for 0.5 seconds. (off for
0.5 seconds)
While
charging
Lights
Lights continuously
Charging
complete
Blinks
Lights for 0.5 seconds. Does not
light for 0.5 seconds. (off for
0.5 seconds)
Overheat
standby
Blinks
Lights for 1 second. Does not
light for 0.5 seconds. (off for
0.5 seconds)
Battery overheated.
Unable to charge.
(Charging will commence
when battery cools)
(2) Regarding the temperature of the battery.
The temperatures for batteries are as shown in the table below, and batteries that have
become hot should be cooled for a while before being recharged.
Table 2
Batteries
Temperatures at which the battery
can be recharged
EB712S, EB7S, EB714S, FEB7S, EB7B,
EB912S, EB9S, EB914S, EB914, FEB9S, EB9B, EB924,
EB1212S, EB12S, EB1214S, EB1214L, FEB12S, EB12B,
EB1220BL, EB1224,
EB1412S, EB1414S, EB1414, EB14B, EB1424,
EB1812S, EB1814SL, EB18B, EB1820, EB1820L, EB1824L
–5°C — 55°C
EB926H, EB930H, EB933X,
EB1226H, EB1230H, EB1230HL, EB1230X, EB1233X,
EB1426H, EB1430H, EB1430X, EB1433X,
EB1826HL, EB1830H, EB1830HL, EB1830X, EB1833X
–5°C — 50°C
BCL1415, BCL1430, EBL1430,
BCL1815, EBM1830
0°C — 50°C

English
16
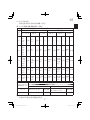
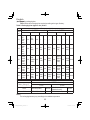
(3) Regarding recharging time
Table 3 shows the recharging time required according to the type of battery.
Table 3 Recharging time (approx. min.) at 20°C
Battery capacity (Ah)
Battery
Voltage
(V)
Ni-Cd BATTERY Ni-MH BATTERY
1.2–1.4 Ah 2.0 Ah 2.4 Ah 2.6 Ah 3.0 Ah 3.3 Ah
7.2 V
EB712S
EB7S
EB714S
FEB7S
(6 cells)
35 min.
EB7B
(6 cells)
60 min.
————————
9.6 V
EB912S
EB914S
EB9S
EB914
FEB9S
(8 cells)
35 min.
EB9B
(8 cells)
60 min.
EB924
(8 cells)
70 min.
EB926H
(8 cells)
80 min.
EB930H
(8 cells)
90 min.
EB933X
(8 cells)
90 min.
12 V
EB12S
EB1212S
EB1214S
EB1214L
FEB12S
(10 cells)
35 min.
EB12B
EB1220BL
(10 cells)
60 min.
EB1224
(10 cells)
70 min.
EB1226H
(10 cells)
80 min.
EB1230H
EB1230HL
EB1230X
(10 cells)
90 min.
EB1233X
(10 cells)
90 min.
14.4 V
EB1412S
EB1414S
EB1414
(12 cells)
35 min.
EB14B
(12 cells)
60 min.
EB1424
(12 cells)
70 min.
EB1426H
(12 cells)
80 min.
EB1430H
EB1430X
(12 cells)
90 min.
EB1433X
(12 cells)
90 min.
18 V
EB1812S
EB1814SL
(15 cells)
35 min.
EB18B
EB1820L
EB1820
(15 cells)
60 min.
EB1824L
(15 cells)
70 min.
EB1826HL
(15 cells)
80 min.
EB1830H
EB1830HL
EB1830X
(15 cells)
90 min.
EB1833X
(15 cells)
90 min.
Battery capacity (Ah)
Battery Voltage (V)
Li-ion BATTERY
1.5 Ah 3.0 Ah
14.4 V BCL1415 (4 cells) 40 min.
BCL1430 (8 cells)
EBL1430 (4 cells)
90 min.
18 V BCL1815 (5 cells) 40 min. EBM1830 (10 cells) 90 min.
NOTE
The recharging time may vary according to the ambient temperature.

English
17
4. Disconnect the charger’s power cord from the receptacle.
5. Hold the charger fi rmly and pull out the battery.
NOTE
Be sure to pull out the battery from the charger after use, and then keep it.
Regarding electric discharge in case of new batteries, etc.
As the internal chemical substance of new batteries and batteries that have not been used
for an extended period is not activated, the electric discharge might be low when using
them the fi rst and second time. This is a temporary phenomenon, and normal time required
for recharging will be restored by recharging the batteries 2 ― 3 times.
How to make the batteries perform longer.
(1) Recharge the batteries before they become completely exhausted.
When you feel that the power of the tool becomes weaker, stop using the tool and recharge
its battery. If you continue to use the tool and exhaust the electric current, the battery may
be damaged and its life will become shorter.
(2) Avoid recharging at high temperatures.
A battery will be hot immediately after use. If such a battery is recharged immediately after
use, its internal chemical substance will deteriorate, and the battery life will be shortened.
Leave the battery and recharge it after it has cooled for a while.
CAUTION
○
If the battery is charged while it is heated because it has been left for a long time
in a location subject to direct sunlight or because the battery has just been used,
the pilot lamp of the charger lights for 1 second, does not light for 0.5 seconds (off
for 0.5 seconds).
In such a case, fi rst let the battery cool, then start charging.
○
Since the built-in micro computer takes about 3 seconds to confi rm that the
battery being charged with UC18YGL2 is taken out, wait for a minimum of
3 seconds before reinserting it to continue charging. If the battery is reinserted
within 3 seconds, the battery may not be properly charged.
MAINTENANCE AND INSPECTION
1. Inspecting the mounting screws:
Regularly inspect all mounting screws and ensure that they are properly tightened. Should
any of the screws be loose, retighten them immediately. Failure to do so could result in
serious hazard.
2. Cleaning of the charger
When the charger is stained, wipe with a soft dry cloth or a cloth moistened with soapy
water. Do not use chloric solvents, gasoline or paint thinner, for they melt plastics.
3. Store idle charger
When not in use, the charger should be stored in dry, high or locked-up place — out of
reach of children.

English
18
4. Service parts list
CAUTION
Repair, modifi cation and inspection of Hitachi Power Tools must be carried out
by a Hitachi Authorized Service Center. This Parts List will be helpful if presented
with the tool to the Hitachi Authorized Service Center when requesting repair or
other maintenance. In the operation and maintenance of power tools, the safety
regulations and standards prescribed in each country must be observed.

English
19
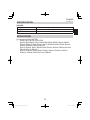
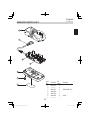
SERVICE PARTS LIST
2
1
3
4
5
6
7
Item
No.
Code No.
No.
Used
Remarks
1329-634 1
2 –––––––– 1
3 329-637 1 230V-240V “4, 5”
4326-285 7
5329-635 1
6326-358 3 D3×8
7 –––––––– 1

-
 1
1
-
 2
2
-
 3
3
-
 4
4
-
 5
5
-
 6
6
-
 7
7
-
 8
8
-
 9
9
-
 10
10
-
 11
11
-
 12
12
-
 13
13
-
 14
14
-
 15
15
-
 16
16
-
 17
17
-
 18
18
-
 19
19
-
 20
20


Hitachi UC 18YGL2 Handling Instructions Manual
- カテゴリー
- パワーツール
- タイプ
- Handling Instructions Manual
他の言語で
- English: Hitachi UC 18YGL2