
Copyright © 2006-2010, 3Com Corporation. All Rights Reserved. 3Com and the 3Com logo are registered trademarks and VCX is trademark of 3Com Corporation. 3101A0AV AP100-20091203
3COM
®
350x SERIES IP PHONES QUICK START
3503 IP PHONE Requires VCX 9.5 or higher
3502 IP PHONE Requires VCX 9.5 or higher
3501 IP PHONE Requires VCX 9.5 or higher
3500 IP PHONE Requires VCX 9.5 or higher
3500B IP PHONE Requires VCX 9.5 or higher
WARNING: 3Com 350x Series IP Phones are intended for connection only on Local Area Network. Do not
connect them to any networking device outside of the building in which the IP Phones are located.
Packing List
z 3Com 350x Series IP Phone
z Phone stand
z Phone handset and handset cord
z Ethernet cable
z Warranty sheet
z Compliance and Satety Manual
Phone Installers This document explains how to connect and activate
a 3Com 350x Series IP Phones to a 3Com VCX™ IP Telephony
Solution. For complete installation information, see the related
installation guide for your phone system.
Phone Users For information on using your IP Phones, see the
appropriate Quick Reference Guide or IP Phones Guide. If your system
uses a third-party messaging application, refer to that application’s
guide.
Instructions for Use with the 3Com VCX™ IP Telephony Solution
In a VCX environment, the system administrator performs configuration tasks before the system recognizes a new IP Phone
and allows user login. After the administrator provides you with an extension number and a password, you can login to the IP
Phone. On the top of the display panel on the IP Phone shows the date, time, extension number, and login status icon.
z For the 3Com 3503 IP phone, indicates that you are logged off, indicates that you are logged in;
z For other 3Com 350x series IP phones, indicates that you are logged off, indicates that you are logged in.
If you are logged off, you can use these steps to log in:
1 Press Menu Button + 4.
2 Enter your VCX password at the prompt and then press #.If the login fails, contact the system administrator.
Initializing your Voice Mailbox
Initializing the voice mailbox enables you to retrieve and manage your voice mail. To initialize the voice mailbox, press the
Message button, identified by this icon:
. Follow the system prompts to change the default personal password and to
create a name announcement and a personal greeting.
These instructions might be superseded by your organization’s network configuration and operating
practices. See your system administrator or the relevant installation guide for more information about initial
phone configuration.
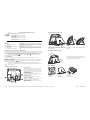
Connecting the IP Phones (3500 shown)
1 Power connector
For optional AC power adapter. 3Com 350x Series IP
Phones can operate with either an AC power adapter or
power received through the Ethernet connection. See
3Com 350x Series IP Phones Compliance and Safety
Manual for connection details.
2 Handset connector
Connect one end of the handset cable to the handset and
the other end to the handset connector.
3 Headset connector
Optionally, connect a headset to the IP Phone.
4 Network port connector
Optionally, use an Ethernet cable to connect your
computer or an Attendant Console to the network.
5 Network connector
Use an Ethernet cable to connect the IP Phone to the
LAN.
Connecting the phone Stand (3503 shown)
Connect the cables first (route the network cables
through the stand), and then mount the stand to the rear
panel of the IP Phone.
The phone stand can support two different heights (55 and
35 degrees).
Removing the phone Stand (3503 shown)
To remove the stand, hold the phone with one hand and
hold the stand with another hand, then pull the stand with
proper strength to separate it from the phone.
Optional Components
Wall Mount
0231A0ER
(UC2M1WM)
Stand
0231A0ES
(UC21M1BRACKET)
Power Adapter
0231A0EQ
(AC-FSP25-OVS)

Copyright © 2006-2010, 3Com Corporation. All Rights Reserved. 3Com and the 3Com logo are registered trademarks and VCX is trademark of 3Com Corporation. 3101A0AV AP100-20091203
3COM
®
350x 系列 IP 话机快速入门
3503 IP 话机需要 VCX 9.5 及以上版本
3502 IP 话机需要 VCX 9.5 及以上版本
3501 IP 话机需要 VCX 9.5 及以上版本
3500 IP 话机需要 VCX 9.5 及以上版本
3500B IP 话机需要 VCX 9.5 及以上版本
警告:
3Com IP
话机只可用于局域网连接,请勿将话机连接到其所在建筑之外的网络设备。
装箱清单
z 3Com 话机
z 支架
z 话机听筒和听筒软连线
z 以太网线缆
z 保修卡
z 安全兼容性手册
话机安装人员:本文解释了如何连接和激活 3Com VCX IP 话机技术解决
方案中的 IP 话机。关于完整的安装信息,请参见您话机系统的相关安装
指南。
话机用户:关于如何使用 IP 话机,请参见相关的快速参考指南或用户手
册。如果用户的系统使用的是第三方信息传递应用,请参见该应用的相
关说明书。
与
3Com VCX™ IP
话机技术解决方案配合使用说明
VCX环境中,在系统识别一个新的IP话机并允许用户登录之前,系统管理员需要完成相关配置任务。在系统管理员为用户提
供分机号码和密码后,用户可以登录话机。话机显示屏上方会依次显示登录状态图标、分机号码以及日期和时间。
用户可以通过登录状态图标观察当前是否已经登录:
z 对于 3503 IP 话机: 表示未登录, 表示已登录;
z 对于其他型号 IP 话机: 表示未登录, 表示已登录。
如果话机当前为未登录状态,用户可以使用下述步骤登录:
1 按 Menu 按键 + 4。
2 看到提示后输入 VCX 密码,并按#号键。如果登录失败,请联系系统管理员。
语音邮箱初始化
语音邮箱初始化功能可以使用户重新获取并管理语音邮箱。邮箱初始化步骤如下:先按下带有
图标的Message键,根据系
统提示信息,修改缺省的个人密码,并创建名字通报及个人问候语。
警告:上述使用说明可能会被用户的网络配置和运行情况所取代。初始化话机配置的更多信息,请咨询系统管
理员或参考相关安装说明书。
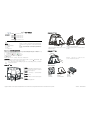
连接话机(以
3500
为例)
1 电源插座
用于可选的交流电源适配器,3Com话机既可以使用交流电
源适配器,也可以使用以太网供电。连接细节,请参见3Com
350x 系列IP话机安全和兼容性手册。
2 听筒插座
将听筒连接线一端与听筒相连,另一端插入话机的听筒插
座。
3 耳麦插座
可选。连接话机与耳麦。
4 网口插座
可选。使用以太网线将用户计算机或话务员控制台连接到
网络。
5 网络插座
使用以太网线将话机连接到局域网。
连接话机支架(以
3503
为例)
先连接好话机的各条线缆,网线需要穿过支架,然后将支
架安装到话机后面板上
话机支持两种不同高度的机架安装方式。
方式1的话机与桌面的夹角为55度;方式2的话机与桌面的夹
角为35度
拆卸话机支架(以
3503
为例)
拆卸支架时,一只手抓住话机,另一只手抓住支架,然后用
力往外拽,即可将支架从话机上拆卸下来
Optional Components
壁挂件
0231A0ER
(UC2M1WM)
支架
0231A0ES
(UC21M1BRACKET)
电源适配器
0231A0EP
(AC-FSP25)
-
 1
1
-
 2
2

