English
How to mount your system onto wall
The wall mounting instructions are only for use by
qualified wall mounting personnel.
Ask a qualified person to help you with the wall
mounting, which includes drilling holes on the wall
and mounting the set onto wall.
What else you’ll need?
Drilling tools (e.g. an electrical drill).
Find a suitable location for mounting and complete
the necessary rear connections.
The person for wall mounting should:
– learn about the piping, wiring and other relevant
information inside your wall, to avoid unexpected
damage;
– choose suitable drilling tools according to the
drilling requirements;
– take other precautions necessary for the wall
mounting work.
A Mounting your main unit onto wall
IMPORTANT!
– Leave adequate space on both sides of the
main unit to facilitate disc door openning!
1 Find an appropriate location on the wall and use the wall
mounting bracket for the main unit as a template to drill four
6mm-diameter holes.
2 Secure four longer screws (supplied) in the holes .
3 Hook the main unit onto the bracket.
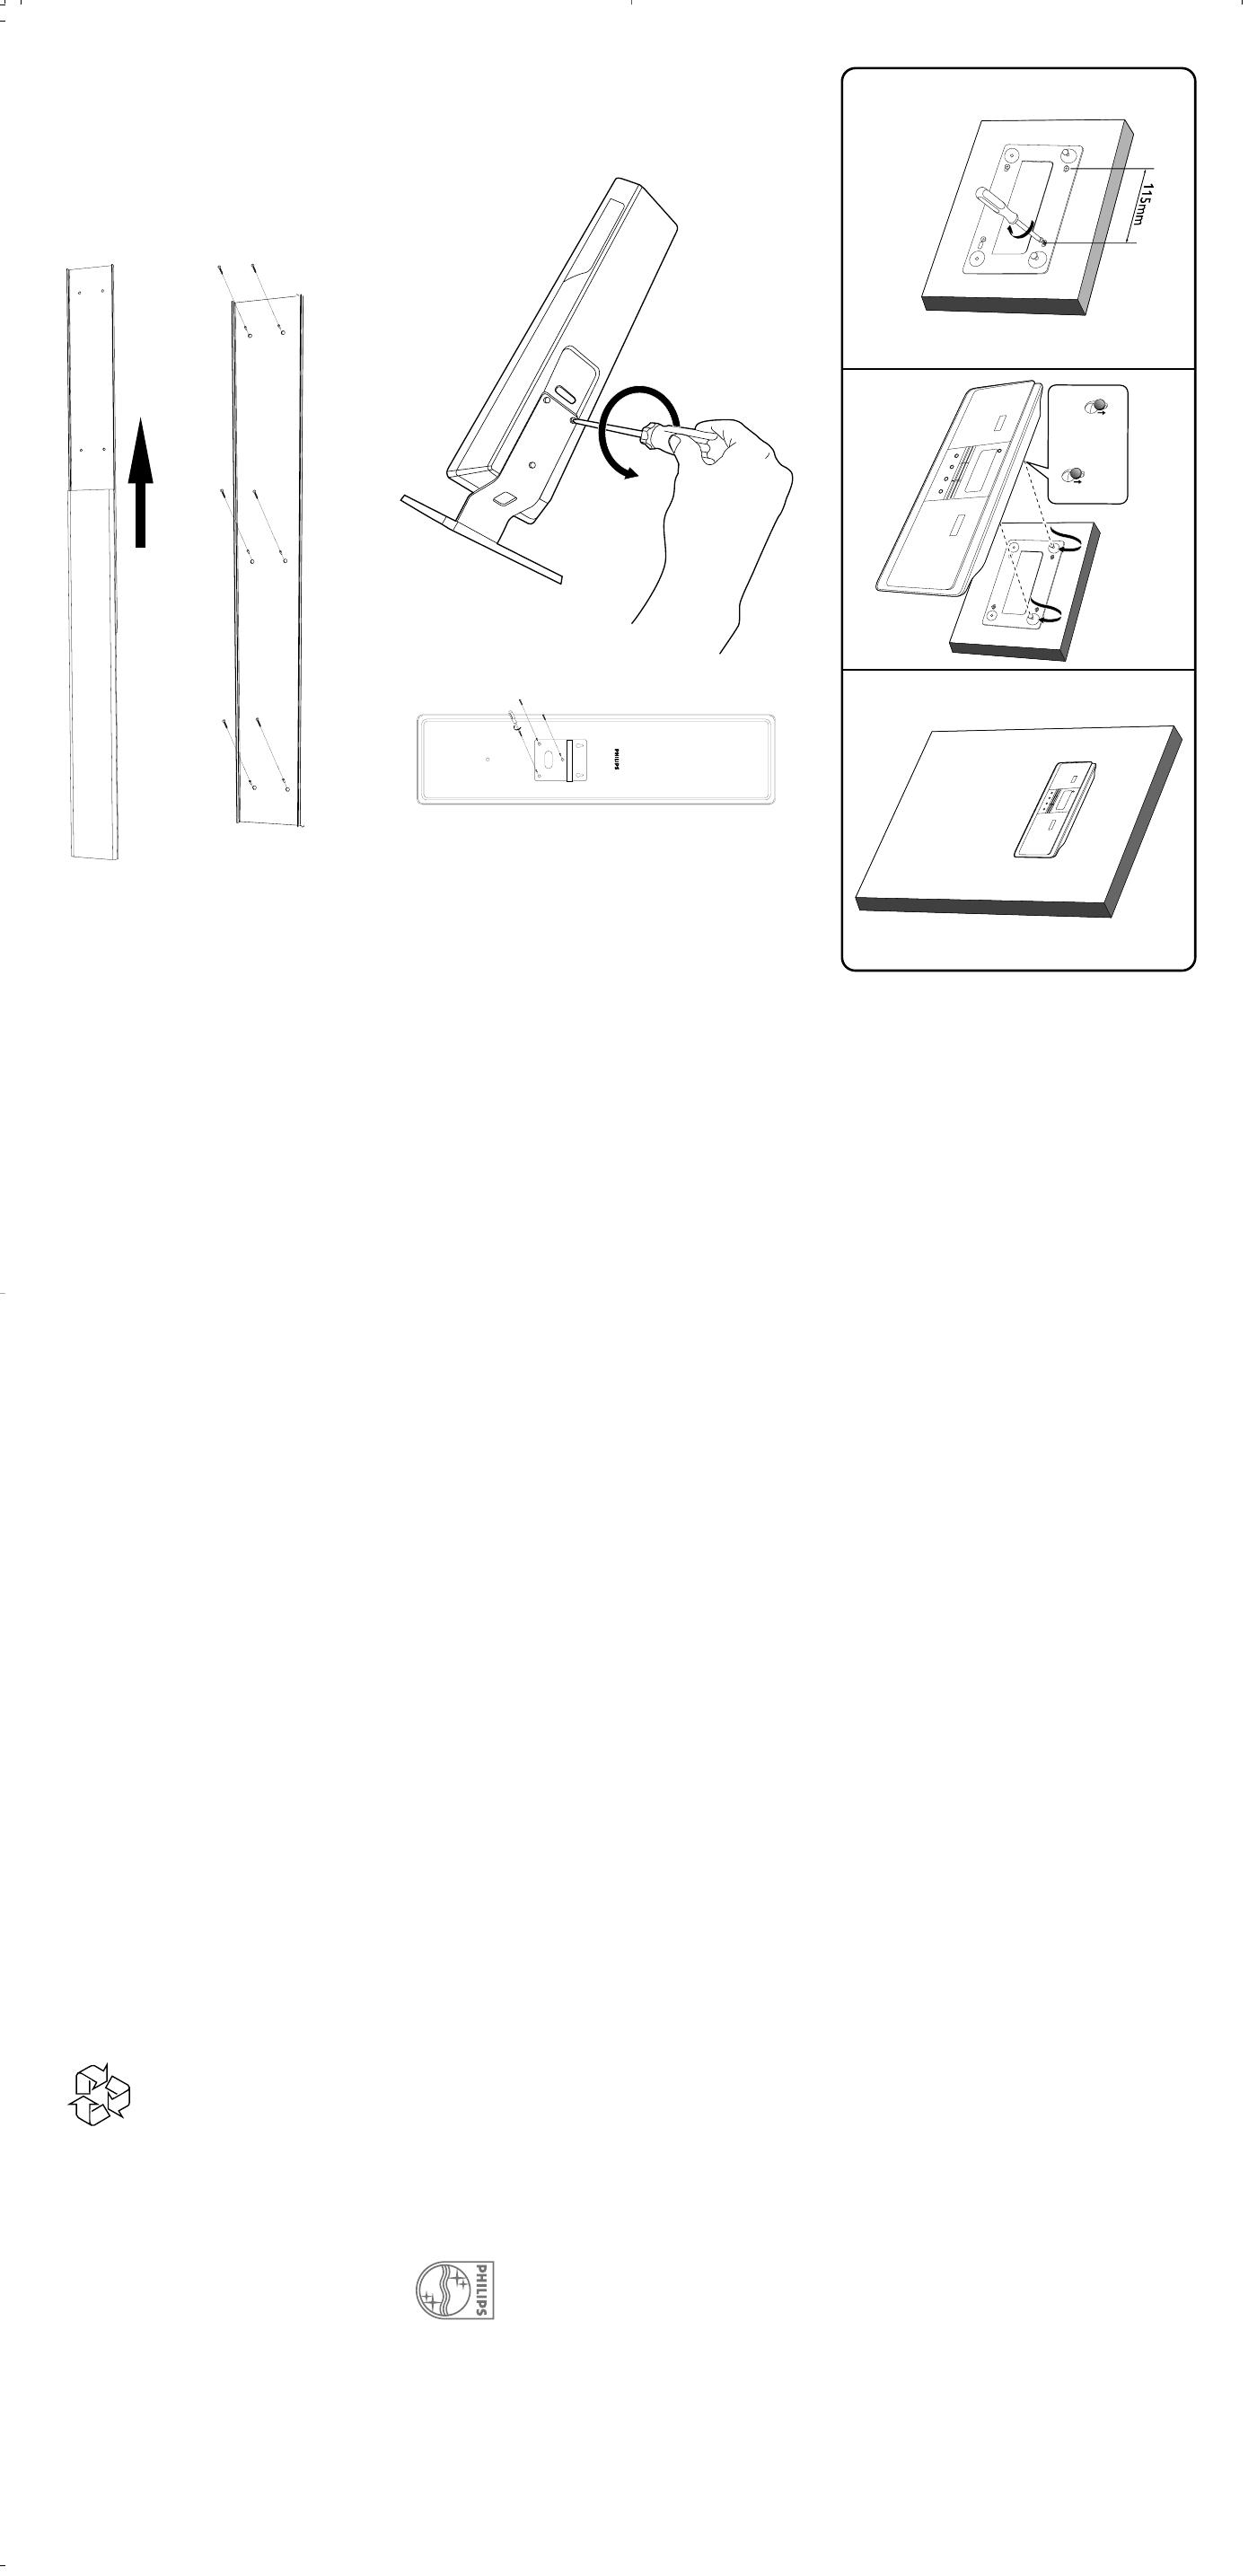
B Mounting your speakers onto wall
1 Detach the stand from any speaker. Place the detached
screws aside for step 3.
2 Drill two 6mm-diameter holes at the chosen locations on the
wall, with 46mm between them.
3 Secure the screws (obtained from step 1) in the holes
respectively, leaving the screws 5mm proud of the wall.
4 Install the bracket on the speaker with the supplied shorter
screws as shown.
B
C
123
A
5 Hook and mount the speaker in place.
Repeat the steps above to mount the other speaker.
C Install the DIN cable and cabling channel
(optional) onto wall
1 Fix the bottom half of the DIN cable on the wall with screws
as shown.
2 Guide the DIN cable between the main set and the
subwoofer into the cabling channel.
3 Fit the upper half of the cabling channel on the bottom piece
as shown.
中
文(简体)
如何将系统安装在墙壁上
壁挂安装指示仅供合格的壁挂安装人员使用。
要求合格的人员协助您进行壁挂安装,包括在墙上钻孔以
及将装置架设在墙上。
您还需要什么?
钻孔工具
(例如电钻)。
找到合适的架设位置并完成所需的后方连接工作
(请参与
“安装”)。
要进行壁挂安装的人员应该要:
– 了解您墙壁内部的管线以及其他相关信息,以避免造成
未预期的伤害;
– 根据钻孔需求选择适当的钻孔工具;
– 在进行壁挂安装作业前,采取其他必要的预防措施。
A 将主机安装在墙壁上
重要
– 在主机两边预留足够的空间,以便
CD
前盖板开启!
1 在墙上合适的位置上使用主机壁挂安装支架作为模板钻出四个直
径
6
毫米的孔。
2 将随附的尺寸稍长的螺丝分别牢固地锁入孔中。
3 将主机挂在支架上。
B 将喇叭安装在墙壁上
1 从任一喇叭上卸下底座。将卸下的螺丝放在一旁以备第
3
步时使
用。
2 将木钉与螺丝分别牢固地锁入孔中,让螺丝距离墙面
5
毫米远。
3 将进行第1步时获取的螺丝分别牢固地锁入孔中,让螺丝距离墙
面
5
毫米远。
4 利用随附的尺寸稍短的螺丝安装喇叭上的托架,如图所示。
重复上述步骤以安装其他喇叭。
C 在墙壁上安装
DIN
缆线以及缆线通道
(
选购
)
1 利用螺丝将
DIN
缆线的下半部固定在墙上,如图所示。
2 将
DIN
缆线从主机与重低音喇叭间穿过进入缆线通道。
3 将底座缆线通道的上半部如图所示安装。
C Royal Philips Electronics N.V. 2007
All rights reserved.
http://www.philips.com
PDCC-JS/JW-0728
2007.9.10, 10:081

 1
1

