
PRODUCT
INFORMATION
GUIDE
AEROX 3
WIRELESS

3
CONTENTS
Product overview 6–7
Setup 8
Connecting via 2.4 GHz wireless
Pairing via Bluetooth
Battery level indicator 9
Translations
Español 10
简体中文 12
繁體中文 14
16
18
Deutsch 20
Русский 22
Français 24
Italiano 26
Português 28
Polski 30
Regulatory 32
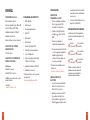
WELCOME TO AEROX 3
Your new mouse is the result of our unyielding pursuit
of perfection for over 20 years. We poured our hearts
into creating the best possible ultra lightweight gaming
mouse, optimizing it for speed and performance. The
SteelSeries Aerox 3 is engineered to get the fastest
swipes, so you can beat the competition to the trigger.
When milliseconds count, speed matters.

STEELSERIES ENGINE
4 5
STEELSERIES ENGINE
To enjoy GameSense integration, program macros, and
customize lighting effects and other mouse settings on your
new Aerox 3 Wireless mouse, download SteelSeries Engine at
steelseries.com/engine
find help at support.steelseries.com
PACKAGE CONTENTS
Aerox 3 Wireless Mouse
USB Type-C to USB Type-A Super
Mesh Data/Charging Cable (5’9”/1,8 m)
USB Type-C Wireless Dongle
Extension Adapter
Product Information Guide
SYSTEM REQUIREMENTS /
COMPATIBILITY
PC
Mac
Xbox
STEELSERIES ENGINE
SOFTWARE REQUIREMENTS
Platforms
Windows 7+
Mac OS X 10.13+
160 MB of free hard drive space for
installation

3
5
6
4
1 2
OFF
2.4G
7
7
9
8
10
11 12
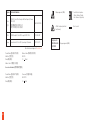
6 7
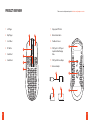
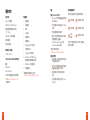
PRODUCT OVERVIEW Find accessories and replacement parts at steelseries.com/gaming-accessories
1 Left Trigger
2 Right Trigger
3 Scroll Wheel
4 CPI Button
5 Side Button 1
6 Side Button 2
7 Virgin-grade PTFE Feet
8 Wireless Mode Switch
9 TrueMove Air Sensor
10 USB Type-C to USB Type-A
Super Mesh Data/Charging
Cable
11 USB Type-C Wireless Dongle
12 Extension Adapter

8 9
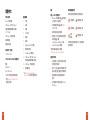
SETUP More detailed product information at steelseries.com/aerox-3-wireless
CONNECTING VIA
2.4 GHZ WIRELESS
1 Connect the Aerox 3 Wireless
Dongle 11 to an available USB
port on your device.
2 Toggle the Wireless Mode
Switch 8 to the “2.4 GHz”
position.
3 The mouse and dongle will
automatically pair.
4 To further customize your
mouse, or re-pair a Wireless
Dongle 11 , download the
SteelSeries Engine software
from steelseries.com/engine
PAIRING VIA
BLUETOOTH
1 Initiate Bluetooth pairing
mode on your Bluetooth 5.0 or
higher enabled device.
2 Hold the CPI Button 4 and
toggle the Wireless Mode
Switch 8 to the Bluetooth
position to turn on your
mouse.
3 The Mouse lighting will start
blinking blue when searching
for a connection.
4 Select “Aerox 3 Wireless”
on your Bluetooth-enabled
device.
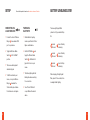
BATTERY LEVEL INDICATOR
The mouse lighting will ash
yellow to notify you about battery
life:
5minute
intervals 2hours of battery
remaining
2minute
intervals 1.5 hours of battery
remaining
1minute
interval 1hour of battery
remaining
When charging, the lighting will
ash green for 10 seconds, before
resuming default lighting.

10 11
ESPAÑOL
CONTENIDO DE LA CAJA
Ratón inalámbrico Aerox 3
Cable de carga/datos Super Mesh USB
tipo C a USB tipo A (5'9"/1,8 m)
Adaptador inalámbrico USB tipo C
Adaptador de extensión
Guía de información sobre el producto
REQUISITOS DEL SISTEMA/
COMPATIBILIDAD
PC / Mac / Xbox
REQUISITOS DE SOFTWARE DEL
MOTOR STEELSERIES
Plataformas
Windows 7 o superior
Mac OS X 10.13 o superior
160 MB de espacio libre en disco duro
para la instalación
* Ayuda en
support.steelseries.com
VISTA GENERAL DEL PRODUCTO
1 Gatillo izquierdo
2 Gatillo derecho
3 Rueda de desplazamiento
4 Botón CPI
5 Botón lateral 1
6 Botón lateral 2
7 Pies de Virgin-grade PTFE
8 Interruptor de modo inalámbrico
9 Sensor TrueMove Air
10 Cable de carga/datos Super Mesh
USB tipo C a USB tipo A
11 Adaptador inalámbrico USB tipo C
12 Adaptador de extensión
* Podrás encontrar accesorios y piezas
de repuesto en
steelseries.com/gaming-accessories
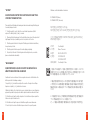
CONFIGURACIÓN
CONEXIÓN VÍA
INALÁMBRICA A 2,4GHZ
1 Conecta el adaptador inalámbrico
Aerox 3 11 a un puerto USB
disponible en tu dispositivo.
2 Cambia el interruptor de modo
inalámbrico 8 a la posición "2,4
GHz".
3 El ratón y el adaptador se
emparejarán automáticamente.
4 Para personalizar aún más tu ratón
o volver a emparejar el adaptador
inalámbrico 11 , descarga el
software SteelSeries Engine de
steelseries.com/engine
* Información más detallada sobre el
producto en
steelseries.com/aerox-3-wireless
EMPAREJAMIENTO VÍA
BLUETOOTH
1 Inicia el modo de empareja miento
Bluetooth en el dispo sitivo con
Bluetooth 5.0 o posterior.
2 Mantén presionado el botón CPI
4 y cambia el interruptor de
modo inalámbrico 8 a la posición
Bluetooth para encender el ratón.
3 La iluminación del ratón comenzará
a parpadear en azul cuando busque
una conexión.
4 Selecciona "Aerox 3 Wireless" en el
dispositivo con Bluetooth.
INDICADOR DE NIVEL DE BATERÍA
La iluminación del ratón parpadeará en
amarillo para informar de la duración de
la batería:
5minutos
(frecuencia) 2horas restantes
de batería
2minutos
(frecuencia) 1.5 horas restantes
de batería
1
minuto
(frecuencia)
1
hora restante
de batería
Durante la carga, la iluminación
parpadeará en verde durante 10
segundos antes de reanudar la
iluminación predeterminada.

12 13
简体中文
包装内容
Aerox 3 无线鼠标
USB Type-C 到 USB Type-A
卓越的编织数据传输/充电线
(5’9”/1.8 m)
USB Type-C 无线适配器
扩展适配器
产品信息指南
系统要求 / 兼容性
PC / Mac / Xbox
STEELSERIES ENGINE 软件要求
平台
Windows 7 +
Mac OS X 10.13+
160 MB 可用硬盘空间供安装使用
* 访问 support.steelseries.com
获取帮助
产品概览
1 左触发器
2 右触发器
3 滚轮
4 CPI 按钮
5 侧部按钮 1
6 侧部按钮 2
7 Virgin-grade PTFE 脚貼
8 无线模式开关
9 TrueMove Air 传感器
10 USB Type-C 到 USB Type-A
卓越的编织数据传输/充电线
11 USB Type-C 无线适配器
12 扩展适配器
* 如需配件和更换部件,请访问
steelseries.com/gaming-accessories
设置
连接 VIA 2.4 GHZ 无线
1 将 Aerox 3 无线适配器11 连接至设备
的 USB 端口。
2 将无线模式开关切换 8至“2.4 GHz”
位置。
3 鼠标和适配器将自动配对。
4 要进一步定制您的鼠标或为无线适
配器重新配对 11,请从
steelseries.com/engine 下载
SteelSeries Engine 软件
* 更多产品信息请访问
steelseries.com/aerox-3-wireless
通过蓝牙配对
1 在启用蓝牙 5.0 或更高版本的设备上
启动蓝牙配对模式。
2 按住 CPI 按钮 4,将无线模式开关切
换8至蓝牙 位置,打开鼠标。
3 搜索连接时,鼠标灯将开始闪烁
蓝光。
4 在启用蓝牙的设备上选择“Aerox 3
Wireless”。
电池电量指示灯
鼠标灯将呈黄色闪烁,通知您电池寿命:
5分钟间隔 2电池剩余小时数
2分钟间隔 1.5 电池剩余小时数
1
分钟
间隔
1
电池剩余小时数
充电时,将呈绿色闪烁 10 秒钟,然后恢复
默认点亮模式。

14 15
繁體中文
包裝內容物
Aerox 3 無線滑鼠
USB Type-C 轉 USB Type-A
卓越的編織數據傳輸/充電線
(5’9”/1.8 m)
USB Type-C 無線接收器
擴充轉接器
產品資訊指南
系統要求 / 相容性
PC / Mac / Xbox
STEELSERIES ENGINE 軟體要求
平台
Windows 7+
Mac OS X 10.13+
160 MB 可用於安裝的硬碟空間
* 請在 support.steelseries.com
取得更多協助
產品概觀
1 左鍵
2 右鍵
3 滾輪
4 CPI 按鈕
5 側鍵 1
6 側鍵 2
7 Virgin-grade PTFE 腳墊
8 無線模式開關
9 TrueMove Air 感應器
10 USB Type-C 轉 USB Type-A
卓越的編織數據傳輸/充電線
11 USB Type-C 無線接收器
12 擴充轉接器
* 在 steelseries.com/gaming-
accessories 尋找配件與更換部件
設定
透過 2.4 GHZ 無線連接
1 將 Aerox 3 無線接收器 11 接到裝置
上可用的 USB 連接埠。
2 將無線模式開關 8 切換到 “2.4
GHz” 位 置。
3 滑鼠和接收器將自動配對。
4 若要進一步自訂滑鼠或重新配對無
線接收器 11,請從
steelseries.com/Engine 下載
SteelSeries Engine 軟體
* 如需詳細的產品資訊,請瀏覽
steelseries.com/aerox-3-wireless
透過藍牙配對
1 在啟用藍牙 5.0 或更高版本的裝置上
啟動藍牙配對模式。
2 按住 CPI 按鈕 4 並將「無線模式」開
關 8 切換至藍牙 位置以開啟滑鼠。
3 搜尋連線時,滑鼠燈會開始閃爍
藍色。
4 在啟用藍牙的裝置上選取「Aerox 3
Wireless」。
電池電量指示燈
滑鼠點亮,黃燈閃爍,通知您電池壽命:
5分鐘間隔 2剩餘電量小時
2分鐘間隔 1.5 剩餘電量小時
1
分鐘
間隔
1
剩餘電量小時
充電结束後,綠燈閃爍 10 秒,然後恢復原
廠閃燈模式。

16 17
日本語
パッケージの内容
Aerox 3ワイヤレスマウス
USB Type-C → USB Type-A スーパーメッ
シュデータ/充電ケーブル 1.8 m (5’9”)
USB Type - Cワイヤレスドングル
拡張アダプタ
製品情報ガイド
システム要件 / 互換性
PC / Mac / Xbox
STEELSERIES ENGINE
ソフト ウェア 要 件
プラットフォーム
Windows 7+
Mac OS X 10.13+
インストールには 160 MB の空きハード ド
ライブ容量が必要
* 詳細は support.steelseries.com のヘ
ル プ を 参 照 してくだ さ い
製品概要
1 左トリガー
2 右トリガー
3 スクロールホイール
4 CPI ボタン
5 サ イドボ タン 1
6 サ イドボ タン 2
7 Virgin-grade PTFE フィート
8 ワイヤレスモードスイッチ
9 TrueMove Air センサー
10 USB Type-C → USB Type-A
スーパーメッシュデータ/充電ケ
ーブル
11 USB Type - Cワイヤレスドングル
12 拡 張アダプタ
* アクセサリおよび交換部品は、
steelseries.com/gaming-accessories
をご覧くだ さい
セットアップ
VIA 2.4 GHZワイヤレスの接続
1 Aerox 3ワイヤレスドングル11 をデバ
イスの利用可能なUSBポートに接
続します。
2 ワイヤレスモードスイッチを「 82.4
GHz」の位置に切り替えます。
3 マウスとドングルが自動的にペアリン
グされます。
4 さらにマウスをカスタマイズしたり、
ワイヤレスドングルを再ペアリングす
るには、
11 Steel Series Engineソフ
トウェアを
steelseries.com/engineからダウン
ロ ードしてくだ さい 。
* より詳しい製品情報は、
steelseries.com/aerox-3-wireless
を ご覧 ください
BLUETOOTHを介したペアリング
1 Bluetooth 5.0以上が有効になってい
るデバイスでBluetoothペアリングモ
ードを開 始します。
2 CPIボタン 4を押したまま、ワイヤレ
スモードスイッチをBluetooth 8の
位置に切り替えてマウスの電源を
入 れ ま す 。
3 接続を検索すると、マウスのライトが
青く点 滅 し始 め ます。
4 Bluetooth対応デバイスで「Aerox 3ワ
イ ヤ レ ス 」を 選 択 し ま す 。
バッテリーレベルインジケータ
バッテリー残量を通知するため、マウスの
ライトが黄色に点滅します。
5分間隔 2バッテリー 残 量
時間
2分間隔 1.5 バッテリー 残 量
時間
1
分
間隔
1
バッテリー 残 量
時間
充電中は、デフォルトのライトが点灯する
前に、ライトが緑色に10秒間点滅します。

18 19
한국어
제품 개요
설치
11
8
11
4
8
배터리 수준 표시기
5 2
2 1.5
1
1

20 21
DEUTSCH
PACKUNGSINHALT
Aerox 3 Wireless Maus
USB Typ-C zu USB Typ-A Super Mesh-
Daten-/-Ladekabel (1,8 m)
USB Typ-C Wireless Dongle
Verlängerungsadapter
Produktinformationen
SYSTEMVORAUSSETZUNGEN/
KOMPATIBILITÄT
PC / Mac / Xbox
STEELSERIES ENGINE
SOFTWAREVORAUSSETZUNGEN
Plattformen
Windows 7+
Mac OS X 10.13+
160 MB freier Festplattenspeicher für
die Installation
* Hilfe erhalten Sie unter
support.steelseries.com
PRODUKTÜBERSICHT
1 Linker Auslöser
2 Rechter Auslöser
3 Scrollrad
4 CPI-Taste
5 Seitliche Taste 1
6 Seitliche Taste 2
7 Virgin-grade PTFE-Füße
8 Wireless Modus-Schalter
9 TrueMove Air-Sensor
10 USB Typ-C zu USB Typ-A
Super-Mesh-Daten-/-Ladekabel
11 USB Typ-C Wireless Dongle
12 Verlängerungsadapter
* Zubehör und Ersatzteile nden Sie
unter
steelseries.com/gaming-accessories
SETUP
ANSCHLUSS VIA 2,4 GHZ
DRAHTLOS
1 Schließen Sie den Aerox 3 Wireless
Dongle 11 an einen freien USB-
Anschluss Ihres Geräts an.
2 Stellen Sie den Wireless Modus-
Schalter auf 8 die Position „2,4
GHz“.
3 Maus und Dongle koppeln sich
automatisch.
4 Um Ihre Maus weiter anzupassen
oder einen Wireless Dongle 11
erneut zu koppeln, laden Sie die
SteelSeries Engine-Software von
steelseries.com/engine herunter.
* Detailliertere Produktinformationen
unter steelseries.com/aerox-3-wireless
KOPPLUNG PER BLUETOOTH
1 Starten Sie den Bluetooth-
Kopplungsmodus auf Ihrem
für Bluetooth 5.0 oder höher
geeigneten Gerät.
2 Halten Sie die CPI-Taste gedrückt
4 und bringen Sie den Wireless
Modus-Schalter 8 in die
Bluetooth-Position , um Ihre Maus
einzuschalten.
3 Die Mausbeleuchtung blinkt blau,
während nach einer Verbindung
gesucht wird.
4 Wählen Sie auf Ihrem Bluetooth-
fähigen Gerät „Aerox 3 Wireless“.
BATTERIESTANDSANZEIGE
Die Mausbeleuchtung blinkt gelb,
um Sie über die verbleibende
Batteriebetriebsdauer zu informieren:
5Minuten-
intervalle 2verbleibende
Akkustunden
2Minuten-
intervalle 1.5 verbleibende
Akkustunden
1
Minuten-
intervall
1
verbleibende
Akkustunde
Während des Ladevorgangs blinkt die
Beleuchtung 10 Sekunden lang grün,
ehe die Standardbeleuchtung wieder
eingeschaltet wird.

22 23
РУССКИЙ
СОДЕРЖИМОЕ УПАКОВКИ
Беспроводная мышь Aerox 3
Кабель с USB Type-C на USB Type-A
для зарядки/передачи данных Super
Mesh (5’9”/1,8 м)
Беспроводной адаптер USB Type-C
Переходник удлинителя
Информация об изделии
СИСТЕМНЫЕ ТРЕБОВАНИЯ /
СОВМЕСТИМОСТЬ
ПК / Mac / Xbox
ТРЕБОВАНИЯ ПРОГРАММНОГО
ОБЕСПЕЧЕНИЯ STEELSERIES
ENGINE
ПЛАТФОРМЫ
Windows 7+
Mac OS X 10.13+
160 Мб свободного места на жёстком
диске для установки
* Справочная информация
приведена по адресу
support.steelseries.com
ОБЗОР ИЗДЕЛИЯ
1 Левая кнопка
2 Правая кнопка
3 Колесо прокрутки
4 Кнопка CPI
5 Боковая кнопка 1
6 Боковая кнопка 2
7 Ножки из Virgin-grade PTFE
8 Переключатель беспроводного
режима
9 Сенсор TrueMove Air
10 Кабель с USB Type-C на USB
Type-A для зарядки/передачи
данных
Super Mesh
11 Беспроводной адаптер USB
Type-C
12 Переходник удлинителя
* Принадлежности и запасные части
можно найти на веб-сайте:
steelseries.com/gaming-accessories
НАСТРОЙКА
БЕСПРОВОДНОЕ ПОДКЛЮЧЕНИЕ
2,4 ГГЦ
1 Подключите беспроводной
адаптер Aerox 3 11 к свободному
USB-порту вашего устройства.
2 Переведите переключатель
беспроводного режима в
положение 8 2.4 GHz.
3 Мышь и адаптер будут
автоматически сопряжены.
4 Для дальнейшей настройки
мыши или повторного
сопряжения беспроводного
адаптера 11 загрузите
программное обеспечение
SteelSeries Engine с веб-сайта:
steelseries.com/engine.
* Более подробная информация об
изделии:
steelseries.com/aerox-3-wireless
СОПРЯЖЕНИЕ ЧЕРЕЗ BLUETOOTH
1 Запустите режим сопряжения
Bluetooth на устройстве с
поддержкой Bluetooth 5.0 или
выше.
2 Удерживайте кнопку CPI 4 и
переведите переключатель
беспроводного режима 8 в
положение Bluetooth , чтобы
включить мышь.
3 При поиске соединения
подсветка мыши начнет мигать
синим цветом.
4 Выберите Aerox 3 Wireless своем
на устройстве с поддержкой
Bluetooth.
ИНДИКАТОР УРОВНЯ ЗАРЯДА
Подсветка мыши будет мигать
желтым цветом, чтобы уведомить
вас о времени работы от батареи:
5-минутные
интервалы 2
оставшихся
часов работы
от батареи
2-минутные
интервалы 1.5
оставшихся
часов работы
от батареи
1
-минутный
интервал
1
час работы от
батареи
Во время зарядки индикатор будет
мигать зеленым светом в течение
10 секунд, прежде чем вернуться к
подсветке по умолчанию.

24 25
FRANÇAIS
CONTENU DE L’EMBALLAGE
Souris sans l Aerox 3
Câble de chargement/données Super
Mesh USB Type-C vers USB Type-A
(5’9”/1,8m)
Dongle sans l USB de type C
Adaptateur d’extension
Guide d’informations produit
CONFIGURATION SYSTÈME
REQUISE/COMPATIBILITÉ
PC / Mac / Xbox
CONFIGURATION LOGICIELLE
REQUISE POUR LE MOTEUR
STEELSERIES
Plates-formes
Windows 7+
Mac OS X 10.13+
160Mo d’espace disque disponible pour
l’installation
* trouver de l’aide sur support.
steelseries.com
PRÉSENTATION DES PRODUITS
1 Bouton gauche
2 Bouton droit
3 Molette de délement
4 Bouton CPI
5 Bouton latéral 1
6 Bouton latéral 2
7 Pieds en Virgin-grade PTFE
8 Commutateur de mode sans l
9 Capteur TrueMove Air
10 Câble de chargement/données
Super Mesh USB Type-C vers USB
Type-A
11 Dongle sans l USB de type C
12 Adaptateur d’extension
* Trouvez des accessoires et des pièces
de rechange sur
steelseries.com/gaming-accessories
CONFIGURATION
CONNEXION VIA 2,4 GHZ SANS FIL
1 Connectez le dongle sans l Aerox
3 11 à un port USB disponible sur
votre appareil.
2 Basculez le commutateur de mode
8 sans l en position “2,4 GHz”.
3 La souris et le dongle s’appaireront
automatiquement.
4 Pour personnaliser davantage
votre souris ou appairer à nouveau
un dongle sans l 11 , téléchargez le
logiciel SteelSeries Engine sur
steelseries.com/engine
* Pour plus d’informations sur les
produits, rendez-vous sur steelseries.
com/aerox-3-wireless
APPAIRAGE VIA BLUETOOTH
1 Lancez le mode d’appairage
Bluetooth sur votre appareil
Bluetooth 5.0 ou supérieur.
2 Maintenez le bouton CPI enfoncé
4 et mettez le commutateur de
mode 8 sans l en position
Bluetooth pour allumer votre
souris.
3 L’éclairage de la souris
commencera à clignoter en bleu
lorsque vous chercherez une
connexion.
4 Sélectionnez “Aerox 3 Wireless”
sur votre appareil Bluetooth.
INDICATEUR DE NIVEAU DE
BATTERIE
L’éclairage de la souris clignote en jaune
pour vous informer de la durée de vie
de la batterie:
5intervalles
de minutes 2
heures de
batterie
restantes
2intervalles
de minutes 1.5
heures de
batterie
restantes
1
intervalle de
minutes
1
heure de
batterie
restante
Pendant la charge, l’éclairage clignote
en vert pendant 10 secondes, avant de
reprendre l’éclairage par défaut.

26 27
ITALIANO
CONTENUTO DELLA CONFEZIONE
Mouse wireless Aerox 3
Cavo di ricarica/dati Super Mesh
da USB di tipo C a USB di tipo A
(5’9”/1,8 m)
Dongle wireless USB di tipo C
Adattatore prolunga
Guida alle informazioni sul prodotto
REQUISITI DI SISTEMA/
COMPATIBILITÀ
PC / Mac / Xbox
REQUISITI
SOFTWARE DEL MOTORE
STEELSERIES
Piattaforme
Windows 7+
Mac OS X 10.13+
160 MB di spazio libero su disco rigido
per l’installazione
* assistenza su
support.steelseries.com
PANORAMICA PRODOTTO
1 Trigger sinistro
2 Trigger destro
3 Rotella di scorrimento
4 Pulsante CPI
5 Pulsante laterale 1
6 Pulsante laterale 2
7 Piedini in Virgin-grade PTFE
8 Interruttore modalità wireless
9 Air Sensor TrueMove
10 Cavo di ricarica/dati
super mesh da USB di tipo C a USB
di tipo A
11 Dongle wireless USB di tipo C
12 Adattatore prolunga
* Accessori e ricambi sono disponibili
all’indirizzo
steelseries.com/gaming-accessories
CONFIGURAZIONE
COLLEGAMENTO WIRELESS A
2,4 GHZ
1 Collegare il dongle wireless Aerox 3
11 a una porta USB disponibile sul
dispositivo.
2 Portare l’interruttore della modalità
wireless 8 sulla posizione “2,4
GHz”.
3 Il mouse e il dongle si abbineranno
automaticamente.
4 Per personalizzare ulteriormente il
mouse o accoppiare nuovamente
un dongle wireless11 , scaricare il
software SteelSeries Engine da
steelseries.com/engine
* Informazioni più dettagliate
sul prodotto sono disponibili su
steelseries.com/aerox-3-wireless
ACCOPPIAMENTO TRAMITE
BLUETOOTH
1 Avviare la modalità di
accoppiamento Bluetooth sul
dispositivo abilitato Bluetooth 5.0
o superiore.
2 Tenere premuto 4 il pulsante CPI
e portare l’interruttore della 8
modalità wireless sulla posizione
Bluetooth per accendere il mouse.
3 La spia del mouse inizierà a
lampeggiare in blu quando il
dispositivo è in cerca di una
connessione.
4 Selezionare “Aerox 3 Wireless” sul
dispositivo abilitato per Bluetooth.
INDICATORE DI LIVELLO DELLA
BATTERIA
La spia del mouse lampeggerà in giallo
per avvisare della durata residua della
batteria:
5minuti di
intervallo 2ore di batteria
rimanenti
2minuti di
intervallo 1.5 ore di batteria
rimanenti
1
intervallo di
minuto
1
ora di carica
residua della
batteria
Durante la ricarica, la spia verde
lampeggia per 10 secondi prima di
tornare all’illuminazione predenita.

28 29
PORTUGUÊS
CONTEÚDO DA EMBALAGEM
Rato sem os Aerox 3
Cabo de dados/carregamento Super
Mesh USB tipo C para USB tipo A
(5’9”/1,8 m)
Dongle sem os USB Tipo C
Adaptador de extensão
Guia de informações do produto
REQUISITOS DO SISTEMA/
COMPATIBILIDADE
PC / Mac / Xbox
REQUISITOS DO SOFTWARE DO
MOTOR STEELSERIES
Plataformas
Windows 7+
Mac OS X 10.13+
160 MB de espaço livre no disco rígido
para instalação
* encontre ajuda em
support.steelseries.com
DESCRIÇÃO GERAL DO PRODUTO
1 Botão esquerdo
2 Botão direito
3 Roda de deslocação
4 Botão CPI
5 Botão lateral 1
6 Botão lateral 2
7 Pés em Virgin-grade PTFE
8 Interruptor de modo sem os
9 Sensor central TrueMove Air
10 Cabo de dados/carregamento Super
Mesh USB Tipo C para USB Tipo A
11 Dongle sem os USB Tipo C
12 Adaptador de extensão
* Encontre acessórios e peças de
substituição em
steelseries.com/gaming-accessories
CONFIGURAÇÃO
LIGAR POR WIRELESS 2,4 GHZ
1 Ligue o Dongle sem os Aerox 3 11
a uma porta USB disponível no seu
dispositivo.
2 Mude o interruptor de modo sem
os 8 para a posição “2,4 GHz”.
3 O rato e o dongle são
emparelhados automaticamente.
4 Para personalizar ainda mais o
seu rato ou voltar a emparelhar
um dongle sem os 11 , transra o
software SteelSeries Engine em
steelseries.com/engine
* Informações mais detalhadas sobre o
produto em
steelseries.com/aerox-3-wireless
EMPARELHAMENTO POR
BLUETOOTH
1 Inicie o modo de emparelhamento
por Bluetooth no dispositivo
compatível com Bluetooth 5.0 ou
superior.
2 Mantenha premido o botão CPI 4
e mude o interruptor de modo sem
os 8 para a posição Bluetooth
para ligar o rato.
3 A iluminação do rato começa a
piscar a azul quando procura uma
ligação.
4 Selecione “Aerox 3 Wireless” no
seu dispositivo com Bluetooth
ativado.
INDICADOR DE NÍVEL DA BATERIA
A iluminação do rato pisca a amarelo
para avisar sobre a duração da bateria:
5minutos de
intervalo 2horas de bateria
restante
2minutos de
intervalo 1.5 horas de bateria
restante
1
minuto de
intervalo
1
hora de bateria
restante
Durante o carregamento, a luz pisca a
verde durante 10 segundos, antes de
retomar a iluminação predenida.

30 31
POLSKI
ZAWARTOŚĆ PACZKI
Aerox 3 Wireless mysz
Kabel USB typu C do USB typu A Super
Mesh do transmisji danych / ładowania
(5’9”/1,8 m)
Bezprzewodowy klucz sprzętowy USB
typu C
Adapter przedłużający
Przewodnik z informacjami o produkcie
WYMAGANIA SYSTEMOWE /
KOMPATYBILNOŚĆ
PC / Mac / Xbox
STEELSERIES ENGINE
WYMAGANIA SYSTEMOWE
Platformy
Windows 7+
Mac OS X 10.13+
160 MB wolnego miejsca na dysku
twardym do instalacji
* znajdź pomoc pod adresem
support.steelseries.com
BUDOWA PRODUKTU
1 Lewy przycisk
2 Prawy Przycisk
3 Rolka przewijania
4 Przycisk CPI
5 Przycisk boczny 1
6 Przycisk boczny 2
7 Nóżki PTFE
8 Przełącznik trybu bezprzewodowego
9 Sensor TrueMove Air
10 USB Type-C do USB Type-A Kabel
do transmisji danych / ładowania
Super Mesh
11 Bezprzewodowy klucz sprzętowy
USB typu C
12 Adapter przedłużający
* Akcesoria i części zamienne dostępne
na stronie
steelseries.com/gaming-accessories
KONFIGURACJA
POŁĄCZENIE BEZPRZEWODOWE
2,4 GHZ
1 Podłącz nadajnik Aerox 3 Wireless
11 do dostępnego portu USB w
Twoim urządzeniu.
2 Ustaw przełącznik Trybu
Bezprzewodowego 8 w pozycji
„2,4 GHz”.
3 Mysz i nadajnik zostaną
automatycznie sparowane.
4 Aby spersonalizować swoją mysz
lub ponownie sparować ją z
Nadajnikiem Bezprzewodowym
11 , pobierz program SteelSeries
Engine dostępny pod adresem
steelseries.com/engine
* Szczegółowe informacje na temat
produktu dostępne są na stronie
steelseries.com/air-3-wireless
PAROWANIE ZA POMOCĄ
BLUETOOTH
1 Zainicjuj tryb parowania Bluetooth
na swoim urządzeniu z obsługą
Bluetooth 5.0 lub wyższą.
2 Przytrzymaj przycisk CPI
4 i ustaw przełącznik Trybu
Bezprzewodowego 8 w pozycji
Bluetooth , aby włączyć mysz.
3 Podczas wyszukiwania połączenia
podświetlenie myszy zacznie
migać na niebiesko.
4 Na swoim urządzeniu
obsługującym Bluetooth wybierz
„Aerox 3 Wireless”.
WSKAŹNIK POZIOMU BATERII
Podświetlenie myszy będzie migać
na żółto, informując o poziomie
naładowania baterii:
5minutowe
odstępy
2godzin pracy na
baterii
2minutowe
odstępy
1.5 godzin pracy na
baterii
1minutowy
odstęp
1godzina pracy
na baterii
Podczas ładowania, światełko będzie
migać na zielono przez 10 sekund przed
wznowieniem oświetlenia domyślnego.

32 33
REGULATORY
Europe – EU Declaration of Conformity
Hereby, SteelSeries ApS. declares that the equipment which is compliance with directive RoHS
2.0 (2015/863/EU), R.E.D (2014/53/EU), EMC Directive (2014/30/EU), and LVD (2014/35/
EU) which are issued by the Commission of the European Community.
The full text of the EU declaration of conformity is available at the following internet address:
steelseries.com
SteelSeries ApS. hereby conrms, to date, based on the feedback from our suppliers indicates
that our products shipping to the EU territory comply with REACH (Registration, Evaluation,
Authorization, and Restriction of Chemicals - (EC) 1907/2006) compliance program. We are
fully committed to oering REACH compliance on the products and posting accurate REACH
compliance status for the all of products.
Operating Temperature: 0 to + 40°C.
Frequency bands and Powers (Mouse and Transceiver)
a. Frequency band(s) in which the radio equipment operates:
• WIFI: 2.400 – 2.4835 GHz
b. Maximum radio-frequency power transmitted in the frequency band(s) in which the radio
equipment operates:
• EIRP(2.4G): л/4-DQPSK: 3.17 dBm (Mouse)
• EIRP(BT): GFSK: 3.29 dBm (Mouse)
• EIRP(2.4G): л/4-DQPSK: 0.91 dBm (Transceiver)
c. Firmware Version: V1.5.9 (Mouse); V1.2.7 (Transceiver)
UK Declaration of Conformity
Hereby, SteelSeries ApS. declares that the following equipment which is compliance with
Electromagnetic Compatibility Regulations 2016, Electrical Equipment (Safety) Regulations 2016
and The Restriction of the Use of Certain Hazardous Substances in Electrical and Electronic
Equipment Regulations 2012 issued by the Department for Business, Energy& Industrial Strategy.
The full text of the UK declaration of conformity is available at the following internet address:
https://steelseries.com/
WEEE
This product must not be disposed of with your other household waste or treat them in
compliance with the local regulations or contact your local city oce, your household waste
disposal service or the shop where you purchased the product.
TURKEY ROHS COMPLIANCE
Republic of Turkey: In conformity with the EEE Regulation
Türkiye Cumhuriyeti: EEE Yönetmeliğine Uygundur
Safety Guideline for the Battery
This battery must not be disposed of with your other household waste or treat them in
compliance with the local regulations or contact your local city oce, your household waste
disposal service or the shop where you purchased the product.
Federal Communication Commission Interference Statement
This device complies with Part 15 of the FCC Rules. Operation is subject to the following two
conditions: (1) This device may not cause harmful interference, and (2) this device must accept
any interference received, including interference that may cause undesired operation.
This equipment has been tested and found to comply with the limits for a Class B digital device,
pursuant to Part 15 of the FCC Rules. These limits are designed to provide reasonable protection
against harmful interference in a residential installation. This equipment generates, uses and can
radiate radio frequency energy and, if not installed and used in accordance with the instructions,
may cause harmful interference to radio communications. However, there is no guarantee
that interference will not occur in a particular installation. If this equipment does cause harmful
interference to radio or television reception, which can be determined by turning the equipment
o and on, the user is encouraged to try to correct the interference by one of the following
measures:
• Reorient or relocate the receiving antenna.
• Increase the separation between the equipment and receiver.
• Connect the equipment into an outlet on a circuit dierent from that to which the receiver is
connected.
• Consult the dealer or an experienced radio/TV technician for help.

34 35
FCC Caution:
Any changes or modications not expressly approved by the party responsible for compliance
could void the user’s authority to operate this equipment.
This transmitter must not be co-located or operating in conjunction with any other antenna or
transmitter.
Radiation Exposure Statement:
The device has been evaluated to meet general RF exposure requirement, the device can be
used in portable exposure condition without restriction.
FCC ID: ZHK-M00019 (Mouse)
FCC ID: ZHK-M00019TX(Transceiver)
Frequency bands and Powers (Mouse and Transceiver)
a. Frequency band(s) in which the radio equipment operates: 2.400 – 2.4835 GHz
b. Maximum radio-frequency power transmitted in the frequency band(s) in which the radio
equipment operates:
• Conducted Average Power/(2.4G): л/4-DQPSK: -1.0 dBm (Mouse)
• Conducted Average Power/(BT): GFSK: -0.95 dBm (Mouse)
• Conducted Average Power/(2.4G): л/4-DQPSK: -2.32 dBm (Transceiver)
c. Firmware Version: V1.5.9 (Mouse); V1.2.7 (Transceiver)
Regions Contact Information
USA SteelSeries ApS., 656 W Randolph St.,
Suite 3E, Chicago, IL 60661, USA +1 312 258 9467
More information and support from steelseries.com
Industry Canada Statement
This device complies with Industry Canada license-exempt RSS standard(s). Operation is subject
to the following two conditions:
1. this device may not cause interference, and
2. this device must accept any interference, including interference that may cause undesired
operation of the device.
Le présent appareil est conforme aux CNR d’Industrie Canada applicables aux appareils radio
exempts de licence. L’exploitation est autorisée aux deux conditions suivantes:
1. l’appareil ne doit pas produire de brouillage, et
2. l’utilisateur de l’appareil doit accepter tout brouillage radioélectrique subi, même si le brouillage
est susceptible d’en compromettre le fonctionnement.
This Class B digital apparatus complies with Canadian ICES-003.
Cet appareil numérique de la classe B est conforme à la norme NMB-003 du Canada.
This device and its antenna(s) must not be co-located or operating in conjunction with any other
antenna or transmitter, except tested built-in radios.
Cet appareil et son antenne ne doivent pas être situés ou fonctionner en conjonction avec une
autre antenne ou un autre émetteur, exception faites des radios intégrées qui ont été testées.
The County Code Selection feature is disabled for products marketed in the US/ Canada.
La fonction de sélection de l’indicatif du pays est désactivée pour les produits commercialisés aux
États-Unis et au Canada.
The appliance must not be exposed to splashes or drops of water and it should not be used as a
support for any object lled with liquid, such as a vase.
L’appareil ne doit pas être exposé à des éclaboussures ou à des gouttes d’eau et il ne doit pas
servir de support à un quelconque objet rempli de liquide, tel qu’un vase.
Radiation Exposure Statement
The device has been evaluated to meet general RF exposure requirement, The device can be
used in portable exposure condition without restriction.
Déclaration d’exposition aux radiations:
L’appareil a ete evalue pour repondre aux exigencies generals d’ exposition aux radio frequencies.
L’appareil peut etre utilise en condition d’ exposition portable sans restriction

36 37
“CAUTION!”
RISK OF EXPLOSION IF BATTERY PACK IS NOT REPLACE BY SAME TYPE AS
SPECIFIED BY THE MANUFACTURER.
Please keep follow all listed important warnings and cautions below while using this battery pack
to avoid any damage or hazard.
1. The battery polarity (+) and (-) shall not be connected and charged reversely. Risk of
explosion if the battery polarity (+) and (-) is reversed.
2. Please keep this battery pack away from re and high heat sources due to the explosion that
might happen. Do not place your battery pack close to any heater or hot location.
3. This battery pack shall not be hit or impacted. This battery pack shall not be dealt with any
sharp or keen objects either.
4. This battery pack shall not be exposed to moisture, dripping or splashing.
5. If any electrolyte ows out of this battery pack when touching the user’s eyes and skin,
please seek medical advice immediately.
“MISE EN GARDE!”
RISQUE D’EXPLOSION SI LE BLOC-PILES N’EST PAS REMPLACÉ PAR LE
MÊME TYPE QUE SPÉCIFIÉ PAR LE FABRICANT.
Veuillez suivre tous les avertissements et mises en garde ci-dessous lors de l’utilisation de cette
batterie pour éviter tout dommage ou danger.
1. La polarité (+) et (-) de la batterie ne doit pas être connectée et chargée à l’envers. Risque
d’explosion si la polarité (+) et (-) de la batterie est inversée.
2. Gardez cette batterie à l’écart du feu et des sources de chaleur élevées en raison de l’explosion
qui pourrait se produire. Ne placez pas votre batterie près d’un radiateur ou d’un endroit chaud.
3. Cette batterie ne doit pas être heurtée ni impactée. Ce bloc-batterie ne doit pas non plus être
traité avec des objets tranchants ou vifs.
4. Cette batterie ne doit pas être exposée à l’humidité, aux gouttes ou aux éclaboussures.
5. Si un électrolyte s’écoule de cette batterie lorsque vous touchez les yeux et la peau de
l’utilisateur, consultez immédiatement un médecin.
IC: 9638A-M00019 (Mouse)
IC: 9638A-M00019TX (Transceiver)
SteelSeries ApS.
Mouse / Transceiver
M-00019 / M-00019TX
R-R-SS4-M-00019
R-R-SS4-M-00019TX
SteelSeries ApS./China
この装置は、クラスB機器です。この装置は、住宅環境で使用することを目的とし ていますが、こ
の装置がラジオやテレビジョン受信機に近接して使用されると、受 信障害を引き起こすことがあ
ります。 取扱説明書に従って正しい取り扱いをして下さい。 VCCI-B
この機器の使用周波数帯では、電子レンジ等の産業・科学・医療用機器のほか工場の製造ラ
イン等で使用されている移動体識別用の構内無線局(免許を要する無線局)及び特定小電力
無線局(免許を要しない無線局)並びにアマチュア無線局(免許を要する無線局)が運用され
ています。
1 この機器を使用する前に、近くで移動体識別用の構内無線局及び特定小電力無線局並びに
アマチュア無線局が運用されていないことを確認して下さい。
2 万一、この機器から移動体識別用の構内無線局に対して有害な電波干渉の事例が発生し

38 39
た場合には、速やかに使用周波数を変更するか又は電波の発射を停止した上、下記連絡先に
ご連絡頂き、混信回避のための処置等(例えば、パーティションの設置など)についてご相談し
て下さい。
3 その他、この機器から移動体識別用の特定小電力無線局あるいはアマチュア無線局に対し
て有害な電波干渉の事例が発生した場合など何かお困りのことが起きたときは、次の連絡先
へお問い合わせ下さい。
低功率電波輻射性電機管理辦法
取得審驗證明之低功率射頻器材,非經核准,公司、商號或使用者均不得擅自變更頻率、加大功
率或變更原設計之特性及功能。
低功率射頻器材之使用不得影響飛航安全及干擾合法通信;經發現有干擾現象時,應立即停
用,並改善至無干擾時方得繼續使用。
前述合法通信,指依電信管理法規定作業之無線電通信。低功率射頻器材須忍受合法通信或工
業、科學及醫療用電波輻射性電機設備之干擾。
鋰電池安全使用指南
注意: 電池若未正確更換,可能會爆炸,請用原廠建議之同款的電池來更換。
電池不可當作一般的家庭廢棄物棄置,請依據當地法規使用公共回收系統退回、回收或處理
電池。
電池極性(+)和( - )不得相反連接,充電電池極性如果電池極性反轉,則有爆炸危險。
請勿將此電池放在靠近火源或任何高溫的地方,否則可能會因高熱源而發生爆炸。
電池組不得受撞擊,也不能用任何尖銳的物體去穿刺。
該電池組無防水功能,不得暴露於潮濕場所避免受潮導致兩電池極性短路導致爆炸危險。
*報廢電池請按照廢棄物管理辦法回收處理
该电子电气产品含有某些有害物质,在环保使用期限内可以放心使用,超过环保使用期限之后
则应该进入回收循环系统。
廢電池請回收
《废弃电器电子产品回收处理管理条例》提示性说明
为了更好地关爱及保护地球,当用户不再需要此产品或产品寿命终止时,请遵守国家废弃电
器电子产品回收处理相关法律法规,将其交给当地具有国家认可的回收处理资质的厂商进行
回收处理。
锂电池安全使用指南
注意: 电池若未正确更换,可能会爆炸,请用原厂建议之同款的电池来更换。
电池不可当作一般的家庭废弃物弃置,请依据当地法规使用公共回收系统退回、回收或处理
电池。
1.电池极性(+)和( - )不得相反连接,充电电池极性如果电池极性反转,则有爆炸危险。
2.请勿将此电池放在靠近火源或任何高温的地方,否则可能会因高热源而发生爆炸。
3.电池组不得受撞击,也不能用任何尖锐的物体去穿刺。
4.该电池组无防水功能,不得暴露于潮湿场所避免受潮导致两电池极性短路导致爆炸危险。
微功率设备产品使用说明:
(一)符合“微功率短距离无线电发射设备目录和技术要求”的具体条款和使用场景,采用
的天线类型和性能,控制、调整及开关等使用方法;
(二)不得擅自改变使用场景或使用条件、扩大发射频率范围、加大发射功率(包括额外加
装射频功率放大器),不得擅自更改发射天线;
(三)不得对其他合法的无线电台(站)产生有害干扰,也不得提出免受有害干扰保护;
(四)应当承受辐射射频能量的工业、科学及医疗(ISM)应用设备的干扰或其他合法的无
线电台(站)干扰;
(五)如对其他合法的无线电台(站)产生有害干扰时,应立即停止使用,并采取措施消除干
扰后方可继续使用;
(六)在航空器内和依据法律法规、国家有关规定、标准划设的射电天文台、气象雷达站、卫
星地球站(含测控、测距、接收、导航站)等军民用无线电台(站)、机场等的电磁环境保护区域内
使用微功率设备,应当遵守电磁环境保护及相关行业主管部门的规定;
(七)禁止在以机场跑道中心点为圆心、半径5000米的区域内使用各类模型遥控器;
(八)微功率设备使用时温度和电压的环境条件。
ページが読み込まれています...
ページが読み込まれています...
ページが読み込まれています...
ページが読み込まれています...
ページが読み込まれています...
-
 1
1
-
 2
2
-
 3
3
-
 4
4
-
 5
5
-
 6
6
-
 7
7
-
 8
8
-
 9
9
-
 10
10
-
 11
11
-
 12
12
-
 13
13
-
 14
14
-
 15
15
-
 16
16
-
 17
17
-
 18
18
-
 19
19
-
 20
20
-
 21
21
-
 22
22
-
 23
23
-
 24
24
-
 25
25


他の言語で
- italiano: Steelseries Aerox 3 Guida utente
- français: Steelseries Aerox 3 Mode d'emploi
- English: Steelseries Aerox 3 User guide