
4-196-714-42(1)
ICD-SX712/SX713/SX813
数码录音棒
IC Recorder
制造商:索尼 (中国)有限公司
地 址:北京市朝阳区太阳宫中路12号楼
冠城大厦701
产 地:广东省东莞市
产品标准:Q/CYSNC0007
出版日期:2012年3月
使用产品前请仔细阅读本使用说明书,
并请妥善保管。
注意
说明书储存在数码录音棒内,详细信息请见快
速入门指南。
Note
The complete instruction manual is stored in the
built-in memory of the IC recorder.
CS
Quick Start Guide GB

2
CS
锂电池用户不可自行更换,如电
池损坏需要更换,请联系专业人
员。
警告
请勿将电池 (已安装的电池组或
电池)长时间暴露于例如阳光,
火等极热的地方。
额定电流: 800 mA
也可以连接适用本型号的Sony
USB充电交流电源适配器 (另购)
对电池进行充电。
容量 (可用容量)
ICD-SX712:
2 GB (约1.80 GB = 1932735283
字节)
ICD-SX713/ICD-SX813:
4 GB (约3.60 GB = 3865470566
字节)
部分存储空间被用作管理区。
本快速入门指南仅描述如何录
制、播放或删除文件等的基本操
作。解释IC录音机的所有特征及
功能的操作说明以2种语言PDF文
件形式保存在IC录音机的内置内
存中。要将操作说明从IC录音机
复制至电脑,请参见第8页上的
“第6步:将操作说明复制到电
脑”。
也可以从Sony支持主页重新获取
操作说明:
http://www.sony-asia.com/
section/support
另外,要安装附带的应用软件
(Sound Organizer),请参阅以
PDF文件形式保存的操作说明。
有关使用Sound Organizer软件
的详情,请访问其帮助文件。

3
CS
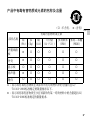
产品中有毒有害物质或元素的名称及含量
(a :不含有, × :含有)
a :表示该有毒有害物质在该部件所有均质材料中的含量均在SJ/
T11363-2006标准规定的限量要求以下。
× :表示该有毒有害物质至少在该部件的某一均质材料中的含量超出SJ/
T11363-2006标准规定的限量要求。
部件名称
有毒有害物质或元素
铅
(Pb)
汞
(Hg)
镉
(Cd)
六价铬
(Cr(VI))
多溴联苯
(PBB)
多溴二苯醚
(PBDE)
内置线路
板
×
aa a a a
外壳
×
aa a a a
显示板
aaa a a a
扬声器
×
aa a a a
附件
aaa a a a
CS

4
CS
开始
第1步:检查包装内的
内容
IC录音机 (1)
使用IC录音机之前,应去除显示窗
口的薄膜。
立体声耳机 (1)
(仅限ICD-SX712/SX713)
降噪立体声耳机 (1)
(仅限ICD-SX813)
耳塞帽 (小号、大号)(1)
(仅限ICD-SX813)
USB连接电缆 (1)
防风罩 (1)
用它罩住内置话筒。
底座 (1)
电话录音话筒 (1)
应用软件,Sound Organizer
(CD-ROM)(1)
便携袋 (1)
NH-AAA (AAA尺寸)可充电电池
(2)
电池盒 (1)
microSDHC卡 (4 GB)(1)
(仅限ICD-SX813)
该卡有一个用户可用区域和一个管
理区域。该卡可供用户使用的容量
约为3.6 GB。
SD卡适配器 (1)
(仅限ICD-SX813)
除附带的SD卡适配器外,使用任何
其他适配器均无法保证操作。
操作说明
操作说明为保存在IC录音机的内置
内存中的PDF文件。
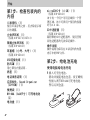
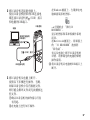
第2步:给电池充电
使用电脑给电池充电
1 插入可充电电池。
滑动并提起电池仓盖,按正确极
性插入两节NH-AAA可充电电池,
然后关闭仓盖。

5
CS
2 将IC录音机连接到电脑上。
使用IC录音机附带的USB连接电
缆连接IC录音机的 (USB)接口
和电脑的USB端口。
3 将IC录音机从电脑上断开。
按照以下步骤进行操作,否则,
如果IC录音机中存有数据文件,
则可能会损坏文件或无法播放这
些文件。
1确认IC录音机的操作指示灯没
有亮起。
2在电脑上进行如下操作。
在Windows画面上,左键单击电
脑桌面底部的图标。
t左键单击 “弹出IC
RECORDER”。
显示的图标和菜单因操作系统
而异。
在Macintosh画面上,将桌面上
的 “IC RECORDER”拖放到
“回收站”。
有关从电脑上断开IC录音机的
详情,请参阅您的电脑附带的
操作说明。
3将IC录音机从电脑的USB端口上
断开。
电脑
IC录音机
连接至电脑的
USB端口
至 (USB)接口
USB连接电缆

6
CS
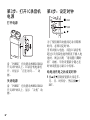
第3步:打开IC录音机
电源
打开电源
沿 “POWER”方向滑动POWER/HOLD
开关1秒钟以上。IC录音机电源打
开,并显示 “正在访问...”动
画。
关闭电源
沿 “POWER”方向滑动POWER/HOLD
开关2秒钟以上,显示 “关机”动
画。
第4步:设定时钟
为了使用闹铃功能或记录日期和
时间,必须设定时钟。
当首次插入电池,或在IC录音机
超过1天没装电池的情况下插入电
池时,则会出现 “请设置日期时
间”动画,年份设置部分随之在
时钟设置显示窗口中闪烁。
给电池充电之后设定时钟
1 按v或V控制按钮依次设定年、
月、日、时和分,然后按
N/
ENT。
x STOP
N/ENT
v, V

7
CS
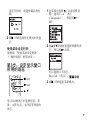
设定年份时,请选择最后两位
数。
2 按x STOP返回停止模式中的显
示。
使用菜单设定时钟
请参阅 “使用菜单设定时钟”
(“操作说明”的第19页)。
第5步:设定显示窗口
所用的语言
可以从2种语言中选择信息、菜
单、文件夹名、文件名等所用的
语言。
1 在菜单中选择 (IC录音机设
置)选项卡t “语言
(Language)”,然后按
N/
ENT。
2 按v或V控制按钮选择所需的语
言,然后按
N/ENT。
可以选择以下语言。
English (英文)、
3 按x STOP退出菜单模式。
x STOP
N/ENT
v, V


9
CS
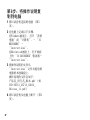
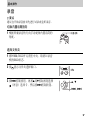
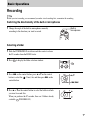
基本操作
录音
z 要点
建议在开始录音前首先进行试录或监听录音。
切换内置话筒指向
选择文件夹
1
根据所要录音的方向手动更改内置话筒的
角度。
1 将POWER/HOLD开关滑至中央,取消IC录音
机的HOLD状态。
2 按 显示文件夹选择窗口。
3 按.控制按钮,再按v或V控制按钮选择
(语音)选项卡,然后按
>控制按钮。
内置话筒
., >
v, V

10
CS
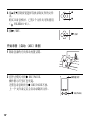
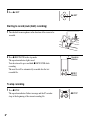
开始录音 (自动 (AGC)录音)
4
按v或V控制按钮选择存放录制文件的文件
夹。
购买IC录音机时,已有5个文件夹可供使用
( FOLDER01-05)。
5 按N/ENT。
1 朝录音源的方向转动内置话筒。
2 在停止模式中按z REC/PAUSE。
操作指示灯呈红色亮起。
无需在录音时按住
z REC/PAUSE不放。
上一个文件录完后会自动录制新文件。
v
V
N/ENT
操作指示灯
z REC/PAUSE

11
CS
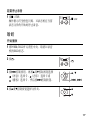
若要停止录音
聆听
开始播放
1
按x STOP。
操作指示灯呈橙色闪烁,IC录音机在当前
录音文件的开始处停止录音。
1 将POWER/HOLD开关滑至中央,取消IC录音
机的HOLD状态。
2 按。
3 按.控制按钮,再按v或V控制按钮选择
(语音)选项卡、 (音乐)选项卡或
(播客)选项卡,然后按
>控制按钮。
4 按v或V控制按钮选择文件夹。
x STOP
., >
v, V
v
V

12
CS
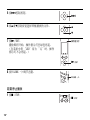
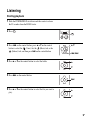
若要停止播放
5
按>控制按钮。
6 按v或V控制按钮选择所要播放的文件。
7 按N/ENT。
播放即将开始,操作指示灯呈绿色亮起。
(在菜单中将 “LED”设为 “关”时,操作
指示灯不会亮起。)
8 按VOLUME -/+调节音量。
1 按x STOP。
>
v
V
操作指示灯
N/ENT
VOLUME -/+
x STOP

13
CS
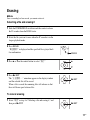
删除
P注
录音一旦被删除,将无法恢复。
选择文件,将其删除
1
将POWER/HOLD开关滑至中央,取消IC录音
机的HOLD状态。
2 当IC录音机处于停止或播放模式时,选择
所要删除的文件。
3 按ERASE。
“确定删除?”出现在显示窗口,同时播放
所指定的文件以便确认。
4 按v或V控制按钮选择 “执行”。
5 按N/ENT。
显示窗口出现 “正在删除...”动画,所选
文件将被删除。
当某个文件被删除后,其余的文件将会前
移,使文件之间不留空间。
ERASE
v
V
N/ENT


2
GB
WARNING
Do not expose the batteries (battery pack or batteries
installed) to excessive heat such as sunshine, fire or
the like for a long time.
RATED CURRENT CONSUMPTION: 800 mA
Capacity (User available capacity)
ICD-SX712:
2 GB (approx. 1.80 GB =
1,932,735,283 Byte)
ICD-SX713/ICD-SX813:
4 GB (approx. 3.60 GB =
3,865,470,566 Byte)
A part of the memory capacity is used as a
management area.
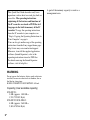
This Quick Start Guide describes only basic
operations, such as how to record, play back, or
erase files. The operating instructions
explaining all the features and functions of
the IC recorder are stored as PDF files in 2
languages in the built-in memory of the IC
recorder. To copy the operating instructions
from the IC recorder to your computer, see
“Step 6: Copying the Operating Instructions to
Your Computer” on page 6.
You can also get another copy of the operating
instructions from the Sony support home page:
http://www.sony-asia.com/section/support
Moreover, to install the supplied application
software (Sound Organizer), refer to the
operating instructions stored as PDF files.
For details on using the Sound Organizer
software, visit its help files.

3
GB
Getting Started
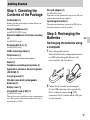
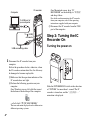
Step 1: Checking the
Contents of the Package
IC Recorder (1)
Remove the film on the display window before you
use the IC recorder.
Stereo headphones (1)
(for ICD-SX712/SX713 only)
Stereo headphones for noise canceling
(1)
(for ICD-SX813 only)
Earbuds (Size S, L) (1)
(for ICD-SX813 only)
USB connecting cable (1)
Wind screen (1)
Use this to cover the built-in microphones.
Stand (1)
Telephone recording microphone (1)
Application software, Sound Organizer
(CD-ROM) (1)
Carrying pouch (1)
NH-AAA (size AAA) rechargeable
batteries (2)
Battery case (1)
microSDHC card (4 GB) (1)
(for ICD-SX813 only)
This card has a user available area and a management
area. The capacity of this card available to the user is
approximately 3.6 GB.
SD card adaptor (1)
(for ICD-SX813 only)
Operations are not guaranteed if you use any SD card
adaptor other than the one supplied.
Operating Instructions
The operating instructions are stored as PDF files in
the built-in memory of the IC recorder.
Step 2: Recharging the
Batteries
Recharging the batteries using
a computer
1 Insert rechargeable batteries.
Slide and lift the battery compartment lid, insert
two NH-AAA rechargeable batteries with
correct polarity, and close the lid.
2 Connect the IC recorder to your computer.
Use the USB connecting cable supplied with
the IC recorder to connect the (USB)
connector of the IC recorder and the USB port
of your computer.
GB

4
GB
3 Disconnect the IC recorder from your
computer.
Follow the procedures below; otherwise, when
the IC recorder contains data files, the files may
be damaged or become unplayable.
1Make sure that the operation indicator of the
IC recorder does not light.
2Perform the following operation on your
computer.
On a Windows screen, left-click the icon at
the bottom of the desktop of the computer.
t Left-click “弹出IC RECORDER.”
The icon and menu displayed can be different on
different operating systems.
On a Macintosh screen, drag “IC
RECORDER” on the desktop to “回收站”
and drop it there.
For details on disconnecting the IC recorder
from your computer, refer to the operating
instructions supplied with your computer.
3Disconnect the IC recorder from the USB
port of the computer.
Step 3: Turning the IC
Recorder On
Turning the power on
Slide the POWER/HOLD switch in the direction
of “POWER” for more than 1 second. The IC
recorder is turned on, and the “正在访问...”
animation is displayed.
Computer
IC recorder
To USB port of
your computer
To (USB)
connector
USB connecting cable

5
GB
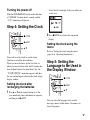
Turning the power off
Slide the POWER/HOLD switch in the direction
of “POWER” for more than 2 seconds, and the
“关机” animation is displayed.
Step 4: Setting the Clock
You need to set the clock to use the alarm
function or record the date and time.
When you insert batteries for the first time, or
when you insert batteries after the IC recorder has
been without batteries for more than 1 day, the
“请设置日期时间” animation appears, and then
the year section begins to flash in the clock setting
display window.
Setting the clock after
recharging the batteries
1 Press v or V on the control button to set the
year, month, day, hour, and minute in sequence,
and then press
N/ENT.
Select the last two digits of the year when you
set the year.
2 Press x STOP to return to the stop mode
display.
Setting the clock using the
menu
Refer to “Setting the clock using the menu”
(page 16 in “Operating Instructions”).
Step 5: Setting the
Language to Be Used in
the Display Window
You can select the language to be used for
messages, menus, folder names, file names, etc.
from 2 languages.
x STOP
N/ENT
v, V
x STOP
N/ENT
v, V

6
GB
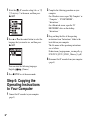
1 Select the (IC recorder setting) tab t “语
言(Language)” in the menu, and then press
N/ENT.
2 Press v or V on the control button to select the
language that you want to use, and then press
N/ENT.
You can select the following languages.
English, (Chinese)
3 Press x STOP to exit the menu mode.
Step 6: Copying the
Operating Instructions
to Your Computer
1 Connect the IC recorder to your computer
(page 3).
2 Complete the following procedure on your
computer.
On a Windows screen; open “My Computer” or
“Computer,” - “IC RECORDER” -
“Instructions.”
On a Macintosh screen; open the “IC
RECORDER” drive on the desktop -
“Instructions.”
3 Drag and drop the files of the operating
instructions from “Instructions” folder to the
local disk on your computer.
The file names of the operationg instructions
are as follows:
Product name_language name_version.pdf (e.g.
ICD-SX712_SX713_SX813_Chinese_11.pdf)
4 Disconnect the IC recorder from your computer
(page 4).
ページが読み込まれています...
ページが読み込まれています...
ページが読み込まれています...
ページが読み込まれています...
ページが読み込まれています...
ページが読み込まれています...
ページが読み込まれています...
ページが読み込まれています...
-
 1
1
-
 2
2
-
 3
3
-
 4
4
-
 5
5
-
 6
6
-
 7
7
-
 8
8
-
 9
9
-
 10
10
-
 11
11
-
 12
12
-
 13
13
-
 14
14
-
 15
15
-
 16
16
-
 17
17
-
 18
18
-
 19
19
-
 20
20
-
 21
21
-
 22
22
-
 23
23
-
 24
24
-
 25
25
-
 26
26
-
 27
27
-
 28
28


他の言語で
- English: Sony ICD-SX713 Quick start guide