本产品为Xbox One无线2.4G手柄,实现RF2.4G无线手柄在XBOX one主机上进行游戏操作,
另外还可兼容PS3,PC(X-input/D-input)主机上使用。
01
02
03
04
05
06
09
10
11
12
13
14
15
16
07
08
17
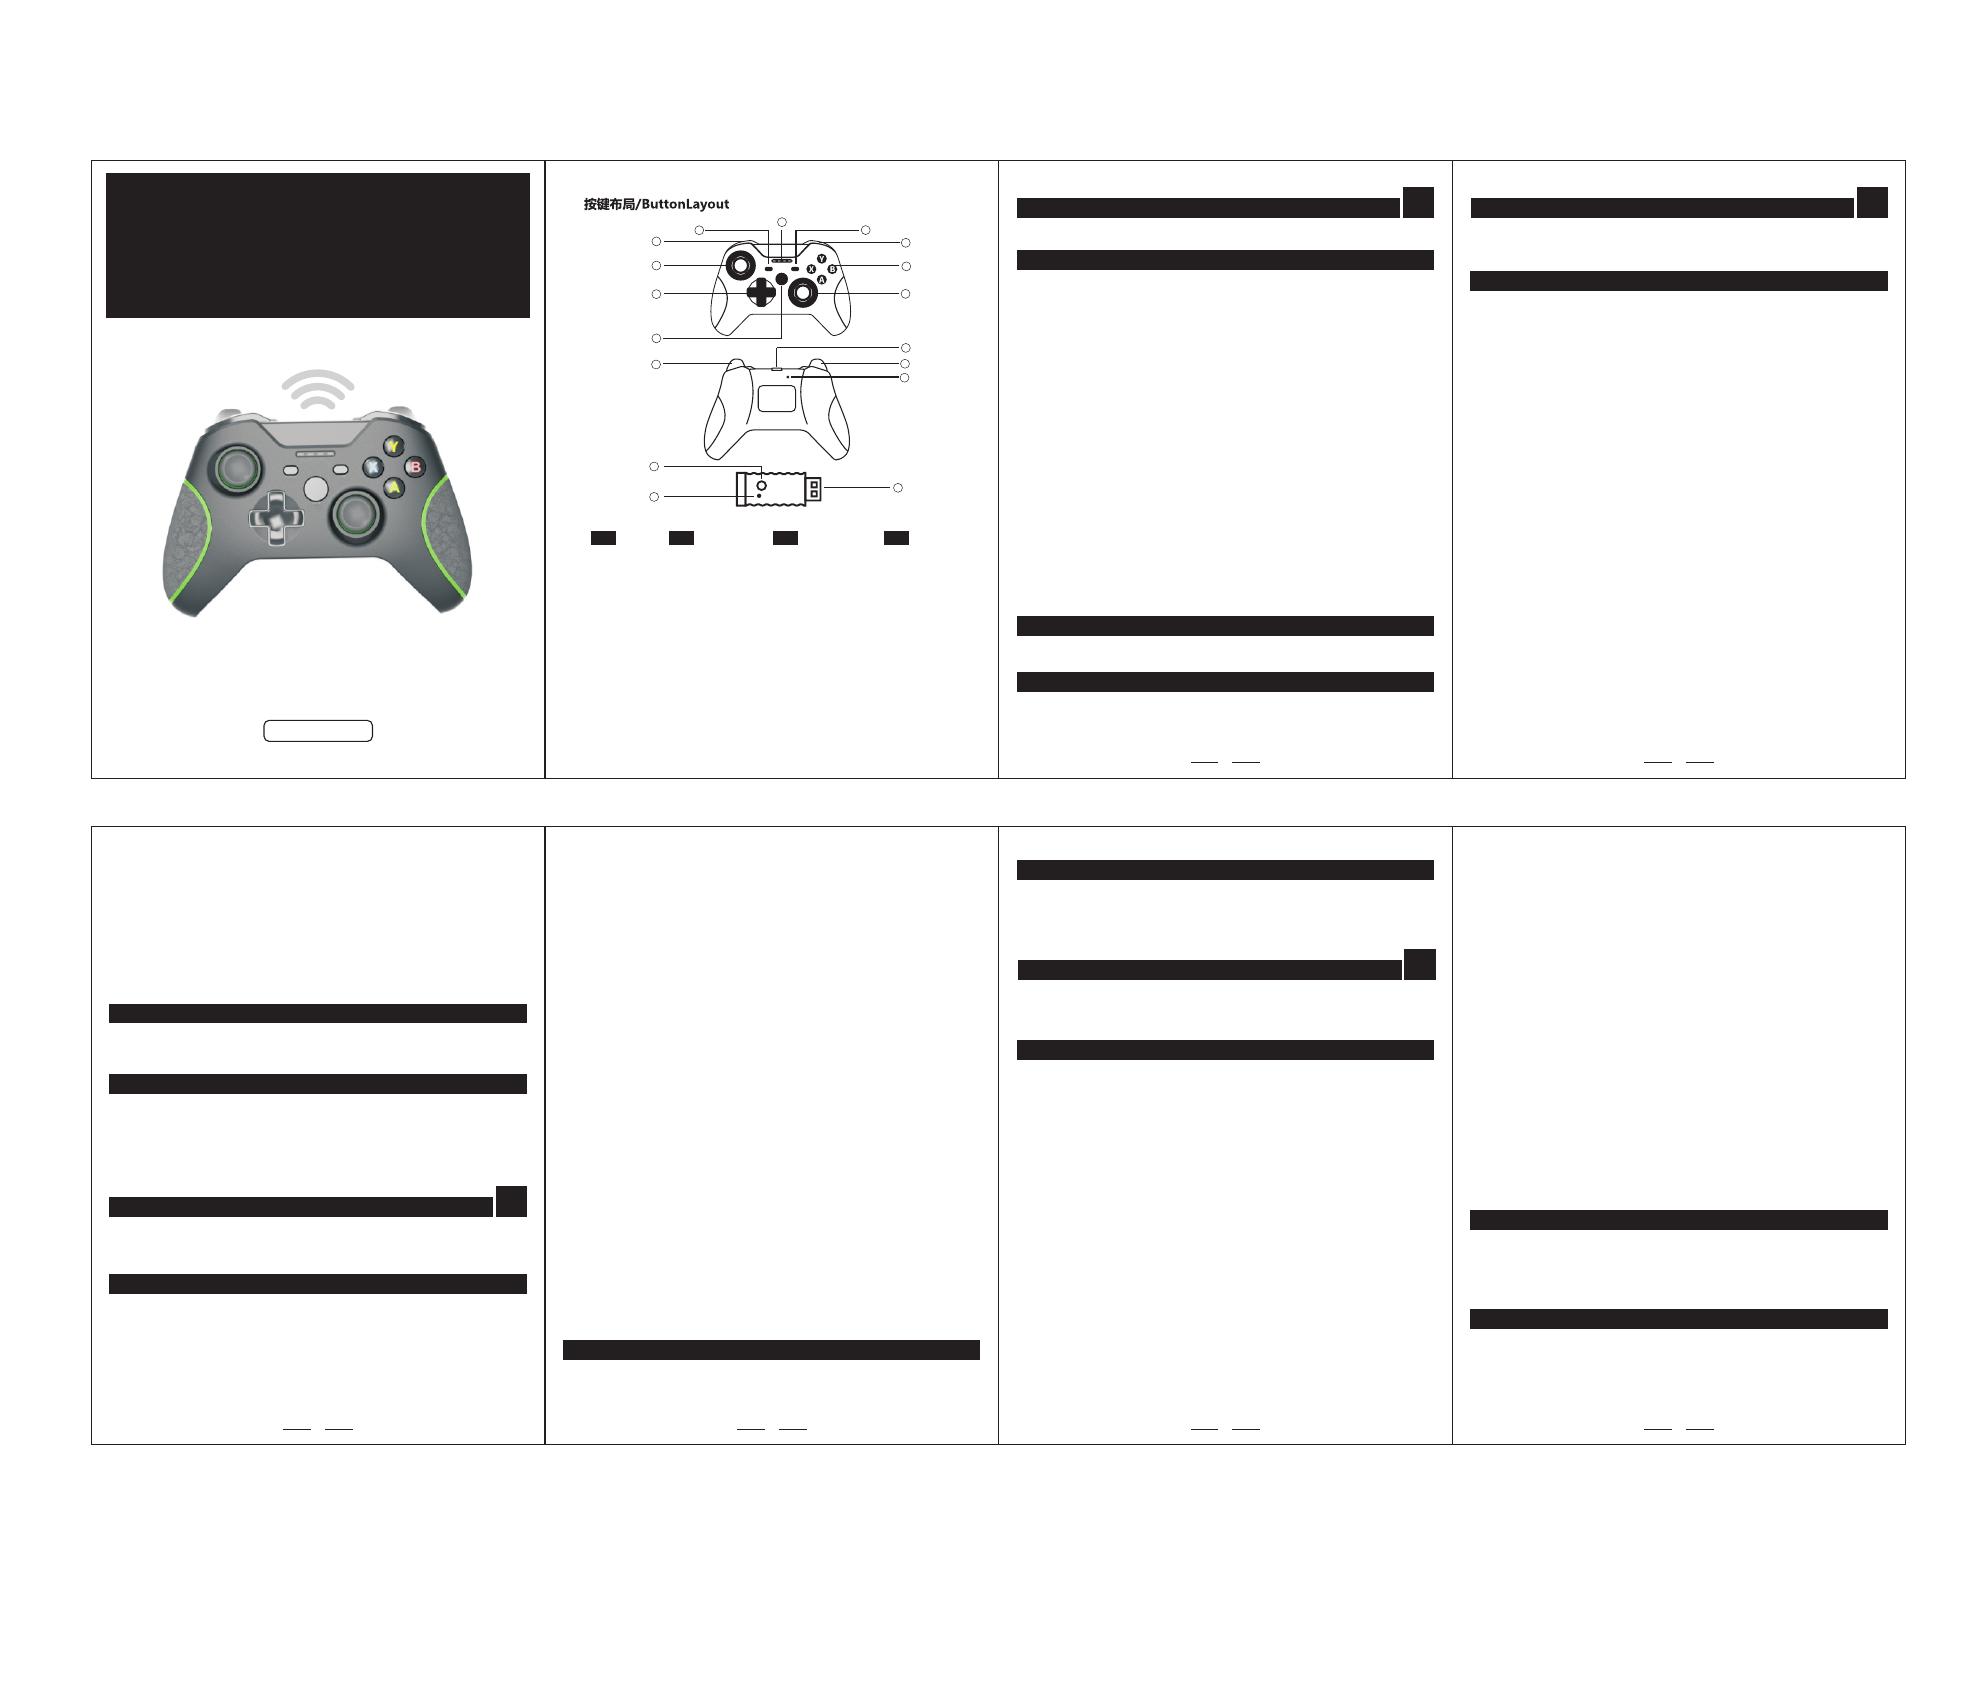
1.View键
2.LB键
3.左摇杆(L3)
4.十字键
5.HOME键
6.RT键
7.Home键
8.接收器指示灯
9.指示灯
10.Menu键
11.RB键
12.A,B,X,Y键
13.右摇杆(R3)
14.Mirco充电口
15.LT键
16.复位孔
17.USB接口
CH EN
产品简要
操作说明
启动Xbox one主机,将接收器端的USB接头插到主机上此时接收器的LED灯闪烁,短按手柄
HOME键开机LED1-LED4灯闪烁进入搜索配对,连接成功后手柄LED1-LED4灯常亮,且接收
器灯常亮即可使用。
启动PS3主机,将接收器端的USB接头插到主机上此时接收器的LED灯闪烁,短按手柄HOME键
开机LED1-LED4灯闪烁进入搜索配对,连接成功后手柄对应的指示灯常亮,且接收器灯常亮即
可使用。
启动PC电脑,将接收器端的USB接头插到主机上此时接收器的LED灯闪烁,短按手柄HOME键
开机LED1-LED4灯闪烁进入搜索配对,连接成功后手柄对应的指示灯常亮,且接收器灯常亮即
可使用。长按HOME键5秒可转换X-input/D-input模式。X-input模式LED1灯常亮,D-
input模式LED1-LED4灯常亮。
连接说明
自动休眠
连接后手柄无任何操作5分钟自动休眠,手柄休眠后短按HOME键开机与插在主机上的接收器连
接。
连接后长按L3+R3+HOME键3秒可关闭手柄
低电压报警
如果锂电池电压低于3.5V±0.1V,则当前通道灯快闪提示电压低
如果锂电池电压低于3.45V±0.1V则自动休眠;
充电指示
手柄关机下,充电时LED1-LED4长亮呼吸,充满LED灭;
连接状态下充电当前通道指示灯闪烁(慢闪),充满电当前指示灯常亮
复位
当手柄出现异常时可用坚硬细小的回形针按下手柄背面小孔,进行复位。
参 数
充电输入直流电压:5V/1A
内置电池容量:600mA
休眠电流:小于50uA
工作电流:25mA-150mA
注意事项
1.严禁私自拆开本产品。
2.严禁将产品放在强光下暴晒。
3.严禁大力摔打产品。
4.请勿在高温或潮湿环境中使用及存放本产品。
游戏手柄
使用说明书 /Instrucciones / Instructions / 製品の取扱説明書
HS-XO305
WIRELESS
CONTROLLER
FOR Xbox One/PS3/PC (X-input/D-input)
1.View Button
2. LB Button
3.Left Joystick (L3)
4.D Pad
5.HOME Button
6.RT Button
7.Home Button
8.Receiver Indicator Light
9.Indicator Light
10.Menu Button
11.RB Button
12.A,B,X,Y Button
13.Right Joystick (R3)
14.Mirco Charging Port
15. LT Button
16.Reset Hole
17.USB Port
JP
1.Viewキー
2.LBキー
3.左スティック(L3)
4.クロスキー
5.HOMEキー
6.RTキー
7.ホームボタン
8.レシーバーインジケーター
9.インジケーターライト
10.メニューキー
11.RBキー
12.A、B、X、Yキー
13.右スティック(R3)
14.Mirco充電ポート
15.LTキー
16.リセット穴
17.USBインターフェース
CH
This product is the Xbox One wideless 2.4G controller. It is used to play games on XBOX
one console through RF 2.4G wireless controller.
It is compatible with PS3 and can be used on PC(X-input/D-input) console.
Product Brief EN
Operation Guide
Start the Xbox one console and insert USB of the receiver to the console. The LED light
on the receiver will be on. Short press HOME Button on the controller to open the
controller. Then LED1-LED4 lights will flash to search for pairing. After they are well
connected, LED1-LED4 lights of the controller will be on and the light of the receiver
will be on, indicating that they can be used.
Start PS3 console and insert USB of the receiver to the console. The LED light on the
receiver will be on. Short press HOME Button on the controller to open the controller.
Then LED1-LED4 lights will flash to search for pairing. After they are well connected,
related indicator lights of the controller will be on and the light of the receiver will be
on, indicating that they can be used.
Start PC and insert USB of the receiver to the console. The LED light on the receiver will
be on. Short press HOME Button on the controller to open the controller. Then LED1-
LED4 lights will flash to search for pairing. After they are well connected, related
indicator lights of the controller will be on and the light of the receiver will be on,
indicating that they can be used. Long press HOME Button for five seconds to switch
the X-input mode and the D-in put mode. In the X-input mode, LED1 light will be on; in
the D-input mode, LED1-LED4 lights will be on.
Connection Description
Auto Sleep
After it is well connected, the controller will sleep automatically if operation is done
within 5 minutes. After the controller sleeps, you can press the Home Button to power
it up and connect it with the receiver plugged on the host computer.
After it is well connected, you can close the controller by pressing L3+R3+HOME Button
for three seconds.
Low Voltage Alarm
If the lithium battery voltage is lower than 3.5V±0.1V, the current channel will flash
quickly to show low voltage;
If the lithium battery voltage is lower than 3.45V±0.1V, the controller will enter the
dormant state automatically;
Parameters
Charging Indicator
Under the shutdown state of the controller, LED1-LED4 will flash slowly when the
controller is charged. After it is fully charged, the LED will be off;
If the controller is charged under the connection state, the indicator light of the
current channel will flash (flash slowly). After it is fully charged, the indicator light will
be on;
Reset
When the Controller is abnormal, you can press the small hole on the back of the
controller with a small office clip to reset it.
Input DC Voltage for Charging: 5V/1A
Build-in Battery Capacity: 600mA
Dormancy Current: Less than 50uA
Input Current: 25mA-150mA
Precaution
1. Do not disassemble the product without permission.
2. Do not expose the product to strong light.
3. Do not throw the product violently.
4. Do not use or store this product in high temperature or humidity environment.
製品の概要 JP
この製品は
操作用のRF2.4Gワイヤレスコントローラーを実現し、さらに、PS3およびPC(X入力/
D入力)ホストと互換性があります。
XboxOneワイヤレス2.4Gコントローラーであり、XBOXoneホストでのゲーム
Xbox
レシーバーのLEDライトが点滅し、ハンドルのHOMEボタンを短く押してLED1-
LED4ライトが点滅し、検索ペアリングに入ります。接続成功すると、ハンドルLED1-
LED4ライトが常にオンになります。また、ライトが常にオンのときにレシーバーを使
用できます。
操作の説明
接続の説明
Oneホストを起動し、レシーバー側のUSBコネクターをホストに接続すると、
PS3ホストを起動し、レシーバー側のUSBコネクターをホストに接続すると、レシーバ
ーのLEDライトが点滅し、ハンドルのHOMEボタンを短く押してLED1をオンにします
。LED4ライトが点滅して検索ペアリングに入ります。接続が成功したら、ハンドルの
対応するインジケーターライトは常に点灯しており、レシーバーはライトが常に点灯
しているときに使用できます。
PCを起動し、レシーバーのUSBコネクターをホストに接続します。このとき、レシー
バーのLEDライトが点滅します。ハンドルのホームボタンを短く押すと、LED1-
LED4ライトが点滅し、検索ペアリングに入ります。接続が成功すると、ハンドルの対
応するインジケーターライトが常に点灯します。レシーバーは、ライトが常に点灯し
ているときに使用できます。 HOMEボタンを5秒間長押しすると、X-input/D-in
putモードに切り替わります。 X-inputモードのLED1は常にオンであり、D-
inputモードのLED1-LED4は常にオンです。
自动休眠自動スリープ
接続後、ハンドルは何も操作せずに自動的に
5分間スリープします。ハンドルが休止状態になったら、HOMEボタンを押して電源を
入れ、ホストに接続されているレシーバーに接続します。
接続後、L3 + R3 + HOMEボタンを3秒間押し続けてハンドルをオフにします
低電圧アラーム
リチウム電池の電圧が
3.5V±0.1V未満の場合、電流チャネルライトがすばやく点滅して、電圧が低いことを
示します。
リチウム電池の電圧が3.45V±0.1Vより低い場合、自動的にスリープします。
充電手順
ハンドルをオフにすると、充電中はLED1-
LED4がオンと呼吸を続け、充電完了になるとLEDがオフになります。
接続すると、充電電流チャネルインジケータが点滅(ゆっくり点滅)し、完全に充電
されると電流インジケータが常に点灯します
リセット
ハンドルが異常な場合は、硬くて小さいペーパークリップを使用して、ハンドルの背
面にある小さな穴を押してリセットできます。
パラメータ
充電入力DC電圧:5V / 1A
内蔵バッテリー容量:600mA
スリープ電流:50uA未満
動作電流:25mA-150mA
注意事項
1.本製品を無断で解体することは固くお断りいたします。
2.製品を強い光にさらすことは固く禁じられています。
3.製品を激しく叩くことは固く禁じられています。
4.本製品を高温多湿の環境で使用または保管しないでください。
ES
1.Botón Vista
2.Botón LB
3. Joystick izquierdo L3
4.Botón direccional
5.Botón INICIO
6.Botón RT
7.Botón INICIO
8.Indicador del receptor
9.Indicador
10.Botón del Menú
11.Botón RB
12.Botón A,B,X,Y
13.Joystick derecho R3
14.Puerto de carga Micro
15.Botón LT
16.Botón de reinicio
17.Interfaz USB
Introducción del producto ES
Este producto es un controlador inalámbrico 2.4G Xbox One, que realiza el controlador
inalámbrico RF2.4G para la operación del juego en el host XBOX one.
Además, es compatible con hosts de PS3 y PC (entrada X / entrada D).
Instrucciones para la operación
Instrucciones de conexión
Inicie el host de Xbox one, conecte el conector USB en el extremo del receptor al host.
La luz LED del receptor parpadeará y presione brevemente el botón INICIO del
controlador para encender, las luces LED1-LED4 parpadearán para ingresar al
emparejamiento de búsqueda. Después de que la conexión sea exitosa, las luces
LED1-LED4 del controlador están siempre encendidas, y la luz del receptor siempre
está encendida, se puede usarla.
Inicie el host de PS3, conecte el conector USB en el extremo del receptor al host y la luz
LED del receptor parpadeará, presione brevemente el botón de inicio del controlador
para encender, las luces LED1-LED4 parpadearán para ingresar al emparejamiento de
búsqueda, después de que la conexión sea exitosa, la luz indicadora correspondiente
del controlador está siempre encendida y la luz del receptor siempre está encendida,
se puede usarla.
Instrucciones para la operación
Instrucciones de conexión
Inicie la PC y conecte el conector USB del receptor al host. En este momento, la luz LED
del receptor parpadea, presione brevemente el botón de inicio del controlador para
encender , las luces LED1-LED4 parpadearán para ingresar al emparejamiento de
búsqueda y la luz indicadora correspondiente del controlador está siempre
encendida. Después de que la conexión es exitosa, la luz indicadora correspondiente
del controlador está siempre encendida y la luz del receptor siempre está encendida,
se puede usarla. Mantenga presionado el botón INICIO durante 5 segundos para
cambiar al modo de entrada X-input / D-in put. El LED1 en el modo de X-input está
siempre encendido y el LED1-LED4 en el modo de D-input está siempre encendido.
Suspensión automática
Después de conectarse, el controlador se suspenderá automáticamente durante 5
minutos sin ninguna operación. Después de que el controlador esté inactivo, presione
el botón INICIO para encender y conectar al receptor enchufado al host.
Después de conectar, presione y mantenga presionado el botón L3 + R3 + INICIO
durante 3 segundos para apagar el controlador
Alarma de baja tensión
Si el voltaje de la batería de litio es inferior a 3,5 V ± 0,1 V, la luz del canal actual
parpadea rápidamente para indicar que el voltaje es bajo.
Si el voltaje de la batería de litio es inferior a 3,45 V ± 0,1 V, se suspenderá
automáticamente;
Instrucciones de carga
Cuando el controlador está apagado, el LED1-LED4 se mantendrá encendido mientras
se carga, y el LED se apagará cuando esté lleno
Cuando está conectado, el indicador del canal de corriente de carga parpadea
(parpadea lentamente) y el indicador de corriente está siempre encendido cuando
está completamente cargado
Reinicio
Cuando el controlador es anormal, se puede usar un clip de papel pequeño y duro
para presionar el pequeño orificio en la parte posterior del controlador para
restablecerlo.
Parámetros
Voltaje DC de entrada de carga: 5V / 1A\
Capacidad de la batería incorporada: 600 mA
Corriente de suspensión: menos de 50uA
Corriente de trabajo: 25mA-150mA
Precauciones
1. Está estrictamente prohibido abrir este producto sin autorización.
2. Está estrictamente prohibido exponer el producto a una luz intensa.
3. Está estrictamente prohibido batir el producto vigorosamente.
4. No utilice ni almacene este producto en un ambiente húmedo o de alta
temperatura.
1 2
3 4 5 6
109*80MM双面四折页


