
FO *OTUSVDUJPOGPS6TF
[I ⸪叓檟䒹ⴑ
'SJEHFGSFF[FS
ぢ摺㩏㌷ぢて㩏嵯㊳
,*/

en Content
Information concerning
disposal . . . . . . . . . . . . . . . . . . 3
Safety and warning
information . . . . . . . . . . . . . . . . 3
Getting to know
your appliance . . . . . . . . . . . . . 5
Fascia . . . . . . . . . . . . . . . . . . . . 5
Room temperature . . . . . . . . . . 6
Installing the appliance . . . . . . . 6
Connecting the appliance . . . . . 6
Switching on the appliance . . . . 7
Setting the temperature . . . . . . 7
Warning signal . . . . . . . . . . . . . 8
Store food in the appliance . . . 8
Variable interior design . . . . . . . 9
Interior fittings of refrigerator
compartment . . . . . . . . . . . . . . 10
Refrigerator compartment . . . . . 10
Sticker “OK” . . . . . . . . . . . . . . . 10
Super cooling . . . . . . . . . . . . . . 10
Freezer compartment . . . . . . . . 10
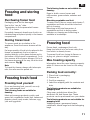
Freezing and storing food . . . . . 11
Freezing fresh food . . . . . . . . . . 11
Freezing food . . . . . . . . . . . . . . 11
Super freezing . . . . . . . . . . . . . 12
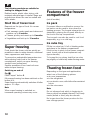
Features of the freezer
compartment . . . . . . . . . . . . . . 12
Thawing frozen food . . . . . . . . . 12
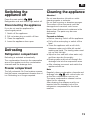
Switching the appliance off . . . . 13
Defrosting . . . . . . . . . . . . . . . . . 13
Cleaning the appliance . . . . . . . 13
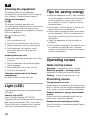
Light (LED) . . . . . . . . . . . . . . . . 14
Tips for saving energy . . . . . . . 14
Operating noises . . . . . . . . . . . 14
Eliminating minor faults
yourself . . . . . . . . . . . . . . . . . . . 15
Customer service . . . . . . . . . . . 16
zh 目录
处理旧机器的注意事项 . . . . . . . . 17
安全与警告提示 . . . . . . . . . . . . . 17
了解本机器 . . . . . . . . . . . . . . . . . 18
操作面板, . . . . . . . . . . . . . . . . . 19
注意室内温度 . . . . . . . . . . . . . . . 19
安装本设备 . . . . . . . . . . . . . . . . . 19
接通本设备 . . . . . . . . . . . . . . . . . 19
开机 . . . . . . . . . . . . . . . . . . . . . . 19
设定温度 . . . . . . . . . . . . . . . . . . 20
报警声 . . . . . . . . . . . . . . . . . . . . 20
将食物放入到冰箱中 . . . . . . . . . 21
可随需要调整的机器内布置 . . . . 21
冷藏室附件 . . . . . . . . . . . . . . . . . 21
粘贴标签 “OK” . . . . . . . . . . . . . . 22
冷藏室 . . . . . . . . . . . . . . . . . . . . 22
超级冷藏 . . . . . . . . . . . . . . . . . . 22
冷冻室 . . . . . . . . . . . . . . . . . . . . 22
冷冻和存放 . . . . . . . . . . . . . . . . 22
冷冻新鲜食物 . . . . . . . . . . . . . . 23
冷冻食品 . . . . . . . . . . . . . . . . . . 23
超级冷冻 . . . . . . . . . . . . . . . . . . 23
冷冻室附件 . . . . . . . . . . . . . . . . 24
解冻冷冻食物 . . . . . . . . . . . . . . 24
关机 . . . . . . . . . . . . . . . . . . . . . . 24
除霜 . . . . . . . . . . . . . . . . . . . . . . 24
清理本设备 . . . . . . . . . . . . . . . . 24
照明 (LED) . . . . . . . . . . . . . . . . 25
节能 . . . . . . . . . . . . . . . . . . . . . . 25
运转时的噪声 . . . . . . . . . . . . . . 25
自行解除小故障 . . . . . . . . . . . . . 26
售后服务 . . . . . . . . . . . . . . . . . . . 27

3
Information
concerning disposal
*
Disposal of packaging
The packaging protects your appliance from
damage during transit. All utilised materials
are environmentally safe and recyclable.
Please help us by disposing the packaging
in an environmentally friendly manner.
Please ask your dealer or inquire at your local
authority about current means of disposal.
*
Disposal of your old
appliance
Old appliances are not worthless rubbish!
Valuable raw materials can be reclaimed
by recycling old appliances.
This appliance has been identified
in accordance with the European
directive 2012/19/EG on Waste
Electrical and Electronic Equipment –
WEEE. The directive specifies the
framework for an EU-wide valid return and
recycling of old appliances.
m
Warning
Redundant appliances
1. Pull out the mains plug.
2. Cut off the power cord and discard with
the mains plug.
Refrigerators contain refrigerant and gases in
the insulation. Refrigerant and gases must be
disposed of professionally.
Ensure that tubing of the refrigerant circuit is
not damaged prior to proper disposal.
Safety and warning
information
Before you switch ON the
appliance
Please read the operating and installation
instructions carefully. They contain important
information on how to install, use and
maintain the appliance.
Retain all documents for subsequent use or
for the next owner.
Technical safety
This appliance contains a small quantity
of environmentally-friendly but flammable
R600a refrigerant. Ensure that the tubing of
the refrigerant circuit is not damaged during
transportation and installation. Leaking
refrigerant may cause eye injuries or ignite.
If damage has occurred
– Keep naked flames and/or ignition
sources away from the appliance,
– thoroughly ventilate the room for
several minutes,
– switch off the appliance and pull out the
mains plug,
– Notify customer service.
The more refrigerant an appliance
contains, the larger the room must be in
which the appliance is situated. Leaking
refrigerant can form a flammable gas-air
mixture in rooms which are too small.
The room must be at least 1 m
3
per 8 g of
refrigerant. The amount of refrigerant in your
appliance is indicated on the rating plate
inside the appliance.
Only customer service may change the
power cord and carry out any other repairs.
Improper installations and repairs may put
the user at considerable risk.

4
Important information when
using the appliance
Never use electrical appliances inside the
appliance (e.g. heater, electric ice maker,
etc.).
Risk of explosion!
Never use a steam cleaner to defrost or
clean the appliance! The steam may
penetrate electrical parts and cause a short-
circuit.
Risk of electric shock!
Do not use pointed or sharp-edged
implements to remove frost or layers of ice.
You could damage the refrigerant tubing.
Leaking refrigerant may ignite or cause eye
injuries.
Do not store products which contain
flammable propellants (e.g. spray cans)
or explosive substances in the appliance.
Risk of explosion!
Do not stand on or lean heavily against
base of appliance, drawers or doors, etc
Before defrosting and cleaning the
appliance, pull out the mains plug or switch
off the fuse. Do not pull out the mains plug
by tugging on the power cord.
Bottles which contain a high percentage
of alcohol must be sealed and stored in an
upright position.
Keep plastic parts and the door seal free of
oil and grease. Otherwise, parts and door
seal will become porous.
Never cover or block the ventilation
openings for the appliance.
People who have limited physical, sensory
or mental abilities or inadequate knowledge
must not use this appliance unless they are
supervised or given meticulous instructions.
Do not store bottled or canned drinks
(especially carbonated drinks) in the freezer
compartment. Bottles and cans may
explode!
Never put frozen food straight from the
freezer compartment into your mouth.
Risk of low-temperature burns!
Avoid prolonged touching of frozen food,
ice or the evaporator pipes, etc.
Risk of low-temperature burns!
Children in the household
Keep children away from packaging and its
parts. Danger of suffocation from
collapsible boxes and foil!
Do not allow children to play with the
appliance!
If the appliance features a lock, keep the
key out of the reach of children.
General regulations
The appliance is suitable
for refrigerating and freezing food,
for making ice.
The appliance is intended for domestic use
only.
The appliance is suppressed according to
EU Directive 2004/108/EC.
The refrigeration circuit has been checked for
leaks.
This product complies with the relevant safety
regulations for electrical appliances
(EN 60335/2/24).

5
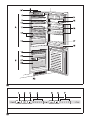
Getting to know
your appliance
Please fold out the illustrated last page.
These operating instructions refer to several
models.
The diagrams may differ.
* not all models
Fig.
1
1–7 Fascia
8 The main switch
9Light (LED)
10 Adjustable glass shelf (EasyLift)
11 Fixed glass shelf *
12 Delicatessen drawers
13 Vegetable container
14 Butter and cheese compartment
15 Egg shelf
16 Adjustable (EasyLift) storage
compartment
17 Bottle holder
18 Storage compartments
for large bottles
19 Berry tray *
20 Frozen food drawer (small)
21 Glass shelf
22 Frozen food drawer (large)
23 Ventilation opening
A Refrigerator compartment
A Freezer compartment
Fascia
Fig.
2
1Alarm button
Used to switch off the warning signal.
(See chapter entitled “Warning signal”.)
2 Super button (freezer compartment)
Switches super freezing on and off.
3 Temperature setting button freezer
compartment
The button sets the temperature in the
freezer compartment.
4 Temperature display freezer
compartment
The numbers correspond to the set
freezer compartment temperatures
in °C.
5 “Super” button (refrigerator
compartment)
Switches super cooling on and off.
6 Refrigerator compartment temperature
setting button
The button sets the temperature in the
refrigerator compartment.
7 Temperature display refrigerator
compartment
The numbers correspond to the set
refrigerator compartment temperatures
in °C.

6
Room temperature
The appliance is designed for a specific
climate class. Depending on the climate
class, the appliance can be operated at the
following temperatures.
The climate class can be found on the rating
plate at the bottom left-hand side in the
appliance.
Ventilation
Fig.
1
/23
This area needs to be well ventilated.
Otherwise, the refrigeration unit will work
harder. This increases energy consumption.
Therefore: Never cover or block the ventilation
opening!
Installing the appliance
Install the appliance in a dry, well ventilated
room. The installation location should neither
be exposed to direct sunlight nor near a heat
source, e.g. a cooker, radiator, etc.
If installation next to a heat source is
unavoidable, use a suitable insulating plate
or observe the following minimum distances
to a heat source:
3 cm to electric or gas cookers.
30 cm to an oil or coal-fired cooker.
Connecting the
appliance
After installing the appliance, wait at least
1 hour until the appliance starts up.
During transportation the oil in the
compressor may have flowed into the
refrigeration system.
Before switching on the appliance for the first
time, clean the interior of the appliance
(see chapter “Cleaning”).
The socket should be freely accessible.
Connect the appliance only to 220–240 V/
50 Hz alternating current via a correctly
installed earthed socket. The socket must be
fused with a 10 to 16 A fuse.
For appliances operated in non-European
countries, check whether the stated voltage
and current type on the rating plate match the
values of your mains supply. The rating plate
is situated in the bottom left-hand side of the
appliance. The power cord may be replaced
by a technician only.
m
Warning
Never connect the appliance to electronic
energy saver plugs or to power inverters
which convert the direct current to 230 V
alternating current (e.g. solar equipment,
power supplies on ships).
Climate class Ambient temperature
SN +10 C to 32 C
N +16 C to 32 C
ST +16 C to 38 C
T +16 C to 43 C

7
Switching on the
appliance
Switch on the appliance with the main
switch
8
.
Fig.
2
A warning signal sounds and alarm button
1
flashes.
The warning signal is switched off by pressing
the alarm button
1
.
The alarm button is lit and the temperature
displays flash until the appliance has reached
the set temperatures.
Operating tips
While the refrigeration unit is running, water
droplets or a thin layer of ice may form at
the rear panel of the refrigerator. This is due
to functional reasons It is not necessary
to scrape off the frost or wipe off the water
droplets. The rear panel defrosts auto-
matically. The condensation flows into the
evaporation area of the appliance via the
condensation channels and the drainage
hole.
The fully automatic No Frost system keeps
the freezer compartment and refrigerator
compartment free of ice. Defrosting is not
required.
The front sides of the housing are partly
heated slightly. This prevents condensation
in the area of the door seal.
If you cannot open the freezer compartment
door immediately after closing it, wait
2–3 minutes until the partial vacuum has
equalised.
Setting the
temperature
Fig.
2
Refrigerator compartment
(can be selected from +2 °C to +8 °C)
Keep pressing temperature setting button
6
until the required refrigerator compartment
temperature is set. The value last selected
is saved.
The set temperature is indicated on display
7
.
We recommend a setting of +4 °C.
Perishable food should not be stored above
+4 °C.
Freezer compartment
(can be selected from –16 °C to –24 °C)
Keep pressing temperature setting button
3
until the required freezer compartment
temperature is set.
The value last selected is saved.
The set temperature is indicated on display
4
.
We recommend a setting of –18 °C in the
freezer compartment.

8
Warning signal
Switching off the warning
signal
Fig.
2
If the alarm button
1
is pressed, the warning
signal switches off and the display is reset to
standby.
Door warning signal
The door warning signal switches on if the
appliance door is left open for longer than one
minute. A long-term warning signal sounds.
Temperature warning
The temperature warning signal switches on
if the freezer compartment is too warm.
A beeping signal sounds.
Thaw warning
If taste, odour and appearance have not
changed, the food can be boiled or fried and
then refrozen.
No longer store the frozen produce for the
max. storage period.
Temperature warning
The warning signal may switch on without any
risk to the frozen food:
When the appliance is switched on.
when large quantities of fresh food are
placed in the appliance.
if the freezer compartment door is open too
long.
Store food in the
appliance
Note the chill zones in the
refrigerator compartment!
The air circulation in the refrigerator
compartment produce different refrigerant
zones:
Coldest zone
is between the arrow stamped on the side
and the base of the refrigerator
compartment.
Fig.
3
Note
Store perishable food (e.g. fish, sausage,
meat) in the coldest zone.
Warmest zone
is at the very top of the door.
Note
Store e.g. cheese and butter in the
warmest zone. When served, the cheese
will not have lost its flavour and the butter
will be easy to spread.
Alarm
button
Temperature
display
Explanation
illuminates flashes
Temperature
warning:
Frozen food is not
at risk of thawing.
flashes flashes
Thaw warning:
Frozen food
is
at
risk of thawing.
flashes illuminates
Thaw warning:
At some time
the freezer
compartment
was
too warm. Frozen
food is at risk of
thawing.

9
Note when loading products
Wrap or cover food before placing in the
appliance. This will retain the aroma, colour
and freshness of the food. In addition, flavours
will not be transferred between foods and the
plastic parts will not become discoloured.
Note
Avoid contact between food and rear panel.
Otherwise the air circulation will be impaired.
Food or packaging could freeze to the rear
panel.
We recommend arranging the food as
follows:
On the shelves in the refrigerator
compartment:
Bakery products, ready meals, cold
sensitive fruit and vegetables
Delicatessen drawer:
Delicatessen, small packages, already
opened packages
In the vegetable container:
vegetables, salad, fruit.
In the door (from top to bottom):
butter, cheese, eggs, tubes, small bottles,
large bottles, milk, juice cartons
In the freezer compartment: frozen food,
ice cubes, ice cream
Usable capacity
Information on the usable capacity can be
found inside your appliance on the rating
plate.
Variable interior
design
Adjustable “EasyLift” storage
compartment
Fig.
4
The height of the shelf can be adjusted
without taking it out.
Pull right lever to move the shelf upwards.
Pull left lever to move the shelf downwards.
Only ever press one lever.
To take out the shelf, move it all the way
upwards and remove.
Note
If a load exceeds 5 kg, the position of the
shelf can no longer be changed.
Fixed glass shelf
Fig.
5
To change the position of the glass shelf,
press buttons on the underside and detach
the glass shelf from the fixing. Reposition
stopper.
Re-insert glass shelf and fix by applying light
pressure.
Adjustable “EasyLift” storage
compartments
Fig.
6
The height of the storage compartments can
be adjusted without taking them out.
Simultaneously press up the buttons on the
underside of the storage compartments to
move the storage compartments downwards.
They can be moved upwards without pressing
the buttons.
To take out the storage compartments, push
them all the way upwards in succession and
remove.

10
Interior fittings
of refrigerator
compartment
Bottle shelf
Fig.
7
Bottles can be stored securely on the bottle
shelf. If the bottle shelf is not required, it can
be hung under the glass shelf.
Refrigerator
compartment
The temperature in the refrigerator compart-
ment can be set from +2 °C to +8 °C.
The refrigerator compartment is the ideal
storage location for ready meals, cakes and
pastries, preserved food, condensed milk,
hard cheese, fruit and vegetables sensitive to
cold as well as tropical fruit.
Sticker “OK”
not all models
The “OK” temperature monitor can be used
to determine temperatures below +4 °C.
Gradually reduce the temperature if the
sticker does not indicate “OK”.
Note
When the appliance is switched on, it may
take 12 hours until the temperature is
reached.
Super cooling
Super cooling sets the refrigerator
temperature to the coldest temperature
setting for approx. 6 hours.
Then the appliance automatically switches
to the temperature set prior to super cooling
mode.
Switch on super cooling mode, e.g.:
before placing large quantities of food in the
refrigerator compartment.
to cool drinks quickly.
Switching on and off
Fig.
2
Press “super” button
5
.
The button is lit when super cooling is
switched on.
Note
When super cooling is switched on, increased
operating noises may occur.
Freezer compartment
Use the freezer compartment
To store deep frozen food
To make ice cubes.
To freeze food.
Ensure that the freezer compartment door
has been closed properly. If the door is open,
the frozen food will thaw. The freezer com-
partment will become covered in thick ice.
Also: waste of energy due to high power
consumption!
Correct
setting
Temperature too high,
reduce temperature.

11
Freezing and storing
food
Purchasing frozen food
Packaging must not be damaged.
Use by the “use by” date.
Temperature in the supermarket freezer
–18 °C or lower.
If possible, transport deep-frozen food in an
insulated bag and place quickly in the freezer
compartment.
Storing frozen food
To ensure good air circulation in the
appliance, insert the freezer drawers all the
way.
If a large quantity of food is to be placed in the
freezer compartment, the food can be
stacked directly on the glass shelves and in
the bottom of the freezer compartment. To do
this, remove all the freezer drawers. Pull out
the freezer drawers all the way, lift at the front
and remove.
Fig.
8
Note
To insert the freezer drawer with telescopic
rails, the rails must be pulled out.
Freezing fresh food
Freezing food yourself
If you are freezing food yourself, use only
fresh, undamaged food.
The following foods are suitable for
freezing:
Meat and sausage products, poultry and
game, fish, vegetables, herbs, fruit, cakes and
pastries, pizza, ready meals, leftovers, egg
yolk and egg-white.
The following foods are not suitable for
freezing:
Eggs in shells, soured cream and
mayonnaise, green salads, radishes and
onions.
Blanching vegetables and fruit
To retain colour, flavour, aroma and vitamin C,
vegetables and fruits should be blanched
prior to freezing.
Blanching is the brief immersion of
vegetables and fruit in boiling water.
Literature on freezing and blanching is
available in bookshops.
Freezing food
Freeze fresh, undamaged food only.
Keep food which is to be frozen away from
food which is already frozen.
To prevent food from losing its flavour or
drying out, place in airtight containers.
Max. freezing capacity
Information about the max. freezing capacity
within 24 hours can be found on the rating
plate.
Packing food correctly:
1. Place food in packaging.
2. Remove air.
3. Seal the wrapping.
4. Label the wrapping with the contents and
date.
The following products are suitable for
wrapping food:
Cling wrap, polyethylene blown film,
aluminium foil and freezer tins. These
products can be purchased from your dealer.
The following products are not suitable for
wrapping food:
Wrapping paper, greaseproof paper,
cellophane, refuse bags and used shopping
bags.

12
The following products are suitable for
sealing the wrapped food:
Rubber bands, plastic clips, string, cold-
resistant adhesive tape or similar. Bags and
polyethylene blown film can be sealed with
a film sealer.
Shelf life of frozen food
Depends on the type of food. At a mean
temperature:
Fish, sausage, ready meals and cakes and
pastries: up to
6 months
Cheese, poultry and meat: up to
8 months
Vegetables and fruit: up to
12 months
Super freezing
Food should be frozen solid as quickly as
possible in order to retain vitamins, nutritional
value, appearance and flavour.
To prevent an undesirable temperature rise
when placing fresh food in the freezer
compartment, switch on super freezing
several hours beforehand.
Smaller quantities of food can be frozen
without super freezing.
Switching on and off
Fig.
2
Press “super” button
2
.
If the super freezing has been switched on the
button is lit.
Super freezing automatically switches off after
approx. 2½ days.
Note
When super freezing is switched on,
increased operating noises may occur.
Features of the freezer
compartment
(not all models)
Ice pack
If a power failure or malfunction occurs, the
ice packs can be used to slow down the
thawing process. The longest storage time is
obtained by placing the ice pack directly on
the food in the top compartment.
The ice pack can also be used to cool food
temporarily, e.g. in a cold bag.
Ice cube tray
Fill the ice cube tray ¾ full of drinking water
and place in the freezer compartment.
If the ice tray is stuck to the freezer compart-
ment, loosen with a blunt implement only
(spoon-handle).
To loosen the ice cubes, twist the ice cube
tray slightly or hold briefly under flowing water.
Thawing frozen food
Depending on the type and appliacation,
select one of the following options:
at room temperature
in the refrigerator
in an electric oven, with/without fan assisted
hot-air
in the microwave
Note
Do not refreeze food which is beginning to
thaw or which has already thawed. Only ready
meals (boiled or fried) may be refrozen.
No longer store the frozen produce for the
max. storage period.

13
Switching the
appliance off
Press the main switch.
Fig.
1
/8
Refrigeration unit and interior light switch off.
Disconnecting the appliance
If you do not use the appliance for
aprolonged period:
1. Switch off the appliance.
2. Pull out mains plug or switch off fuse.
3. Clean the appliance.
4. Leave the appliance door open.
Defrosting
Refrigerator compartment
Defrosting is actuated automatically.
The condensation flows into the evaporation
area of the appliance via the condensation
channels and the drainage hole.
Freezer compartment
The fully automatic No Frost system ensures
that the freezer compartment remains free of
ice. Defrosting is no longer required.
Cleaning the appliance
Attention!
Do not use abrasive, chloride or acidic
cleaning agents or solvents.
Do not use scouring or abrasive sponges.
The surface of the rear panel could be
damaged and corrosion could occur.
Never clean shelves and containers in the
dishwasher. The parts may become
deformed!
Proceed as follows:
Before cleaning: Switch off the appliance.
Pull out the mains plug or switch off the
fuse!
Clean the appliance with a soft cloth,
lukewarm water and a little pH neutral
washing-up liquid. The rinsing water must
not run into the light.
Wipe the door seal with clear water only
and then wipe dry thoroughly.
Rinsing water must not run through the
drainage hole into the evaporation area.
After cleaning reconnect and switch the
appliance back on.
Note
Regularly clean condensation channels and
drainage hole,
Fig.
9
, with cotton buds, etc.
so that the condensation can run out.
The upper condensation channel can be
taken out for cleaning.
After cleaning, the stopper must be re-
inserted into the drainage hole of the
refrigerator compartment for functional
reasons.

14
Cleaning the equipment
All variable parts of the refrigerator
compartment can be taken out for cleaning.
(See chapter “Variable interior design”.)
Taking out the drawers
Fig.
0
Tilt drawers forwards and take out.
To insert drawer, place the front of the drawer
on the telescopic rails and push into the
appliance. The drawer is engaged by pushing
it into the appliance.
Remove telescopic rails
Fig.
B
1. Pull out extension rail.
2. Push lock in the direction of the arrow.
3. Detach telescopic rail from the rear pin.
4. Push telescopic rail together, push
backwards above the rear pin and
disengage.
Installing telescopic rails
1. Place the extended telescopic rail on the
front pin.
2. Pull the telescopic rail forwards slightly
until it engages.
3. Place telescopic rail on the rear pin.
4. Push lock backwards.
Take glass shelves out of the freezer
compartment
Lift shelf at the front and take out.
Light (LED)
Your appliance features a maintenance-free
LED light.
Caution! Light (LED)
Class 1M laser lighting (IEC 60825
Standard). Do not look directly into the lighting
with optical instruments. Risk of eye injury!
These lights may be repaired by customer
service or authorised technicians only.
Tips for saving energy
Install the appliance in a dry, well ventilated
room! The appliance should not be installed
in direct sunlight or near a heat source
(e.g. radiator, cooker). If required, use an
insulating plate.
Allow warm food and drinks to cool down
before placing in the appliance!
When thawing frozen products, place them
in the refrigerator. The low temperature of
the frozen products cools the food in the
refrigerator.
Open the appliance doors as briefly as
possible.
The ventilation opening in the base should
be cleaned occasionally with a vacuum
cleaner or paint brush to prevent increased
power consumption.
Operating noises
Quite normal noises
Humming
– refrigeration unit is running.
Bubbling, gurgling
or
whirring noises
–
refrigerant is flowing through the tubing.
Clicking
– motor is switching on or off.
Preventing noises
The appliance is not level
Please align the installation cavity with a spirit
level. To do this, use the height-adjustable feet
of the cavity or place something underneath.
Drawers, baskets or storage areas wobble
or stick
Please check the removable parts and re-
insert them correctly if required.
Receptacles are touching each other
Move the bottles or receptacles slightly away
from each other.

15
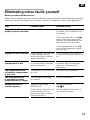
Eliminating minor faults yourself
Before you call customer service:
Please check whether you can eliminate the fault yourself based on the following information.
Customer service will charge you for advice, even if the appliance is still under guarantee!
Fault Possible cause Remedial action
Temperature differs
greatly from the set value.
In some cases it is adequate
to switch off the appliance for
5 minutes.
If the temperature is too
high
wait a few hours and check
whether the temperature has
approached the set value.
If the temperature is too
low
check the temperature again
the next day.
Displays do not illuminate. Power failure; the fuse has
been switched off; the
mains plug has not been
inserted properly.
Check whether the power is
on, the fuse must be switched
on.
Bottom of the refrigerator
compartment is wet.
The condensation channels
or condensation drainage
pipe are blocked.
Clean the condensation
channels and the drainage
pipe, see “Cleaning the
appliance”.
The temperature in the
refrigerator compartment
is too cold.
Temperature has been set
too low.
Increase the temperature.
The refrigeration unit
is switching on more
frequently and for longer.
The ventilation opening
is covered.
Remove obstacles.
Refrigerator has no
cooling capacity.
Appliance has been
switched off.
Power failure; the fuse has
been switched off; the
mains plug has not been
inserted properly.
Press main switch.
Fig. 1/8
Check whether the power is
on, check the fuses.

16
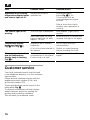
Customer service
Your local customer service can be found
in the telephone directory or in the customer-
service index.
Please provide customer service with the
appliance product number (E-Nr.) and
production number (FD).
These specifications can be found on the
rating plate.
Fig.
A
To prevent unnecessary call-outs, please
assist customer service by quoting the
product and production numbers.
This will save you additional costs.
Appliance is not cooling,
temperature display lamps
and interior light are lit.
Showroom mode is
switched on.
Hold down alarm
button,Fig. 2/1, for
10 seconds until an
acknowledgement signal
sounds.
After a short time check
whether your appliance is
cooling.
The interior light is not
working.
The LED light is defective. See chapter “Light (LED)”
section.
Door was open too long.
Light is switched off after
approx. 10 min.
When the door is closed and
opened, the light is on again.
Temperature display
lamps are flashing.
Fig. 2/4, or Fig. 2/7.
Appliance door opened
frequently.
A lot of food was placed in
the freezer.
Do not open the door
unnecessarily.
Switch on super freezing
before inserting the food.
Warning signal sounds
and the temperature
display lamp is flashing.
Fig. 2/4
Fault – the freezer
compartment is too warm!
Frozen food is at risk!
See chapter entitled “Warning
signal”.
Fault Possible cause Remedial action

17
处理旧机器的注意事项
*
处理包装材料
包装材料可以保护您的机器,在搬运过程中不
受损, 在搬运过程中不受损,所有这些材料对
环境无害并能再生处理。 请帮助我们:请将包
装材料按环保标准去处理。
至于目前所采用的处理方法,请向专业商店或
向地方政府等单位询问。
*
处理旧机器
旧机器并非无价值之废品! 经由合乎环保标准
的处理可以回收很有价值的原材料。
根据欧洲关于作废电气和电子设备的
法令 2012/19/EG (waste electrical and
electronic equipment – WEEE) 本机器
有相关标记。 该法令是在全欧盟范围内关于
作废设备回收处理和再生利用的有效法律依
据。
m
警告
不再使用的机器应依下列步骤处理:
1. 拔出电源插头,
2. 切断电源电线并连同电源插头一起丢掉,
冷藏冷冻设备中有制冷剂,且隔热材料含各种
气体, 这些制冷剂和气体需由专家人员处理,
因此一直到按专业标准去处理时,请勿损坏到
制冷循环管线。
安全与警告提示
启用本机器以前
请仔细阅读使用说明书和安装说明书!
说明书中有重要的安装、使用与维护等说明。
请将所有资料保存好,以便以后随时查阅或者
提供给以后的使用者。
技术安全
本机器含有少量具环保性却易燃性的冷却剂
R600a。 在搬运或安装机器时,请注意制冷
循环的管道不受损, 制冷剂可能会喷出且伤
到眼睛,制冷剂为易燃之液体!
机器受损时
– 明火或点火源应远离本机器。
– 让房间好好通风几分种。
– 关机并拔出电源插头,
– 通知售后服务部门。
机器中的制冷剂量越大,安装机器的空间
也应该越大。 空间太小时,且发生制冷剂
外漏情况,可能会产生易燃性的气体 - 空
气混合物。每 8 克制冷剂,应至少具备 1
立方米的空间。
本机器的制冷剂量标示在机器内铭牌上。
如果需要更换电源线或需要进行其他修理工
作,必须由售后服务部门专业人员进行。
如果进行不合格的安装或修理工作,可能会
对使用者造成很大的危险。
使用本机器时
请勿在机器内使用其他电器 ( 例如加热器、
电气制冰器等 )。
引爆危险!
请勿用蒸汽清洗机来对本设备进行除霜或清
理! 蒸汽可能会接触到电气元件并造成断
路。
有电击危险!
清除霜层或冰层时,请勿采用尖形或锐边的
用具。 否则可能会损坏冷却剂管。 制冷剂可
能会喷出再着火且伤到眼睛。
请勿存放含有燃气的物品 (如喷雾罐等)
或易爆物质。
引爆危险!
请勿将底座、抽屉或机器门当梯级误用。
进行除霜或清理时,请拔出电源插头或关掉
保险装置。 要拉出插头,不要拉住电源电
线。

18
度数高的酒类一定要密封好且只要立放。
塑料部件和门密封材料不要用油脂沾染,
否则塑料部件和门密封材料会变疏松。
绝不可盖住或阻挡本设备通风口和排气口。
有身心或感官等障碍的人士或缺乏相关知识
的使用者使用本机器时,必须在他人的监督
或详细指导下才可以使用本机器。
冷冻室内不可存放瓶罐或罐头 (特别是含碳
酸的饮料), 瓶子和罐头可能会爆开!
取出冷冻物时,请勿马上含在嘴里。
冻伤危险!
请避免手与冷冻食物、冰、蒸发器管等的长
时间接触。
冻伤危险!
家中有儿童时应注意事项
包装材料和包装材料的部分不要给孩童玩耍
用。可折叠的纸箱和塑料薄膜可能会有窒息
危险!
本机器不是孩童用的玩具!
有门锁的机器:钥匙应远离儿童保存好!
一般性规定
本设备适于
食物的冷藏和冷冻,
制冰块。
本机器只能在家中使用。
本机器依据欧盟标准 2004/108/EC 被消除无线
电干扰。
冷却循环已进行密封检查。
本产品符合有关电器产品的安全规定
(EN 60335/2/24 欧盟标准 )。
了解本机器
请翻开最后一页的图示。
本使用说明书适于多种机型。
因此可能与本说明书中的图示会有所差异。
* 只有部分机型
图
1
1–7 操作面板,
8 主开关
9照明 (LED)
10 可调动的玻璃搁盘 (EasyLift)
11 固定的玻璃搁盘 *
12 精美食品抽屉
13 湿度果蔬室
14 存放黄油和奶酪的保鲜盒
15 存放鸡蛋的搁架
16 可调动的搁盘 (EasyLift)
17 瓶挡
18 大瓶搁架
19 浆果盒 *
20 冷冻物盘 ( 小型 )
21 玻璃层板
22 冷冻物盘 ( 大型 )
23 通风口和排气口
A 冷藏室
B 冷冻室

19
操作面板
图
2
1
报警按钮
用于关掉报警声。
(参阅“报警声”章节)。
2 “super” ( 超級冷凍 ) 按钮
用来开 / 关超级冷冻功能。
3 调节冷冻室温度的按钮
用此按钮可设定冷冻室内温度。
4 冷冻室温度显示灯
数值显示冷冻室温度的摄氏度。
5 “super” ( 智能速冷 ) 按钮
用来开 / 关超级冷藏功能。
6 冷藏室温度設定按鈕
用此按钮可设定冷藏室的温度。
7 冷藏室温度显示
数字是调节的以 °C 为单位的冷藏室温
度。
注意室内温度
本机器适于一定的气候类型, 依据气候类型的
不同,本机器可在下列室内温度条件下使用。
气候类型标示在机器铭牌上,在机器左下方。
通风
图
1
/23
应确保热气能无阻碍地消散, 否则会提高制冷
机的负荷, 因而提高耗电量。
因此:绝不可将通风口和排气口盖住或阻挡!
安装本设备
干燥的、通风良好的空间最适合置放本机器。
安装地点不应受阳光直晒,也不应靠近热源,
例如炉灶、暖气设备等。 如果无法避免把本机
器安装在热源附近,请使用适当隔热板且于热
源保持下列最小间距:
与电炉或煤气炉保持 3 公分的间距。
与烧油或烧煤的炉灶保持 30 公分的间距。
接通本设备
安装本机器后要至少等待一个小时,才可以起
用。
在搬运机器的过程中,压缩机中的油可能会在
冷却系统中移位。
起用前,应清理机器内部 ( 参阅 “ 清理 ” 章节
的相关说明 )。
插座应易于接近。
机器应该用符合相关规定的接地插座连接到
220–240 V/50Hz 的交流电电源, 插座应具备
10 安培到 16 安培的保险装置。
在欧洲以外其它国家使用的机器,应该检查机
器铭牌所标示电压和电流类型是否和当地国电
网相符, 机器铭牌在机器左下方。 如果需要更
换电源电缆,必须由专业人员进行。
m
警告
切勿将本机器连接到电子节能插头 ( 例如
Ecoboy, Sava Plug 等 ) 或到换流器 ( 将直流电
换成 230 伏交流电的 ),例如太阳能发电设备
或船舶电网等。
开机
用主开关
8
启动本机器。
图
2
警示音响起,报警键
1
闪烁。
按下警报按钮
1
可停止警报声。
温度指示灯在闪耀且警报按钮指示灯亮起,
一直到机器达到所设温度为止。
气候类型 室内温度
SN +10 °C 到 32 °C
N +16 °C 到 32 °C
ST +16 °C 到 38 °C
T +16 °C 到 43 °C

20
使用本设备的特别注意事项
制冷机运行时,冷藏室背面上会形成凝结水
滴或霜层。那是由于冷却循环的功能特点而
产生的。 此时不需要刮除霜层或擦拭水珠。
冷藏室背面会完全自动除霜。 溶解水会通过
溶解水槽和排水孔流到机器的蒸发范围。
全自动化无霜系统使冷冻室和冷藏室不会形
成霜层。 因此不需要除霜。
机壳正面具备局部加温功能,如此可以防止
机门密封条部位会产生冷凝水。
冷冻室门关上以后,如果无法马上重新打
开,请等候 2 到 3 分钟直到低压得到了平衡
为止。
设定温度
图
2
冷藏室
( 设定范围:+2 °C 到 +8 °C).
要重复触按温度设置按钮
6
,直到调节好所需
的冷藏室温度为止。 机器将保存最新的设定
值。
显示灯
7
将显示所设置的温度。
我们建议设定为 +4 °C。
容易受损的食物应储藏在不超过 +4°C 的温度
下。
冷冻室
( 设定范围:–16 °C 到 –24 °C).
要重复按下温度设置按钮
3
,一直到机器显示
所需冷冻室温度为止。
机器将保存最新的设定值。
显示灯
4
将显示所设置的温度。
我们建议设定为 –18 °C。
报警声
停止警示音
图
2
按下报警键
1
可停止警示音,显示器回到准备
就绪状态。
机器门警示音
当机器门打开时间超过一分钟,门警示音响
起。 此时会响起持续的信号声。
温度警示音
冷冻室温度过高时,温度警示音响起。
此时会发出嘟嘟声。
开始解冻警示:
如果味道、香味和外观没有改变,可经烹煮或
煎炒处理后再进行冷冻。
但此时不能再利用最长储存时间。
温度警示
在下列没有解冻危险的情况下,警示音也可能
会响起:
启用机器时,
存放大量新鲜食物时。
冷冻室门敞开的时间太久时。
报警按
钮
温度显示 说明
发亮 闪烁
温度警示
冷冻食品没有解冻的
危险。
闪烁 闪烁
开始解冻警示:
冷冻食品存在解冻的
危险。
闪烁 发亮
开始解冻警示:
机器内温度曾经过高
过。 冷冻食品存在解
冻的危险。
ページが読み込まれています...
ページが読み込まれています...
ページが読み込まれています...
ページが読み込まれています...
ページが読み込まれています...
ページが読み込まれています...
ページが読み込まれています...
ページが読み込まれています...
ページが読み込まれています...
ページが読み込まれています...
ページが読み込まれています...
-
 1
1
-
 2
2
-
 3
3
-
 4
4
-
 5
5
-
 6
6
-
 7
7
-
 8
8
-
 9
9
-
 10
10
-
 11
11
-
 12
12
-
 13
13
-
 14
14
-
 15
15
-
 16
16
-
 17
17
-
 18
18
-
 19
19
-
 20
20
-
 21
21
-
 22
22
-
 23
23
-
 24
24
-
 25
25
-
 26
26
-
 27
27
-
 28
28
-
 29
29
-
 30
30
-
 31
31


