IC Recorder
Quick Start Guide
ICD-PX240
Welcome to your new Sony IC recorder!
This is the Quick Start Guide, which provides you with instructions on the basic operations of the IC recorder.
Please read it carefully. We hope you enjoy using your new Sony IC recorder.
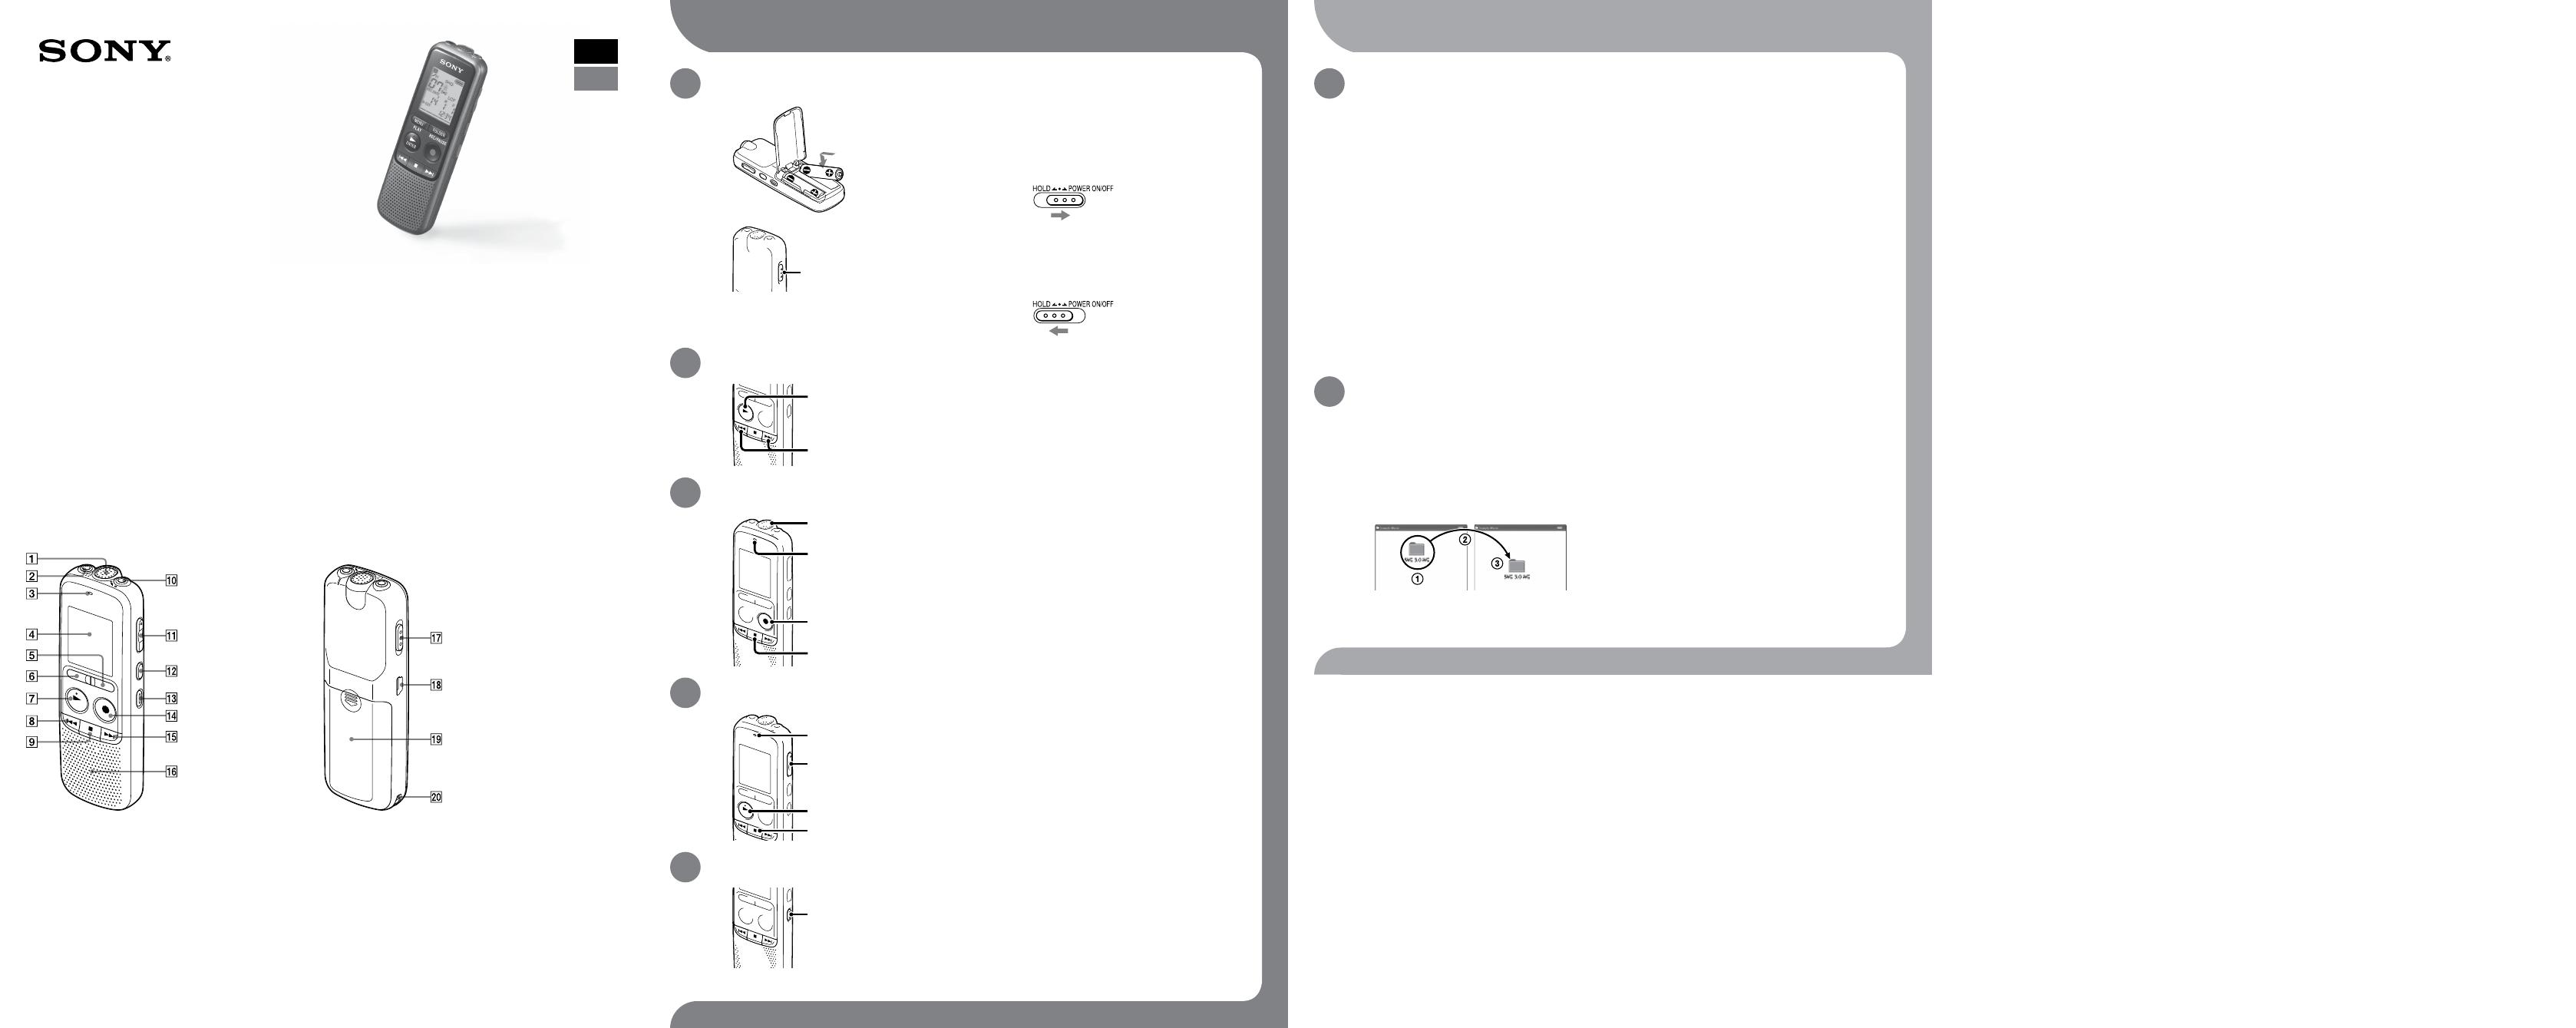
Parts and controls
Built-in microphone
(headphone) jack
Operation indicator
Display window
FOLDER button
MENU button
PLAY/ENTER button (*)
(review/fast backward) button
(stop) button
(microphone) jack (PLUG IN POWER) (*)
VOL (volume) –/+ button (*)
DIVIDE button
ERASE button
REC/PAUSE (record/pause) button
(cue/fast forward) button
Speaker
HOLD•POWER ON/OFF switch
(USB) connector
Battery compartment
Strap hole (A strap is not supplied.)
* These buttons and the jack have a tactile dot. Use it as a reference point for operations, or to identify each terminal.
GB
CS
Check the supplied items.
ˎ IC Recorder (1)
ˎ Stereo headphones (1)
ˎ USB connecting cable (1)
ˎ LR03 (size AAA) alkaline batteries (2)
ˎ Carrying pouch (1)
ˎ Help Guide (HTML file stored in the built-in memory
so it can easily be copied to your computer.)
ˎ Quick Start Guide
Let’s try out your new IC recorder
1. Power on.
Slide and lift the battery compartment lid, then insert
batteries with the correct polarity.
Turn the power on.
Slide and hold the HOLD•POWER ON/OFF switch in the direction of
“POWER ON/OFF” until the window display appears.
To turn the power off, slide and hold the HOLD•POWER ON/
OFF switch in the direction of “POWER ON/OFF” until “OFF” is
displayed.
To prevent unintentional operations (HOLD)
2. Set the date and time.
When you insert batteries and turn the power on, the year section
begins to flash.
Press or to set the year (the last two digits of the
year), and then press PLAY/ENTER. Repeat this procedure
to set month, day, hour, and minute in sequence.
3. Record.
Operation
indicator
Press REC/PAUSE.
Recording starts and the operation indicator lights in red.
¼ You can pause recording by pressing REC/PAUSE. Press REC/
PAUSE again to restart recording.
Place the IC recorder so that the built-in microphone face the
direction of the source to be recorded.
Press (stop) to stop recording.
“ACCESS” appears and the recording stops.
4. Listen.
Operation
indicator
Press PLAY/ENTER.
Playback starts and the operation indicator lights in green.
Adjust the volume by pressing VOL –/+.
Press (stop) to stop playback.
5. Erase.
When the IC recorder is in the stop mode, press and hold
ERASE.
When the IC recorder is in the playback mode, press ERASE.
“ERASE” is displayed.
Press ERASE.
Installing the help guide on your computer
By installing the help guide on your computer from the built-in memory of the IC recorder, you can
search for detailed operations and possible solutions when a problem occurs.
Connect the (USB) port of the IC recorder with the USB port of a running computer with the
supplied USB connecting cable inserted into the ports securely until each plug stops to the end.
In Windows: Click [Computer] (or [My Computer]), then double-click [IC RECORDER] [FOR
WINDOWS].
In Mac: Double-click [IC RECORDER] on the desktop.
Install the help guide.
In Windows: Double-click [Help_Guide_Installer] (or [Help_Guide_Installer.exe]).
In Mac: Double-click [Help_Guide_Installer_for_mac.app]. (v10.5.8 or higher)
Follow the instructions that appear on the screen to proceed with installation.
After the installation completes, double-click the [Help_Guide_icdp24_cn.htm] icon in the
desktop for Windows (or in Finder for Mac).
The help guide is displayed.
You can also view the help guide on the following Sony IC Recorder customer support home page:
http://rd1.sony.net/help/icd/p24/cn/
Copying files from the IC recorder to your computer
You can copy the files and folders from the IC recorder to your computer to store them.
Connect the IC recorder to your computer.
Copy files or folders you want to transfer to your computer.
Drag and drop the files or folders you want to copy from “IC RECORDER” to the local disk on your
computer.
To copy a file or folder (Drag and drop)
IC RECORDER Your computer
Click and hold,
drag,
and then drop.
Disconnect the IC recorder from your computer.
Utilizing Your Computer
WARNING
Do not expose the batteries (battery pack or batteries installed) to excessive heat such as sunshine, fire or the like for a
long time.
CAUTION
Risk of explosion if battery is replaced by an incorrect type.
Dispose of used batteries according to the instructions.
For the customers in China
RATED CURRENT CONSUMPTION: 1500 mA
AC adaptor: AC-UD10
Additional features
Details of these additional features for recording, playback, and editing are included in the help guide.
ˎ MODE (Recording mode)
ˎ SENS (Microphone sensitivity)
ˎ LCF (Low cut filter)
ˎ VOR (Voice Operated Recording)
ˎ REC-OP (Adding a recording)
ˎ DPC (Digital Pitch Control)
ˎ N-CUT (Noise cut)
ˎ EASY-S (Easy search)
ˎ CONT (Continuous play)
ˎ LOCK (Protecting a file)
ˎ ALARM
ˎ DIVIDE (Dividing a file)
ˎ USB AC adaptor AC-UD10
Optional accessories
Precautions
On power
Operate the unit only on 3.0 V or 2.4 V DC.
Use two LR03 (size AAA) alkaline batteries or two
NH-AAA rechargeable batteries.
On safety
Do not operate the unit while driving, cycling or
operating any motorized vehicle.
On handling
ˎ Do not leave the unit in a location near heat sources, or
in a place subject to direct sunlight, excessive dust or
mechanical shock.
ˎ Should any solid object or liquid fall into the unit,
remove the battery and have the unit checked by
qualified personnel before operating it any further.
If you have any questions or problems concerning your
unit, please consult your nearest Sony dealer.
Specifications
Capacity (User available capacity *
1
*
2
)
4 GB (approx. 3.50 GB = 3,758,096,384 Byte)
*
1
A small amount of the built-in memory is used for
file management and therefore not available for user
storage.
*
2
When the built-in memory is formatted with the IC
recorder.
Dimensions (w/h/d) (not incl. projecting parts and
controls) (JEITA)*
3
Approx. 38.5 mm × 115.2 mm × 21.3 mm
Mass (JEITA)*
3
Approx. 72 g including two LR03 (size AAA) alkaline
batteries
*
3
Measured value by the standard of JEITA (Japan
Electronics and Information Technology Industries
Association)
Note
Depending on the country or region, some of the models or optional accessories are not available.


 1
1
 2
2

