
PARIS

1
1
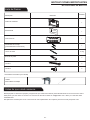
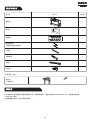
Remote control
1
Hanging bracket
(preassembled to fireplace)
1
Crystal bed
0.3 kg
4
Wall Plug
4
Fireplace insert
Front panel
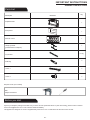
Description Illustration
Qty
Screw 1
Screw 2
4
Drill
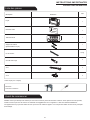
Unpack your fireplace package and make sure you have all of the parts listed above. If parts are missing, please contact customer
service at [email protected] or call 1-855-837-2569 immediately.
This appliance is designed for use as a supplementary heat source.
It is not intended to be the main source of heat.
Required Tools (not included)
Parts List
Before you start
E-1
Philips Screwdriver
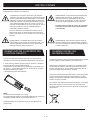
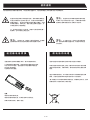
IMPORTANT INSTRUCTIONS
ASSEMBLY INSTRUCTIONS

1. Read all instructions before using this appliance.
2. This heater is hot when in use. To avoid burns, do not let bare
skin touch hot surfaces. Keep combustible materials, such as
pillows, bedding, papers, clothes and curtains at least 3 feet
(0.9m) from the front of this heater and keep them away from the
sides and rear.
3. CAUTION: Extreme caution is necessary when any heater is
used by or near children or invalids and whenever the heater is left
operating unattended.
4. Always unplug this appliance when not in use.
5. Do not operate any heater with a damaged cord or plug or after
the appliance malfunctions, has been dropped or damaged in any
manner. Return heater to authorized service facility for examination,
electrical or mechanical adjustment, or repair.
6. Any repairs to this appliance should be carried out by a qualified
service person.
7. Under no circumstances should this appliance be modified.
8. Do not use outdoors.
9. This heater is not intended for use in bathrooms, laundry areas
and similar indoor locations. Never locate heater where it may fall
into a bathtub or other water container.
10. Do not run cord under carpeting. Do not cover cord with throw
rugs, runners or similar coverings. Arrange cord away from traffic
areas and where it will not be tripped over.
11. To disconnect this appliance, turn controls to the off position,
then remove plug from outlet.
12. Connect to properly grounded outlets only.
14. Do not insert or allow foreign objects to enter any
ventilation or exhaust opening as this may cause an electric
shock, fire or damage the heater.
15. To prevent possible fire, do not block air intakes or exhaust
in any manner. Do not use on soft surfaces, like a bed, where
openings may become blocked.
16. This heater has hot and arcing or sparking parts inside. Do
not use it in areas where gasoline, paint or flammable liquids
are used or stored. This appliance should not be used as a
drying rack for clothing, nor should Christmas stockings or
decorations be hung on or near it.
17. Use this appliance only as described in this manual. Any
other use not recommended by the manufacturer may cause
fire, electric shock or injury to persons.
18.
Always plug heaters directly into a wall outlet/receptacle.
Never use with an extension cord or relocatable power
tap (outlet/power strip).
19.The heater has a safety device that makes it stop working
once the inner temperature reaches 85º (± 2°C). To reset the
appliance, turn heater off and disconnect power, let it cool off
for 10 minutes and plug back in.
20.This Class B digital apparatus complies with Canadian
ICES-003.
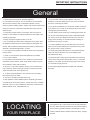
The fireplace must not be used until it is securely fastened to
,ecalperif cirtcele ruoy rof noitacol a gnisoohc nehW .llaw eht
ensure that the general instructions are followed. For best
results, install the electric fireplace away from direct sunlight
and dust.
General
LOCATING
YOUR FIREPLACE
E-2
furniture,
IMPORTANT INSTRUCTIONS
ASSEMBLY INSTRUCTIONS
13.This appliance, when installed must be electrically grounded in
accordance with local codes,
with the current CSA C22.1 Canadian
Electrical code or for USA
installations, follow local codes and the
National Electric Code,
ANSI/NEPA No. 70.

IMPORTANT INSTRUCTIONS
ASSEMBLY INSTRUCTIONS
1. Do not connect this heater to a programmer, timer, separate remote control system or any other device that switches the heater on
automatically, since a fire risk exists if the heater is covered or positioned incorrectly.
2. If the supply cord is damaged, it must be replaced by the manufacturer, its service agent or similarly qualified persons in order to
avoid a hazard.
3. In order to avoid a hazard due to inadvertent resetting of the thermal cut-out, this appliance must not be supplied through an external
switching device, such as a timer, or connected to a circuit that is regularly switched on and off by the utility.
4. Do not use this heater in the immediate surroundings of a bath, shower or swimming pool.
5. If the glass becomes damaged, do not use the heater in order to avoid a hazard.
6. Always make sure the electrical socket is accessible and located adjacent to but not above the heater.
7. This heater must be mounted to the wall.
1. This heater must be fitted onto a flat wall. Ideally, install the heater directly to a brick wall, masonry surface or the internal wooden
frame of a plasterboard wall. If the wooden frame behind the plasterboard is not accessible, use a minimum of four heavy-duty anchors
that are suitable for the weight of the heater.
2. We do not recommend that the heater be fitted to a wall covered in blown vinyl wallpaper, polystyrene tiles or other flammable materials.
3. It is important that the heater be never installed under a shelf or flammable materials such as curtains.
4. If the heater is to be mounted on to a plasterboard wall with wooden studs, make sure the wall is strong and stable enough to hold the
weight of the appliance. The vapour control barrier must not be damaged, and the structural members of the house must not be damaged.
We recommend minimum 12mm thick plasterboard.
5. Before drilling into walls, always check that there are no hidden wires, pipes, etc. Make sure that screws and wall plugs supplied are
suitable for supporting the unit in your surface. Consult a qualified person if you are not sure.
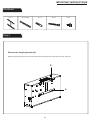
Handling and unpacking
Before starting the installation of this fireplace, please read the following:
1. The installation should be carried out by two adults to avoid injury or d amage. If for any reason it is considered too heavy, please
obtain assistance.
2. When lifting the fireplace, always keep your back straight. Bend your legs and not your back. Avoid twisting at the waist. It is better
to reposition your feet.
3. Avoid upper body / top heavy bending. Always bend from the knees rather than the waist. Do not lean forward or sideways while
handling the heater.
4. Always grip the heater with the palm of the hand. Do
not use the tips of fingers for support.
5. Always keep the heater as close to the body as possible. This will min imize the cantilever action.
6. Use gloves to provide additional grip.
7. Unpack the package and lift the product gently out of the box, put it on a flat surface with the front panel facing up.
E-3
Safety Warnings
Installation tips

IMPORTANT INSTRUCTIONS
ASSEMBLY INSTRUCTIONS
A x 1 B x 0.3 kg C x 4 D x 4 E x 4
E-4
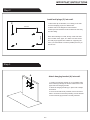
Hardware
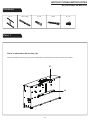
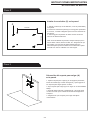
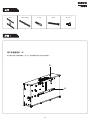
Step 1
Remove hanging bracket (A) from back of fireplace by removing the two screws (E) at the top of the unit.
Remove the hanging bracket (A).
E
A

IMPORTANT INSTRUCTIONS
ASSEMBLY INSTRUCTIONS
E-5
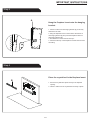
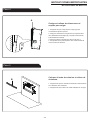
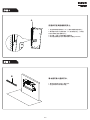
Step 2
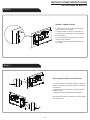
Step 3
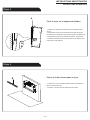
Install wall plugs (C) into wall.
Attach hanging bracket (A) into wall.
1. Drill 4 holes (8 mm diameter, 4 mm deep) on the wall.
2. Insert wall plugs (C) into the drilled holes.
3. Please refer to the diagram for hole locations.
4. Both top holes should be located at least 420 mm away
from the ceiling.
Note: Before drilling into walls, always check that there
are no hidden wires, pipes, etc. Make sure that screws
and wall plugs supplied are suitable for supporting the
unit in your wall material. Consult a qualified person if you
are not sure.
270 mm
181 mm
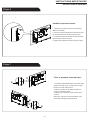
1. Holding the hanging bracket (A) to the drilled holes,
insert screws (D) through the second & fifth holes on the
upper and lower hanging bracket.
2. Attach the hanging bracket (A) in place with a Philips
screwdriver.
3. The screw should be fully inserted, flush to the wall in
order to avoid the screw head protruding over the bracket.
4. Ensure the hanging bracket is securely attached.
C
A
D

IMPORTANT INSTRUCTIONS
ASSEMBLY INSTRUCTIONS
E-6
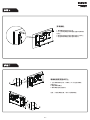
1. Check to make sure the hanging bracket (A) is securely
attached to the wall.
2. Hang the fireplace insert on the hooks at the bottom of
the hanging bracket (A) and push the fireplace insert into
the hanging bracket (A).
3. Re-fasten the screws removed in Step 1.
4. Check that the top of the fireplace is at least 400 mm from
the ceiling.
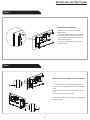
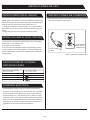
1. Ensure the crystals are spread evenly in the fireplace
opening.
2. Check to make sure the crystal bed is securely in place.
Step 5
Step 4
Hang the fireplace insert onto the hanging
bracket.
Place the crystal bed in the fireplace insert.
A
B

IMPORTANT INSTRUCTIONS
ASSEMBLY INSTRUCTIONS
E-7
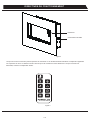
1. Make sure the front panel is free of
debris and dirt.
2. Hold the panel securely and hang it onto
the fireplace hooks, located on both sides.
3. The panel should be secured on all four
hooks on the fireplace.
4. Check to make sure the panel is held
securely in place.
Step 6
Install the front panel.
Step 7
1. Locate the holes on both left and right sides and
insert a screw (E) through the hook, into the fireplace
insert.
2. Tighten screw to pass it through the hook, on both
sides.
3. Ensure the front panel is secure.
Note: Tighten up the screw carefully, to avoid damage
to the front panel.
Attach the front panel to the fireplace.
E
E
E
E

power tap (outlet/power strip).
Dimensions (W x D x H)
Grounding pin
Cover of
Grounded
Outlet BOX
15.3 kg / 19.6 kg
41 x 6 1/8 x 19 1/4 in
104.1 x 15.6 x 49 cm
WALL MOUNTED FIREPLACE
SPECIFICATIONS
fireplace
fireplace
8
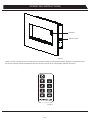
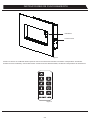
Figure 1.
1. If the glass panel cracks or breaks, stop using the appliance
immediately and have the glass replaced.

Indicators
E-9
OPERATING INSTRUCTIONS
Figure 3
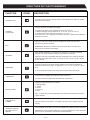
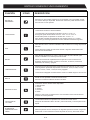
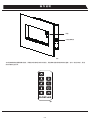
When a function is changed from the control panel or remote there will be a corresponding indicator displayed. The indicator shows
the function changed and the level selected. When the function is turned off, the corresponding indicator will fade off.
Figure 2
Manual control

E-10
OPERATING INSTRUCTIONS
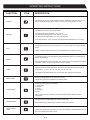
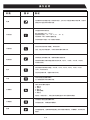
This button will not only put the fireplace insert in a standby mode, but also you can
see the flame effect through the screen. This will turn off all functions at once.
The fireplace contains a fan forced heater.
The default setting temperature is 72°F (22°C).
The thermostat setting range is 50°-86°F or 10°-30°C.
The thermostat is adjustable by 2°F or 1°C increments.
To change between °F and °C press and hold the HEATER button for 5 seconds.
Press the ECO button when the heater is on, to run the heater in a reduced wattage
range.
NOTE: Holding the ECO button for 3 seconds disables any heater functions.
To quickly heat up a cold room/space, press the BOOST button to run the heater at
the full rated wattage.
Pressing the BOOST button repeatedly will cycle through the following boost settings:
5 minutes, 10 min, 15 min, 20 min, 25 min, 30 min and off.
Pressing the timer button repeatedly will cycle through the following timer settings:
30 minutes, 1 hr, 2 hr, 3 hr, 4 hr, 5 hr, 6 hr, 7 hr, 8 hr and off.
The fireplace will automatically turn off when the timer reaches zero minutes.
5 different flame effects are available:
1. Snow White
2. Rubine
3. Ocean
4. Provence
5. Party
Party: In this mode, the unit will cycle automatically between all flame effects
periodically.
The flame speed is adjustable from remote control only.
Flame speed range: setting 1 the slowest to setting 5 the fastest.
The child safety lock is adjustable from remote control only.
Holding the child safety lock button for 3 seconds disables or enables all functions on
the control panel and remote control.
Brightness is adjustable from remote control only.
POWER
HEATER
ECO
BOOST
TIMER
BRIGHTNESS
FLAME MODE
FLAME SPEED
CHILD SAFETY
LOCK
This button controls the brightness of the flame effect.
FUNCTION ICON DESCRIPTION

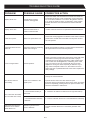
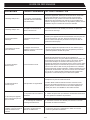
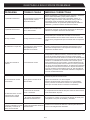
Display shows “E2”.
There is no power.
Power cord gets warm.
The remote control is
not working.
The noise when the heater
is on is louder than normal.
Abnormal noise when the
heater is not on and the
flame effect is on.
Display shows “E1”.
Inspect the heater and check that the air inlets and outlets are
not blocked as this may cause overheating. Unplug the heater
for 10 minutes and allow it to cool down. Plug back in and turn
it on; check the heater for signs of overheating. If the problem
persists discontinue use of the heater and contact customer
service.
Contact customer service for a replacement thermostat sensor.
Check that unit is plugged into a standard 120V outlet. Press the
power button several times and make sure the power is set to
the “ON” position.
Adjust the temperature settings to ensure that the thermostat is
set higher than the current room temperature.
Check your heater cord and plug connections. Faulty wall outlet
connections or loose plugs can cause the outlet or plug to
overheat. Be sure the plug fits tight in the outlet. Heaters draw
more current than small appliances, overheating of the outlet
may occur even if it has not occurred with the use of other
appliances. During use check frequently to determine if your
plug outlet or faceplate is HOT! If so, discontinue use of the
heater and have a qualified electrician check and/or replace the
faulty outlet(s).
Change the remote batteries.
b. Contact Customer Service for a new heater/blower assembly.
E-11
TROUBLESHOOTING GUIDE
The heater does not blow
warm air.
Manual Reset overheat
protection has triggered.
The thermostat sensor is
broken or disconnected.
There is no power to the unit.
Thermostat setting is preventing
heater from turning on.
Normal operation.
There are no batteries or the
signal is poor
a. The air intakes are dirty or
obstructed.
b. The blower/heater assembly
is defective.
a. Check the air intakes for obstructions or high dust build up.
Operate remote control at a slow measured pace.
Press the remote control buttons with an even motion and gentle
pressure. Repeatedly pressing buttons in rapid succession may
cause the transmitter to malfunction.
POSSIBLE CAUSEPROBLEM CORRECTIVE ACTION
Contact Customer Service for a new flame generator drive
motor.
The flame generator drive
motor is defective.

E-12
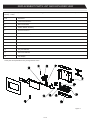
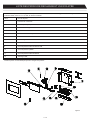
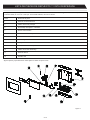
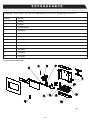
REPLACEMENT PARTS LIST AND EXPLODED VIEW
Part
Part Name
1
2
3
5
8
9
10
11
12
6
4
7
Flame Generator Drive Motor
Heater / Blower Assembly
Main Circuit Board
Tray Circuit Board
Flame Circuit Board
RGB Flame Circuit Board
LED Display
Flame Generator / Spinner
Control Panel Buttons
Thermostat Sensor
Tray
Remote Control
Figure 4
Some parts and specifications may change without notice.
For replacement parts, please contact customer service at [email protected] or call 1-855-837-2569, 7:00 a.m.–5:00 p.m. CST,
Monday – Friday.

E-13
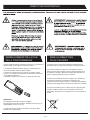
REPLACING THE REMOTE
CONTROL BATTERY
DISPOSING OF USED
BATTERIES
When the remote control stops operating or its range seems reduced,
it is time to replace the batteries with new ones.
Do not mix old and new batteries.
Do not mix alkaline, standard (carbon-zinc), or rechargeable (ni-cad,
ni-mh, etc) batteries.
The batteries may contain hazardous substances that could
endanger the enviroment and human health.
This symbol appearing on the battery and/or packaging
indicates that used batteries must not be processed with
municipal waste. Instead they should be brought to the
appropriate collection point for recycling.
By correctly disposing of used batteries, you prevent potential
negative consequences for the environment and human health.
Recycling used materials also preserves our natural resources.
For more information about collecting and recycling used
batteries, please contact your local municipality, your waste
disposal service or the store where you purchased this product.
1. On the back end of the remote, press and slide the battery door
open and remove the old batteries.
2. Replace with two AAA batteries (not included), checking that the +
and - sides of the battery match the markings inside the battery
compartment.
3.Replace the battery compartment door.
NOTE:
Batteries should be removed if the product is to be left unused for a
long time.
INSTRUCTIONS
cleaning the appliance.

E-14
BASIC WARRANTY :
THIS WARRANTY IS VOID IF :
IF WARRANTY SERVICE IS NEEDED :
1 YEAR WARRANTY
For Flamelux Electric Fireplace Insert
The company warrants that this item is free from manufacturing and material defects for a period of one year from
date of purchase, subject to the following conditions and limitations.
1. Install and operate this item in accordance with the Installation
and operating instructions provided with the product at all times.
Any alteration, willful abuse, accident, or misuse of the product
shall nullify this warranty.
2. This warranty is non-transferable and is made to the original
owner, provided that the purchase was made through an authorized
supplier of the product.
3. This warranty is limited to the repair or replacement of part(s)
found to be defective in material or workmanship, provided that
such part(s) have been subjected to normal conditions of use and
service, after said defect is confirmed by the company’s inspection.
4. The company may, at its discretion, fully discharge all obligations
with respect to this warranty by refunding the wholesale price of
the defective part(s).
5. Any installation, labour, construction, transportation, or other
related costs/expenses arising from defective part(s), repair,
replacement, or otherwise of same, will not be covered by this
warranty, nor shall the company assume responsibility for same.
6. The owner/user assumes all other risks, if any, including the risk
of any direct, indirect, or consequential loss or damages arising
out of the use, or inability to use the product, except as provided
by law.
7. All other warranties expressed or implied with respect to the
product, its components and accessories, or any obligations/
liabilities on the part of the company are hereby expressly excluded.
8. The company neither assumes nor authorizes any third party to
assume, on its behalf, any other liabilities with respect to the sale
of the product.
9. The warranties as outlined within this document do not apply to
any accessories used in conjunction with the installation of this
product.
(a) The fireplace is subjected to prolonged periods of dampness or
condensation.
(b) Any alteration, willful abuse, accident, or misuse of the product.
(c) You do not have the original receipt of purchase.
Please note: When you open the carton, carefully check the unit
and make sure there is no damage. If you have any problems with
how the various functions operate, with internal damage of the
product or missing parts, please contact [email protected].
Do not attempt to do any service work yourself.
Cette garantie est nulle et non avenue si l'appareil est utilisé à des fins commerciales ou industrielles.
Détaillant:
Numéro de série:
Numéro de modèle:
The warranty is null and void if used in commercial or industrial applications.
Retailer:
Serial Number:
Model Number:
Purchase Date:

Perceuse
Tournevis cruciforme
Déballez votre foyer électrique et vérifiez que vous avez toutes les pièces énumérées ci-dessus. Si des pièces sont manquantes,
veuillez communiquer avec le Service à la clientèle au [email protected] ou appelez le 1 855 837-2569 immédiatement.
Cet appareil est conçu pour être utilisé en tant que source de chaleur d’appoint. Il ne doit pas être utilisé comme source principale
de chauffage.
Outils requis (non compris)
Liste des pièces
Avant de commencer
F-1
INSTRUCTIONS IMPORTANTES
INSTRUCTIONS DE MONTAGE
1
1
Télécommande
1
Support de fixation
(préassemblé au foyer)
1
Lit de cristaux
0,3 kg
4
Cheville d’ancrage
4
Foyer
Panneau avant
Description Illustration
Qté
Vis 1
Vis 2
4

Généralités
EMPLACEMENT
DU FOYER ÉLECTRIQUE
F-2
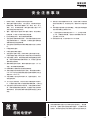
1. Lisez toutes les directives avant d'utiliser cet appareil.
2. Le foyer devient très chaud lorsqu'il est en marche.
Pour éviter toute brûlure, ne laissez pas la peau nue
tels que ,selbammalfni xuairétam sel zedraG .seduahc secafrus
sel rehcuot
meubles, oreillers, draps, papiers, vêtements et rideaux à au moins
3 pi (90 cm) de la face avant et loin des côtés et de l'arrière.
3. MISE EN GARDE : Une attention particulière est nécessaire
lorsque le foyer est utilisé par ou à proximité d'enfants ou de
personnes handicapées, ou lorsqu'il est laissé en marche sans
surveillance.
4. Débranchez cet appareil lorsqu'il n'est pas utilisé.
5. N’utilisez pas le foyer si le cordon ou la fiche est endommagé,
si l'appareil est défectueux ou s'il est tombé ou a été endommagé
de quelque manière que ce soit. Dans un tel cas, retournez le foyer
au centre de service après-vente agréé pour réparation ou réglage
électrique ou mécanique.
6. Toute réparation de cet appareil ne doit être effectuée que par
un technicien qualifié.
7. Cet appareil ne doit être modifié en aucune circonstance.
8. Ne pas utiliser l'appareil à l'extérieur.
9. Ce foyer n'est pas destiné à être utilisé dans des salles de bain
ou buanderies, ou tout endroit similaire. Ne placez jamais le foyer
dans un endroit où il risque de tomber dans une baignoire ou autre
réservoir d'eau.
10. Ne faites pas passer le cordon électrique sous des tapis.
Ne couvrez pas le cordon électrique de tapis, moquettes ou des
objets similaires. Disposez le cordon d'alimentation dans un endroit
où il ne sera pas piétiné.
11. Pour déconnecter l’appareil, mettez toutes les commandes à la
position off (arrêt) puis débranchez la fiche de la prise murale.
12. Ne branchez l'appareil qu'à une prise de courant avec mise à la
terre.
14. Évitez d’introduire ou de faire tomber des corps étrangers
dans les fentes d'entrée et de sortie de l'air car cela pourrait
provoquer des décharges électriques, causer un incendie ou
endommager le foyer.
15. Pour réduire les risques d'incendie, ne bouchez pas les orifices
d'entrée et de sortie de l'air. N'utilisez pas le foyer sur des
surfaces molles, un lit par exemple, où les ouvertures pourraient
être obstruées.
16. Ce foyer renferme des pièces chaudes qui produisent
des arcs et des étincelles. Ne l’utilisez pas dans des endroits où
sont manipulés ou entreposés de l’essence, de la peinture ou des
produits inflammables. Cet appareil ne doit pas être utilisé comme
un sèche-linge. Ne vous servez pas de cet appareil pour accrocher,
sur sa surface ou à proximité de celui-ci, des décorations de Noël
ou tout autre type de décoration.
17. Utilisez cet appareil uniquement comme indiqué dans ce manuel.
tiarruop tnacirbaf el rap eédnammocer non noitasilitu ertua etuoT
provoquer un incendie ou occasionner des chocs électriques ou des
blessures.
18. Branchez toujours le foyer directement dans la prise
N'utilisez jamais de rallonge électrique ou de barre
d'alimentation multiprises.
19. Cet appareil a un dispositif de sécurité qui l'arrête
automatiquement si la température interne atteint 85º (± 2°C). Pour
réinitialiser l'appareil, mettez les commandes en position d'arrêt (off)
et débranchez l'appareil de la prise murale. Laissez l'appareil refroidir
20.Cet appareil numérique de classe B est conforme à la
NMB-003 canadienne.
Le foyer ne doit pas être utilisé avant d’être solidement fixé
au mur. Avant de choisir un emplacement pour votre foyer
électrique, assurez-vous que les recommandations générales
aient été respectées. Pour de meilleurs résultats, placer le
foyer électrique loin des rayons directs du soleil et de la
poussière.
murale.
INSTRUCTIONS IMPORTANTES
INSTRUCTIONS DE MONTAGE
durant 10 minutes, puis rebranchez-le et remettez-le en marche.
13. Une fois installé, cet appareil doit être mis à la terre conformément
aux codes locaux ou, en l’absence de tels codes, conformément à la
version en vigueur du Code canadien de l’électricité, CSA C22.1.,
ou à la dernière édition du National Electrical Code, ANSI/NFPA 70
si le produit est installé aux États-Unis.

1. Ne pas brancher cet appareil à un dispositif de programmation, une minuterie, un système de télécommande ou tout autre dispositif
qui met l’appareil en marche automatiquement, car un risque d'incendie existe si l'appareil est couvert ou mal positionné.
2. Si le cordon d'alimentation est endommagé, il doit être remplacé par le fabricant, son agent de service ou un technicien qualifié afin
d'éviter tout danger.
3. Afin d'éviter tout risque lié à la réinitialisation du coupe-circuit thermique, cet appareil ne doit pas être connecté à un dispositif de
commutation externe, une minuterie, ou relié à un circuit qui est régulièrement déclenché par les services publics.
4. Ne pas utiliser cet appareil dans les environs immédiats d'une baignoire, d'une douche ou d'une piscine.
5. Si le verre est endommagé, ne pas utiliser l'appareil afin d'éviter tout danger.
6. Assurez-vous toujours que la prise électrique est accessible et est adjacente à, mais pas au-dessus du foyer électrique.
7. Le foyer électrique doit toujours être monté au mur.
1. Cet appareil doit être monté sur un mur droit. Idéalement, fixer l’appareil directement à un mur de brique, une surface de maçonnerie
ou aux montants de bois d’un mur en placoplâtre. Si les montants en bois derrière le mur de placoplâtre ne sont pas accessibles, utilisez
au minimum quatre chevilles d’ancrage ultra robustes, appropriées pour le poids du foyer.
2. Il n’est pas recommandé d’installer l’appareil sur un mur recouvert de papier peint en vinyle soufflé, de carreaux de polystyrène, ou tout
3. Il est important que l’appareil ne soit pas installé sous une tablette ou des matériaux inflammables, tels que des rideaux.
4. Si l’appareil doit être monté sur un mur en placoplâtre ayant des montants en bois à l’arrière, vérifiez que le mur est suffisamment solide
et stable pour soutenir le poids de l’appareil. Il est important que le pare-vapeur ne soit pas endommagé et que les éléments de structure de
la maison ne soient pas endommagés. Nous recommandons une surface en placoplâtre de 12 mm d'épaisseur au minimum.
5. Avant de percer les murs, vérifiez toujours qu'il n'y a pas de câbles, de tuyaux cachés, etc. Assurez-vous que les vis et chevilles
.rûs sap setê'n suov is eéifilauq ennosrep enu zetlusnoC .ecafrus ertov snad lierappa'l retroppus ruop seéirporppa tnos seinruof
Manipulation et déballage
Avant de commencer l’installation du foyer électrique, veuillez lire les directives suivantes :
1 L’installation doit être effectuée par deux adultes afin d’éviter le risque de blessures ou de dommages. Si l’appareil est trop lourd pour
quelque raison que ce soit, veuillez obtenir de l’aide supplémentaire.
2 Gardez votre dos bien droit en soulevant le foyer électrique. Pliez vos jambes plutôt que votre dos. Évitez les mouvements de torsion à
la taille; il vaut mieux changer la position de vos pieds.
vous eN .elliat al euq tôtulp xuoneg sel sruojuot zeilP . sedruol segrahc sel tnatropsnart ne sproc ud tuah ud stnemevuom sel zetivÉ 3
penchez pas vers l’avant ou de côté lorsque vous soulevez le foyer.
.stgiod sed tuob ud sap zenet e
l en ;niam al ed emuap al ceva reyof el sruojuot zeppirgA 4
5 Gardez toujours le foyer aussi près du corps que possible, pour minimiser la charge en surplomb.
6 Portez des gants pour une meilleure prise.
.tuah el srev tnava uaennap el ,etiord ecafrus enu rus reyof el zecalP .etîob al ed sroh tnemecuod el-zeveluos te reyof el zellabéD 7
F-3
Consignes de sécurité
Conseils d’installation
INSTRUCTIONS IMPORTANTES
INSTRUCTIONS DE MONTAGE
autre matériau inflammable.

F-4
Quincaillerie
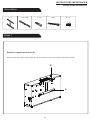
Étape 1
Retirez le support de fixation (A) de l’arrière du foyer en enlevant les deux vis (E) situées sur le dessus de l’unité.
Retirez le support de fixation (A).
INSTRUCTIONS IMPORTANTES
INSTRUCTIONS DE MONTAGE
A x 1 B x 0.3 kg C x 4 D x 4 E x 4
E
A

F-5
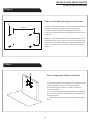
Étape 2
Étape 3
Fixer le support de fixation (A) au mur.
Fixer les chevilles d’ancrage (C) dans le mur.
INSTRUCTIONS IMPORTANTES
INSTRUCTIONS DE MONTAGE
1. Percez 4 trous (8 mm diamètre, 40 mm de profondeur) dans le mur.
2. Insérez les chevilles d’ancrage (C) dans les trous percés.
3. Veuillez consulter le schéma pour l'emplacement des trous.
4. Les deux trous supérieurs doivent être situés à au moins 420 mm
du plafond.
Remarque : Avant de percer dans les murs, vérifiez toujours qu'il n'y
a pas de câbles, de tuyaux cachés, etc. Assurez-vous que les vis et
matériau de votre mur. En cas de doute, consultez une personne
1. En tenant le support de fixation (A) vis-à-vis des trous percés,
insérez les vis (D) à travers le deuxième et le quatrième trou sur
la partie supérieure et inférieure du support de fixation.
2. Vissez le support de fixation (A) en place à l’aide d’un
tournevis cruciforme.
3. La vis devrait être entièrement insérée dans le mur, à égalité
avec la surface afin d'éviter que la tête de la vis ne dépasse du
4. Vérifiez que le support de fixation (A) est solidement fixé en
place.
270 mm
181 mm
C
chevilles fournies sont appropriées pour supporter l'appareil dans le
A
D
qualifiée.
support de fixation.
ページが読み込まれています...
ページが読み込まれています...
ページが読み込まれています...
ページが読み込まれています...
ページが読み込まれています...
ページが読み込まれています...
ページが読み込まれています...
ページが読み込まれています...
ページが読み込まれています...
ページが読み込まれています...
ページが読み込まれています...
ページが読み込まれています...
ページが読み込まれています...
ページが読み込まれています...
ページが読み込まれています...
ページが読み込まれています...
ページが読み込まれています...
ページが読み込まれています...
ページが読み込まれています...
ページが読み込まれています...
ページが読み込まれています...
ページが読み込まれています...
ページが読み込まれています...
ページが読み込まれています...
ページが読み込まれています...
ページが読み込まれています...
ページが読み込まれています...
ページが読み込まれています...
ページが読み込まれています...
ページが読み込まれています...
ページが読み込まれています...
ページが読み込まれています...
ページが読み込まれています...
ページが読み込まれています...
ページが読み込まれています...
ページが読み込まれています...
ページが読み込まれています...
ページが読み込まれています...
-
 1
1
-
 2
2
-
 3
3
-
 4
4
-
 5
5
-
 6
6
-
 7
7
-
 8
8
-
 9
9
-
 10
10
-
 11
11
-
 12
12
-
 13
13
-
 14
14
-
 15
15
-
 16
16
-
 17
17
-
 18
18
-
 19
19
-
 20
20
-
 21
21
-
 22
22
-
 23
23
-
 24
24
-
 25
25
-
 26
26
-
 27
27
-
 28
28
-
 29
29
-
 30
30
-
 31
31
-
 32
32
-
 33
33
-
 34
34
-
 35
35
-
 36
36
-
 37
37
-
 38
38
-
 39
39
-
 40
40
-
 41
41
-
 42
42
-
 43
43
-
 44
44
-
 45
45
-
 46
46
-
 47
47
-
 48
48
-
 49
49
-
 50
50
-
 51
51
-
 52
52
-
 53
53
-
 54
54
-
 55
55
-
 56
56
-
 57
57
-
 58
58


他の言語で
- español: FLAMELUX Z1520026R Instrucciones de operación
- français: FLAMELUX Z1520026R Mode d'emploi
- English: FLAMELUX Z1520026R Operating instructions

