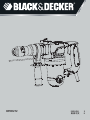
Black & Decker BPHR272K は、コンクリートや石材への穴あけや、軽いハツリ作業に適したハンマーです。850Wのハイパワー設計で、最大26mmのコンクリートに穴あけが可能です。また、モード切り替え機能で、回転のみの「回転モード」と、回転と打撃を組み合わせた「打撃モード」の2つのモードを切り替えることができます。打撃数は毎分3400回で、コンクリートや石材に素早く穴あけが可能です。さらに、サイドハンドルとデプスストップが付属しており、作業性を向上させています。
Black & Decker BPHR272K は、コンクリートや石材への穴あけや、軽いハツリ作業に適したハンマーです。850Wのハイパワー設計で、最大26mmのコンクリートに穴あけが可能です。また、モード切り替え機能で、回転のみの「回転モード」と、回転と打撃を組み合わせた「打撃モード」の2つのモードを切り替えることができます。打撃数は毎分3400回で、コンクリートや石材に素早く穴あけが可能です。さらに、サイドハンドルとデプスストップが付属しており、作業性を向上させています。

®
BPHR272
ENGLISH 3
8

2
C
BA
D E
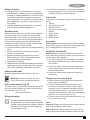
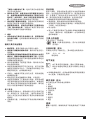
* The picture above may differ slightly to actual unit.
1
8
1
2
3
4
5
12
XXXX XX JN
6
8
6
7
7
5
5
3
9
10
11
11

3
ENGLISH
Intended use
Your Black & Decker hammer has been designed
for drilling in concrete and masonry as well as for
light chiselling applications.
Safety instructions
General power tool safety warnings
WARNING! Read all safety warnings
and all instructions. Failure to follow the
warnings and instructions listed below may
result in electric shock, re and/or serious
injury.
Save all warnings and instructions for future
reference. The term "power tool" in all of the warn-
ings listed below refers to your mains operated
(corded) power tool or battery operated (cordless)
power tool.
1. Work area safety
a. Keep work area clean and well lit. Cluttered
or dark areas invite accidents.
b. Do not operate power tools in explosive
atmospheres, such as in the presence of
ammable liquids, gases or dust. Power
tools create sparks which may ignite the dust or
fumes.
Hammer BPHR272
Power input W 850
No-load speed /min 700
Impact rate BPM 3400
Impact energy (EPTA) J 4.1
Modes 2
Max capacity mm
- Concrete 26
- Steel -
-Wood -
Weight kg 5.1
c. Keep children and bystanders away while
operating a power tool.
Distractions can
cause you to lose control.
2. Electrical safety
a. Power tool plugs must match the outlet.
Never modify the plug in any way. Do not
use any adapter plugs with earthed
(grounded) power tools. Unmodied plugs
and matching outlets will reduce risk of electric
shock.
b. Avoid body contact with earthed or
grounded surfaces such as pipes, radiators,
ranges and refrigerators. There is an
increased risk of electric shock if your body is
earthed or grounded.
c. Do not expose power tools to rain or wet
conditions. Water entering a power tool will
increase the risk of electric shock.
d. Do not abuse the cord. Never use the cord
for carrying, pulling or unplugging the
power tool. Keep cord away from heat, oil,
sharp edges or moving parts. Damaged or
entangled cords increase the risk of electric
shock.
e. When operating a power tool outdoors, use
an extension cord suitable for outdoor use.
Use of a cord suitable for outdoor use reduces
the risk of electric shock.
f. If operating a power tool in a damp location
is unavoidable, use a residual current device
(RCD) protected supply. Use of an RCD
reduces the risk of electric shock.
3. Personal safety
a. Stay alert, watch what you are doing and
use common sense when operating a power
tool. Do not use a power tool while you are
tired or under the inuence of drugs, alcohol
or medication. A moment of inattention while
operating power tools may result in serious
personal injury.
b. Use personal protective equipment. Always
wear eye protection. Protective equipment
such as dust mask, non-skid safety shoes, hard
hat, or hearing protection used for appropriate
conditions will reduce personal injuries.
c. Prevent unintentional starting. Ensure the
switch is in the off-position before
connecting to power source and/or battery
pack, picking up or carrying the tool.
Carrying power tools with your nger on the
BPHR272
HAMMER
Technical data

4
ENGLISH
switch or energising power tools that have the
switch on invites accidents.
d. Remove any adjusting key or wrench before
turning the power tool on. A wrench or a key
left attached to a rotating part of the power tool
may result in personal injury.
e. Do not overreach. Keep proper footing and
balance at all times. This enables better
control of the power tool in unexpected
situations.
f. Dress properly. Do not wear loose clothing
or jewellery. Keep your hair, clothing and
gloves away from moving parts. Loose
clothes, jewellery or long hair can be caught in
moving parts.
g. If devices are provided for the connection of
dust extraction and collection facilities,
ensure these are connected and properly
used. Use of dust collection can reduce
dust-related hazards.
4. Power tool use and care
a. Do not force the power tool. Use the correct
power tool for your application. The correct
power tool will do the job better and safer at the
rate for which it was designed.
b. Do not use the power tool if the switch does
not turn it on and off. Any power tool that
cannot be controlled with the switch is
dangerous and must be repaired.
c. Disconnect the plug from the power source
and/or the battery pack from the power tool
before making any adjustments, changing
accessories, or storing power tools. Such
preventive safety measures reduce the risk of
starting the power tool accidentally.
d. Store idle power tools out of the reach of
children and do not allow persons unfamiliar
with the power tool or these instructions to
operate the power tool. Power tools are
dangerous in the hands of untrained users.
e. Maintain power tools. Check for
misalignment or binding of moving parts,
breakage of parts and any other condition
that may affect the power tools operation. If
damaged, have the power tool repaired
before use. Many accidents are caused by
poorly maintained power tools.
f. Keep cutting tools sharp and clean. Properly
maintained cutting tools with sharp cutting
edges are less likely to bind and are easier to
control.
g. Use the power tool, accessories and tool
bits etc. in accordance with these
instructions, taking into account the
working conditions and the work to be
performed.
Use of the power tool for
operations different from those intended could
result in a hazardous situation.
5. Service
a. Have your power tool serviced by a qualied
repair person using only identical
replacement parts. This will ensure that the
safety of the power tool is maintained.
Hammer safety warnings
u Wear ear protectors. Exposure to noise can
cause hearing loss.
u Use auxiliary handle(s), if supplied with the
tool. Loss of control can cause personal injury.
u Hold power tool by insulated gripping sur-
faces, when performing an operation where
the cutting accessory may contact hidden
wiring or its own cord. Cutting accessory con-
tacting a "live" wire may make exposed metal
parts of the power tool "live" and could give the
operator an electric shock.
u Never use a chisel accessory in rotary mode.
The acces-sory will bind in the material and
rotate the drill.
u Use clamps or another practical way to secure
and support the workpiece to a stable platform.
Holding the work by hand or against your body
leaves it unstable and may lead to loss of con-
trol.
u Before drilling into walls, oors or ceilings,
check for the location of wiring and pipes.
u Avoid touching the tip of a drill bit just after drill-
ing, as it may be hot.
u The intended use is described in this instruction
manual. The use of any accessory or attach-
ment or performance of any operation with this
tool other than those recom-mended in this in-
struction manual may present a risk of personal
injury and/or damage to property.

5
ENGLISH
Safety of others
u This appliance is not intended for use by per-
sons (including children) with reduced physical,
sensory or mental capabilities, or lack of experi-
ence and knowledge, unless they have been
given supervision or instruction concerning use
of the appliance by a person responsible for
their safety.
u Children should be supervised to ensure that
they do not play with the appliance.
Residual risks
Additional residual risks may arise when using the
tool which may not be included in the enclosed
safety warnings. These risks can arise from mis-
use, prolonged use etc. Even with the application
of the relevant safety regulations and the imple-
mentation of safety devices, certain residual risks
can not be avoided. These include:
u Injuries caused by touching any rotating/moving
parts.
u Injuries caused when changing any parts,
blades or accessories.
u Injuries caused by prolonged use of a tool.
When using any tool for prolonged periods
ensure you take regular breaks.
u Impairment of hearing.
u Health hazards caused by breathing dust devel-
oped when using your tool (example:- working
with wood, especially oak, beech and MDF.)
Label on the tool
The following symbols are shown on the tool:
Warning! In order to reduce the risk of
injury, the user must read the manual.
Date code position (Fig. D)
The date code (12) is printed on the housing of the
tool, which also contains the year of manufacture.
For example: 2013 XX JN
Year of manufacture
Electrical safety
Double insulation measures are taken in
this power tool, so no grounding is needed.
Please check whether the voltage of power
supplied is consistent with the voltage on
the nameplate or not.
u If the wire is damaged, it should be replaced by
the manufacturer or a service center authorized
by Black & Decker, to avoid danger.
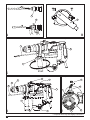
Part name
The power tool includes some or all of the following
parts:
1. Switch
2. Oil-injection inlet cap
3. Modes selector
4. Tool chuck (tool holder)
5. sleeve
6. Side handle
7. Depth stop
8. Botton cover
Assembly
Warning! Before assembly, please ensure that the
power tool is powered off and the power plug of the
tool is unplugged from the power source.
Install the side handle
Warning! When holes are drilled in the concrete,
bricks and other surfaces, please grip the side han-
dle to ensure safe operation.
u The side handle (6) can be rotated to any side,
which can facilitate the use of the power tool in
any position.
u Rotate the side handle (6) counterclockwise, to
unlock and release the power tool, rotate it to
the desired position.
u Rotate the side handle clockwise to tighten it
adequately.
Fitting an accessory (Fig. A)
u Please clean the drill shank and lubricate the
drill bit before installing it.
u Pull back and hold the slide-sleeve(5), and
then screw the drill bit into the chuck, press it
internally until it is fastened, the drilling bit can
be automatically locked in situ. Pull the drill bit
outwards to test whether it has been adequately
locked in the correct position or not.
u Pull back and hold the drill sleeve(5) clamp, you
can remove the drill bit.
Use
Warning! Please use the power tool under normal
load; no overloading is permitted.
Warning! Before drilling holes in the wall, oor or
ceiling, please check the positions of the wire and

6
ENGLISH
steel tube.
Chipping/Chiseling (Fig. B)
u When the cutting / stripping / removing opera-
tion is conducted, please put the operation
modes selector (3) to position , the drilling
bit, cold chisel and scaling chisel etc. should be
properly used.
Warning! Do not rotate the knob when the power
tool is rotating under the load, otherwise it will be
damaged.
Hammer drilling (Fig. B)
u When using the hammer driller to drill holes on
the masonry and concrete surfaces, the opera-
tion mode selector (3) should be set to position
.
u The drilling bit should be aligned to the drilling
position, and then press the switch button to
achieve the best effect. Keep the power tool be
positioned correctly, prevent it from deviating
the hole.
u When the fragments plug the borehole or
powders, please do not apply further pressure,
and make the tool rotate in an idling state, then
gradually take out the drilling bit from the hole.
Repeat the said steps for several times, the
plugged hole can be clean, and then resume
the normal drilling.
Warning! When the drilling bit begins to break
down the reinforced concrete or hit the steel bar
inside the concrete, the power tool may have
dangerous reaction force. Please always keep
balance, stable posture and tightly grip the tool, to
prevent from generating the dangerous reaction
force. When the concrete is chiseled, the distance
between the two points of one chiseling shall not
be too much away from the edge, which shall be
about 8cm or so, dene the distance through nd-
ing the cracking strength of the concrete.
Overload coupling device
If the drilling bit is clamped or hooked up, the driv-
ing force transmitted to the drill shaft will be cut off.
A huge force will occur, so two hands must tightly
grip the power tool when it is in operation, and
ensure that the operator is standing in a stable and
xed position.
Select the depth of holes to be drilled (Fig.
C)
A depth gauge is an easy to use ruler to ensure
that the drilling depth is consistent. Unlock the side
handle, adjust the depth gauge according to the
required depth, and then tighten the side handle.
u Unfasten the side handle (6) by turning counter-
clockwise the grip.
u Set the depth stop (7) to the desired position.
The maximum depth of the drilled hole shall
equal to the distance between the tip of drilling
bit and the front end of the depth stop.
u Tighten the side handle by turning the grip
clockwise.
Switch on and off
Warning! Before inserting the plug, please con-
rm whether the switch can trigger freely or not,
whether it can return to the original position after
releasing.
u Press the switch button (1), the power tool can
be started immediately.
u Release the button (1), the tool stops rotating.
Accessories
The performance of an electric tool depends on
its accessories. Black & Decker accessories are
designed according to high quality standards, to
enhance the performance of electric tool. The use
of these accessories can help you conveniently
operate the tool.
Maintenance
The Black & Decker cord / cordless appliance /
tools are of sophisticated design, can be used for
a long time, and only little maintenance is needed.
To obtain consistent satisfactory use, proper
maintenance and regular cleaning of the tools are
necessary.
Warning! Before performing any maintenance
work on the cord / cordless electric tools, the fol-
lowing points must be implemented:
u Switch off the power of the equipment / tools
and pull off the plug;
u If the equipment / tools are equipped with inde-
pendent battery pack, please turn off the power
and remove the battery pack from the equip-
ment / tools.
u If the equipment / tools are equipped with an
integrated battery, please run out the battery,
before turning off its power.
u Before the cleaning, unplug the charger plug

7
ENGLISH
from the power source. In addition, except
the regular cleaning on your charger, no other
maintenance is needed.
u Regularly use the soft brush or dry cloth to
clean the ventilation slot of the equipment /
tools / charger.
u Regularly use a damp cloth to clean the motor
housing. Please do not use any abrasive clean-
ing agents or solvent-based cleansing agents.
u Regularly open the clamping chuck and tap it
gently to remove any internal dust (after instal-
lation).
Replace the carbon brushes (Fig. E)
Lubrication
u Regularly replace and check the carbon
brushes. Replace it in time when it is worn to
the abrasive boundary line. Keep the carbon
brush clean and make it freely slide in the
brushing range. Two brushes shall be replaced
at the same time.
u Use the cross screwdriver to counterclockwise
unscrew the screws, open the bottom cover(8)
open the brush cover(9), you can remove the
the new brush, and then clockwise fasten the
and then use the cross screwdriver to tighten it
properly.
u Open the cap of the lube oil-injection inlet(2),
check the lube oil in the gearbox, if the lube
adequate amount of lube oil provided by the
company.
Cleaning
Warning! Once the visible dust build-up
is found at and/or around the ventilat-
powder within the host shell with clean dry
air. To perform this procedure, wear the
approved safety equipment and dust mask.
Warning! It is strictly forbidden to clean
the non-metallic parts of the tool with the
solvents or other irritant chemicals. These
chemicals may weaken the materials of
these components. Use a cloth moistened
with a mild soapy water to clean it. Do not
let any substance permeate into the tool
and.do not immerse any part of the tool
into a liquid.
Protect the environment
Separate collection. This product may not
be disposed together with the ordinary
household waste.
needed to be replaced or you will no longer need
to use these products, please do not put them
together with the household waste. Please place
them separately to recycle.
Separate collection of the used products
and packaging materials allow the
materials to be recycled and reused.
Reuse of the recycled materials helps to prevent
the pollution of the environment, and reduces the
demand for raw materials. Local regulations may
provide separate collection of the electrical
products from the household, at the municipal
waste sites or by the retailer when you purchase a
new product.

8
1.
a.
b.
c.
2.
a.
BPHR272
W 850
/min 700
BPM 3400
(EPTA) J 4.1
2
mm
- 26
- -
- -
kg 5.1
b.
c.
d.
e.
f.
RCDRCD
3.
a.
b.
c. /
d.
e.
f.
g.
4.
a.
b.
c.
d.
BPHR272

9
e.
f.
g.
"
5.
a.
u
u
u
u
u
u
u
u
/
u
u
u/
u
u
u
u
:
D
(12)
2013 XX JN
u
D
1.
2.
3.
4.
5.
6.
7.
8.

10
u 6
u 6
u
A
u
u (5)
u (5)
B
u / / (3)
q
B
u
(3)
s
u
u
8cm
C
u (6)
u (7)
u
u 1
u 1
/ /
/
u /
u /
/
u /
u
u / /
u
u
A
u
u (1 1)

11
(8)(9)
(10)(9)
(8)
u (2)
S
@
@
88
676A

N384588 01/2014
-
 1
1
-
 2
2
-
 3
3
-
 4
4
-
 5
5
-
 6
6
-
 7
7
-
 8
8
-
 9
9
-
 10
10
-
 11
11
-
 12
12


Black & Decker BPHR272K は、コンクリートや石材への穴あけや、軽いハツリ作業に適したハンマーです。850Wのハイパワー設計で、最大26mmのコンクリートに穴あけが可能です。また、モード切り替え機能で、回転のみの「回転モード」と、回転と打撃を組み合わせた「打撃モード」の2つのモードを切り替えることができます。打撃数は毎分3400回で、コンクリートや石材に素早く穴あけが可能です。さらに、サイドハンドルとデプスストップが付属しており、作業性を向上させています。
他の言語で
- English: Black & Decker BPHR272K User manual