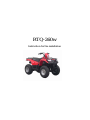
Roketa RTQ-260w Installation Instructions Manual
- タイプ
- Installation Instructions Manual

RTQ-260w
Instruction for the installation

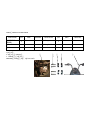
STEP 1 INSTALL HANDLE BAR
PART NAME QTY SPEC. REMARK PART NAME QTY SPEC. REMARK
1
On ATV
2
ATTACHMENT
1
On ATV
2
ATTACHMENT
4
M8 60 attachment
Install step:
1.put
2. Put on clamp by
1.
REMARK Clamp

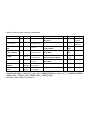
STEP 2INSTALL MAIN LAMP AND LAMPSHADE
PART NAME QTY SPEC. REMARK PART NAME QTY SPEC. REMARK
SCREW
2
ON MAIN LAMP
1 Four hole On main
lampshade
TOP COVER 1 ON MAIN LAMP
1 Six holes On main
lampshade
1
ON ATV
1 Two
holes
On ATV
1 ON MAIN LAMP
1 Four
holes
ON ATV
2
M820
ON MAIN
LAMPHOLDER
1 Four
holes
ON ATV
MAIN LAMP HOLDER
1
ON HANDLE BAR
HOLDER
1 Six holes ON ATV
1
TWO
HOLES
ON MAIN
LAMPSHADE
MAIN LAMP 1 ON ATV
INSERT OF MAIN
LAMP
1 FOUR
HOLES
ON MAIN
LAMPSHADE
INSTALL STEP :1.TAKE
PUT HOLE FIX BY
REMARKSURE CONNECT FASTNESS !!!!

hang hole hole of installation

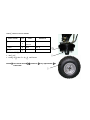
STEP 3 INSTALL FRONT WHEEL
3
INSTALL STEP
2. Take off
3. Install
Remark valve must be in forth
2 prick is in 3 ’way, right and left 2is
balanceable.
PART NAME QTY. SPEC. REMARK
FRONT WHEEL
2
23*7-10
INSIDE CARTON
NUT
8
M10 See 3
3 trig hub
1
On the ATV

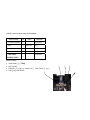
STEP 4 INSTALL REAR SHOCK ABSORBER
PARTS NAME QTY SPEC. REMARK
rear shock absorber
1
On the ATV
bolt
1
M12 80 On
1
M12 On
1
On
1
On the ATV
INSTALL STEP:
1. TAKE AWAY
2. Put
3.

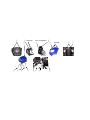
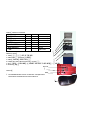
STEP 5 INSTALL BATTERY
PART NAME QTY SPEC. REMARK
1 In box of battery
1 In box of battery
1 In box of battery
1 12V/9Ah Inside carton
1 Inside carton
1 On ATV
1 Inside carton
INSTALL STEP
1. TAKE
2. OPEN THE PACKING
3. OPEN
4. AFTER PUT INTO ELECTROLYTE CLOSE
5. PUT
6. BUTTON
BLACK
NOTICE
RED
PLS REFER INSTRUCTION ‘S THE WAY OF INJECTING
ELECTROLYTE WHICH PUT INTO THE BOX.
-
 1
1
-
 2
2
-
 3
3
-
 4
4
-
 5
5
-
 6
6
-
 7
7


Roketa RTQ-260w Installation Instructions Manual
- タイプ
- Installation Instructions Manual
他の言語で
- English: Roketa RTQ-260w