
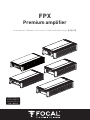
FPX
Premium amplifier
User manual / Manuel d'utilisation / Gebrauchsanleitung / 使用手册
English page 3
Français page 17
Deutsch seite 31
中文:第45页


English
Your Focal-JMlab product was developed and manufactured with high-quality materials and components
which can be recycled and/or re-used. This symbol indicates that electrical and electronic equipment
must be disposed of separately from normal garbage at the end of its operational lifetime.Please dispose
of this product by bringing it to your local collection point or recycling centre for such equipment. This will
help to protect the environment in which we all live.
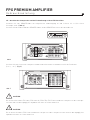
FPX PREMIUM AMPLIFIER
User manual
Thank you for choosing Focal for your car audio system and for sharing in our philosophy.
This product is made with the best of Focal's technology.
For best results we recommend your FPX amplifier is installed by your Focal dealer. To make full use of its
functionalities and, therefore, to enjoy its performance to the full, we advise you to carefully read all the
instructions in this booklet and to keep it for future reference. Any problem due to non-compliance with the
instructions for use may lead to invalidation of the warranty.
CAUTION
This symbol is used for important instructions. Failure to follow these instructions may lead to serious
injury or damage to property.
Contents
- 1 FPX amplifier
- 1 User manual
- 1 Set of accessories
- 1 Remote control (FPX 1.1000, FPX 2.750, FPX 5.1200)
CAUTION
• Do not activate any function that might distract you when driving the vehicle. Functions and settings requiring
prolonged attention should only be used when the vehicle is completely stopped. Always stop the vehicle in a safe
location before accessing these functions. Risk of causing an accident.
• When driving the vehicle, keep the volume low so that noises outside the vehicle can be heard. Risk of causing
an accident.
• Do not open the casing of your FPX amplifier and do not modify it in any way. Risk of accident, fire or electric
shock.
Please validate your Focal-JMlab warranty,
it is now possible to register your product online: www.focal.com/warranty

4
FPX PREMIUM AMPLIFIER
User manual
CAUTION
• Only use your FPX amplifier on mobile 12 volt applications. Any other use than the designed application entails
a risk of fire, electric shock or injury.
• Use fuses of the correct amperage. Risk of fire or electrical discharge.
• Do not obstruct your FPX amplifier's heat sink. It may overheat internally and cause a fire.
• Make connections properly. Check the gauge and type of cable. Risk of fire, injury and/or damage to the amplifier.
• Do not use nuts or bolts from the steering or braking circuits, from tanks or reservoirs, seat belts or other
safety equipment for making the ground (earth) connection. The use of these items for grounding (earthing)
could deactivate the vehicle control system and cause a fire or other damage.
•
Keep small items that may be swallowed, such as bolts, accessories or screws out of the reach of children.
Swallowing such items could lead to serious injury. If swallowed, consult a doctor.
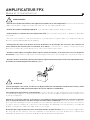
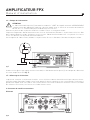
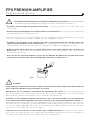
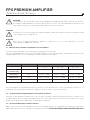
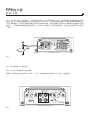
•
Before beginning installation, disconnect the negative battery terminal to avoid risk of injury, fire or material
damage. (Fig. 1)
fig. 1
WARNING
Prolonged listening at high volume, above 110dB, can cause permanent hearing damage. Listening at volumes
above 130 dB, even for short periods can lead to untreatable hearing damage.
Stop listening in the event of any problem. Failure to observe this precaution may lead to injury or damage to the
equipment. If a malfunction persists, return the unit to your Focal dealer for repair.
Use the specified accessories and install them correctly. Use only the accessories specified in the user manual
and those provided in the packaging. The use of other components may cause internal damage to the product, or
may lead to its incorrect installation. Parts used may become loose and cause damage or the technical failure of the
product. Risk of accident, fire or electric shock.
Do not install the unit in highly damp or dusty areas. Avoid installing the unit in parts of the vehicle subject to high
damp or excessive dust. Penetration of the unit by moisture or dust could lead to a failure.

5
FPX PREMIUM AMPLIFIER
User manual
Installing your FPX amplifier
Installing this product requires technical skill and experience. If you are not sure of your ability to install the
amplifier, entrust this task to a Focal dealer in order to take full advantage of everything your FPX amplifier can do.
Cabling your FPX amplifier
Only use the connection points specified in the user manual and the accessories supplied.
The speaker cable must ONLY be used to connect the amplifier to the speakers. The gauge of the power cables must
match that shown in the table (paragraph 3.1). This gauge depends on the power of the amplifier and the cable length
required. Use double or triple shielded RCA cables to prevent any interference to the low level signal.
Operating time for your FPX amplifier
Avoid using the amplifier for extended periods without starting the vehicle. This can lead to flattening the battery.
Ventilation
It is essential to leave the upper part of your FPX amplifier uncovered to prevent overheating.
Items required for installation (in addition to accessories provided)
• 2 appropriately sized cable sheaths (1 for the power cable and one for the set comprising speaker cables, remote,
RCA modulation)
• Multimeter (volts/amps)
• Soldering iron and solder
• Crimping tool
• Wire stripper
• Wire cutter
• Battery terminal spanner
• Hand drill and drill bits
• Heat shrink sleeving in appropriate diameters for the different cables
• Power cable of appropriate length and gauge
• Remote switch-on wire of appropriate length and gauge (REM input on amplifier)
• Ground (earth) wire of appropriate length and gauge
• Fuse holder and suitable fuse
• Connector to positive (+) battery terminal
• Connector to vehicle chassis (-)
• Bolt with 6 mm head (minimum) with appropriate nut for grounding (earthing) to vehicle chassis
Installation
This section covers points relating to the vehicle that must be taken into account for the installation of your amplifier.
You will save time by planning the positioning of your system and its cabling in advance.
During this preparatory phase, ensure that all adjusters remain accessible once installation is complete.

6
FPX PREMIUM AMPLIFIER
User manual
Before commencing installation please scrupulously follow the following instructions:
1 - Read the instructions in full and be sure that you fully understand them before installing your amplifier.
2 - Disconnect the cable from the negative terminal on the vehicle battery before beginning installation (Fig. 1).
3 - For ease of fitting we suggest you put all wires in position before installing your amplifier.
4 - Route the RCA, speaker and REM cables away from power cables to avoid any signal interference.
5 - Use good quality connectors/fittings or good quality soldered joints when connecting the amplifier to ensure a
secure installation and to minimise signal or power losses.
6 - Before carrying out any operation ensure you are not cutting or drilling the fuel tank, any fuel, brake, hydraulic
or vacuum line or any electrical wiring or safety-related item.
7 - Never run any wiring under the vehicle. It is essential to run wiring inside the vehicle. When running cables,
ensure they do not interfere with operation of the vehicle. Cabling that obstructs or passes over such items as
the steering wheel, the pedals (brake, accelerator and clutch, etc.) could be extremely dangerous.
8 - Avoid running wires over or through sharp edges. All wiring routed through metal must be protected by a
grommet. Route wiring away from moving parts (e.g. seat rails) and sharp or pointed edges. This will also
protect cables from being pinched or damaged with the consequent risk of an electrical short-circuit.
9 - Always use fuses to protect the battery and the electrical circuit from any potential damage. Install a fuse-holder
and an appropriate fuse in the 12V+ power supply cable less than 40cm from the battery terminal. Ideally, this
distance should be as short as possible (Fig. 7).
10 - Prepare the chassis ground (earth) by removing all traces of paint from the metal surface, thus ensuring a good
ground (earth) contact. Ground (earth) connections should be as short as possible and ALWAYS connected to
metal welded to the vehicle bodywork or chassis (Fig. 2). The grounding (earthing) point usually chosen is the
one used to connect the negative terminal of the battery to the vehicle chassis.
11 - NEVER install this product in a vehicle's engine compartment. To do so would void the warranty.
1 - Positioning your FPX amplifier
Choosing a correct location for your FPX amplifier
Because of the amplifier's power, it needs heat dissipation for its operation. For this reason the amplifier must be
mounted in a ventilated location, especially above it. Avoid fitting it into any location that is close-fitting or covers the
amplifier in its immediate vicinity.
2 - Securing your FPX amplifier in place
Position your amplifier in the desired location and mark it.
Mark the attachment points in its support.
Use the mounting screws supplied (screws supplied are suitable for screwing into a wood base).
3 - Cabling your FPX amplifier
CAUTION
If you have any doubt over your ability to correctly install the amplifier and wiring, entrust this task to a Focal dealer/
installer.

7
FPX PREMIUM AMPLIFIER
User manual
3 - Cabling your FPX amplifier
WARNING
Do not run the power cables near the low level inputs, high level inputs, antenna or sensitive equipment or
cabling. The power cables carry a high current, capable of interfering with the audio signal.
WARNING
Use the shortest possible cable lengths to optimise the quality of the installation and limit signal losses.
WARNING
Before beginning the connection phase, remove the negative (-) terminal from the battery of the vehicle
(fig.1).
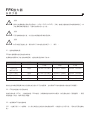
3.1 Choosing cable of the correct gauge
Your FPX amplifier requires a power supply of the correct amperage.
The cable gauge to be used depends on the distance of the cable from the battery, as recommended in the following table:
It is essential to scrupulously adhere to the recommendations in this table for the safety of your electrical system; it
is also important to maintain the maximum performance of your FPX amplifier.
3.2 - Cabling your FPX amplifier's input signals
Route all the modulation cables (RCA), speaker cables, and the REM cable together, isolating them from other high-
power consumption equipment in the vehicle and, in particular, electrical motors (e.g. windscreen wiper motor, etc.)
Do not cut any cables down yet. You will do this later.
3.3 – Wiring your FPX amplifier's power supply
3.3.1 – Route the positive (+) power cable, taking care to keep it away from the cables you have already positioned,
to avoid any interference. DO NOT CONNECT THE CABLE YET.
Amplifier Amperage Length of cable (meters)
0-2m 2-4m 4-6m
FPX 4.800 and
FPX 2.750
60A 16mm
2
/ 5AWG 21mm
2
/ 4AWG 35mm
2
/ 2AWG
FPX 1.1000 90A 21mm
2
/ 4AWG 35mm
2
/ 2AWG 53mm
2
/ 0AWG
FPX 4.400 SQ 50A 8mm
2
/ 8AWG 16mm
2
/ 5AWG 21mm
2
/ 4AWG
FPX 5.1200 90A 21mm
2
/ 4AWG 35mm
2
/ 2AWG 53mm
2
/ 0AWG

8
FPX PREMIUM AMPLIFIER
User manual
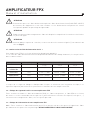
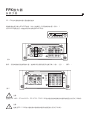
3.3.2 – Locate the negative (-) power cable. This cable should be as short as possible and ideally should not exceed
1 meter in length, in order to ensure an optimal connection between the amplifier and the vehicle chassis. The cable
and its gauge must be in accordance with the table in 3.1. Locate an appropriate ground (earth) point, then sand it to
remove all traces of paint or other finish, thus optimising the quality of the connection. Drill through the sheet metal
you have previously sanded, making a hole to match the bolt you have chosen, ensuring you are well clear of all cable
routes, reservoirs or tanks or other sensitive vehicle parts. Solder and insulate (using heat shrink sleeving) the earth
cable to the FPX amplifier earth connector supplied (Fig. 2).
3.4 - Connecting input connectors to your FPX amplifier
You may now begin the input/output cable connection phase.
Connect the RCA connectors (Fig. 3), paying attention to polarity and distribution. Connect the other end to the
amplifier's INPUTS connection panel.
fig. 2
fig. 3

9
FPX PREMIUM AMPLIFIER
User manual
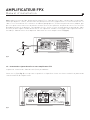
3.5 - Connecting the speakers and the remote to your FPX amplifier
Solder and insulate (using heat shrink sleeving) the REMOTE cable to the cable connector provided (Fig. 4).
Connect the other end of the REMOTE cable to the REMOTE terminal on the head unit.
Finally, connect the speaker cables to the amplifier, taking care to match polarities (+ to +, - to -). (Fig. 5).
fig. 5
fig. 4
WARNING
All speakers or speaker sets cabled to your FPX 4.800, FPX 4.400 SQ, FPX 2.750, FPX 5.1200 amplifier must always
have an impedance greater than 2 Ohms.
WARNING
All speakers or speaker sets cabled to your FPX 1.1000 amplifier must always have an impedance greater than 1 Ohm.

10
FPX PREMIUM AMPLIFIER
User manual
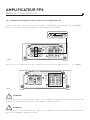
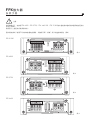
WARNING
In bridged mode, all speakers or speaker sets connected to your FPX 4.800, FPX 2.750, FPX 4.400 SQ, FPX 5.1200
must always have an impedance greater than 4 Ohms.
Any use of lower impedances would result in the voiding of the warranty.
To use a FPX amplifier in bridged mode and thus double the power available, observe the connections and polarities
shown below in: "BRIDGE" (Fig. 6).
FPX 2.750
FPX 4.400
FPX 4.800
FPX 5.1200
fig. 6
fig. 6
fig. 6
fig. 6

11
FPX PREMIUM AMPLIFIER
User manual
fig.7
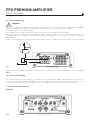
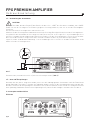
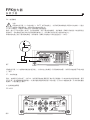
3.6 – Power supply wiring
WARNING
The cable connecting the positive (+) battery terminal to the "+BATT" terminal on the amplifier must ALWAYS
have a fuse suitable for the power of your amplifier, positioned 40 cm or closer to your vehicle battery.
Fuse holder connections must be sealed.
Disassemble the fuse holder, taking care to remove the fuse. Secure the base of the fuse holder.
Cut a length of power cable between 10 and 40 cm (max.). Strip 1 cm and tin. Screw the cable into the terminal on
the battery side of the fuse holder. Crimp the power cable into an appropriate connector and screw this to a source of
battery power.
Strip 1 cm at the end of the remaining length of cable and tin. Screw the cable into the other terminal of the fuse holder.
Solder and insulate (using heat shrink sleeving) the positive (+) power cable to the FPX amplifier connector supplied
(Fig. 7).
3.7 – Start-up and checking
The connection phase is now complete. It now remains to check the power supply is good and the correct operation
of the system (head unit/amplifier/speakers). Set the source gain to minimum. Set the gain on your amplifier at 1/3
of its total travel. Power up all the components. Once all components are switched on, test at low volume.
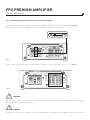
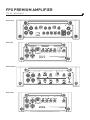
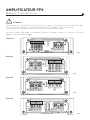
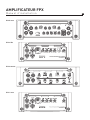
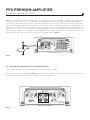
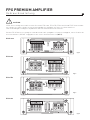
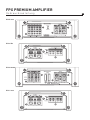
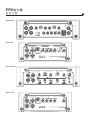
4 - Control panel and connections
FPX 4.800
fig.8

12
FPX PREMIUM AMPLIFIER
User manual
FPX 2.750
FPX 5.1200
FPX 4.400 SQ
FPX 1.1000
CH1 / CH2 CH3 / CH4

13
FPX PREMIUM AMPLIFIER
User manual
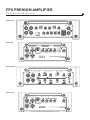
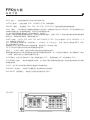
INPUT: These connectors are for low level signal inputs.
OUTPUT: These connectors (FPX 1.1000 and FPX 2.750) allow mirroring.
REMOTE: This connector (FPX 1.1000, FPX 2.750, FPX 5.1200) is for connecting the accessory volume control.
GAIN: The rotary GAIN control is for adjusting the level of the signal entering the amplifier. Voltage gain varies from
0.2 to 5V. Optimisation of the performance of the audio system consists of applying the maximum gain upstream in
the system and the lowest gain downstream.
This control should be adjusted to suit the level of the sound source (line output level).
Start by setting the amplifier gain at its lowest level. Gradually increase the level (volume) of the source up to 3/4.
Increase the gain on the amplifier up to the maximum desired listening level. Reduce the level if distortion occurs.
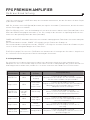
MODE: This switch (FPX 4.800, FPX 4.400 SQ, et FPX 5.1200) allows channels 3 and 4 (3, 4, 5, 6 for FPX 5.1200) to
mirror, if required, the signals from channels 1 and 2.
Thus, if you only have one stereo output (a right and a left), you can still amplify all four channels by activating 2CH
mode. If you wish to use FPX in its four independent channel mode, select 4CH.
FPX 5.1200 4CH mode allows channels 3 and 4 to mirror channels 5 and 6.
PHASE (°): The rotary PHASE control is used to adjust channel phasing with the rest of the system.
A readjustment of the phase of the subwoofer makes it possible for the subwoofer and the rest of the speakers to
play simultaneously at the crossover frequency. For a theoretical signal period, one of the sources is slightly shifted
so that at the listening position the phasing is perfect.
X-OVER MODE: This switch enables users to choose between a high-pass filter (HPF), a low-pass filter (LPF) or non
filtered mode (FULL).
X-OVER FREQ (Hz): Adjustment of the cross-over filter frequency. This rotary control adjusts the setting of the low-
pass or high-pass filter. The value selected defines the frequency up to which or from which the signal will be cut.
F-MULT: This switch activates a 10X multiplier for the setting value of the cut-off frequency.
SUBSONIC: This rotary control is used to remove sub-bass frequencies below a selected frequency.
BASS BOOST: This rotary control is used to raise the bass sound level from 0 to 12 dB.
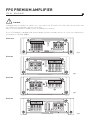
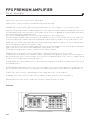
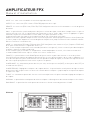
FPX 4.800
fig.9

14
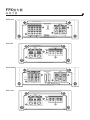
FPX PREMIUM AMPLIFIER
User manual
FPX 2.750
FPX 5.1200
FPX 4.400SQ
FPX 1.1000

15
FPX PREMIUM AMPLIFIER
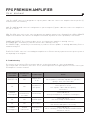
User manual
Status of Indi-
cator LEDs
Presence of
sound
Possible origin Action
PROTECT red NO
Output short
circuit
Turn audio system off
Check speakers, minimum impedance of speakers,
speaker connections and cables
Off NO
No power or
poor power
Turn audio system off
Check presence of 12 V
Check power cables and their polarity
Check fuses
PROTECT
Flashing red
Distorted,
intermittent or
no sound
Overheating
Turn head unit off
Allow your amplifier to cool before resuming use
Off NO No REM signal
Turn head unit on
Check for voltage at REM terminal
Off NO Fuse failure
Turn head unit off
Check fuses and replace if necessary
POWER
Flashing green
YES/NO
or distorted
Ground (earth)
problem
Turn head unit off
Check continuity of connection between GND terminal
and vehicle chassis
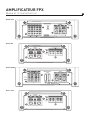
+12V: The +BATT connector is designed to accept the power cable that connects the amplifier with the positive (+)
terminal on the vehicle battery.
GND: The GND (ground) connector is designed to accept the negative (-) power cable that connects the amplifier to
the vehicle chassis.
REM: The REM connector is for the connection between the amplifier and the source (head unit) via a REM or REMOTE
output on the head unit. This switches the amplifier on automatically when the source (head unit) is switched on.
POWER and PROTECT: These indicator lights are for checking that the amplifier is working correctly.
The POWER light, continuously lit, indicates that the unit is working correctly.
The PROTECT light, continuously or intermittently lit, indicates that the product is working abnormally. Refer to
troubleshooting in 5.
FUSES: The FUSES connector is for holding the amplifier fuses. Ensure that any replacement fuses perfectly match
the amperage of the originals.
5 - Troubleshooting
The statuses of the various LEDs are used to indicate certain failure modes or causes of breakdowns.
Check all possible cases below. If, after these checks, normal operation is not regained, please refer the issue to your
FPX amplifier's installer or dealer.

16
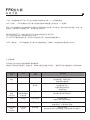
FPX PREMIUM AMPLIFIER
User manual
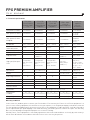
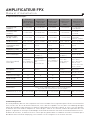
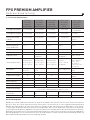
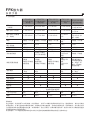
FPX 4.800
Class D 4/3/2
channel ampli-
fier
FPX 2.750
Class D 2
channel/mono
amplifier
FPX 4.400SQ
Class AB
4/3/2 channel
amplifier
FPX 1.1000
Class D
mono amplifier
FPX 5.1200
amplifier
ClassD -
5 channels
CEA power (4 ohms)
4x120WRMS 2x220WRMS 4x70WRMS 1x420WRMS
4 x 75WRMS +
1 x 420WRMS
Max. power (2 ohms)
4x185WRMS 2x385WRMS 4x100WRMS 1x700WRMS
4 x 120W +
1 x 720W
Max. power (4 ohms
bridged)
2x370WRMS 1x770WRMS 2x200WRMS 1x1000WRMS
2 x 240 +
720WRMS
(channel 5 :
2Ohms)
Bandwidth
10Hz – 20KHz 20Hz – 20KHz 10Hz – 22KHz 15Hz – 250Hz 10Hz - 20kHz
Minimum total har-
monic distortion
0.01% 0.01% 0.04 % 0.08 % 0,03%
Crosstalk (1 KHz)
> 55dB > 72dB > 54dB - > 65dB
SNR (1W/A)
> 76dBA > 76dBA > 77dBA > 76dBA > 76dB
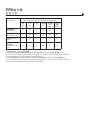
Subsonic filter
-
20Hz-50Hz
(12dB/oct)
-
10Hz-50Hz
(24dB/oct)
20Hz - 50Hz
High-pass/low-pass
filter
Configurable
High-pass/low-
pass
50Hz-500Hz
Configurable
High-pass/low-
pass
50Hz-500Hz
Configurable
High-pass/low-
pass
40Hz-5000Hz
Low-pass
50Hz-250Hz
(24dB/oct)
Configurable
High-pass/
low-pass
50Hz-
500Hz. Chanel 5:
low-pass filter
50Hz - 250Hz
Bass Boost
0 to12 dB linear
(¾)
0 to 12dB linear - 0 to 12dB linear
Channel 5 : 0 to
12 dB linear
Phase
- - - 0 to 180° linear 0 to 180 ° linear
Full-range function
✓ ✓ ✓
-
Channels 1/2
and 3/4
Mirror mode
✓
-
✓
-
✓
Standby current (A)
1.1 A 0.95 A 0.6 A 1.75 A 1,75A
Fuses
2x30 A 2x30 A 2x30 A 3x30 A 3 x 30A
Remote control
-
✓
-
✓ ✓
Protection
Short circuit/low impedance/reverse polarity
/DC/voltage drop/overheat protection
Dimensions
(LxWxH)
9
21⁄64
x5
13⁄64
x2
3⁄32
"
(237x132x53mm)
9
21⁄64
x5
13⁄64
x2
3⁄32
"
(237x132x53mm)
12
23⁄64
x6
57⁄64
x2
1⁄4
"
(314x175x57mm)
11
11⁄16
x5
13⁄64
x2
3⁄32
"
(297x132x53mm)
11
13⁄16
x6
57⁄64
x 2
1⁄4
(300x175x57mm)
Weight (kg)
4.40lbs (2kg) 4.40lbs (2kg) 8.16lbs (3.7kg) 5.62lbs (2.55kg) 9.03lbs (4,1kg)
6 – Technical specifications
Warranty conditions
In the event of a problem, please contact your Focal dealer. The warranty for France for all Focal equipment is 2
years. In case of faulty equipment, this must be sent at your expense, in its original packaging, to the dealer, who will
test the equipment and determine the nature of the fault. If the equipment is under warranty, it will be returned to
you or replaced with pre-paid shipping. If not under warranty, you will be given an estimate for repair. The warranty
does not cover damage arising from improper use or incorrect wiring.
Outside France, Focal equipment is covered by a guarantee with terms and conditions set locally by each country's
official Focal distributor in accordance with laws in force in the territory in question.

17
AMPLIFICATEUR FPX
Manuel d'installation
Français
Votre produit Focal-JMlab a été conçu et fabriqué avec des matériaux et composants de haute qualité,
susceptibles d’être recyclés et réutilisés. Ce symbole signifie que les appareils électriques et électroniques,
lorsqu’ils sont arrivés en fin de vie, doivent être éliminés séparément des ordures ménagères. Veuillez
rapporter cet appareil à la déchetterie communale ou à un centre de recyclage. Vous contribuez ainsi à la
préservation de l’environnement.
Nous vous remercions d’avoir choisi Focal pour votre système Car Audio et de partager avec nous notre
philosophie. Ce produit intègre le meilleur de la technologie Focal. Pour obtenir les meilleurs résultats, nous
vous recommandons de faire installer votre amplificateur FPX par votre revendeur Focal. Afin d’en exploiter
l’ensemble des fonctionnalités et ainsi de profiter pleinement de ses performances, nous vous conseillons de lire
attentivement les instructions de ce livret, puis de le conserver pour vous y référer ultérieurement. Tout problème
dû au non-respect des règles d’utilisation peut entraîner une invalidation de la garantie.
AVERTISSEMENT
Ce symbole désigne les instructions importantes. Le non-respect de ces instructions peut entrainer de
graves blessures, ou des dommages matériels.
Contenu de l’emballage :
- 1 amplificateur FPX
- 1 manuel d’utilisation
- 1 set d’accessoires
- 1 télécommande (FPX 1.1000, FPX 2.750, FPX 5.1200)
AVERTISSEMENT
• N’activez aucune fonction susceptible de détourner votre attention lors de la conduite du véhicule. Les fonctions
ou réglages requérant une attention prolongée ne doivent être exploitées qu’à l’arrêt complet du véhicule. Veillez
a toujours stopper le véhicule dans un endroit sûr avant d’activer ces fonctions. Il y a risque de provoquer un
accident.
• Gardez le volume à faible niveau de façon à pouvoir entendre les bruits extérieurs durant la période de conduite
du véhicule. Il y a risque de provoquer un accident.
• N’ouvrez pas votre amplificateur FPX et n’opérez pas de modifications sur le produit. Il y a risque d’accident,
d’incendie ou de choc électrique.
Pour validation de la garantie Focal-JMlab,
il est maintenant possible d’enregistrer son produit en ligne : www.focal.com/garantie

18
AMPLIFICATEUR FPX
Manuel d'installation
AVERTISSEMENT
• Utilisez votre amplificateur FPX sur des applications mobiles de 12 volts uniquement. Toute utilisation autre que
l’application désignée comporte un risque d’incendie, de choc électrique ou de blessure.
• Utilisez des fusibles d’ampérage approprié. Il y a risque d’incendie ou de décharge électrique.
• N’obstruez pas le radiateur de votre amplificateur FPX. Une surchauffe interne peut se produire et provoquer
un incendie.
• Effectuez correctement les connexions. Vérifiez la section du câble et le type de câble. Il y a risque d’incendie, de
blessures et/ou d’endommagement de l’appareil.
• N’utilisez pas d’écrous ni de boulons du circuit de direction ou de freinage, des réservoirs, des ceintures ou
autres éléments de sécurités pour la connexion de la masse. L’utilisation de ces organes comme masse peut
désactiver le système de contrôle du véhicule et causer un incendie ou autre avarie.
• Gardez les petits objets susceptibles d’être ingérés, comme les boulons, accessoires ou les vis, hors de portée
des enfants. L’ingestion de tels objets peut entraîner de graves blessures. En cas d’ingestion, consultez un médecin.
• Avant d’entamer l’installation, déconnectez la borne négative de la batterie pour éviter tout risque de blessure,
d’incendie ou d’endommagement du matériel. (fig. 1)
fig. 1
ATTENTION
L’écoute prolongée à fort niveau, au-delà de 110 dB, peut détériorer durablement l’audition. Des écoutes, même
brèves, au-delà de 130 dB, peuvent provoquer des lésions auditives irrémédiables.
Interrompez toute utilisation en cas de problème. Le non-respect de cette précaution peut entraîner des blessures
ou endommager l’appareil. Si un dysfonctionnement persiste, retournez l’appareil auprès de votre revendeur Focal
en vue de sa réparation.
Utilisez les accessoires spécifiés et installez les correctement. Utilisez uniquement les accessoires spécifiés
dans le manuel d’utilisation, ainsi que ceux qui sont fournis dans l’emballage. L’utilisation d’autres composants
peut causer des dommages internes au produit, ou son installation risque de ne pas être effectuée correctement.
Les pièces utilisées risquent de se desserrer et de provoquer des dommages ou une défaillance technique du
produit. Il y a risque d’accident, d’incendie ou de choc électrique.
N’installez pas l’appareil dans des zones fortement humides ou poussiéreuses. Evitez d’installer l’appareil dans
des zones du véhicule soumises à une forte humidité ou à une présence excessive de poussière. La pénétration
d’humidité ou de poussière à l’intérieur du produit risque de provoquer une défaillance.

19
AMPLIFICATEUR FPX
Manuel d'installation
Installation de votre amplificateur FPX
L’installation de ce produit requière des compétences techniques et de l’expérience. En cas d’incertitude sur
l’aptitude à installer l’amplificateur, confiez cette tâche à un revendeur Focal afin de profiter pleinement de
l’ensemble des possibilités de votre amplificateur FPX.
Câblage de votre amplificateur FPX
Utilisez uniquement les départs de câbles préconisés dans le manuel d’utilisation et les accessoires fournis.
Le câble haut-parleur doit être UNIQUEMENT utilisé pour relier l’amplificateur aux haut-parleurs. La section des
câbles d’alimentation doit correspondre à celle mentionnée dans le tableau (paragraphe 3.1) et est fonction de
la puissance de l’amplificateur et de la longueur de câble nécessaire. Utilisez des câbles RCA à double ou triple
blindage pour éviter tout parasitage du signal bas niveau.
Durée de fonctionnement de votre amplificateur FPX
Evitez de faire fonctionner l’amplificateur durant une longue période sans démarrer le véhicule. Ceci peut entraîner
la décharge prématurée de la batterie.
Ventilation
Il est impératif de ne pas couvrir la zone supérieure de votre amplificateur FPX afin de ne pas créer de surchauffe.
Matériel requis pour effectuer l’installation (en dehors des accessoires fournis) :
• 2 gaines de section adéquates (1 gaine pour le câble d’alimentation, 1 gaine pour le lot de câbles haut-parleurs,
REMOTE, modulation RCA)
• Multimètre (voltage/ampérage)
• Fer à souder + étain
• Pince à sertir
• Pince à dénuder
• Coupe-fils
• Clé de borne de batterie
• Perceuse à main et mèches assorties
• Gaines thermo-rétractables de diamètres appropriés aux différents câbles
• Câble d’alimentation de longueur et de section adéquates
• Câble d’allumage à distance (entrée REM de l’amplificateur) de longueur et de section adéquates
• Câble de masse de longueur et de section adéquates
• Porte fusible et fusible adéquat
• Cosse de liaison à la borne positive (+) de la batterie
• Cosse de liaison au châssis du véhicule (-)
• Vis avec tête de vis de 6 mm au minimum et son écrou pour mise à la masse sur le châssis du véhicule
Installation
La section ci-dessous traite de points relatifs au véhicule dont il faut tenir compte pour l’installation de votre
amplificateur. Vous gagnerez du temps en planifiant à l’avance la disposition du système et du câblage.
Assurez-vous, durant cette étape préparatoire, que l’ensemble des réglages resteront accessibles une fois
l’installation terminée.

20
AMPLIFICATEUR FPX
Manuel d'installation
Avant de commencer l’installation, merci de suivre scrupuleusement les règles suivantes :
1 – Après lecture intégrale du manuel d’utilisation, assurez vous d’avoir compris l’ensemble des instructions avant
d’installer votre amplificateur.
2 - Débranchez le fil négatif de la batterie avant de commencer l’installation (fig.1).
3 - Pour faciliter le montage, nous suggérons de dérouler tous les fils avant d’installer votre amplificateur.
4 - Acheminez l’ensemble des câbles RCA, haut-parleur et REM à l’ écart des câbles d’alimentation afin d’éviter
tout parasitage du signal.
5 - Utilisez des connecteurs/raccords ou des soudures de qualité pour relier l’amplificateur afin d’assurer une
fiabilité d’installation et minimiser les pertes de signal ou de puissance.
6 – Vérifiez avant de réaliser quelque opération de ne pas couper ou percer le réservoir d’essence, les conduites de
carburant, de frein, hydrauliques ou de dépression, ainsi que le câblage électrique ou tout élément sécuritaire.
7 - Ne faites jamais passer de fil sous le véhicule. Il faut impérativement les installer à l’intérieur de celui-ci. Lors
du passage des câbles, vérifiez que ceux-ci ne gêneront pas la conduite du véhicule. Les câbles qui obstruent
ou dépassent à des endroits tels que le volant, les pédales (frein, accélérateur et embrayage, etc…), peuvent
s’avérer extrêmement dangereux.
8 - Evitez de faire passer des fils par-dessus ou à travers des bords tranchants. Tout fil acheminé à travers du métal
doit être protégé par des passe-fils. Faites cheminer les câbles à l’ écart des pièces mobiles (rails d’un siège…)
et des arêtes acérées ou pointues. Cela évitera ainsi de coincer ou d’endommager les câbles et d’engendrer un
court-circuit électrique.
9 - Protégez toujours la batterie et le circuit électrique de dommages potentiels à l’aide de fusibles. Installez un
porte-fusible et un fusible appropriés sur le câble d’alimentation 12 V positif (+) à moins de 40 cm de la borne
de la batterie. Idéalement, cette distance doit être la plus courte possible (fig. 7).
10 - Préparez la masse du châssis en grattant toute trace de peinture sur la surface métallique, afin d’assurer
une bonne mise à la masse. Les connexions de masse doivent être aussi courtes que possible et TOUJOURS
connectées à du métal soudé à la carrosserie ou au châssis du véhicule (fig. 2). Le point de masse généralement
retenu est celui assurant la liaison entre la borne négative de la batterie et le châssis du véhicule.
11 - NE montez JAMAIS ce produit dans le compartiment moteur du véhicule. Ceci entrainerait l’annulation de la
garantie.
I - Mise en place de votre amplificateur FPX
Où installer votre amplificateur FPX ?
En raison de la puissance de l’amplificateur, une dissipation thermique est nécessaire au fonctionnement. Pour cette
raison, l’amplificateur doit être monté dans un endroit permettant une ventilation, tout spécialement sur le dessus.
Evitez tout encastrement ou recouvrement de l’amplificateur dans sa zone proche d’installation.
2 - Fixation de votre amplificateur FPX
Positionnez votre amplificateur à l’emplacement souhaité et le repérer.
Repérez les points de fixation dans votre support.
Utilisez les vis de fixation fournies (adaptées à un vissage dans un support bois).
3 – Câblage de votre amplificateur FPX
AVERTISSEMENT
En cas de doute sur l’aptitude à installer l’amplificateur et câbler le système de façon adéquate, confiez cette tâche
à un revendeur/installateur Focal.
ページが読み込まれています...
ページが読み込まれています...
ページが読み込まれています...
ページが読み込まれています...
ページが読み込まれています...
ページが読み込まれています...
ページが読み込まれています...
ページが読み込まれています...
ページが読み込まれています...
ページが読み込まれています...
ページが読み込まれています...
ページが読み込まれています...
ページが読み込まれています...
ページが読み込まれています...
ページが読み込まれています...
ページが読み込まれています...
ページが読み込まれています...
ページが読み込まれています...
ページが読み込まれています...
ページが読み込まれています...
ページが読み込まれています...
ページが読み込まれています...
ページが読み込まれています...
ページが読み込まれています...
ページが読み込まれています...
ページが読み込まれています...
ページが読み込まれています...
ページが読み込まれています...
ページが読み込まれています...
ページが読み込まれています...
ページが読み込まれています...
ページが読み込まれています...
ページが読み込まれています...
ページが読み込まれています...
ページが読み込まれています...
ページが読み込まれています...
ページが読み込まれています...
ページが読み込まれています...
ページが読み込まれています...
ページが読み込まれています...
ページが読み込まれています...
ページが読み込まれています...
ページが読み込まれています...
ページが読み込まれています...
-
 1
1
-
 2
2
-
 3
3
-
 4
4
-
 5
5
-
 6
6
-
 7
7
-
 8
8
-
 9
9
-
 10
10
-
 11
11
-
 12
12
-
 13
13
-
 14
14
-
 15
15
-
 16
16
-
 17
17
-
 18
18
-
 19
19
-
 20
20
-
 21
21
-
 22
22
-
 23
23
-
 24
24
-
 25
25
-
 26
26
-
 27
27
-
 28
28
-
 29
29
-
 30
30
-
 31
31
-
 32
32
-
 33
33
-
 34
34
-
 35
35
-
 36
36
-
 37
37
-
 38
38
-
 39
39
-
 40
40
-
 41
41
-
 42
42
-
 43
43
-
 44
44
-
 45
45
-
 46
46
-
 47
47
-
 48
48
-
 49
49
-
 50
50
-
 51
51
-
 52
52
-
 53
53
-
 54
54
-
 55
55
-
 56
56
-
 57
57
-
 58
58
-
 59
59
-
 60
60
-
 61
61
-
 62
62
-
 63
63
-
 64
64


他の言語で
- Deutsch: Focal FPX 1.1000 Benutzerhandbuch
- français: Focal FPX 1.1000 Manuel utilisateur
- English: Focal FPX 1.1000 User manual
その他のドキュメント
-
 FOCAL NAIM Deutschland ISUB-ACTIVE-2.1 取扱説明書
-
Philips CMP200/93 Product Datasheet
-
Magnat Audio Anniversary 4000 STARK 取扱説明書
-
MAC Audio ZX 2000 取扱説明書
-
MAC Audio ZX 4000 取扱説明書
-
Magnat Audio EDITION FOUR 取扱説明書
-
Sony XM-2002GTR 取扱説明書
-
MAC Audio Ice Cube 108F 取扱説明書
-
 Magnat Audio BLACK CORE FOUR LTD 取扱説明書
-
Magnat Audio Power Core One Limited 取扱説明書

