

ENGLISH
Introduction
Congratulations on your purchase and welcome to Philips! To fully
benet from the support that Philips offers, register your product at
www.philips.com/welcome.
General description (Fig. 1)
A Permanent lter (specic types only)
B Removable lter holder
C Removable water tank cover
D Water tank
E Water level indicator
F Lid of jug
G Jug
H On/off switch
I Hotplate
J Mains cord with plug
K Coffeemaker
L Lid of coffeemaker
Important
Read this user manual carefully before you use the appliance and save it for
future reference.
Danger
- Never immerse the appliance in water or any other liquid, nor rinse it
under the tap.
Warning
- Check if the voltage indicated on the appliance corresponds to the local
mains voltage before you connect the appliance.
- Do not use the appliance if the plug, the mains cord or the appliance
itself is damaged.
- If the mains cord is damaged, you must have it replaced by Philips, a
service centre authorised by Philips or similarly qualied persons in
order to avoid a hazard.
- This appliance is not intended for use by persons (including children)
with reduced physical, sensory or mental capabilities, or lack of
experience and knowledge, unless they have been given supervision or
instruction concerning use of the appliance by a person responsible for
their safety.
- Keep the appliance and its cord out of the reach of children.
Caution
- Do not place the appliance on a hot surface and prevent the mains
cord from coming into contact with hot surfaces.
- Unplug the appliance if problems occur during brewing and before you
clean it.
- This appliance is intended to be used in household and similar
applications such as:
- staff kitchen areas in shops, ofces and other working environments;
- farm houses;
- by clients in hotels, motels and other residential type environments;
- bed and breakfast type environments.
- Wait until the appliance has cooled down before you store it, especially
if you want to push the mains cord into the appliance. The hotplate and
the coffee jug may be hot.
- Beware of hot steam when you open the lid of the coffeemaker.
- The jug is hot during and after brewing. Always hold the jug by
its handle.
- Never use the jug in a microwave oven.
- Do not move the appliance while it is brewing coffee.
Electromagnetic elds (EMF)
This Philips appliance complies with all applicable standards and regulations
regarding electromagnetic elds.
Before first use
1 Placetheapplianceonaatandstablesurface.
2 Pushexcesscordintotheopeninginthebackoftheappliance.Tox
thecord,pushitintothenarrowpartoftheopening(Fig.2).
Note: Make sure that the cord does not come into contact with hot surfaces.
3 Putthemainspluginanearthedwallsocket.
4 Cleanthedetachableparts(seechapter‘Cleaning’).
5 Reassembleallparts.
- Make sure the water tank cover is placed correctly (‘click’) (Fig. 3).
- Make sure the lter holder is placed correctly. First place the back of
the lter holder under the rim of the hinge (1) and then push down the
handgrip (2) until the lter holder locks into place (Fig. 4).
Note: If the lter holder is not placed correctly, the lid cannot be closed.
6 Flushtheappliance(seesection‘Flushingtheappliance’below).
Flushing the appliance
Note: Do not put a lter and ground coffee in the lter holder.
1 Openthelidofthecoffeemaker(Fig.5).
2 FillthewatertankwithfreshcoldwateruptotheMAX
indication(Fig.6).
Note: Do not switch on the appliance when the lid is still open.
3 Closethelid.
4 Putthejugonthehotplate(Fig.7).
Note: Make sure you put the jug on the hotplate with the spout facing into the
appliance.
5 Presstheon/offswitchtoswitchontheappliance(Fig.8).
, Thepower-onlightgoeson.
6 Lettheapplianceoperateuntilallthewaterhasrunintothejug.
7 Switchofftheappliance.Letitcooldownforatleast3minutes
beforeyoustartbrewingcoffee.
Using the appliance
1 Openthelidofthecoffeemaker(Fig.5).
2 Fillthewatertankwithfreshcoldwateruptotherequired
level(Fig.9).
- The indications on the left side of the water level window correspond
to large cups (120ml).
- The indications on the right side of the water level window correspond
to small cups (80ml).
3 Makesurethelterholderisplacedcorrectly.Firstplacethebackof
thelterholderundertherimofthehinge(1)andthenpushdown
thehandgrip(2)untilthelterholderlocksintoplace(Fig.4).
Note: If the lter holder is not placed correctly, the lid cannot be closed and the
drip stop cannot function properly. The drip stop prevents coffee from dripping
through the lter onto the hotplate when the jug is removed.
4 Takeapaperlter(type1x2orno.2)andfoldthesealededgesto
preventtearingandfolding(Fig.10).
Note: Some versions come with a permanent lter. In this case you do not need
to use paper lters.
5 Putthepaperlterorthepermanentlterinthelter
holder(Fig.11).
6 Putgroundcoffee(lter-negrind)inthelter(Fig.12).
- For large cups: use one heaped measuring spoon of ground coffee for
each cup.
- For small cups: use one level measuring spoon of ground coffee for
each cup.
7 Closethelidofthecoffeemaker.(Fig.13)
8 Placethejugwiththelidclosedonthehotplate(Fig.7).
Note: Make sure you put the jug on the hotplate with the spout facing into the
appliance. If the spout of the jug sticks out from under the lter holder, the
coffee may cool down.
Note: If you do not place the jug properly on the hotplate, the drip
stop prevents the coffee from owing into the jug. This may cause the lter
to overow.
9 Presstheon/offswitchtoswitchontheappliance(Fig.8).
, Thepower-onlightgoeson.
10 Letthewaterpassthroughthelterintothejug.
Note: If you want to remove the jug during brewing, the drip stop prevents
coffee from dripping through the lter onto the hotplate. Place back the jug as
soon as possible to prevent the lter from overowing (Fig. 14).
11 Youcanleavethejugonthehotplatetokeepthecoffeewarmandto
preserveitsavour.
Note: Make sure you put the jug on the hotplate with the spout facing into the
appliance. If the spout of the jug sticks out from under the lter holder, the
coffee may cool down.

Guarantee and support
If you need information or support, please visit www.philips.com/support
or read the separate worldwide guarantee leaet.
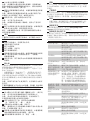
Troubleshooting
This chapter summarises the most common problems you could encounter
with the appliance. If you are unable to solve the problem with the
information below, contact the Consumer Care Centre in your country.
Problem Possiblesolution
The appliance does
not work.
Plug in and switch on the appliance.
Make sure that the voltage indicated on the
appliance corresponds to the local mains voltage.
Fill the water tank with water.
In all other cases, contact the Philips Consumer
Care Centre.
Water leaks out of
the appliance.
Do not ll the water tank beyond the MAX level.
In all other cases, contact the Philips Consumer
Care Centre.
The appliance takes
a long time to brew
coffee.
Descale the appliance (see chapter ‘Descaling’).
The appliance
produces a lot of
noise and steam
during the brewing
process.
Make sure that the appliance is not blocked by
scale. If necessary, descale the appliance (see
chapter ‘Descaling’ ).
The lter overows
when I remove the
jug from the
appliance while it
is brewing coffee.
If you remove the jug from the hotplate while
the appliance is brewing coffee, place the jug
back onto the hotplate as soon as possible to
prevent the lter from overowing. Also note
that the coffee does not reach its full taste before
the end of the brewing cycle. Therefore we advise
you not to remove the jug and pour out the
coffee before the end of the brewing cycle.
The lid of the coffee
maker wobbles when
I remove the jug from
the hotplate.
Make sure you put the jug on the hotplate with
the spout facing into the appliance (i.e. not
pointing sideways).
Coffee grounds end
up in the jug.
Make sure that the water tank cover is in place
before you put the ground coffee in the lter.
Do not put too much ground coffee in the lter.
Make sure you put the jug on the hotplate with
the spout facing into the appliance (i.e. not
pointing sideways).
Unclog the opening in the bottom of the lter
holder.
Use the right size of paper lter (1x2 or no. 2).
Make sure the paper lter is not torn.
The coffee is too
weak
Use the right proportion of coffee to water.
Make sure the paper lter does not collapse.
Use the right size of paper lter (1x2 or no. 2).
Make sure there is no water in the jug before you
start to brew coffee.
The coffee does not
taste good.
Do not leave the jug with coffee on the hotplate
too long, especially not if it only contains a small
amount of coffee.
The coffee is not hot
enough.
Make sure you put the jug on the hotplate with
the spout facing into the appliance (i.e. not
pointing sideways).
The amount of coffee
is smaller than I
expected.
Some of the water is absorbed by the ground
coffee. Put more water in the water tank.
12 Afteruse,presstheon/offswitchtoswitchofftheappliance.
Note: The appliance does not switch off automatically.
Note: If you want to brew another jug of coffee right away, let the appliance
cool down for 3 minutes rst.
13 Removethelterholderandthrowawaythepaperlterandits
contents.Ifyouhaveusedthepermanentlter,emptyandrinseit.
Tip: After the brewing cycle is completed, you can pour the hot coffee into a
thermos jug to keep it hot and fresh.
Cleaning
Neverimmersetheapplianceinwateroranyotherliquid,norrinseit
underthetap.
1 Unplugtheapplianceandletitcooldown.
2 Cleantheoutsideoftheappliancewithamoistcloth.
3 Removethelterholder.
4 Removethewatertankcover(Fig.15).
5 Removethelidfromthejug.
6 Cleanthelterholder,thepermanentlter(specictypesonly),
thewatertankcover,thejugandthelidofthejuginhotwaterwith
somewashing-upliquidorinthedishwasher.
7 Aftercleaning,rinsethejugwithfreshhotwaterandreattach
allparts.
Descaling
Regular descaling prolongs the life of the appliance and guarantees optimal
brewing results and a constant brewing time for a long time.
In case of normal use (two full jugs of coffee every day), descale the
appliance:
- 2 or 3 times a year if you use soft water (up to 18dH);
- 4 or 5 times a year if you use hard water (over 18dH).
Contact your local water board for information about the water hardness in
your area.
You can use white vinegar with 4% acetic acid or a liquid descaler to descale
the coffeemaker.
Note: If the appliance starts to produce more steam, this can be an indication
that scale is building up.
Neverusevinegarwithanaceticacidcontentof8%ormore,natural
vinegar,powderdescalersortabletdescalerstodescaletheappliance,as
thismaycausedamage.
Descaling takes approx. 30 to 60 minutes.
1 Fillthewatertankwithapprox.600mlofwhitevinegar(4%acetic
acid)(Fig.16).
Note: Do not put a lter and ground coffee in the lter holder.
Note: You can also use an appropriate liquid descaler. In this case, follow the
instructions on the package of the descaler.
2 Presstheon/offswitchtoswitchontheapplianceandletitcomplete
thebrewingcycle(seechapter‘Usingtheappliance’)(Fig.8).
3 Emptythejugoverasink(Fig.17).
Note: For extra through descaling and to make sure that there is no scale left in
the appliance, repeat steps 1 to 3.
4 Lettheappliancecompletetwomorebrewingcycleswithfreshcold
watertoremoveanyvinegar/descalerandscaleresidues(Fig.18).
5 Cleanthejugandthelterholder(seechapter‘Cleaning’).
Replacement
You can order a new jug from your local Philips dealer or a Philips
service centre under type number HD7990/20 (black) or HD7990/70
(celestial blue).
Ordering accessories
To buy accessories or spare parts, visit www.shop.philips.com/service
or go to your Philips dealer. You can also contact the Philips Consumer Care
Centre in your country (see the worldwide guarantee leaet for contact
details).
Recycling
- Do not throw away the appliance with the normal household waste
at the end of its life, but hand it in at an ofcial collection point for
recycling. By doing this, you help to preserve the environment.

首次使用之前
1 将产品放在一个水平、稳固的表面上。
2 将过长的线缆推入产品背面的开口处。要固定线缆,
可将其推入开口处的较窄部分。(图2)
注意:确保电源线未与高温表面接触。
3 将插头插入有接地的电源插座。
4 清洗可拆卸部件(见“清洁”一章)。
5 重新组装所有部件。
-
确保水箱盖正确放置(可听到“咔哒”一声)。
(图 3)
- 确保过滤网架正确放置。先将过滤网架的背面放到铰
链 (1) 边下,然后按下手柄 (2),直到过滤网架锁定
到位。 (图 4)
注意:如果过滤网架放置不正确,咖啡机盖将无法关闭。
6 冲洗本产品(见下面“冲洗产品”部分的介绍)。
冲洗产品
注意:切勿将过滤网和咖啡粉放于过滤网架之上。
1 打开咖啡机盖。(图5)
2 在水箱中注入清水,直至最高水位标示(MAX)。(图6)
注意:当盖子仍然开着的时候,请不要开机。
3 合上盖子。
4 将玻璃壶放在加热盘上。(图7)
注意:确保在将玻璃壶放到加热盘上时壶口朝向产品。
5 按下开/关按钮打开产品。(图8)
, 电源指示灯亮起。
6 让产品一直运转到水全部注入玻璃壶内。
7 关闭产品。让其至少冷却3分钟,然后开始冲煮咖啡。
使用本产品
1 打开咖啡机盖。(图5)
2 在水箱中注入清水,直至所需水位。(图9)
- 水位窗左侧的指示对应于大杯(120 毫升)。
- 水位窗右侧的指示对应于小杯(80 毫升)。
3 确保过滤网架正确放置。先将过滤网架的背面放到铰
链(1)边下,然后按下手柄(2),直到过滤网架锁定
到位。(图4)
注意:如果过滤网架放置不正确,咖啡机盖将无法关闭,
并且防滴漏功能也将无法正常工作。防滴漏功能可以在取
下咖啡壶时防止咖啡透过滤网滴漏。
4 取一张过滤纸(1X2型或2号),将密封边折起,
以防撕破或折叠。(图10)
注意:有些咖啡壶的型号带有永久过滤网。在这种情
况下,就不需使用过滤纸。
5 将过滤纸或永久性过滤网放到过滤网架上。(图11)
6 将磨碎的咖啡粉(适合过滤的粒度)放入过滤网。
(图12)
- 大杯:每杯需一满勺份量的咖啡粉。
- 小杯:每杯需一平勺份量的咖啡粉。
7 盖上咖啡机盖。(图13)
8 盖上盖子,将玻璃壶放置在加热盘上。(图7)
注意:确保在将玻璃壶放到加热盘上时壶口朝向产品。
如果壶口从过滤网架下突出,咖啡将会变冷。
注意:如果未将玻璃壶正确放置在加热盘上,防滴漏功能
将阻止咖啡流入玻璃壶。这可能导致咖啡从过滤网溢出。
9 按下开/关按钮打开产品电源。(图8)
, 电源指示灯亮起。
简体中文
简介
感谢您的惠顾,欢迎光临飞利浦!为了您能充分享受飞
利浦提供的支持,请在 www.philips.com/welcome
上注册您的产品。
基本说明 (图 1)
A 永久性过滤网(仅限特定型号)
B 可拆卸过滤网架
C 可分离式水箱盖
D 水箱
E 水位计
F 壶盖
G 壶
H 开/关按钮
I 加热盘
J 带插头的电源线
K 咖啡壶
L 咖啡壶盖
注意事项
使用本产品之前,请仔细阅读本使用说明书,
并妥善保管以备日后参考。
危险
- 不要将本产品浸入水或其它液体中,也不要在水
龙头下冲洗。
警告
- 在将产品连接电源之前,请先检查产品所标电压
与当地的供电电压是否相符。
- 如果插头、电源线或产品本身受损,请勿再使用
本产品。
- 如果电源软线损坏,为避免危险,必须由制造厂
或其维修部或类似的专职人员来更换。
- 肢体不健全、精神有障碍及缺乏相关经验和知识
的人(包括儿童)必须在监护人的监督及指导下
使用。
- 将产品及其线缆放在儿童接触不到的地方。
注意
- 切勿将本产品放在热的表面上,并防止电源线与
热的表面接触。
- 如果在煮咖啡期间出现问题,请拔下产品的电源
插头。器具在清洁前必须拔下电源插头或连接
器,器具再次使用前必须把器具擦干。
- 本产品仅打算用于家用及类似用途,如:
- 商店、办公场所及其它工作环境的厨房;
- 农庄;
- 由旅店、旅馆及其它住宿型环境中的客人使用;
- 提供住宿和早餐的场所。
- 在存放前,特别是在将电源线推入产品之前,
务必等到产品冷却。加热盘可能会非常热。
- 请留意,在打开咖啡机壶盖时,会有热汽冒出。
- 在冲煮期间或冲煮后,咖啡壶会变热。务必握持
咖啡壶柄。
- 不要在微波炉内使用咖啡壶。
- 冲煮咖啡期间,请勿移动本产品。
电磁场 (EMF)
本飞利浦产品符合所有有关暴露于电磁场的适用标准和
法规。

更换
您可以从当地飞利浦经销商处或飞利浦服务中心订购型
号为 HD7990/20(黑色)或 HD7990/70(灰色)的新
玻璃壶。
订购附件
要购买附件和备件,请访问 www.shop.philips.com/service
或 请联系飞利浦经销商。您也可以联系您所在国家/地区的
飞利浦客户服务中心(联系详情,请参阅全球保修卡)。
回收
- 弃置产品时,请不要将其与一般生活垃圾堆放在一起;
应将其交给官方指定的回收点。这样做有利于环保。
保修和支持
如果您需要信息或支持,请访问 www.philips.com/
support 或阅读单独的全球保修卡。
故障种类和处理方法
本章归纳了使用本产品时最可能遇到的问题。如果您无
法根据下面的信息解决问题,请联系您所在国家/地区的
飞利浦客户服务中心。
问题 可能的解决方法
产品不能工作。 插电并打开产品。
确保产品上标示的电压与当地的电
源电压相符。
将水注入水箱。
如果仍有问题,请与飞利浦客户服
务中心联系。
产品漏水。 切勿让水位超过最大 (MAX) 水位。
如果仍有问题,请与飞利浦客户服
务中心联系。
产品煮咖啡的时
间过长。
去除产品内的水垢(见“除水垢”
一章)。
产品在煮咖啡过
程中产生很大的
噪音和蒸汽。
确保产品不被水垢堵塞,如有必
要,请去除产品内的水垢
(见“除水垢”一章)。
冲煮咖啡的过程
中取出玻璃壶时
过滤网溢出。
如果您在产品冲煮咖啡的过程中从
加热盘上取出了玻璃壶,请尽快将
其玻璃壶放回加热盘,以免过滤网
溢出。另请注意,在冲煮周期结束
之前,咖啡将无法释放其最浓的香
味。因此建议您在冲煮周期结束之
前,请不要取出玻璃壶并倒出咖啡。
从加热盘上取走
玻璃壶时,咖啡
机盖晃动。
确保在将玻璃壶放到加热盘上时壶
口朝向产品(即不要斜向一边)。
玻璃壶内残留咖
啡粉。
将咖啡粉放到过滤网时,确保水箱
盖放置到位。
不要将太多咖啡粉放到过滤网中。
确保在将玻璃壶放到加热盘上时壶
口朝向产品(即不要斜向一边)。
疏通过滤网架底部的开口。
使用正确规格的过滤纸(1x2 型或
2 号)。
确保过滤纸未破裂。
咖啡太稀 使咖啡与水的比例恰当。
确保过滤纸未折叠。
使用正确规格的过滤纸(1x2 型或
2 号)。
10 让水透过过滤网流入玻璃壶。
注意:如果要在冲煮过程中取出玻璃壶,防滴漏功能
将阻止咖啡透过过滤网滴漏到加热盘上。请尽快放回玻
璃壶,以免过滤网溢出。(图14)
11 您可以将玻璃壶留在加热盘,以便将咖啡保温并保留
其香味。
注意:确保在将玻璃壶放到加热盘上时壶口朝向产品。
如果壶口从过滤网架下突出,咖啡将会变冷。
12 使用完毕后,按开/关按钮以关闭产品。
注意:本产品不会自动关机。
注意:如果想立刻再冲煮一壶咖啡,请先让产品冷却
3分钟。
13 取下过滤网架并丢弃过滤纸及其残留物。如果您使用
的是永久性过滤网,请将其清空并洗净。
提示:冲煮周期完成之后,即可将热咖啡倒到热水壶中,
以将其保温并保鲜。
清洁
不要将本产品浸入水或其它液体中,也不要在水龙头下
冲洗。
1 拔掉产品的插头,并使其完全冷却。
2 用湿布清洁产品外部。
3 取下过滤网架。
4 取下水箱盖。(图15)
5 取下玻璃壶的盖子。
6 用适量洗涤剂在热水中清洗,或用洗碗机清洗过滤网
架、永久性过滤网(仅限特定型号)、水箱盖、
玻璃壶和壶盖。
7 清洁完毕后,用干净的热水冲洗玻璃壶并重新组装所
有部件。
除水垢
定期去除水垢既可延长产品的使用寿命,又可保证长时
间获得最佳的冲煮效果和恒定的冲煮时间。
在正常使用情况下(每天两满壶咖啡),可按以下方法
除去产品的水垢:
- 如果使用软水(18dH 或以下),每年除垢 2 到 3 次;
- 如果使用硬水(18dH 以上),每年除垢 4 到 5 次。
可联系所在地区的自来水管理部门以了解当地的水质硬度。
您可以使用醋酸度为 4% 的白醋或液体除垢剂去除咖啡
机的水垢。
注意:如果产品开始产生更多蒸汽,这可能表示水垢正
在沉淀。
不要使用醋酸度为8%或以上的白醋、天然醋、粉状除垢
剂或片状除垢剂给本产品除垢,否则可能会造成损坏。
除垢需要大约 30 到 60 分钟。
1
给水箱注入约600毫升白醋(醋酸度为4%)。
(图16)
注意:切勿将过滤网和咖啡粉放于过滤网架之上。
注意:您也可以使用适当的除垢剂。在这种情况下,
应按照除垢剂包装上的说明进行操作。
2 按开/关按钮打开产品,使其完成冲煮周期
(见“使用本产品”一章)。(图8)
3 将壶中的水全部倒入水槽。(图17)
注意:要想多执行几次除垢操作并确保产品中没有水垢
残留,可以重复步骤1到3。
4 使用清水让咖啡壶再完成两次烹煮程序,以便清除剩
余的白醋/除垢剂和水垢残留物。(图18)
5 清洁玻璃壶和过滤网架(见“清洁”一章)。

问题 可能的解决方法
在开始冲煮咖啡之前,确保玻璃壶
里没有水。
咖啡口感不好。 切勿长时间将装有咖啡的玻璃壶放
置在加热盘上,尤其是装有少量咖
啡时。
咖啡不够热。 确保在将玻璃壶放到加热盘上时壶
口朝向产品(即不要斜向一边)。
咖啡量比我预计
的少。
有部分水被研磨咖啡吸收了。
请往水箱中多加一点水。
14/12/2015
保留备用
-
 1
1
-
 2
2
-
 3
3
-
 4
4
-
 5
5
-
 6
6


