
SSD 18 LTX 200
SSW 18 LTX 200
5
9
Original instructions ....................14
www.metabo.com

2
1
2
3
4
5
6
7
8
9
10
11
12
13
SSW...
SSD...

3

18 V 3,0 Ah 6.25455 Li-Power Extreme
18 V 4,0 Ah 6.25527 Li-Power Extreme
18 V 5,2 Ah 6.25587 Li-Power Extreme
D
C
A
B
ASC 15, ASC 30, ASC 30-36, SC 60 Plus
6.28849
6.28838
etc.
6.28850
6.28831
6.28832
6.28836
SSD...:
SSW...:
1/2” 1/4”
4

5
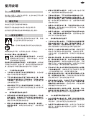
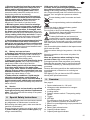
使用说明
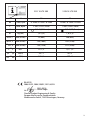
1. 一致性声明
作为唯一责任人,我们在此声明,这些冲击起子符合第
3页中指定的标准和指令。
2. 规定用途
冲击起子适用于钻紧和拆卸螺丝。
因使用不当造成的损坏由用户承担全部责任。
必须遵守通用事故预防规章和随附的安全资料。
3. 一般安全规则
为了您的安全及保护您的电动工具,请特
别注意有此警示标志的地方!
警告-仔细阅读该使用说明可减少损伤危险。
如需转交电动工具,必须将这些文件一同转交。
针对电动工具的一般性警告提示
警告-阅读所有的警告提示和指示。
如未确实
遵循警告提示和指示,可能导致电击、火灾并
且/或其他的严重伤害。
妥善保存所有的警告提示和指示,以便日后查阅。
在警告提
示和指示中使用的“电动工具”是指必须连接电源的电动工
具(配备电线)和使用蓄电池的电动工具(无电线)。
3.1 工作场所的安全规章
a) 工作场所必须保持干净并且照明要充足。
杂乱或昏
暗的工作场所容易导致意外。
b) 不可在有爆炸危险的环境下操作本电动工具。有爆
炸危险的环境是指充斥了易燃液体、瓦斯或尘埃的
工作场所。
操作机器时会产生火花,火花容易引燃
尘埃或易燃蒸汽。
c) 操作机器时不可让儿童或旁观者靠近工作场所。
工
作时如果因为第三者的干扰而分散注意力可能导致
操作失控。
3.2 使用电器用品的安全指示
a) 使用的插座必须能够配合电动工具的插头。切勿擅
自更改插头。转接插头不可以和接了地线的电动工
具一起使用。
使用机器出厂时的原装插头和合适的
插座可以降低遭受电击的危险。
b) 避免让身体碰触接地的物体,例如水管、散热器、
电炉和冰箱等。
如果您的身体接地了,非常容易遭
受电击
。
c) 机器必须远离雨水或湿气。
如果让水渗入电动工具
中,会提高操作者遭受电击的危险。
d) 正确地处理电线。不可以使用电线提携电动工具、
悬挂电动工具或者以抽拉电线的方式拔出插头。电
线必须远离高温、油垢、锋利的边缘或转动中的机
件。
电线如果受损或缠绕在一起,会提高操作者遭
受电击的危险。
e) 如果在户外使用电动工具,只能使用合适的户外专
用延长线。
使用合格的户外专用延长线,可降低操
作者遭受电击的危险。
f) 如果无法避免的,必须在潮湿的环境中使用本电动
工具,得使用剩余电流保护开关。
使用剩余电流保
护开关可以预防遭受电击。
3.3 针对操作者的安全指示
a) 工作时务必要全神贯注,不但要保持头脑清醒更要
理性地操作电动工具。疲惫、喝酒或服用毒品、兴
奋剂、药物之后,切勿操作电动工具。
使用电动工
具时只要稍微分心便可能发生后果严重的意外。
b) 穿好您个人的防护装备并戴上护目镜。
根据所使用
的电动工具穿戴合适的防护装备,例如防尘面罩、
止滑工作鞋、安全帽或耳罩,可降低工作伤害的发
生机率。
c) 避免意外启动机器。插上插头并且/或安装蓄电池之
前,提起或搬运机器之前,务必先检查电动工具是
否处在关闭状况。
如果您在提携电动工具时,手指
碰触了开关,或者在连接电源时,起停开关仍然设
定在开动位置,都可能造成极严重的意外。
d) 开动电动工具之前必须拆除仍然插在机器上的调整
工具/或螺丝扳手。
如果机器已经开始转动,而机器
上仍然插着调整工具,很容易伤害使用者。
e) 避免错误的持机姿势。操作机器时要确保立足稳
固,并要随时保持平衡。
正确的操作姿势能够帮助
您在突发状况下及时控制住电动工具。
f) 穿着合适的工作服。工作时不可以穿太宽松的衣
服,也不可以戴首饰。不可以让头发、衣服和手套
接触机器上的转动机件
。宽松的衣物、长发或首饰
容易被卷入转动的机件中。
g) 如果能够在机器上安装吸尘装置、集尘装备,务必
按照指示安装此类辅助工具,并且正确地操作该装
置。
使用吸尘装备可以防止工作尘危害人体。
3.4 小心地使用和处理电动工具
a) 勿让机器承载过重的负荷。根据工作性质选择适合
的电动工具。
正确地选用电动工具可以在规定的功
率范围中,更有效率更安全的操作机器。
b) 勿使用开关故障的电动工具。
如果无法正常操控起
停开关,极容易在操作机器时产生意外。尽快将故
障的机器送修
。

6
c) 在调整机器设定、更换零件或不使用机器时,都必
须先从插座上拔出插头并且/或取出蓄电池。
这个预
防措施可以避免不小心开动电动工具。
d) 不使用电动工具时,必须把机器存放在儿童无法取
得之处。勿让不熟悉机器操作方法及未阅读本说明
书的人使用本机器。
让经验不足的人操作电动工具
容易发生意外。
e) 细心地保养、维护电动工具。检查机器上的转动零
件是否运作正常,并确定是否有零件断裂或损坏。
故障的机件会影响电动工具的运作功能。使用机器
之前务必先更换或修理故障的机件。
若未彻底执行
机器的维护工作容易导致工作意外。
f) 切割工具必须保持锋利、清洁。
经过细心保养而且
刀刃锋利的切割工具不易被夹住,而且较容易操
作。
g) 遵照这些指示使用电动工具、配件及安装在机器上
的工具。另外也必须注意有关机器操作方式及机器
适用范围的解说。
如果使用电动工具执行不符合该
机器性能的工作,极容易发生意外。
3.5 小心地使用和处理充电式机器
a) 只能使用制造商推荐的充电器为蓄电池充电。
不可
以使用针对某些特定蓄电池的充电器,为其它的蓄
电池充电,可能引起火灾。
b) 务必使用电动工具的专用蓄电池。
使用不合适的蓄
电池可能发生工作意外并引起火灾。
c) 不使用的蓄电池必须远离回形针、硬币、钥匙、钉
子、螺丝或其它的金属物体。上述物体可能连接蓄
电池上的触点引起短路。
蓄电池的两个触点如果发
生短路,可能引起火灾。
d) 如果使用不当可能从蓄电池渗出液体。避免接触此
类流动物体。如果不小心触摸了,马上用水冲洗。
如果上述液体侵入眼睛必须即刻就医。
从蓄电池流
出的液体会刺激或灼伤皮肤。
3.6 检修服务
a) 只能将电动工具交给合格的专业人员检修。检修时
只能换装原厂零、配件。
唯有如此才能确保机器的
安全性能。
4. 特殊安全规则
进行任何调整或维护前,应取出机器的电池组。
安装电池组前应确保机器已关闭。
确保工作地点无电源电缆,煤气管道或者水管等(例如
可以采用金属探测器)。
操作过程中切削配件可能接触隐藏的电线时,请握住电
动工具的绝缘表面。切削配件接触带电电线可能使电动
工具外露的金属部件带电,因而导致操作人员触电。
请勿让电池组接触水和湿气!
电池组不得暴露于明火!
请勿使用有故障或变形的电池组!
请勿拆开电池组!
请勿触摸电池组或使其短路!
有缺陷的锂离子电池组可能会泄漏出弱酸
性、易燃液体!
如果电池液泄漏并接触到皮肤,请立即用大
量清水冲洗。如果电池液泄漏并沾到眼睛,
请用清水清洗眼部并立即就医。
必须使用适用于冲击起子的起子钻头。
钻紧长螺丝时要小心
_
有打滑危险。
安装螺丝时机器必须关闭。
长时间工作时请带上耳罩。长时间的高噪音水平可能会
影响您的听力。
请勿用于在处理过程中会产生有害粉尘或蒸气的物料
(例如:石棉)。
进行任何调整、转换或维护前,应取出机器的电池组。
LED灯 (6):不要直接用光学仪器观察LED辐射。
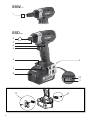
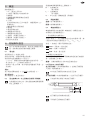
5. 概述
请参见第2页。
1 ½“ 工具的方形附件
*
2 六角起子钻头的六角套筒附件
*
3 锁紧套
*
4 旋转选择器开关/运输安全装置
5 触发开关
6 LED灯
在光线昏暗的地方工作时使用。机器开启时LED灯
会点亮。
7 转速/拧紧扭矩预选按钮
8 电池组
9 电池组释放按钮
10 容量指示灯按钮
11 容量和信号指示灯

7
12 皮带扣(如图所示连接)
*
13 钻头库(如图所示连接)
*
* 取决于功能/型号
6. 初始操作/设置
进行任何调整或维护前,应取出机器的电池组。
安装电池组前应确保机器已关闭。
6.1 电池组
使用前请给电池组 (8) 充电。
如果性能降低,请重新给电池组充电。
理想的存储温度范围为10℃到30℃。
“Li-Power”锂离子电池组带有容量和信号指示灯: (11)
- 按下按钮 (10),LED会指示充电水平。
- 如果一个LED闪烁,则电池组电量几乎用尽,必须充
电。
拆卸:
按下电池组释放按钮 (9) 并向前拉电池组 (8)。
插入电池组:
滑入电池组 (8) 直至其就位。
6.2 设置旋转方向,合上运输安全装置(开机锁)
在电机完全停止前,请勿启动旋转选择器开关或
合上运输锁 (4)!
启动旋转选择器开关/合上运输锁 (4)
R = 右旋转设置
(插入螺丝)
L = 左旋转设置
(卸下螺丝)
0 = 中心位置:运输锁设置(开机锁)
6.3 接通和断开
接通:按下触发开关 (5)。
断开:松开触发开关 (5)。
6.4 转速/拧紧扭矩
转速和拧紧扭矩直接相关。转速越低,拧紧扭矩越低。
有两种方式控制拧紧扭矩:
1) 预先选择最大拧紧扭矩。
可通过按按钮(7)从三种拧紧扭矩设置中选择一种。最
大拧紧扭矩在第3页的表中提供(M
MAX
、M
MED
、M
MIN
)。
按钮 (7) 点亮状态可指示选定的设置。
MAX = 不点亮 = 最大扭矩
MED = 闪烁 = 中等扭矩
MIN = 连续点亮 = 最小扭矩
2) 拧紧扭矩的无级调节:
通过按住或轻按触发开关 (5) 可无级调节转速和扭矩,
以便适应工作条件。
建议:通过试用起子确定正确的设置。
6.5 更改SSD...的起子钻头
插入起子钻头:向前滑动锁紧套 (3) 并将起子钻头插入
到底。 松开锁紧套 (3)。
向外拉起子钻头以检查定位是否正确。
拆下起子钻头:向前滑动锁紧套 (3) 并拆下起子钻头。
只能使用带此类插入端的起子钻头:
9,5 mm (3/8“)
起子钻头必须与螺丝相匹配。
不得使用已损坏的起子钻头。
6.6 更换SSW...起子钻头
插入起子钻头:将工具安装到方形附件 (1) 上,直至
限位挡块。
拆下起子钻头: 从方形附件 (1) 向外拉工具。
起子钻头必须与螺丝相匹配。
不得使用已损坏的起子钻头。
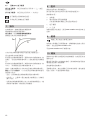
7. 使用
安装螺丝时应确保机器对齐。
螺丝紧固过程有两个要素:
插入螺丝以及用击发机构拧紧螺丝。
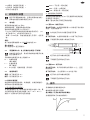
拧紧扭矩取决于冲击持续时间。

8
大约5秒的冲击持续时间便可达到最大拧紧扭矩。
扭矩曲线取决于应用类型:
对于硬螺丝紧固应用(硬质材料中的螺丝连接,如金
属),很短的冲击持续时间(a)便能达到最大拧紧扭
矩。
对于软螺丝紧固应用(软质材料中的螺丝连接,如木
材),需要较长的冲击持续时间 (b)。
建议:通过试用起子确定正确的冲击持续时间。
警告!采用小螺丝时,0.5秒以内的冲击持续时间便可
达到最大扭矩。
- 因此,必须精确监控螺丝紧固过程的持续时间。
- 在按钮 (7) 上选择一个合适的最大拧紧扭矩(请参见
第 6.4 节)。
- 通过按住或轻按触发开关 (5) 调节拧紧扭矩,确保螺
丝不会损坏,螺丝头不会断裂。
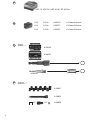
8. 配件
只能使用麦太保原厂配件。
仅使用符合本使用说明中的要求和规范的配件。
请参见第4页。
A 充电器
B 电池组具有不同的容量
只能使用电压与电动工具匹配的电池组。
C 起子钻头
D ½ “ 工具
有关完整配件的信息,请见www.metabo.com或参考主
目录。
9. 修理
只能由合格的电工修理电动工具!
如有麦太保电动工具需要维修,请联系当地的麦太保代
理商。地址请见www.metabo.com。
可从www.metabo.com下载零件表。
10. 环境保护
废弃的机器、包装和配件的环保性处置和回收,请遵循
国家相关规定。
电池组不能作为常规废物来处理。请将有故障或使用过
的电池组返回给麦太保经销商!
请勿让电池组接触水!
处理电池组前,应在电动工具中对其放电。应防止触点
短路(例如,可使用胶带来保护)。
11.技术规格
第3页规格注释如下。
保留因技术发展而进行变更的权利。
U = 电池组电压
n
0
= 空载速度
s = 冲击频率
H = 机器工具附件
m = 重量(带最小电池组)
M
MAX
= 最大拧紧扭矩(设置 I)
M
MED
= 中等拧紧扭矩(设置 II)
M
MIN
= 最小拧紧扭矩(设置 III)
测量值依照EN 60745确定。
直流电
引用的技术资料皆含有公差值在内(依照相关有效标
准)。
排放值
通过这些数值,可以评价电动工具的排放,也可
以与其他电动工具进行比较。依赖于特殊的应用场合
和工具使用环境,实际排放值可能会偏大或者偏小。在
评价这些数值时,应该把工作间断和低使用周期考虑在
内。根据这些排放值,可以为用户明确制定保护措施,
例如任何编制步骤必须到位。
依照EN 60745规定的振动总值(三个方向上的矢量
和):
a
h
= 振动传导值(冲击螺丝紧固)
K
h
= 不确定(振动)
典型A荷重声音水平:
L
pA
= 声压水平
L
WA
= 声压功率等级
K
pA,
K
WA
= 不确定 (噪音水平)
请戴护耳器!

9
操作說明
1. 一致性聲明
身為唯一責任人,我們在此聲明,這些衝擊起子符合第
3 頁中指定的標準和指令。
2. 規定用途
衝擊起子適用於鎖緊和拆卸螺絲。
損壞若由不當使用所造成,概由使用者自行負責。
請務必遵守一般意外防範守則,與機器隨附的安全資
訊。
3. 一般安全規則
為了保護您自身的安全以及您的電動工
具,請特別注意標示此符號的文字的各個
部分!
警告–請務必閱讀操作說明,以降低受傷
的風險。
傳用電動工具時,請務必連同這些文件一起交付。
針對電動工具的一般性警告提示
警告
_
閱讀所有的警告提示和指示。
如未確實
遵循警告提示和指示,可能導致電擊、火災並
且/或其他的嚴重傷害。
妥善保存所有的警告提示和指示,以便日後查閱。
在警
告提示和指示中使用的“電動工具”是指必須連接電源
的電動工具(配備電線)和使用蓄電池的電動工具(無
電線)。
3.1 工作場所的安全規章
a) 工作場所必須保持乾淨並且照明要充足。
雜亂或昏
暗的工作場所容易導致意外。
b) 不可在有爆炸危險的環境下操作本電動工具。有爆
炸危險的環境是指充斥了易燃液體、瓦斯或塵埃的
工作場所。
操作機器時會產生火花,火花容易引燃
塵埃或易燃蒸汽。
c) 操作機器時不可讓兒童或旁觀者靠近工作場所。
工
作時如果因為第三者的幹擾而分散注意力可能導致
操作失控。
3.2 使用電器用品的安全指示
a) 使用的插座必須能夠配合電動工具的插頭。切勿擅
自更改插頭。轉接插頭不可以和接了地線的電動工
具一起使用。
使用機器出廠時的原裝插頭和合適的
插座可以降低遭受電擊的危險。
b) 避免讓身體碰觸接地的物體,例如水管、散熱器、
電爐和冰箱等。
如果您的身體接地了,非常容易遭
受電擊。
c) 機器必須遠離雨水或濕氣。
如果讓水滲入電動工具
中,會提高操作者遭受電擊的危險。
d) 正確地處理電線。不可以使用電線提攜電動工具、
懸掛電動工具或者以抽拉電線的方式拔出插頭。電
線必須遠離高溫、油垢、鋒利的邊緣或轉動中的機
件。
電線如果受損或纏繞在一起,會提高操作者遭
受電擊的危險。
e) 如果在戶外使用電動工具,只能使用合適的戶外專
用延長線。
使用合格的戶外專用延長線,可降低操
作者遭受電擊的危險。
f) 如果無法避免的,必須在潮濕的環境中使用本電動
工具,得使用剩餘電流保護開關。
使用剩餘電流保
護開關可以預防遭受電擊。
3.3 針對操作者的安全指示
a) 工作時務必要全神貫注,不但要保持頭腦清醒更要
理性地操作電動工具。疲憊、喝酒或服用毒品、興
奮劑、藥物之後,切勿操作電動工具。
使用電動工
具時只要稍微分心便可能發生後果嚴重的意外。
b) 穿好您個人的防護裝備並戴上護目鏡。
根據所使用
的電動工具穿戴合適的防護裝備,例如防塵面罩、
止滑工作鞋、安全帽或耳罩,可降低工作傷害的發
生機率。
c) 避免意外啟動機器。插上插頭並且/或安裝蓄電池之
前,提起或搬運機器之前,務必先檢查電動工具是
否處在關閉狀況。
如果您在提攜電動工具時,手指
碰觸了開關,或著在連接電源時,起停開關仍然設
定在開動位置,都可能造成極嚴重的意外。
d) 開動電動工具之前必須拆除仍然插在機器上的調整
工具/或螺絲扳手。
如果機器已經開始轉動,而機器
上仍然插著調整工具,很容易傷害使用者。
e) 避免錯誤的持機姿勢。操作機器時要確保立足穩
固,並要隨時保持平衡。
正確的操作姿勢能夠幫助
您在突發狀況下及時控制住電動工具。
f) 穿著合適的工作服。工作時不可以穿太寬鬆的衣
服,也不可以戴首飾。不可以讓頭髮、衣服和手套
接觸機器上的轉動機件。
寬鬆的衣物、長髮或首飾
容易被捲入轉動的機件中。
g) 如果能夠在機器上安裝吸塵裝置、集塵裝備,務必
按照指示安裝此類輔助工具,並且正確地操作該裝
置。
使用吸塵裝備可以防止工作塵危害人體。

10
3.4 小心地使用和處理電動工具
a) 勿讓機器承載過重的負荷。根據工作性質選擇適合
的電動工具。
正確地選用電動工具可以在規定的功
率範圍中,更有效率更安全的操作機器。
b) 勿使用開關故障的電動工具。
如果無法正常操控起
停開關,極容易在操作機器時產生意外。盡快將故
障的機器送修。
c) 在調整機器設定、更換零件或不使用機器時,都必
須先從插座上拔出插頭並且/或取出蓄電池。
這個預
防措施可以避免不小心開動電動工具。
d) 不使用電動工具時,必須把機器存放在兒童無法取
得之處。勿讓不熟悉機器操作方法及未閱讀本說明
書的人使用本機器。
讓經驗不足的人操作電動工具
容易發生意外。
e) 細心地保養、維護電動工具。檢查機器上的轉動零
件是否運作正常,並確定是否有零件斷裂或損壞。
故障的機件會影響電動工具的運作功能。使用機器
之前務必先更換或修理故障的機件。
若未徹底執行
機器的維護工作容易導致工作意外。
f)
切割工具必須保持鋒利、清潔。
經過細心保養而且刀
刃鋒利的切割工具不易被夾住,而且較容易操作。
g) 遵照這些指示使用電動工具、配件及安裝在機器上
的工具。另外也必須注意有關機器操作方式及機器
適用範圍的解說。
如果使用電動工具執行不符合該
機器性能的工作,極容易發生意外。
3.5 小心地使用和處理充電式機器
a) 只能使用製造商推薦的充電器為蓄電池充電。
不可
以使用針對某些特定蓄電池的充電器,為其他的蓄
電池充電,可能引起火災。
b) 務必使用電動工具的專用蓄電池。
使用不合適的蓄
電池可能發生工作意外並引起火災。
c) 不使用的蓄電池必須遠離回形針、硬幣、鑰匙、釘
子、螺絲或其他的金屬物體。上述物體可能連接蓄
電池上的觸點引起短路。
蓄電池的兩個觸點如果發
生短路,可能引起火災。
d) 如果使用不當可能從蓄電池滲出液體。避免接觸此
類流動物體。如果不小心觸摸了,馬上用水沖洗。
如果上述液體侵入眼睛必須即刻就醫。
從蓄電池流
出的液體會刺激或灼傷皮膚。
3.6 檢修服務
a) 只能將電動工具交給合格的專業人員檢修。檢修時
只能換裝原廠零、配件。
唯有如此才能確保機器的
安全性能。
4. 特殊安全規則
進行任何調整或維護前,須先取出機器的電池組。
安裝電池組前先確認機器已關閉。
確保工作地點無電源電纜,瓦斯管道或者水管等(例如
可以採用金屬探測器)。
操作過程中若切削配件可能會接觸隱藏的電線,請握
住電動工具的絕緣表面。切削配件接觸帶電電線可能
會使電動工具外露的金屬部件帶電,因而導致操作人
員觸電。
請勿讓電池組接觸水和濕氣!
電池組不得暴露於明火!
請勿使用有故障或變形的電池組!
請勿拆開電池組!
請勿觸摸電池組或使其短路!
有缺陷的鋰離子電池組可能會泄漏出弱酸
性、易燃液體!
如果電池液泄漏並接觸到皮膚,請立即用大
量清水沖洗。如果電池液泄漏並沾到眼睛,
請用清水清洗眼部並立即就醫。
必須使用適用於衝擊起子的鑽頭。
鎖緊長螺絲時要小心 – 有打滑的危險。
機器必須在關閉的狀況下才可施用在螺絲上。
長時間工作時請戴耳罩。長時間的高噪音水平可能會影
響您的聽力。
會產生粉塵或蒸氣,可能威脅健康的材料(例如石
綿),請勿處理。
進行任何調整、轉換或維護前,應先取出機器的電池
組。
LED燈 (6):不要直接用光學儀器觀察LED輻射。

11
5. 概述
請參閱第2頁。
1 ½ “ 工具的方形附件*
2 六角起子鑽頭的六角套筒附件*
3 鎖緊套*
4 旋轉選擇器開關/運輸安全裝置
5 觸發開關
6 LED燈
在光線昏暗的地方工作時使用。 機器開啟時 LED
燈會點亮。
7 轉速/鎖緊扭力預選按鈕
8 電池組
9 電池組釋放按鈕
10 蓄電量指示燈按鈕
11 蓄電量和信號指示燈
12 皮帶扣(如圖所示連接)*
13 鑽頭庫(如圖所示連接)*
* 取決於功能/型號
6. 初始操作/設定
進行任何調整或維護前,應先取出機器的電池
組。安裝電池組前須確保機器已關閉。
6.1 電池組
使用電池組 (8) 前請先充電。
如果性能降低,請重新將電池組充電。
理想的存放溫度範圍為10°C到30°C。
“Li-Power”鋰電池組帶有蓄電量和信號指示燈: (11)
- 按下按鈕 (10),LED會指示充電水平。
- 如果有一個LED閃爍,表示電池組電量幾乎用盡,必
須充電。
拆卸:
按下電池組釋放按鈕 (9) 並向前拉出電池組 (8)。
插入電池組:
滑入電池組 (8) 直至其就位。
6.2 設定旋轉方向,扣上運輸安全裝置(開機鎖)
在致動器完全停止前,請勿啟動旋轉選擇器開關
或合上運輸鎖 (4)!
啟動旋轉選擇器開關/合上運輸鎖 (4)
R = 右旋轉設定
(鎖入螺絲)
L = 左旋轉設定
(卸下螺絲)
0 = 中心位置:運輸鎖設置(開機鎖)
6.3 開啟與關閉
啟動:按下觸發開關 (5)。
關閉:鬆開觸發開關 (5)。
6.4 轉速/鎖緊扭力
轉速和鎖緊扭力直接相關。轉速越低,鎖緊扭力越小。
有兩種方式控制鎖緊扭力:
1) 預先選擇最大鎖緊扭力。
可按下按鈕(7),從三種鎖緊扭力設定中選擇一種。第
3頁的表中提供最大鎖緊扭力(M
MAX
、M
MED
、M
MIN
)。
按鈕 (7) 會亮起,顯示所選擇的設定。
MAX = 不點亮 = 最大扭矩
MED = 閃爍 = 中等扭矩
MIN = 常亮 = 最小扭矩
2) 鎖緊扭力的無級調節:
緊按或輕按觸發開關(5) 即可對轉速和扭矩進行無級調
節,以便適應工作條件。
建議: 以嘗試鎖緊的方式來判定正確的設定。
6.5 更改SSD...的起子鑽頭
插入起子鑽頭: 向前滑動鎖緊套 (3) 並將起子鑽頭插
入到底。鬆開鎖緊套 (3)。
向外拉起子鑽頭以檢查定位是否正確。
拆下起子鑽頭:向前滑動鎖緊套 (3) 並拆下起子鑽頭。
只能使用帶此類插入端的起子鑽頭:
9,5 mm (3/8“)
起子鑽頭必須與螺絲相匹配。
不得使用已損壞的起子鑽頭。

12
6.6 更換SSW...起子鑽頭
插入起子鑽頭: 將工具安裝到方形附件 (1) 上,直至
限位擋塊。
拆下起子鑽頭: 將工具從方形附件 (1) 向外拉。
起子鑽頭必須與螺絲相匹配。
不得使用已損壞的起子鑽頭。
7. 操作
安裝螺絲時,應確保螺絲與機器對齊。
螺絲鎖緊的過程有兩個要素:
插入螺絲,以及用擊發機構鎖緊螺絲。
鎖緊扭力取決於沖擊持續時間。
大約5秒的沖擊持續時間便可達到最大鎖緊扭力。
扭力曲線取決於應用類型:
對於硬性的螺絲鎖緊應用(硬質材料中的螺絲連接,如
金屬),很短的沖擊持續時間 (a) 便能達到最大鎖緊扭
力。
對於軟性的螺絲鎖緊應用(軟質材料中的螺絲連接,如
木材),則需要較長的沖擊持續時間 (b)。
建議:以嘗試鎖緊的方式來判定正確的沖擊持續時間。
警告!採用小螺絲時,0.5秒以內的沖擊持續時間便可
達到最大扭力。
- 因此,必須精確監控螺絲鎖緊過程的持續時間。
- 在按鈕 (7) 上選擇一個合適的最大鎖緊扭力(請參見
第 6.4 節)。
- 以緊按或輕按觸發開關(5)的方式來調節鎖緊扭力,確
保螺絲不會損壞,螺絲頭也不會斷裂。
8. 配件
請務必使用麦太保原廠配件。
請只使用符合操作說明所列要求與規格的配件。
請參閱第4頁。
A 充電器
B 電池組具有不同的蓄電量
只能使用電壓與電動工具匹配的電池組。
C 起子鑽頭
D ½“ 工具
有關完整配件的資訊,請見www.metabo.com或參考主
目錄。
9. 維修
電動工具只能由合格電工維修!
如有麥太保電動工具需要維修,請聯繫當地的麥太保代
理商。 地址請見www.metabo.com。
可從www.metabo.com下載零件表。
10. 環保
請遵守符合環保之棄置與回收廢棄機器、包裝及配件的
國家法規。
電池組不能視為一般廢料來處理。請將故障或使用過的
電池組送回麥太保經銷商!
請勿讓電池組接觸水!
丟棄電池組前,應先在電動工具中將其放電。避免接點
短路(例如,可使用膠帶來保護)。

13
11. 技術規格
以下為第3页所列規格的具體說明。
保留因技術發展而進行變更的權利。
U = 電池組電壓
n
0
= 空載速度
s = 沖擊頻率
H = 刀具附件
m = 重量(裝最小電池組)
M
MAX
= 最大鎖緊扭力(設定 I)
M
MED
= 中等鎖緊扭力(設定II)
M
MIN
= 最小鎖緊扭力(設定III)
測量值係依據EN 60745的標準。
直流電
上述技術規格數據,皆受公差影響(依據相關的適用標
準)。
電磁輻射值
通過這些數值,可以評價電動工具的排放,也可
以與其他電動工具進行比較。根據特殊的應用場合和工
具使用環境,實際排放值可能會偏大或者偏小。在評價
這些數值時,應該把工作間斷和低使用週期考慮在內。
根據這些排放值,可以為用戶明確制定保護措施,例如
任何編制步驟必須到位。
總震動值(三個方向的向量總計),係依據
EN 60745的標準:
a
h
= 震動散發值(以沖擊進行螺絲鎖緊)
K
h
= 不確定(震動)
典型A-有效的聲音等級:
L
pA
= 聲壓等級
L
WA
= 聲功率等級
K
pA,
K
WA
= 不確定 (噪音水平)
請務必配戴耳罩!

14
Original instructions
We, being solely responsible, hereby declare that
these impact screwdrivers conform to the standards
and directives specified on page 3.
The impact screwdriver is suitable for driving in and
removing screws.
The user bears sole responsibility for any damage
caused by improper use.
Generally accepted accident prevention regula-
tions and the enclosed safety information must be
observed.
For your own protection and for the
protection of your electrical tool, pay
attention to all parts of the text that are
marked with this symbol!
WARNING – Reading the operating instruc-
tions will reduce the risk of injury.
Pass on your electrical tool only together with these
documents.
General Power Tool Safety Warnings
WARNING – Read all safety warnings and
all instructions. Failure to follow the warnings
and instructions may result in electric shock, fire
and/or serious injury.
Save all warnings and instructions for future
reference! The term "power tool" in the warnings
refers to your mains-operated (corded) power tool
or battery-operated (cordless) power tool.
3.1 Work area safety
a) Keep work area clean and well lit. Cluttered or
dark areas invite accidents.
b) Do not operate power tools in explosive
atmospheres, such as in the presence of flam-
mable liquids, gases or dust. Power tools create
sparks which may ignite the dust or fumes.
c) Keep children and bystanders away while
operating a power tool. Distractions can cause
you to lose control.
3.2 Electrical safety
a) Power tool plugs must match the outlet.
Never modify the plug in any way. Do not use
any adapter plugs with earthed (grounded)
power tools. Unmodified plugs and matching out-
lets will reduce risk of electric shock.
b) Avoid body contact with earthed or
grounded surfaces, such as pipes, radiators,
ranges and refrigerators. There is an increased
risk of electric shock if your body is earthed or
grounded.
c) Do not expose power tools to rain or wet
conditions. Water entering a power tool will
increase the risk of electric shock.
d) Do not abuse the cord. Never use the cord
for carrying, pulling or unplugging the power
tool. Keep cord away from heat, oil, sharp
edges or moving parts. Damaged or entangled
cords increase the risk of electric shock.
e) When operating a power tool outdoors, use
an extension cord suitable for outdoor use.
Use of a cord suitable for outdoor use reduces the
risk of electric shock.
f) If operating a power tool in a damp location is
unavoidable, use a residual current device
(RCD) protected supply. Use of an RCD reduces
the risk of electric shock.
3.3 Personal safety
a) Stay alert, watch what you are doing and use
common sense when operating a power tool.
Do not use a power tool while you are tired or
under the influence of drugs, alcohol or medi-
cation. A moment of inattention while operating
power tools may result in serious personal injury.
b) Use personal protective equipment. Always
wear eye protection.
Protective equipment such
as dust mask, non-skid safety shoes, hard hat, or
hearing protection used for appropriate conditions
will reduce personal injuries.
c) Prevent unintentional starting. Ensure the
switch is in the off-position before connecting
to power source and/or battery pack, picking
up or carrying the tool. Carrying power tools with
your finger on the switch or energising power tools
that have the switch on invites accidents.
d) Remove any adjusting key or wrench before
turning the power tool on. A wrench or a key left
attached to a rotating part of the power tool may
result in personal injury.
e) Do not overreach. Keep proper footing and
balance at all times. This enables better control of
the power tool in unexpected situations.
f) Dress properly. Do not wear loose clothing or
jewellery. Keep your hair, clothing and gloves
away from moving parts. Loose clothes, jewellery
or long hair can be caught in moving parts.
g) If devices are provided for the connection of
dust extraction and collection facilities, ensure
these are connected and properly used. Use of
dust collection can reduce dust-related hazards.
3.4 Power tool use and care
a) Do not force the power tool. Use the correct
power tool for your application. The correct
power tool will do the job better and safer at the rate
for which it was designed.
b) Do not use the power tool if the switch does
not turn it on and off. Any power tool that cannot
be controlled with the switch is dangerous and must
be repaired.
1. Declaration of Conformity
2. Specified Use
3. General safety instructions

15
c) Disconnect the plug from the power source
and/or the battery pack from the power tool
before making any adjustments, changing
accessories, or storing power tools. Such
preventive safety measures reduce the risk of
starting the power tool accidentally.
d) Store idle power tools out of the reach of
children and do not allow persons unfamiliar
with the power tool or these instructions to
operate the power tool. Power tools are
dangerous in the hands of untrained users.
e) Maintain power tools. Check for misalign-
ment or binding of moving parts, breakage of
parts and any other condition that may affect
the power tool's operation. If damaged, have
the power tool repaired before use. Many acci-
dents are caused by poorly maintained power tools.
f) Keep cutting tools sharp and clean. Properly
maintained cutting tools with sharp cutting edges
are less likely to bind and are easier to control.
g) Use the power tool, accessories and tool bits
etc. in accordance with these instructions,
taking into account the working conditions and
the work to be performed. Use of the power tool
for operations different from those intended could
result in a hazardous situation.
3.5 Battery tool use and care
a) Recharge only with the charger specified by
the manufacturer. A charger that is suitable for
one type of battery pack may create a risk of fire
when used with another battery pack.
b) Use power tools only with specifically desig-
nated battery packs. Use of any other battery
packs may create a risk of injury and fire.
c) When battery pack is not in use, keep it away
from other metal objects, like paper clips,
coins, keys, nails, screws or other small metal
objects, that can make a connection from one
terminal to another. Shorting the battery terminals
together may cause burns or a fire.
d) Under abusive conditions, liquid may be
ejected from the battery; avoid contact. If
contact accidentally occurs, flush with water. If
liquid contacts eyes, additionally seek medical
help. Liquid ejected from the battery may cause irri-
tation or burns.
3.6 Service
a) Have your power tool serviced by a qualified
repair person using only identical replacement
parts. This will ensure that the safety of the power
tool is maintained.
Remove the battery pack from the machine before
any adjustment or maintenance is carried out.
Before fitting the battery pack, make sure that the
machine is switched off.
Ensure that the spot where you wish to work is free
of power cables, gas lines or water pipes (e.g.
using a metal detector).
Hold power tool by insulated gripping
surfaces, when performing an operation where
the cutting accessory may contact hidden
wiring. If the cutting accessory contacts a "live"
wire, exposed metal parts of the electrical tool may
become "live" and give the operator an electric
shock.
Protect battery packs from water and mois-
ture!
Do not expose battery packs to naked flame!
Do not use faulty or deformed battery packs!
Do not open battery packs!
Do not touch or short-circuit battery packs!
Slightly acidic, flammable fluid may leak from
defective li-ion battery packs!
If battery fluid leaks out and comes into
contact with your skin, rinse immediately
with plenty of water. If battery fluid leaks out
and comes into contact with your eyes, wash them
with clean water and seek medical attention imme-
diately.
Only screwdriving bits suitable for the impact screw-
driver must be used.
Take care when driving in long screws - risk of slip-
ping.
Mount the machine on the screw only when it is
switched off.
Wear ear protectors when working for long
periods of time. High noise levels over a
prolonged period of time may affect your hearing.
Materials that generate dusts or vapours that may
be harmful to health (e.g. asbestos) must not be
processed.
Remove the battery pack from the machine before
any adjustments, conversions or servicing are
performed.
LED lights (6): Do not observe the LED radiation
directly with optical instruments.
See page 2.
1 Square attachment for 1/2“ tools*
2 Hexagon socket attachment for hexagon
screwdriving bits*
3 Locking sleeve*
4 Rotation selector switch / Transporting safety
device
5Trigger
6LED light
For working on dimly lit areas. The LED lights
light up when the machine is switched on.
7 Button for speed/tightening torque preselection
8 Battery pack
9 Battery pack release button
10 Capacity indicator button
11 Capacity and signal indicator
4. Special Safety Instructions
5. Overview

16
12 Belt hook (attach as shown) *
13 Bit depot (attach as shown) *
* depending on the features / model
Remove the battery pack from the machine
before any adjustment or maintenance is
carried out. Before fitting the battery pack, make
sure that the machine is switched off.
6.1 Battery pack
Charge the battery pack before use (8).
If performance diminishes, recharge the battery
pack.
The ideal storage temperature is between 10°C and
30°C.
"Li-Power" li-ion battery packs have a capacity and
signal indicator: (11)
- Press the button (10), the LEDs indicate the
charge level.
- If one LED is flashing, the battery pack is almost
flat and must be recharged.
Removal:
Press the battery pack release (9) button and pull
the battery pack (8) forwards
.
Inserting:
Slide in the battery pack (8) until it engages.
6.2 Setting the direction of rotation, engag-
ing the transporting safety device
(switch-on lock)
Do not actuate the rotation selector switch or
engage the transportation lock (4) unless the
motor has stopped completely!
Actuate the rotation selector switch / Engage the
transportation lock (4)
R = Right rotation set
(insert screws)
L = Left rotation set
(remove screws)
0 = Central position: transportation lock setting
(switch-on lock)
6.3 Switching on and off
Switching on: press the trigger switch (5).
Switching off: release the trigger switch (5).
6.4
Speed
/ Tightening torque
The speed and tightening torque are connected
directly. The lower the speed, the lower the tight-
ening torque.
The tightening torque is influenced in two ways:
1) Preselect maximum tightening torque.
You can select one of three tightening torque
settings by pressing the button (7). The maximum
tightening torques are provided in the table on page
3 (M
MAX
, M
MED
, M
MIN
).
Button (7) lights up to indicate which setting is
selected.
= Does not light up = max. torque
= Flashing = medium torque
= Continuously lit = min. torque
2) Stepless adjustment of the tightening torque:
The speed and tightening torque can be adjusted
steplessly by pressing the trigger (5) firmly or lightly,
thus adapting to working conditions.
Recommendation: determine the correct setting
by carrying out trial screwdriving.
6.5
Changing screwdriving bit
for
SSD...
Inserting screwdriving bit: Slide locking sleeve
(3) forward and insert screwdriving bit as far as the
stop. Release locking sleeve (3).
Pull on the screwdriver bit to check that it is
correctly seated.
Removing screwdriving bit: Slide locking sleeve
(3) forward and remove screwdriving bit.
Only use screwdriving bits with such plug-in
ends:
The screwdriving bit used must match the
screw.
Damaged screwdriving bits must not be used.
6.6
Changing
SSW... screwdriving bits
Inserting screwdriving bit: Fit the tool on the
square attachment (1) until the limit stop.
Removing screwdriving bit: Pull the tool from the
square attachment (1).
The screwdriving bit used must match the
screw.
Damaged screwdriving bits must not be used.
Mount the machine on the screw, ensuring it is
aligned straight.
The screwdriving process has two elements:
inserting the screw and
tightening the screw with the percussion mech-
anism.
The tightening torque depends on the impact dura-
tion.
6. Initial Operation/Setting
7. Use
MAX
MED
MIN
9,5 mm (3/8“)

17
With an impact duration of approx. 5 seconds, the
maximum tightening torque has been reached.
The torque curve depends on the type of applica-
tion:
With a hard screwdriving application (screw-
couplings in hard material such as metal), maximum
tightening torque is already reached after a short
impact duration (a).
With a soft screwdriving application (screw-
couplings in soft material such as wood), a longer
impact duration (b) is required.
Recommendation: determine the correct impact
duration by carrying out trial screwdriving.
Caution! With small screws, maximum torque can
be reached even below an impact duration of 0.5
seconds.
- This is why the duration of the screwdriving
process must be monitored exactly.
- Select a suitable maximum tightening torque on
button (7) (see chapter 6.4).
- Adjust the tightening torque by pressing firmly or
lightly on the trigger (5), ensuring that the screw is
not damaged or that the screw head does not tear
off.
Use only genuine Metabo accessories.
Use only accessories that fulfil the requirements
and specifications listed in these operating instruc-
tions.
See page 4.
AChargers
B Battery packs with different capacity
Only use battery packs with the appropriate
voltage for your power tool.
C Screwdriving bits
D1/2“ tool
For a complete range of accessories, see
www.metabo.com or the catalogue.
Repairs to electrical tools must be carried out
by qualified electricians ONLY!
If you have Metabo electrical tools that require
repairs, please contact your Metabo service centre.
For addresses see www.metabo.com.
You can download spare parts lists from
www.metabo.com.
Observe national regulations on environmentally
compatible disposal and on the recycling of disused
machines, packaging and accessories.
Battery packs must not be disposed of with regular
waste. Return faulty or used battery packs to your
Metabo dealer!
Do not allow battery packs to come into contact with
water!
Only for EU countries: Never dispose of
power tools in your household waste! In
accordance with European Guideline 2002/
96/EC on used electronic and electric equipment
and its implementation in national legal systems,
used power tools must be collected separately and
handed in for environmentally compatible recycling.
Before disposal, discharge the battery pack in the
power tool. Prevent the contacts from short-
circuiting (e. g. by protecting them with adhesive
tape).
Explanatory notes on the specifications on page 3.
Changes due to technological progress reserved.
U = Voltage of battery pack
n
0
= No-load speed
s=Impact frequency
H =Machine tool attachment
m =Weight (with smallest battery pack)
M
MAX
= max. tightening torque (setting I)
M
MED
= medium tightening torque (setting II)
M
MIN
= min. tightening torque (setting III)
Measured values determined in conformity with EN
60745.
Direct current
The technical specifications quoted are subject to
tolerances (in compliance with the relevant valid
standards).
Emission values
Using these values, you can estimate the
emissions from this power tool and compare these
with the values emitted by other power tools. The
actual values may be higher or lower, depending on
the particular application and the condition of the
tool or power tool. In estimating the values, you
should also include work breaks and periods of low
use. Based on the estimated emission values,
specify protective measures for the user - for
example, any organisational steps that must be put
in place.
Vibration total value
(vector sum of three directions)
determined in accordance with EN 60745:
a
h
= Vibration emission value(screwdriving with
impact)
K
h
= Uncertainty (vibration)
Typical A-effective perceived sound levels:
:
L
pA
= Sound pressure level
L
WA
= Acoustic power level
K
pA
, K
WA
= Uncertainty (noise level)
Wear ear protectors!
8. Accessories
9. Repairs
10. Environmental Protection
11. Technical specifications


170 27 2070 - 0315 (incl.SHW)
3585 7
www.metabo.com.cn
-
 1
1
-
 2
2
-
 3
3
-
 4
4
-
 5
5
-
 6
6
-
 7
7
-
 8
8
-
 9
9
-
 10
10
-
 11
11
-
 12
12
-
 13
13
-
 14
14
-
 15
15
-
 16
16
-
 17
17
-
 18
18
-
 19
19
-
 20
20


