
LS700-4K
DLP Projector
User Guide
IMPORTANT: Please read this User Guide to obtain important information on installing
and using your product in a safe manner, as well as registering your product for future
service. Warranty information contained in this User Guide will describe your limited
coverage from ViewSonic Corporation, which is also found on our web site at http://
box in the upper right corner of our website. “Antes de operar su equipo lea cu
idadosamente las instrucciones en este manual”
Model No. VS17455

i
Compliance Information
FCC Statement
This device complies with part 15 of FCC Rules. Operation is subject to the following
two conditions: (1) this device may not cause harmful interference, and (2) this device
must accept any interference received, including interference that may cause undesired
operation.
This equipment has been tested and found to comply with the limits for a Class B digital
device, pursuant to part 15 of the FCC Rules. These limits are designed to provide
reasonable protection against harmful interference in a residential installation. This
equipment generates, uses, and can radiate radio frequency energy, and if not installed
and used in accordance with the instructions, may cause harmful interference to radio
communications. However, there is no guarantee that interference will not occur in a
particular installation. If this equipment does cause harmful interference to radio or
television reception, which can be determined by turning the equipment o and on, the
user is encouraged to try to correct the interference by one or more of the following
measures:
● Reorient or relocate the receiving antenna.
● Increase the separation between the equipment and receiver.
● Connect the equipment into an outlet on a circuit dierent from that to which the
receiver is connected.
● Consult the dealer or an experienced radio/TV technician for help.
Warning: You are cautioned that changes or modications not expressly approved by
the party responsible for compliance could void your authority to operate the equipment.
For Canada
CAN ICES-3 (B)/NMB-3(B)
CE Conformity for European Countries
The device complies with the EMC Directive 2014/30/EU and Low Voltage
Directive 2014/35/EU.
Following information is only for EU-member states:
The mark is in compliance with the Waste Electrical and Electronic
Equipment Directive 2012/19/EU (WEEE).
The mark indicates the requirement NOT to dispose the equipment
including any spent or discarded batteries or accumulators as unsorted
municipal waste, but use the return and collection systems available.
If the batteries, accumulators and button cells included with this
equipment, display the chemical symbol Hg, Cd, or Pb, then it means
that the battery has a heavy metal content of more than 0.0005%
Mercury or more than, 0.002% Cadmium, or more than 0.004% Lead.

ii
Important Safety Instructions
1. Read these instructions.
2. Keep these instructions.
3. Heed all warnings.
4. Follow all instructions.
5. Do not use this unit near water.
6. Clean with a soft, dry cloth.
7. Do not block any ventilation openings. Install the unit in accordance with the
manufacturer’s instructions.
8. Do not install near any heat sources such as radiators, heat registers, stoves, or
other devices (including ampliers) that produce heat.
9. Do not defeat the safety purpose of the polarized or grounding-type plug. A
polarized plug has two blades with one wider than the other. A grounding type plug
has two blades and a third grounding prong. The wide blade and the third outlet,
consult an electrician for replacement of the obsolete outlet.
10. Protect the power cord from being walked on or pinched particularly at plugs.
Convenience receptacles and the point where they exit from the unit. Be sure that
the power outlet is located near the unit so that it is easily accessible.
11. Only use attachments/accessories specied by the manufacturer.
12. Use only with the cart, stand, tripod, bracket, or table specied by the
manufacturer, or sold with the unit. When a cart is used, use caution
when moving the cart/unit combination to avoid injury from tipping over.
13. Unplug this unit when unused for long periods of time.
14. Refer all servicing to qualied service personnel. Servicing is required when the
unit has been damaged in any way, such as: if the power-supply cord or plug is
damaged, if liquid is spilled onto or objects fall into the unit, if the unit is exposed to
rain or moisture, or if the unit does not operate normally or has been dropped.

iii
Declaration of RoHS2 Compliance
This product has been designed and manufactured in compliance with Directive
2011/65/EU of the European Parliament and the Council on restriction of the use of
certain hazardous substances in electrical and electronic equipment (RoHS2 Directive)
and is deemed to comply with the maximum concentration values issued by the
European Technical Adaptation Committee (TAC) as shown below:
Substance Proposed Maximum
Concentration
Actual Concentration
Lead (Pb) 0.1% < 0.1%
Mercury (Hg) 0.1% < 0.1%
Cadmium (Cd) 0.01% < 0.01%
Hexavalent Chromium (Cr
6+
) 0.1% < 0.1%
Polybrominated biphenyls (PBB) 0.1% < 0.1%
Polybrominated diphenyl ethers (PBDE) 0.1% < 0.1%
Bis (2-ethylhexyl) phthalate (DEHP) 0.1% < 0.1%
Butyl benzyl phthalate (BBP) 0.1% < 0.1%
Dibutyl phthalate (DBP) 0.1% < 0.1%
Diisobutyl phthalate (DIBP) 0.1% < 0.1%
Certain components of products as stated above are exempted under the Annex III of
the RoHS2 Directives as noted below:
Examples of exempted components are:
1. Lead in glass of cathode ray tubes.
2.
3. Lead as an alloying element in aluminium containing up to 0.4% lead by weight.
4. Copper alloy containing up to 4% lead by weight.
5. Lead in high melting temperature type solders (i.e. lead-based alloys containing
85% by weight or more lead).
6. Electrical and electronic components containing lead in a glass or ceramic other
than dielectric ceramic in capacitors, e.g. piezoelectronic devices, or in a glass or
ceramic matrix compound.

iv
Copyright Information
Copyright © ViewSonic
®
Corporation, 2017. All rights reserved.
Macintosh and Power Macintosh are registered trademarks of Apple Inc.
Microsoft, Windows, Windows NT, and the Windows logo are registered trademarks of
Microsoft Corporation in the United States and other countries.
ViewSonic, the three birds logo, OnView, ViewMatch, and ViewMeter are registered
trademarks of ViewSonic Corporation.
VESA is a registered trademark of the Video Electronics Standards Association.
DPMS and DDC are trademarks of VESA.
PS/2, VGA and XGA are registered trademarks of International Business Machines
Corporation.
Disclaimer: ViewSonic Corporation shall not be liable for technical or editorial errors or
omissions contained herein; nor for incidental or consequential damages resulting from
furnishing this material, or the performance or use of this product.
In the interest of continuing product improvement, ViewSonic Corporation reserves the
change without notice.
No part of this document may be copied, reproduced, or transmitted by any means, for
any purpose without prior written permission from ViewSonic Corporation.
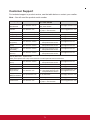
Product Registration
it becomes available, please visit your region section on ViewSonic’s website to register
your product online.
Registering your product will best prepare you for future customer service needs.
Your Records” section.
For additional information, please see the “Customer Support” section in this guide.
For Your Records
Product Name: LS700-4K
ViewSonic DLP Projector
Model Number: VS17455
Document Number: LS700-4K_UG_ENG Rev.1A
Serial Number: ________________________________________________
Purchase Date: ________________________________________________
Product disposal at end of product life
The lightsource in this product contains mercury which can be dangerous to you and the
environment. Please use care and dispose of in accordance with local, state or federal
laws.
ViewSonic respects the environment and is committed to working and living green.
Thank you for being part of Smarter, Greener Computing. Please visit ViewSonic
website to learn more.
USA & Canada: http://www.viewsonic.com/company/green/recycle-program/
Europe: http://www.viewsoniceurope.com/uk/support/recycling-information/
Taiwan: http://recycle.epa.gov.tw/recycle/index2.aspx

目录
重要安全说明 ...................... 1
简介 ....................................3
投影机特点 ................................................. 3
包装内容 .................................................... 4
投影机的外观 ............................................. 5
设备控制和功能 ......................................... 6
安装投影机 ........................ 11
选择一个位置 ........................................... 11
投影尺寸 .................................................. 12
连接 ..................................13
连接到计算机或显示器 ............................. 14
连接视频源设备 ....................................... 15
连接到 HDMI 设备 ................................... 16
............................ 16
连接到复合视频源设备
通过投影机播放声音 ................................ 16
操作 ..................................17
启动投影机 ............................................... 17
使用菜单 .................................................. 18
切换输入信号 ........................................... 26
更改HDMI 输入设置 ................................. 27
调节投影图像 ........................................... 28
执行梯形校正 ........................................... 29
使用CEC功能
..............................................
. 30
光源级别
...............................................
31
高海拔操作
.................................................. 31
在用户模式下优化图像
.....................
32
在用户模式下微调图像质量 . 33
选择宽高比
....................................
37
关于宽高比
............................................... 37
3D功能
.........................................
38
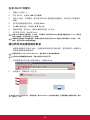
通过局域网控制投影机
............................. 39
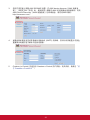
通过网页浏览器控制投影机
..................... 40
关于 Crestron e-Control
®
43
在待机模式下使用投影机
......................... 45
关闭投影机
............................................... 46
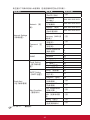
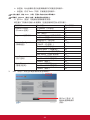
菜单操作
.................................................. 46
菜单说明
.................................................. 49
维护 ..................................51
维护投影机
............................................... 51
LED指示灯 ............................................... 52
故障排除
...........................53
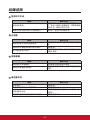
规格
..................................54
投影机规格
............................................... 54
熔断器规格
............................................... 54
.....................
.....................

外形尺寸 .................................................. 54
吊顶安装 .................................................. 54
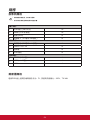
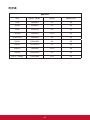
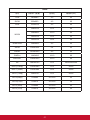
时序表 ...................................................... 55
版权信息 ........................... 59
版权 ......................................................... 59
免责声明 .................................................. 59
附录 .................................. 60
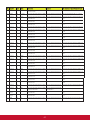
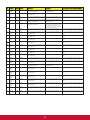
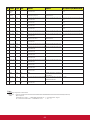
IR控制表 .................................................. 60
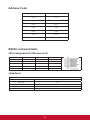
Address Code .......................................... 61
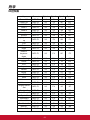
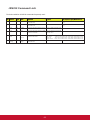
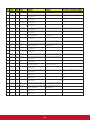
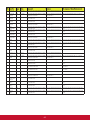
RS232 command table ............................ 61

11
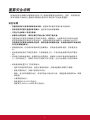
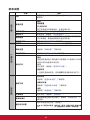
重要安全说明
投影机的设计和测试均按照信息技术 (IT) 设备的最新安全标准执行。但是,在使用时按
照本手册和产品标签上提供的说明进行操作对于保证用户安全极其重要。
安全说明
• 在使用投影机之前请详细阅读本手册。妥善保存本使用手册以备日后参考。
• 切勿在使用过程中直视投影机镜头。强光束可能会损害眼睛。
• 只应让专业维修人员进行维修。
• 投影机光源亮起时,请切记要打开镜头快门或取下镜头盖。
• 在某些地区可能存在线路电压不稳定的情况。根据设计,此投影机在100到240伏特
的交流电源电压范围内可以安全运行,但停电或电压波动超过±10伏特时无法工作。
在电源电压可能波动或断电的区域,建议您通过电源稳压器、电涌保护器或不间断电源
(UPS)来连接投影机。
• 使用投影机时,切勿用任何物体挡住投影镜头,否则会造成物体受热、变形甚至起
火。
• 切勿将投影机放在不稳定的推车、支架或电缆上方。产品可能会掉落并造成严重损
坏。
• 切勿自行拆卸此投影机。投影机包含高压部件,接触到人体时可能会造成触电或死
亡。在任何情况下,您都不可以打开或卸下其它护盖。应让专业维修人员进行维修。
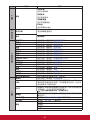
• 请勿将投影机置于以下任何环境中。
- 通风不佳或狭窄的空间。请至少离墙50厘米,并确保投影机周围空气畅通。
- 温度过高的地方,如窗户紧闭的汽车内。
- 潮湿、多尘或有烟雾的地方,否则可能会污染光学元件,缩短投影机使用寿命,使图
像变暗。
- 火警附近的地方。
- 温度超过40°C/104°F的地方。
- 海拔高于 5000 m (16500 英尺)的地方。

2
• 请勿堵塞通风孔。如果通风口严重受阻,投影机内部过高的热度可能会引起火灾。
- 请勿将投影机放置在毯子、衬垫或其它柔软物体的表面上。
- 请勿用布或其它物体覆盖投影机。
- 请勿在投影机附近放置任何易燃品。
• 切勿踩踏投影机或在投影机上面放置任何物体。这些行为可能会损坏投影机本身以及
造成事故或人身伤害。
• 请勿在投影机附近或投影机上面放置液体。液体如果溅入投影机内会造成损坏。如果
投影机进水,请从电源插座拔下电源线插头,联系当地维修中心进行修复。
• 可以将本产品安装在天花板吊装架上进行背投。
只使用符合相关要求的天花板吊装架并确保安装是安全的。
• 当投影机在运行时,您可能会感觉有热气和气味从通风栅中排出。这是正常现象,而
不是产品缺陷。
• 运输和安装时请勿使用安全杆。安全杆只应配合市场上销售的防盗绳使用。
投影机天花板吊装的安全说明
我们希望您使用投影机时有愉快的体验, 因此我们需要提醒您注意这些安全事项,以防人
身和财产受到损害。
如果您要吊挂安装投影机,我们强烈建议您使用合适的投影机天花板吊装套件,并确保投影
机安装得安全且牢固。
如果没有使用合适的投影机天花板吊装套件则会存在安全风险。使用规格或长度错误的不合
适连接器或螺丝可能会导致投影机从天花板掉落。
您可以从投影机经销商购买投影机天花板吊装。套件除安装套件以外我们还建议您购买安全
带。安全带应牢固连接到投影机上的防盗锁凹槽以及吊装支撑架的底座。在安装支撑架的连
接器松动时这可以提供额外的保护。
如同对待任何明亮光源一样,请勿直视光束。

33
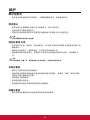
简介
投影机特点
此投影机集成了高性能的光学引擎投影技术和用户友好的设计,可靠性高,使用简便。
此投影机具有下列特点:
此投影机具有下列特点。
• 色彩模式提供专 为不同投影机目的设计的不同选项。
• 与 NTSC、PAL、SECAM 和 HDTV 兼容
• D-Sub 15 针端子可连接模拟视频
• 配备HDMI 连接,支持HDCP
• 多语言屏幕显示菜单
• 数字梯形失真校正可校正失真变形的图像
• RS-232 接口支持串行控制
• 在设定的时间长度内未检测到输入信号时,省电模式可使灯泡功耗降低最多30%。
• 演示计时器能更好地控制演示时间
• 支持 3D 功能
• 色彩管理可根据您的喜好对色彩进行调整
• 屏幕类型校正功能可在多种预设颜色表面进行投影
• 可切换到正常、省电和CUSTOM模式以降低功耗
• 快速自动搜索可提高信号检测速度
• 省电模式开启后功耗不到0.5W
• “Network Settings”可通过远程电脑对投影机状态进行管理
• 单键自动调整,可显示最佳图像质量(仅适用于模拟信号)
• 为数据/视频显示提供可调节的色彩管理控制

4
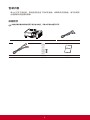
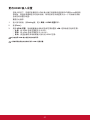
包装内容
请小心打开产品包装,并检查是否包含下列所有物品。如果缺失任何物品,请与您购买
此投影机时的经销商联系。
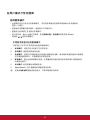
标准附件
随此投影机提供的附件适用于您所在的地区,可能与手册中的图示不同。
投影机 电源线
VGA线 遥控器电池 快速使用手册

55
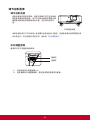
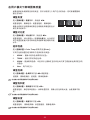
投影机的外观
前面/后面
侧面
上面/底面
警告
• 本设备必须接地。
• 您可以在固定布线中添加断电装置或将电源线插接到附近的电源插座以方便使用。如果在设备操作过程中发生故
障或错误,请使用断电装置切断电源或从电源插座拔下插头。

6
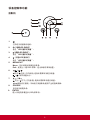
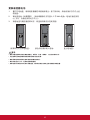
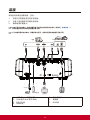
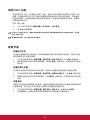
设备控制和功能
投影机
6
1
2
4
3
75
1.
打开或关闭投影机电源。
2.
(电源LED 指示灯)
参见“LED 指示灯消息”。
3.
(温度LED 指示灯)
参见“LED 指示灯消息”。
4.
(灯泡LED 指示灯)
参见“LED 指示灯消息”。
9. ENTER
进入所选的屏幕显示(OSD)菜单项。
SOURCE
显示信号源选择条。
5. MENU/EXIT
Menu:显示或退出屏幕显示菜单。
Exit:返回上一级 OSD 菜单、退出和保存菜单设置。
6.
/
向左/ 向右 (方向按钮):选择所需菜单项进行调整。
/ :调节音量大小。
7.
/
向上/ 向下 (方向按钮):选择所需菜单项进行调整。
/ (梯形校正按钮) :手动校正因投影角度而产生的扭曲图像。
8
7
6
9
8.

77
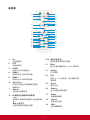
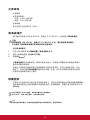
遥控器
1. On
开启投影机
2.
OFF
关闭投影机
返回主页
Home
Setting
HDMI 1
HDMI 2
选择所显示 HDMI 的来源
选择所显示 HDMI 的来源
3. COMP
4.
6.
7.
9.
5.
10.
11.
13.
打开菜单
14.
15.
18.
16.
Auto Sync
可自动为所显示的图像确定最佳
图像时序
Source
显示信号源选择条
1 2
3 4
5
6 7
8
9
10
11
12
13 14
15
16 17
18 19
20
21
22
23
24 25
26
27 28
29
30
31
选择 D-Sub/分量显示
812.
/
梯形校正按钮和方向按钮
手动校正因投影角度而产生的扭曲图
像
向左/向右
向上/向下
选择所需菜单项进行调整
选择所需菜单项进行调整
进入所选的屏幕显示(OSD)菜单项
Enter
返回上一个OSD菜单、退出和保存菜
单设置
Exit
Aspect
选择显示比例
显示HDR菜单
显示内置的测试画面
Pattern
17. Blank
19. HDR
隐藏屏幕画面

8
20.
21.
22.
23.
增大音量
调节对比度
Contrast
24.
Brightness
(音量 )
调节亮度
25.
Color Temp
调节色温
26.
Standard
标准模式
27.
Sports
运动模式
28.
User 1
User 2
用户模式1
用户模式2
29.
Movie
电影模式
30.
(静音)
开启和关闭投影机音频
(音量 )
减小音量
Eco Mode
显示灯泡模式选项列表
31.


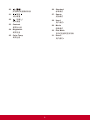
更换遥控器电池
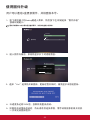
1. 要打开电池盖,请将遥控器翻过来使后面朝上。按下指示处,然后沿指示方向向上拉
电池盖。
2. 取出旧电池(如果需要),然后根据指示方向放入 2 节 AAA 电池。电池正极应指向
(+) 方向,负极应指向此方向 (-)。
3. 将电池盖与遥控器底部对齐,将盖回归原位以完成流程。
按图示方向打开电池盖。 按仓内的图示装入电池。 盖上电池盖。
警告
• 避免将遥控器和电池放在潮湿高温处,如厨房、浴室、桑拿房、 日光浴房或汽车内。
• 只应使用电池制造商推荐的相同或同类电池进行更换。
• 请参照制造商的说明和当地环境法规处理废旧电池。
• 请勿将电池投入火中。这样可能有爆炸危险。
• 如果电池用尽或您将长时间不用遥控器,请将电池取出以防发生电池漏液损坏遥控器。
10

11
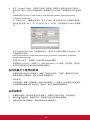
安装投影机
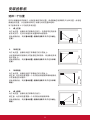
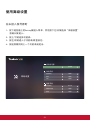
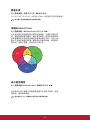
选择一个位置
您可以根据房间布局或个人喜好来确定安装位置。考虑因素包括屏幕的尺寸和位置、合适电
源插座的位置,以及投影机和其它设备之间的位置和距离。
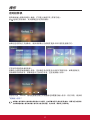
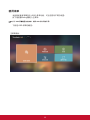
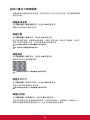
对于投影机有 4 个可能的安装位置:
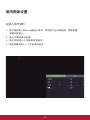
1. 桌上正投
对于此位置,投影机放在屏幕的正前方。这是最常见的投影
机安装方式。这可以快速安装设置和移动性较高。
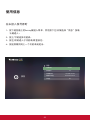
启动投影机后,转到基本设置: 投影机投影菜单并选择桌上
正投。
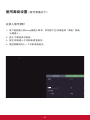
2. 吊装正投
对于此位置,投影机倒挂于屏幕前方的天花板上。
从经销商处购买投影机天花板悬挂安装套件,将投影机安装
到天花板上。
启动投影机后,转到基本设置: 投影机投影菜单并选择吊装
正投。
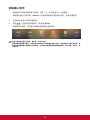
3. 吊装背投
对于此位置,投影机倒挂于屏幕后方的天花板上。
请注意,此安装位置需要一个专用的后部投影屏幕和投影机
天花板悬挂安装套件。
启动投影机后,转到基本设置: 投影机投影菜单并选择吊装
背投。
4. 桌上背投
对于此位置,投影机放在屏幕的正后方。
请注意,此安装位置需要一个专用的后部投影屏幕。
启动投影机后,转到基本设置: 投影机投影菜单并选择桌上
背投。

121312
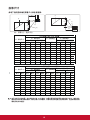
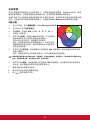
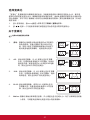
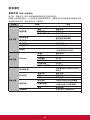
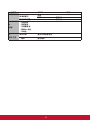
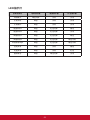
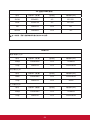
投影尺寸
参考下面的图表确定屏幕尺寸和投影距离。
(a)
(c)
(b)
(e)
(f)
(d)
(a)
(c)
(b)
(e)
(f)
(d)
(e):屏幕 (f):镜头中心
由于光学元件的差异,在这些数字中有 3% 的容差。如果您要将投影机固定安装在某个地方,建议您先
使用这台投影机作实际测试,确认投影大小和距离,并参考其光学性能之后再做安装。这会帮助您找到
最适合的安装位置。
英寸 毫米
60 1524 58 1483 77 1948 29 747 1.6 41 1.6 41
70 1778 68 1738 90 2281 34 872 1.9 48 1.9 48
80 2032 78 1993 103 2613 39 996 2.2 55 2.2 55
90 2286 88 2248 116 2945 44 1121 2.4 62 2.4 62
100 2540 99 2503 129 3278 49 1245 2.7 69 2.7 69
120 3048 119 3012 155 3942 59 1494 3.3 83 3.3 83
150 3810 149 3777 194 4939 74 1868 4.1 104 4.1 104
200 5080 199 5051 260 6601 98 2491 5.4 138 5.4 138
250 6350 249 6325 325 8262 123 3113 6.8 173 6.8 173
300 7620 299 7599 391 9924 147 3736 8.2 207 8.2 207
最小偏移 最大偏移
(c) 图像高度
(a) 屏幕尺寸
最小距离 最大距离
(b) 投影距离
(d) 垂直偏移
英寸 毫米 英寸 毫米 英寸 毫米 英寸 毫米 英寸 毫米
16:9 屏幕上显示 16:9 的图像
英寸 毫米
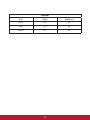
60 1524 53 1358 70 1785 27 686 1.5 38
70 1778 63 1592 82 2090 31 800 1.7
44
80 2032 72 1826 94 2395 36 914 2.0 51
90 2286 81 2059 106 2699 40 1029 2.2 57
100 2540 90 2293 118 3004 45 1143 2.5 63
120 3048 109 2761 142 3615 54 1372 3.0 76
150 3810 136 3463 178 4530 67 1714 3.7 95
200 5080 182 4632 238 6055 90 2286 5.0 127
250 6350 228 5801 298 7580 113 2858 6.2 159
300 7620 274 6971 358 9105 135 3429 7.5 190
最小偏移 最大偏移
(c) 图像高度
(a) 屏幕尺寸
最小距离 最大距离
(b) 投影距离
(d) 垂直偏移
英寸 毫米 英寸 毫米 英寸 毫米 英寸 毫米 英寸 毫米
16:9 屏幕上显示 4: 3 的图像
38
44
51
57
63
76
95
127
159
190
1.5
1.7
2.0
2.2
3.0
3.7
5.0
6.2
7.5
2.5

13
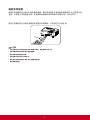
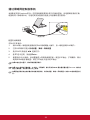
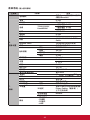
连接
当连接信号源至投影机时,务必:
1. 在进行任何连接前关闭所有设备。
2. 为每个信号源使用正确的信号线。
3. 确保线缆牢固插入。
在如下所示的连接中,部分线缆可能不包括在此投影机的包装内(请参见“包装内容”)。
您可能需要从电气商店购买需要的信号线。
以下链接和图标仅供参考。根据投影机型号,投影机后面的连接插孔可能不同。
4. HDMI 线
1. USB 线(mini-B型到A型)
3. RS-232 线
2. VGA 线(D-Sub 到 D-Sub) 6. 音频线
5. 复合视频线
7. RJ45线
RS232
HDMI
7
Internet
LAN 接口
1
6
扬声器
3
2
显示器
4
USB 充电器
USB
6
AV设备
电脑
5
2
ページが読み込まれています...
ページが読み込まれています...
ページが読み込まれています...
ページが読み込まれています...
ページが読み込まれています...
ページが読み込まれています...
ページが読み込まれています...
ページが読み込まれています...
ページが読み込まれています...
ページが読み込まれています...
ページが読み込まれています...
ページが読み込まれています...
ページが読み込まれています...
ページが読み込まれています...
ページが読み込まれています...
ページが読み込まれています...
ページが読み込まれています...
ページが読み込まれています...
ページが読み込まれています...
ページが読み込まれています...
ページが読み込まれています...
ページが読み込まれています...
ページが読み込まれています...
ページが読み込まれています...
ページが読み込まれています...
ページが読み込まれています...
ページが読み込まれています...
ページが読み込まれています...
ページが読み込まれています...
ページが読み込まれています...
ページが読み込まれています...
ページが読み込まれています...
ページが読み込まれています...
ページが読み込まれています...
ページが読み込まれています...
ページが読み込まれています...
ページが読み込まれています...
ページが読み込まれています...
ページが読み込まれています...
ページが読み込まれています...
ページが読み込まれています...
ページが読み込まれています...
ページが読み込まれています...
ページが読み込まれています...
ページが読み込まれています...
ページが読み込まれています...
ページが読み込まれています...
ページが読み込まれています...
ページが読み込まれています...
ページが読み込まれています...
ページが読み込まれています...
ページが読み込まれています...
ページが読み込まれています...
ページが読み込まれています...
ページが読み込まれています...
ページが読み込まれています...
ページが読み込まれています...
ページが読み込まれています...
ページが読み込まれています...
ページが読み込まれています...
ページが読み込まれています...
ページが読み込まれています...
ページが読み込まれています...
-
 1
1
-
 2
2
-
 3
3
-
 4
4
-
 5
5
-
 6
6
-
 7
7
-
 8
8
-
 9
9
-
 10
10
-
 11
11
-
 12
12
-
 13
13
-
 14
14
-
 15
15
-
 16
16
-
 17
17
-
 18
18
-
 19
19
-
 20
20
-
 21
21
-
 22
22
-
 23
23
-
 24
24
-
 25
25
-
 26
26
-
 27
27
-
 28
28
-
 29
29
-
 30
30
-
 31
31
-
 32
32
-
 33
33
-
 34
34
-
 35
35
-
 36
36
-
 37
37
-
 38
38
-
 39
39
-
 40
40
-
 41
41
-
 42
42
-
 43
43
-
 44
44
-
 45
45
-
 46
46
-
 47
47
-
 48
48
-
 49
49
-
 50
50
-
 51
51
-
 52
52
-
 53
53
-
 54
54
-
 55
55
-
 56
56
-
 57
57
-
 58
58
-
 59
59
-
 60
60
-
 61
61
-
 62
62
-
 63
63
-
 64
64
-
 65
65
-
 66
66
-
 67
67
-
 68
68
-
 69
69
-
 70
70
-
 71
71
-
 72
72
-
 73
73
-
 74
74
-
 75
75
-
 76
76
-
 77
77
-
 78
78
-
 79
79
-
 80
80
-
 81
81
-
 82
82
-
 83
83


