
9 Lettheappliancecooldownfor3minutes.
10 Fillthewatertankwithfreshcoldwater.(Fig.9)
11 Switchontheapplianceandlettheitbrewuntilthewatertankisempty.
12 Repeatstep9to11oncemore.
Note: Repeat step 12 until the water in the jug no longer tastes or smells like vinegar.
13 Cleantheseparateparts(seechapter‘Cleaning’).
Ordering accessories
To buy accessories or spare parts, visit www.shop.philips.com/service
or go to your Philips dealer. You can also contact the Philips Consumer Care
Centre in your country (see the worldwide guarantee leaet for contact details).
Recycling
- Do not throw away the appliance with the normal household waste
at the end of its life, but hand it in at an ofcial collection point for
recycling. By doing this, you help to preserve the environment.
- Follow your country’s rules for the separate collection of electrical
and electronic products. Correct disposal helps prevent negative
consequences for the environment and human health.
Warranty and support
If you need information or support, please visit www.philips.com/
support or read the separate international warranty leaet.
Troubleshooting
This chapter summarises the most common problems you could encounter
with the appliance. If you are unable to solve the problem with the
information below, visit www.philips.com/support for a list of frequently
asked questions or contact the Consumer Care Centre in your country.
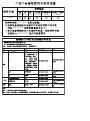
Problem Solution
The appliance does
not work.
Make sure that the voltage indicated on the
appliance corresponds to the local mains voltage.
Make sure that:
The appliance is plugged in and switched on.
The water tank is lled with water.
In all other cases, contact the Philips Consumer
Care Centre.
The appliance
continues to drip
long after the brewing
cycle has nished.
Some dripping is normal. This is caused by steam
that condenses inside the appliance. If more than
3 to 5 drops of coffee fall on the hotplate after you
remove the jug, the drip stop is dirty. Push the drip
stop to open it and rinse it under a running tap.
If you remove the jug from the appliance for more
than 20 seconds, the lter holder starts to overow.
If the above solutions do not solve the problem,
please contact the Philips Consumer Care Centre.
The lter overows
while the appliance is
brewing coffee.
Check if you placed the lter holder into the
appliance properly. If the lter holder is not in the
correct position, the drip stop does not work,
which may cause the lter holder to overow.
If you remove the jug from the appliance for
more than 20 seconds during the brewing
process, the lter holder starts to overow.
The coffee is too weak. Set the intensity knob to intense.
Put more ground coffee in the lter holder to get
the coffee-to-water ratio right.
Make sure that the paper lter does not collapse.
Use the right size of paper lter (1x4 or no.4).
Make sure that there is no water in the jug
before you start to brew coffee.
The coffee is too
strong.
Set the intensity knob to mild.
Use less ground coffee or more water.
The appliance takes a
long time to brew coffee.
Descale the appliance (see chapter ‘Descaling’).
The appliance
produces a lot of noise
and steam during the
brewing process.
Descale the appliance (see chapter ‘Descaling’).
8 Putpre-groundcoffee(lter-negrind)inthelter(1)andclosethe
lterholderlid(2)(Fig.12).
Tip: Experiment with the amount of coffee and water to nd out the perfect
coffee-to-water ratio for you.
9 Presstheon/offswitchdownwardstoswitchontheappliance(Fig.6).
10 Whenallthewaterhaspassedthroughthelter,youcanremovethe
jugfromtheappliance.
Ifyouremovethejugformorethan20secondsbeforeallthewaterhas
passedthroughthelter,theltermayoverow.
, Thecoffeeiskepthotonthehotplateuntilyouswitchoffthe
applianceoruntiltheapplianceswitchesofautomaticallyaftertheset
keep-warmtime.
11 Openthelterholderlid(1)andremovethelterholder(2)(Fig.13).
12 Throwawaythepaperlter.(Fig.14)
13 Lettheappliancecooldownforatleast3minutesbeforeyoustart
brewingcoffeeagain.
Note: If you set a keep-warm time of 60 minutes or more, the light in the
on/off switch starts to ash after 30 minutes to indicate that the freshness of
your coffee is declining.
Cleaning
Neverimmersetheapplianceinwater.
1 Unplugtheappliance.
2 Cleantheoutsideoftheappliancewithamoistcloth(Fig.15).
3 Openthelterholderlid(1)andremovethelterholder(2)(Fig.13)
Note: Make sure you place the lter holder back into the appliance properly.
4 Cleantheglassjugandthelterholderinhotwaterwithsome
washing-upliquidorinthedishwasher(Fig.16).
5 Aftercleaning,rinsetheglassjugwithfreshhotwater(Fig.17).
Water tank
1 Removethewatertankfromtheappliance(1)andremovethelidof
thewatertank(2)(Fig.2).
2 Cleanthewatertankinhotwater,ifnecessarywithsomewashing-up
liquidorinthedishwasher(Fig.18).
Note: If you use a washing-up brush, be careful not to damage the valve in the
bottom of the water tank.
Donotuseanobjectwithsharpedgestocleanthewaterinletonthe
appliance.
3 Rinsethewatertankwithfreshwateraftercleaningandputitback
ontotheappliance(Fig.3).
Descaling
Regular descaling prolongs the life of the appliance and guarantees optimal
brewing results for a long time. In case of normal use (two full jugs of coffee
every day), descale the appliance:
- 2 or 3 times a year if you use soft water (up to 18dH).
- 4 or 5 times a year if you use hard water (over 18dH).
You can use white vinegar with 4% acetic acid. You can also use an
appropriate liquid descaler. In this case, follow the instructions on the
package of the descaler.
Donotuseadescalingpowder.
1 Set the IntensityswitchknobtotheCALCposition(Fig.19).
Note: Use of the CALC position is preferred to get optimal descaling results.
You can also descale without setting the Intensity switch knob to the CALC position.
2 Fillthewatertankwithwhitevinegar(4%aceticacid).(Fig.20)
3 Putapaperlterinthelterholdertocollectthescale(Fig.21).
4 Presstheon/offswitchdownwardstoswitchontheappliance(Fig.5).
5 Oncetheapplianceisnished,letitcooldownfor3minutesand
removethepaperlter.
6 Repeatstep2-5oncemore.Re-usethevinegarinthejugtollthe
watertankagain.
7 Switchofftheappliance(Fig.22).
8 Removethepaperlter.


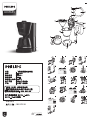 1
1
 2
2
 3
3
 4
4
 5
5
 6
6
 7
7


