
2001 Sony Corporation
Operating Instructions
Manual de instrucciones
GB
Compact Disc
Changer System
ES
CT
For installation and connections, see the supplied installation/connections
manual.
Con respecto a la instalación y a las conexiones, consulte el manual de
instalación/conexiones suministrado.
3-225-051-21 (1)
CDX-444RF

2
Welcome!
Thank you for purchasing the Sony CD
changer system. This unit lets you enjoy CD
sound with the changer.
The CDX-444RF is a compact disc changer
system comprised of the wired remote
commander, the relay box, and the CD
changer. The CD changer modulates the audio
signal into the RF (Radio Frequency) signal so
that it can be received by the existing FM tuner
of your car audio. Therefore you will be able to
enjoy CD play with your car audio even if it
has no input terminals for a compact disc
player.
•Compact and space saving CD changer for
vertical, horizontal, suspended, or inclined
installation in your car.
•Supplied wired remote enables you to
control the CD changer installed in the trunk
room of your car.
•Repeat play function for playing a track or a
disc repeatedly.
•Shuffle play function for playing tracks of
one disc or of all discs in random order.
•D-BASS function for dynamic bass boot.

3
Table of contents
Getting Started
Resetting the unit ................................................. 4
Preparing the CD changer .................................. 4
Changing the transmitting frequency ............... 5
CD Changer
Listening to a CD ................................................. 6
Playing tracks in random order
— Shuffle Play ................................................. 7
Playing tracks repeatedly
— Repeat Play ................................................. 7
Boosting the bass sound
— D-bass .......................................................... 7
Changing the output level .................................. 8
Additional Information
Precautions ............................................................ 9
Notes on handling discs ...................................... 9
Maintenance ........................................................ 10
Location of controls ........................................... 11
Specifications ...................................................... 12
Troubleshooting guide ...................................... 13

4
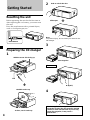
Getting Started
Resetting the unit
Before operating the unit for the first time or
after replacing the car battery, you must reset
the unit.
Press the reset button with a pointed object,
such as a ball-point pen, etc.
Preparing the CD changer
1
2
Note
To prevent injury, do not insert your hand in the
CD changer.
3
4
Use the supplied disc magazine or the disc
magazine XA-250. The disc magazine XA-10B
cannot be used with this unit. If you use any
other disc magazine, it may cause a
malfunction.
x
Disc magazine
To remove
Z (EJECT)
Tab
Labelled surface up
10 discs, one in each tray
With the arrow side facing up
Reset button
x
Push to unlock the door
Slide open

5
Notes
• To listen to an 8 cm CD, use the optional Sony CD
adaptor CSA-8. Be sure to always use the
specified adaptor, as failing to do so may cause a
malfunction of the unit. If you use any other
adaptor, the unit may not operate properly.
When using the Sony CD adaptor, make sure that
the three catches on the adaptor are firmly
latched onto the 8 cm CD.
• Do not insert the Sony CD adaptor CSA-8 in the
disc magazine without a disc, malfunction may
result.
If the disc magazine does not lock properly
Take out the disc magazine, press Z, and re-
insert it.
Use the unit with the door closed
completely
Otherwise, foreign matter may enter the unit
and contaminate the lenses inside the CD
changer.
Notes on the disc magazine
•Do not leave the disc magazine in locations
with high temperature and high humidity,
such as on a car dashboard or in the rear
window where the disc magazine will be
subject to direct sunlight.
•Do not place more than one disc at a time
onto a tray, otherwise the CD changer and
the discs may be damaged.
•Do not drop the disc magazine or subject it to
a violent shock.
When the tray comes out
Normally, the trays will not come out of the
disc magazine. However, if they are pulled out
of the disc magazine, it is easy to re-insert
them.
With the cut-away portion of the tray facing you,
insert the right corner of the tray in the slot, then
push in the left corner until it clicks.
Note
Do not insert the tray upside down or in the
wrong direction.
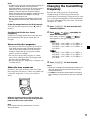
Changing the transmitting
frequency
Because this unit processes CD playback
sound through an FM tuner, there may be
interference noise during CD playback. In such
a case, change the frequency of the modulated
RF signal transmitted from the unit. The initial
setting is 88.3 MHz.
1 Press (SHUF/REP) for two seconds until
frequency appears.
2 Press or repeatedly to
select the frequency.
Each time you press or ,
the frequency changes as follows:
:
88.3 MHz t 89.9 MHz t 89.7 MHz t
89.5 MHz t 89.3 MHz t 89.1 MHz t
88.9 MHz t 88.7 MHz t 88.5 MHz t
88.3 MHz
:
88.3 MHz t 88.5 MHz t 88.7 MHz t
88.9 MHz t 89.1 MHz t 89.3 MHz t
89.5 MHz t 89.7 MHz t 89.9 MHz t
88.3 MHz
3 Press (SHUF/REP) for two seconds.
Notes
• When you change the transmitting frequency on
the unit, be sure to tune your FM tuner to the
newly selected one.
• Press u on the wired remote before changing
the frequency if the power to the unit is turned
off.

6
CD Changer
Listening to a CD
1 Turn on the FM tuner of your car audio.
2 Tune in the selected transmitting
frequency* with the FM tuner of your car
audio.
* The frequency of the unit is set to 88.3 MHz
at the factory.
You can change the frequency. (See
“Changing the transmitting frequency” on
page 5.)
3 Press u.
CD playback starts.
4 Adjust the volume with the volume
control on your car audio.
All the tracks play from the beginning.
Stopping CD play
Press (OFF).
Notes
• When CD playback stops, you may hear some
noise from the speakers. To prevent this from
happening, turn the volume down before
stopping CD playback.
• If you turn off the ignition switch of your car
without stopping CD playback, it will
automatically resume CD playback from where it
was stopped when you turn on the ignition
switch again.
Locating a specific track
— Automatic Music Sensor (AMS)
During CD playback, push down either
side of (AMS) once for each track you
wish to skip.
To locate
succeeding
tracks
To locate
previous
tracks
To search
forward
To search
backward
Locating a specific point in a track
— Manual Search
During CD playback, push down and
hold either side of (AMS). Release the
control when you have found the
desired point.
Locating a specific disc
— Disc Select
During CD playback, press (DISC+) or
(DISC-) once for each disc you wish to
skip.
To locate succeeding discs
To locate previous discs
Listening to the radio or a tape
Be sure to stop CD playback before you start
listening to the radio or a tape.
Note
Be sure to stop CD playback, otherwise there may
be some interference with radio reception.

7
Playing tracks in random
order — Shuffle Play
You can select:
•SHUF 1 to play the tracks on the current disc
in random order.
•SHUF 2 to play all the discs in random order.
Press (SHUF/REP) repeatedly until the
desired setting appears (SHUF 1 or
SHUF 2).
After five seconds, the shuffle play starts.
Each time you press (SHUF/REP), the
display changes as follows:
B SHUF 1 B SHUF 2 B REP 1 B REP 2
Cancel (SHUF off) b
To go back to the normal playback mode, press
(SHUF/REP) repeatedly until “SHUF” or
“REP” disappears.
Playing tracks repeatedly
— Repeat Play
You can select:
•REP 1 to repeat the track.
•REP 2 to repeat the disc.
Press (SHUF/REP) repeatedly until the
desired setting appears (REP 1 or REP 2).
After five seconds, the repeat play starts.
Each time you press (SHUF/REP), the
display changes as follows:
B SHUF 1 B SHUF 2 B REP 1 B REP 2
Cancel (REP off) b
To go back to the normal playback mode, press
(SHUF/REP) repeatedly until “REP” or
“SHUF” disappears.
Boosting the bass sound
— D-bass
You can enjoy a powerful bass sound. The D-
bass function boosts the low frequency signal.
You can hear the bass line more clearly even
while the vocal volume remains the same. You
can emphasize and adjust the bass sound
easily with the D-BASS button.
0dB
D-BASS 2
D-BASS 1
Adjusting the bass curve
Press (D-BASS) repeatedly to select the
desired bass curve.
As the D-BASS number increases so does
the effect.
B D-BASS 1 B D-BASS 2
Cancel (D-BASS off) b
Notes
• Setting the output level from 4 to 5 while using
the D-bass function, the amount of bass boost
decreases to avoid distortion; however, it’s not a
malfunction.
Adjust the volume with your car audio.
• Selecting D-BASS 2, a distortion may occur
depending on your CD.
Should this occur, select D-BASS or turn down
the output level.
Level
Frequency (Hz)

8
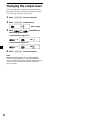
Changing the output level
You can select the output level from the unit.
Normally the unit is used in the initial output
level; change the level if necessary.
1 Press (SHUF/REP) for two seconds.
2 Press (SHUF/REP) momentarily.
Initial setting
3 Press or repeatedly to
select the output level.
To decrease the output level
: ,
To increase the output level
: ,
4 Press (SHUF/REP) for two seconds.
Note
When you select level 4 or 5, the CD playback
sound may be distorted or you may hear some
noise. In such a case, select a lower output level on
the unit and turn down the overall volume on
your car audio.

9
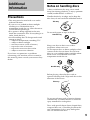
This way
Not this way
Additional
Information
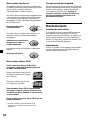
Precautions
•This unit cannot be used with a car audio
without FM tuner.
•If your car was parked in direct sunlight
resulting in a considerable rise in
temperature inside the car, allow the unit to
cool off before operating it.
•If no power is being supplied to the unit,
check the connections first. If everything is in
order, check the fuse.
•Avoid installing the CD changer and wired
remote in places:
— subject to temperature exceeding 55°C.
— subject to direct sunlight.
— near heat sources (such as heaters).
— exposed to rain or moisture.
— exposed to excessive dust or dirt.
— subject to excessive vibration.
If you have any questions or problems
concerning your unit that are not covered in
this manual, please consult your nearest Sony
dealer.
Not this way
This way
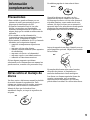
Notes on handling discs
A dirty or defective disc may cause sound
drop-outs during playback. To enjoy optimum
sound, handle the disc as follows.
Handle the disc by its edge, and to keep the
disc clean, do not touch the unlabeled surface.
Do not stick paper or tape on the disc.
Keep your discs in their cases or disc
magazines when not in use.
Do not expose discs to direct sunlight or heat
sources such as hot air-ducts. Do not leave
discs in a car parked in direct sunlight where
there can be a considerable rise in the
temperature inside the car.
Before playing, clean the discs with an
optional cleaning cloth. Wipe each disc in the
direction of the arrows.
Do not use solvents such as benzine, thinner,
commercially available cleaners or antistatic
spray intended for analog discs.
Discs with special shapes (heart-shaped discs,
octagonal discs etc.) cannot be played on this
unit. Attempting to do so may damage the
unit. Do not use such discs.

10
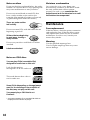
Notes on discs
If you use the discs explained below, the sticky
residue can cause the disc to stop spinning and
may cause malfunction or ruin your discs.
Do not use second-hand or rental CDs that
have a sticky residue on the surface (for
example, from peeled-off stickers or from ink,
or glue leaking from under the stickers).
There are paste residue.
Ink is sticky.
Do not use rental CDs with old labels that are
beginning to peel off.
Stickers that are beginning
to peel away, leaving a
sticky residue.
Do not use your discs with labels or stickers
attached.
Labels are attached.
Notes on CD-R discs
You can play CD-Rs (recordable CDs)
designed for audio use on this unit.
Look for this mark to
distinguish CD-Rs for audio use.
This mark denotes that a disc is
not for audio use.
Some CD-Rs (depending on the equipment
used for its recording or the condition of
the disc) may not play on this unit.
You cannot play a CD-R that is not
finalized*.
* A process necessary for a recorded CD-R disc to
be played on the audio CD player.
Moisture condensation
On a rainy day or in a very damp area,
moisture may condense on the lenses inside
the unit, and the unit will not operate
properly. In such a case, remove the disc
magazine and wait for about an hour until
the moisture has evaporated.
Maintenance
Fuse replacement
If the fuse blows, check the power connection
and replace the fuse. If the fuse blows again
after replacement, there may be an internal
malfunction. In such a case, consult your
nearest Sony dealer.
Warning
Use the specified amperage fuse.
Use of a higher amperage fuse may cause
serious damage.

11
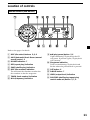
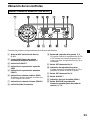
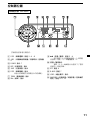
Location of controls
Wired remote (RM-X82RF)
Refer to the pages for details.
1 DISC (disc select) buttons 5, 6, 8
2 AMS (Automatic Music Sensor/manual
search) control 6
3 D-BASS indication 7
4 REP (repeat play) indication
5 SHUF (shuffle play) indication
6 DISC (disc number) indication
The indicated disc number matches the
disc number in the disc magazine.
7 TRACK (track number) indication
8 MHz (frequency) indication
9 u (play/pause) button 5, 6
If pressed during CD playback, the CD
will pause. If pressed again, CD playback
will continue.
0 Play/pause indication
Turns around during CD playback and
flashes when the pause button is pressed.
qa OFF button 6
qs D-BASS button 7
qd LEVEL (output level) indication
qf SHUF/REP (shuffle play/repeat play/
control mode set) button 5, 7, 8

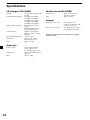
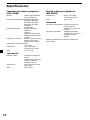
12
CD changer (CDX-444RF)
System Compact disc digital audio
system
Transmitting frequency 88.3 MHz/88.5 MHz/
88.7 MHz/88.9 MHz/
89.1 MHz/89.3 MHz/
89.5 MHz/89.7 MHz/
89.9 MHz (switchable)
Input/output terminals Wired remote control
(8 pin)
RF signal (FM) output
Power input (3 pin)
Current drain 800 mA (at playback)
800 mA (at disc loading/
ejecting)
Operating temperature –10°C to +55°C
Dimensions Approx. 262 × 90 ×
181.5 mm (w/h/d)
Mass Approx. 2.1 kg
Relay box
Input/output Aerial input terminal
Aerial output cord
CD changer input cord
Dimensions Approx. 40 × 40 × 27 mm
(w/h/d)
Mass Approx. 140 g
Specifications
Wired remote (RM-X82RF)
Dimensions Approx. 122 × 36.5 ×
15.5 mm (w/h/d)
Mass Approx. 255 g
General
Supplied accessories Disc magazine (1)
Parts for installation and
connections (1 set)
Optional accessories CD single adaptor CSA-8
Disc magazine XA-250
Design and specifications are subject to change
without notice.

13
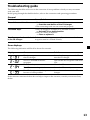
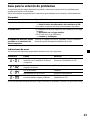
Troubleshooting guide
The following checklist will assist in the correction of most problems which you may encounter
with your unit.
Before going through the checklist below, refer to the connection and operating procedures.
General
Cause/Solution
•The built-in micro computer has malfunctioned.
t Press the reset button of the CD changer.
•The connecting cords are not connected properly.
•The CD changer is installed in an unstable location.
t Re-install it in a stable location.
•The CD is dirty or defective.
t Clean or replace it.
Take out the disc magazine, press Z, and re-insert the disc
magazine until it is locked securely.
Problem
The unit does not function.
The sound skips.
The disc magazine is not locked
in the CD changer.
Error displays
The following indication will flash for about five seconds.
Display Cause
The disc magazine is not inserted in
the CD changer.
No CD is inserted in the disc
magazine.
The CD is dirty.
The CD is inserted upside down.
The CD changer cannot be operated
because of some problem.
Solution
Insert the disc magazine with CDs
into the CD changer.
Take out the disc magazine and insert
CDs.
Clean the CD.
Insert the CD correctly.
Press the reset button of the CD
changer.
If the solutions mentioned above do not help to improve the situation, consult your nearest Sony
dealer.

2
¡Bienvenido!
Enhorabuena por la adquisición del sistema de
cambiador de discos compactos de Sony. Esta
unidad le permitirá disfrutar del sonido de los
discos compactos con el cambiador.
El CDX-444RF es un sistema de cambiador de
discos compactos que se compone de mando a
distancia alámbrico, caja de relé y cambiador
de CD. El cambiador de CD modula la señal de
audio en la señal RF (Radiofrecuencia) para
que el sintonizador de FM del sistema de
audio del automóvil pueda recibirla. Por tanto,
podrá disfrutar de reproducciones de CD con
el sistema de audio del automóvil aunque no
disponga de terminales de entrada para
reproductores de CD.
•El cambiador de CD, compacto y de tamaño
reducido, puede instalarse en el automóvil en
posición vertical, horizontal, suspendida o
inclinada.
•El mando a distancia alámbrico suministrado
permite controlar el cambiador de CD
instalado en el maletero del automóvil.
•La función de reproducción repetida
permite reproducir un tema o un disco de
forma repetida.
•La función de reproducción aleatoria
permite reproducir temas de un disco o de
todos los discos en orden aleatorio.
•Función D-BASS para reforzar los graves
dinámicos.

3
Índice
Procedimientos iniciales
Restauración de la unidad .................................. 4
Preparación del cambiador de discos
compactos ........................................................ 4
Cambio de la frecuencia de transmisión .......... 5
Cambiador de discos compactos
Escucha de discos compactos ............................. 6
Reproducción de temas en orden aleatorio
— Reproducción aleatoria ............................. 7
Reproducción repetida de temas
— Reproducción repetida .............................. 7
Potenciación de los graves
— D-bass .......................................................... 7
Cambio del nivel de salida ................................. 8
Información complementaria
Precauciones ......................................................... 9
Notas sobre el manejo de discos ........................ 9
Mantenimiento ................................................... 10
Ubicación de los controles ................................ 11
Especificaciones.................................................. 12
Guía para la solución de problemas ................ 13

4
2
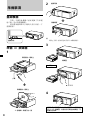
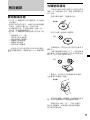
Nota
Para evitar lesiones, no inserte la mano en el
cambiador de CD.
3
4
Emplee el cargador de discos suministrado o el
XA-250. El cargador de discos XA-10B no puede
utilizarse con esta unidad. Si utiliza otro tipo
de cargador de discos, pueden producirse
fallos de funcionamiento.
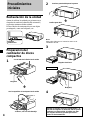
Procedimientos
iniciales
Restauración de la unidad
Antes de utilizar la unidad por primera vez o
después de sustituir la batería del automóvil,
es preciso restaurar dicha unidad.
Pulse el botón de restauración con un objeto
puntiagudo, como un bolígrafo, etc.
Preparación del
cambiador de discos
compactos
1
x
Cargador de discos
Para extraer
Z (EJECT)
Lengüeta
Con la superficie de la etiqueta hacia arriba
10 discos, uno en cada bandeja
Con el lado de la flecha hacia arriba
x
Botón de
restauración
Presione para desbloquear la puerta
Deslice para abrir

5
Notas
• Para reproducir discos compactos de 8 cm, utilice
el adaptador de CD Sony opcional CSA-8.
Asegúrese de utilizar siempre el adaptador
especificado, ya que en caso contrario pueden
producirse fallos de funcionamiento en la
unidad. Si utiliza otro tipo de adaptador, la
unidad puede no funcionar correctamente.
Cuando utilice el adaptador de CD Sony,
asegúrese de que los tres retenes del mismo
quedan firmemente encajados en el CD de 8 cm.
• No inserte el adaptador de CD Sony CSA-8 en el
cargador sin discos, ya que si lo hace pueden
producirse fallos de funcionamiento.
Si el cargador de discos no encaja
adecuadamente
Extraiga el cargador, pulse Z y vuelva a
insertarlo.
Utilice la unidad con la puerta
completamente cerrada.
De lo contrario, podrían entrar objetos
extraños en el mismo y ensuciar las lentes del
interior del cambiador de CD.
Notas sobre el cargador de discos
•No deje el cargador de discos en lugares con
temperatura y humedad altas, como en el
salpicadero o en la bandeja trasera del
automóvil, donde podría estar expuesto a la
luz solar directa.
•No coloque más de un disco en un bandeja,
ya que en caso contrario el cambiador y los
discos pueden dañarse.
•No deje caer el cargador de discos ni lo
someta a golpes violentos.
Si la bandeja se sale
Normalmente, las bandejas no se salen del
cargador de discos. No obstante, si se sacan del
cargador, puede volver a insertarlas
fácilmente.
Con la parte recortada de la bandeja hacia fuera,
inserte la esquina derecha de dicha bandeja en la
ranura y, a continuación, presione la esquina
izquierda para introducirla hasta oír un chasquido.
Nota
No inserte la bandeja al revés o en la dirección
incorrecta.
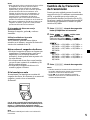
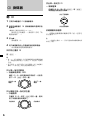
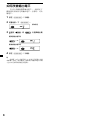
Cambio de la frecuencia
de transmisión
Puesto que esta unidad procesa el sonido de
reproducción de CD mediante un sintonizador
de FM, es posible que se oiga ruido por
interferencias durante la reproducción de CD.
En tal caso, cambie la frecuencia de la señal RF
modulada que transmite la unidad. El ajuste
inicial es 88,3 MHz.
1 Pulse (SHUF/REP) durante dos segundos
hasta que aparezca la frecuencia.
2 Pulse o varias veces
para seleccionar la frecuencia.
Cada vez que pulse o , la
frecuencia cambiará de la siguiente forma:
:
88,3 MHz t 89,9 MHz t 89,7 MHz t
89,5 MHz t 89,3 MHz t 89,1 MHz t
88,9 MHz t 88,7 MHz t 88,5 MHz t
88,3 MHz
:
88,3 MHz t 88,5 MHz t 88,7 MHz t
88,9 MHz t 89,1 MHz t 89,3 MHz t
89,5 MHz t 89,7 MHz t 89,9 MHz t
88,3 MHz
3 Pulse (SHUF/REP) durante dos segundos.
Notas
• Cuando cambie la frecuencia de transmisión de
la unidad, asegúrese de ajustar el sintonizador
de FM en la frecuencia seleccionada.
• Pulse u en el mando alámbrico antes de
cambiar la frecuencia si la alimentación de la
unidad está desactivada.

6
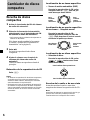
Cambiador de discos
compactos
Escucha de discos
compactos
1 Active el sintonizador de FM del sistema
de audio del automóvil.
2 Sintonice la frecuencia de transmisión
seleccionada* con el sintonizador de FM
del sistema de audio del automóvil.
* La frecuencia de la unidad se ha ajustado en
fábrica en 88,3 MHz.
Si lo desea, puede cambiar la frecuencia.
(Consulte “Cambio de la frecuencia de
transmisión” en la página 5.)
3 Pulse u.
Se inicia la reproducción de discos
compactos.
4 Ajuste el volumen con el control de
volumen del sistema de audio del
automóvil.
Todos los temas se reproducen desde el
principio.
Detención de la reproducción de CD
Pulse (OFF).
Notas
• Al detener la reproducción de discos compactos,
es posible que oiga ruido procedente de los
altavoces. Para evitarlo, disminuya el volumen
antes de detener la reproducción.
• Si desactiva la llave de encendido del automóvil
sin detener la reproducción del disco compacto,
ésta se reanudará automáticamente en el punto
donde se detuvo al volver a activar la llave de
encendido.
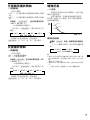
Para
localizar
temas
posteriores
Para
localizar
temas
anteriores
Para buscar
hacia
delante
Para buscar
hacia atrás
Localización de un tema específico
— Sensor de música automático (AMS)
Durante la reproducción de CD, pulse
cualquier lado de (AMS) una vez por
cada tema que desee omitir.
Localización de un punto específico
de un tema — Búsqueda manual
Durante la reproducción de CD,
mantenga pulsado cualquier lado de
(AMS). Deje de pulsar el control cuando
encuentre el punto que desee.
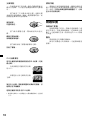
Localización de un disco específico
— Selección de disco
Durante la reproducción de CD, pulse
o tantas veces como
discos desee omitir.
Para localizar discos posteriores
Para localizar discos anteriores
Escucha de la radio o de una cinta
Antes de escuchar la radio o una cinta,
asegúrese de detener la reproducción de CD.
Nota
Asegúrese de detener la reproducción de CD, ya
que en caso contrario pueden producirse
interferencias en la recepción de la radio.

7
Reproducción de temas en
orden aleatorio
— Reproducción aleatoria
Es posible seleccionar lo siguiente:
•SHUF 1 para reproducir aleatoriamente los
temas del disco actual.
•SHUF 2 para reproducir aleatoriamente los
temas de todos los discos.
Pulse (SHUF/REP) varias veces hasta que
aparezca el ajuste deseado (SHUF 1 o
SHUF 2).
Transcurridos cinco segundos, se iniciará la
reproducción aleatoria.
Cada vez que pulse (SHUF/REP), la
indicación cambiará de la siguiente forma:
SHUF 1 B SHUF 2 B REP 1 B REP 2
Cancelación (desactivación de SHUF) b
Para recuperar el modo normal de
reproducción, pulse (SHUF/REP) varias veces
hasta que “SHUF” o “REP” desaparezca.
Reproducción repetida de
temas — Reproducción repetida
Es posible seleccionar lo siguiente:
•REP 1 para repetir el tema.
•REP 2 para repetir el disco.
Pulse (SHUF/REP) varias veces hasta que
aparezca el ajuste deseado (REP 1 o REP
2).
Transcurridos cinco segundos, se iniciará la
reproducción repetida.
Cada vez que pulse (SHUF/REP), la
indicación cambiará de la siguiente forma:
B SHUF 1 B SHUF 2 B REP 1 B REP 2
Cancelación (desactivación de REP) b
Para recuperar el modo normal de
reproducción, pulse (SHUF/REP) varias veces
hasta que “REP” o “SHUF” desaparezca.
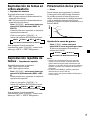
Potenciación de los graves
— D-bass
Puede obtener graves potentes. La función
D-bass potencia la señal de baja frecuencia.
Es posible escuchar la línea de graves con
mayor nitidez mientras el volumen del sonido
vocal se mantiene al mismo nivel. Puede
potenciar y ajustar los graves fácilmente con el
botón D-BASS.
0dB
D-BASS 2
D-BASS 1
Ajuste de la curva de graves
Pulse (D-BASS) varias veces para
seleccionar la curva de graves que desee.
El efecto se incrementa al aumentar el
número de D-BASS.
B D-BASS 1 B D-BASS 2
Cancelación (D-BASS desactivado)b
Notas
• Si ajusta el nivel de salida de 4 a 5 mientras
utiliza la función D-bass, la potenciación de
graves disminuirá para evitar distorsiones. No
obstante, no se trata de fallo de funcionamiento.
Ajuste el volumen con el sistema de audio del
automóvil.
• Al seleccionar D-BASS 2, pueden producirse
distorsiones en función del CD.
Si esto ocurre, seleccione D-BASS o disminuya el
nivel de salida.
Nivel
Frecuencia (Hz)

8
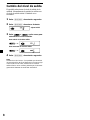
Cambio del nivel de salida
Es posible seleccionar el nivel de salida de la
unidad. Normalmente la unidad se utiliza con
el nivel de salida inicial. Cámbielo si es
necesario.
1 Pulse (SHUF/REP) durante dos segundos.
2 Pulse (SHUF/REP) durante un instante.
Ajuste inicial
3 Pulse o varias veces para
seleccionar el nivel de salida.
Para reducir el nivel de salida
: ,
Para aumentar el nivel de salida
: ,
4 Pulse (SHUF/REP) durante dos segundos.
Nota
Si selecciona el nivel 4 o 5, es posible que el sonido
de reproducción de CD se distorsione o que se oiga
cierto ruido. En tal caso, seleccione un nivel de
salida inferior en la unidad y disminuya el volumen
general del sistema de audio del automóvil.
ページが読み込まれています...
ページが読み込まれています...
ページが読み込まれています...
ページが読み込まれています...
ページが読み込まれています...
ページが読み込まれています...
ページが読み込まれています...
ページが読み込まれています...
ページが読み込まれています...
ページが読み込まれています...
ページが読み込まれています...
ページが読み込まれています...
ページが読み込まれています...
ページが読み込まれています...
ページが読み込まれています...
ページが読み込まれています...
ページが読み込まれています...
ページが読み込まれています...
ページが読み込まれています...
ページが読み込まれています...
-
 1
1
-
 2
2
-
 3
3
-
 4
4
-
 5
5
-
 6
6
-
 7
7
-
 8
8
-
 9
9
-
 10
10
-
 11
11
-
 12
12
-
 13
13
-
 14
14
-
 15
15
-
 16
16
-
 17
17
-
 18
18
-
 19
19
-
 20
20
-
 21
21
-
 22
22
-
 23
23
-
 24
24
-
 25
25
-
 26
26
-
 27
27
-
 28
28
-
 29
29
-
 30
30
-
 31
31
-
 32
32
-
 33
33
-
 34
34
-
 35
35
-
 36
36
-
 37
37
-
 38
38
-
 39
39
-
 40
40


