
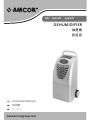
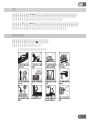
HD 2000HT 3000HT
DEHUMIDIFIER
www.amcorgroup.com
抽濕機
除湿器
GB
Instruction Manual
TC
說明書
SC
www.amcorgroup.com

2
THANK YOU
DO NOT USE YOUR DEHUMIDIFIER UNDER THE FOLLOWING CONDITIONS:
• For safety reasons, read this manual carefully before operating.
• Persons who are not familiar with this manual must not use this product.
• We strongly recommend keeping this manual in a safe place for future reference.
GENERAL SAFETY
Thank you for choosing this innovative Amcor dehumidifier. The instruction manual
describes the many benefits and advanced features that this unique product has to
offer. Before you use your new dehumidifier you should carefully read the instruc-
tions to get long lasting results from this excellent product. We suggest that you
keep the manual in a safe place for future reference.
For over 50 years, Amcor has specialised in complete indoor environment
control,manufacturing dehumidifiers, portable air conditioners, coolers, air puri
-
fiers/ ionisers and aromatherapy products. These world class products incorporate
the latest technological developments and are designed to create a quality environ-
ment.

GB
3
GENERAL SAFETY
HOW IT WORKS
Your Amcor dehumidifier draws in air through the lower front panel onto a refriger-
ated cold grill. As the air in the room passes over the cold surface, moisture con-
denses and collects into a front loading removable high capacity 7-litre water tank.
The drier, slightly warmer air is then expelled through the front upper grill back into
the room.
The Amcor dehumidifier fights condensation, mould and dampness throughout the
house.
– And it is also great for drying the laundry!
Your Amcor dehumidifier may incorporate a fragrance emitter (selected models)
located on the back of the unit. When the fragrance is no longer noticeable, the
fragrance capsule should be replaced by a fresh one. To change capsules, rotate the
knob located on the back of the unit anticlockwise and insert a new capsule which
can be ordered from the Amcor help-line
SAVE ENERGY
Did you know it takes less heat to warm dry air than damp humid air!

GB
4
CONTROLS
CONNECTING TO THE MAINS SUPPLY
POSITIONING YOUR DEHUMIDIFIER
Your Amcor dehumidifier will begin to protect your home from the harmful effects
of excessive moisture as soon as it is turned on.
Excess moisture will travel throughout your home, in the same way that cooking
smells spread to every room in the house. For this reason, the dehumidifier should
be positioned in a central and clear location so that it can draw this moist air to-
wards it from all over the home. A warm hallway or landing is an excellent position
for your dehumidifier. If possible, leave interior doors partly open. Alternatively,
if you have a serious problem in one area you can begin by positioning the dehu-
midifier close to this area and later moving it to a more central point. Do not place
directly against a radiator or other heat source.
For the most efficient use, outside doors and windows should be kept closed when
the dehumidifier is operating.
When positioning your Amcor dehumidifier, ensure that it is placed on a level sur
-
face clear of any obstacle that may limit the air movement.
Your Amcor dehumidifier is fitted with 2 front castors and 2 large integrated back
wheels for easy movement including stairs.
If you move the unit, it should first be switched off and the water tank emptied.
A cable tidy is conveniently located at the back of the unit for storage of the cable
when the unit is not being used.
The first time that you use the unit please ensure that it has been standing for 2
hours in an upright position before it is switched on.
Plug the unit into a properly earthed mains socket.
Your Amcor dehumidifier is now ready for use.
Please note, If the supply cord is damaged, it must be replaced by an approved ser-
vice representative or a similar qualified person in order to avoid a hazard.
IMPORTANT: THIS UNIT SHOULD NOT BE USED AT TEMPERATURES BELOW
5°C

GB
5
CONTROLS
CONNECTING TO THE MAINS SUPPLY
POSITIONING YOUR DEHUMIDIFIER
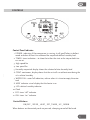
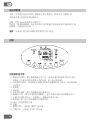
Control Panel Indicator:
1. POWER: indicating if the compressor is running- it will go off when in defrost
mode and when the unit has achieved the requested relative humidity level.
2. TIMER: timer indication – to show that either the start or the stop or both tim-
ers are set.
3. High speed fan
4. Low speed fan
5. Humidity requested: display shows the selected relative humidity level
6. CONT: continuous, display shows that the unit will run without considering the
air’s relative humidity
7. WATER FULL: water full indication, advises when it is time to empty the water
tank
8. HEAT indicator: visual display that the heater is on
9. LED: relative humidity indicator
10. Clock
11. OFF: timer “off” indicator
12. ON: timer “on” indicator
Control Buttons
ON/OFF _ SPEED _ HEAT _ SET _TIMER _ UP _ DOWN
When buttons on the control panel are pressed, a beeping sound will be heard .

GB
6
ON/OFF button
Switches the unit on or off, while the compressor is running, the POWER light [1] is
on.
Fan SPEED Control
The Amcor dehumidifier features a two-speed fan control. Press the button marked
“SPEED” to illuminate the high fan speed indicator [3] for fast operation. For qui-
eter operation press the” SPEED” button to illuminate the low indicator [4].
Relative Humidity Setting
By depressing button “UP or DOWN” repeatedly you can choose from a range of
relative humidity settings:
CONT [6] _ 50% [5] _ 60% [5] _ 70% [5] _ 80% [5]
Generally we feel most comfortable when the setting is 50%-60%. Select your pre-
ferred humidity level and the unit will run until the moisture in the room reaches
the desired level. From then on it will cycle on and off to maintain the level chosen.
If “CONT.” is selected [6], the dehumidifier will run continuously irrespective of
how dry the air becomes.
The digital display indicates the actual relative humidity level in the air. In most
cases you will see a reduction in condensation within a few days. In severe cases,
however, it may take several weeks to remove sufficient moisture to obtain an ac-
ceptable humidity level.
HEAT button
The 800W fan heater, activated by depressing the HEAT button, only runs with high
fan speed. The HEAT indicator [8] will come on when the heater is operating.
To activate the heater without dehumidification select 80% RH as explained above
and then press the heat button. The compressor will stop (power light 1 will go off)
and the heater only will run with high speed fan.
The heater should not be used in room temperatures above 21˚C. Above 25 ˚C the
heater will automatically cut off.
The unit will discharge warm dry air from the top grill making it effective in drying
damp items e.g. clothes in the area.
To avoid possible heat damage to fabric leave at least 1 m gap around the unit.
Garments must not be dried on top of this unit; this will restrict the air flow, cause
damage to the unit/ fabric and present a risk of fire / electrical shock.

GB
7
Programming the 24 hour clock.
A 4 digit LED display will constantly indicate the real time.
The real time setting procedure:
Press the “SET” button for 2 seconds. The 2 digits on the left of the display [10] will
blink indicating it is now possible to change the hours setting on the clock.
Repeatedly press the “UP” or “DOWN” button until the correct hour is shown.
Press the SET” button for the second time until the 2 right digits in the 4 digit
display [10] blink indicating it is now possible to change the minutes setting on the
clock.
Repeatedly press the “UP” or “DOWN” button until the correct minute(s) is
shown.
Press the “SET” button for the third time.
The current time is set, the 4 digit display indicates the time constantly until the
Time button [11] is pressed to program the timer.
Programming the Timer – when the machine is OFF
Please familiarise yourself with this sequence before setting the timer. Long delays
in the sequence of setting will cause the timer to revert back to the 24 hour clock
display. This will then involve starting the sequence again from the beginning.
Press the “TIMER” button when the unit is off.
The 2 digits to the left of the 4 digit display – the hours - will blink indicating it is
possible to change the hours setting on the timer. Additionally the word ON will be
shown alongside the digits.
Repeatedly press the “UP” or “DOWN” button until the desired hour is shown on
the timer.
Press the “TIMER” button again.
The 2 digits to the right of the 4 digit display – the minutes - will blink indicating it
is possible to change the minutes setting on the timer. Additionally the word ON
will be shown alongside the digits.
Repeatedly press the “UP” or “DOWN” button until the desired minutes are shown
on the timer.
AT THIS POINT YOU HAVE TWO OPTIONS EITHER
1. Press “SET” and the unit will switch on at the desired time and remain ON.
It will switch on at the setting that was last used. The Timer Light will illuminate.

GB
8
OR ALTERNATIVELY TO SET THE “OFF” TIME
2. Press the “TIMER” button again and the 2 digits to the left of the 4 digit display
will blink indicating it is possible to change the hours setting on the timer. Ad-
ditionally the word OFF will be shown alongside the digits. Follow the proce-
dure for setting the “ON” timer but this time set the “OFF” timer. When this is
complete press “SET”. The Timer Light will illuminate. The unit will now switch
both ON and OFF at the times set.
In both cases the clock will revert, within 10 seconds to show the real time and a
small clock graphic will appear in the window to show the timer is set.
Pressing either the “TIMER” or “SET” button at any time after the timer has been
set will cancel the settings.
Programming the Timer – when the machine is ON
The timer can be set in exactly the same way as described above. The only differ-
ence is that the first timer to be set will be the “OFF” timer. Then again.
YOU HAVE TWO OPTIONS EITHER
Press “SET” and the unit will switch off at the desired time and remain OFF. The
Timer Light will illuminate to show the timer is set.
OR ALTERNATIVELY
Press the “Timer” button again and the 2 digits to the left of the 4 digit display will
blink indicating it is possible to change the hours setting on the timer. Additionally
the word ON will be shown alongside the digits. Follow the procedure for setting
the “OFF” timer but this time set the “ON” timer. When this is complete press
“SET”. The Timer Light will illuminate. The unit will now switch both OFF and ON
at the times set.
In both cases the clock will revert, within 10 seconds to show the real time and a
small clock graphic will appear in the window to show the timer is set.
Pressing either the “TIMER” or “SET” button, or switching the unit off at any time
after the timer has been set will cancel the settings.
Defrost Control
Your Amcor dehumidifier is equipped with an intelligent defrost system which has
an automatic de-icing mode to defrost the cold coil on which ice forms during low
temperatures or low humidity operation. The defrost system will switch the com-
pressor off and on periodically according to the condition of the cold coil and the
room air temperature. When in defrost mode the fan will operate continuously and
the power light [1] will blink.
Please remember that this dehumidifier is not to be used in temperatures below
5˚C.

GB
9
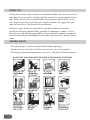
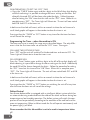
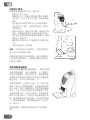
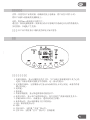
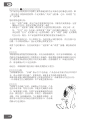
Continuous Drainage Option
This unit can alternatively be used with a continuous
drainage hose as follows:
• Remove the water container from the unit.
• Pull the funnel selector to the continuous drainage
position A as shown in fig 1. it should be pulled
forward and clicked into position. This avoids any
leakage.
• Pull out the water stopper at the back of the water
unit (fig 2) and insert a 6mm diameter (1.5mm
thick) hose over the spout.
• Place the other end of the hose in a drain, ensur-
ing that it is not twisted, folded, or otherwise likely
to obstruct the water flow.
• The hose must be positioned so that there is a
gradual downward slope from the connection
point to the drain.
• Ensure that the outlet of the drainage pipe is not
under the water level in the drain.
• Replace the water container.
Note: In very cold weather conditions precautions should be taken to prevent the
drainage pipe from freezing.
To return to water tank use, push the funnel selector into position B (fig1) and rein
-
sert the water stopper (fig 2).
Water Full Indicator [7]
When the water tank is full, the “water full” indicator light [7] will illuminate and the
unit will automatically shut off and beep repeatedly to indicate that the water tank is
full. See instructions for emptying the water tank.
The water full indicator light will also illuminate and the unit will beep if the water
tank has not been properly inserted or if it has been removed. Once the tank is emp-
tied and replaced correctly, the unit will re-start.
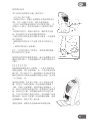
Emptying the Water Container
When the water container is full the water full indica-
tor light will illuminate and the unit will automatically
shut off. Wait a few minutes to allow the water to fin-
ish draining into the water container. To remove the
water container, pull the lower front panel forward.
Pull out and lift the water tank by the handle and
carry it away for emptying. Gently replace the con-
tainer and close the lower front panel. When the tank
is properly inserted, both the hole and the float
mechanism in the container will be located directly beneath the drainage spout and
the water full indicator light will go out.

GB
10
Washing and changing the Filters
The Amcor dehumidifier features two filters: a
replaceable activated carbon filter to remove odours
and a washable high efficiency dust filter to purify the
air. It is recommended to clean the washable air filter
at regular intervals depending upon how frequently
the unit is used, at least every 3 months.
To do this, first remove the water tank. Pull down and
remove the filter-housing unit that incorporates both
filters. Push the filter locks on either side of the filter-
housing unit and remove the filter fame. Take the
carbon filter out of the housing unit. The dust filter
can then be washed under running water. It must
be dried before inserting it back into the unit. The
carbon filter cannot be washed but can be
vacuum cleaned. It is recommended to replace the carbon filter every 12 months,
depending upon how frequently the unit is used. Replace the filter frame with the
word front outside.
For replacement filters please contact the dealer or Amcor hotline number.
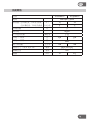
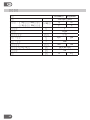
TECHNICAL DATA
Model No. HD2000HT HD3000HT
Mains 220-240V / 50Hz
Water extraction -at 32˚C 90%RH
-at 30˚C 70%RH
L/24hr 14 22
9 15
Water tank capacity
L 7
Refrigerating agent R134A
Temperature range
˚C 5 - 35
Power consumption-Dehum W 230 370
Power consumption -Heater W 800
Max. airflow
m
3
160 180
Dimensions of unit (W x H x D) mm 345 x 722 x 325
Wheel diameter mm 120
Weight
kg 18 21.5

GB
11
TECHNICAL DATA
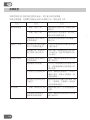
TROUBLESHOOTING
If the product is used according to this manual you should enjoy trouble free use.
In cases of difficulty please check the following points before contacting the dealer
or Amcor help line.
Symptom Check Action
Product does not
start
Is the “power” light on? Make sure the unit is plugged in to a
live mains socket.
Is the “water full” light
on?
Make sure the container is empty of
water and fitted
Is the humidistat set to a
high relative humidity?
Select a lower humidity setting [5] or
continuous running mode [4].
Water is leaking
outside of the
water tank
Has the unit been run-
ning in cold temperatures
under 5°C?
Only run the unit in a heated space
above 5°C.
Has the container been
removed for emptying
immediately after the unit
was running?
Wait a few minutes to allow the
condensation within the unit to flow
into the container after switching
off the unit and before removing the
container.
Reduced water
extraction
Is the humidistat set to a
high relative humidity?
Select a lower humidity setting [5] or
continuous running mode [4].
Are the filters blocked? Washable air filter may need clean
-
ing. Activated carbon filter may need
cleaning or replacing.
Is the air already relatively
dry?
Select a lower humidity setting [5] or
continuous running mode.
Is the unit running in a
cold room?
Ensure that the unit is operating in a
heated space above 5°C.
Not collecting
water
Is the “water full” light
[9] on?
Make sure the container is empty of
water and fitted properly in position.
Is the humidistat set to a
high relative humidity?
Select a lower humidity setting [5] or
continuous running mode [4].

TC
12
一般安全手則
出於安全考慮,操作前請詳細閱讀本說明書。
不熟悉本說明書的人不應操作本產品。
建議保留本說明書,以備日後參考。
切勿在下列條件下使用本抽濕機:
謝謝
感謝您購買本創新的Amcor抽濕機。建議您妥善保存本說明書,以備將來參考
之用。本說明書中說明了這一獨特產品的許多優點及先進的技術。在使用本產
品之前,請仔細閱讀這些說明,以保證本產品發揮其最佳功能。
在過往的50多年裹,Amcor致力發展專業的、全面的的室内环境控制技術,生
產与銷售抽濕機、移動式冷氣機、冷風機、空气淨化機、离子发生器以及有芳
香療法的香芬機。結合了最先進的技术发展,提供世界級水平的產品。

TC
13
一般安全手則
您的AMCOR抽濕機通過前面板中部的入風口將空氣抽到冷卻器。當室內的空氣
通過冷凍的表面的時候,濕氣會凝結並𣾀集到可移動水箱當中。之後,乾燥且
有一點溫暖的空氣通過產品控制面板後面的出風口排到房間內。
Amcor抽濕機抗室內凝結、黴變以及潮濕。
抽濕機產品也可以用於烘乾衣物!
Amcor抽濕機可以配備了一個芳香器(可選擇),位於產品的背部。一旦明顯感覺
到沒有香氣了,則要更換一個新的芳香囊。如果要更換芳香囊,以逆時針方向
轉動位於產品後面的芳香器,並放入一個新的芳香囊。芳香囊可以通過代理商
或Amco熱線來訂購。
節能
您知道嗎?加熱乾燥的空氣所消耗的熱量較潮濕的空氣少!
只要一開動,AMCOR抽濕機就會開始對您的家居環境進行保護,防止因為過度
的潮濕而引發有害反應。
如果過量的潮氣在您的家中蔓延,就象烹飪的氣味在房子裏的每個房間裏蔓延
一樣。因此,應當把本抽濕機放置在房間中央的位置,這樣可以對房間平均及
有效地抽濕。溫暖的走廊以及樓梯平臺是放置抽濕機的理想位置。如果可能,
要把屋內的門打開,這樣便於空氣流通。如果房間內某一個區域內的濕度特別
高,您可以把抽濕機直接放置於這一區域,之後再把它移動到中心點去。不可
直接將本產品放置於加熱器或其他的熱源旁邊。
為了達到最佳抽濕效果,在抽濕機運作的時候,要保證外部的門窗都關閉。
在安裝AMCOR抽濕機的時候,請確保將其平穩地放置于水平表面上,上面不得
有阻礙空氣流動的障礙物。
為了方便移動(包括在樓梯上移動),AMCOR抽濕機上面裝有四個輪子。
如果您要移動產品,則應當先把它關閉,並清除水箱積水。
在產品的後面設有電源線存放位,當不使用產品的時候,可以用於存放電源
線。

TC
14
在第一次使用本產品的時候,請確保在接上電源前,將產品直立兩個小時。
將本產品插入到接地的電源插座上。
這樣,您的Amcor抽濕機可以使用了。
請注意:如果電線損壞,則必須由經許可的維護代理或是具有同等資格的人員
對替換,以避免產生危險。
重要:本產品不得在低於5攝氏度的環境下加以使用。
連接到電源
控制
控制面板指示燈:
1. 電源(POWER):顯示壓縮機是否在工作。當產品處於除霜模式時以及當已
經達到了所要求的相對濕度水平的時候,這一指示燈熄滅。
2. 計時器(TIMER):計時器指示燈顯示啟動或者關閉計時己設定,或者兩者都
已經設定。
3. 高風速。
4. 低風速。
5. 所要求的濕度:顯示所選擇的相對濕度水平。
6. 連續(CONT):顯示本產品將持續運行,而不考慮空氣的相對濕度是多少。
7. 水滿(WATER FULL):水滿顯示,建議何時清空水箱。
8. 加熱指示燈:指示加熱器處於打開的狀態。
9. LED:相對濕度指示燈。
10. 時鐘。
11. 關閉(OFF):計時器“關閉”指示燈。
12. 打開(ON):計時器“打開”指示燈。

TC
15
連接到電源
控制
控制按鍵
開/關(ON/OFF0 - 速度(SPEED0 - 加熱(HEAT) - 設置(SET) -計時器(TIMER)
- 上(UP) - 下(DOWN)
按下控制面板上的按鍵時,會聽到“畢”的聲音。
開/關按鍵
打開或關閉產品,而當壓縮機工作的時候,電源指示燈(1)亮。
風扇速度控制
AMCOR抽濕機具備雙風速控制功能。按下“速度”按鍵,高風速指示燈(3)會
亮,產品以高風速運作。如果要較安靜的運作,請按“速度”按鍵,低風速指
示燈(4)會亮。
相對濕度設置
反復按下“上”或“下”按鍵,則可以選擇一系列相對濕度設置:
持續 (6) – 50% (5) – 60% (5) – 70% (5) – 80% (5)
一般而言,當設置為50%-60%的時候,我們感覺最舒適。選擇你最中意的濕度
水平,則產品會一直運轉,直到室內的濕氣達到你所想要的水平。產品會重覆
打開以及關閉,從而保持所選擇的濕度水平。如果選擇“持續”(6),抽濕機會
持續運轉,而不論空氣有多麼乾燥。
數字顯示器(9)指示了空氣中的實際相對濕度。在大多數情況下,幾天內發現凝
結的水已減少。不過,在嚴重的情況下,可能要花費數周的時間來去除濕氣,
達到可以接受的濕度水平。
加熱按鍵
按下“加熱”按鍵來啟動800W風扇加熱器,它只能在高風速時運作。當加熱器
運行的時候,“加熱”指示燈(8)會亮。
如果要啟動加熱器而不進行去濕,則按照上面的相對濕度設置方法選擇80%的
相對濕度,之後按下加熱按鍵。壓縮機會停止(電源指示燈1熄滅),而加熱器只
以高風速來運作。
加熱器使用的室溫不得超過21攝氏度。如果溫度超過25攝氏度,加熱器會自動
關閉。
本產品會從頂部出風口放出乾熱的空氣,可以有效地乾燥室內潮濕的物品,例
如衣物。
為了避免纖維受熱而損壞,在產品周圍至少要留出1米的縫隙。
不要將衣物直接放在出風口上進行乾燥,因為這樣會限制空氣的流動,對產
品/纖維造成損壞,並造成火災/觸電的危險。

TC
16
設定24小時時鐘。
本產品的LED顯示屏會有4個數位持續顯示實際的時間。
實際時間設置步驟:
按下“設置”按鍵兩秒鐘。在顯示(10)左邊的兩位數字會開始閃爍,表明現在可
對時鐘的小時進行更改。
反復地按下“上”或“下”按鍵,直到顯示出正確的小時數。
第二次按下“設置”按鍵,直到在四位數的顯示(10)的右邊兩位數字開始閃爍,
表明現在可以對時鐘的分鐘設置進行更改。
反復地按下“上”或“下”按鍵,直到顯示出正確的分鐘數。
第三次按下“設置”按鍵。
確定時間設置完成,四位數的實際時間會持續顯示,直到按下“時間”按鍵
(11)來對計時器進行調整。
計時器設置 ﹣當產品處於關閉狀態時
在設置計時器之前,請熟悉本操作程序。如果設置的順序出現長時間的延誤,
計時器會返回到24小時的時鐘顯示。這樣就需要從頭再一次啟動設定程序。
當產品關閉的時候,按下“計時器”按鍵。
顯示屏四位數字左邊的兩位代表小時,這兩位數會閃爍,表明可以在計時器上
設定小時。此外“打開”(ON)顯示也會亮起。
反復按下“上”與“下”按鍵,直到在計時器上出現所需要的小時數。
再次按下“計時器”按鍵。
顯示屏四位數字右邊的兩位代表分鐘,會閃爍,可以在計時器上設定分鐘。
反復按下“上”與“下”按鍵,直到在計時器上出現所需要的分鐘數。
這時,你可以有兩種選擇。
按下“設置”按鍵,確定計時器的設定,計時器指示燈會亮。產品會在所設置
的時間打開,並持續運作。它會在上次使用的設定打開。
或者作為另一種選擇,設置“關閉”的時間
再次按下“計時器”按鍵,四位數顯示幕左邊的兩位數會閃爍,設定小時。同
時,“關閉”(OFF)會在顯示屏上亮起。按照設置“打開”計時器的步驟設定,
不過這次是設置“關閉”計時器。這一過程結束時,按下“設置”按鍵。計時
器的燈會點亮。現在,本產品會按照所設置的時間重覆打開或關閉。
在這兩種情況設定後,在十秒鐘之內,會返回顯示即時的時間,並且在視窗會
出現一個小鐘錶的圖示,顯示計時器已經設置完畢。
設置了計時器以後,在任何時間按下“計時器”或“設置”按鍵,都會取消設
置。

TC
17
計時器設置 ﹣當產品處於打開狀態時
當產品在運作的時候可以按照上面所描述同樣的方式來對計時器進行設置。唯
一的區別在於將要設置的第一個計時器為“關閉”計時器。之後,再設置“打
開”計時器。
您有兩種選擇方案。
按下“設置”按鍵,設定產品在需要的時間關閉,並保持關閉的狀態。計時器
指示燈會亮,表明計時器已經設置。或者
再次按下“計時器”按鍵。四位數字左邊的兩位數會閃爍,設定小時。此
外,“打開”(ON) 會亮起。按照設置“關閉”計時器的步驟設定,不過這次是
設置“打開”計時器。這一過程結束時,按下“設置”按鍵。計時器的燈會點
亮。現在,本產品會按照所設置的時間重覆關閉或打開。
在這兩種情況設定後,在十秒鐘之內,會返回顯示即時的時間,並且在視窗會
出現一個小鐘錶的圖示,顯示計時器已經設置完畢。
設置了計時器以後,在任何時間按下“計時器”或“設置”按鍵,都會取消設
置。
除霜控制
本抽濕機配備智慧型的除霜功能,具有自動除霜模式,可以為冷卻器除霜。這
些霜是在低溫或低濕度工作的情況下形成的。除霜系統會根據冷卻器以及室內
空氣溫度的實際情況定期打開及關閉壓縮機。在除霜模式下,風扇會持續運
作,而電源指示燈(1)也會閃爍。
請記住,本除濕器不能在低於5攝氏度的情況下使用。
水滿指示燈(7)
當水箱滿的時候,“水滿”指示燈(7)會亮起,產品會自動關閉且發出畢畢的聲
音,表示水箱中的水滿了,需要清理。請參見有關清理水箱的說明。
如果水箱未能正確的擺放或者在已經取出的情況下,水滿的指示燈也會點亮。
一旦水箱清空且正確的放回,本產品便會重新啟動。
清理水箱
當水箱當中充滿了水時,水滿指示燈會亮起,
產品也會自動關閉。等待幾分鐘,以便水完成
流作水箱中。如果要取下水箱,先將產品前面
板底部的向前拉出。抓住把手,拉出水箱,並
清空。輕輕地放回水箱,並扣上前面板底部。
當正確放作水箱時,水箱中的入水孔以及浮標
會直接對著排水口,而水滿的指示燈也會熄
滅。

TC
18
持續排水選項
本產品設有持續排水功能,操作如下:
•從產品上取下水箱。
•如圖1中所示,將漏斗選擇器拉開到持續排
水位置A,並卡入排水口位置。這樣會避免
漏水。
•在本產品的背面底部排水口拉出膠塞(圖2),
並在排水口上插入一條直徑6毫米(1.5毫米
厚)的軟管。
•將排水管的另一端放入排水溝,確保其不會
扭結、折疊或其他對水流造成阻塞的情況。
•排水管的位置從連接點到排水溝要有一個逐
漸的向下的斜度。
•確保排水管的出水口不是處於排水溝的水位
之下。
• 裝回水箱及扣上前面板。
注意:在非常冷的天氣環境下,要採取預防措
施,防止排水管發生凍結。
如果要返回使用水箱收集排水,漏斗選擇器拉
出及推到位置B(圖1),並將膠塞插回產品背後
的排水口(圖2)。
清洗與更換過濾網
AMCOR抽濕機配備兩個過濾網:一個是可更換
的活性碳過濾網,用於去除異味,另一個是可
清洗高效隔塵網,用於清潔空氣。建議根據產
品實際使用的頻率定期對可可清洗高效隔塵網
進行清洗,至少每三個月清洗一次。
如果要這樣做,首先取下水箱。拉下並取出過
濾器,其包含了兩種過濾網。在過濾器的兩面
推上卡鎖,並取下過濾器框。將活性碳過濾網
取出。之後,就可以使用水清洗隔塵網,將其
放回產品裹之前,必須完全乾燥。活性碳過濾
網不可以進行清洗,不過可以用吸塵器進行清
潔。建議根據產品的使用頻率,每12個月更換
一次活性碳過濾網。更換過濾器框時,將有字
的一面向外。
需要過濾網,請致電代理商或AMCOR熱線訂
購。
技術規格

TC
19
技術規格
型號
HD2000HT HD3000HT
電源
220-240V / 50Hz
除濕量 - 在32攝氐度,90%室內濕度
- 在30攝氐度,70%室內濕度
升 /
24小時
14 22
9 15
水箱容量
升
7
制冷劑
R134A
工作温度范圍
攝氐度
5 - 35
功耗 — 除濕
瓦
230 370
功耗 — 加熱
瓦
800
最大氣流量
立方米
160 180
產品尺寸 (闊 x 高 x 深)
亳米
345 x 722 x 325
腳輪直径
亳米
120
重量
公斤
18 21.5

TC
20
故障檢查
如果您按照本手冊的規定使用本產品,則不會出現任何問題。
如果出現問題,在聯繫代理商或AMCOR熱線之前,請先查看下表。
產品無法啟動 “電源”燈亮了嗎? 確保產品已經插入到了帶電的市線
插座中。
“水滿”燈亮了嗎? 確保容器中已經沒有水,並已經正
確安裝在相應的位置上。
恒溫器是否設定為較高
的相對濕度?
選擇較低的濕度設置(5)或持續運作
模式(4)。
水漏出了水箱 產品是否是在低於5攝氏
度以下的環境中運作?
只能在空間溫度高於5攝氏度的情況
下運行產品。
產品運作後,是否將水
箱立即取下進行清空?
等幾分鐘,確保關閉產品以後及取
下水箱之前,產品中的凝結的水流
入水箱中。
抽濕能力降低 恒溫器是否設定為較高
的相對濕度?
選擇一個較低的濕度產品(5)或持續
運行模式(4)。
過濾網是否被堵塞? 可洗的空氣過濾網可能須要進行清
洗。活性碳過濾網可能需要進行清
潔或更換。
空氣是否已經相對乾燥? 選擇一個較低的濕度設十一(5)或持
續運行模式。濕度水平降低後,抽
濕就會降低。
產品是否在很冷的房間
內運行?
確保產品在高於5攝氏度的環境下運
行。一般來說,空氣越冷,所能抽
走的濕氣就會越少。
沒有抽濕 “水滿”燈(9)是否打開? 確保水箱已清空,且安放在適當的
位置。
恒溫器是否設置成為一
個較高的相對濕度?
選擇一個較低的相對濕度(5)或持續
運行模式(4)。
ページが読み込まれています...
ページが読み込まれています...
ページが読み込まれています...
ページが読み込まれています...
ページが読み込まれています...
ページが読み込まれています...
ページが読み込まれています...
ページが読み込まれています...
ページが読み込まれています...
ページが読み込まれています...
-
 1
1
-
 2
2
-
 3
3
-
 4
4
-
 5
5
-
 6
6
-
 7
7
-
 8
8
-
 9
9
-
 10
10
-
 11
11
-
 12
12
-
 13
13
-
 14
14
-
 15
15
-
 16
16
-
 17
17
-
 18
18
-
 19
19
-
 20
20
-
 21
21
-
 22
22
-
 23
23
-
 24
24
-
 25
25
-
 26
26
-
 27
27
-
 28
28
-
 29
29
-
 30
30


