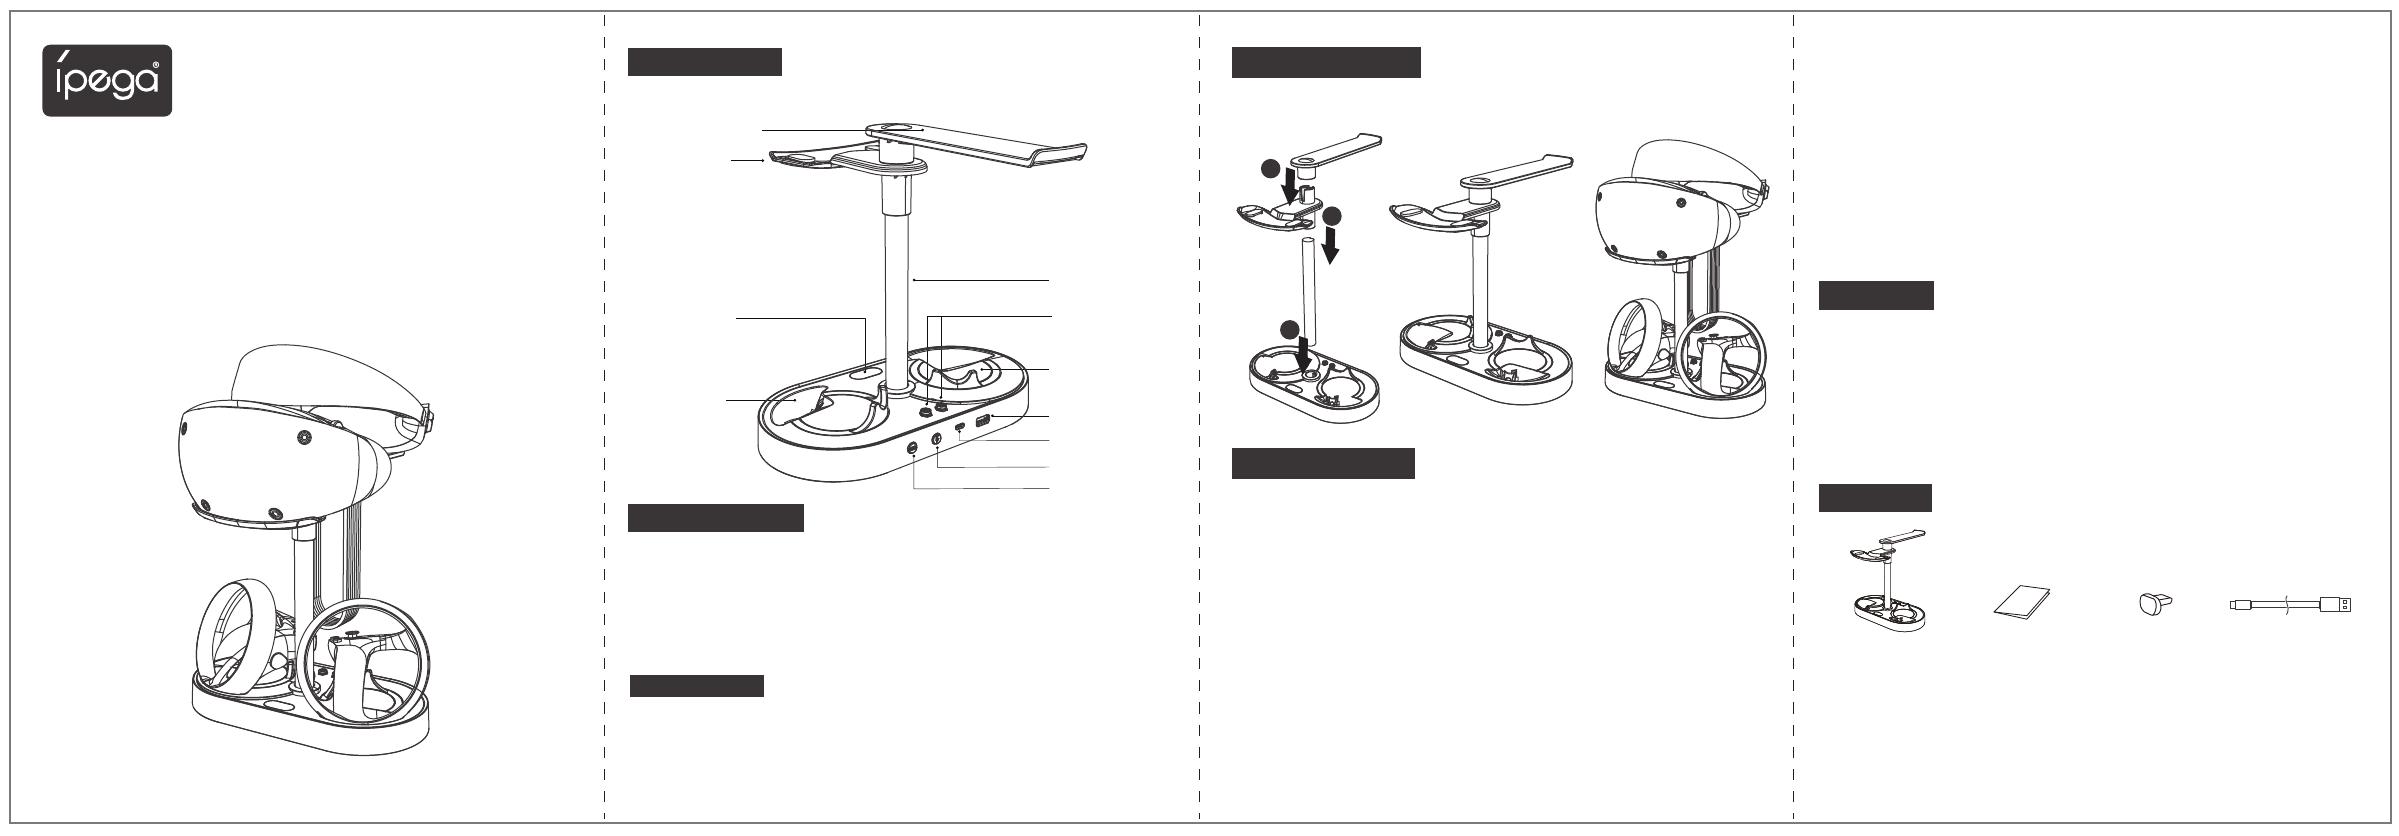
产品外观图示 产品装配说明:
产品使用说明:
1.请不要把本产品在潮湿或高温地方存储;
2.不要敲击、摔打、棒打、刺穿、或试图去分解本产品,以免对产品造成不必要的损害;
3.不要在靠近火或其它热源的地方使用;
4.非专业人员误拆卸本产品,否则不在售后保修服务内;
1、产品装配好后,依次将VR头戴放置在挂架,将两个VR控制器装入磁吸充电转接
头后放置在充电槽。
2、将产品配备的USB线连接游戏主机与产品,通电后充电指示灯亮蓝灯,充电中指
示灯亮橙色,充满后转蓝灯。底座背部的充电开关可开启或关闭充电电路(包括充
电指示灯,但不影响发光柱灯效),充电完成或不需要充电时,可关闭充电电路。
3、发光柱具备10种灯光效果
可由灯效开关控制,发光柱默认灯效: 呼吸渐变
1.呼吸渐变、2.闪烁、3.红、4.绿、5.蓝、6.黄、7.青、8.紫、9.白、10.熄灭
(闪烁定义:红绿蓝黄青紫白,每秒切换一种颜色)
*断电时保存当前灯效状态;
*灯效开关:控制灯光效果转换与开启关闭;灯效开关短按并松开时改变灯效;长按
三秒开关时关闭并保存当前灯效,再次短按开关时开启保存的灯效;
4、底座有1个USB2.0接口仅具备数据传输功能(产品连接到P5主机后端USB接口
上生效),不作为充电接口。
将充电座的三个部件按以下方法装配好
注意事项:
底座 x1
产品清单:
VR头戴支撑架
说明书 x1 充电转接头 x4 Type-C线 x1
发光柱
备用充电转接头1-2
VR手柄充电槽2
USB接口
VR手柄充电槽1
VR手柄充
电指示灯
电源输入接口
充电开关
灯光控制开关
VR头戴放置架
扫码加入官方技术支持微信群扫码关注派鲨鱼微信公众号
扫描上方二维码关注“派鲨鱼(ipega)”微信公众号,
可获取更多产品资讯。如需官方客服技术支持请扫码
加入官方技术支持微信群。
P5 VR 2 彩虹充电座
产品说明书(PG-P5V001)
产品适用说明:
1.本产品可供VR头戴、VR手柄、耳机收纳使用。
2.本产品可供VR手柄充电使用。
3.采用磁吸充电,方便快捷。
4.具备1个USB数据扩展接口。
5.炫彩RGB灯效。
电性参数:
1.输入电压:DC 5V
2.输入电流:2A
3.充电电流: <700 mA*2;
4.充电时间:约1.5H
1
2
3
Product Illustration Assembly Instructions:
Product instructions:
1. Please do not store this product in wet or high-temperature areas.
2. Don’t knap, beat, drub, pierce, or try to decompose this product, to avoid
unnecessary damage to the product.
3. Please keep away the fire or heating area while charging the controller
4. Non professional personnel should not disassemble the product, otherwise
it will not be covered in the after-sales warranty service.
1. Once the product is assembled, place the VR headset on the hanger, install the VR
controllers into the magnetic charging adapter and place them in the charging port.
2. Using the USB cable to connect the product and console. Once power on, the
charging indicator light turns blue.
The indicator light turns orange during charging, and turns blue when fully charged.
The charging switch at the back of the base can turn on or off the charging circuit
(including the charging indicator light, but it does not affect the light bar)
Once finished charging, you can turn off the changing function of the product.
3. The light bar has 10 lighting effects which controlled by the light effect switch
button.
The default light effect of the light bar: Gradient
1. Gradient, 2. Flashing, 3. Red, 4. Green, 5. Blue, 6. Yellow, 7. Cyan, 8. Purple,
9.White, 10. Off
(Flash definition: red, green, blue, yellow, blue, purple, white, one color switched
every second)
*When the power is off, the current lighting effect will be saved
*Lighting effect switch:
Control the switching and turning on and off of the lighting effect;
Short press the light effect switch and release it to change the light effect; Press
and hold the switch for 3 seconds to turn off and save the current light effect, and
short press the switch again to turn on the saved light effect;
4. There is an USB2.0 port on the base that only has the data transmission function
(connect to the P5 console active the function), and it is not allow to use as a
charging port.
Step-By-Step Assembly Instructions
Note :
Charging Stand x1
Product List:
VR headset hanger
Manual x1 Charging adapter x4 Type-C Cable x1
Light bar
Alternative
charging port
VR controller
charging port
USB port
VR controller
charging port
VR controller
charging indicator
AC power port
Charging on/off
Light on/off
VR headset
stand
P5 VR 2 STAND
DUAL CHARGE
User manual (PG-P5V001)
Product Description :
1. This product can be used for storage of VR headset, VR controller and headset.
2. Charge for 2 PS VR2 controllers simultaneously.
3. Magnetic charging, convenient and fast.
4. With 1 USD data expansion port.
5. Dazzling RGB light effect.
Specifications:
1. Voltage : DC 5V
2. Working current : ≤2.3A
3. Charging current : <700 mA*2
4. Charging hours: ~1.5 hours
1
2
3
