Minix NEO X7 は、Android™ OS を搭載した革命的なスマートメディアハブです。Google Playストアにサインインして、お気に入りのアプリをダウンロードして、Minix NEO X7に直接インストールできます。YouTube™、インターネットラジオ、その他多数のアプリをGoogle Playストアから簡単に利用できます。また、他のサードパーティストアからアプリをダウンロードしたり、「ApkInstaller」ですぐに.apkファイルをインストールすることもできます。 Minix NEO X7には、イーサネット、Bluetooth、Wi-Fi接続が搭載されており、同じネットワーク内の多くのデバイスに接続して、ビデオ、音楽、写真などのコンテンツを共有できます。
Minix NEO X7 は、Android™ OS を搭載した革命的なスマートメディアハブです。Google Playストアにサインインして、お気に入りのアプリをダウンロードして、Minix NEO X7に直接インストールできます。YouTube™、インターネットラジオ、その他多数のアプリをGoogle Playストアから簡単に利用できます。また、他のサードパーティストアからアプリをダウンロードしたり、「ApkInstaller」ですぐに.apkファイルをインストールすることもできます。 Minix NEO X7には、イーサネット、Bluetooth、Wi-Fi接続が搭載されており、同じネットワーク内の多くのデバイスに接続して、ビデオ、音楽、写真などのコンテンツを共有できます。


-
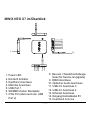
 1
1
-
 2
2
-
 3
3
-
 4
4
-
 5
5
-
 6
6
-
 7
7
-
 8
8
-
 9
9
-
 10
10
-
 11
11
-
 12
12
-
 13
13
-
 14
14
-
 15
15
-
 16
16
-
 17
17
-
 18
18
-
 19
19
-
 20
20
-
 21
21
-
 22
22
-
 23
23
-
 24
24
-
 25
25
-
 26
26
-
 27
27
-
 28
28
-
 29
29
-
 30
30
-
 31
31
-
 32
32
-
 33
33
-
 34
34
-
 35
35
-
 36
36
-
 37
37
-
 38
38
-
 39
39
-
 40
40
-
 41
41
-
 42
42
-
 43
43
-
 44
44
-
 45
45
-
 46
46
-
 47
47
-
 48
48
-
 49
49
-
 50
50
-
 51
51
-
 52
52
-
 53
53
-
 54
54
-
 55
55
-
 56
56
-
 57
57
-
 58
58


Minix NEO X7 は、Android™ OS を搭載した革命的なスマートメディアハブです。Google Playストアにサインインして、お気に入りのアプリをダウンロードして、Minix NEO X7に直接インストールできます。YouTube™、インターネットラジオ、その他多数のアプリをGoogle Playストアから簡単に利用できます。また、他のサードパーティストアからアプリをダウンロードしたり、「ApkInstaller」ですぐに.apkファイルをインストールすることもできます。 Minix NEO X7には、イーサネット、Bluetooth、Wi-Fi接続が搭載されており、同じネットワーク内の多くのデバイスに接続して、ビデオ、音楽、写真などのコンテンツを共有できます。
他の言語で
- Deutsch: Minix NEO X7 Bedienungsanleitung
- English: Minix NEO X7 Owner's manual