
SabrePro 15
V1.0

Regulatory Notices
CB :
● Onlyusebatteriesdesignedforthiscomputer.Thewrongbatterytypemayexplode,leakordamagethe
computer.
● Donotremoveanybatteriesfromthecomputerwhileitispoweredon.
● Donotcontinuetouseabatterythathasbeendropped,orthatappearsdamaged(e.g.bentortwisted)
inanyway.Evenifthecomputercontinuestoworkwithadamagedbatteryinplace,itmaycausecircuit
damage,whichmaypossiblyresultinre.
● RechargethebatteriesusingtheNotebook’ssystem.Incorrectrechargingmaymakethebatteryexplode.
● Donottrytorepairabatterypack.Referanybatterypackrepairorreplacementtoyourservice
representativeorqualiedservicepersonnel.
● Keepchildrenawayfrom,andpromptlydisposeofadamagedbattery.Alwaysdisposeofbatteries
carefully.Batteriesmayexplodeorleakifexposedtore,orimproperlyhandledordiscarded.
● Keepthebatteryawayfrommetalappliances.
● Afxtapetothebatterycontactsbeforedisposingofthebattery.
● Donottouchthebatterycontactswithyourhandsormetalobjects.
CAUTION:RISKOFEXPLOSIONIFBATTERYISREPLACEDBYANINCORRECTTYPE.
DISPOSEOFUSEDBATTERIESACCORDINGTOTHEINSTRUCTIONS
RF Exposure :
Thisequipmentmustbeinstalledandoperatedinaccordancewithprovidedinstructionsandmustnotbe
co-located or operating in conjunction with any other antenna or transmitter. End-users and installers
mustbeprovidedwithantennainstallationinstructionsandtransmitteroperatingconditionsforsatisfyingRF
exposurecompliance.
BSMI Notice (Taiwan Only)
● ThesymbolabovemustbeattachedtotheproductindicatingcompliancewiththeBSMIstandard.
● MostNotebookareclassiedbytheBureauofStandards,MeteorologyandInspection(BSMI)asClassB
informationtechnologyequipment(ITE).
● Caution:Suggesttooperateunder35˚C
RoHS

Battery Maintenance Guidance
BeforeyouuseyourNotebookontheroad,youwillhavetochargethebatterypack.Thebatterypackbegins
tochargeassoonastheNotebookisconnectedtoexternalpowerusingthepoweradapter.Fullychargethe
batterypackbeforeusingitforthersttime.AnewbatterypackmustcompletelychargebeforetheNotebookis
disconnectedfromexternalpower.IttakesafewhourstofullychargethebatterywhentheNotebookisturned
OFF.Pleasenotethebatterystopschargingifthetemperatureistoohighorthebatteryvoltageistoohigh.
NOTE:Donotleavethebatterypackdischarged.Thebatterypackwilldischargeovertime.Ifnot
usingabatterypack,itmustcontinuedtobechargedeverythreemonthtoextendrecoverycapacity
orelseitmayfailtochargeinthefuture.RechargeableLi-Ionbatteriesrequireroutinemaintenance
andcareintheiruseandhandling.ReadthroughbelowinstructionandyourNotebookwillachieve
themaximumbatterylifespan.
Battery Maintenance :
● Donotleavebatteriesunusedforextendedperiodsoftime,eitherintheNotebookorinstorage.Whena
batteryhasbeenunusedfor3months,checkthechargestatusandchargeordisposeofthebatteryas
appropriate.
● ThetypicalestimatedlifeofaRechargeableLi-Ionbatteryisabouttwotothreeyearsor300to500charge
cycles,whicheveroccursrst.Onechargecycleisaperiodofusefromfullycharged,tofullydischarged,
andfullyrechargedagain.Useatwotothreeyearlifeexpectancyforbatteriesthatdonotrunthrough
completechargecycles.
● RechargeableLi-Ionbatterieshavealimitedlifeandwillgraduallylosetheircapacitytoholdacharge.
Thislossofcapacityisirreversible.Asthebatterylosescapacity,thelengthoftimeitwillpowerthe
Notebookdecreases.
● Theruntimeofyourbatterywillvarydependingontheproduct’scongurationandtheapplicationsthat
yourun.Routinelycheckthebattery’schargestatus.
● Batteryterminalsmustavoidcontactwithanymetallicsubstance.Forpreventingshortage,avoidsilver
coins,tinselsandanyothermetallicsubstancestocontactthe+and-terminalsofthebattery.For
example,Itmighthappenbyinsertingthebatteriestoacoatpocketoraleatherhandbagwithsome
metallicsubstancesmountedonit(metalbuttonsorzippers).Thereishighpossibilityofcausingshort
circuitsandconnectiondamageofthebattery.
● Considerreplacingthebatterywithanewoneifyounoteeitherofthefollowingconditions:
(1) Thebatteryruntimedropsbelowabout80%oftheoriginalruntime.
(2) Thebatterychargetimeincreasessignicantly.
(3) Ifabatteryisstoredorotherwiseunusedforanextendedperiod,besuretofollowthestorage
instructions.Ifyoudonotfollowtheinstructions,andthebatteryhasnochargeremainingwhenyou
checkit,considerittobedamaged.Donotattempttorechargeitortouseit.Replaceitwithanew
battery.
Charging :
TheRechargeableLi-IonbatteryisrechargedinternallyusingtheACadapter.Torechargethebattery,make
surethebatteryisinstalledandtheNotebookisconnectedtotheACadapter.Thechargetimeswillbe
signicantlylongerifyourNotebookisinusewhilethebatteryischarging.Ifyouwanttochargethebattery
morequickly,putyourcomputerintoSuspendmodeorturnitoffwhiletheadapterischargingthebattery.
PleasealwaysfollowthecharginginstructionsprovidedwithyourNotebook.
* If you happen to leave your battery pack to go through an extended period of self-discharge, say more
than three months, the battery voltage level will become too low and needs to be Pre-Charged (to bring the
battery voltage level high enough) before it automatically resumes its normal Fast Charge. Pre-Charge may
take 30 minutes. Fast Charge usually takes 2~3 hours.

Low Battery State :
Whenthebatterylevelislow,anotificationmessageappears.Ifyoudonotrespondtothelowbattery
message,thebatterycontinuestodischargeuntilitistoolowtooperate.Whenthishappens,yourNotebook
goesintoSuspendmode.ThereisnoguaranteeyourdatawillbesavedoncetheNotebookreachesthispoint.
CAUTION:ToprotectyourNotebookfromdamage,useonlythepoweradapterthatcamewithit
becauseeachpoweradapterhasitsownpoweroutputrating.
OnceyourNotebookgoesintosuspendmodeasaresultofadeadbattery,youwillbeunabletoresume
operationuntilyouprovideasourceofpowereitherfromanadapterorachargedbattery.Onceyouhave
providedpower,youcanpresstheSuspend/Resumebuttontoresumeoperation.InSuspendmode,your
dataismaintainedforsometime,butifapowersourceisnotprovidedpromptly,thepowerindicatorstops
flashingandthengoesout,inwhichcaseyouhavelostthedatathatwasnotsaved.Onceyouprovide
power,youcancontinuetouseyourcomputerwhileanadapterchargesthebattery.
Storage :
● Chargeordischargethebatterytoapproximately50%ofcapacitybeforestorage.
● Chargethebatterytoapproximately50%ofcapacityatleastonceeverythreemonths.
● RemovethebatteryandstoreitseparatelyfromtheNotebook.
● Storethebatteryattemperaturesbetween5°Cand20°C(41°Fand68°F).
CAUTION:Thebatteryself-dischargesduringstorage.Highertemperatures(above20°Cor
68°F)reducethebatterystoragelife.
Handling Precautions :
● Donotdisassemble,crush,orpunctureabattery.
● Donotshorttheexternalcontactsonabattery.
● Donotdisposeofabatteryinreorwater.
● Donotexposeabatterytotemperaturesabove60°C(140°F).
● Keepthebatteryawayfromchildren.
● Avoidexposingthebatterytoexcessiveshockorvibration.
● Donotuseadamagedbattery.
● Ifabatterypackhasleakinguids,donottouchanyuids.Disposeofaleakingbatterypack(see
DisposalandRecyclingsection).Incaseofeyecontactwithuid,donotrubeyes.Immediatelyusheyes
thoroughlywithwaterforatleast15minutes,liftingupperandlowerlids,untilnoevidenceoftheuid
remains.Seekmedicalattention.
Transportation :
Alwayscheckallapplicablelocal,national,andinternationalregulationsbeforetransportingaRechargeable
Li-Ionbattery.Transportinganend-of-life,damaged,orrecalledbatterymay,incertaincases,bespecically
limitedorprohibited.
Disposal and Recycling :
RechargeableLi-Ionbatteriesaresubjecttodisposalandrecyclingregulationsthatvarybycountryand
region.Alwayscheckandfollowyourapplicableregulationsbeforedisposingofanybattery.Contactyour
localbatteryrecyclingorganization.Manycountriesprohibitthedisposalofwasteelectronicequipmentin
standardwastereceptacles.Placeonlydischargedbatteriesinabatterycollectioncontainer.Useelectrical
tapeorotherapprovedcoveringoverthebatteryconnectionpointstopreventshortcircuits.
Thesymbolofthecrossedoutwheeledbinindicatesthattheproduct(electricalandelectronicequipment)
shouldnotbeplacedinmunicipalwaste.Pleasechecklocalregulationsfordisposalofelectronicproducts.

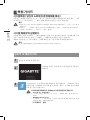
注意事項
● 請僅使用專為本電腦所設計的電池。不正確的電池類型可能會造成爆炸、漏電或損壞電腦。
● 請勿在開啟電源時取出電腦的電池。
● 請勿繼續使用已掉落的電池,或是出現任何損壞狀況(例如彎曲或扭曲)的電池。即使電腦能夠以受損的電池
繼續運作,也可能造成電路損壞,並造成火災。
● 請使用筆記型電腦的系統為電池充電。不正確的充電方式可能會導致電池爆炸。
● 請勿嘗試自行修理電池。請交由維修代表或合格維修人員進行任何電池修理或更換。
● 請勿讓兒童接觸受損的電池,應立即加以丟棄。請務必謹慎處理電池。若曝露在火焰中、不當處理或棄置,
可能會造成電池爆炸或漏電。
● 請將電池遠離金屬設備。
● 在棄置電池之前,請在電池接觸點上黏貼膠帶。
● 請勿以雙手或金屬物體碰觸電池接觸點。
射頻曝露值:
本設備必須依據所提供的指示安裝及操作,且不得與任何其他天線或發射機並置或共同操作。必須對一般使用
者及安裝人員提供天線安裝指示及發射機操作條件,以滿足射頻曝露值的法規要求。
※ 減少電磁波影響,請妥善使用。
本機限在不干擾合法電台與不受被干擾保障條件下於室內使用。
依據低功率電波輻射性電機管理辦法第十二條:「經型式認證合格之低功率射頻電機,非經許可,公司、商號或使用者均
不得擅自變更頻率、加大功率或變更原設計之特性及功能。」第十四條:「低功率射頻電機之使用不得影響飛航安全及干
擾合法通信;經發現有干擾現象時,應立即停用,並改善至無干擾時方得繼續使用。前項合法通信,指依電信法規定作業
之無線電通信。低功率射頻電機須忍受合法通信或工業、科學及醫療用電波輻射性電機設備之干擾。」
BSMI須知(限台灣)
● 產品必須貼上以上標誌,代表符合BSMI標準的規定。
● 經濟部標準檢驗局(BSMI)將大部分的筆記型電腦歸類為B級資訊技術設備(ITE)。
● 注意:最高操作溫度35℃
電池保存須知
鋰離子充電電池在使用和處理時,需要定期進行保養。請仔細閱讀並遵循以下說明,以安全地使用鋰電池,讓
電池擁有最長的使用壽命。
電池保養:
● 無論是置於筆記型電腦中或存放處,請勿讓電池長時間放置不用。 電池若超過 3 個月未使用,請檢查充電
狀態,決定是否進行充電或 棄置電池。
● 鋰電池一般預估使用壽命為2到3年,或是300到500次的充電週期,以先發生者為準。一次充電週期是指從
完全充電到完全放電,然後 再次完全充電的一段時間。未經過完整充電週期的電池,使用壽命 預計為2到3
年。
● 鋰離子充電電池的使用壽命有限,充電容量將逐漸減少,量無法回復。當電池的充電容量降低,能為筆記型電
腦供電的時間也會變短。
● 鋰電池在未使用或處於存放狀態時,會持續緩慢放電 (自動放電)。 請定期檢查電池的充電狀態。
● 請勿將電池短路。以錢幣、金屬片等金屬物品直接連接電池的正極(+)及負極(-)終端(外觀類似電池上的金屬
條)時,可能會不小心引發短路。例如,當您將備用電池放在口袋或皮包內可能發生此狀況。將終端短路可
能會損壞電池。
● 若您注意到下列情況之一,請考慮更換新電池:
(1) 電池運作時間,縮短到少於原始運作時間的80%。
(2) 電池充電時間大幅延長。
RoHS

(3) 若電池長時間存放或未使用,請務必遵循本文件提供的存放操作說明。若您未遵循本說明,而在查看電
池時發現仍未允電,則該 電池應已損壞。請勿試圖為該電池充電或使用電池。請更換新電 池。
充電:
電腦內的鋰電池可經由交流電變壓器重新充電。要將鋰電池重新充電,請先確定已妥當裝入電池,而且電腦以
連接交流電源。鋰電池並沒有「記憶功能」,因此在重新充電前,並不需要將鋰電池完全放電。電池充電期
間,如果正在使用筆記型電腦,充電時間會明顯比較長。如果縮短充電時間,請在充電時,將電腦切換為暫停模
式或關機。
* 若電池閒置自行放電超過三個月,則電池的電壓位準會變過低,而在電池自動恢復成正常充電前,需要預先充
電( 提高到足夠的電池電壓位準),預先充電可能需花費30 分鐘,快速充電通常需花費2-3 小時。
低電量狀態:
電池電量低時,會出現通知訊息。如果您不回應電池電量不足的訊息,電池將持續放電,直到電量過低而無法
操作為止。發生此種情況時,您的筆記型電腦將進入閒置模式,當電腦達到此情況時,並不保證您的資料將被
儲存。
注意:為保護您的筆記型電腦免於受損,請務必使用隨附的變壓器,因為每一個變壓器都有規定的電源
輸出率。
一旦因為電池沒電而使電腦進入暫停模式,除非由變壓器或另一個充好電的電池提供電源,否則電腦無法恢復
作業。重新提供電源後,就可以按暫停 / 開機按鈕來恢復作業。待機模式時,您電腦內的資料都會暫時保留,
但如果等到電源指示燈停止閃爍,終究熄滅,您還沒有接上外接電源,那所有未存檔的資料都會消失。提供電
源後就可以一邊使用電腦,一邊讓電池充電。
電池存放:
● 存放前請將電池充電或放電至約容量的50%。
● 至少每3個月將電池充電至約容量的50%。
● 從產品中取出電池,並另行存放。
● 將電池存放於5°C 到20°C (41°F到68°F) 的溫度中。
注意:電池在存放時會自動放電。高溫 (20
°C
或68
°F
以上) 會縮短電池存放壽命。
處理注意事項:
● 請勿拆解、壓碎或穿刺電池。
● 請勿讓電池外露接點短路。
● 請勿將電池棄置於火中或水中。
● 請勿讓電池暴露在60°C (140°F) 以上的溫度中。
● 請將電池置於兒童無法觸及之處。
● 請勿讓電池承受過度衝擊或震動。
● 請勿使用損壞的電池。
● 若電池組有漏液現象,請勿觸碰任何液體。請棄置漏液的電池組。
● 若眼睛接觸到電池漏液,請勿搓揉眼睛。請立即掀開上下眼皮,水徹底清洗眼睛至少15分鐘,直到沒有任
何電池漏液殘留為止,並請立即就醫。
棄置與回收:
鋰電池受到不同國家和地區的棄置與回收法規規範。在棄置任何電池前,請務必查看並遵守您當地適用的法規
或是聯絡您當地的電池回收組織。許多國家禁止將廢棄的電子設備,棄置於一般的垃圾桶內。只將耗盡電力的
電池置入電池回收桶。使用絕緣膠帶或其他核准的覆蓋物,蓋住電池的接點,以防止短路。

請勿將本產品當作一般垃圾丟棄。本產品零組件設計為可回收利用。這個打X的垃圾桶標誌表示本產
品(電器與電子設備)不應視為一般垃圾丟棄,請依照您所在地區有關廢棄電子產品的處理方式處理。
請勿將電池當作一般垃圾丟棄。這個標誌表示電池不應視為一般垃圾丟棄。
單元
Unit
限用物質及其化學符號
六價鉻
Hexavalent
chromium
(Cr
+6
)
外殼 ○ ○○○ ○ ○
面板 ○ ○○○ ○ ○
主機板 ○ ○○○ ○ ○
記憶體 ○ ○○○ ○ ○
硬碟 ○ ○○○ ○ ○
網路卡 ○ ○○○ ○ ○
喇叭
○ ○○○ ○ ○
交換式電
源供應器
○ ○○○ ○ ○
(鍵盤、電
源線、排
線、傳輸
線等)
○ ○○○ ○ ○
其它固定
(螺絲、夾
具、卡榫)
- ○○○ ○ ○
備考1.〝超出0.1wt% 〞及〝超出0.01wt %〞係指限用物質之百分比含量超出百分比含量基準值。
Note 1:“Exceeding 0.1 wt %” and “exceeding 0.01 wt %” indicate that the percentage content of the restricted substance
exceeds the reference percentage value of presence condition.
備考2.〝
○
〞係指該項限用物質之百分比含量未超出百分比含量基準值。
Note 2:“
○
”
indicates that the percentage content of the restricted substance does not exceed the percentage of reference value of presence.
備考3.〝
-
〞係指該項限用物質為排除項目。
Note 3 The “
-
” i indicates that the restricted substance corresponds to the exemption
Restricted substances and its chemical symbols

B급 기기(가정용 방송통신기기) :
이 기기는 가정용 (B 급 ) 으로 전자파적합등록을 한 기기로서 주로 가정에서 사용하는것을 목적으로 하며 , 모
든 지역에서 사용할 수 있습니다 .
< 경고 > 발열 , 화재 , 폭발 등의 위험을 수반할 수 있으니 다음 사항을 지켜주시기 바랍니다 .
(1) 육안으로 식별이 가능할 정도의 부풀음이 발생된 전지는 위험할 수 있으므로 제조자 또는 판매자로 즉시 문의
하십시오
(2) 지정된 정품 충전기만을 사용 하십시오
(3) 화기에 가까이 하지 마십시오 ( 전자레인지에 넣지 마십시오 )
(4) 여름철 자동차 내부에 방치 하지 마십시오
(5) 찜질방 등 고운 다습한 곳에서 보관 , 사용하지 마십시오
(6) 이불 , 전기장판 , 카펫 위에 올려 좋고 장시간 사용하지 마십시오
(7) 전원을 켠 상태로 밀폐된 공간에 장시간 보관하지 마십시오
(8) 전지 단자에 목걸이 , 동전 , 열쇠 , 시계 등 금속 제품이 닿지 않도록 주의 하십시오
(9) 휴대 기기 , 제조업체가 보증한 리튬 2 차 전지를 사용 하십시오
(10) 분해 , 압착 , 관통 등의 행위를 하지 마십시오
(11) 높은 곳에서 떨어뜨리는 등 비정상적 충격을 주지 마십시오
(12) 60 도 이상의 고온에 노출하지 마십시오
(13) 습기에 접촉도지 않도록 하십시오

English
1
English
PB
Congratulations on your purchase of the GIGABYTE Notebook.
This manual will help you to get started with setting up your notebook. The final product configuration
depends on the model at the point of your purchase. GIGABYTE reserves the right to amend without
prior notice. For more detailed information, please visit our website at www.gigabyte.com
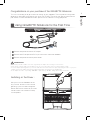
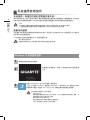
1 Connect the power cord to the AC adapter.
2 Connect the AC adapter to the DC-in jack on the rear side of the notebook.
3 Connect the power cord to the power outlet.
Switching on the Power :
After you turn on the Notebook for the
very first time, do not turn it off until the
operating system has been configured.
Please note that the volume for the audio
will not function until Windows® Setup
has completed.
Using GIGABYTE Notebook for the First Time
IMPORTANT!
• Ensure that your Notebook PC is connected to a grounded power adapter before turning it on for the first time.
• When using your Notebook PC on power adapter mode, the socket outlet must be near to the unit and easily accessible.
• Locate the input/output rating label on your Notebook PC and ensure that it matches the input/output rating information on your power
adapter. Some Notebook PC models may have multiple rating output currents based on the available SKU.
• Power adapter information: - Input voltage: 100-240Vac - Input frequency: 50-60Hz - Rating output voltage: 19.5V,9.23A
1
3
2

English
3
English
2
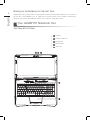
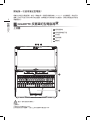
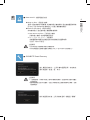
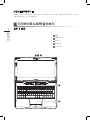
Top View & Front View
1
Webcam
2
Webcam Indicators
3
Microphone
4
Power Button
5
TouchPad
Your GIGABYTE Notebook Tour
2 31
5
4
Booting Up the Notebook for the First Time
Depending on your configuration, the Microsoft® Windows® Boot Screen will be the first screen that
you will see as the notebook starts up. Follow the on-screen prompts and instructions and enter your
personal information to complete the setup of the Windows® Operating System.

English
3
English
2
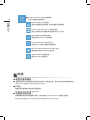
Left View
1
USB 3.1 Gen.1 Port
2
USB 3.1 Gen.1 Port
3
USB 3.1 Gen.2 Port (Type-C)
4
Battery Charge Indicator
5
HDD Status LED
6
Wireless Lan Status LED
7
Microphone Input Jack
8
Headphone Output Jack
Right View
Rear View
1 SD Card Reader
2 USB 3.1 Gen.1 Port
3 Kensington Lock Slot
1 3
2 7 84 5 6
1 2 3
Warning:
DO NOT remove the built-in lithium battery. For any service needs, please contact your local GIGABYTE Authorized
Service Center.
●
Do not install the Notebook PC on a slant or a place prone to vibrations, or avoid using the Notebook PC in that location for
a long time.This increases the risk that a malfunction or damage to the product will occur.
●
Do not store and use Notebook PC in direct sunlight or the location where temperatures exceed 112°F (45°C) such
as inside a vehicle.There is a danger of Lithium-ion battery expansion and aging.
●
Do not use the Notebook PC in a badly ventilated location such as on bedding, on a pillow or cushion, etc, and do
not use it in a location such as room with floor heating as it may cause the computer to overheat.Take care that the
Notebook PC vents (on the side or the bottom) are not blocked especially in these environments. If the vents are
blocked, it may be dangerous and cause the Notebook PC to overheat.
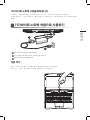
1 2 3 4
1 Ethernet Port
2 MiniDisplayPort
3 HDMI Port
4 DC-in Jack

English
5
English
4
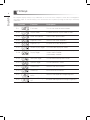
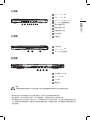
Hotkeys
The computer employs hotkeys or key combinations to access most of the computer’s controls like screen brightness
and volume output. To activate hotkeys, press and hold the <Fn> key before pressing the other key in the hotkey
combination.
Function Description
Fn+!
Fan Switch Turn fans to maximum/normal model
Fn+F2
Airplane Mode Enable/disable the Airplane Mode function.
Fn+F4
Power Management Switch various power modes
Fn+F5
Brightness Down Decrease the screen brightness.
Fn+F6
Brightness Up Increase the screen brightness.
Fn+F7
Screen Display Toggle Turn the screen display on and off.
Fn+F8
Display Toggle
"Switche display output between the display
screen, external monitor
(if connected) and both."
Fn+F9
Touchpad Toggle Turn the internal touchpad on and off.
Fn+F10
Speaker Toggle Turn the speaker on and off.
Fn+F11
Volume Down Decrease the sound volume.
Fn+F12
Volume Up Increase the sound volume.
Fn+Z
Keyboard Backlight
Down
Decrease the keyboard backlight brightness
Fn+X
Keyboard Backlight
Up
Increase the keyboard backlight brightness
Function

English
5
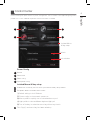
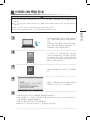
Control Center
Control Center gives quick access to power management, macro functions and keyboard lighting effects
provides user a faster and better experience when customization is needed
Default
lock windows
Isolated Macro-
M key setup
Power Config
Balance
Performance
Power saving
Super power saving
Isolated Macro-M key setup
1
Choose each macro key from M1 to M4, you’ll see the hotkey setup windows
2
Five options below and choose each of them.
(1)1) Default setting: to lock Windows
(2)2) Power config: to choose each power con
(3)3) Macro profile: to quickly start a customized macro prof
(4)4) Light profile: to choose different keyboard light prof
(5)5) Turn off hotkey: to make the macro key without any functio
3
Click "Apply" and macro key has been setted up.
31
42
1
2
3
4

English
6
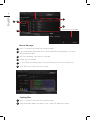
Lighting Efex
Click "+" to create a new profile and naming the profile.
There're five effects below for choosing: static, random, off, breathing & cycling.
Macro Manager
Click "+" to create a new profile and naming the profile.
If you would add the delay timed, you can choose fixed delay or record delay; if you won't,
please choose No delay.
Click "Start recording" and it will turn in read color.
To type your macro profile.
To click "Start recording" again to stop recording and it will turn in white color.
Click "Save" and store the marcro profile.
/
1
2
3
4
5
6
1
2
2
3
4
5
6
Naming the macro profile

English
7
English
4
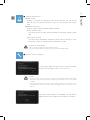
Smart USB Backup Guide
WARNING
●
You can backup original recovery image through this application in case of losing by device damage.
●
Yo
u can backup original recovery image to USB disk and restore the system if any
storage system replacement with the
recovery USB disk.
●
Before you restore the system through the recovery USB disk, please make sure that you have already made
the backup of your data.
●
Please DO NOT shut down or un-plug the system when performing backup through recovery USB disk.
1
•
Please plug in the USB Flash Drive which
is at least 32GB in capacity to make the
original image (backup the data in USB
first. All data will be eliminated during the
creation of recovery USB Flash Drive)
2
•
Insert the driver disk to your optical
drive and run the install of “Smart
USB Backup” (for none-ODD model,
please use USB ODD device or
download from http://www.gigabyte.
com
3
•
Run the “Smart USB Backup” after
finishing the install.
4
•
Select your USB disk from the drop-down
list and start to create the recovery USB
disk.
5
•
The window will pop out when the creation of recovery disk is done.
•
Please press ESC on starting the system when you need to restore the system. Select “boot
from recovery USB disk” and the system will be restored.
•
The time needed for restore will be around 30 mins(time needed may vary by USB disk mod-
el) .
>32G

English
7
English
8
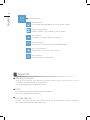
Windows 10 Recovery Guide
During the laptop turn on process, press and hold F9 key
to launch the tool.
2
1
3
Turn off and restart the laptop.
There are two options for system recovery
●
Reset this PC
You can choose to keep or remove your files and then reinstalls Windows without
losing your files.
●
GIGABYTE Smart Recovery
Your PC settings will be restored to factory default settings.
Caution: All personal data and les will be lost.
Choose “Troubleshoot” to enter the recovery settings. (Also you can choose
“Continue” to exit recovery system and continue to Windows 10 for les or data
backup.)
System Recovery (Restore your laptop operating system)
When something is going wrong with the laptop operating system, the storage of the laptop has a hidden
partition containing a full back up image of the operating system that can be used to restore the system to
factory default settings.
All ready to go
Make sure your PC is plugged in. This will take a few minutes.
Recovery Guide
Note
˙
If the storage has been switched or the partition deleted, the recovery option will no longer be available
and a recovery service will be needed.
˙
The recovery function is only available on devices with O/S preinstalled. Devices with DOS do not have
the recovery function.
Launch System Recovery
The system recovery feature is preinstalled before the laptop is shipped from the factory. The option
menu allows you to launch the Windows recovery tool to reinstall the operating system to factory
default.
The brief introduction below will show you how to start the recovery tool and restore your system.

English
9
English
6
Here are what will happen
˙
All of your personal files and apps will be removed.
˙
Your PC settings will be restored to pure O/S (without GIGABYTE app) .
4
▓
Choose “Reset this PC”
►
Keep my files
Choose an account to continue.All apps will be removed, and settings will
back to pure O/S (without GIGABYTE app), but your personal files will be
kept.
►
Remove everything
All apps, setting and personal files will be removed.
Just remove my files
Only personal data and files will be removed, but computer settings will be
kept.
Fully clean the drive
The drive will be completely restored to factory default settings. It takes
more time. > [Click on “Reset” to execute recovery function.]
▓
GIGABYTE Smart Recovery
Caution
˙
Once the “Recovery” is selected, your personal data and les will be deleted after
the laptop starts restoring, and the operating system will be reset to factory default
settings.
˙
A progress indicator bar will show on the window when the recovery process is
running. Please make sure the AC-adapter is plugged in and do not turn off the
laptop.
The recovery will be activated and you will see the option
buttons on the window. Click on “Yes” to start it.
After the system recovery is completed, you will see the
option button on the window, please click on “Shutdown”.

English
PB
English
10
▓
Advanced options
System Restore
Use a restore point recorded on your PC to restore Windows.
System Image Recovery
Recover Windows using a specic system image le.
Startup Repair
Fix problems that keep Windows from loading.
Command Prompt
Use the Command Prompt for advanced trobleshooting.
UEFI Firmware Settings
Change settings in your PC’s UEFI firmware.
Startup Settings
Change Windows Startup behavior.
Warranty & Service:
Warranty and service and related information please refer to the warranty card or
GIGABYTE service website as the below link:
https://www.gigabyte.com/Support/Laptop
FAQ:
FAQ (Frequent Asked Questions) please refer to the below
https://www.gigabyte.com/Support/Faq
Full User Manual:
For more user guide and software instruction, please refer to the below link: http://www.gigabyte.
com/support-downloads/download-center.aspx
Appendix

1
PB
感謝您選擇技嘉筆記型電腦 !
為協助您順利使用技嘉筆記型電腦,我們特地設計此快速安裝說明。如果您需要更多關於電腦功能資
訊,歡迎上技嘉官方網站www.gigabyte.tw查詢。產品實際規格以出貨為準,如有異動恕不另行通知。
1
將電源線接上變壓器。
2
將變壓器連接到筆記型電腦後側的電源插孔。
3
將電源線插入電源插座。
首次使用
GIGABYTE
技嘉筆記型電腦
重要
•第一次啟動筆記型電腦之前,請先確認已經將電源變壓器連接至電腦。
•找出筆記型電腦的輸入/輸出頻率標籤,並請確認符合電源變 壓器上的輸入/輸出頻率資訊。
•當筆記型電腦在電源變壓器使用模式時,請將電源變壓器靠近 插座以便於使用。
•電源變壓器資訊: 輸入電壓:
100-240Vac
輸入頻率:
50-60Hz
輸出電壓功率:
19.5V,9.23A
開啟筆記型電腦
電源指示燈會顯示機器是否為開機狀態。
第一次開機時在還未完全進入作業系統
前,請勿強制關機。 開啟電源後直到該作
業系統配置完成前,音量將無法設定。
1
3
2
ページが読み込まれています...
ページが読み込まれています...
ページが読み込まれています...
ページが読み込まれています...
ページが読み込まれています...
ページが読み込まれています...
ページが読み込まれています...
ページが読み込まれています...
ページが読み込まれています...
ページが読み込まれています...
ページが読み込まれています...
ページが読み込まれています...
ページが読み込まれています...
ページが読み込まれています...
ページが読み込まれています...
ページが読み込まれています...
ページが読み込まれています...
-
 1
1
-
 2
2
-
 3
3
-
 4
4
-
 5
5
-
 6
6
-
 7
7
-
 8
8
-
 9
9
-
 10
10
-
 11
11
-
 12
12
-
 13
13
-
 14
14
-
 15
15
-
 16
16
-
 17
17
-
 18
18
-
 19
19
-
 20
20
-
 21
21
-
 22
22
-
 23
23
-
 24
24
-
 25
25
-
 26
26
-
 27
27
-
 28
28
-
 29
29
-
 30
30
-
 31
31
-
 32
32
-
 33
33
-
 34
34
-
 35
35
-
 36
36
-
 37
37


他の言語で
- English: Gigabyte SabrePro 15 User manual
関連論文
その他のドキュメント
-
Compal NL8 Series ユーザーマニュアル
-
Lenovo 3000Q 100 Safety And Warranty Manual
-
Panasonic Li-ion 6 Cell 4400mAh 取扱説明書
-
DeWalt DCD710 ユーザーマニュアル
-
DeWalt DCF887 ユーザーマニュアル
-
-
 irocks K71R Rechargeable Wireless Mechanical Keyboard インストールガイド
-
Dell P2720D クイックスタートガイド
-
Dell USB C, 65Wh - PW7018LC ユーザーガイド
