
English
Listening to the Radio
Note
For customers who purchased the “Sony World Model”:
Switch the area to “Eur” or “USA” when you use this
Walkman outside of Japan. For operations, refer to
“Receiving Stations Outside Your Country.”
1 Press FM or AM to select the band and to
turn on the radio.
2 For manual tuning
1 Set TUNE MODE to MANUAL.
2 Rotate TUNING/ENTER to tune in to the
desired station.
For preset tuning
1 Set TUNE MODE to PRESET.
2 Rotate TUNING/ENTER to recall the
desired preset station.
To use preset tuning, store the stations first
(see “Presetting Radio Stations”).
To turn off the radio
Press RADIO OFF.
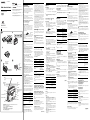
To improve the broadcast reception D
•For AM: Reorient the unit itself.
•For FM: When using the headphones/earphones,
extend the headphones/earphones cord (antenna).
When using the speakers, lift up and adjust the
angle of antenna or connect the headphones/
earphones to MIC jack for best reception. If the
reception is still not good, adjust FM MODE.
Note
The antenna can be damaged
when you move the antenna with
excessive force.
Presetting Radio Stations
You can preset up to 30 stations —20 for FM and 10
for AM (for the JPn area*, up to 16 stations — 8 for
FM and 8 for AM).
* Only if available. See “Receiving Stations Outside Your
Country”.
Presetting Automatically Scanned
Stations
1 Set TUNE MODE to PRESET.
2 Press FM or AM.
3 Press TUNING/ENTER for more than 2
seconds.
Current preset number and frequency digits
will flash for 3 times.
Preset number 1 will flash in the display and
the Walkman starts scanning for stations
from the lowest frequency, and stops for
about 5 seconds when a station is received.
4 If you wish to preset the received station,
press TUNING/ENTER while the preset
number is flashing.
The received station is preset on preset
number 1 and the unit starts scanning for
the next receivable station.
5 Repeat step 4 until all receivable stations are
preset.
To stop scanning
Press RADIO OFF. The radio is turned off at the
same time.
Notes
• If stations are already stored, the newly preset stations
replace the old ones when the above procedure is
completed.
• If stations cannot be presentted automatically, preset
them manually.
Presetting Stations Manually
1 Set TUNE MODE to PRESET.
2 Press FM or AM.
3 Rotate TUNING/ENTER to select the
desired preset number.
4 Press TUNING/ENTER and the preset
number will flash in the display.
5 Rotate TUNING/ENTER to tune in to the
station.
6 Press TUNING/ENTER while the display is
flashing.
Note
If a station is already stored on that number, the newly
preset station will replace the old one.
Scanning the Preset Radio Stations
— DAPS (Digital Auto Preset
Scanning)
1 Set TUNE MODE to PRESET.
2 Press FM or AM.
3 Press and hold FM or AM pressed in step 2
for 2 seconds or more.
The preset stations of the selected band will
be played for about 5 seconds each. (During
DAPS the indicators in the display flash.)
4 Press FM or AM again to select the station
while the desired preset station is being
played.
1
2
1
2
1
2
D
•
•
*
*
1
2
3
4
5
•
•
1
2
3
4
5
6
1
2
3
4
•
•
*
i
Ω
*
**
*
**
D
When using headphones/earphones
헤드폰/이어폰 사용
When using speakers
스피커 사용
FM AM
Notes
• In step 3 or 4, if you select a band which you did not
select in step 2 by pressing FM or AM, the newly
selected band will be played normally.
• Until a station is selected in step 4, the DAPS function
turned on in step 3 will continue.
Receiving Stations
Outside Your Country
(excluding European, Saudi Arabian,
and Chinese models)
1 Press RADIO OFF and turn off the radio.
2 Press and hold FM until “Eur”, “USA”, or
“JPn” flashes in the display.
3 Rotate TUNING/ENTER to select “Eur”,
“USA”, or “JPn” and press TUNING/
ENTER.
4 Tune in to stations and store as necessary
following the procedure of “Listening to the
Radio” and “Presetting Radio Stations.”
Note
If no area are preset, the preset numbers retain their
former setting.
Precautions
On batteries
•
Do not carry the dry batteries with coins or other metallic objects. It
can generate heat if the positive and negative terminals of the
batteries are accidentally contacted by a metallic object.
• When you are not going to use your Walkman for a long time,
remove the batteries to prevent damage from battery leakage
and corrosion.
On handling
• Do not leave the unit in a location near heat sources, or in a
place subject to direct sunlight, excessive dust or sand,
moisture, rain, mechanical shock, or leave it in a car with its
windows closed.
•We do not recommend the use of tape longer than 90 minutes.
They are very thin and tend to be stretched easily. This may
cause malfunction of the unit or sound deterioration.
• The LCD display may become hard to see or slow down when
using the unit at high temperatures (above 40˚C/104°F) or at
low temperatures (below 0˚C/32°F). At room temperature, the
display will return to its normal operating condition.
• If the unit has not been used for a long time, set it in the
playback mode to warm up for a few minutes before you start
using again.
• Keep personal credit cards using magnetic coding or spring-
wound watches, etc., away from the unit to prevent possible
damage from the magnet used in the speaker.
On headphones/earphones
Road safety
Do not use headphones/earphones while driving, cycling, or
operating any motorized vehicle. It may create a traffic hazard
and is illegal in some areas. It can also be potentially dangerous to
play your headphones/earphones at high volume while walking,
especially at pedestrian crossings.
You should exercise extreme caution or discontinue use in
potentially hazardous situations.
Preventing hearing damage
Do not use headphones/earphones at high volume. Hearing
experts advise against continuous, loud and extended play. If you
experience a ringing in your ears, reduce volume or discontinue
use.
Caring for others
Keep the volume to a moderate level. This will allow you to hear
outside sounds and to be considerate to the people around you.
On maintenance
•Clean the tape head and path using a cotton swab and
commercially available cleaning solvent after every 10 hours of
use.
•To clean the exterior, use a soft cloth slightly moistened in
water. Do not use alcohol, benzine or thinner.
•Clean the headphone/earphone plugs periodically.
Troubleshooting
The playback speed is too fast/slow.
The playback sound is distorted.
• Set REC TIME/PLAY MODE at the same position as
when the tape was recorded.
The display and operation are not normal.
• Remove the batteries and leave the unit without
batteries for 10 minutes or more, and then insert them
again. Preset the stations again, since the preset
stations are erased from the memory.
Playback may not start automatically even if you
release FF/CUE or REW/REVIEW at the end of the
tape.
• To start playback again, press x STOP, then press bB
PLAY.
한국어
라디오를 듣기
주의점
“Sony World Model”을 구입하신 분께:
본 워크맨을 일본 국외에서 사용하실 때에는 지역을“Eur”또
는“USA”로 전환하여 주십시오. 조작에 관해서는“국외 방
송을 듣기”를 참조하여 주십시오.
1 FM 또는 AM 을 눌러서 밴드를 선택하고 라디
오를 켭니다.
2 수동 튜닝
1 TUNE MODE 를 MANUAL 로 설정합니
다.
2 TUNING/ENTER 을 돌려서 원하는 방송
국에 맞춥니다.
프리세트 튜닝
1 TUNE MODE 를 PRESET로 설정합니다.
2 TUNING/ENTER 을 돌려서 원하는 프리
세트한 방송국을 호출합니다.
프리세트 튜닝을 사용하려면 우선 방송국을 기억
시켜 놓으십시오(“라디오 방송국을 프리세트
하기”참조).
라디오를 끄려면
RADIO OFF 를 누릅니다.
수신 상태를 양호하게 하려면 D
• AM: 본기 방향을 변경합니다.
• FM: 헤드폰/이어폰을 사용할 경우, 헤드폰/이어폰 코드
(안테나)를 늘어뜨려 놓습니다.
스피커를 사용할 경우, 수신 감도를 높이려면 안테나를
세워 각도를 조절하고 감도를 더 높이려면 MIC 잭에 헤
드폰/이어폰을 꽂습니다. 그래도 감도가 좋지 않으면 FM
MODE 모드를 조절합니다.
주의점
안테나를 너무 세게 움직이면 손상될
수 있습니다.
라디오 방송국을 프리세트하기
30개 방송국-FM 20개 방송국과 AM 10개 방송국(JPn지
역*에서는 16개 방송국-FM 8개 방송국과 AM 8개 방송
국)을 사전 설정할 수 있습니다.
* 이용 가능한 경우“국외 방송을 수신하기”참조
자동 선국한 방송국을 기억시켜 놓기
1 TUNE MODE 를 PRESET 로 설정합니다.
2 FM 또는 AM 을 누릅니다.
3 TUNING/ENTER 를 2 초 이상 누릅니다.
현재 프리세트 번호와 주파수 번호가 3회 점
멸합니다.
표시창에서 프리세트 번호 1이 점멸하고
Walkman 은 낮은 주파수부터 선국을 시작해
서 방송국을 수신하면 약 5 초간 정지됩니다.
4 수신한 방송국을 기억시키려면 프리세트 번호가
점멸하고 있을 동안에 TUNING/ENTER 를
누릅니다.
수신한 방송국이 프리세트 번호 1에 기억되고
본기는 다음 방송국의 선국을 시작합니다.
5 순서 4 를 반복해서 수신할 수 있는 모든 방송국
을 기억시킵니다.
선국을 정지하려면
RADIO OFF 를 누릅니다. 동시에 라디오가 꺼집니다.
주의점
• 이미 방송국이 기억되어 있을 경우에는 상기 순서가 끝나면
이전에 기억되어 있던 방송국은 새로 프리세트한 방송국으로
변경됩니다.
• 라디오 방송국이 자동으로 프리세트가 안될 경우, 수동으로
프리세트하여 주십시오.
라디오 방송국을 수동으로 기억시켜 놓기
1 TUNE MODE 를 PRESET 로 설정합니다.
2 FM 또는 AM 을 누릅니다.
3 TUNING/ENTER 을 돌려서 원하는 프리세트
번호를 선택합니다.
4 TUNING/ENTER 를 누르면 프리세트 번호가
표시창에서 점멸합니다.
5 방송국을 선국하려면 TUNING/ENTER 를 돌
립니다.
6 표시창이 점멸하는 동안 TUNING/ENTER 를
누릅니다.
주의점
그 번호에 이미 방송국이 기억되어 있을 때에는 기억되어 있던
방송국은 새로 프리세트한 방송국으로 변경됩니다.
프리세트 라디오 방송국 스캔하기 - DAPS
(Digital Auto Preset Scanning)
1 TUNE MODE 을 PRESET 로 설정합니다.
2 FM 또는 AM 을 누릅니다.
3 FM 또는 AM 을 2 초 이상 누릅니다.
선택된 밴드의 프리세트 방송국이 5 초 동안
재생됩니다. (DAPS 도중 표시창의 표시등
이 점멸합니다.)
4
원하는 프리세트 방송국이 재생될 때 FM 또는
AM 를 다시 눌러 방송국을 선택합니다.
주의점
• 2 단계에서 선택하지 않은 밴드를 FM 또는 AM 을 눌
러 선택할 경우, 3 단계 또는 4 단계에서 새로 선택된
밴드가 정상적으로 재생됩니다.
• 단계 4에서 방송국이 선택될 때까지 3 단계에서 켠
DAPS 기능이 계속 작동합니다.
국외 방송을 수신하기
(유럽, 사우디아라비아, 중국 모델은 제외)
1 RADIO OFF 를 눌러서 라디오를 끕니다.
2 “Eur”,“USA”또는“JPn”이 표시창에서
점멸할 때까지 FM 을 누릅니다.
3 TUNING/ENTER 를 돌려서“Eur”,
“USA”또는“JPn”를 선택하고 TUNING/
ENTER 를 누릅니다.
4
“라디오를 듣기”및“라디오 방송국을 프
리세트하기”의 절차를 따라 방송국을 선국
하고 필요한 경우 저장합니다.
주의점
프리세트된 영역이 없을 경우, 프리세트 번호는 이전 설정을 그
대로 유지합니다.
사용상의 주의
배터리에 대하여
• 건전지는 동전 등의 금속과 함께 휴대하지 마십시오. 금속에 의하여
배터리의 양극과 음극이 단락되면 발열될 염려가 있습니다.
• 오랫동안 워크맨을 사용하지 않는 경우, 전지 누액 및 이에 따른 부
식으로 인한 손상을 피하려면 배터리를 빼도록 하십시오.
취급에 대하여
• 본기를 열원과 가까운 곳이나 직사광선, 심한 먼지나 모래, 습기, 비,
물리적 충격의 영향을 받기 쉽거나 창문이 닫힌 차안과 같은 곳에 두
지 마십시오.
• 90분을 초과하는 테이프는 사용하지 마십시오. 이 테이프는 매우 얇
게 늘어나기 쉽습니다. 그것은 본 제품의 고장이나 음질 저하의 원인
이 됩니다.
• 본기는 기온이 높은 곳(40˚C)이나 기온이 낮은 곳(0˚C 이하)에서
사용하면 LCD 화면이 잘 보이지 않거나 표시 속도가 느리게 되는
경우가 있습니다. 실온에서는 표시의 동작은 정상으로 되돌아옵니
다.
• 본기를 장기간 사용하지 않았던 경우에는 사용하기 전에 재생 모드
로 해서 몇 분간 워밍업한 후에 사용하여 주십시오.
• 자기 코드를 사용한 신용 카드나 손목 시계 등은 스피커의 자석에 의
하여 손상되는 것을 방지하기 위하여 본기에서 멀리하여 주십시오.
헤드폰/이어폰에 대하여
교통 안전에 대하여
자전거, 오토바이, 자동차 등의 운전 중에는 헤드폰/이어폰을 사용
하지 마십시오. 위험할 뿐만 아니라 법률 위반이 되는 지역도 있습
니다. 특히 횡단보도에서는 보행 중에도 높은 음량으로 헤드폰/이
어폰을 사용하면 위험한 경우가 있습니다.
위험하다고 생각될 때에는 특히 주의하거나 사용을 중지하여 주십
시오.
청력을 보호하기 위하여
헤드폰/이어폰은 너무 높은 음량으로 사용하지 마십시오. 높은 음
량으로 계속해서 장시간 듣는 것은 위험하다고 알려져 있습니다.
귀가 울릴 때에는 음량을 낮추거나 사용을 중지하여 주십시오.
주위 사람들에게 배려를
알맞은 음량으로 즐겨 주십시오. 주위의 소리를 들을 수 있을 뿐만
아니라 주위 사람들에게 폐도 끼치지 않게 됩니다.
손질에 대하여
• 10 시간 사용할 때마다 한 번씩 면봉과 시판용 클리닝액을 사용하여
테이프 헤드와 주행부를 청소하여 주십시오.
• 표면은 물로 살짝 적신 부드러운 헝겊으로 닦아 주십시오. 알코올이
나 벤젠 또는 시너는 사용하지 마십시오.
• 헤드폰/이어폰 및 이어폰 플러그는 정기적으로 청소하여 주십시오.
문제 해결
재생 속도가 빠르다/느리다.
재생 사운드가 일그러진다.
• REC TIME/PLAY MODE 을 테이프를 녹음했던 위치와
같은 위치로 설정하여 주십시오.
표시와 조작이 정상이 아니다.
• 배터리를 꺼내고 10분 이상 기다렸다가 다시 넣어 주십시오.
메모리에 프리세트해 놓은 방송국은 소거되므로 방송국을 다
시 한 번 프리세트해 주십시오.
테이프의 끝에서 FF/CUE 또는 REW/REVIEW를 눌러도
되감기가 자동으로 시작되지 않을 수 있습니다.
• 되감기를 다시 시작하려면 x STOP을 누른 다음 bB PLAY
버튼을 누르십시오.
주요 제원
라디오 부분
지역* FM (MHz) AM(kHz)
Eur 87.5 - 108 531 - 1 602
USA 87.5 - 108 530 - 1 710
JPn 76 - 90 531 - 1 710
* Eur: 유럽 및 기타 국가, USA : 미국, 카나다, 중미 및 남미, JPn :
일본
주파수 응답 재생 : 40 –15 000 Hz
녹음 : 100 – 8 000 Hz
입력 마이크로폰(MIC) 잭
출력 헤드폰(i) 잭
부하 임피던스 8 – 300 Ω
전원 요구사항 3V DC: 배터리 R6(AA 사이즈) × 2
외부 DC 3V 전원
출력 스피커 500 mW + 500 mW (JEITA*)
규격 (w/h/d) 약 112.0 × 82.5 × 35.0 mm
돌기 부분 및 컨트롤 스위치류는 제외
중량 약 200 g (본체만)
부속품 스테레오 헤드폰 또는 이어폰 (1)
Sony 건전지 R6P(SR) (2)
(“Sony World Model”전용)
디자인 및 주요 제원은 예고 없이 변경하는 경우가 있습니다.
배터리의 지속 시간*(약 시간)
Sony 알카라인 LR6(SG)**
Sony R6P(SR)
(헤드폰/이어폰 사용)
재생
24 6
라디오
48 15
MIC(마이크로폰)녹음
20 4.5
라디오 녹음
12 3
(스피커 사용)
재생
10 2.5
라디오
17.5 5
라디오 녹음
6.5 1
* JEITA(일본전자정보기술산업협회) 표준에 따라 측정한 값입니다.
(Sony HF 시리얼 카세트 테이프 사용)
** LR6(SG) Sony 알카라인 건전지(일본산)를 사용할 경우
주의점
사용상태, 주위의 온도나 배터리의 종류에 따라서 배터리의 지
속시간이 짧아지는 경우가 있습니다.
1
2
3
4
•
•
•
•
•
•
•
•
•
•
•
•
• x bB
Specifications
Frequency range
Area* FM (MHz) AM(kHz)
Eur 87.5 - 108 531 - 1 602
USA 87.5 - 108 530 - 1 710
JPn 76 - 90 531 - 1 710
* Eur: European and other countries, USA:USA, Canada, and
Central and South America, JPn:Japan.
Frequency response Playback: 40 - 15 000 Hz
Recording: 100 - 8 000 Hz
Input Microphone (MIC) jack
Output Headphones (i) jack
Load impedance 8 - 300 Ω
Power requirements 3 V DC: batteries R6 (size AA) × 2
External DC 3V power sources
Power output Speakers 500 mW + 500 mW (JEITA*)
Dimensions (w/h/d) Approx. 112.0 × 82.5 × 35.0 mm
(4
1
/
2
× 3
1
/
4
× 1
7
/
16
inches), excl.
projecting parts and controls
Mass Approx. 200 g (7.1oz) (main unit only)
Supplied accessories Stereo headphones or earphones (1)
Sony dry battery R6P(SR) (2) (“Sony
World Model” only)
Design and specifications are subject to change without notice.
Battery life* (Approx. hours)
Sony alkaline LR6(SG)
**
Sony R6P(SR)
(using headphones/earphones)
playback 24 6
radio 48 15
mic recording 20 4.5
radio recording 12 3
(using the speakers)
playback 10 2.5
radio 17.5 5
radio recording 6.5 1
* Measured value by the standard of JEITA (Japan Electronics
and Information Technology Industries Association. (Using a
Sony HF series cassette tape)
**When using Sony LR6(SG) alkaline dry batteries (produced in
Japan).
Note
The battery life may be shorter depending on the
operating condition, the surrounding temperature and
battery type.


 1
1
 2
2

