
HP4696

2

3
J
F
C
D E
G H
L
I
N
M
A
B
K
1

4

HP4696
ENGLISH 6
한국어 14
BAHASA MELAYU 22
ภาษาไทย 31
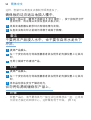
繁體中文 37
简体中文 44

6
Introduction
Congratulations on your purchase and welcome to Philips! To fully benet
from the support that Philips offers, register your product at www.philips.
com/welcome.
With the new Salon Multistylist, you can create a unique look for every
occasion. It offers unlimited creativity and versatility in hairstyling.
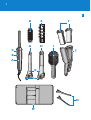
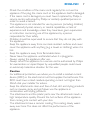
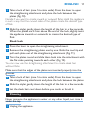
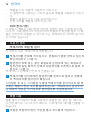
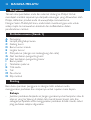
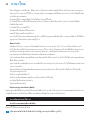
General description (Fig. 1)
A Handle
B Power-on light
C Locking ring
D Slide-on brush
E Slide-on spiral
F Straightening plates (with curved and at sides)
G Small curling attachment
H Large curling attachment
I Paddle brush
J Straightening attachment
K Ready dot
L Lever
M Storage pouch
N Hair clips
Important
Read this user manual carefully before you use the appliance and save it
for future reference.
Danger
Keep the appliance away from water. Do not use it near or over
water contained in baths, washbasins, sinks etc. When you use the
appliance in a bathroom, unplug it after use.
Warning
Check if the voltage indicated on the appliance corresponds to the
local mains voltage before you connect the appliance.
-
-
ENGLISH

Check the condition of the mains cord regularly. Do not use the
appliance if the plug, the mains cord or the appliance itself is damaged.
If the mains cord is damaged, you must have it replaced by Philips, a
service centre authorised by Philips or similarly qualied persons in
order to avoid a hazard.
This appliance is not intended for use by persons (including children)
with reduced physical, sensory or mental capabilities, or lack of
experience and knowledge, unless they have been given supervision
or instruction concerning use of the appliance by a person
responsible for their safety.
Children should be supervised to ensure that they do not play with
the appliance.
Keep the appliance away from non-heat-resistant surfaces and never
cover the appliance with anything (e.g. a towel or clothing) when it is
hot.
Keep the appliance away from ammable items.
Never leave the appliance unattended when it is plugged in.
Always unplug the appliance after use.
Always return the appliance to a service centre authorised by Philips
for examination or repair. Repair by unqualied people could cause
an extremely hazardous situation for the user.
Caution
For additional protection, we advise you to install a residual current
device (RCD) in the electrical circuit that supplies the bathroom. This
RCD must have a rated residual operating current not higher than
30mA. Ask your installer for advice.
Keep the attachments clean and free of dust, dirt and styling products
such as mousse, spray and gel. Never use the appliance in
combination with styling products.
The attachments and the plastic parts near the attachments reach a
high temperature quickly. Prevent the hot surfaces of the appliance
from coming into contact with your skin.
The attachments have a ceramic coating. This coating slowly wears
away over time. This does not affect the performance of the
appliance.
-
-
-
-
-
-
-
-
-
-
-
-
-
ENGLISH 7

Do not leave attachments in your hair for more than a few seconds
at a time, to prevent damage to your hair.
Only use the appliance on dry hair.
Do not use the appliance on articial hair.
Do not use the appliance for any other purpose than described in
this manual.
Wait until the appliance has cooled down before you store it.
Do not wind the mains cord round the appliance.
Electromagnetic elds (EMF)
This Philips appliance complies with all standards regarding
electromagnetic elds (EMF). If handled properly and according to the
instructions in this user manual, the appliance is safe to use based on
scientic evidence available today.
Preparing for use
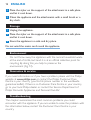
Connecting/disconnecting attachments
This procedure applies to all attachments.
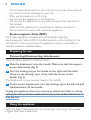
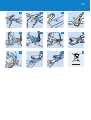
1 Slide the attachment onto the handle. Make sure that the support
points downwards (Fig. 2).
2 Turn the locking ring on the handle to the right until the bold
arrow on the locking ring is in line with the arrow on the
handle (Fig. 3).
The attachment is now securely xed to the handle.
3 To disconnect attachments, turn the locking ring to the left and pull
the attachment off the handle.
Unplug the appliance when you remove an attachment after or during
styling. Do not touch the metal and ceramic parts of the attachment, as
they are hot.
Using the appliance
With the Salon Multistylist you can create tight curls, large curls, waves,
ringlets, icks and a sleek look.
-
-
-
-
-
-
ENGLISH8

1 Comb or brush your hair so that it is disentangled and smooth.
2 Connect an attachment to the handle (see chapter ‘Preparing for
use’). Make sure that the support points downwards.
3 Place the appliance on the support of the attachment.
4 Put the mains plug in the wall socket.
The power-on light goes on and the appliance heats up (Fig. 4).
The appliance is ready for use when the ready dot on the
attachment changes colour (Fig. 5).
5 Styleyourhair.Seethesectionsbelowforspecicinstructionsfor
each attachment.
Note: When you use one of the curling attachments or the slide-on brush,
always make sure that you wind the end of the lock in the required direction.
6 Leave the styler in your hair for a few seconds.
How long you have to keep the styler in your hair depends on the
thickness of your hair.
Do not leave the styler in your hair longer than 10 seconds.
Large or tight curls
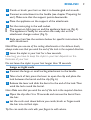
1 Connect the large or small curling attachment to the handle.
2 Take a lock of hair, press the lever to open the clip and place the
lock between the barrel and the clip (Fig. 6).
3 Release the lever and slide the barrel to the end of the lock. Then
wind the lock round the barrel.
Note: Make sure that you wind the end of the lock in the required direction.
4 Open the clip after 5 to 10 seconds and remove the barrel from
the hair.
5 Letthecurlscooldownbeforeyoucomb,brushornger-comb
thehairintoitsnalstyle.
Tip: You can comb the curls with your ngers to add volume.
,
,
ENGLISH 9

Waves
1 Connect the small curling attachment to the handle. Slide the slide-
on brush onto the curling attachment.
2 Take a lock of hair and wind it round the slide-on brush (Fig. 7).
Prevent the slide-on brush from getting tangled in the hair in the
following way:
Do not put too much hair in one lock.
Do not wind a lock of hair more than twice round the slide-on brush.
When you unwind a lock of hair, make sure that you hold the slide-on
brush away from the underlying hair.
3 Remove the slide-on brush from your hair after 5 to 10 seconds.
4 Letthewavescooldownbeforeyoucomb,brushornger-comb
thehairintoitsnalstyle.
Ringlets
1 Connect the large curling attachment to the handle. Slide the slide-
on spiral onto the curling attachment.
2 Take a lock of hair, press the lever to open the clip and place the
lock between the barrel and the clip (Fig. 8).
3 Release the lever and slide the barrel to the end of the lock. Then
windthelockroundthebarrelfollowingthespiralprole.
Note: Make sure that you wind the end of the lock in the required direction.
4 Open the clip after 5 to 10 seconds and remove the barrel from
the hair.
5 Lettheringletscooldownbeforeyoucomb,brushornger-comb
thehairintoitsnalstyle.
Flicks
1 Connect the straightening attachment to the handle.
2 Slide the straightening plates into the attachment with the curved
sides pointing towards each other (Fig. 9).
-
-
-
ENGLISH10

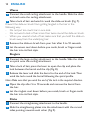
3 Take a lock of hair (max. 5 to 6cm wide). Press the lever to open
the straightening attachment and place the lock between the
plates (Fig. 10).
Decide if you want to create inward or outward icks. Hold the appliance
in such a way that the curved sides of the plates create the desired type
of ick.
4 Slide the styler gently down the length of the hair in a few seconds.
When the plates are 3-5cm above the end of the lock, slightly twist
the appliance inwards or outwards to create the desired type of
ick.
Sleek look
1 Press the lever to open the straightening attachment.
2 Remove the straightening plates one by one. Grab the cool tip and
pull each plate out of the straightening attachment (Fig. 11).
3 Turn the plates round and slide them back into the attachment with
theatsidespointingtowardseachother(Fig.12).
You can now use the straightening attachment to create sleek hair
without icks.
Make sure that the edges of the plates are inserted properly into the
grooves.
4 Take a lock of hair (max. 5 to 6cm wide). Press the lever to open
the straightening attachment and place the lock between the plates.
5 Slide the styler gently down the length of the hair in a few seconds.
6 Let the sleek hair cool down before you comb or brush it.
Cleaning
Never immerse the appliance in water or any other liquid, nor rinse it
under the tap.
1 Unplug the appliance.
ENGLISH 11

2 Place the styler on the support of the attachment in a safe place
and let it cool down.
3 Clean the appliance and the attachments with a small brush or a
dry cloth.
Storage
1
Unplug the appliance.
2 Place the styler on the support of the attachment in a safe place
and let it cool down.
3 Store the appliance in a safe and dry place.
Do not wind the mains cord round the appliance.
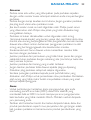
Environment
Do not throw away the appliance with the normal household waste
at the end of its life, but hand it in at an ofcial collection point for
recycling. By doing this, you help to preserve the
environment (Fig. 13).
Guarantee & service
If you need information or if you have a problem, please visit the Philips
website at www.philips.com or contact the Philips Customer Care
Centre in your country (you nd its phone number in the worldwide
guarantee leaet). If there is no Customer Care Centre in your country,
go to your local Philips dealer or contact the Service Department of
Philips Domestic Appliances and Personal Care BV.
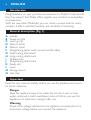
Troubleshooting
This chapter summarises the most common problems you could
encounter with the appliance. If you are unable to solve the problem with
the information below, contact the Customer Care Centre in your
country.
-
ENGLISH12

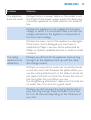
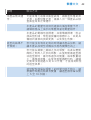
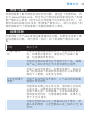
Problem Solution
The appliance
does not work.
Perhaps there is a power failure or the socket is not
live. Check if the power supply works. If it does, plug
in another appliance to check whether the socket is
live.
Perhaps the appliance is not suitable for the mains
voltage to which it is connected. Make sure that the
voltage indicated on the appliance corresponds to
the local mains voltage.
Perhaps the mains cord of the appliance is damaged.
If the mains cord is damaged, you must have it
replaced by Philips, a service centre authorised by
Philips or similarly qualied persons in order to avoid
a hazard.
The styling
results are not
satisfactory.
Perhaps you did not let the appliance heat up long
enough. Let the appliance heat up until the ready
dot changes colour.
Perhaps you wound too much hair round the barrel
or put too much hair between the plates. When you
use the curling attachments or the slide-on brush, do
not make the locks too thick. The thinner the lock of
hair, the tighter the curl. When you use
the straightening attachment, make sure the locks are
no wider than 5 to 6cm for a good result.
Perhaps you did not leave the styling attachment in
your hair long enough. Keep the styler in your hair
for 5 to 10 seconds, depending on the thickness of
your hair.
ENGLISH 13

14
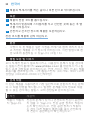
제품 소개
필립스 제품을 구입해 주셔서 감사합니다! 필립스가 드리는 지원
혜택을 받으실 수 있도록 www.philips.com/welcome에서 제품
을 등록하십시오.
신제품 살롱 멀티스타일리스트로 언제 어디에나 어울리는 멋진
스타일을 연출해 보세요. 자유롭고 다양한 헤어스타일링이 가능
합니다.
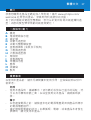
각 부의 명칭 (그림 1)
A 손잡이
B 전원 표시등
C 잠금장치
D 슬라이드 장착식 브러시
E 슬라이드식 나선형 액세서리
F 스트레이트 판(곡면 및 평면)
G 촘촘한 컬 액세서리
H 굵은 컬 액세서리
I 패들 브러시
J 스트레이트너
K 준비 표시
L 레버
M 보관용 파우치
N 헤어 클립
중요사항
본 제품을 사용하기 전에 이 사용 설명서를 주의 깊게 읽고 나중
에 참조할 수 있도록 잘 보관하십시오.
위험
본 제품은 물이 닿지 않는 곳에 보관하십시오. 본 제품을 욕
조, 세면대 또는 싱크대와 같이 물 가까이에서 사용하지 마십
시오. 욕실에서 사용할 경우 사용 후에는 반드시 전원 플러그
를 뽑으십시오.
-
한국어

경고
제품에 전원을 연결하기 전에, 제품에 표시된 전압과 사용 지
역의 전압이 일치하는지 확인하십시오.
전원 코드를 정기적으로 점검하여 플러그나 전원 코드 또는
제품 자체에 손상이 있으면 제품을 사용하지 마십시오.
전원 코드가 손상된 경우, 안전을 위해 필립스 서비스 센터 또
는 필립스 서비스 지정점에 의뢰하여 교체하십시오.
신체적인 감각 및 정신적인 능력이 떨어지거나 경험과 지식이
풍부하지 않은 사용자(어린이 포함)는 혼자 제품을 사용하지
말고 제품 사용과 관련하여 안전에 책임 질 수 있도록 지시사
항을 충분히 숙지한 사람의 도움을 받으십시오.
어린이가 제품을 가지고 놀지 못하도록 지도해 주십시오.
제품을 열에 약한 표면 위에 놓지 말고 가열된 상태에서 제품
에 타월이나 옷 등 어떤 것으로도 덮지 마십시오.
제품을 인화 물질에 가까이 하지 마십시오.
제품을 전원에 연결한 상태로 자리를 비우지 마십시오.
사용 후 반드시 전원 코드를 뽑으십시오.
제품의 검사나 수리가 필요한 경우 반드시 필립스 서비스 지
정점에 문의하십시오. 비공인업체에서 수리하는 경우 제품 사
용자에게 심각한 상황을 초래할 수 있습니다.
주의
추가 안전을 위하여 잔여 전류 소멸 장치(RCD)를 욕실 전원
에 설치할 것을 권장합니다. 이 RCD의 정격 잔여 전류는
30mA 이하여야 합니다. 자세한 설치 방법은 전기 설비업체에
문의하십시오.
액세서리는 먼지, 이물질 및 무스, 스프레이, 젤 등의 스타일
링 제품이 묻지 않은 깨끗한 상태로 유지하십시오. 본 제품 사
용 시 스타일링 제품을 함께 사용하지 마십시오.
액세서리와 주위의 플라스틱 부위는 금방 뜨거워집니다. 제품
의 뜨거운 표면에 피부가 닿지 않도록 주의하십시오.
액세서리는 세라믹으로 코팅되어 있습니다. 시간이 지나면서
코팅이 조금씩 마모되지만 제품 성능에는 영향을 미치지 않습
니다.
모발에 액세서리를 몇 초 이상 대지 마십시오. 모발이 손상될
수 있습니다.
모발이 건조한 상태에서만 사용하십시오.
-
-
-
-
-
-
-
-
-
-
-
-
-
-
-
-
한국어 15

제품을 인조 모발에 사용하지 마십시오.
이 설명서에 나와있는 이외의 용도로 제품을 사용하지 마십시
오.
제품이 충분히 식은 다음 보관하십시오.
전원 코드를 제품에 감지 마십시오.
EMF(전자기장)
이 필립스 제품은 EMF(전자기장)와 관련된 모든 기준을 준수합
니다. 이 사용 설명서의 지침에 따라 적절하게 취급할 경우 이 제
품은 안전하게 사용할 수 있으며 이는 현재까지의 과학적 증거에
근거하고 있습니다.
사용 전 준비
액세서리의 조립 및 분리
이 과정은 모든 액세서리에 해당됩니다.
1 액세서리를 본체에 끼우십시오. 받침대가 밑을 향하고 있는지
확인하십시오 (그림 2).
2 잠금장치 위에 있는 굵은 화살표와 손잡이에 있는 화살표가
일직선에 놓일 때까지 본체의 잠금장치를 오른쪽으로 돌려 주
십시오 (그림 3).
액세서리가 본체에 안전하게 연결됩니다.
3 액세서리를 분리하려면 잠금장치를 왼쪽으로 돌리고 본체에
서 액세서리를 잡아당겨 빼십시오.
스타일링 후 또는 스타일링 도중에 액세서리를 분리하고자 할 경
우에는 제품의 전원 코드를 뽑아주십시오. 액세서리의 금속부위
나 세라믹 부분은 뜨거우므로 닿지않도록 조심하십시오.
제품 사용
살롱 멀티스타일리스트를 사용하면 촘촘한 컬, 굵은 컬, 웨이브,
나선형 웨이브, 나이아가라 웨이브, 스트레이트 헤어를 연출할 수
있습니다.
1 모발을 빗질하여 엉킨 부분을 풀고 부드럽게 하십시오.
-
-
-
-
한국어16

2 액세서리를 본체에 연결하십시오(‘사용 전 준비’란 참조).
받침대가 밑을 향하고 있는지 확인하십시오.
3 액세서리 받침대에 제품을 놓으십시오.
4 전원 플러그를 벽면 콘센트에 꽂으십시오.
전원 표시 등이 켜지고 제품이 가열되기 시작합니다 (그
림 4).
액세서리에 있는 준비 표시등의 색이 바뀌면 사용할 준비가
된 것입니다 (그림 5).
5 모발을 스타일링합니다. 각 액세서리의 자세한 사용 방법은
아래 섹션을 참조하십시오.
참고: 컬링 액세서리 또는 슬라이드 장착식 브러시를 사용할 때
모발 끝단이 원하는 방향으로 감겨 있는지 확인하십시오.
6 스타일러를 모발에서 몇 초간 유지하십시오.
스타일러의 지속 시간은 모발의 굵기에 따라 달라집니다.
스타일러를 모발에 10초 이상 대지 마십시오.
굵거나 촘촘한 컬
1 굵은 컬 액세서리 또는 촘촘한 컬 액세서리를 본체에 연결합
니다.
2 모발을 한 단 잡은 다음, 레버를 눌러 클립을 열고 배럴과 클
립 사이에 모발을 놓으십시오 (그림 6).
3 레버를 놓고 배럴을 모발 끝까지 끌어 내리십시오. 그리고 모
발을 배럴에 감아 주십시오.
참고: 모발 끝이 원하는 방향으로 감겨 있는지 확인하십시오.
4 5 ~ 10초 후 클립을 열고 모발에서 배럴을 빼십시오.
5 컬을 식힌 후에 빗, 브러시 또는 손가락을 사용하여 모발을 마
지막으로 정리하십시오.
도움말: 볼륨감을 더하기 위해 손가락으로 컬을 빗어주십시오.
,
,
한국어 17

웨이브
1 촘촘한 컬 액세서리를 연결하고 그 위에 슬라이드 장착식 브
러시를 끼우십시오.
2 모발 한 단을 브러시에 감아 주십시오 (그림 7).
모발이 브러시에 엉키는 것을 방지하려면 다음 방법을 따르십시
오.
한 단에 모발을 너무 많이 넣지 마십시오.
모발 단을 브러시에 두 번 이상 감지 마십시오.
모발 단을 풀 때에는 브러시가 아래쪽 모발에 닿지 않도록 주
의하십시오.
3 5 ~ 10초 후에 브러시를 빼십시오.
4 컬을 식힌 후에 빗, 브러시 또는 손가락을 사용하여 모발을 마
지막으로 정리하십시오.
나선형 웨이브
1 굵은 컬 액세서리를 연결하고 그 위에 슬라이드 장착식 나선
형 액세서리를 끼우십시오.
2 모발을 한 단 잡은 다음, 레버를 눌러 클립을 열고 배럴과 클
립 사이에 모발을 놓으십시오 (그림 8).
3 레버를 놓고 배럴을 모발 끝까지 끌어 내리십시오. 그리고 모
발을 배럴에 감아 주십시오.
참고: 모발 끝이 원하는 방향으로 감겨 있는지 확인하십시오.
4 5 ~ 10초 후 클립을 열고 모발에서 배럴을 빼십시오.
5 웨이브를 식힌 후에 빗, 브러시 또는 손가락을 사용하여 모발
을 마지막으로 정리하십시오.
나이아가라 웨이브
1 스트레이트너를 본체에 연결하십시오.
2 스트레이트너의 곡면이 서로 마주보도록 스트레이트너를 액
세서리에 밀어 넣으십시오 (그림 9).
-
-
-
한국어18

3 모발을 한 단(최대 5~6cm 너비) 잡은 다음 레버를 눌러 액세
서리를 열고 모발을 나이아가라 웨이브 열판 사이에 높으십시
오 (그림 10).
안쪽 또는 바깥쪽 웨이브 중 선택하십시오. 제품을 원하는 방향으
로 잡고 열판을 구부리면 원하는 웨이브가 만들어집니다.
4 수 초 동안 스타일러를 위에서부터 끝까지 미끄러지듯 내리십
시오. 열판이 머리 끝단의 3-5cm 위에 있을 때 제품을 원하
는 방향으로 살짝 구부리면 최상의 효과를 얻을 수 있습니다.
스트레이트
1 레버를 눌러 스트레이트너를 여십시오.
2 스트레이트너를 하나씩 분리하십시오. 쿨 팁을 잡고 각 열판
을 스트레이트너에서 당겨 빼십시오 (그림 11).
3 열판을 둥글게 돌려 평면이 서로 마주보도록 액세서리에 끼우
십시오 (그림 12).
이제 스트레이트너를 사용하여 웨이브 없는 스트레이트 헤어를
연출할 수 있습니다.
열판 측면의 튀어나온 가장자리가 틀에 맞게 들어갔는지 확인해
주십시오.
4 모발을 한 단(최대 5~6cm 너비) 잡은 다음 레버를 눌러 액세
서리를 열고 모발을 나이아가라 웨이브 열판 사이에 높으십시
오.
5 수 초 동안 스타일러를 위에서부터 끝까지 미끄러지듯 내리십
시오.
6 열기가 식을 때까지 모발을 그대로 둔 후 빗질을 하십시오.
청소
절대 제품을 물 또는 다른 액체에 담그거나 헹구지 마십시오.
1 제품의 전원 코드를 뽑으십시오.
2 액세서리 받침대에 스타일러를 두고 안전한 곳에 놓은 후 열
기를 식히십시오.
한국어 19

3 제품과 액세서리를 작은 솔이나 마른 천으로 닦아주십시오.
보관
1
제품의 전원 코드를 뽑으십시오.
2 액세서리 받침대에 스타일러를 두고 안전한 곳에 놓은 후 열
기를 식히십시오.
3 안전하고 건조한 장소에 제품을 보관하십시오.
전원 코드를 제품에 감지 마십시오.
환경
수명이 다 된 제품은 일반 가정용 쓰레기와 함께 버리지 마시
고 지정된 재활용 수거 장소에 버리십시오. 이런 방법으로 환
경 보호에 동참하실 수 있습니다 (그림 13).
품질 보증 및 서비스
보다 자세한 정보가 필요하시거나, 사용상의 문제가 있을 경우에
는 필립스전자 홈페이지 www.philips.co.kr 를 방문하시거나 필
립스 고객 상담실로 문의하십시오. 전국 서비스 센터 안내는 제품
보증서를 참조하십시오. *(주)필립스전자: (02)709-1200 *고객
상담실: (080)600-6600(수신자부담)
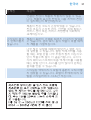
문제 해결
이 란은 제품을 사용하면서 가장 일반적으로 경험하게 되는 문제
와 그 해결 방법을 제시합니다. 발생한 문제를 아래 정보로 해결
할 수 없는 경우에는 필립스 고객 상담실로 문의하십시오.
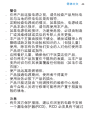
문제점 해결책
제품이 작동하
지 않습니다.
전원에 문제가 있거나 콘센트에 전원이 공급되
지 않을 수 있습니다. 전원 공급 장치가 작동하
는지 확인하십시오. 전원 공급 장치가 작동하
는 경우 다른 제품의 플러그를 꽂아 콘센트에
서 전원이 공급되는지 확인하십시오.
-
한국어20
ページが読み込まれています...
ページが読み込まれています...
ページが読み込まれています...
ページが読み込まれています...
ページが読み込まれています...
ページが読み込まれています...
ページが読み込まれています...
ページが読み込まれています...
ページが読み込まれています...
ページが読み込まれています...
ページが読み込まれています...
ページが読み込まれています...
ページが読み込まれています...
ページが読み込まれています...
ページが読み込まれています...
ページが読み込まれています...
ページが読み込まれています...
ページが読み込まれています...
ページが読み込まれています...
ページが読み込まれています...
ページが読み込まれています...
ページが読み込まれています...
ページが読み込まれています...
ページが読み込まれています...
ページが読み込まれています...
ページが読み込まれています...
ページが読み込まれています...
ページが読み込まれています...
ページが読み込まれています...
ページが読み込まれています...
ページが読み込まれています...
ページが読み込まれています...
ページが読み込まれています...
ページが読み込まれています...
ページが読み込まれています...
ページが読み込まれています...
-
 1
1
-
 2
2
-
 3
3
-
 4
4
-
 5
5
-
 6
6
-
 7
7
-
 8
8
-
 9
9
-
 10
10
-
 11
11
-
 12
12
-
 13
13
-
 14
14
-
 15
15
-
 16
16
-
 17
17
-
 18
18
-
 19
19
-
 20
20
-
 21
21
-
 22
22
-
 23
23
-
 24
24
-
 25
25
-
 26
26
-
 27
27
-
 28
28
-
 29
29
-
 30
30
-
 31
31
-
 32
32
-
 33
33
-
 34
34
-
 35
35
-
 36
36
-
 37
37
-
 38
38
-
 39
39
-
 40
40
-
 41
41
-
 42
42
-
 43
43
-
 44
44
-
 45
45
-
 46
46
-
 47
47
-
 48
48
-
 49
49
-
 50
50
-
 51
51
-
 52
52
-
 53
53
-
 54
54
-
 55
55
-
 56
56


