ページを読み込んでいます...

Kaiterra Sensedge Mini
Air Quality Monitor
Made in China
www.kaiterra.com [email protected]
Origins Technology Limited.
603 6/F, Laws Commercial Plaza, 788 Cheung Sha Wan Road, Hong Kong

ENGLISH
Kaiterra Sensedge Mini Air Quality Monitor User
Manual What’s Included
●Sensedge Mini
●Sensedge Mini sensor modules x 2
●Surface / Drywall mount
●Electrical box mount
●Drywall screws and anchors (3 pairs)
●Electrical box screws (US) x 2
●Electrical box screws (China and EU) x 2
●Fastening screws x 2
●USB cable
●Charger
●Certificate of calibration and testing
●User manual
●Certificate of conformity
Important Safeguards
Please read the safety warnings before use and take the necessary precautions to
reduce the risk of fire, electric shock, or injury. The Kaiterra limited warranty applies only
if the unit is used according to these instructions.
WARNING
●To reduce safety risks, always use service personnel from the manufacturer or
service provider, or other qualified personnel for installation and maintenance. ●
Make sure the power is OFF during installation or maintenance. ●DO NOT tamper
with or use nonofficial spare parts for repair or maintenance. ●DO NOT use the
device in environments with high humidity or possible direct exposure to water.
●DO NOT use the device in an outdoor environment.
●DO NOT use the device near heat sources such as radiators, furnaces, ovens, or
stoves.

Getting Started
The Sensedge Mini is a commercial-grade air quality monitor. This user manual will
provide a basic guide to its first use. Further information can be found on the Kaiterra
Support Portal at http://support.kaiterra.com/sensedge-mini
Operational Temperature:0 - 40℃
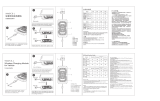
Externals and Air Flow
Air is drawn into the Sensedge Mini from the lower side, as well as the air intake on the
upper side. It is vital that neither side of the device is covered. Any changes in airflow
may affect the readings and accuracy.
Power and Connectivity
The Sensedge Mini provides multiple power and connectivity options:
Power:
●USB-C: Only use the cable and charger/adapter supplied with the device
●DC direct wiring: Used for power supply of 12V, 1000mA
●PoE (Power over Ethernet): Available for model SE000200P

Connectivity:
●2.4GHz Wi-Fi (802.11 b/g/n)
●Ethernet: Used for data transfer via Ethernet
●RS-485: Used for Modbus communication
●Bluetooth
Sensor Modules
The Sensedge Mini utilizes a modular design to allow for easy control and replacement
of sensors. A CO2 sensor and a temperature and relative humidity sensor areis built
into the core of the device, and a variety of other sensors may be inserted using the two
sensor bays on the lower side of the device.
To insert a sensor module, simply align it with the bay and press it in, ensuring the
Kaiterra logo on the plastic tab is facing outwards. When inserted correctly, the module
will click into place, and an LED light above the bay will briefly flash red if the device is
powered on.
To remove a sensor module, gently pull the tab outward and remove the module from
the bay. Make sure to pull at a 90 degree angle.
Sensors may be inserted in either sensor bay, and in any order. They may be swapped
both when the Sensedge Mini is powered on and operational, and when the device is
turned off.
By default, the Sensedge Mini is shipped with the KM-200 and KM-203 sensor modules,
which together measure PM2.5, and TVOC., temperature, and relative humidity.
Sensor Module Status Light Indications:
Steady OFF
Sensor working normal
Flash red once
Sensor module powered on
Steady ON
Sensor module needs to be changed
Flash
Sensor module failure
Flash slowly
Sensor module in sleep mode

Control and Status
Move the ON/OFF switch right to turn on the device. The STATUS light will go on briefly
to indicate the device has been powered on.
To reset the device, use a paperclip and hold down the RESET pinhole. The STATUS
light will flash red rapidly, indicating that the reset is successful.
STATUS Light Indications:
Standard operation:
Steady OFF
Device working normal
Flash red once
Device powered on
Flash red rapidly
Reset successful
Configuration:
Flash yellow
Device in configuration mode
Flash yellow rapidly for
5 seconds
Identify via configuration tool
Flash green rapidly
Connecting to the network
Glow green gradually
Connecting to the cloud
Troubleshooting:
Steady ON in red
Device failure
Flash red
No network connection
Installation
The Sensedge Mini can be mounted on a concrete block wall, drywall, ceiling, or to an
electrical box.

For detailed instructions on installation, power, and connectivity setup, please visit our
support center website at http://support.kaiterra.com/sensedge-mini or scan the QR
code below.
Warranty Information
Kaiterra provides a 1-year limited manufacturer warranty on the Sensedge Mini. To
obtain a copy of the warranty for this product, please visit
https://support.kaiterra.com/policies
Troubleshooting
For additional support, please contact your sales representative or email us at
中文

Kaiterra 睿石 Mini 空气质量监测仪用户手册
包装清单
●睿石 Mini 主机
●睿石 Mini 传感器模块 x 2
●墙面/石膏板墙安装圆盘底座
●有底盒安装方盘底座
●石膏板螺丝&锚栓(3 对)
●底盒螺丝(美标)x 2
●底盒螺丝(国标/欧标)x 2
●固定螺丝 x 2
●USB 数据线
●充电器
●校准测试报告
●用户手册
●合格证书
重要预防措施
请在使用前阅读安全须知,并采取必要预防措施来降低火灾、电击或受伤的风险。原点生
活(Kaiterra)有限保修仅在遵照这些说明使用设备时适用。
安全须知
●为了避免危险,必须始终由制造商、服务代理商或有资质的人员进行安装、维护等操
作。
●安装与维护前,请确保电源已断开。
●请勿以任何方式改造或使用非官方配件维修维护设备。
●请勿将设备置于高湿度环境或可能直接接触水的位置。
●请勿将设备置于室外。
●请勿将设备放在散热器、壁炉、烤箱、炉灶等热源附近。
开始使用
睿石 Mini 是一款商用空气质量监测仪。此手册为用户首次使用设备提供指导,更多信息
可以在 Kaiterra 官网的“客户支持”中查询,链接地址:
http://support.kaiterra.com/sensedge-mini。

运行温度:0 - 40℃
外观和空气流动
睿石 Mini 的进气口位于设备的上方和下方,使用时请确保设备的任何一侧都不能被覆盖。
气流的变化可能影响睿石 Mini 的读数及准确性。
供电和联网方式
睿石 Mini 提供多种供电和联网选择:
供电:
●USB-C:仅可使用设备随附的数据线及充电器或适配器
●DC 电源接口:用于 12V,1000mA 供电
●PoE(通过以太网供电):适用于型号 SE000200P
联网:
●2.4GHz Wi-Fi (802.11 b/g/n)
●以太网:用于通过以太网进行数据传输
●RS-485:用于支持 Modbus 通讯
传感器模块

睿石 Mini 采用模块化设计,便于控制及更换传感器。其中,二氧化碳和温湿度传感器内
置于设备内部,设备下方的两个传感器凹槽可用于装载各种其他的传感器模块。
安装传感器模块时,只需将传感器轻压入凹槽内,确保铝制外壳上的 Kaiterra 标志朝外即
可。当正确安装后,模块将被锁定于凹槽内,如设备已经接入电源,模块凹糟上方的模块状
态指示灯会短暂亮起且呈红色。
如需拆卸模块,轻轻提起拉环,使拉环与模块呈 90 度角,然后向外拉动,即可从凹槽内
拆下模块。
传感器模块可以安装到任何一个传感器凹槽中,并且任意顺序安装均可。传感器模块在睿
石 Mini 开机运行时以及关闭时均可进行更换。
默认情况下,睿石 Mini 随机附带 KM-200 和 KM-203 传感器模块,检测 PM2.5、与
TVOC、温度和相对湿度。
传感器模块状态指示灯含义:
指示灯不亮 传感器正常工作
红灯闪烁一次 传感器模块接入电源成功
红灯长亮 需要更换传感器模块
红灯闪烁 传感器模块故障
红灯慢速闪烁 传感器进入睡眠模式
设备控制和状态
向右拨动开关,打开设备。当设备状态指示灯短暂亮起,表示设备成功开机。
如需重置设备,请使用回形针长按重置孔,直到状态指示灯开始快速闪烁红色,即表示设
备重置成功。
状态指示灯含义:

通用:
指示灯不亮 设备正常工作
红灯短暂亮起 设备成功开机
红灯快速闪烁 设备重置成功
配置:
黄灯闪烁 设备处于配置模式
黄灯持续快闪 5 秒钟 通过配置工具识别设备
绿灯快速闪烁 正在接入网络或通讯
绿灯明暗变换闪烁 正在接入云端
故障排除:
红灯长亮 设备故障
红灯闪烁 没有网络连接
安装睿石 Mini
睿石 Mini 支持墙面表面安装、石膏板墙安装、吊顶安装以及有底盒安装等方式。
关于产品安装说明、供电以及联网设置等更多信息,请访问 Kaiterra 官网“客户支持”:
http://support.kaiterra.com/sensedge-mini 获取或者扫描下方二维码。

质保政策
Kaiterra 为睿石 Mini 提供一年的有限保修服务,如需完整质保政策文档,请访问
https://support.kaiterra.com/policies。
故障排除
如需其他支持,请联系您的销售代表或发送邮件至 [email protected],与我们取得
联系。
END - FCC Caution
Any Changes or modifications not expressly approved by the party responsible for
compliance could void the user's authority to operate the equipment.
This device complies with part 15 of the FCC Rules. Operation is subject to the
following two conditions: (1) This device may not cause harmful interference, and (2)
this device must accept any interference received, including interference that may
cause undesired operation.
Note: This equipment has been tested and found to comply with the limits for a Class B
digital device, pursuant to part 15 of the FCC Rules. These limits are designed to
provide reasonable protection against harmful interference in a residential installation.
This equipment generates, uses and can radiate radio frequency energy and, if not
installed and used in accordance with the instructions, may cause harmful interference
to radio communications. However, there is no guarantee that interference will not occur
in a particular installation. If this equipment does cause harmful interference to radio or

television reception, which can be determined by turning the equipment off and on, the
user is encouraged to try to correct the interference by one or more of the following
measures:
—Reorient or relocate the receiving antenna.
—Increase the separation between the equipment and receiver.
—Connect the equipment into an outlet on a circuit different from that to which the
receiver is connected.
—Consult the dealer or an experienced radio/TV technician for
help. FCC RF Radiation Exposure Statement:
1. This Transmitter must not be co-located or operating in conjunction with any other
antenna or transmitter.
2. This equipment complies with RF radiation exposure limits set forth for an
uncontrolled environment.
3. This equipment should be installed and operated with a minimum distance 20cm
between the radiator & your body.
Adapter shall be installed near the equipment and shall be easily accessible. The
operating temperature of the EUT can’t exceed 40℃and shouldn’t be lower than
0℃.
The plug is considered as a disconnect device of adapter.
The product shall be connected to a USB interface of version USB2.0 or higher.
Hereby, Origins Technology Limited declares that this product is in compliance with
essential requirements and other relevant provisions of Directive 2014/53/EU. This
product is allowed to be used in all EU member states.
RADIO FREQUENCY MAXIMUM TRANSMIT POWER AND FREQUENCY BAND
INFORMATION
Frequency bands
Maximum output power
WIFI(EIRP) 2412-2472MHz
18.14dBm
BLE(EIRP) 2402-2480MHz
6.79Bm

User manuals for licence-exempt radio apparatus shall contain the following or
equivalent notice in a conspicuous location in the user manual or alternatively on the
device or both.
This device complies with Industry Canada licence-exempt RSS standard(s).
Operation is subject to the following two conditions:
(1) this device may not cause interference, and
(2) this device must accept any interference, including interference that may cause
undesired operation of the device.
Le présent appareil est conforme aux CNR d'Industrie Canada applicables aux
appareils radio exempts de licence. L'exploitation est autorisée aux deux conditions
suivantes :
(1) l'appareil nedoit pas produire de brouillage, et
(2) l'utilisateur de l'appareil doit accepter tout brouillage radioélectrique subi, même
si le brouillage est susceptible d'en compromettre le fonctionnement.
Radio apparatus containing digital circuitry which can function separately from the
operation of a transmitter or an associated transmitter, shall comply with ICES-003. In
such cases, the labelling requirements of the applicable RSS apply, rather than the
labelling requirements in ICES-003. This Class B digital apparatus complies with
Canadian ICES-003.
Cet appareil numérique de la classe B est conforme à la norme NMB-003 du Canada.
IC SAR Warning:
This equipment should be installed and operated with minimum distance 20 cm
between the radiator and your body.
Lors de l’ installation et de l’ exploitation de ce dispositif, la distance entre le radiateur
et le corps est d ’au moins 20 cm.
/