
WASP DELUXE
Legendary Hybrid Synthesizer with Dual OSCs, Multi-Mode VCF,
16-Voice Poly Chain and Eurorack Format
V 3.0
快速启动向导

带有此标志的终端
设备具有强大的电
流, 存在触电危险。 仅限使用
带有
¼'' TS 或扭锁式插头的高
品质专业扬声器线。 所有的安
装或调整均须由合格的专业人
员进行。
此标志提醒您, 产品
内存在未绝缘的危
险电压, 有 触电危险。
此标志提醒您查阅
所附的重要的使用
及维修说明。 请阅读有关
手册。
小心
为避免触电危险,
请勿打开机顶盖 (或背面挡
板)。 设备内没有可供用户维
修使用的部件。 请将维修事项
交由合格的专业人员进行。
小心
为避免着火或触电
危险, 请勿将此设备置于雨淋
或潮湿中。 此设备也不可受液
体滴溅, 盛有液体的容器也不
可置于其上, 如花瓶等。
小心
维修说明仅是给
合格的专业维修人员使用的。
为 避免触电危险, 除了使用说
明书提到的以外, 请勿进行任
何其它维修。 所有维修均须由
合格的专业人员进行。
1. 请阅读这些说明。
2. 请妥善保存这些说明。
3. 请注意所有的警示。
4. 请遵守所有的说明。
5. 请勿在靠近水的地方使
用本产品。
6. 请用干布清洁本产品。
7. 请勿堵塞通风口。 安装本
产品时请遵照厂家的说明。
8. 请勿将本产品安装在热
源附近, 如 暖 气 片, 炉子或其
它产生热量的设备 ( 包 括功
放器)。
9. 请勿移除极性插头或接
地插头的安全装置。 接地插头
是由两个插塞接点及一个接
地头构成。 若随货提供的插头
不适合您的插座, 请找电工更
换一个合适的插座。
10. 妥善保护电源线, 使其不
被践踏或刺破, 尤其注意电
源插头、多用途插座及设备连
接处。
11. 请只使用厂家指定的附属
设备和配 件。
12. 请只使用
厂家指定的
或随货销售的
手推车, 架子,
三 角架, 支架
和桌子。 若使
用手推车来搬运设备, 请注意
安全放置设备, 以 避免手推车
和设备倾倒而受伤。
13. 遇闪电雷鸣或长期不使用
本设备时, 请 拔出电源插头。
14. 所有维修均须由合格的
维修人员进行。 设备受损时需
进行维修, 例如电源线或电源
插头受损, 液体流入或异物落
入设备内, 设备遭雨淋或受潮,
设备不能正常运作或被摔坏。
15. 本设备连接电源时一定要
有接地保 护。
16. 若电源插头或
器具耦合器用作
断电装置, 应当保
证它们处于随时可
方便操作状态。
17. 本产品仅适用
于海拔 2000 米以
下地区, 本产品仅
适用于非热带气
候条件下。
对于任何因在此说明书提到
的全部或部份描述、 图片或
声明而造成的损失,
Music Tribe
不负任何责任。 技术参数和
外观若有更改, 恕不另行通
知。 所有的商标均为其各自所
有者的财产。
Midas, Klark Teknik,
Lab Gruppen, Lake, Tannoy,
Turbosound, TC Electronic, TC Helicon,
Behringer, Bugera, Oberheim,
Auratone
和 Coolaudio 是 Music
Tribe Global Brands Ltd.
公司的商
标或注册商标。
© Music Tribe
Global Brands Ltd. 2021
版权所有。
有关音乐集团保修的适用条
款及其它相关信息, 请登陆
musictribe.com/warranty 网站查看
完整的详细信息。
重要的安全须知
法律声明
保修条款
2 3
快速启动向导
WASP DELUXE

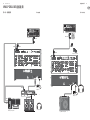
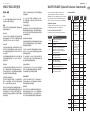
第一步: 连接应用
WASP DELUXE 连接应用
录音室系统 乐队/练习系统
Desktop Computer
MIDI Keyboard
Headphones
Studio Monitors
Audio Interface
USB B MIDI IN
MIDI OUT
USB B
USB A
USB A
Power
Adaptor
Headphones
Expression Pedal
Footswitch
MIDI Keyboard
MIDI OUT
MIDI IN
Keyboard Amplier
Power
Adaptor
4 5
快速启动向导
WASP DELUXE

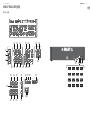
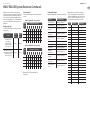
WASP DELUXE 控制
第二步: 控制
(19) (20) (21) (26) (28) (29) (30) (31)
(23) (24) (25)
(32) (33)
(27)
(22)
(1)
(4)
(7) (8) (9) (12) (15)
(18)
(5) (6) (13) (14) (16) (17)
(3)
(2)
(10) (11)
1 2 3 4
5 6 7 8
9 10 11 12
13 14 15 16
(34)
(35) (36) (37)
6 7
快速启动向导
WASP DELUXE

第二步: 控制
键盘部分
(1) BEND 旋钮可向上 (顺时针) 或向下 (逆时针)
移动键盘音高。
(2) TUNE 旋钮可用于微调键盘音高。
(3) GLIDE 控制从一个音符到另一个音符的变化
率。顺时针旋转旋钮会减慢移至下一个音
高的速度。
振荡器部分
(4) FT 旋钮 (用于上振荡器) 设置振荡器的
音高。
(5) WIDTH % 旋钮控制振荡器声音的宽度。
(6) WAVEFORM 旋钮控制上振荡器的波形形
状。在 OFF 设置中, 波形保留为不变的正弦
波。从左起的第二设置为 “锯齿” 波形, 而
下一个设置创建一个 “方波” 波形。 ENH 设
置充当增强器, 为振荡器的音调添加力量
和清晰度。
(7) FT 旋钮 (用于下振荡器) 设置振荡器的
音高。
(8) PITCH 旋钮参照上振荡器的音高调节第二个
振荡器的音高, 以产生调制效果。
(9) WAVEFORM 旋钮控制下部振荡器的波形形
状。 在 OFF 设置中, 波形保留为不变的正弦
波。从左起第二个设置为 “锯齿” 波形,而
下一个设置创建一个 “方波” 波形。 ENH设
置充当增强器, 为振荡器的音调添加力量
和清晰度。
(10) MIX 部分控制上下振荡器 (OSC 1 / OSC 2 旋钮)
的相对混合。
(11) EXT. 旋钮可让您将来自 EXT. AUDIO 插孔的音
频信号与振荡器信号混合。
控制振荡器部分
本部分提供的振荡器本身不会发出声音, 但可用
于控制主振荡器和滤波器。
(12) NOISE 信号旋钮产生白噪声, 可以将其混合
以产生敲击声。
(13) FREQUENCY 旋钮调节控制振荡器的速度。
(14) PITCH MOD. 改变主振荡器之间的音高差以产
生附加的调制效果。
(15) WAVEFORM 开 关提供六种不同的设置:
正弦波, 上升锯齿波, 下降锯齿波, 方波,
NOISE (噪声) 和 RND. (随机)。
滤波器部分
(16) FREQ. 旋钮设置滤波器的截止频率。
(17) Q 旋钮控制滤波器宽度 (用于带通和陷波
滤波器) 或滤波器的斜率 (高通和低通滤
波器)。
(18) FILTER 旋钮提供四个滤波器选项:
LO (低通), BAND (带通), NOTCH (陷波)
和 HI (高通)。
包络生成器部分
本部分有两个小部分: VCA ENV. (控制振荡器的包
络) 和 CONTROL ENV. (控制滤波器包络)。
VCA 包络
(19) ATTACK 旋钮控制音符起音的速度。
(20) DECAY 旋钮控制当手指停留在键盘上时音
符音量衰减的速度, 然后控制手指从键盘
上移开后音符的淡出。
(21) SUSTAIN LEVEL/REPEAT 旋钮控制当手指停
留在键盘上时音符的基线音量。 当完全逆
时针设置时, 音符会重复, 然后 ATTACK 和
DECAY 旋钮控制重复的速度。
(22) HOLD 开关在激活后会在包络点无限期地
保持音符。
控制包络
(23) ATTACK 旋钮控制滤波器开始的速度。
(24) DECAY 旋钮控制滤波器截止频率衰减的
速度。
(25) DELAY/REPEAT 旋钮将滤波器起音延迟多达
1秒钟。
输出部
(26) VOLUME 旋钮控制 MAIN AUDIO 和 MAIN OUT
插孔的最终音量。
(27) PHONES 旋钮控制旋钮正上方 ⁄" TRS 插孔
的耳机音量。
MIDI 部分
(28) USB PORT 允许通过 USB B 型连接连接到计
算机。 WASP DELUXE 将显示为类兼容的 USB
MIDI 设备, 能够支持 MIDI 输入和输出。
• • USB MIDI IN - 接收来自应用程序的输入
MIDI 数据。
• • USB MIDI OUT - 将 MIDI 数据发送到应用程序。
(29) MIDI IN 通过 5 针 DIN 接口从外部源接收
MIDI 数据。 通常是 MIDI 键盘, 外部硬件音
序器, 配备 MIDI 接口的计算机等。
(30) MIDI THRU 使用 5 针 DIN 插孔来传递 MIDI
INPUT 接收的 MIDI 数据。 这些数据通常会
发送到另一个 WASP DELUXE 合成器, 以运
行 Poly Chain 或分配给另一个 MIDI 通道的
鼓机。
(31) EXT. AUDIO 输入将外部线路电平音源连接
到此 3.5 毫米输入。 如果此处未连接任何
东西, 则主音频输出在内部连接到此外部
输入。
(32) POWER LED 灯亮, 表明设备已开启。
(33) MAIN AUDIO使用 3.5 毫米 TRS 连接输出主音
频输出。 通常, 可以将其分配到另一个 WASP
DELUXE 的音频输入或其他模块化合成器
设备的音频输入。 如果在 Eurorack 中使用
WASP DELUXE, 则这是主输出, 因为未使用后
面板输出接口。
后面板
(34) MAIN OUT 使用 ¼" TRS 输出连接到外部设备
的输入, 如下所示 (请注意, 它们都是单声
道, 不是左/右):
• • LOW - 此乐器电平单声道输出可以连接到例如吉
他放大器或调音台的乐器电平输入。
• • HIGH - 此线路电平单声道输出可以连接到例如
调音台,键盘放大器或有源音箱的线路
电平输入。
(35) MIDI CHANNEL 有 4 个开关, 可用于将 MIDI
通道号设置为1到 16 (请参阅第 13 页上的
表)。 也可以使用 MIDI SysEx 命令更改 MIDI 通
道, 如本说明书后面的 MIDI SysEx 表中所示。
(当 WASP DELUXE 放在 Eurorack 中且不再存在
这些开关时, 将使用此方法。)
电源部分
(36) POWER 开关打开和关闭设备。
(37) DC INPUT 连接到随附的 12V DC 电源适配器。
电源适配器可以插入能够以 50 Hz/60 Hz 的
频率提供 100V 到 240V 电压的 AC 插座。
仅使用提供的电源适配器。
WASP DELUXE 控制
8 9
快速启动向导
WASP DELUXE

WASP DELUXE 使用
第三步: 使用第三步: 使用
概述
本 “启动” 指南将帮助您设置 WASP DELUXE 模拟
合成器, 并简要介绍其功能。
连接
要将 WASP DELUXE 连接到您的系统, 请查阅本文档
前面的连接指南。
软件安装
WASP DELUXE 是 USB 类兼容的 MIDI 设备, 因此不需
要安装驱动程序。 WASP DELUXE 不需要任何其他驱
动程序即可与 Windows 和 MacOS 配合使用。
硬件安装
在系统中完成所有连接。 使用后面板 MIDI 开关将
WASP DELUXE 设置为系统中唯一的 MIDI 通道。 将外
部 MIDI 键盘直接连接到 WASP DELUXE MIDI IN 5 针
DIN 型输入。
仅使用随附的电源适配器为 WASP DELUXE 供电。 确
保您的音响系统已关闭。 打开 WASP DELUXE 后面
板电源开关。
预热时间
我们建议在录音或现场演出前让 WASP DELUXE 预
热 15 分钟或更长时间。 (如果它是从寒冷的地方
带来的, 时间会更长。) 这将使精密模拟电路的时
间达到其正常工作温度和调音性能。
振荡器部分和混音旋钮
WASP DELUXE 具有两个振荡器, 一个内部噪声发生
器和一个外部源输入。 WASP DELUXE 使用这些中的
每一个以及任意组合来生成声音。
使用 MIX 控件可以调节每个源的音量以创建一个
整体混音。 首先调节振荡器1的音量控制, 同时将
其他源关闭。 在 OUTPUT 部分, 调节主音量。 现在,
如果您在 MIDI 键盘上弹奏音符, 则应该只听到振
荡器1的声音。
调高另一个振荡器和/或噪声, 并调节其音量控件
以创建混音。
在 Oscillator 部分, 调节任一振荡器的 FT (Foot) 旋
钮, 您将听到各个八度的声音。 调节WAVEFORM 旋
钮并聆听差异。
控制振荡器部分
尝试使用 FREQ. 和 PITCH MOD. 旋钮以了解它们如何
影响振荡器的速度和音高。 使用控制振荡器的 6
向 WAVEFORM 开关应用不同的控制波形, 并聆听它
们如何影响声音。
滤波器和控制包络部分
切换选择低通, 带通, 陷波或高通滤波器, 并尝试
使用 FREQ 旋钮设置截止频率。 使用 Q 旋钮试验
滤波器的轮廓和斜率。
CONTROL ENV. 控件用于控制滤波器, 因此可以尝试
使用 Attack, Decay 和 Delay 旋钮来聆听这些控件如
何影响滤波器声音。
花一些时间在正 (+) 和负 (-) 设置之间移动 FILTER
CONTROL 旋钮, 以了解上升或下降控制包络的不同
组合如何影响振荡器和滤波器。
包络生成器部分
在此部分中, 调节 Attack, Decay和 Sustain; 在演奏音
符时, 它们会随着时间影响整体音量。 释放音符
后,响度衰减开关会影响电平的衰减。
EURORACK
WASP DELUXE 合成器可以从其工厂底盘中取出, 并
安装在标准的 Eurorack 箱 (未提供)中。 请参阅本
说明书后面显示的详细信息。
固件更新
有关 WASP DELUXE 合成器固件的任何更新, 请定
期访问我们的网站 behringer.com。 可以下载固件文
件并将其存储在计算机上, 然后用于更新 WASP
DELUXE。 固件文件随附有关更新过程的详细说明。
Some parameters in the WASP DELUXE synthesizer can be
changed using MIDI system exclusive (SysEx) commands.
A MIDI utility such as the popular MIDI OX can be used to send the
SysEx command data string to the WASP DELUXE using the USB
MIDI conection between a host computer and the WASP DELUXE.
SysEx Data Format
The following data format is used when creating a SysEx message
(with the data beginning with F0 and ending with F7).
F0 00 20 32 aa bb cc dd ee F7
The various items in this SysEx data string are described below:
Item Description
00 20 32
Manufacturer SysEx ID number
(Behringer GmbH)
aa Reserved
bb
Device ID: 00-0xF (must match hardware
device ID), or 7F to address all devices.
Note: This is the same as the Poly Chain ID.
It is not the MIDI Channel
cc
Main parameter number
(see Command Table below)
dd
Sub parameter number
(see Command Table below)
ee
Parameter value MSB (will be zero unless the
parameter value is greater than 127)
Parameter value LSB (Range is 0 to 127)
(see Command Table below)
Command Table
cc (Main) dd
(Sub)
Description (Para
Range)
Default
0xA
Global
Setting
00 MIDI Channel 0 to 15 0
01
Key Priority
(In poly chain mode,
note priority will be
restricted to ’LOW’)
0-LOW
1-HIGH
2-LAST
0- LOW
02 Multi Trigger
0-OFF
1-ON
(1.05 style)
2-ON
(1.06 style)
0- OFF
03
Pitch Bend
semitones
(Pitch wheel range)
Eective when pitch
bend range not
xed. See “OC Pitch
bend mode” below
0 to 12 12
06 MIDI IN Transpose
0 to 24
The range is
-12 to + 12,
so 12 is no
transpose
12
07 MIDI Note Zero Volts 0 to 127 36
08
Poly Chain*
see note below
0-OFF, 1-ON 0- OFF
09
Device ID
(Poly Chain ID)
0-15 0
0A
Enable/Disable MIDI
Channel Switches
0- Enable
1- Disable
0-Enable
0B Modulation Curve
0- Soft
1- Med
2- Hard
0- Soft
OC Pitch Bend Mode
0- PitchBend
Range Fixed
1- PitchBend
Range
Settable
0- Fixed
OD Poly Chain Style
0- New Style
1- Old Style
0- New
Style
0xB
Restore Global
Settings
0xE
Start User Pitch
CV Calibration
0xF
Restore Default
CV Calibration
WASP DELUXE System Exclusive Commands
10 11
快速启动向导
WASP DELUXE

Command Examples
Note: All command parameters should be in hexadecimal format.
Note: A decimal to hex conversion table is shown below.
If you are using the MIDI Transpose command, then the 3rd
column shows the MIDI IN Transpose that corresponds to each
data value. For example, if you wanted a transpose of +8 as
shown in the table above, then the data sent is 14 (hex).
Function SysEX Command String
Set MIDI Channel to 13
F0 00 20 32 00 7F 0A 00 00 0C F7
Set Key Priority to last F0 00 20 32 00 7F 0A 01 00 02 F7
Turn on Multi Trigger
(1.05 style)
F0 00 20 32 00 7F 0A 02 00 01 F7
Set Pitch Bend
semitone to 11
F0 00 20 32 00 7F 0A 03 00 0B F7
Set MIDI IN Transpose
to +8
F0 00 20 32 00 7F 0A 06 00 14 F7
Set Note C5 as Zero Volts F0 00 20 32 00 7F 0A 07 00 48 F7
Turn on Poly Chain F0 00 20 32 00 7F 0A 08 00 01 F7
Set Device ID to 5 F0 00 20 32 00 7F 0A 09 00 05 F7
Disable MIDI
Channel Switches
F0 00 20 32 00 7F 0A 0A 00 01 F7
Set Modulation Curve
to Medium
F0 00 20 32 00 7F 0A 0B 00 01 F7
Make pitch bend
range eective
F0 00 20 32 00 7F 0A 0C 00 01 F7
Set poly chain style to
old style
F0 00 20 32 00 7F 0A 0D 00 01 F7
Value Value (hex) MIDI Transpose
0 0 -12
1 1 -11
2 2 -10
3 3 -9
4 4 -8
5 5 -7
6 6 -6
7 7 -5
8 8 -4
9 9 -3
10 A -2
11 B -1
12 C 0
13 D 1
14 E 2
15 F 3
16 10 4
17 11 5
18 12 6
19 13 7
20 14 8
21 15 9
22 16 10
23 17 11
24 18 12
*Note: If you use SysEx instead of the recommended A-440
method to turn on the Poly Chain, then the Poly Chain Device ID of
other units in the chain is not set automatically. You have to use
SysEx to set the Poly Chain ID of the rst WASP DELUXE to Device
ID=0, the second WASP DELUXE to ID=1, the third WASP DELUXE
to ID=3 and so on. All WASP DELUXE units must have the same
MIDI channel.
Retriggering Style
These examples show the dierence between the old and new
retriggering styles
Example
Old style
(v1.0.5)
New style
(v1.0.6)
Press and hold note A.
Note A is playing.
Then press and hold
note B. Note B is playing
(A stop). Release note A.
Retrigger No Retrigger
Press and hold note A. Note A
is playing. Then press and hold
note B. Note B is playing
(A stop). Release note B.
Retrigger Retrigger
Poly Chain Style
These two tables show the dierence between old and new poly
chain style.
TABLE OF NOTE RESPONSE -- Old poly chain style
Poly chain
Device
no.
How many notes are playing
0 1 2 3 4 5 6 7
1 O
Note1
Note1 Note1 Note1 Note1 Note1 Note1
2 O Note1
Note2
Note2 Note2 Note2 Note2 Note2
3 O Note1 Note1
Note3
Note3 Note3 Note3 Note3
4 O Note1 Note1 Note1
Note4
Note4 Note4 Note4
5 O Note1 Note1 Note1 Note1
Note5
Note5 Note5
TABLE OF NOTE RESPONSE -- New poly chain style
Poly chain
Device
no.
How many notes are playing
0 1 2 3 4 5 6 7
1 O
Note1
Note1 Note1 Note1 Note1 Note1 Note1
2 O O
Note2
Note2 Note2 Note2 Note2 Note2
3 O O o
Note3
Note3 Note3 Note3 Note3
4 O O O O
Note4
Note4 Note4 Note4
5 O O O O O
Note5
Note5 Note5
Note: Turning on the Poly Chain will aect the note
priority function
WASP DELUXE System Exclusive Commands
12 13
快速启动向导
WASP DELUXE

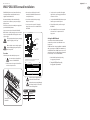
The WASP DELUXE synthesizer can be removed from its factory
chassis and installed into a standard Eurorack chassis (not
supplied). The module width is 70HP.
We recommend that this procedure is undertaken only by
experienced service technicians, to prevent personal injury, or
damage to the unit.
The Eurorack case will need its own suitable power supply unit to
power the WASP DELUXE synthesizer.
A 10-pin connector on the rear of the main PCB of the WASP
DELUXE allows the +12 VDC power supply connection to be made.
A 10-pin to 16-pin adapter ribbon cable is supplied to connect to
your power supply.
Before proceeding, make sure that your power supply
is capable of supplying +12 VDC, 1 Amp.
Make sure that the connections using the supplied
adapter cable will supply the ground and power to
the correct pins of X23.
Procedure
Follow all steps in the order in which they are presented.
1. Disconnect the power cord and all other
connections to the WASP DELUXE.
2. Undo the 8 screws on the top panel as shown. There is
no need to undo any other screws.
3. Disconnect the two cables from the lower side of
the main PCB of the WASP DELUXE, and remove the
assembly from the chassis.
4. Store the chassis assembly and the power supply
adaptor in a dry safe place.
5. Securely connect the 10-pin end P1 of the supplied
adapter cable to connector X23 on the Main PCB of the
WASP DELUXE.
6. Make sure your power supply is turned o
and disconnected from the AC mains.
7. Make sure that your power supply will supply
the following to the pins of connector X23, as
shown in the diagram above:
Pins Connection
1 and 2 No Connection
3 to 8 Ground
9 and 10 +12 VDC
Disconnect from
Main PCB
400 mm ± 10
12
910
1
15
2
16
Red Stripe
Supplied Eurorack Power Supply Cable, Part # A74-0001-79446
Connect End P1 to Connector X23 on main PCB
Pins 1 and 2
No Connection
X23
X21 No Connection
Pins 3 to 8
Ground
Pins 9 and 10
+12 VDC
P1 P2
8. Securely connect the 16-pin end P2 of the supplied
adapter cable to your power supply, and double check
all connections are correct.
9. Securely install the WASP DELUXE Synthesizer into your
Eurorack, using 8 screws in the front panel.
10. Perform a full test and safety test before using the
WASP DELUXE.
11. The 3.5 mm MAIN OUT connector on the top panel is
used instead of the .” rear outputs which are no
longer present.
Setting the MIDI Channel
Once installed in a Eurorack, the MIDI channel number
is automatically set to channel 1 (as the MIDI switches are no
longer present.)
The MIDI channel can be changed using MIDI OX or a similar MIDI
utility on your computer to send MIDI SysEx commands directly
to the WASP DELUXE via the USB MIDI connection. Here is a brief
guide to the procedure (see the MIDI SysEx pages in this manual
for the actual SysEx codes sent to the WASP DELUXE):
1. Disable the MIDI Channel Switches by sending
the appropriate SysEx command.
2. Change the MIDI Channel by sending
the appropriate SysEx command.
WASP DELUXE Eurorack Installation
14 15
快速启动向导
WASP DELUXE

其他的重要信息
1. 在线注册。 请购买 Music Tribe
产品后立即在 musictribe.com 网站
注册。 网页上有简单的在线注册
表格。 这有助于我们更快更有效
率地处理您维修等事宜。 请阅读
保修的相关条款及条件。
2. 无法正常工作。 若您的
Music Tribe 产品无法正常工作,
我们会为您尽快修复。 请联
系您购买产品的销售商。 若你
所在地区没有 Music Tribe 销售
商, 请联系 musictribe.com 网站的
“WHERETOBUY” 一栏下的所列出的
子公司或经销商。
3. 电源连接。 将本设备连接电源
前, 请确保使用的电压正确。 保险
丝需要更换时, 必须使用相同型号
及定额的保险丝。
其他的重要信息
技术参数
合成器架构
声音数 单音
类型 模拟量
震荡器
2 个数控振荡器
低频振荡器
1 (0.5 Hz 至 100 Hz)
VCF 1 个可切换的 Lo,Band, Notch 和 Hi
信封
VCA,VCF
连接性
MIDI 输入 / 通过 5 针 DIN / 16 通道
USB (MIDI) USB 2.0, B 型
主输出 (高)
1 x ¼" TS, 不平衡, 最大 0 dBu
高输出阻抗
1.3 千欧
主输出 (低)
1 x ¼" TS, 不平衡,高输出以下 27 dB
低输出阻抗
1k
主音频输出
3.5 mm TRS, 不平衡, 最大 0 分贝
手机
3.5 mm TRS, 不平衡, 最大 -2 dBu @ 32
欧姆
手机输出阻抗
25
USB
类型
符合 Class B 标准的 USB 2.0
支持的操作系统
Windows XP 或更高版本
Mac OS X 10.6.8 或更高版本
电源要求
外接电源适配器
12 V 直流 1000 mA
能量消耗
2 瓦
环境因素
工作温度范围
5°C – 40°C (41°F – 104°F)
物理
尺寸 (高 x 宽 x 深) 87 x 374 x 136 毫米 (3.4 x 14.7 x 5.4 英寸)
模组宽度
70 马力
重量
1.6 公斤 (3.5 磅)
装运重量
2.5 公斤 (5.5 磅)
16 17
快速启动向导
WASP DELUXE

We Hear You
-
 1
1
-
 2
2
-
 3
3
-
 4
4
-
 5
5
-
 6
6
-
 7
7
-
 8
8
-
 9
9
-
 10
10


他の言語で
関連論文
-
Behringer EURORACK 104 クイックスタートガイド
-
-
-
-
-
Behringer Model D クイックスタートガイド
-
-
-
-
Behringer RX1202FX 取扱説明書