
www.blackanddecker.com
English 7
简体中文 12
2
1
12
11
3 4
5
7
9
10
6
8
FSMH13151SM

2
3
12a
5
10
11
11a
C1
8
11
B
A
12
13
14
C
7
9
E
15
6
F

2
3
5
16
23
17
18
19
19a
22
24
19b
19c
20
18a
20a
16a
12b
20b
20e
20c
20d
21
G

4
5
17
18
21
H
19
19a
19c
19b
I
20
20a
J

4
5
N
20
20b
20d20c
K
24 22
22
24
24a
22a
L
M

6
7
PO
4
Q
2
R
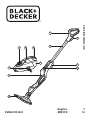
FSMH13151SM
STEAM MOP
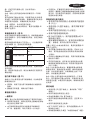
Technical Data
FSMH13151SM
Voltage V
ac
220-240
Power W 1300
Tank Capacity ml 500
Weight kg 2.8

7
ENGLISH
6
7
Intended use
Your BLACK+DECKER
TM
FSMH13151SM steam mop has
been designed for sanitising and cleaning sealed hardwood,
sealed laminate, linoleum, vinyl, ceramic tile, stone and
marble oors. This appliance is intended for indoor household
use only.
Safety Instructions
t
Warning! Read all Safety,
Maintenance, Service' manual
carefully before operating
this appliance. Read all of this
manual carefully before operat-
ing this appliance.
Labels on appliance
The following pictograms along with the
date code are shown on the appliance.
CAUTION Hot Steam
Water dripping when used
upside down
Steam escapes from all
sides
Do not leave unsuper-
vised with young children
Hand wash only
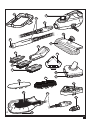
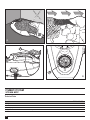
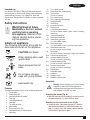
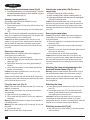
Features
This appliance includes some or all of the following features.
1. On/off switch
2. Smart select dial
3. Hand held steam unit handle
4. Filler cap
5. Hand held steam unit
6. Hand grip
7. Top cable tidy hook
8. Main handle
9. Bottom cable tidy hook
10. Hand held steam unit release button
11. Main body
12. Floor cleaning head
12a. Steam burst oor cleaning head
12b. Carpet glider
(for use on carpets)
13. Floor cleaning pad
14. Floor cleaning pad release tab
15. Hanging Bracket
16. Steam hose
16a. Hose release button
17. Steam nozzle
18. Large squeegee accessory
(for use on shower screens / glass / mirrors / clothing /
upholstery)
18a. Large squeegee sock
19. Steam burst brush unit
19a. Steam burst wire brush
( for use on BBQ / ovens)
19b. Steam burst brush
( for use on BBQ / ovens / oven hobs / taps / grout)
19c. Steam burst wide brush
(for use on larger work surfaces)
20. Delta head
(for use on clothing / upholstery / larger work surfaces)
20a. Flat surface cleaning pad
20b. Garment steaming interface
(for use on clothing / upholstery)
20c. Garment steaming brush
(for use on clothing / upholstery)
20d. Garment steaming pad
(for use on clothing / upholstery)
20e. Carpet glider
21. Adjustable nozzle
22. SteaMitt
TM
23. SteaMitt
TM
hose
24. SteaMitt
TM
cleaning pad
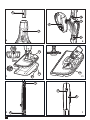
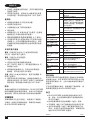
Assembly
@
Warning! Before attempting any of the following
instructions, make sure that the appliance is
switched off and unplugged and the appliance is
cold and does not contain any water.
Attaching the handle (Fig. A)
u Slide the bottom end of the handle (8) into the top end of
the steam mop body (11) until it clicks into place.
Attaching the hand held steam cleaner (Fig. B)
u Holding the back of the steam mop body (11) push the
hand held steam cleaner (5) rmly into the steam mop
body (11) making sure it sits correctly over the interface
(11a) and clicks securely into place.

8
ENGLISH
Removing the hand held steam cleaner (Fig. B)
u Push the release button (10) on the main body (11) and lift
the hand held steam cleaner (5) off the interface (11a) and
away from the main body (11).
Attaching a cleaning pad (Fig. C)
Replacement cleaning pads are available from your
BLACK+DECKER dealer.
u Place a cleaning pad (13) on the oor with the velcro 'loop'
side facing up.
u Lightly press the steam mop down onto the cleaning pad
(13).
Note: This unit may be supplied with a standard oor cleaning
head (12) or a steam burst cleaning head (12a). In either case
use these instructions to t a cleaning pad.
Caution! Never leave the steam mop in one spot on any
surface for any period of time. Always place the steam mop
with the handle (8) supported in the upright position when
stationary and make sure the steam mop is turned off when
not in use.
Removing a cleaning pad
Caution! Always wear suitable shoes when changing the
cleaning pad on your steam mop.
Do not wear slippers or open toed footwear.
u Return the handle (8) to the upright position and turn the
steam mop 'OFF'.
u Wait until the steam mop cools down (approximately 5
minutes).
u Lift the steam mop away from the cleaning pad freeing it
from the velcro fastening.
Caution! Never leave the steam mop in one spot on any
surface for any period of time.
Always place the steam mop with the handle (8) supported in
the upright position when stationary and make sure the steam
mop is turned off when not in use.
Filling the water tank (Fig. Q)
Note! Fill the water tank with clean tap water (Do not use any
additives or chemicals).
Note! In areas of hard water, the use of de-ionised water is
recommended.
u Open the ller cap (4) by ipping it up.
u Fill the water tank with water (Do not use any additives or
chemicals).
Warning! When lling, detach from main unit and maintain in
a horizontal position.
Warning! Your water tank has a 0.5 litre capacity. Do not over
ll the tank.
u Close the ller cap (4).
Note! Ensure the ller cap is rmly secured.
Attaching the carpet glider (12b) (For use on
carpets only)
u Place the carpet glider (12b) on the oor.
u Attach a cleaning pad to the oor cleaning head (12)
u Lightly press the steam mop down onto the carpet glider
(12b) until it clicks into place.
Caution! Never leave the steam mop in one spot on any
surface for any period of time. Always place the steam mop
with the handle (8) supported in the upright position when
stationary and make sure the steam mop is turned off when
not in use.
Removing the carpet glider
Caution! Always wear suitable shoes when changing the
carpet glider on your steam mop. Do not wear slippers or
open toed footwear.
u Return the handle (8) to the upright position and turn the
steam mop 'OFF'.
u Wait until the steam mop cools down (approximately 5
minutes).
u Place the front of your shoe onto the carpet glider removal
tab and press down rmly.
u Lift the steam mop up and off the carpet glider.
Caution! Never leave the steam mop in one spot on any
surface for any period of time. Always place the steam mop
with the handle (8) supported in the upright position when
stationary and make sure the steam mop is turned off when
not in use.
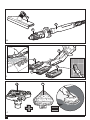
Attaching the hose and accessories to the
hand held steam cleaner (Fig. G - O)
Warning! Inspect the seal between the connection point on
the hand held steam cleaner (5) and the steam hose (16)
before each use. If the seal malfunctions or is damaged,
please contact your nearest authorised repair agent. Do not
use the appliance.
Attaching the hose
u Press the steam hose release button (16a) on the steam
hose (16).
u Connect the steam hose (16) to the hand held steam
cleaner (5) and release the steam hose release button
(16a) making sure it clicks into place.
Important! Ensure that the steam hose (16) is securely
connected to the hand held steam cleaner (5). If steam
escapes from the joint, the hose is incorrectly tted. Switch off,
allow the unit to cool then remove and ret the hose.
Attaching accessories (Fig H)
u Align the lugs on the steam nozzle (17) with the recesses
on the accessory.

9
ENGLISH
u Press the accessory onto the steam nozzle (17) and twist
anti-clockwise until the accessory clicks into place.
Important! All accessories, apart from the SteaMitt
TM
(22)
which has its own hose and connector (23), must be attached
to the steam hose (16) for use.
Removing the hose and accessories
Warning! The steam hose (16), Steam nozzle (17) and
accessories become hot during use. Allow the unit and all
accessories to cool before attempting to remove.
Removing an accessory
u Twist the accessory clockwise then pull away from the
hose (16).
Removing the hose
u Press the steam hose release button (16a) on the steam
hose (16) and pull away from the hand held steam unit.
SteaMitt
TM
Your BLACK+DECKER
TM
SteaMitt
TM
has been designed for
sanitising and cleaning tiles, work tops, kitchen surfaces and
bathroom surfaces. This appliance is intended for indoor
household use only.
Attaching the SteaMitt
TM
hose to the hand held
steam unit
Warning! Inspect the seal on the steam nozzle and hose
before each use. If the seal is missing or damaged then
please contact your nearest authorised repair agent. Do not
use the appliance. Inspect the seal on the SteaMitt
TM
and
hose If the seal is missing, damaged or any steam is escaping
then please contact your nearest authorised repair agent.
Do not use the appliance. Ensure there is no blockage or
impedence in the SteaMitt
TM
hose or attachment hose. If any
are detected then please contact your nearest authorised
repair agent. Do not use the appliance.
Fitting a cleaning pad to the SteaMitt
TM
(Fig. L)
Warning! Ensure there is no blockage or impedence in
the steam release vents If any are detected then please
contact your nearest authorised repair agent. Do not use the
appliance.
u Fit the cleaning pad (24) to the SteaMitt
TM
(22) by
attaching the 'loop' velcro strips (24a) on the upper side
of the cleaning pad, to the 'hook' velcro pads (22a) on the
underside of the SteaMitt
TM
(4). Press down rmly.
Warning! The SteaMitt
TM
should not be used without tting a
cleaning pad.
Note: The SteaMitt
TM
accommodates 4 types of cleaning pads
of varying thickness. Scouring pad (for use on tough stains
and non delicate surfaces), Bathroom pad (for use on taps
and other moulded bathroom surfaces), Standard pad (for use
on all larger surfaces) and Polishing pad (for use on delicate
surfaces).
@
Warning! Always use the SteaMitt
TM
as shown in
figure M, with your hand inside the protective glove.
@
Warning! Never attempt to use the SteaMitt
TM
by
gripping it externally as shown in figure N.
This will result in scalding.
@
Warning! Avoid using the SteaMitt
TM
in tight corners
as shown in gure O.
@
Warning! Should a problem occur during use,
use the quick release tab to quickly remove the
SteaMitt
TM
from your hand as shown in gure P.
@
Warning! Do not use the SteaMitt
TM
on cold glass,
such as windows as damage may be caused by the
sudden change in temperature.
@
Warning! Never point or direct the mitt at yourself
or any other person.
Note: Variable steam dial is disconnected when the
SteaMitt
TM
is tted and subsequently the ow of steam is
limited.
Use
Important! This unit will kill 99.9% of bacteria and germs
when used in accordance with the instructions in this manual
and with the micro bre pads tted and a continuous run time
of 90 seconds.
Switching on and off
u To switch the appliance on, press the ON/Off switch (1).
It takes approximately 15 seconds for the steam mop to
heat up.
u To switch the appliance off, press the ON/Off switch (1).
Note: always have your hand inside the SteaMitt
TM
before you
press the steam button.
Caution! Never leave the steam mop in one spot on any
surface for any period of time.
Always place the steam mop with the handle (8) supported in
the upright position when stationary and make sure the steam
mop is turned off when not in use.
Caution! Always empty the steam mop after use.
Note! When rst lled or after running dry, it can take up to 45
seconds for steam to be produced.
Smart select Technology (Fig. R)
This steam mop is tted with an Smart select dial (2) which
shows various cleaning applications. They are used to select

10
ENGLISH
the correct operating mode for your particular cleaning
operation.
Using Smart select, choose from one of the following
applications by turning the Smart select
dial (2) until the
required setting is selected.
Setting Mop Hand held
Wood/Laminate High temperature steam for
windows
Stone/Marble
Tiles/Vinyl Low temperature steam for
heavy grime
The steam mop will select the correct volume of steam
required for your particular cleaning operation.
Note: Always check you are using the correct setting before
using your steam mop.
Steam Burst (Fig. C1)
The oor head (12a) is equipped with a steam burst pedal to
aid in the removal of stubborn marks and stains.
u During use, press the steam burst pedal to apply extra
cleaning power.
u To revert back to normal setting press the pedal again.
Hints for optimum use
General
Caution: Never use the steam mop without rst attaching a
cleaning pad.
u Always vacuum or sweep the oor before using the steam
mop.
u The easiest way to use the appliance is to tilt the handle
to a 45º angle and clean slowly, covering a small area at a
time.
u Use water only with no additives or chemicals with your
steam mop. To remove stubborn stains from vinyl or
linoleum oors, you can pre-treat with a mild detergent
and some water before using the steam mop.
Steam Cleaning with the mop
u Fit hand held steam cleaner (5) to the steam mop body
(11)
u Place a cleaning pad (13) on the oor with the velcro 'loop'
side facing up.
u Lightly press the steam mop down onto the cleaning pad
(13).
u Connect the steam mop to the mains.
u Press the ON/OFF button (1). It takes approximately 15
seconds for the steam mop to heat up.
u Turn the Smart select dial (2) until the required setting is
reached. After a few seconds steam will start to come out
of the steam head.
Note! When rst lled or after running dry, it can take up to 45
seconds for steam to be produced.
u It takes a few seconds for steam to enter the cleaning pad.
The steam mop will now glide easily over the surface to be
sanitized/cleaned.
u Push and pull the steam mop slowly across the surface to
thoroughly steam clean each section.
u When you have nished using the steam mop, return
the handle (8) to the upright position, making sure that it
is supported and turn it 'OFF'. Wait until the steam mop
cools down (approximately ve minutes).
Caution! It is important to monitor the water level in the
water tank. To rell the water tank and continue to sanitize/
clean stand the mop upright making sure that the handle is
supported and turn the steam mop 'OFF'. Unplug the unit from
the electrical wall outlet, and rell the water tank.
Caution! Never leave the steam mop in one spot on any
surface for any period of time. Always place the steam mop
with the handle (8) supported in the upright position when
stationary and make sure the steam mop is turned off when
not in use.
Carpet refreshing
u Place a cleaning pad (13) on the oor with the 'loop' side
facing up.
u lightly press the steam mop down onto the cleaning pad.
u Place the carpet glider (12b) on the oor.
u Lightly press the steam mop down onto the carpet glider
until it clicks into place.
u Connect the steam mop to the mains.
u Press the ON/OFF button (1). It takes approximately 15
seconds for the steam mop to heat up.
u Turn the Smart select dial (2) to the Wood/Laminate
setting.
u Push and pull the steam mop slowly across the carpet to
thoroughly refresh each section.
u When you have nished using the steam mop, return the
handle (8) to the upright position and turn the unit OFF.
Wait until the steam mop cools down (approximately ve
minutes).
After use
u Turn the Smart select
dial (2) to the OFF position.
u Wait until the steam mop cools down.
u Unplug the steam mop from the electrical wall outlet.
u Empty the water tank.
u remove the cleaning pad (13) and wash it ready for next
use (take care to follow the wash care instructions printed

11
ENGLISH
on the cleaning pad).
u Wrap the supply cable around the cable tidy hooks (7 and
9).
u There is a hanging bracket (15) built into the hand grip (6)
which allows your steam mop to be hung from a suitable
hook on the wall. Always ensure that your wall hook is
capable of supporting the weight of the steam mop safely.
Hand held steam cleaning
Warning! Unit will not produce steam unless it is connected to
the main body (11) or the steam hose (16) is tted.
Warning! Only use in a horizontal position.
u Attach the required accessory.
u Connect the hand held steam cleaner to the mains.
u Press the ON/OFF button (1). It takes approximately 15
seconds for the steam mop to heat up.
u Turn the Smart select dial (2) until the required setting is
reached. After a few seconds steam will start to come out
of the steam head.
Note! When rst lled or after running dry, it can take up to 45
seconds for steam to be produced.
u When you have nished using the hand held steam
cleaner turn the Smart select dial (2) to the OFF position.
Turn the unit OFF by pressing the ON/OFF button (1) and
disconnect from the mains supply. Wait until the unit cools
down before storing (approximately ve minutes).
Accessories
The performance of your appliance depends on the accessory
used. BLACK+DECKER accessories are engineered to high
quality standards and designed to enhance the performance
of your appliance. By using these accessories you will get the
very best from your equipment.
Troubleshooting
If your appliance seems not to operate properly, follow the
instructions below. If this does not solve the problem, please
contact your local BLACK+DECKER repair agent.
The steam mop is not
turning on
1. Check the unit is plugged in at the wall
socket.
2. Check the unit is switched on using the
ON/OFF switch (1)
3. Check the fuse in the plug.
The steam mop is not
producing steam
4. The steam mop will only produce steam if
the hand held steam cleaner (5) is
correctly docked into the main body (11)
or the steam hose is tted or the Smart
select is turned to ON
5. Check that the water tank is full. Note:
When rst lled or after running dry it can
take up to 45 seconds for steam to be
produced.
6. Check steps 1, then 2, then 3
The steam mop stops
producing steam
during use
7. Check steps 4, then 5, then 3
Problem Step Possible solution
The steam mop is
producing too much
steam during use
8. Turn the Smart select dial (2)
anti-clockwise to reduce the amount of
steam being produced
The steam mop is
producing too little
steam during use
9. Turn the Smart select dial (2) clockwise to
increase the amount of steam being
produced
No steam is being
produced from the
hand held steam
cleaner
10. Check that the Smart select dial (2) is at
the ON position
11. Check steps 5, then 1, then 2, then 3
The hand held steam
cleaner is producing
too little steam during
use
12. Turn the Smart select dial (2) clockwise to
increase the amount of steam being
produced
13. Check step 5
The hand held steam
cleaner is producing
too much steam during
use
14. Turn the Smart select dial (2)
anti-clockwise to reduce the amount of
steam being produced
The accessories keep
falling off the unit
15. Refer to the assembly chapter for correct
tting instructions of all parts and
accessories
Steam is escaping
from unexpected areas
of the unit
16. Refer to the assembly chapter for correct
tting instructions of all parts and
accessories
Where can I get further
information/
accessories
17. www.blackanddecker.co.uk/steammop
www.blackanddecker.ie/steammop
Service Information
BLACK+DECKER offers a full network of company-owned
and authorized service locations throughtout Asia. All
BLACK+DECKER Service Centers are staffed with trained
personnel to provide customers with efcient and reliable
product service.
Whether you need technical advice, repair, or genuine factory
replacement parts, contact the BLACK+DECKER location
nearest to you.
NOTE
u BLACK+DECKER’s policy is one of continuous improve-
ment to our products and, as such, we reserve the right to
change product specications without prior notice.
u Standard equipment and accessories may vary by country.
u Product specications may differ by country.
u Complete product range may not be available in all
countries. Contact your local BLACK+DECKER dealers for
range availability.

12
简体中文
FSMH13151SM
蒸汽拖把
技术参数
FSMH13151SM
电压
伏特
交流
220-240
功率
瓦
1300
水箱容量
毫升
500
重量 千克
2.8
设计用途
您的 BLACK+DECKER
TM
FSMH13151SM 蒸汽拖
把设计用于清洁与清洗密封实木地板、密封复合地
板、油地毡地板、乙烯基地板、瓷砖地板、石地板
及大理石地板。本设备仅适用于室内家庭用途。
安全说明
t
警告!使用设备前,请仔
细阅读“安全、维护、
保养”手册的所有内容。
使用设备前,请仔细阅读
本手册。
设备上的标签
设备上显示下列图形和日期码。
警示热蒸汽
倒置时滴水
蒸汽从四面逸出
不要让儿童在无人看
管下接触
只能手洗
部件名称
本设备包含如下部分或全部部件。
1. On/Off 开关
2. 智能选择旋钮
3. 手持式蒸汽设备手柄
4. 注水口盖子
5. 手持式蒸汽设备
6. 手柄
7. 顶端电源线整理钩
8. 主手柄
9. 底端电源线整理钩
10. 手持式蒸汽设备释放按钮
11. 主机身
12. 地板清洁头
12a. 强力蒸汽喷射地板清洁头
12b. 地毯助滑器
(仅用于地毯)
13. 地板清洁垫
14. 地板清洁垫释放凸耳
15. 吊钩
16. 蒸汽软管
16a. 软管释放按钮
17. 蒸汽喷嘴
18. 大型橡胶清洁器附件
(用于淋浴屏/玻璃/镜子/服装/内饰)
18a. 大型橡胶清洁器套
19. 强力蒸汽喷射毛刷装置
19a. 强力蒸汽喷射钢丝刷
(用于烧烤/烤箱)
19b. 强力蒸汽喷射毛刷
(用于烧烤/烤箱/灶具/水龙头/灌浆)
19c. 强力蒸汽喷射宽头毛刷
(用于较大的工作表面)
20. 三角拖把头
(用于服装/内饰/较大的工作表面)

13
简体中文
20a. 平面清洁垫
20b. 衣物蒸汽挂烫接口
(用于服装/内饰)
20c. 衣物蒸汽挂烫毛刷
(用于服装/内饰)
20d. 衣物蒸汽挂烫垫
(用于服装/内饰)
20e. 地毯助滑器
21. 可调节喷嘴
22. SteaMitt
TM
23. SteaMitt
TM
软管
24. SteaMitt
TM
清洁垫
组装
@
警告! 进行如下任何操作之前,请确保
关闭设备开关、拔下设备插头、设备处
于冷却状态并卡入含水。
安装手柄(图 A)
u 将手柄 (8) 的底端向蒸汽拖把机身的顶端 (11)
滑动,直至其卡入到位。
连接手持蒸汽清洁器(图 B)
u 握住蒸汽拖把机身 (11) 背面,将手持蒸汽清洁器
(5) 紧紧推入蒸汽拖把机身 (11),使它正确固定
在接口 (11a) 上方并卡入到位。
拆卸手持蒸汽清洁器(图 B)
u 按下主机身 (11) 上的释放按钮 (10),同时将手持
蒸汽清洁器 (5) 提离接口 (11a) 并拉离主机
身 (11)。
安装清洁垫(图 C)
BLACK
+DECKER 代理商提供备用清洁垫。
u 将清洁垫 (13) 置于地板上,魔术扣贴“环形”
面朝上。
u 将蒸汽拖把往清洁垫 (13) 上轻压。
注:该装置随附标准地板清洁头
(12) 或强力蒸汽喷
射清洁头 (12a)。无论哪种情况,都请按照上述说明
安装清洁垫。
小心!禁止让蒸汽拖把长时间停留在任一工作表
面上。蒸汽拖把处于静止状态时,尽量使手柄
(8)
保持竖直位置;未使用蒸汽拖把时,请确保将其开
关关闭。
拆卸清洁垫
小心!给蒸汽拖把更换清洁垫时,请务必穿上合适
的鞋子。
请勿穿拖鞋或露趾鞋。
u 将手柄 (8) 恢复到竖直位置,并关闭蒸汽拖把。
u 等待蒸汽拖把冷却(大约 5 分钟)。
u 将蒸汽拖把从清洁垫上提起,使魔术贴分离。
小心!禁止让蒸汽拖把长时间停留在任一工作表
面上。
蒸汽拖把处于静止状态时,尽量使手柄
(8) 保持
竖直位置;未使用蒸汽拖把时,请确保将其开关
关闭。
给水箱加水(图 Q)
注意!给水箱注入干净的自来水(不要使用任何添
加剂或化学品)。
注意!如果您所在地区的自来水水质较硬,建议您
使用去离子水。
u 向上翻开注水口盖子 (4)。
u 给水箱加水(不要使用任何添加剂或化学品)。
警告!装水时,请将水箱从主装置上拆下并保持水
平位置。
警告!本水箱的容量为 0.5 升。请勿超过水箱的最
高水位线。
u 关闭注水口盖子 (4)。
注意!确保注水口盖子已经稳固安装。
连接地毯助滑器 (12b)(仅用于地毯)
u 将地毯助滑器 (12b) 置于地板上。
u 将清洁垫连接到地板清洁头 (12) 上。
u 将蒸汽拖把往地毯助滑器 (12b) 上轻压,直至其
卡入到位。
小心!禁止让蒸汽拖把长时间停留在任一工作表
面上。蒸汽拖把处于静止状态时,尽量使手柄
(8)
保持竖直位置;未使用蒸汽拖把时,请确保将其开
关关闭。
取下地毯助滑器
小心!给蒸汽拖把更换地毯助滑器时,请务必穿上
合适的鞋子。请勿穿拖鞋或露趾鞋。
u 将手柄 (8) 恢复到竖直位置,并关闭蒸汽拖把。
u 等待蒸汽拖把冷却(大约 5 分钟)。
u 请将自己鞋子的前部放在地毯助滑器拆卸凸
耳上,用力向下踩。
u 将蒸汽拖把向上拉,使其离开地毯助滑器。
小心!禁止让蒸汽拖把长时间停留在任一工作表
面上。蒸汽拖把处于静止状态时,尽量使手柄
(8)
保持竖直位置;未使用蒸汽拖把时,请确保将其开
关关闭。

14
简体中文
将软管和附件连接到手持式蒸汽清洁器
(图 G - O)
警告!每次使用前,检查手持式蒸汽清洁器
(5) 和蒸汽软管 (16) 上的连接点之间的密封件。
如果密封件出现故障或损坏,请与最近的授权维修
代理联系。请勿使用设备。
安装软管
u 按下蒸汽软管 (16) 上的蒸汽软管释放按钮 (16a)。
u 将蒸汽软管 (16) 连接到手持式蒸汽清洁器 (5),
并松开蒸汽软管释放按钮 (16a),确保其卡入
到位。
重要信息!确保蒸汽软管
(16) 稳固连接到手持式蒸
汽清洁器 (5)。如果蒸汽从接头中逸出,则软管安装
不正确。关闭开关,让本设备冷却,然后拆下并重
新安装软管。
安装附件(图 H)
u 将蒸汽喷嘴 (17) 上的凸耳与附件的凹槽对齐。
u 将附件按压到蒸汽喷嘴 (17) 上,逆时针旋转,
直到附件卡入到位。
重要信息!所有附件,除了有自己的软管和接头
(23) 的 SteaMitt
TM
(22) 外,均必须连接到蒸汽软管
(16) 方可使用。
拆卸软管和附件
警告!蒸汽软管 (16)、蒸汽喷嘴 (17) 和附件在使
用期间会发热。应等设备和所有附件冷却后才尝试
拆卸。
拆卸附件
u 顺时针旋转附件,然后拉离软管 (16)。
拆卸软管
u 按下蒸汽软管 (16) 上的蒸汽软管释放按钮 (16a),
然后从手持式蒸汽设备上拉开。
SteaMitt
TM
BLACK+DECKER
TM
SteaMitt
TM
设计用于消毒和清洁
瓷砖、工作台、厨房表面和浴室表面。本设备仅适
用于室内家庭用途。
将 SteaMitt
TM
软管连接到手持式蒸汽设备
警告!每次使用前检查蒸汽喷嘴和软管上的密
封件。如果密封件丢失或损坏,请与最近的授权维
修代理联系。请勿使用设备。检查 SteaMitt
TM
和软
管上的密封件。如果密封件丢失、受损或有任何
蒸汽逸出,请与最近的授权维修代理联系。请勿
使用设备。确保
SteaMitt
TM
软管或连接软管中没有
堵塞。如果检测到任何堵塞,请与最近的授权维修
代理商联系。请勿使用设备。
为 SteaMitt
TM
安装清洁垫(图 L)
警告!确保蒸汽放气口没有任何堵塞。如果检测到
任何堵塞,请与最近的授权维修代理商联系。请勿
使用设备。
u 通过将清洁垫上方的“环形”魔术贴条 (24a)
粘贴到 SteaMitt
TM
(4) 下方 的“钩形”魔术贴垫
(22a),将清洁垫 (24) 安装到 SteaMitt
TM
(22) 上。
向下按紧。
警告!不应在没有安装清洁垫的情况下使用
SteaMitt
TM
。
注:SteaMitt
TM
可使用 4 种不同厚度的清洁垫。
百洁布(用于顽固污渍和非精致表面)、浴室垫
(用于水龙头和其他模压浴室表面)、标准垫
(用于所有较大的表面)和抛光垫(用于精致表面)。
@
警告!使用
SteaMitt
TM
时务必将您的手放在
防护手套内(如图 M 所示)。
@
警告!切勿尝试在使用 SteaMitt
TM
时
抓住其外部(如图 N 所示),这样会导致
烫伤。
@
警告!避免在狭窄的角落使用 SteaMitt
TM
,
如图 O 所示。
@
警告!如果使用过程中出现问题,应使用
快速释放凸耳迅速从手中取出 SteaMitt
TM
,
如图 P 所示。
@
警告!不要在窗户等冷玻璃上使用
SteaMitt
TM
,因为温度突然变化可能会损坏
玻璃。
@
警告!切勿将手套指向自己或指向任何其
他人。
注:安装
SteaMitt
TM
时,变速蒸汽旋钮会断开
连接,蒸汽流将受到限制。
使用
重要信息!若按照本手册中的说明操作并使用装配
的微纤维垫连续运行 90 秒,本设备将消灭 99.9%
的细菌。
开启和关闭
u 要启动设备,请按下 ON/Off 开关 (1)。蒸汽拖
把需要大约 15 秒钟进行加热。
u 要关闭设备,请按下 ON/Off 开关 (1)。

15
简体中文
注:在按下蒸汽按钮之前,务必将手放入
SteaMitt
TM
。
小心!禁止让蒸汽拖把长时间停留在任一工作表
面上。
蒸汽拖把处于静止状态时,尽量使手柄
(8) 保持竖
直位置。未使用蒸汽拖把时,请确保将其开关关闭。
未使用蒸汽拖把时,请确保将其开关关闭。
小心!使用后,务必清空蒸汽拖把。
注意!刚注入水或水份耗尽后,最多可能需要
45
秒来产生蒸汽。
智能选择技术(图 R)
本蒸汽拖把装有智能选择旋钮 (2),该旋钮提供各种
清洁用途指示。您可以根据清洁用途,设定正确的
操作模式。
使用智能选择来选择以下应用之一,方法是旋转智
能选择旋钮
(2),直到选定所需设置。
设置 拖把 手持式
实木地板/复合地板 用于窗户的高温蒸汽
石地板/大理石地板
瓷砖地板/乙烯基地板 用于重度污垢的低温蒸汽
本蒸汽拖把会根据您的特殊清洁用途,选择合适的
蒸汽流量。
注:使用蒸汽拖把之前,请务必确保您正在使用正
确的设置。
强力蒸气喷射(图 C1)
地板头 (12a) 备有强力蒸气喷射踏板,以协助您清
除顽固的污渍。
u 使用时,请按下强力蒸气喷射踏板以加强清洁
效果。
u 要恢复正常设置,请再次按下踏板。
最佳使用提示
一般原则
警示:禁止在未安装清洁垫的情况下使用蒸汽拖把。
u 使用蒸汽拖把前,请务必使用吸尘器或扫把将地
板上的灰尘清除干净。
u 本产品最简单的使用方法就是将手柄倾斜至
45° 角,慢慢清洁,每次只清洁一小片地方。
u 只使用水,不要将蒸汽拖把与添加剂或化学品一
起使用。要清除乙烯基地板或油地毡地板上的顽
固污渍,可在使用蒸汽拖把前,用温和洗涤剂和
适量的水进行处理。
用拖把进行蒸汽清洁
u 将手持式蒸汽清洁器 (5) 安装到蒸汽拖把机
身 (11) 上。
u 将清洁垫 (13) 置于地板上,魔术扣贴“环形”
面朝上。
u 将蒸汽拖把往清洁垫 (13) 上轻压。
u 将蒸汽拖把连接到电源。
u 按 ON/OFF 按钮 (1)。蒸汽拖把需要大约 15
秒钟进行加热。
u 旋转智能选择旋钮 (2),直至达到所需的设
置。
数秒后,蒸汽将从蒸汽头中涌出。
注意! 刚注入水或水份耗尽后,最多可能需要
45
秒来产生蒸汽。
u 蒸汽需要几秒钟时间进入清洁垫。完成以上步
骤后,蒸汽拖把将能轻松在待清洁/清洗的表面
上滑动。
u 在表面上慢慢推拉蒸汽拖把,用蒸汽彻底清洁地
板的各个角落。
u 用完蒸汽拖把后,将手柄 (8) 返回到直立位置,
确保稳固支撑并将其关闭。等待蒸汽拖把冷却
(约 5 分钟)。
小心!务必监控水箱水位。要重新装满水箱并继
续清洁/清洗,请将拖把直立放置,确保手柄稳固
支撑,并关闭蒸汽拖把。从墙面插座上拔下工具
插头,然后重新注满水箱。
小心!禁止让蒸汽拖把长时间停留在任一工作表
面上。蒸汽拖把处于静止状态时,尽量使手柄
(8)
保持竖直位置;未使用蒸汽拖把时,请确保将其开
关关闭。
清洗地毯
u 将清洁垫 (13) 置于地板上,魔术扣贴“环形”
面朝上。
u 将蒸汽拖把往清洁垫上轻压。
u 将地毯助滑器 (12b) 置于地板上。
u 将蒸汽拖把往地毯助滑器上轻压,直至其卡入
到位。
u 将蒸汽拖把连接至主电源。
u 按下 ON/OFF 按钮 (1)。蒸汽拖把需要大约 15
秒钟进行加热。
u 将智能选择旋钮 (2) 旋至“木板/复合地板”设置。

16
简体中文
u 在地毯上慢慢推拉蒸汽拖把,用蒸汽彻底清洁地
毯的各个部分。
u 用完蒸汽拖把后,将手柄 (8) 恢复到竖直位置,
并关闭装置。等待蒸汽拖把冷却(约 5 分钟)。
使用后
u 将智能选择旋钮 (2) 转至关闭位置。
u 等待蒸汽拖把冷却。
u 从墙面插座上拔下蒸汽拖把插头。
u 清空水箱。
u 拆卸清洁垫 (13) 并清洗以备下次使用(注意遵
循清洁垫上印制的清洁保养说明)。
u 将电源线缠绕在电源线整理钩上 (7 和 9)。
u 可以使用手柄 (6) 内置的吊钩 (15) 将蒸汽拖把
挂到墙上一个符合其重量标准的挂钩上。请务
必确保所使用的挂钩能够安全地承受蒸汽拖把
的重量。
手持式蒸汽清洁
警告!在连接至主机身 (11) 或安装蒸汽软管
(16) 前,设备不会产生蒸汽。
警告!只能在水平位置使用。
u 连接所需的附件。
u 将手持式蒸汽清洁器连接到电源。
u 按下 ON/OFF 按钮 (1)。蒸汽拖把需要大约 15
秒钟进行加热。
u 旋转智能选择旋钮 (2),直至达到所需设置。
数秒后,蒸汽将从蒸汽头中涌出。
注意!刚注入水或水份耗尽后,最多可能需要
45
秒来产生蒸汽。
u 使用手持式蒸汽清洁器后,将智能选择旋钮 (2)
旋转到关闭位置。按 ON/OFF 按钮 (1) 关闭设备并
断开电源。等待设备冷却再存放(约 5 分钟)。
附件
设备的性能取决于所使用的附件。BLACK+DECKER
附件依据高质量标准进行规划,并设计用于增强设
备的性能。使用这些配件会令您的设备如虎添翼。
故障排除
如果设备似乎无法正常运行,请按照以下说明进
行操作。如果仍不能解决问题,请联系您当地的
BLACK+DECKER 维修代理。
问题 步骤 可能的解决方案
蒸汽拖把没有启动
1.
检查设备是否已插入墙壁插座。
2. 使用 ON/OFF 开关 (1) 检查设备是
否已打开
3.
检查插头中的保险丝。
蒸汽拖把不产生
蒸汽
4. 只有当手持式蒸汽清洁器 (5) 正
确插入主机 (11),或安装了蒸
汽软管,或已将智能选择旋钮
旋转到开启位置,蒸汽拖把才
会产生蒸汽
5.
检查水箱是否已满。注:刚注入水
或水份耗尽后,可能需要最长 45 秒
时间来产生蒸汽。
6. 依次检查步骤 1、步骤 2 和 步骤 3
蒸汽拖把在使用过程
中停止产生蒸汽
7. 依次检查步骤 4、步骤 5 和 步骤 3
蒸汽拖把在使用过程
中产生的蒸汽太多
8. 逆时针旋转智能选择旋钮 (2),
以减少产生的蒸汽量
蒸汽拖把在使用过程
中产生的蒸汽太少
9. 顺时针旋转智能选择旋钮 (2),
以增加产生的蒸汽量
手持式蒸汽清洁器不
产生蒸汽
10. 确认智能选择旋钮 (2) 位于 ON
位置
11. 依次检查步骤 5、步骤 1、步骤 2
和 步骤
3
手持式蒸汽清洁器在
使用过程中产生的蒸
汽太少
12. 顺时针旋转智能选择旋钮 (2),
以增加产生的蒸汽量
13. 检查步骤 5
手持式蒸汽清洁器在
使用过程中产生的蒸
汽太多
14. 逆时针旋转智能选择旋钮 (2),
以减少产生的蒸汽量
附件一直从设备上掉
落
15.
有关所有部件和附件的正确安装
说明,请参阅组装章节
蒸汽从设备的意外区
域逸出
16.
有关所有部件和附件的正确安装
说明,请参阅组装章节
在哪里可以获得更多
信息/附件
17. www.blackanddecker.co.uk/steammop
www.blackanddecker.ie/steammop
服务信息
BLACK
+DECKER 提供覆盖整个亚洲的公司隶属和
授权服务地点。所有 BLACK+DECKER 服务中心都
具有训练有素的人员,为客户提供高效和可靠的产
品服务。
不论您是需要技术建议、维修或原厂替换部件,请
联系离您最近的
BLACK+DECKER 地点。
备注
u BLACK+DECKER 的政策是持续改进我们的产
品,因此,我们保留随时更改产品规格的权利,
恕不另行通知。
u 标准设备和附件可能会因国家(地区)而异。
u 不同国家(地区)的产品规格也可能会有所不同。
u 并非所有的国家(地区)都可提供完整的产品
系列。有关各产品系列的供货情况,请联系您当
地的 BLACK+DECKER 代理商。
12/2017N567449
-
 1
1
-
 2
2
-
 3
3
-
 4
4
-
 5
5
-
 6
6
-
 7
7
-
 8
8
-
 9
9
-
 10
10
-
 11
11
-
 12
12
-
 13
13
-
 14
14
-
 15
15
-
 16
16


BLACK+DECKER FSMH1321 ユーザーマニュアル
- タイプ
- ユーザーマニュアル
- このマニュアルも適しています
他の言語で
- English: BLACK+DECKER FSMH1321 User manual