
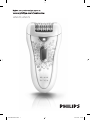
HP6570, HP6572
4203.000.4524.1.indd 1 03-12-09 11:08

2
4203.000.4524.1.indd 2 03-12-09 11:08

3
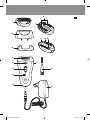
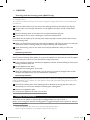
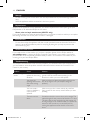
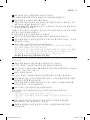
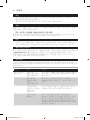
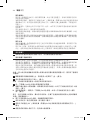
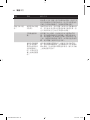
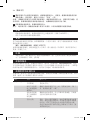
O
F
P
E
D
A
C
B
I
J
ML N
G
H
K
1
4203.000.4524.1.indd 3 03-12-09 11:08

4
4203.000.4524.1.indd 4 03-12-09 11:08

6
한국어 14
繁體中文 22
简体中文 29
4203.000.4524.1.indd 5 03-12-09 11:08

6
Congratulations on your purchase and welcome to Philips! To fully benet from the support that
Philips offers, register your product at www.philips.com/welcome.
This Philips SatinPerfect epilator has been designed around the needs of today’s women and has
been produced in Europe according to the highest engineering standards. We involve many women
worldwide in our development and production process to give us feedback on our concepts and
products to give you the best quality possible.
Your new SatinPerfect epilator gives you the best performance in epilation, providing you with
perfect and long-lasting smoothness in a pleasant way.
The epilator has a premium design and clever features. The epilating head covers a maximum area
of the skin and its discs are made of ceramic material, which ensures a proper grip on even the
nest hairs for easy hair removal. Hairs are removed by the root and grow back thinner and less
visible.
The SatinPerfect has a body-contouring epilating head that is subtly curved to ensure that the
epilator follows every contour of your body. Its pressure control ensures that the epilator always
maintains a consistent epilating speed for consistent results. The Opti-light is a built-in light that
reveals even nest hairs clearly so that you do not miss a hair.
The active hairlifter on the front of the active hairlifter with active massage gently vibrates and lifts
at-lying hairs so that they can be easily removed. The active massaging roller on the back of the
active hairlifter with active massage vibrates to give the skin a pleasant sensation that soothes the
effect of epilation.
The optimal performance cap that pivots to follow your body contours for optimal skin contact
gives you optimal performance in hair removal and perfect, long-lasting smooth legs.
The hair primer on the optimal performance cap gently stretches the skin and primes the hairs for
removal.
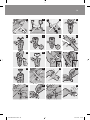
Epilator
Speed setting indications
On/off button
- Press once for speed II
- Press twice for speed I
Opti-light
Epilating head
Release button
Basic epilation cap
Shave, trim and style attachment (HP6572 only)
Trimming comb (HP6572 only)
Optimal performance cap
Hair primer
Active hairlifter with active massage
Active massaging roller
Active hairlifter
Cleaning brush
Adapter
Luxury pouch (not shown)
Read this user manual carefully before you use the appliance and save it for future reference.
- Keep the appliance and the adapter dry.
4203.000.4524.1.indd 6 03-12-09 11:08

- Do not use the appliance near or over a washbasin or bath lled with water (Fig. 2).
- Do not use the appliance in the bath or in the shower (Fig. 3).
- If you use the epilator in the bathroom, do not use an extension cord (Fig. 4).
- Only use the epilator with the adapter supplied.
- Do not use the appliance, an attachment or the adapter if it is damaged or broken to avoid
injuries.
- If the adapter is damaged, always have it replaced with one of the original type in order to avoid
a hazard.
- The adapter contains a transformer. Do not cut off the adapter to replace it with another plug,
as this causes a hazardous situation.
- Check if the voltage indicated on the adapter corresponds to the local mains voltage before you
connect the appliance.
- The appliance is not intended for use by persons (including children) with reduced physical,
sensory or mental capabilities, or lack of experience and knowledge, unless they have been given
supervision or instruction concerning use of the appliance by a person responsible for their
safety.
- Children should be supervised to ensure that they do not play with the appliance.
- The epilator is only intended for removing women’s body hair on areas below the neck by
epilating (legs) and shaving (underarms and bikini area, HP6572 only). Do not use the appliance
for any other purpose.
- For hygienic reasons, the appliance should only be used by one person.
- To prevent damage and injuries, keep the appliance (with or without attachment)
away from scalp hair, eyebrows, eyelashes, clothes, threads, cords, brushes etc.
- Do not use the epilator on irritated skin or skin with varicose veins, rashes, spots, moles (with
hairs) or wounds without consulting your doctor rst.
- People with a reduced immune response or people who suffer from diabetes mellitus,
haemophilia or immunodeciency should also consult their doctor rst.
- Your skin may become a little red and irritated the rst few times you use the appliance. This
phenomenon is absolutely normal and quickly disappears. As you use the appliance more often,
your skin gets used to epilation, skin irritation decreases and regrowth becomes thinner and
softer. If the irritation has not disappeared within three days, we advise you to consult a doctor.
- Do not look directly into the Opti-light to avoid being dazzled by the light.
- Do not use the epilating head of the epilator without attachment.
- Do not expose the appliance to temperatures lower than 5°C or higher than 35°C.
This Philips appliance complies with all standards regarding electromagnetic elds (EMF). If handled
properly and according to the instructions in this user manual, the appliance is safe to use based on
scientic evidence available today.
Note: Always clean the epilating head of the epilator before rst use.
- When you use the appliance for the rst time, we advise you to try them out on an area with
only light hair growth to get accustomed to the epilation process.
- We advise you to epilate before going to bed at night, as skin irritation usually disappears
overnight.
- Epilation is easier just after taking a bath or shower. Make sure your skin is completely dry when
you start epilating.
7
4203.000.4524.1.indd 7 03-12-09 11:08

- Make sure your skin is clean, entirely dry and free from grease. Do not use any cream before
you start epilating.
- Epilation is easier and more comfortable when the hair has the optimum length of 3–4 mm. If
the hairs are longer, we recommend that you shave rst and epilate the shorter regrowing hairs
after 1 or 2 weeks. You can also use the shave, trim and style attachment with the trimming
comb to pretrim hairs to this ideal length (HP6572 only).
- As your hair grows in different cycles, it is best to epilate a few days in a row when you start
epilating. This will help you to remain stubble-free longer because your hairs will start regrowing
in the same cycle and pace.
- The epilator is delivered with the basic epilation cap attached. If you want to use it with the
optimal performance cap or the active hairlifter with active massage, detach the basic epilation
cap by pulling it off the appliance and attach the optimal performance cap or the active hairlifter
with active massage (see chapter ‘Using the appliance’, section ‘Epilating the legs with the
epilator’).
- While epilating, stretch your skin with your free hand. This lifts up the hairs and helps to
minimise the pulling sensation.
- For optimal performance, place the epilating head on the skin at an angle of 90° with the on/off
button pointing in the direction in which you are going to move the appliance. Guide the
appliance across the skin against the direction of hair growth in a slow, continuous movement
without exerting any pressure.
- On some areas, hair may grow in different directions. In this case, it may be helpful to move the
appliance in different directions to achieve optimal results.
- If you sweat during epilation, dab your skin dry with a soft cloth.
- When you use the optimal performance cap, make sure that both rollers of the hair
primer always stay in contact with the skin to ensure an optimal result.
- When you use the active hairlifter with active massage, make sure the active massaging roller
and the active hairlifter always stay in contact with the skin. The massaging roller stimulates and
relaxes the skin for gentler epilation.
- To relax the skin, we advise you to apply a moisturising cream immediately after epilation or a
few hours after epilation, depending on what is better for your skin.
- Regular use of an exfoliating sponge or cream (e.g. during showering) 24 hours after epilation
helps to prevent ingrowing hair, as the gentle scrubbing action removes the upper skin layer and
ne hair can get through to the skin surface.
1 Insert the appliance plug into the bottom of the appliance and put the adapter in the wall
socket.
- If you already have some experience with epilation, you can simply use the epilating head with
the basic epilation cap.
- If you are not used to epilation, we advise you to start epilating with the optimal performance
cap. This cap ensures optimal skin contact and its pivoting head stretches the skin and prepares
the hairs for epilation.
- If your hairs lie at on your skin, we advise you to use the active hairlifter with active massage.
The active hairlifter with active massage not only lifts up the hairs but its active massaging roller
also minimises the pulling sensation of epilation.
Note: Remove the basic epilation cap before you attach the optimal performance cap or the active
hairlifter with active massage.
8
4203.000.4524.1.indd 8 03-12-09 11:08

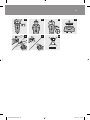
1 Squeeze both sides of the basic epilation cap (1) and pull it off the appliance (2) (Fig. 5).
2 Put the desired attachment on the epilating head (Fig. 6).
Note: The procedure for placing the attachments onto the appliance is the same for all attachments.
3 Press the on/off button once to switch on the epilator.
, The epilator starts running at speed II, which is the most efcient speed for epilation. The
bottom speed setting indication II lights up (Fig. 7).
, If you want to use speed I, press the on/off button a second time. The top speed setting
indication I lights up (Fig. 8).
Tip: Speed I is suitable for areas with little hair growth, for hard-to-reach areas and for areas where
bones are located directly beneath the skin, such as knees and ankles.
, When you press the on/off button a third time, the epilator switches off.
4 Stretch the skin with your free hand to make the hairs stand upright.
5 Place the epilating head at an angle of 90° onto the skin with the on/off button pointing in
the direction in which you are going to move the appliance (Fig. 9).
6 Move the appliance slowly over the skin against the direction of hair growth.
- When you use the optimal performance cap, make sure that both rollers of the hair primer
always stay in contact with the skin to ensure an optimal result.
- When you use the active hairlifter with active massage, make sure the active massaging roller
and the active hairlifter always stay in contact with the skin. The massaging roller stimulates and
relaxes the skin for gentler epilation.
Use the shave, trim and style attachment to shave sensitive areas such as the underarms and the
bikini line.
1 Press the release button (1) and remove the epilating head from the epilator (2) (Fig. 10).
Note: The shave, trim and style attachment can be removed in the same way.
2 Put the shave, trim and style attachment on the appliance and press it until it snaps home
(‘click’). (Fig. 11)
3 Switch on the appliance.
Note: Use speed II when you shave with the shave, trim and style attachment.
4 Stretch the skin with your free hand. When shaving the underarms, raise your arm to stretch
the skin.
5 Place the shave, trim and style attachment at an angle of 90° onto your skin with the on/off
button pointing in the direction in which you are going to move the appliance.
6 Move the appliance slowly against the direction of hair growth.
Note: Make sure that the shaving unit with integrated trimmer is always fully in contact with the skin.
- Shave your bikini line as shown in the gure (Fig. 12).
- Shave your underarms as shown in the gure. Move the appliance in different
directions. (Fig. 13)
7 When you have nished shaving, switch off the appliance and clean the shave, trim and style
attachment (see chapter ‘Cleaning and maintenance’).
8 Put the trimming comb on the shave, trim and style attachment when you store the
appliance.
9
4203.000.4524.1.indd 9 03-12-09 11:08

Use the shave, trim and style attachment with the trimming comb attached to trim your bikini line
to a length of 3mm.
You can also use the trimming comb to pretrim long hairs (longer than 10mm) on the underarms
or bikini line.
1 Press the release button (1) and remove the epilating head from the epilator (2) (Fig. 10).
2 Put the shave, trim and style attachment on the appliance and press it until it snaps home
(‘click’).
3 Put the trimming comb on the shave, trim and style attachment (Fig. 14).
4 Follow steps 3 to 6 in section ‘Shaving the underarms and bikini line’.
Note: Make sure the surface of the trimming comb always stays fully in contact with the skin to ensure
an even trimming result.
5 When you have nished trimming, switch off the appliance and clean the shave, trim and style
attachment and the trimming comb (see chapter ‘Cleaning and maintenance’).
6 Leave the trimming comb on the shave, trim and style attachment when you store the
appliance.
The epilator has an integrated overheat protection, which prevents overheating of the appliance.
Note: To avoid overheating of the epilator, do not press the appliance too hard onto your skin. The epilator
works best when you move it over your skin without exerting any pressure.
1 If the overheat protection is activated, the appliance switches off automatically and the speed
setting indications ash red.
2 Let the appliance cool down.
, The lights stop ashing after 30 seconds.
3 When the appliance has cooled down, you can switch it on again. If the lights start to ash
red again, the appliance has not yet cooled down completely.
If you press the epilating head too hard onto your skin or when the rotating discs of the epilating
head get blocked (e.g. by clothes etc.), the appliance stops and the speed setting indications start to
ash red for 5 seconds.
1 Check if the rotating discs of the epilating head are blocked by turning the discs with your
thumb until you can remove whatever is blocking the rotating discs.
2 Switch on the appliance again.
Do not press the appliance too hard onto the skin.
Note: Make sure the epilator is switched off and unplugged before you start to clean it.
Never use scouring pads, abrasive cleaning agents or aggressive liquids such as petrol or acetone
to clean the appliance.
- Clean the appliance after each use to ensure better performance.
- Never rinse the appliance or the adapter under the tap (Fig. 15).
10
4203.000.4524.1.indd 10 03-12-09 11:08

- Keep the appliance and the adapter dry (Fig. 16).
1 Remove the attachment from the epilating head (Fig. 5).
2 Remove loose hairs from the attachments with the cleaning brush (Fig. 17).
3 Rinse the attachments with lukewarm water while turning them (Fig. 18).
4 Dry the attachments before you use or store them.
1 Press the release knob (1) and remove the epilating head from the appliance (2) (Fig. 10).
2 Remove loose hairs with the cleaning brush (Fig. 19).
3 Rinse the epilating head under the tap for 5-10 seconds while turning the discs with your
thumb (Fig. 20).
Note: Never try to detach the epilating discs from the epilating head.
4 Shake the epilating head rmly (Fig. 21).
5 Dry the epilating head thoroughly with a tea towel.
Note: Make sure the epilating head is completely dry before you place it back onto the appliance.
6 To reattach the epilating head, place it on the appliance and press it onto the appliance until it
snaps home (‘click’) (Fig. 22).
1 Remove the trimming comb, if attached, by pulling it off the shave, trim and style
attachment (Fig. 23).
2 Press the release knob (1) and remove the shave, trim and style attachment from the
appliance (2) (Fig. 24).
3 Remove the shaving unit from the shave, trim and style attachment (Fig. 25).
4 Rinse the shaving unit, the shave, trim and style attachment and the trimming comb under a
lukewarm tap for 5 to 10 seconds while turning them a little (Fig. 26).
5 Shake the shaving unit, the shave, trim and style attachment and the trimming
comb rmly (Fig. 27).
6 Dry the shave, trim and style attachment and the trimming comb thoroughly with a tea towel
and let the shaving unit dry.
Note: Do not exert any pressure on the shaving unit to avoid damage.
7 Reattach the shaving unit to the shave, trim and style attachment. Place the shave, trim and
style attachment on the appliance and press it onto the appliance until it snaps home (‘click’).
Note: Make sure the shaving unit is dry before you attach it to the shave, trim and style attachment and
the shave, trim and style attachment is completely dry before you place it back onto the appliance.
8 Put the trimming comb on the shave, trim and style attachment.
Tip: Rub a drop of sewing machine oil onto the shaving unit twice a year to extend the lifetime of the
cutting element.
11
4203.000.4524.1.indd 11 03-12-09 11:08

- Put the trimming comb on the shave, trim and style attachment to prevent damage (HP6572
only).
- Store the appliance and the accessories in the luxury pouch.
All parts of the appliance can be replaced. If you need to replace one or more parts, go to your
Philips dealer or an authorised Philips service centre.
If you use the shave, trim and style attachment two or more times a week, we advise you to replace
the shaving unit after one or two years or when it is damaged.
- Do not throw away the appliance with the normal household waste at the end of its life, but
hand it in at an ofcial collection point for recycling. By doing this, you help to preserve the
environment (Fig. 28).
If you need service or information or if you have a problem, please visit the Philips website at
or contact the Philips Consumer Care Centre in your country (you nd its
phone number in the worldwide guarantee leaet). If there is no Consumer Care Centre in your
country, go to your local Philips dealer.
This chapter summarises the most common problems you could encounter with the appliance. If
you are unable to solve the problem with the information below, contact the Consumer Care
Centre in your country.
Problem Cause Solution
Poor epilating
results
You move the
epilator in the wrong
direction.
Move the appliance against the direction of hair
growth, with the on/off button pointing in the
direction in which you move the epilator.
You place the
epilating head on the
skin at the wrong
angle.
Make sure that you place the epilating head on the
skin at an angle of 90° (see chapter ‘Using the
epilator’).
You have used a
cream or depilatory
cream prior to
epilation.
Make sure your skin is clean, entirely dry and free
from grease. Do not use any cream before you start
epilating.
The hairs are too
short.
Sometimes the hairs are too short to be caught. The
optimal length for easy removal of the hairs is 3-4mm.
The hairs that are not caught during this session will
be long enough to be removed when you epilate the
next time. You can also try to catch the hairs by
moving the appliance across the skin a few more
times.
12
4203.000.4524.1.indd 12 03-12-09 11:08

Problem Cause Solution
The epilator does
not work.
The socket to which
the appliance is
connected does not
work.
Make sure the socket is live. If you connect the
epilator to a socket in a bathroom cabinet, you may
need to switch on the light in the bathroom to make
sure the socket is live. You could also use a working
socket outside the bathroom.
The overheat
protection has been
activated.
When the epilator stops working and the speed
setting indications start ashing red, the overheat
protection has been activated. Let the appliance cool
down. The lights stop ashing after 30 seconds. When
the appliance has cooled down, switch on the epilator
again. If the lights start ashing again, the epilator has
not yet cooled down sufciently.
The overload
protection is
activated because
something got
caught between the
rotating discs or
because you pressed
the appliance too
hard onto your skin.
When the overload protection has been activated, the
speed setting indications ash red. Turn the discs with
your thumb until you can easily remove the item that
is blocking the rotating discs. Then switch on the
appliance again. Do not press the appliance too hard
onto your skin.
13
4203.000.4524.1.indd 13 03-12-09 11:08

14
제품 소개
필립스 제품을 구입해 주셔서 감사합니다! 필립스가 드리는 지원 혜택을 받으실 수
있도록 www.philips.co.kr에서 제품을 등록하십시오.
필립스 SatinPerfect 제모기는 현대 여성의 필요에 맞게 디자인되었으며 최우수 공학
표준에 따라 유럽에서 생산되었습니다. 필립스는 개발 및 생산 과정에서 전 세계에 있는
수많은 여성을 참여시켜 제품과 컨셉에 대한 사용자의 의견을 반영함으로써 최상의
품질을 보장하기 위해 최선을 다하고 있습니다.
SatinPerfect 제모기는 탁월한 제모 성능을 자랑하며 완벽하고 산뜻한 부드러움을
오래도록 지속시켜 줍니다.
SatinPerfect 제모기는 뛰어난 디자인과 우수한 기능을 갖추고 있습니다. 제모 헤드는
사용 가능한 피부 면적이 넓고, 제모 디스크는 세라믹 재질로 되어 있어서 잔털 위에서도
미끄러지지 않아 쉽게 제모를 할 수 있습니다. 또한 모근을 제거하기 때문에 다시 자라는
체모는 가늘고 눈에 잘 띄지 않습니다.
SatinPerfect 제모기는 몸 전체 피부에 사용할 수 있도록 약간의 굴곡이 있는 제모
헤드를 갖추고 있어서 제모기를 전신에 걸쳐 사용할 수 있습니다. 제모기의 압력 제어
기능은 일관적인 제모 효과를 위해서 일정한 속도를 유지하는 역할을 합니다. 조명등은
놓치는 체모가 없도록 잔털까지 뚜렷하게 보여주는 내장 조명입니다.
액티브 마사지 기능이 있는 액티브 체모 리프터 앞면에 있는 액티브 체모 리프터는 미세
진동을 생성하여 피부에 밀착된 체모를 올려줌으로써 제모가 쉽게 될 수 있도록
도와줍니다. 액티브 마사지 기능이 있는 액티브 체모 리프터 뒷면에 있는 액티브 마사지
롤러 역시 진동을 생성하여 제모 후에 매끈한 느낌이 들도록 해줍니다.
고성능 캡은 최적의 피부 접촉을 위해서 신체 곡선을 따라 회전하고 최고의 제모 효과와
함께 완벽하고 오래 지속되는 부드러운 다리를 만들어 줍니다.
고성능 캡에 있는 체모 프라이머는 스킨을 부드럽게 당겨서 체모를 다듬어 줍니다.
각 부의 명칭 (그림 1)
제모기
속도 설정 표시등
전원 버튼
- 한 번 누를 경우 속도 II
- 두 번 누를 경우 속도 I
조명 라이트
제모 헤드
열림 버튼
기본 제모 캡
면도, 트리밍, 스타일링 액세서리(HP6572만 해당)
트리밍 빗(HP6572만 해당)
고성능 캡
체모 프라이머
액티브 마사지 기능이 있는 액티브 체모 리프터
액티브 마사지 롤러
액티브 체모 리프터
세척용 브러시
어댑터
고급 파우치(그림 없음)
중요사항
본 제품을 사용하기 전에 이 사용 설명서를 주의 깊게 읽고 나중에 참조할 수 있도록 잘
보관하십시오.
위험
- 제품과 어댑터에 물이 묻지 않도록 주의하십시오.
한국어
4203.000.4524.1.indd 14 03-12-09 11:08

- 본 제품을 물이 채워진 세면대나 욕조 위 등 물이 있는 근처에서 사용하지 마십시오 (
그림 2).
- 본 제품을 목욕이나 샤워 중에 사용하지 마십시오 (그림 3).
- 욕실에서 사용할 경우 연장선을 사용하지 마십시오 (그림 4).
경고
- 반드시 함께 제공된 어댑터만 사용하십시오.
- 제품, 액세서리 또는 어댑터가 손상되거나 고장난 경우 사용하지 마십시오. 부상의
위험이 있습니다.
- 어댑터에 손상 부위가 있으면, 위험할 수 있으므로 반드시 정품으로 교체하여
사용하십시오.
- 어댑터에는 변압기가 내장되어 있습니다. 위험할 수 있으므로, 어댑터를 잘라내고
다른 플러그로 교체하지 마십시오.
- 전원을 연결하시기 전에 어댑터에 표시된 전압과 해당 지역의 전압이 일치하는지
확인하십시오.
- 신체적인 감각 및 정신적인 능력이 떨어지거나 경험과 지식이 풍부하지 않은 성인 및
어린이는 혼자 제품을 사용하지 말고 제품 사용과 관련하여 안전에 책임 질 수
있도록 지시사항을 충분히 숙지한 사람의 도움을 받으십시오.
- 어린이가 제품을 가지고 놀지 못하도록 지도해 주십시오.
주의
- 본 제모기는 다리, 겨드랑이, 비키니 라인(HP6572만 해당) 등 목 아래에 있는
여성의 체모를 제거하는 용도로만 사용하도록 되어 있습니다. 절대 다른 용도로
사용하지 마십시오.
- 위생상 좋지 않으므로 이 제품을 타인과 함께 사용하지 마십시오.
- 제품이 손상되거나 다칠 수 있으므로, 액세서리 연결 여부와 관계없이 제품 사용
도중 모발, 눈썹, 속눈썹, 옷, 실, 전깃줄, 빗 등에 닿지 않도록 주의하십시오.
- 자극을 받은 피부나 정맥류, 발진, 종기, 털이 난 점, 상처 등이 있는 피부에 제모기를
사용하려면 먼저 의사와 상담하십시오.
- 면역력이 약하거나 당뇨병, 혈우병, 면역 결핍증을 앓고 있는 사용자는 먼저 의사와
상담한 후에 사용하십시오.
- 처음 몇 차례는 피부가 조금 빨개지거나 자극을 느낄 수 있습니다. 하지만 흔히
나타나는 현상이며 곧 사라집니다. 제모기 사용 횟수가 늘어나면서 익숙해지면, 피부
자극은 줄어들고 전보다 가늘고 부드러운 체모가 새로 자라납니다. 3일이 지나도
피부 자극이 사라지지 않으면 의사와 상담하십시오.
- 지나치게 눈이 부실 수 있으므로 조명등을 직접 들여다 보지 마십시오.
- 액세서리를 부착하지 않은 채로 제모 헤드를 사용하지 마십시오.
- 실내 온도가 5C - 35C인 곳에서 제모기를 사용하십시오.
전자기장(EMF)
이 필립스 제품은 EMF(전자기장)와 관련된 모든 기준을 준수합니다. 이 사용 설명서의
지침에 따라 적절하게 취급할 경우 이 제품은 안전하게 사용할 수 있으며 이는
현재까지의 과학적 증거에 근거하고 있습니다.
제모 팁
제모를 시작하기 전에
참고: 제품을 처음 사용할 때는 제모기의 제모 헤드를 깨끗하게 세척하십시오.
- 제품을 처음 사용하는 경우 익숙해질 때까지 체모가 가는 부위부터 사용해보십시오.
- 피부 자극이 발생하면 밤사이에 사라질 수 있도록 제모기를 잠자리에 들기 전에
사용하는 것이 좋습니다.
- 목욕이나 샤워 직후에 하면 제모가 한결 쉬워집니다. 전신이 마른 상태에서 제모를
시작하십시오.
한국어 15
4203.000.4524.1.indd 15 03-12-09 11:08

- 피부가 깨끗하고 물기나 유분이 없어야 합니다. 크림을 바르지 말고 체모를
제거하십시오.
- 체모의 길이가 3-4mm일 때가 제모하기에 가장 쉽고 효과적입니다. 체모가 이보다
더 길면 먼저 면도한 다음 1-2주 후에 짧게 자라난 체모를 제거하거나, 면도, 트리밍,
스타일링 액세서리를 트리밍 빗(HP6572만 해당)과 함께 사용하여 적절한 길이로
체모를 잘라주는 것이 좋습니다.
- 각각의 체모는 다양한 주기로 자라기 때문에 제모를 며칠 간 연속으로 해주는 것이
효과적입니다. 이렇게 하면 체모가 같은 주기와 속도로 자라게 되어 까칠거리는
흔적이 없는 피부가 됩니다.
- 처음 제품을 구입하면 기본 제모 캡이 기본적으로 부착되어 있습니다. 이를 고성능
캡 또는 액티브 마사지 기능이 있는 액티브 체모 리프터로 바꾸려면 제모기에서 기본
제모 캡을 분리하고 고성능 캡 또는 액티브 마사지 기능이 있는 액티브 체모
리프터를 부착하십시오(‘제품 사용’ 장의 ‘제모기를 사용한 다리 제모’ 란
참조).
제모 중에
- 제모를 할 때 다른 한 손으로 피부를 잡아당겨 체모를 들어올리고 제모로 인한
자극을 최소화하십시오.
- 최적의 성능을 위해서는 전원 버튼이 제모기가 움직일 방향을 향하게 한 상태에서
제모 헤드를 피부와 수직(90°)이 되게 세우십시오. 제모기에 압력을 가하지
않으면서 체모가 자라는 반대 방향으로 천천히 계속 움직이십시오.
- 일부 신체 부위에서는 체모가 여러 방향으로 자라날 수 있습니다. 이러한 경우 여러
방향으로 제품을 움직이면 최상의 효과를 얻을 수 있습니다.
- 제모 중에 땀이 나면 부드러운 천으로 닦아 주십시오.
- 고성능 캡을 사용할 경우 최적의 제모 효과를 위해 체모 프라이머의 양쪽 롤러가
항상 피부에 접촉되어 있는지 확인하십시오.
- 액티브 마사지 기능이 있는 액티브 체모 리프터를 사용할 경우 액티브 마사지 롤러와
액티브 체모 리프터가 항상 피부에 접촉 되도록 하십시오. 마사지 롤러는 제모가
부드럽게 될 수 있도록 피부를 촉진 및 진정시키는 역할을 합니다.
제모 후에
- 피부를 진정 시키려면 자신의 피부에 맞게 제모 직후 또는 몇 시간 후에 보습제를
바르는 것이 좋습니다.
- 제모한지 24시간 후에 각질 제거용 스펀지 또는 크림을 사용하여 샤워 중이나 기타
상황에서 정기적으로 사용하며 부드럽게 문지르면 각질을 제거하고 잔털을 피부
표면 위로 노출시켜 주므로 체모가 안으로 자라는 것을 방지할 수 있습니다.
제모기 사용
1 플러그를 제모기에 꽂고 어댑터를 벽면 콘센트에 연결하십시오.
제모기를 사용한 다리 제모
- 이전에 제모를 한 경험이 있는 경우 기본 제모 캡을 부착하여 제모 헤드를 사용하면
됩니다.
- 제모에 익숙하지 않으면 고성능 캡으로 시작하는 것이 좋습니다. 고성능 캡은 피부
접촉 상태를 최적화하고, 캡의 회전 헤드는 피부를 당겨서 체모가 잘 제거되도록
해줍니다.
- 체모가 피부에 밀착되어 있다면 액티브 마사지 기능이 있는 액티브 체모 리프터를
사용하십시오. 체모를 세워 줄 뿐만 아니라 액티브 마사지 롤러가 제모 중 통증을
최소화해 줍니다.
참고: 고성능 캡 또는 액티브 마사지 기능이 있는 액티브 체모 리프터를 부착하기 전에
먼저 기본 제모 캡을 분리하십시오.
1 기본 제모 캡의 양 옆을 꽉 쥐고(1) 잡아 당기면 됩니다(2) (그림 5).
한국어16
4203.000.4524.1.indd 16 03-12-09 11:08

2 제모 헤드에 원하는 액세서리를 끼우십시오 (그림 6).
참고: 제품에 액세서리를 부착하는 방법은 모든 액세서리에 동일합니다.
3 전원 버튼을 한 번 눌러서 제모기를 켜십시오.
, 작동은 속도 II에서 시작되고 이는 제모에 가장 적합한 속도입니다. 밑에 있는 속도
설정 표시등 II에 불이 들어옵니다 (그림 7).
, 속도 I을 사용하려면 전원 버튼을 한 번 더 누르십시오. 위에 있는 속도 설정 표시등 I
에 불이 들어옵니다 (그림 8).
도움말: 속도 I은 체모가 거의 없거나 닿기 힘든 부위, 무릎과 발목 등 피부 바로 아래에
뼈가 있는 부위의 제모에 적합합니다.
, 전원 버튼을 한 번 더 누르면 제모기가 꺼집니다.
4 다른 한 손으로 피부를 팽팽하게 만들어 체모가 위를 향하도록 만듭니다.
5 전원 버튼을 제모기가 움직일 방향으로 두고 제모 헤드를 피부와 수직(90°)이 되게
세우십시오 (그림 9).
6 체모가 자라는 반대 방향으로 천천히 움직이십시오.
- 고성능 캡을 사용할 경우 최적의 제모 효과를 위해 체모 프라이머의 양쪽 롤러가
항상 피부에 접촉되어 있는지 확인하십시오.
- 액티브 마사지 기능이 있는 액티브 체모 리프터를 사용할 경우 액티브 마사지 롤러와
액티브 체모 리프터가 항상 피부에 접촉 되도록 하십시오. 마사지 롤러는 제모가
부드럽게 될 수 있도록 피부를 촉진 및 진정시키는 역할을 합니다.
겨드랑이 및 비키니 라인 면도(HP6572만 해당)
겨드랑이, 비키니 라인 등 민감한 부위를 면도하려면 면도, 트리밍, 스타일링 액세서리를
사용하십시오.
1 열림 버튼을 눌러서(1) 제모 헤드를 분리하십시오(2) (그림 10).
참고: 면도, 트리밍, 스타일링 액세서리도 같은 방법으로 분리됩니다.
2 면도, 트리밍, 스타일링 액세서리를 제품에 대고 제모기에 끼워질 때까지 누르십시오
(‘딸깍’ 소리가 남). (그림 11)
3 제품의 전원을 켜십시오.
참고: 면도, 트리밍, 스타일링 액세서리로 면도를 할 때는 속도II를 사용하십시오.
4 제모기를 들지 않은 손으로 피부를 잡아당기십시오. 겨드랑이를 면도할 때는 팔을
들어올리고 피부를 잡아당기십시오.
5 전원 버튼을 제모기가 움직일 방향으로 두고 면도, 트리밍, 스타일링 액세서리를
피부와 수직(90°)이 되게 세우십시오.
6 체모가 자라는 반대 방향으로 천천히 움직이십시오.
참고: 트리머 기능이 내장된 쉐이빙 유닛이 피부와 항상 완전히 밀착되는지
확인하십시오.
- 그림과 같이 비키니 라인을 면도하십시오 (그림 12).
- 그림과 같이 겨드랑이를 면도하십시오. 제품을 여러 방향으로 움직여야 합니다. (
그림 13)
7 면도가 끝나면 제모기의 전원을 끄고 면도, 트리밍, 스타일링 액세서리를
세척하십시오(‘청소 및 유지 관리’장 참조).
8 제품을 보관할 때는 트리밍 빗을 면도, 트리밍, 스타일링 액세서리에 끼워서
보관하십시오.
한국어 17
4203.000.4524.1.indd 17 03-12-09 11:08

트리밍 빗을 사용한 트리밍(HP6572만 해당)
비키니 라인의 체모를 3mm 길이로 트리밍하려면 트리밍 빗이 부착된 면도, 트리밍,
스타일링 액세서리를 사용하십시오.
겨드랑이, 비키니 라인에 있는 10mm 이상의 긴 체모를 다듬을 때도 트리밍 빗을
사용하실 수 있습니다.
1 열림 버튼을 눌러서(1) 제모 헤드를 분리하십시오(2) (그림 10).
2 면도, 트리밍, 스타일링 액세서리를 기계에 대고 제모기에 끼워질 때까지 누르십시오
(‘딸깍’ 소리가 남).
3 트리밍 빗을 면도, 트리밍, 스타일링 액세서리에 부착하십시오 (그림 14).
4 ’겨드랑이 및 비키니 라인 면도’란의 3-6 단계를 따르십시오.
참고: 트리밍 빗의 표면을 항상 피부와 완전히 밀착시켜 트리밍이 고르게 되도록
하십시오.
5 트리밍이 끝나면 제모기의 전원을 끄고 면도, 트리밍, 스타일링 액세서리와 트리밍
빗을 세척하십시오(‘청소 및 유지관리’란 참조).
6 제품을 보관할 때는 트리밍 빗을 면도, 트리밍, 스타일링 액세서리에 끼워서
보관하십시오.
과열 방지
제모기에는 과열 방지 기능이 있어서 제모기가 과열되는 것을 막아줍니다.
참고: 제모기의 과열을 방지하려면 제모기를 피부 쪽으로 너무 세게 누르지 마십시오.
힘을 주지 말고 피부 위에서 움직이는 것이 가장 효과적입니다.
1 과열 방지 기능이 켜지면 제모기의 전원은 자동으로 꺼지고 속도 설정 표시등에
빨간색 불이 깜빡입니다.
2 제품을 식혀주십시오.
, 깜빡임은 30초 후에 멈춥니다.
3 제품의 열기가 식은 후에 전원을 다시 켰는데 여전히 빨간색 불이 다시 깜빡이면
제모기가 완전히 식지 않았다는 것을 의미합니다.
과부하 방지 기능
제모 헤드를 피부 쪽으로 너무 세게 누르거나 제모 헤드의 회전식 디스크가 옷감 등에
의해 막히면 제모기는 작동을 멈추고 속도 설정 표시등이 5초 동안 빨간색으로
깜빡입니다.
1 제모 헤드의 회전식 디스크를 엄지 손가락으로 돌려가면서 끼어있는 이물질을
제거하십시오.
2 다시 제품의 전원을 켜십시오.
제품을 피부에 대고 너무 세게 누르지 마십시오.
청소 및 유지관리
참고: 청소를 시작하기 전에 제모기의 전원이 꺼져 있고 전원 플러그가 콘센트에서
분리되어 있는지 확인하십시오.
제품을 세척할 때 수세미, 연마성 세제나 휘발유, 아세톤과 같은 강력 세제를 사용하지
마십시오.
- 최적의 성능을 위해 사용 후에는 항상 제품을 청소하십시오.
한국어18
4203.000.4524.1.indd 18 03-12-09 11:08

- 절대 제품을 물로 헹구거나 수돗물로 세척하지 마십시오 (그림 15).
- 제품과 어댑터에 물이 묻지 않도록 주의하십시오 (그림 16).
제품 청소
1 제모 헤드에서 액세서리를 분리하십시오 (그림 5).
2 액세서리에 남아 있는 체모를 청소용 브러시로 제거하십시오 (그림 17).
3 액세서리를 돌려가며 미지근한 물로 헹구십시오 (그림 18).
4 다시 사용하거나 보관하기 전에 액세서리의 물기를 말리십시오.
제모기의 제모 헤드 청소
1 열림 버튼을 눌러서(1) 제모 헤드를 분리하십시오(2) (그림 10).
2 청소용 브러시로 느슨한 체모들을 제거하십시오 (그림 19).
3 엄지 손가락으로 디스크를 돌려가면서 제모 헤드를 5-10초 동안 흐르는 물에서
헹구십시오 (그림 20).
참고: 제모 디스크를 제모 헤드에서 절대 분리하지 마십시오.
4 제모 헤드의 물을 털어내십시오 (그림 21).
5 제모 헤드의 물을 수건으로 완전히 닦아내십시오.
참고: 제품에 다시 끼우기 전에 제모 헤드가 완전히 말라 있어야 합니다.
6 제모 헤드를 다시 부착하려면 제모기에 대고 눌러 끼우십시오(‘찰칵’ 소리가 남) (
그림 22).
면도, 트리밍, 스타일링 액세서리와 트리밍 빗(HP6572만 해당) 세척
1 트리밍 빗이 면도, 트리밍, 스타일링 액세서리에 부착되어 있으면 이를 잡아당겨서
분리하십시오 (그림 23).
2 열림 버튼을 누르고(1) 면도, 트리밍, 스타일링 액세서리를 제품에서 분리하십시오
(2) (그림 24).
3 면도, 트리밍, 스타일링 액세서리에서 쉐이빙 유닛을 분리하십시오 (그림 25).
4 쉐이빙 유닛, 면도, 트리밍, 스타일링 액세서리, 트리밍 빗을 살짝 돌려가며 미지근한
물에서 5-10초간 헹구십시오 (그림 26).
5 쉐이빙 유닛, 면도, 트리밍, 스타일링 액세서리, 트리밍 빗을 세게 흔들어서 물을
털어내십시오 (그림 27).
6 면도, 트리밍, 스타일링 액세서리와 트리밍 빗은 수건으로 물기를 완전히 닦고
쉐이빙 유닛은 자연 건조시키십시오.
참고: 손상 방지를 위해 쉐이빙 유닛에 힘을 가하지 마십시오.
7 쉐이빙 유닛을 면도, 트리밍, 스타일링 액세서리에 다시 부착하십시오. 면도,
트리밍, 스타일링 액세서리를 제품에 대고 눌러 끼우십시오(‘찰칵’ 소리가 남).
참고: 쉐이빙 유닛을 면도, 트리밍, 스타일링 액세서리에 부착하기 전에 완전히 건조
되었는지 확인하고, 면도, 트리밍, 스타일링 액세서리를 제품에 부착하기 전에도 완전히
건조 되었는지 확인하십시오.
8 트리밍 빗을 면도, 트리밍, 스타일링 액세서리에 부착하십시오.
도움말: 일년에 두 번 정도 재봉틀용 기름을 쉐이빙 유닛에 한 방울 떨어뜨리면 커팅
부품의 수명이 늘어납니다.
한국어 19
4203.000.4524.1.indd 19 03-12-09 11:08

보관
- 손상 방지를 위해 트리밍 빗을 면도, 트리밍, 스타일링 액세서리에 부착해서
보관하십시오(HP6572만 해당).
- 제모기와 액세서리를 제공된 고급 파우치에 넣어 보관하십시오.
교체
제품의 모든 부품은 교체가 가능합니다. 부품을 교체하려면 필립스 대리점 또는 필립스
지정 서비스 센터로 문의하십시오.
면도, 트리밍, 스타일링 액세서리(HP6572만 해당)
면도, 트리밍, 스타일링 액세서리를 일 주일에 두 번 이상 사용하는 경우에는 쉐이빙
유닛을 1~2년에 한 번 교체하거나 손상되면 바로 교체하십시오.
환경
- 수명이 다 된 제품은 일반 가정용 쓰레기와 함께 버리지 마시고 지정된 재활용 수거
장소에 버리십시오. 이런 방법으로 환경 보호에 동참하실 수 있습니다 (그림 28).
품질 보증 및 서비스
보다 자세한 정보가 필요하시거나, 사용상의 문제가 있을 경우에는 필립스전자 홈페이지
(www.philips.co.kr)를 방문하시거나 필립스 고객 상담실로 문의하십시오. 전국
서비스센터 안내는 제품 보증서를 참조하십시오. *(주)필립스전자: (02)709-1200 *
고객 상담실: (080)600-6600(수신자부담)
문제 해결
이 란은 제품을 사용하면서 가장 일반적으로 경험하게 되는 문제와 그 해결 방법을
제시합니다. 발생한 문제를 아래 정보로 해결할 수 없는 경우에는 필립스 고객 상담실로
문의하십시오.
문제점 원인 해결책
제모가 잘 되지
않은 경우
제모기를
움직이는 방향이
잘못되었습니다.
전원 버튼이 제품을 움직이려는 방향으로 향하게
하고 체모가 자라는 반대 방향으로 제모기를
움직이십시오.
제모 헤드와
피부가 이루는
각도가
잘못되었습니다.
제모 헤드가 피부와 수직(90°)이 되게
세워졌는지 확인하십시오(‘제모기 사용’ 장
참조).
제모할 부위에
크림 또는 제모용
크림이 남아
있습니다.
피부가 깨끗하고 물기나 유분이 없어야 합니다.
크림을 바르지 말고 체모를 제거하십시오.
체모가 너무
짧습니다.
체모가 너무 짧으면 제모가 되지 않을 수
있습니다. 제모하기 가장 좋은 길이는 3-4mm
입니다. 아직 제거하기 어려운 체모는 좀 더
기다린 후 충분히 자라면 제모하십시오. 또는
제품을 피부에서 여러 번 움직여도 짧은 체모를
제거할 수 있습니다.
한국어20
4203.000.4524.1.indd 20 03-12-09 11:08
ページが読み込まれています...
ページが読み込まれています...
ページが読み込まれています...
ページが読み込まれています...
ページが読み込まれています...
ページが読み込まれています...
ページが読み込まれています...
ページが読み込まれています...
ページが読み込まれています...
ページが読み込まれています...
ページが読み込まれています...
ページが読み込まれています...
ページが読み込まれています...
ページが読み込まれています...
ページが読み込まれています...
ページが読み込まれています...
ページが読み込まれています...
ページが読み込まれています...
ページが読み込まれています...
ページが読み込まれています...
-
 1
1
-
 2
2
-
 3
3
-
 4
4
-
 5
5
-
 6
6
-
 7
7
-
 8
8
-
 9
9
-
 10
10
-
 11
11
-
 12
12
-
 13
13
-
 14
14
-
 15
15
-
 16
16
-
 17
17
-
 18
18
-
 19
19
-
 20
20
-
 21
21
-
 22
22
-
 23
23
-
 24
24
-
 25
25
-
 26
26
-
 27
27
-
 28
28
-
 29
29
-
 30
30
-
 31
31
-
 32
32
-
 33
33
-
 34
34
-
 35
35
-
 36
36
-
 37
37
-
 38
38
-
 39
39
-
 40
40


他の言語で
- English: Philips HP6572/00 User manual
関連論文
-
Philips HP6576/70 ユーザーマニュアル
-
Philips HP6403/00 ユーザーマニュアル
-
Philips HP6581/00 Product Datasheet
-
Philips HP6572/00 Product Datasheet
-
Philips HP6577/00 Product Datasheet
-
-
-
-
-