
HD2061
Register your product and get support at
www.philips.com/welcome
Important safety instructions
1
Overview
3
Use the appliance
Warning
•If you wish to cancel a function once it is
selected, do not lift the top unit to prevent the
facial scalding. You can unplug the power cord,
re-plug it, and then select another function.
Make soymilk
•Measure ingredients as instructed. You can adjust the
quantity to fit your personal taste.
•For 2-4 servings.
1 Take a cup of dry soybeans with supplied measuring
cup and wash it thoroughly.
•To extend the life of the blade, soak the soybeans
(8-9 hours in fall and spring, 6-7 hours in summer,
and 9-10 hours in winter) and wash it thoroughly
before processing.
2 Put the soybeans evenly at the bottom of the pot.
3 Pour water into the pot. Make sure that the water level
is between MAX (the maximum level indication) and
MIN (the minimum level indication).
4 Put the top unit into the pot. Make sure that the upper
plug is correctly inserted into the connector.
5 Open the power connection cover, insert the power
cord, and connect the power.
»
The indicators flash in cycle, indicating that the power
is connected.
6 Press Select to select Soymilk.
»
The Soymilk indicator lights up.
7 Press Start.
»
The In Progress indicator flashes and the appliance
sounds once, indicating that processing starts.
»
After about 25 minutes, you will hear 6 beeps and
the Keep Warm indicator will light up indicating that
soymilk is ready. The appliance will automatically enter
keep warm mode. This lasts for an hour, and then
automatically stops (see the Keep warm section).
8 After processing, disconnect the power. Hold the handle of
the pot tightly with one hand and lift the top unit with the
other hand.
9 Filtrate soymilk with the filter and it is ready to serve. You
can add some sugar before serving.
Tips
•To shorten the processing time, you can add
warm water no hotter than 70°C.
•Soymilk can also be served without being
ltrated.
Make five grains soymilk
•Measure ingredients as instructed. You can adjust the
quantity to fit your personal taste.
•For 2-4 servings.
1 Measure 30g of soybeans (around 1/2 cup) and 50g of
rice (around 1/2 cup) with the supplied measuring cup.
Wash them thoroughly.
•To extend the life of the blade, soak the soybeans
(8-9 hours in fall and spring, 6-7 hours in summer,
and 9-10 hours in winter) and wash it thoroughly
before processing.
2 Put the rice and the soybeans evenly at the bottom of
the pot.
3 Pour water into the pot. Make sure that the water level
is between MAX (the maximum level indication) and
MIN (the minimum level indication).
4 Put the top unit into the pot. Make sure that the upper
plug is correctly inserted into the connector.
5 Open the power connection cover, insert the power
cord, and connect the power.
»
The indicators flash in cycle, indicating that the power
is connected.
6 Press Select to select Five Grains Soymilk.
»
The Five Grains Soymilk indicator lights up.
7 Press Start.
»
The In Progress indicator flashes and the appliance
sounds once, indicating that processing starts.
»
After about 26 minutes, you will hear 6 beeps and
the Keep Warm indicator will light up indicating that
soymilk is ready. The appliance will automatically enter
keep warm mode. This lasts for an hour, and then
automatically stops (see the Keep warm section).
8 After processing, disconnect the power. Hold the handle of
the pot tightly with one hand and lift the top unit with the
other hand.
9 Pour soymilk into the soymilk cup, and it is ready to
serve. You can add some sugar before serving..
Tip
•To shorten the processing time, you can add
warm water no hotter than 70°C.
Make rice paste
•Measure ingredients as instructed. You can adjust the
quantity to fit your personal taste.
•Example recipes: lily bulb and barley rice paste, for 2-4
servings.
1 Measure 35g of barley and 35g of rice (around 2/5
cup each) with supplied measuring cup. Then, take
20g of fresh lily bulbs (around 7-8 pieces). Wash them
thoroughly.
2 Put the lily bulbs, barley, and rice evenly at the bottom
of the pot.
3 Pour water into the pot. Make sure that the water level
is between MAX (the maximum level indication) and
MIN (the minimum level indication).
4 Put the top unit into the pot. Make sure that the upper
plug is correctly inserted into the connector.
5 Open the power connection cover, insert the power
cord, and connect the power.
»
The indicators flash in cycle, indicating that the power
is connected.
6 Press Select to select Rice Paste.
»
The Rice Paste indicator lights up.
7 Press Start.
»
The In Progress indicator flashes and the appliance
sounds once, indicating that processing starts.
»
After about 26 minutes, you will hear 6 beeps and
the Keep Warm indicator will light up indicating that
soymilk is ready. The appliance will automatically enter
keep warm mode. This lasts for an hour, and then
automatically stops (see the Keep warm section).
8 After processing, disconnect the power. Hold the handle of
the pot tightly with one hand and lift the top unit with the
other hand.
9 Pour rice paste into the soymilk cup, and it is ready to
serve. You can add some sugar before serving.
Tip
•To shorten the processing time, you can add
warm water no hotter than 70°C.
Make fruit/ veggie drink
•Measure ingredients as instructed. You can adjust the
quantity to fit your personal taste.
•Example recipe: banana milkshake, for 2-4 servings.
1 Cut 3 bananas (about 400g) into 1 cm cubes.
2 Put the banana cubes evenly at the bottom of the pot.
3 Pour 300ml of milk and some water into the pot.
Make sure that the water mark is between MAX (the
maximum level indication) and MIN (the minimum
level indication).
4 Put the top unit into the pot. Make sure that the upper
plug is correctly inserted into the connector.
5 Open the power connection cover, insert the power
cord, and connect the power.
»
The indicators flash in cycle, indicating that the power
is connected.
6 Press Select to select Fruit/Veggie Drink.
»
The Fruit/Veggie Drink indicator lights up.
7 Press Start.
»
The In Progress indicator flashes and the appliance
sounds once, indicating that processing starts. After
about 4 minutes, you will hear 6 beeps, indicating that
milkshake is ready.
8 After processing, disconnect the power,. Hold the
handle of the pot tightly with one hand and lift the top
unit with the other hand.
9 Pour banana milkshake into the soymilk cup, and it is
ready to serve. You can add some sugar before serving.
Tips
•After banana milkshake is ready, serve at once
to avoid oxidization.
•Wait about 10 minutes until the appliance
cools down before the next use. This makes
the appliance more durable.
Keep Warm
After soymilk or rice paste is made, you will hear 6
beeps and the Keep Warm indicator will light up.
The keep warm function lasts for an hour, and then
automatically stops.
Tips
•If you lift the top unit as soon as processing
is complete, the appliance does not start the
keep warm function.
•The appliance does not start the keep warm
function at the completion of fruit/veggie
drink.
Reproduction in whole or in part is prohibited
without the written consent of the copyright
owner. Trademarks are the property of Koninklijke
Philips Electronics N.V. or their respective owners.
All rights reserved.
© 2012 Koninklijke Philips Electronics N.V.
UMLeaet_HD2061
HK
WK1246.4
4241 210 12811
Cleaning before
first use
2
Method 1
1 Pour boiling water into the pot, put the top unit
into it, then soak for 10 minutes.
2 Clean the appliance (see the “Cleaning” section)
Method 2
1 Follow the instructions in the “Make soymilk”
section.
2 Pour the soymilk away when it is done, and then
clean the appliance (see the “Cleaning” section).
4
Cleaning
Notes
•Disconnect the power and remove the power
cord before cleaning or disassembling this
appliance.
•Do not immerse the top unit in water.
•To prevent scalding, do not touch the top
unit or inner side of the pot before they cool
down.
•Take care of sharp blades during cleaning to
avoid cutting yourself and others.
1 After disconnecting the power, lift the top unit, rinse
the lower part of the top unit, overflow sensor, blade,
and inner side of the pot.
2 Use a dry cloth to clean the top unit handle, control
panel, upper plug, upper plug connector, base, and
power cord connector. The outside of the pot can be
cleaned with a damp cloth.
Easy clean
•Promptly clean the residue on the appliance; otherwise,
the residue will dry up and stick on the appliance, and
this become difficult to remove. When this happens, you
can use the easy clean function to heat and soak the
inner side of the pot and clean the appliance easier.
•To prevent the residue from smelling, cleaning the
appliance within 10 hours after use.
1 Pour water into the pot. Make sure that water level is
between MAX (the maximum level indication) and MIN
(the minimum level indication).
2 Put the top unit into the pot. Make sure that the upper
plug is correctly inserted into the connector.
3 Open the power connection cover, insert the power
cord, and connect the power.
»
The indicators flash in cycle, indicating that the power
is connected.
4 Press Easy Clean.
»
The Easy Clean indicator lights up and sounds once,
indicating that the easy clean function starts.
»
After about 8 minutes, you will hear 6 beeps and the
In Progress indicator will turn off, indicating that the
easy clean function is complete.
5 Clean the appliance as instructed in the "Cleaning" section.
Recipes
Troubleshooting
Recycling
Do not throw away the appliance with the
normal household waste at the end of its life,
but hand it in at an official collection point for
recycling. By doing this, you help to preserve
the environment.
Guarantee and
service
If you have a problem, need service, or need
information, see www.philips.com/support or contact
the Philips Consumer Care Center in your country.
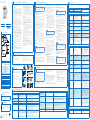
g
a
b
c
d
h
f
e
i
k
j
l
a
Handle of the top unit
b
Control Panel
•Functional
buttons
• Select
• Start
• Easy Clean
•Indicators • Soymilk
• Five Grains Soymilk
• Rice Paste
• Fruit/ Veggie Drink
• In Progress
• Keep Warm
• Easy Clean
c
Overflow sensor - Monitor soymilk and prevent
overflowing
d
Blade
e
Lower part of the top unit
f
Upper plug
g
Pot unit
h
Base
i
Power connection cover
j
Power cord connector
k
Pot handle
l
Upper plug connector
ഌට໎
MAX
3
5
Rice
Paste
Soymilk
Five Grains
Soymilk
Select
Fruit/Veggie
Drink
Start
In Progress
7
25’
26’
4’
BEEP
Read this user manual carefully before you use
the appliance, and save the user manual for future
reference.
Before processing:
•Before you insert the plug into the power outlet,
make sure that the appliance is assembled correctly.
•Make sure that your hands are dry before you insert
the plug into the power outlet.
•Before you connect the appliance to the power, make
sure that the voltage indicated on the bottom of the
appliance corresponds to the local power voltage.
•This appliance can only be used with a grounded plug.
Make sure that the plug is firmly inserted into the
power outlet.
•Never connect this appliance to a timer switch, to
avoid a hazardous situation.
•Make sure that you clean the appliance before use
(see the “Cleaning before first use” section).
•Do not use this appliance to heat up soymilk or other
liquid foods.
•Never use the appliance for dry heating.
•Never add contents (including water) above MAX
(the maximum level indication) or below MIN (the
minimum level indication).
•If the power cord, the plug, or other parts are
damaged, do not use the appliance.
•If the power cord is damaged, you must have it
replaced by Philips, a service center authorized by
Philips or similarly qualified persons to avoid a hazard.
•Do not replace parts of the appliance yourself.
•This appliance is not intended for use by persons
(including children) with reduced physical, sensory
or mental capabilities, or lack of experience and
knowledge, unless they have been given supervision
or instructions concerning use of the appliance by a
person responsible for their safety.
•For their safety, do not allow children to play with the
appliance.
•Make sure that the water you add into the soymilk
maker is warm in ambient temperature.
•This appliance is intended for household use only.
During processing:
•Do not use this appliance on an unstable or uneven
surface.
•Keep the appliance and its power cord out of the
reach of children.
•Never let the appliance run unattended.
•Be careful when lifting the top unit in upright position,
keep a good distance from steam to avoid burns or
scalding.
•Do not touch the steam or the metal parts of the
appliance, to avoid burns or scalding.
•Do not disconnect the power cord or remove the
top unit before processing is complete.
•If you have to stop processing, disconnect the power
cord before you perform other operations.
•If there is a power outage no less than 3 minutes
after start processing, do not immediately restart
the soymilk maker. Empty the contents in the
soymilk maker, and then put in new contents before
restarting. Otherwise, the contents will stick to the
pot or overflow, or the appliance will set off a long
alarm.
After processing:
•Disconnect the power before you continue other
operations.
•Disconnect the power and remove the power cord
before cleaning or disassembling this appliance.
•To prevent steam scalding, keep a certain distance
from the soymilk maker before you lift the top unit.
•The blade on the top unit is sharp. Be careful not to
cut yourself or others.
•To prevent a short circuit or an electric shock,
•do not use water to rinse the outside of the pot
unit or top unit (including the top unit handle,
control panel, upper plug, upper plug connector,
and the power cord connector) and keep them
away from drip or splash;
•do not immerse the top unit in water;
•do not immerse the base of the soymilk maker in
water.
•Use a microwave oven to heat up cold soymilk. Do
not use this appliance to heat it, as the contents will
stick to the inner side of the pot.
•Some foods may discolor the overflow sensor. This is
perfectly normal.
•Store the power cord in a cool and dry place.
•To prevent an electric shock, do not use the power
cord to connect other appliances.
Electromagnetic Fields (EMF)
•This Philips soymilk maker complies with all standards
regarding electromagnetic fields (EMF). If handled
properly and according to the instructions in this user
manual, the appliance is safe to use based on scientific
evidence available today.
For more recipes, you can visit Philips MyKitchen website www.philips.com/kitchen
Soymilk
Recipe Ingredients Cooking
Soymilk 75 g of dry beans (a full cup)
Wash and soak soybeans thoroughly. For details,
see the “Make soymilk” section.
Black bean milk 85 g of black beans (a full cup)
Five grains soymilk
Recipe Ingredients Cooking
Classic five grains soymilk
•15 g of soybeans (around 1/5 cup)
•20 g of rice (around 1/5 cup)
•20 g of millet (around 1/5 cup)
•15 g of oats (around 1/5 cup)
•10 g of wheat
Soak the soybeans thoroughly, wash the
ingredients. For details, see the “Make five grains
soymilk” section.
Red bean and millet milk
•50 g of read beans (around 1/2 cup)
•35 g of millet (around 2/5 cup)
•some sugar
Wash the red beans and millet and soak
thoroughly. For details, see the “Make five grains
soymilk” section.
Rice and soybeans milk
•30g of soybeans (around 1/2 cup)
•50 g of rice (around 1/2 cup)
•some sugar
Wash and soak soybeans thoroughly. Wash rice.
For details, see the “Make five grain soymilk”
section.
Pumkin soybeans milk
•35 g of soybeans (around 1/2 cup)
•35 g of pumpkin (around 1/2 cup)
Wash the soybeans and soak thoroughly.
Remove the pumpkin skin and cut the pumpkin
into 1 cm cubes. For details, see the “Make five
grains coymilk” section.
Sweet potato and
soybean milk
•40 g of sweet potato (around 1/2 cup)
•35 g of soybeans (around 1/2 cup)
Wash the soybeans and soak thoroughly.
Remove the sweet potato skin and cut the
sweet potato into 1 cm cubes. For details, see
the “Make five grains soymilk” section.
Mung bean and barley
paste
•35 g of barley (around 2/5 cup)
•35 g of mung beans (around 2/5 cup)
•20 g of rice (around 1/5 cup)
•10g of oats (around 1/5 cup)
Wash the ingredients. For details, see the “Make
five grains soymilk:” section.
Walnut and cashew paste
•35 g of rice (around 2/5 cup)
•35 g of millet (around 2/5 cup)
•flesh of 5 cashews
•flesh of 5 walnuts
•5-10 chinese dates (with stones removed)
•5-10 longans (with stones removed)
•some sugar
Wash rice and millet. Chop walnut flesh, chinese
dates, and longans into small pieces. For details,
see the “Make five grains soymilk” section.
Rice paste
Recipe Ingredients Cooking
Cashew paste
•150 g of cashews
•some milk and crystal sugar
Brown the cashews and make sure they are
around 1cm in size . Put it into the pot. Add
water up to the middle of MAX and MIN. After
connecting to the power, press Select to select
Rice Paste. Press Start to start processing. Once
done, the appliance will sound. Pour the cashew
paste to the soymilk cup and serve. Finally, add
some milk and sugar to taste.
Complete nutritious rice
paste
•35 g of rice (around 1/2 cup)
•15 g of millet (around 1/5 cup)
•10 g of black sesame seeds
•10 peanuts (with shells removed)
•flesh of walnuts
•5 chinese dates (with stones removed)
Wash rice and millet. Chop walnut flesh into
small pieces. For details, see the “Make rice
paste” section.
Barley and lily rice paste
•35 g of barley (around 2/5 cup)
•35 g of rice (around 2/5 cup)
•20 g of fresh lily bulbs
•some sugar
Wash the barley and rice. Wash and chop fresh
lily bulbs into small pieces. For details, see the
“Make rice paste” section.
Chinese yam and chinese
date rice paste
•50 g of rice (around 1/2 cup)
•30 g of chinese yam
•5-10 chinese dates (with stones removed)
•some crystal sugar
Wash the chinese dates and rice. Remove the
skin of the chinese yam and cut it into 1 cm
cubes. For details, see the “Make rice paste”
section.
Sweet potato and
pumpkin rice paste
•30 g of sweet potato (around 1/2 cup)
•20 g of pumpkin (around 1/3 cup)
•35 g of rice (around 1/3 cup)
•35 g of millet (around 1/3 cup)
Wash millet and rice. Remove the skin of sweet
potato and pumpkin and cut them into 1 cm
cubes. For details, see the “Make rice paste”
section.
Peanut paste
•200 g of peanuts (with shell removed)
•50 g of rice
•some milk and crystal sugar
Brown the peanuts and make sure they are
around 1cm in size. Wash rice. Put the peanuts
into the pot first, then the clean rice. Ad water
up to the middle of MAX and MIN. After
connecting to the power, press Select to select
Rice Paste. Press Start to start processing. Once
done, the appliance will sound. Pour the peanut
paste to the soymilk cup and serve. Finally, add
some milk and sugar to taste.
Almond paste
•70 g of almonds
•30 g of rice
•some milk and crystal sugar
Brown the almonds and make sure they are
around 1cm in size. Wash rice. Put the almonds
into the pot first, then the clean rice. Ad water
up to the middle of MAX and MIN. After
connecting to the power, press Select to select
Rice Paste. Press Start to start processing. Once
done, the appliance will sound. Pour the almond
paste to the soymilk cup and serve. Finally, add
some milk and sugar to taste.
Sesame paste
•125 g of black sesame seeds
•25 g of white sesame seeds
•50 g of rice
•some milk and crystal sugar
Brown the black sesame seeds and the white
sesame seeds. Wash rice. Put both the black and
white sesame seeds into the pot first then put
the clean rice. Add water up to the middle of
MAX and MIN. After connecting to the power,
press Select to select Rice Paste. Press Start to
start processing. Once done, the appliance will
sound. Pour the sesame paste to the soymilk
cup and serve. Finally, add some milk and sugar
to taste.
Walnut paste
•180 g of walnuts
•50 g of rice
•some milk and crystal sugar
Brown the walnuts and make sure they are
around 1cm in size. Wash rice. Put the walnuts
into the pot first, then put the clean rice. Ad
water up to the middle of MAX and MIN. After
connecting to the power, press Select to select
Rice Paste. Press Start to start processing. Once
done, the appliance will sound. Pour the sesame
paste to the soymilk cup and serve. Finally, add
some milk and sugar to taste.
Fruit/veggie drink
Recipe Ingredients Cooking
Banana milkshake
•400 g of banana
•300 ml of milk
Remove the skin of the bananas and cut them
into 1 cm cubes. For details, see the “Make fruit/
veggie drink” section.
This chapter summarizes the most common problems you could encounter with the appliance. If you are unable to solve the problem with the information
below, contact the Philips Consumer Care Center in your country.
Problem Possible cause Solution
The indicators do not light
up.
The upper plug is not plugged correctly. Make sure that the top unit is put into the pot correctly.
Too much ingredient is added. Put proper quantity of ingredient evenly at the bottom of the pot as instructed.
There is water in the top unit or the indicators
are broken.
Contact the Philips Consumer Care Center.
The indicators light up but
the appliance does not work.
You do not press Start. Press Start.
The power is disconnected during processing. Follow the instructions in this user manual.
The appliance is broken. Contact the Philips Consumer Care Center.
Processing will not stop. The appliance is broken. Contact the Philips Consumer Care Center.
The buttons do not work. The appliance is broken. Contact the Philips Consumer Care Center.
The beans or rice is not
ground well.
The voltage is too low. Use a household power regulator.
Too many beans are added.
Put proper quantity of ingredients as instructed in the “Use the appliance”
section.
Insufficient water is added.
Make sure that the water level is between MAX (the maximum level
indication) and MIN (the minimum level indication).
The machine is broken. Contact the Philips Consumer Care Center.
Overflow.
A wrong function was selected. Select a correct function.
Soymilk is too diluted or too many beans are
added.
Put proper quantity of ingredient as instructed in the “Use the appliance”
section.
The water level is above MAX (the maximum
level indication) and MIN (the minimum level
indication).
Make sure that the water level is between MAX (the maximum level
indication) and MIN (the minimum level indication).
The appliance is broken. Contact the Philips Consumer Care Center.
The overflow sensor is not cleaned. Clean the overflow sensor.
Problem Possible cause Solution
The time taken to process
soymilk is longer than
instructed, but other
functions work well.
The voltage is too low. User a household power regulator.
The water temperature is too low. Add warm water in ambient temperature.
Food is burnt.
A wrong function is selected. Select a correct function.
The inner side of the pot was not cleaned. Clean the inner side of the pot.
Insufficient water is added.
Make sure that the water level is between MAX (the maximum level
indication) and MIN (the minimum level indication).
Too much ingredient is added.
Put proper quantity of ingredient as instructed in the “Use the appliance”
section.
The beeps occur before
soymilk is ready.
Too much water or ingredient is added.
•Put proper quantity of ingredient as instructed in the “Use the appliance”
section.
•Make sure that the water level is between MAX (the maximum level
indication) and MIN (the minimum level indication).
The appliance is broken. Contact the Philips Consumer Care Center.
The sea level of your region is too high.
This appliance can only be used in regions no more than 2000m above mean
sea level.
The appliance begins stirring
once you press any button.
The appliance is broken. Contact the Philips Consumer Care Center.
Product information
Motor power: 150 W
Heating power: 900 W
Dimensions (L x W x H):
•Soymilk maker: 231.5 x 180 x 314.2 mm
•Packaging: 230 x 230 x 345 mm
Weight
•Net weight: 2.3 kg
•Gross weight: 2.9 kg
Capacity: 1000 - 1200 ml (for 2-4 servings)
For rated voltage and frequency information, refer to the
typeplate on the product.
Product information is subjected to change without prior
notice.
User manual 使用手冊

重要事項
第一次使用前
的清洗
2
1
配件及功能介紹
方法一
1 將開水倒入豆漿壺,蓋上主機,浸泡 10 分
鐘。
2 按照《清洗》章節的要求,將本產品徹底清
洗乾淨。
方法二
1 按照乾/濕豆豆漿(Soymilk)製作方法所示,製
作豆漿。
2 豆漿製作完成後,將豆漿倒掉不喝,再按照
《清洗》章節的要求,將本產品徹底清洗乾
淨。
3
使用方法
警告
•
如果選擇了某項功能後想取消該功能,切
勿提出主機,以免蒸汽燙傷臉部(以免發
生危險)。可以拔掉電源線後重新插上電
源線,再選擇其他功能。
乾/濕豆豆漿(Soymilk)製作方法
•按照使用方法量取食材,可根據個人口味適量增
減,切勿大幅增減。
•供 2~4 人食用份量。
1 用隨機附送的量杯量取乾豆 1 杯洗淨備用。
•為延長刀片使用壽命,建議製作前用清水充
分浸泡乾豆(春秋季 8~9 小時,夏季 6~7 小
時,冬季 9~10 小時),再將浸泡好的豆子洗
淨備用。
2 將洗淨的豆子均勻平放在豆漿壺底部。
3 豆漿壺內加入清水,不要超過MAX或低於MIN。
4 將主機正確放入豆漿壺,即接通電源連接器。
5 打開電源接口蓋板,插上電源線,接通電源。
»
功能鍵指示燈循環閃爍,表示電源接通。
6 按
Select
(選擇)鍵,選擇Soymilk
(乾/濕豆豆漿)。
»
Soymilk
(乾/濕豆豆漿)指示燈亮起。
7 按
Start
(啟動)鍵。
»
In Progress
(工作中)指示燈閃爍且伴有 1 聲蜂
鳴,豆漿製作開始。
»
約 25 分鐘後,6 聲蜂鳴響起, Keep Warm (保
溫)指示燈亮起,此時豆漿製作完成。 本機將自
動進入保溫功能, 並持續 1 小時後自動結束,參
見《保溫功能》。
8 製作完成後,拔去電源。用一隻手握住豆漿壺手
柄,另一隻手提出主機。
9 用過濾網過濾豆漿,即可準備飲用,也可加入適量
砂糖攪勻飲用。
提示
•
若想縮短製作時間,可加入溫水製作米豆
漿,建議水溫不要超過 70
°C
。
•
也可直接將豆漿倒入豆漿杯中準備飲用。
五穀豆漿 (Five Grains Soymilk) 製
作方法
•按照使用方法量取食材,可根據個人口味適量增
減,切勿大幅增減。
•以黃豆米漿為例,供 2~4 人食用份量。
1 用隨機附送的量杯量取黃豆 30 克,約 1/2 杯,
米 50 克,約 1/2 杯。
•為延長刀片使用壽命,建議製作前用清水充
分浸泡乾豆(春秋季 8~9 小時,夏季 6~7 小
時,冬季 9~10 小時),再將浸泡好的豆子洗
淨備用。
2 將洗淨的豆子與米均勻平放在豆漿壺底部。
3 豆漿壺內加入清水,不要超過MAX或低於MIN。
4 將主機正確放入豆漿壺,即接通電源連接器。
5 打開電源接口蓋板,插上電源線,接通電源。
»
功能鍵指示燈循環閃爍,表示電源接通。
6 按
Select
(選擇)鍵,選擇
Five Grains Soymilk
(五穀
豆漿)。
»
Five Grains Soymilk
(五穀豆漿)指示燈亮起。
7 按
Start
(啟動)鍵。
»
In Progress
(工作中)指示燈閃爍且伴有 1 聲蜂
鳴,豆漿製作開始。
»
約 26 分鐘後,6 聲蜂鳴響起, Keep Warm (保
溫)指示燈亮起,此時五穀豆漿製作完成。 本機
將自動進入保溫功能, 並持續 1 小時後自動結
束,參見《保溫功能》。
8 製作完成後,拔去電源。用一隻手握住豆漿壺手
柄,另一隻手提出主機。
9 請將豆漿倒入豆漿杯中,即可準備飲用,也可加入
適量砂糖攪勻飲用。
提示
•
若想縮短製作時間,可加入溫水製作米豆
漿,建議水溫不要超過 70
°C
。
營養米糊 (Rice Paste) 製作方法
•按照使用方法量取食材,可根據個人口味適量增
減,切勿大幅增減。
•以薏米百合米糊為例,供 2~4 人食用份量。
1 用隨機附送的量杯量取薏米、米各 35 克,約 2/5
杯, 鮮百合 20 克,約 7~8 片。
2 將洗淨的米、薏米和百合均勻平放在豆漿壺底
部。
3 豆漿壺內加入清水,不要超過MAX或低於MIN。
4 將主機正確放入豆漿壺,即接通電源連接器。
5 打開電源接口蓋板,插上電源線,接通電源。
»
功能鍵指示燈循環閃爍,表示電源接通。
6 按
Select
(選擇)鍵,選擇
Rice Paste
(營養米糊)。
»
Rice Paste
(營養米糊)指示燈亮起。
7 按
Start
(啟動)鍵。
»
In Progress
(工作中)指示燈閃爍且伴有 1 聲蜂
鳴,營養米糊製作開始。
»
約 26 分鐘後,6 聲蜂鳴響起, Keep Warm (保
溫)指示燈亮起,此時營養米糊製作完成。 本機
將自動進入保溫功能, 並持續 1 小時後自動結
束,參見《保溫功能》。
8 製作完成後,拔去電源。用一隻手握住豆漿壺手
柄,另一隻手提出主機。
9 請將米糊倒入豆漿杯中,即可準備飲用,也可加入
適量砂糖攪勻飲用。
提示
•
若想縮短製作時間,可加入溫水製作米豆
漿,建議水溫不要超過 70
°C
。
果蔬冷飲 (Fruit/Veggie Drink) 製作
方法
•按照使用方法量取食材,可根據個人口味適量增
減,切勿大幅增減。
•以香蕉奶昔製作為例,供 2~4 人食用份量。
1 準備三根香蕉(約 400 克),切成約 1 厘米見
方大小塊狀備用。
2 將香蕉塊均勻平放在豆漿壺底部。
3 先往豆漿壺內加入 300 毫升純牛奶,然後加入純
淨水,不要超過MAX或低於MIN。
4 將主機正確放入豆漿壺,即接通電源連接器。
5 打開電源接口蓋板,插上電源線,接通電源。
»
功能鍵指示燈循環閃爍,表示電源接通。
6 按
Select
(選擇)鍵,選擇
Fruit/Veggie Drink (果蔬冷
飲)。
»
Fruit/Veggie Drink(果蔬冷飲)指示燈亮起。
7 按
Start
(啟動)鍵。
»
In Progress
(工作中)指示燈閃爍且伴有 1 聲蜂
鳴,果蔬冷飲製作開始。約 4 分鐘後,6 聲蜂
鳴響起,果蔬冷飲製作完成。
8 製作完成後,拔去電源。用一隻手握住豆漿壺手
柄,另一隻手提出主機。
9 請將香蕉奶昔倒入豆漿杯中,即可準備飲用,也可
加入適量砂糖攪勻飲用。
提示
•
香蕉奶昔製作完成後,請盡快飲用,以免
氧化。
•
要想多次使用果蔬冷飲功能時,最好每次
之間要間隔 10 分鐘以上, 待電機冷卻後
再進行下一次工作,以免影響電機使用壽
命。
保溫 (Keep Warm) 功能
在製作完乾/濕豆豆漿、五穀豆漿、營養米糊後,6
聲蜂鳴聲響起, 並於6 秒後進入保溫狀態。Keep
Warm (保溫) 指示燈亮起。保溫功能時間為 1 小
時,1 小時後保溫功能自動結束。
提示
•
若製作完成後,隨即提起主機,則不會進
入保溫功能。
•
製作完果蔬冷飲後,本產品不會進入保溫
功能。
4
清洗
注意
•
在清洗或拆卸本產品之前,請務必拔掉電
源線,切斷電源。
•
切勿將主機浸入水中。
•
在主機,豆漿壺內側冷卻前,切勿用手觸
摸,以防燙傷。
•
在清洗主機時,請格外小心,切勿讓主機
上的刀片劃傷自己或他人。
1 用清水沖洗主機下蓋、防溢感應棒、刀片和豆漿
壺內側。
2 用乾抹布擦拭主機手柄、控制板、電源連接器接
口、電源線接口,豆漿壺外側可用濕抹布擦拭。
易清洗 (Easy Clean) 功能的使用
•製作過程完成後,如果您未能及時清洗黏附在主機
下蓋以及豆漿壺內側的食物殘渣,這些食物殘渣會
變乾、粘結在壺壁和主機上,不易清洗。這時,您
可使用Easy Clean (易清洗)功能,將其加熱潤濕,
讓清洗過程更加方便。
•建議在使用完成後 10 小時內使用易清洗功能清洗
本產品,以免殘留物變質,產生不易清除的異味。
1 豆漿壺內加入清水,不要超過MAX或低於MIN。
2 將主機正確放入豆漿壺,即接通電源連接器 。
3 打開電源接口蓋板,插上電源線,接通電源。
»
功能鍵指示燈循環閃爍,表示電源接通。
4 按Easy Clean (易清洗)
鍵。
»
Easy Clean Easy Clean 指示燈亮起,工作中指示燈
閃爍且伴有 1 聲蜂鳴聲,清洗開始。
»
8 分鐘左右後,6 聲蜂鳴聲響起,In Progress (工
作中)指示燈熄滅,此時易清洗過程結束。
5 按照之前所描述的一般清洗要求,將本產品清洗乾
淨。
產品規格
包裝內產品或零配件型號,請以實物為準。
電機功率:150 W
加熱功率:900 W
外形尺寸(長x寬x高)
•豆漿機:231.5 x 180 x 314.2 mm
•包裝:230 x 230 x 345 mm
重量
•淨重:2.3 kg
•毛重:2.9 kg
容量:1000~1200 ml (共 2~4 人食用份量)
有關額定電壓和頻率資訊,請參閱產品上的型
板。
以上產品規格如有更改,恕不另行通知,敬請諒
解!包裝內產品或零配件型號,請以實物為準。
環保回收
棄置產品時,請不要將其與一般生活垃
圾堆放在一起;應將其交給官方指定的
回收中心。這樣做有利於環保。
保修和服務
如果您需要服務或信息,或者有任何疑問,請
訪問飛利浦網站:
www.philips.com/support。您也可與所在地的
飛利浦客戶服務中心聯繫,或者向飛利浦服務
熱線諮詢,服務熱線 852 2619 9663。
豆漿營養食譜
故障分析及解決方法
您還可登陸飛利浦 MYKITCHEN 網站 www.philips.com/kitchen,獲取更多營養食譜。
乾豆/濕豆豆漿
食譜 配料 製作方法
黃豆豆漿 乾黃豆 75 克,滿杯。 用水洗淨後,並充分浸泡,放入豆漿壺中,加水至MAX和MIN
之間。接通電源,選擇 Soymilk (乾/濕豆豆漿) 功能,待機器鳴
音示意製作完畢,過濾後即可飲用。
黑豆豆漿 黑豆 85 克,滿杯。
五穀豆漿
食譜 配料 製作方法
經典五穀
豆漿
•黃豆 15 克,約 1/5 杯;
米 、 小米各 20 克,約 1/5
杯;燕麥 10 克,約 1/5
杯;小麥仁 10 克。
將黃豆用水洗淨後並充分浸泡,同洗淨的米、小米、小麥仁和
燕麥一起放入豆漿壺中,加水至MAX和MIN之間。接通電源,
選擇 Five Grains Soymilk (五穀豆漿) 功能,待機器鳴音示意製作
完畢,裝杯,加入適量砂糖即可飲用。
紅豆小米
米漿
•紅豆 50 克,約 1/2 杯;小
米 35 克,約 2/5 杯;砂糖
適量。
將紅豆與小米用水洗淨後,放入豆漿壺中,加水至MAX和MIN
之間。接通電源,選擇 Five Grains Soymilk (五穀豆漿) 功能,待
機器鳴音示意製作完畢,裝杯,加入適量砂糖即可飲用。
大米黃豆
米漿
•黃豆 30 克,約 1/2 杯;
米 50 克,約 1/2 杯;砂糖
適量。
將黃豆用水洗淨後並充分浸泡,同洗淨的米一起放入豆漿
壺中,加水至MAX和MIN之間。接通電源,選擇 Five Grains
Soymilk (五穀豆漿) 功能,待機器鳴音示意製作完畢,裝杯,加
入適量砂糖即可飲用。
南瓜黃豆
豆漿
•黃豆 35 克,約 1/2 杯;南
瓜 35 克,約 1/2 杯。
將黃豆洗淨、用水充分浸泡後,同去皮切丁(約 1 厘米大小塊
狀)的南瓜一起放入豆漿壺中,加水至MAX和MIN之間。接通
電源,選擇 Five Grains Soymilk (五穀豆漿) 功能,待機器鳴音示
意製作完畢,過濾後即可飲用。
紅薯黃豆
豆漿
•紅薯 40 克,約 1/2 杯, 黃
豆 35 克,約 1/2 杯。
將黃豆洗淨、用水充分浸泡後,同去皮切丁(約 1 厘米大小塊
狀)的紅薯一起放入豆漿壺中,加水至MAX和MIN之間。接通
電源,選擇 Five Grains Soymilk (五穀豆漿) 功能,待機器鳴音示
意製作完畢,過濾後即可飲用。
綠豆薏仁糊
•薏仁 35 克,約 2/5 杯;綠
豆 35 克,約 2/5 杯;米
20 克,約 1/5 杯;燕麥 10
克,約 1/5 杯;砂糖適量。
將綠豆用水洗淨後並充分浸泡,同洗淨的大米、薏仁和燕麥一
起放入豆漿壺中,加水至MAX和MIN之間。接通電源,選擇Five
Grains Soymilk (五穀豆漿) 功能,待機器鳴音示意製作完畢便倒
入杯中,加入適量砂糖即可飲用。
合桃腰果糊
•米、小米各 35 克,約
2/5 杯;腰果、合桃肉各
5 顆;去核紅棗、桂圓各
5~10 顆;冰糖適量。
將米與小米用水洗淨後,腰果、合桃肉洗淨掰碎,同去核掰碎
的紅棗和桂圓一起放入豆漿壺中,加水至MAX和MIN之間。接
通電源,選擇 Five Grains Soymilk (五穀豆漿) 功能,待機器鳴音
示意製作完畢便倒入杯中,加入適量冰糖即可飲用。
營養米糊
食譜 配料 製作方法
腰果露
•腰果150克; 鮮奶和白糖適
量。
先將略烘的腰果分成1厘米大小後放入壺中,然後放入洗淨的
米。水加至MAX和MIN之間的中間水位。連接電源後,選擇
Rice Paste (營養米糊) 功能。待機器鳴音示意製作完畢後便倒入
碗中。加入適量的鮮奶和白糖即可飲用。
全營養米糊
•米 35 克,約 1/2 杯;小米
15 克,約 1/5 杯;黑芝麻
10 克;花生仁 10 顆;合桃
肉 5 顆;去核紅棗 5 顆。
將米與小米用水洗淨後,合桃肉洗淨掰碎、花生仁洗淨,同去
核掰碎的紅棗一起放入豆漿壺中,加水至MAX和MIN之間。接
通電源,選擇 Rice Paste (營養米糊) 功能,待機器鳴音示意製
作完畢便倒入杯中,加入適量冰糖即可飲用。
薏米百合
米糊
•薏米、米各 35 克,約 2/5
杯;鮮百合 20 克,冰糖
適量。
將米與薏米用水洗淨後,同洗淨撕碎的鮮百合一起放入豆漿壺
中,加水至MAX和MIN之間。接通電源,選擇 Rice Paste (營養
米糊) 功能,待機器鳴音示意製作完畢便倒入杯中,加入適量
冰糖即可飲用。
山藥紅棗
米糊
•米 50 克,約 1/2 杯;山
藥 30 克,去核紅棗 5~10
顆,冰糖適量。
將紅棗去核掰碎與米用水洗淨後,同去皮切丁(約 1 厘米大小
塊狀)的山藥一起放入豆漿壺中,加水至MAX和MIN之間。接
通電源,選擇 Rice Paste (營養米糊) 功能,待機器鳴音示意製
作完畢便倒入杯中,加冰糖攪拌均勻即可飲用。
紅薯南瓜
米糊
•紅薯 30 克,約 1/2 杯;南
瓜 20 克,約 1/3 杯;米
35 克,約 1/3 杯;小米 35
克,約 1/3 杯。
將米與小米用水洗淨後,同去皮切丁(約 1 厘米大小塊狀)的
紅薯和南瓜一起放入豆漿壺中,加水至MAX和MIN之間。接通
電源,選擇 Rice Paste (營養米糊) 功能,待機器鳴音示意製作
完畢便倒入杯中,加入適量冰糖即可飲用。
花生糊
•花生200克, 米50克; 鮮奶
和白糖適量。
先將略烘的花生去皮後分成1厘米大小並放入壺中,然後放入
洗淨的米。水加至MAX和MIN之間的中間水位。連接電源後,
選擇 Rice Paste (營養米糊) 功能。待機器鳴音示意製作完畢後
便倒入碗中。加入適量的鮮奶和白糖即可飲用。
杏仁露
•杏仁70克,米30克; 鮮奶和
白糖適量。
先將略烘的杏仁分成1厘米大小後放入壺中,然後放入洗淨的
米。水加至MAX和MIN之間的中間水位。連接電源後,選擇
Rice Paste (營養米糊) 功能。待機器鳴音示意製作完畢後便倒入
碗中。加入適量的鮮奶和白糖即可飲用。
食譜 配料 製作方法
芝麻糊
•黑芝麻125克,白芝麻25
克,米50克; 鮮奶和白糖
適量。
先將略烘的黑芝麻和白芝麻一起放入壺中,然後加入洗淨的
米。水加至MAX和MIN之間的中間水位。連接電源後,選擇
Rice Paste (營養米糊) 功能。待機器鳴音示意製作完畢後便倒入
碗中。加入適量的鮮奶和白糖即可飲用。
合桃糊
•合桃肉180克,米50克; 鮮
奶和白糖適量。
先將略烘的合桃肉切成1厘米大小後放入壺中,然後加入洗淨
的米。水加至MAX和MIN之間的中間水位。連接電源後,選擇
Rice Paste (營養米糊) 功能。待機器鳴音示意製作完畢後便倒入
碗中。加入適量的鮮奶和白糖即可飲用。
果蔬冷飲
食譜 配料 製作方法
香蕉奶昔
•香蕉 400 克,牛奶 300
克。
將香蕉剝皮後切成約 1 厘米見方大小塊狀,放入豆漿壺中,
加入牛奶,再加入純淨水至MAX和MIN之間。接通電源,選
擇 Fruit/Veggie Drink (果蔬冷飲) 功能,待機器鳴音示意製作完
畢,裝杯,即可飲用。
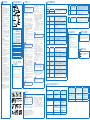
a
主機手柄
b
控制板
•功能鍵 •Select (選擇)
•Start (啟動)
•Easy Clean (易清洗)
•指示燈 •Soymilk (乾/濕豆豆漿)
•Five Grains Soymilk (五穀
豆漿)
•Rice Paste (營養米糊)
•Fruit/ Veggie Drink (果蔬
冷飲)
•In Progress (工作中)
•Keep Warm (保溫)
•Easy Clean (易清洗)
c
防溢感應棒 - 用於檢測豆漿沸騰,防止豆
漿或米糊溢出
d
刀片
e
主機
f
電源連接器接口
g
豆漿壺
h
底座
i
插座蓋板
j
電源線接口
k
豆漿壺手柄
l
電源連接器
為便於您正確操作本產品,使用前請仔細閱
讀本使用手冊,並妥善保管。
使用前須注意的事項:
• 將本產品連接電源之前,請確保本產品
電壓與當地的供電電壓相符。
• 本產品衹能使用帶接地線的電源插座。
確保插頭牢固插到電源插座上。
• 切勿用浸濕的手插接電源插頭。
• 切勿將本產品連接至外部定時器,以免
發生危險。
• 將產品插接到電源插座前,應正確組裝
本產品。
• 第一次使用前,需將本產品清洗乾淨,
參見《第一次使用前的清洗》。
• 禁止使用本產品加熱其它液體類食物。
• 嚴禁乾燒。
• 所加食材(包括清水)切勿超過
MAX,
或低於MIN。
• 如果插頭、電源線、底座或產品本身已
經損壞,請不要使用。
• 如果電源軟線損壞,為避免危險,必須
由製造廠或其維修部或類似的專職人員
來更換。
• 不要自行更換本產品的零配件,以免發
生危險。
• 本產品不打算由肢體不健全、感覺或精
神上有障礙或缺乏相關經驗和知識的人
(包括兒童)使用,除非有負責他們安
全的人對他們使用本產品進行監督或指
導。
• 照看好兒童,確保他們不玩耍該產品,
並將電源線置於兒童無法接觸到的地
方。
• 本產品僅供家用。
使用中須注意的事項:
• 禁止在不穩或傾斜的台面使用本產品。
• 製作飲品時,請將本產品置於兒童觸摸
不到的地方。
• 機器運行中,切勿觸摸豆漿壺邊沿金屬
部分,防止高溫或蒸汽燙傷。
• 製作飲品時,建議添加的清水為常溫
水。
• 本產品工作完成之前,切勿切斷電源,
或提出主機。
• 如果必須終止機器運行,請務必先切斷
電源,然後才繼續其他操作。
• 在程序開始 3 分鐘之後,如果發生突然
意外斷電的情況,切勿馬上重新開始程
序,務必先更換新的食材和水再重新開
始程序,否則可能會發生燒焦壺底、溢
壺現象或機器長鳴。
豆漿製作完成後須注意的事項:
• 製作完成後,請務必先拔掉電源線、切
斷電源,然後繼續其他操作。
• 提出主機時,請與本產品保持一定距
離,謹防蒸汽燙傷臉部。
• 請格外小心,切勿讓主機上的刀片劃傷
自己或他人。
• 在清洗或拆卸本產品之前,請務必拔掉
電源線,切斷電源。
• 嚴禁用水沖洗豆漿壺外部與主機上蓋(
包括主機手柄,控制板,電源連接器,
電源連接器接口以及電源線接口),嚴
禁將主機浸入水中,以免水進入機體內
部而造成短路、觸電等事故。
• 嚴禁將豆漿壺的底座浸入水中(底部留
有散熱孔),避免水經過散熱孔進入電
器器件內部而造成短路、觸電等事故。
• 放涼了的豆漿建議用微波爐加熱,不要
用本產品再次加熱,否則會燒焦豆漿壺
底部。
• 在按照某些食譜製作果蔬飲品和蔬菜濃
湯後,防溢感應棒可能會有輕微染色 。
• 使用完畢後請收好電源線,將其置於乾
燥處,切勿用其接插本產品以外的電
器,以防觸電。
電磁場 (EMF)
這款飛利浦全自動家用豆漿機符合關於電磁
場 (EMF) 的相關標準。據目前的科學證明,
如果正確使用並按照本使用手冊中的說明進
行操作,本產品是安全的。
如果本產品不能工作正常,請查詢以下表格。如果問題仍未解決,則請聯繫您所在國家/地區的飛利浦客戶服務
中心。
故障 可能原因 解決方法
指示燈不亮。
電源連接器未接通。 重新放正主機。
食材放得太多。 按規定量將食材平放在壺底。
主機內進水或者指示燈損壞。 聯繫客戶服務中心。
指示燈亮,機器不工作。
未按 Start(啟動) 鍵。 按下 Start(啟動) 鍵。
工作過程中電源被切斷。 須按正常工作步驟進行操作。
機器故障。 繫客戶服務中心。
電機工作不停。 機器故障。 繫客戶服務中心。
按鍵無反應。 機器故障。 繫客戶服務中心。
豆子或米打不碎。
壓過低。 使用家用穩壓器。
加豆量太多。
按《使用方法》所示添加豆子
和其他食材。
加水過少。 將水加至MAX和MIN之間。
机器故障。 繫客戶服務中心。
溢壺 。
選錯功能。 正確選擇功能。
豆漿太稀或豆加得太多。
按《使用方法》所示添加豆子
和其他食材。
加水低於最低水位線或高於最高水
位線。
將水加至MAX和MIN之間。
機器故障。 繫客戶服務中心。
防溢感應棒未擦洗乾淨。 將防溢感應棒擦洗乾淨。
豆漿加工時間過長,其他正常。
電壓過低。 使用家用穩壓器。
水溫過低。 使用常溫水。
故障 可能原因 解決方法
燒焦壺底。
選錯功能。 正確選擇功能。
豆漿壺內部未清洗乾淨。 將豆漿壺內部清洗乾淨。
加水太少。 將水加至MAX和MIN之間。
食材加得太多。
按《使用方法》所示添加豆子
和其他食材。
豆漿未煮熟,提前響起。
加水過多或其他食材加得太多。
•按《享受》所示添加豆子和
其他食材。
•將水加至MAX和MIN之間。
機器故障。 繫客戶服務中心。
海拔過高。
本產品僅適用於海拔 2000 米
以下的地區。
一按任何鍵,豆漿機便自動攪打。 機器故障。 繫客戶服務中心。
g
a
b
c
d
h
f
e
i
k
j
l
ഌට໎
MAX
3
5
Rice
Paste
Soymilk
Five Grains
Soymilk
Select
Fruit/Veggie
Drink
Start
In Progress
7
25’
26’
4’
BEEP
-
 1
1
-
 2
2

