
Customer care
More information on the complete AgfaPhoto digital camera product range can be
found at
www.agfaphoto.com / www.plawa.com.
Service & Repair Hotline (EU): 00800 752 921 00 (from a landline only)
Service & Support Hotline (Germany): 0900 1000 042 (1.49 euro / min. from a Ger-
man landline only)
Online Service / International contact: [email protected]
Service & Repair (USA/ Canada): [email protected], 866-475-2605
Service & Repair (UK): +44 1908 488676, [email protected]
Manufactured by
plawa-feinwerktechnik GmbH & Co. KG, Bleichereistraße 18, 73066 Uhingen, Germany
Allmonde Group Limited, 218 Fairbourne Drive, Atterbury, Milton Keynes, MK10 9RG,
United Kingdom
AgfaPhoto is used under license of Agfa-Gevaert NV & Co. KG or Agfa-Gevaert NV.
Neither Agfa-Gevaert NV & Co KG nor Agfa-Gevaert NV manufacture this product or
provide any product warranty or support. For service, support and warranty informa-
tion, contact the distributor or manufacturer. All other brands and product names
are registered trademarks of their respective owners. Product design and technical
features can be changed without notice.
Contact: AgfaPhoto Holding GmbH, www.agfaphoto.com
Quick Start Guide Kurzanleitung Guide rapide Guía rápida
Kunden-Service
Informationen zu weiteren AgfaPhoto Produkten nden Sie unter
www.agfaphoto.com / www.plawa.com.
Service- und Reparatur-Hotline (EU): 00800 75292100 (aus dem Festnetz)
Service- und Support-Hotline (D): 0900 1000 042 (1,49 Euro/Min. aus dem
deutschen Festnetz)
Online-Service / Internationaler Kontakt: [email protected]
Service und Reparaturen (USA/ Kanada): [email protected], 866-475-
2605
Hergestellt von:
plawa-feinwerktechnik GmbH & Co. KG, Bleichereistr. 18, 73066 Uhingen / Deutschland
AgfaPhoto wird unter Lizenz von Agfa-Gevaert NV & Co. KG oder Agfa-Gevaert NV
genutzt. Weder Agfa-Gevaert NV & Co. KG noch Agfa-Gevaert NV stellen dieses
Produkt her oder decken die Produktgarantie oder den entsprechenden Support ab.
Wenn Sie Informationen zum Kundendienst, zum Support oder zur Garantie benöti-
gen, wenden Sie sich bitte an den Händler oder den Hersteller. Kontakt: AgfaPhoto
Holding GmbH, www.agfaphoto.com
Assistance à la clientèle
Pour plus d’informations sur l’ensemble de notre gamme de produits :
www.agfaphoto.com / www.plawa.com.
Hotline SAV & Assistance (Allemagne) : 0900 1000 042 (1,49 Euro/ min depuis un
poste xe en Allemagne)
Hotline SAV & Réparation (UE) : 00800 75 292 100 (depuis un poste xe)
Service clientèle / Contact international : [email protected] (Anglais /
Allemand)
Service clientèle (USA/ Canada) : [email protected], 866-475-2605
Fabriquée par
plawa-feinwerktechnik GmbH & Co. KG, Bleichereistr. 18, 73066 Uhingen, Allemagne
La marque AgfaPhoto est utilisée sous licence d‘Agfa-Gevaert NV & Co. ou KG.
Agfa-Gevaert NV & Co. KG ne fabrique pas ces produits et ne fournit ni garantie ni
support technique. Pour toute information sur le support technique ou la garantie,
veuillez contacter le distributeur ou le fabricant. Toutes les autres marques et noms
de produits mentionnés sont des marques déposées appartenant à leurs propriétaires
respectifs. Le modèle et les spécications techniques du produit peuvent être modiés
sans préavis. Contact : AgfaPhoto Holding GmbH, www.agfaphoto.com
Atención al cliente
Información sobre la gama de productos en nuestros sitios web: www.agfaphoto.com
/ www.plawa.com.
Teléfono de servicio y reparación (Europa): 00800 75 292 100 (desde la red ja)
Teléfono de servicio y asistencia técnica (Alemania): 0900 1000 042 (1,49 Euro/ min. desde
la red ja alemana)
Servicio online / Contacto internacional (fuera de EEUU/Canadá): support-apdc@
plawa.com (inglés / alemán)
Servicio y asistencia técnica (EEUU/Canadá): [email protected], 866-
475-2605
Fabricada por:
plawa-feinwerktechnik GmbH & Co. KG, Bleichereistr. 18, 73066 Uhingen, Alemania
AgfaPhoto se emplea bajo licencia de Agfa-Gevaert NV & Co. KG. Agfa-Gevaert NV
& Co. KG no fabrica este producto ni ofrece ningún tipo de garantía o asistencia técni-
ca. Para cualquier tipo de asistencia técnica, servicio o información sobre la garantía,
póngase en contacto con el distribuidor o el fabricante. Todas las marcas y nombres
de productos mencionados son marcas registradas de sus respectivos propietarios.
Reservado el derecho de cambiar el diseño y las características técnicas de los pro-
ductos sin previo aviso. AgfaPhoto Holding GmbH, www.agfaphoto.com.
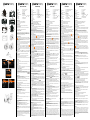
1. Flash light
2. Infrared light
3. Lens
4. Self-timer indicator
5. Microphone
6. Power
7. USB/HD/TV/ Audio Output
8. Speaker
9. Shutter Button
10. Zoom Button
11. Tripod socket
Inserting the Battery
1.
Open the battery cover according to the illustration.
2. Insert the Li-ion battery according to the illustration.
3. Close the battery cover.
Charging the battery
You can use the supplied battery charger to charge the lithium battery.
Powering the Camcorder On
Before starting to take pictures or record movie clips, open and rotate the LCD
Display.
Press the Power Button (6) to turn the camcorder ON/OFF.
Using the Camcorder Menus
Press the Menu Button to display the main OSD (On Screen Display) menu. The
/// buttons allow you to access the various menus available from the OSD.
This camcorder has a touchscreen. You can also use it to adjust basic settings
directly on the display by tapping on the desired option.
Setting the Date and Time.
1.
When powering on for the rst time, use the Menu button (16) and select the
icon to switch to Setup Mode. Select the date and time by moving the /
button or touching the screen to select.
2.
Press / to highlight each column. Then press / or touch the screen to
select the column.
3. Press / to adjust the value. Press the SET Button (17) to save the value you
have changed. Or touch the screen to adjust the Year, Date and Time before
pressing the SET Button (17) to save the value and exit the setting.
Setting the Language
1.
Turn the camcorder power on, press the Menu button (16) and select the
icon to switch to Setup Mode. Move the / button to highlight the Language
item and press the SET button (17) to conrm. Or touch the screen to select.
2. Press the /// button or touch the screen to select the desired language.
Using the camcorder
The camcorder has 3 main Modes:
DV (video) mode, DSC (photo) mode and
voice recording mode. You can switch to the desired mode by using the MODE
button (19).
The icons on the top left corner of the display indicate the selected mode.
Recording Video Clips
1.
Power the camcorder on. It is automatically set to DV mode by default.
2. Press the Recording Button (20) to start or stop recording.
The LCD screen ratio will be different depending on the video clip resolution set-
ting.
Voice Recording
1.
Turn the camcorder on.
2. Press the MODE button (19) to switch to Voice Recording Mode or touch the
screen hotkey.
3. Press the Recording Button (20) to start or stop Voice Recording.
Taking Photos
1.
Turn the camcorder on.
2. Press the MODE button (19) to enter the DSC Mode or touch the screen hotkey.
3. Press the Shutter button (9) to capture images.
Movie Clip / Voice Clip Playback
1.
In Movie/Voice Recording Mode, press the Playback button (21) to display your
recorded video and audio les.
2.
Press the /// button to display the desired le. Press the SET button (17)
to play it back or touch the screen to select Playback of the le.
3.
To pause playback, press the Recording button (20) or touch the ( )
screen icon.
Playing Back Photos
1.
Press the MODE button (19) to enter the DSC Mode and press the Playback
button (21) to display the captured images.
2. Press the /// button to display the desired le.
3.
Press the SET button (17) or touch the screen to view the image in full-screen
mode.
4.
Press the Playback button (21) again to return to the DSC Mode.
Delete
1.
Set the camera to the Playback Mode.
2. Press the MENU Button and press ; or touch the screen to select the le to be
deleted or to delete all les.
3. Press /// or touch the screen to select “Delete one” or “Delete All” to
display submenu.
4. Press /// or touch the screen to select “O” YES or “X” No and press the
SET Button to delete le(s).
Connecting the Camcorder to a PC
You can transfer photos, videos and audio les to your PC.
1.
Connect the camcorder to a PC using the USB cable.
2. Turn on the camcorder.
3. The PC detects the camcorder. The camcorder’s internal memory and memory
card display as removeable drives on the computer.
12. Memory card compartment
13. Battery compartment
14. Macro Button
15. Handstrap
16. Menu Button
17. SET Button
18. LED indicator
19. Mode Button (Video
/ Voice / DSC
)
20. Recording Button
21. Playback Button
1. Blitzlicht
2. Infrarot-Leuchte
3. Objektiv
4. Anzeige für Selbstauslöser
5. Mikrofon
6. Ein/Aus
7. USB-/HD-/TV-/ Audio-Ausgang
8. Lautsprecher
9. Auslöser
10. Zoom-Taste
11. Stativgewinde
12. Speicherkartenfach
Akku einlegen
1.
Öffnen Sie die Abdeckung des Akkufachs (siehe Abbildung).
2. Legen Sie den Akku ein (siehe Abbildung).
3. Schließen Sie die Abdeckung des Batteriefachs.
Akku auaden
Sie können den Lithium-Akku mithilfe des Ladegerätes auaden.
Kamera einschalten
Bevor Sie Fotos oder Videos aufnehmen können, klappen Sie das LCD-Display auf
und drehen es in die gewünschte Position.
Drücken Sie die Ein/Aus-Taste (6), um den Camcorder ein- bzw. auszuschalten.
Bedienung der Camcorder-Menüs
Drücken Sie die Menütaste, um das Hauptmenü einzublenden. Mit den T
asten
/// können Sie die verschiedenen Menüoptionen anwählen.
Dieser Camcorder besitzt einen berührungsempndlichen Bildschirm (Touchscreen).
Sie können die Einstellungen auch direkt durch Antippen der betreffenden Option am
Bildschirm erreichen.
Datum und Uhrzeit einstellen
1. Wenn Sie das Gerät zum ersten Mal einschalten, drücken Sie die Menütaste
(16) und wählen das Symbol
aus, um den Einrichtungsmodus aufzurufen.
Drücken Sie die Tasten /, oder tippen Sie am Bildschirm, um die Option
„Date and Time“ (Datum und Uhrzeit) auszuwählen.
2. Drücken Sie die Tasten /, um die einzelnen Spalten hervorzuheben. Drücken
Sie anschließend die Tasten /, oder tippen Sie auf den Bildschirm, um die
Spalte auszuwählen.
3. Drücken Sie die Tasten /, um den Wert einzustellen. Drücken Sie die
Taste SET (17), um die Einstellungen zu speichern. Oder tippen Sie auf den
Bildschirm, um das Jahr, Datum und die Uhrzeit einzustellen, und drücken Sie
abschließend die Taste SET (17), um die Änderungen zu speichern und die
Einstellfunktion zu verlassen.
Sprache einstellen
1.
Schalten Sie den Camcorder ein, drücken Sie die Menütaste (16), und wählen
Sie das Symbol
aus, um den Einrichtungsmodus aufzurufen. Drücken
Sie die Tasten /, um die Option „Language“ (Sprache) hervorzuheben, und
drücken Sie die Taste SET (17) zur Bestätigung. Oder nehmen Sie die Auswahl
durch Antippen am Bildschirm vor.
2.
Drücken Sie die Tasten ///, oder tippen Sie auf den Bildschirm, um die
gewünschte Sprache auszuwählen.
Camcorder bedienen
Der Camcorder besitzt 3 Betriebsarten:
DV (Digitalvideo), Fotograe und
Sprachaufzeichnung (Diktafon). Mithilfe der Taste MODE (19) können Sie auf
die gewünschte Betriebsart umschalten. Die Symbole oben links am Bildschirm
signalisieren die jeweils ausgewählte Betriebsart.
Videoclips aufzeichnen
1.
Schalten Sie den Camcorder ein. Standardmäßig ist automatisch die Betriebsart
„Videoaufzeichnung“ ausgewählt.
2.
Drücken Sie die Aufnahmetaste (20), um die Aufnahme zu starten bzw. zu stop-
pen. Das Seitenverhältnis des am Display angezeigten Bildes hängt von der
jeweils eingestellten Auösung ab.
Sprachaufzeichnung
1.
Schalten Sie den Camcorder ein.
2. Drücken Sie die MODE-Taste (19), um auf Sprachaufzeichnung umzuschalten,
oder tippen Sie auf die entsprechende Schaltäche am Bildschirm.
3. Drücken Sie die Aufnahmetaste (20), um die Sprachaufzeichnung zu starten bzw.
zu stoppen.
Fotos aufnehmen
1.
Schalten Sie den Camcorder ein.
2. Drücken Sie die MODE-Taste (19), um auf Fotograe umzuschalten, oder tippen
Sie auf die entsprechende Schaltäche am Bildschirm.
3. Drücken Sie den Auslöser (9), um ein Foto aufzunehmen.
Videos / Sprachaufzeichnungen abspielen
1.
Drücken Sie bei gewählter Betriebsart “Videoaufnahme” oder “Sprachaufzeich-
nung” die Wiedergabetaste (21), um die aufgenommenen Videos und Audioda-
teien anzuzeigen.
2. Drücken Sie die Tasten ///, um die gewünschte Datei anzuzeigen. Drück-
en Sie die SET-Taste (17), um sie abzuspielen, oder tippen Sie am Bildschirm auf
die Option zur Dateiwiedergabe.
3. Um die Wiedergabe vorübergehend anzuhalten (Pause), drücken Sie die Aufnah-
metaste (20) oder tippen auf die Schaltäche .
Fotos wiedergeben
1. Drücken Sie die MODE-Taste (19), um auf Fotograe umzuschalten, und drücken
Sie die Wiedergabetaste (21), um die aufgenommenen Fotos anzuzeigen.
2.
Drücken Sie die Tasten ///, um die gewünschte Datei anzuzeigen.
3. Drücken Sie die SET-Taste (17), oder tippen Sie auf den Bildschirm, um das Foto
in Vollbildansicht darzustellen.
4. Drücken Sie die Wiedergabetaste (21) erneut, um zur Fotograefunktion zurück-
zukehren.
Löschen
1.
Schalten Sie auf Wiedergabe um.
2. Drücken Sie die Menütaste (16) und anschließend die Taste , oder tippen Sie
am Bildschirm, um die zu löschende Datei auszuwählen (oder die Löschfunktion
auf alle Dateien anzuwenden).
3.
Drücken Sie die Tasten ///, oder tippen Sie auf den Bildschirm, um die
Option „Eins löschen“ oder „Alles löschen“ auszuwählen.
4. Drücken Sie die Tasten ///, oder tippen Sie auf den Bildschirm, um die
Option „O“ JA oder „X“ NEIN auszuwählen, und drücken Sie die Taste SET, um
den Löschvorgang auszuführen.
Camcorder an einen Computer anschließen
Sie können Ihre aufgenommenen Fotos, Videos und Audiodateien auf den PC
übertragen.
1.
Verbinden Sie den Camcorder über das USB-Kabel mit Ihrem Computer.
2. Schalten Sie den Camcorder ein.
3. Daraufhin erkennt der PC den Camcorder. Der interne Speicher und die Spei-
cherkarte des Camcorders erscheinen auf dem Computer als Wechseldatenträger.
13. Akkufach
14. Makrotaste
15. Tragegurt
16. Menütaste
17. SET-Taste
18. LED-Anzeige
19. Betriebsartenauswahl (Video
/
Diktafon
/ Fotograe )
20. Aufnahmetaste
21. Wiedergabetaste
1. Flash
2. Luz de infrarrojos
3. Objetivo
4. Indicador del temporizador
5. Micrófono
6. Alimentación
7. Salida USB/HD/TV/audio
8. Altavoz
9. Botón del obturador
10. Botón de zoom
11. Sujeción para trípode
Inserción de la pila
1.
Abra la tapa del compartimiento de batería (véase la gura).
2. Inserte la batería de litio-ión (véase la gura).
3. Cierre la tapa del compartimento de la batería.
Cargar la batería
Puede cargar la batería de litio con el cargador incluido.
Encender la cámara
Antes de empezar a fotograar o a grabar vídeos, abra y gire la pantalla LCD.
Pulse el botón de alimentación (6) para encender/apagar la videocámara.
Menús de ajuste de la videocámara
Pulse el botón de menú para ver el OSD (menú en pantalla) principal. Los botones
/// le permiten acceder a los submenús del OSD (menú en pantalla).
Si videocámara lleva una pantalla táctil.. Podrá ajustar los parámetros deseados
directamente punteando en la opción correspondiente.
Ajustar la fecha y la hora
1.
Al encender el dispositivo por primera vez, seleccione el icono
con el botón
Menu (16) para pasar al modo de conguración. Pulse el botón / o toque la
pantalla para seleccionar la fecha y la hora.
2. Pulse los botones / para seleccionar las diferentes columnas. Después,
pulse hacia / o toque la pantalla para seleccionar la columna.
3. Pulse / para ajustar el valor. Pulse el botón SET (17) para guardar los cam-
bios. O toque la pantalla para ajustar el año, la fecha y la hora antes de pulsar el
botón SET (17) para guardar el valor y salir del ajuste.
Seleccionar el idioma
1.
Encienda la videocámara y seleccione el icono
con el botón Menu (16)
para pasar al modo de conguración. Pulse el botón / para resaltar la opción
Language (Idioma) y pulse el botón SET (17) para conrmar. O toque la pantalla
para efectuar la selección.
2. Pulse los botones /// o toque la pantalla para seleccionar el idioma
deseado.
Manejo de la videocámara
La videocámara tiene 3 modos de funcionamiento principales:
video digital,
cámara fotográca y
grabación de voz. Puede seleccionar el modo deseado con el
botón MODE (19).
Los iconos en la esquina superior izquierda de la pantalla indican el modo actual-
mente seleccionado.
Grabar videoclips
1.
Encienda la videocámara. Por defecto, ésta se encenderá en modo de grabación
de vídeo digital (DV)..
2. Pulse el botón de grabación (20) para iniciar o detener la grabación.
El formato de la pantalla LCD varía según la resolución congurada para el
videoclip.
Grabar voz (dictáfono)
1.
Encienda la videocámara.
2. Pulse el botón MODE (19) o toque el botón en pantalla para entrar en el modo
de grabación de voz.
3. Pulse el botón de grabación (20) para iniciar o detener la grabación de voz.
Tomar fotos
1.
Encienda la videocámara.
2. Pulse el botón MODE (19) o toque el botón en pantalla para entrar en el modo
de fotografía.
3. Pulse el botón del obturador (9) para captar imágenes.
Reproducir videoclips/notas de voz
1.
En el modo de grabación de vídeo/voz, pulse el botón de reproducción (21) para
reproducir los vídeos y los archivos de audio grabados.
2. Pulse los botones /// para visualizar el archivo deseado. Pulse el botón
SET (17) para reproducirlo o toque la pantalla para seleccionar la reproducción
del archivo.
3. Para pausar la reproducción del archivo, pulse el botón de grabación (20) o
toque el icono de la pantalla ( ).
Reproducir fotografías
1.
Pulse el botón MODE (19) para pasar al modo de fotografía y pulse el botón de
reproducción (21) para mostrar las imágenes capturadas.
2. Pulse los botones /// para visualizar el archivo deseado.
3. Pulse el botón SET (17) o toque la pantalla para mostrar la foto a pantalla
completa.
4. Pulse el botón de reproducción (21) otra vez para regresar al modo de foto-
grafía.
Eliminar
1.
Congure la cámara en el modo de reproducción.
2. Pulse el botón de menú y luego el botón , o bien toque la pantalla para selec-
cionar el archivo que desee borrar o para eliminar todos los archivos.
3. Pulse los botones /// o toque la pantalla para seleccionar “Eliminar una”
o “Eliminar todas” en el submenú que aparece.
4. Pulse los botones /// o toque la pantalla para seleccionar “O” Sí o “X” No
y pulse el botón SET para eliminar el archivo o archivos.
Conectar la videocámara al PC
Puede transferir sus fotos, vídeos y archivos de audio grabados al PC.
1.
Conecte la videocámara a un ordenador a través del cable USB incluido.
2. Encienda la videocámara.
3. El PC detectará la videocámara automáticamente. La memoria interna y la
tarjeta de memoria aparecerán como discos extraíbles en el ordenador.
12. Compartimento de tarjeta de memoria
13. Compartimento de la batería
14. Botón de macro
15. Correa
16. Botón de menú
17. Botón SET
18. Indicador LED
19. Selector de modo (Vídeo
/ Voz /
Fotografía
)
20. Botón de grabación
21. Botón de reproducción
1. Flash
2. Lumière infrarouge
3. Objectif
4. Indicateur du retardateur
5. Microphone
6. Alimentation
7. Sortie USB / HD / TV / Audio
8. Haut-parleur
9. Bouton de l’obturateur
10. Bouton du zoom
11. Fixation pour trépied
Insertion de la batterie
1.
Ouvrez le compartiment de la batterie tel qu’illustré ici.
2. Insérez la batterie Li-ion tel qu’illustré ici.
3. Refermez le compartiment de la batterie.
Chargement de la batterie
Vous pouvez utiliser le chargeur de batterie fournie pour charger la batterie au lithium.
Allumer le caméscope
Avant de commencer à prendre des photos ou à enregistrer des vidéos, ouvrez et
faites pivoter l’écran.
Appuyez sur le bouton marche-arrêt (6) pour mettre l’appareil sous/hors tension.
Utilisation des menus du caméscope
Appuyez sur le bouton Menu pour afcher le menu principal à l’écran (OSD). Les
boutons /// vous permettent d’accéder aux différents menus disponibles
depuis l’OSD.
Ce caméscope est équipé d’un écran tactile. Vous pouvez également utiliser ce
dernier pour congurer les paramètres de base en appuyant directement sur les op-
tions de votre choix afchées sur l’écran.
Réglage de la date et de l’heure
1.
Lorsque vous allumez votre caméscope pour la première fois, utilisez le bouton
Menu (16) pour sélectionner l’icône
et passer en mode conguration. Sélec-
tionnez la date et l’heure à l’aide des boutons / ou en touchant l’écran.
2. Appuyez sur / pour mettre chaque colonne en surbrillance. Puis, appuyez sur
les boutons / ou sur l’écran pour sélectionner la colonne.
3. Appuyez sur/ pour régler la valeur. Appuyez sur le bouton de réglage (17)
pour enregistrer la valeur que vous avez modiée. Ou bien appuyez sur l’écran
pour régler l’année, la date et l’heure avant d’appuyer sur le bouton de réglage
(17) pour enregistrer la valeur et quitter la conguration.
Sélection de la langue
1.
Allumez votre caméscope, appuyez sur le bouton Menu (16) et sélectionnez
l’icône
pour passer en mode conguration. Appuyez sur le bouton /
pour mettre l’élément Langue en surbrillance et appuyez sur le bouton de réglage
(17) pour conrmer. Vous pouvez également toucher l’écran pour sélectionner
l’élément.
2. Appuyez sur les boutons /// ou touchez l’écran pour sélectionner la
langue de votre choix.
Utilisation du caméscope
Le caméscope comporte 3 modes principaux
: mode VN (vidéo), mode APN
(photo) et
mode enregistrement vocal. Vous pouvez basculer d’un mode à l’autre
en utilisant le bouton MODE (19).
Les icônes situées en haut à gauche de l’écran indiquent le mode sélectionné.
Enregistrement de vidéos
1.
Allumez le caméscope. Il passe automatiquement en mode VN par défaut.
2. Appuyez sur le bouton d’enregistrement (20) pour lancer ou arrêter
l’enregistrement.
Le format de l’écran LCD varie selon le réglage de la résolution vidéo.
Enregistrement vocal
1.
Allumez le caméscope.
2. Appuyez sur le bouton MODE (19) pour passer au mode d’enregistrement vocal
ou sur la touche d’accès rapide correspondante située sur l’écran.
3. Appuyez sur le bouton d’enregistrement (20) pour lancer ou arrêter
l’enregistrement vocal.
Prises de vue
1.
Allumez le caméscope.
2. Appuyez sur le bouton MODE (19) pour passer au mode APN ou sur la touche
d’accès rapide correspondante située sur l’écran.
3. Appuyez sur le bouton de l’obturateur (9) pour prendre des photos.
Lecture d’un enregistrement vidéo / vocal
1.
En mode d’enregistrement vidéo/vocal, appuyez sur le bouton de lecture (21)
pour lire les chiers vidéo et audio que vous avez enregistrés.
2. Appuyez sur les boutons /// pour sélectionner le chier de votre choix.
Pour lancer la lecture du chier, appuyez sur le bouton de réglage (17) ou tou-
chez l’écran pour sélectionner Lecture du chier.
3. Pour interrompre la lecture du chier, appuyez sur le bouton d’enregistrement
(20) ou touchez l’icône ( ) afchée sur l’écran.
Afchage de photos
1.
Appuyez sur le bouton MODE (19) pour passer au mode APN et appuyez sur le
bouton de lecture (21) pour afcher les photos que vous avez prises.
2. Appuyez sur les boutons /// pour sélectionner le chier de votre choix.
3. Appuyez sur le bouton de réglage (17) ou touchez l’écran pour afcher la photo
en mode plein écran.
4. Appuyez à nouveau sur le bouton de lecture (21) pour revenir au mode APN.
Suppression de chiers
1.
Mettez le caméscope en mode Lecture.
2. Appuyez sur le bouton MENU, puis sur le bouton ou sur l’écran pour sélection-
ner le chier à effacer ou pour effacer tous les chiers.
3. Appuyez sur /// ou sur l’écran pour sélectionner « Effacer un » ou « Ef-
facer tous » et afcher le sous-menu.
4. Appuyez sur le ///ou sur l’écran pour sélectionner « O » Oui ou « X » Non
et appuyez sur le bouton de réglage pour effacer le ou les chiers.
Connexion du caméscope à un ordinateur
Vous avez la possibilité de transférer vos chiers photo, vidéo et audio sur votre
ordinateur.
1.
Connectez l’appareil photo à un ordinateur à l’aide du câble USB.
2. Allumez le caméscope.
3. L’ordinateur détecte le caméscope. La mémoire internet et la carte mémoire du
caméscope apparaissent en tant que lecteurs amovibles sur l’ordinateur.
12. Compartiment pour carte mémoire
13. Compartiment de la batterie
14. Bouton Macro
15. Dragonne
16. Bouton Menu
17. Bouton de réglage
18. Voyant
19. Bouton Mode (Vidéo
/ Voix
/ APN
)
20. Bouton d’enregistrement
21. Bouton de lecture
Microflex 102
5
6
7
1
2
3
4
11 12 12
13
14
15
8 9
10
16
17
18
19
20
21
Guida rapida
Assistenza clienti
Tutte le informazioni per i prodotti AgfaPhoto: www.agfaphoto.com / www.plawa.com.
Numero verde assistenza e riparazioni (UE): 00800 75 292 100 (da rete ssa)
Numero supporto tecnico e assistenza (Germania): 0900 1000 042 (1,49 euro/ min. da
rete ssa tedesca)
Assistenza online / Contatto internazionale: [email protected] (Inglese /
Tedesco)
Assistenza e riparazioni (USA/Canada): [email protected], 866-475-
2605
Prodotto da
plawa-feinwerktechnik GmbH & Co. KG, Bleichereistr. 18, 73066 Uhingen, Germania
AgfaPhoto viene utilizzato dietro licenza di Agfa-Gevaert NV & Co. KG. Agfa-Gevaert
NV & Co. KG non produce questo apparecchio e non fornisce alcuna garanzia sul
prodotto o di assistenza. Per informazioni sull’assistenza, il supporto e la garanzia,
contattare il distributore o il produttore. Tutti gli altri marchi e nomi di prodotti sono
marchi registrati di proprietà dei rispettivi titolari. Le speciche tecniche ed il design
del prodotto sono soggetti a modiche senza preavviso. Contatto: AgfaPhoto Holding
GmbH, www.agfaphoto.com
1.
Flash
2. Luce infrarossa
3. Obiettivo
4. Indicatore dell’autoscatto
5. Microfono
6. Alimentazione
7. Uscita USB/HD/TV/ Audio
8. Altoparlante
9. Pulsante dell’otturatore
10. Pulsante Zoom
11. Filettatura per attacco su cavalletto
12. Alloggiamento della scheda di memoria
Inserire la batteria
1.
Aprire il coperchio del vano batterie come illustrato nella gura.
2. Inserire la batteria agli ioni litio come illustrato nella gura.
3. Chiudere il coperchio del vano batteria.
Caricare la batteria
Per caricare la batteria agli ioni litio si può utilizzare il caricatore.
Accendere la videocamera.
Prima di iniziare a scattare fotograe o a riprendere lmati, aprire e ruotare lo schermo
LCD. Premere il pulsante d’accensione (6) per accendere/spegnere la videocamera.
Utilizzo dei Menu
Premere questo pulsante per visualizzare il menu OSD principale. I pulsanti
/// consentono di accedere ai diversi menu disponibili dall’OSD.
La videocamera è dotata della funzione Touchscreen. Tale funzione può essere
utilizzata per regolare le impostazioni di base direttamente sullo schermo, toccando
l’opzione desiderata.
Impostazione di data e ora.
1.
Quando si accende il dispositivo per la prima volta, con il pulsante Menu (16)
selezionare l’icona
per accedere alla modalità Impostazioni. Selezionare
data e ora premendo i pulsanti / o toccare lo schermo per effettuare la
selezione.
2. Premere / per evidenziare ogni colonna. Premere quindi /o toccare lo
schermo per selezionare la colonna.
3.
Premere / per regolare il valore. Premere il pulsante SET (17) per salvare
tutte le impostazioni cambiate. O toccare lo schermo per regolare anno, data
e ora prima di premere il pulsante SET (17) per memorizzare il valore e uscire
dall’impostazione.
Impostazione della lingua
1.
Accendere il dispositivo, premere il pulsante Menu (16) e selezionare l’icona
per accedere alla modalità Impostazioni. Premere / per evidenziare la
voce Lingua e poi il pulsante SET (17) per confermare. O toccare lo schermo per
effettuare la selezione.
2. Premere quindi /// o toccare lo schermo per selezionare la lingua desid-
erata.
Utilizzo della videocamera
La videocamera offre 3 modalità principali:
DV (video), DSC (foto) e
registrazione audio. È possibile selezionare la modalità desiderata con il pulsante
MODE (19). Le icone in alto a sinistra sullo schermo indicano la modalità selezionata.
Registrazione di lmati
1.
Accendere la videocamera. Di default il dispositivo è impostato su DV.
2. Premere il pulsante Registrazione (20) per avviare la registrazione o per inter-
romperla.
A seconda delle impostazioni della risoluzione del video, il rapporto dello schermo
varierà.
Registrazione audio
1.
Accendere la videocamera.
2. Premere il pulsante MODE (19) o toccare il tasto di scelta rapida sullo schermo
per accedere alla modalità Registrazione audio.
3. Premere il pulsante Registrazione (20) per avviare la registrazione o per inter-
romperla.
Scattare fotograe
1.
Accendere la videocamera.
2. Premere il pulsante MODE (19) o toccare il tasto di scelta rapida sullo schermo
per accedere alla modalità DSC.
3. Premere il pulsante dell’otturatore (9) per scattare fotograe.
Riproduzione di lmati/tracce audio
1.
In modalità Registrazione lmati/audio, premere il pulsante Riproduzione (21) per
visualizzare sullo schermo i le audio e video registrati.
2.
Premere quindi /// per visualizzare il le desiderato. Premere il pulsante
SET (17) per avviare la riproduzione del le o toccare lo schermo per selezionare
Riproduzione.
3. Per mettere in pausa, premere il pulsante Registrazione (20) o toccare l’icona
sullo schermo (
).
Riproduzione di fotograe
1.
Premere il pulsante MODE (19) per accedere alla modalità DSC e premere il
pulsante Riproduzione (21) per visualizzare le foto scattate.
2. Premere quindi /// per visualizzare il le desiderato.
3. Premere il pulsante SET (17) o toccare lo schermo per passare alla visualizzazi-
one delle immagini a schermo intero.
4. Premere nuovamente il pulsante Riproduzione (21) per tornare in modalità DSC.
Elimina
1. Impostare la videocamera in modalità Riproduzione.
2. Premere MENU e poi o toccare lo schermo per selezionare il le da cancellare
o per cancellare tutti i le.
3. Premere /// o toccare lo schermo per selezionare Elimina uno o Elimina
tutto e visualizzare il sottomenu.
4. Premere /// o toccare lo schermo per selezionare “O” Sì o “X” No e
premere SET per eliminare il/i le.
Collegamento a un PC
Le immagini, i video e i le audio possono essere trasferiti sul computer.
1.
Collegare la videocamera a un PC con il cavo USB.
2. Accendere la videocamera.
3. Il PC rileverà la videocamera. La memoria interna e la scheda di memoria della
videocamera appariranno come drive rimovibili sul computer.
13. Vano per le batterie
14. Pulsante Macro
15. Cinghia
16. Pulsante Menu
17. Pulsante SET
18. Indicatore LED
19. Pulsante MODE (Video
/ Audio
/ DSC )
20. Pulsante Registrazione
21. Pulsante Riproduzione

Guia de Iniciação Rápida
Assistência ao cliente
Para mais informações sobre a gama completa de câmaras digitais AgfaPhoto, visite
o site
www.agfaphoto.com / www.plawa.com.
Hotline de assistência técnica e reparação (EU): 00800 752 921 00 (apenas a partir
de uma linha xa)
Hotline de assistência técnica e apoio (Alemanha): 0900 1000 042 (1,49 euros/
min., apenas a
partir de uma linha xa alemã)
Assistência Online / Contacto internacional (Não EUA/Canadá): support-apdc@
plawa.com
Assistência Online (EUA/Canadá): [email protected], 866-475-2605
Fabricado por
plawa-feinwerktechnik GmbH & Co. KG, Bleichereistraße 18, 73066 Uhingen, Alemanha
AgfaPhoto é utilizada sob licença da Agfa-Gevaert NV & Co. KG ou da Agfa-Gevaert
NV. Nem a Agfa-Gevaert NV & Co KG nem a Agfa-Gevaert NV fabricam este produto
ou fornecem qualquer garantia ou apoio ao cliente. Para assistência, apoio ao cliente,
ou informação relativa à garantia, contacte o distribuidor ou o fabricante. Contacto:
AgfaPhoto Holding GmbH, www.agfaphoto.com
1. Luz do ash
2. Luz infravermelha
3. Lentes
4. Indicador do disparador automático
5. Microfone
6. Liga/Desliga
7. USB/HD/TV/ Saída de Áudio
8. Alto-falante
9. Botão do obturador
10. Botão de zoom
11. Encaixe do tripé
12. Compartimento do cartão de memória
Inserir a bateria
1.
Abra a tampa do compartimento da bateria como mostra a gura.
2. Insira a bateria Li-ion como mostra a gura.
3. Feche a tampa da bateria.
Carregar a bateria
Você pode usar o carregador de baterias fornecido para carregar a bateria
de lítio.
Ligar a câmera de vídeo
Antes de tirar fotos ou gravar clipes de vídeo, abra e gire a Tela LCD.
Para ligar/desligar a câmera, aperte o botão Power (6).
Utilizar os menus da câmera de vídeo
Aperte o botão Menu para exibir o menu de tela (OSD ) principal. Os botões
/// permitem o acesso aos vários menus do OSD.
Esta câmera de vídeo tem uma tela de toque. Você também pode ajustar os
parâmetros básicos diretamente na tela tocando na opção desejada.
Ajuste de Data e Hora
1. Ao ligar a câmera pela primeira vez, use o botão Menu (16) e selecione o ícone
para acessar o modo Setup. Escolha a data e a hora movendo as setas
/ ou tocando na tela para selecionar.
2. Aperte as setas / para destacar cada coluna. Em seguida aperte as setas
/ ou toque na tela para selecionar a coluna.
3.
Aperte / para ajustar o valor. Aperte o botão SET (17) para salvar o valor
alterado. Ou toque na tela para ajustar o Ano, a Data e a Hora antes de apertar o
botão SET (17) para salvar o valor e sair da conguração.
Congurar o idioma
1. Ligue a câmera, aperte o botão Menu (16) e selecione o ícone
para
acessar o modo Setup. Mova as setas / para destacar o item Language
(idioma) e aperte o botão SET (17) para conrmar. Ou toque na tela para
selecionar.
2. Aperte as setas /// ou toque na tela para selecionar o idioma desejado.
Operação da câmera
A câmera tem 3 modos principais:
modo DV (vídeo), modo DSC (foto) e o
modo de gravação de voz
. Você pode mudar o modo usando o botão MODE (19).
Os ícones no canto superior esquerdo da tela indicam o modo escolhido.
Gravar clipes de vídeo
1.
Ligue a câmera. A câmera liga no modo DV automaticamente.
2. Aperte o botão Recording (20) para iniciar ou parar a gravação.
O formato da tela LCD será diferente a depender do parâmetro de resolução do
videoclipe.
Gravação de voz
1.
Ligue a câmera.
2. Aperte o botão MODE (19) para mudar para o modo Voice Recording ou toque
no atalho da tela.
3.
Aperte o botão Recording (20) para iniciar ou parar a gravação de voz.
Tirar fotos
1. Ligue a câmera.
2. Aperte o botão MODE (19) para mudar para o modo DSC ou toque no atalho da
tela.
3.
Aperte o botão Shutter (9) para capturar as imagens.
Reprodução de clipe de vídeo/voz
1. No modo Movie/Voice Recording, aperte o botão Playback (21) para exibir os
arquivos gravados de vídeo e áudio.
2.
Aperte o botão /// para exibir o arquivo desejado. Aperte o botão SET
(17) para reproduzir ou toque na tela para selecionar o Playback do arquivo.
3. Para pausar a reprodução, aperte o botão Recording (20) ou toque no ícone (
) da tela.
Exibição de fotos
1.
Aperte o botão MODE (19) para entrar no modo DSC e aperte o botão Playback
(21) para exibir as imagens capturadas.
2.
Aperte o botão /// para exibir o arquivo desejado.
3.
Aperte o botão SET (17) ou toque na tela para ver a imagem em tela cheia.
4. Aperte o botão Playback (21) novamente para voltar ao modo DSC.
Apagar
1. Coloque a câmera em modo Playback.
2. Aperte o botão MENU e aperte as setas ou toque na tela para escolher o
arquivo a ser apagado ou para apagar todos os arquivos.
3.
Aperte as setas /// ou toque na tela para escolher “Delete one” (apagar
um) ou “Delete All” (apagar todos) para exibir o submenu.
4.
Aperte as setas /// ou toque na tela para escolher “O” SIM ou “X” NÃO e
aperte o botão SET para apagar o(s) arquivo(s).
Conexão da câmera ao PC
Você pode transferir arquivos de foto, vídeo e áudio para o seu PC.
1. Conecte a câmera ao PC usando o cabo USB.
2. Ligue a câmera.
3. O computador detecta a conexão. A memória interna da câmera e o cartão de
memória aparecem como drives removíveis do computador.
13. Compartimento da bateria
14. Botão de Macro
15. Alça de mão
16. Botão de Menu
17. Botão de Conguração (SET)
18. Indicador LED
19. Botão de Modo (Vídeo
/ Voz
/ DSC )
20. Botão de Gravação
21. Botão de Reprodução
Обслуживание пользователей
Подробную информацию по всему ассортименту цифровых камер AgfaPhoto
можно найти в Интернете по адресу www.agfaphoto.com / www.plawa.com.
Телефон горячей линии обслуживания и ремонта (ЕС): 00800 752 921 00
(только в пределах
национальной телефонной сети)
Телефон горячей линии обслуживания и ремонта (Германия): 0900 1000 042
(1,49 евро/мин. только в пределах Германии)
Онлайн-услуги / Международные контакты (за пределами США / Канады):
plawausa.com, 866-475-2605
Произведено:
plawa-feinwerktechnik GmbH & Co. KG, Bleichereistraße 18, 73066 Uhingen, Германия
Марка AgfaPhoto используется в рамках лицензии Agfa-Gevaert NV & Co. KG
/ Agfa-Gevaert NV. Agfa-Gevaert NV & Co. KG / Agfa-Gevaert NV не производит
этот продукт и не предоставляет ни один из видов гарантии или поддержки.
Для информации по сервису, поддержке и гарантии следует обращаться к
дистрибьютору или производителю. Контактные данные: AgfaPhoto Holding
GmbH, www.agfaphoto.com
Краткая инструкция
Müşteri hizmetleri
AgfaPhoto dijital fotoğraf makinesi ürün yelpazesinin tamamı hakkında daha fazla
bilgiye
www.agfaphoto.com / www.plawa.com. internet sitelerinden ulaşabilirsiniz.
Servis & Onarım Yardım Hattı (AB): 00800 752 921 00 (sadece sabit hattan)
Servis & Destek Yardım Hattı (Almanya): 0900 1000 042 (1.49 Euro/dak. – Sadece
Almanya içinde bir sabit hattan)
Çevrimiçi Hizmet / Uluslararası İrtibat (ABD / Kanada dışı): support-apdc@plawa.
com
ABD/Kanada Çevrimiçi Hizmet: [email protected], 866-475-2605
Üretici şirket
plawa-feinwerktechnik GmbH & Co. KG, Bleichereistraße 18, 73066 Uhingen,
Almanya
AgfaPhoto, Agfa-Gevaert NV & Co. KG ya da Agfa-Gevaert NV’nin lisansı altında
kullanılmaktadır. Ne Agfa-Gevaert NV & Co KG ne de Agfa-Gevaert NV bu ürünü üret-
mekte ya da herhangi bir ürün garantisi ya da desteği sağlamaktadır. Servis, destek
ve garanti bilgileri için, distribütör ya da üretici ile irtibata geçin. İrtibat: AgfaPhoto
Holding GmbH, www.agfaphoto.com
Çabuk Başlatma Kılavuzu
1. Flaş lambası
2. Kızılötesi lamba
3. Lens
4. Kendinden zamanlayıcı göstergesi
5. Mikrofon
6. Güç
7. USB/HD/TV/ Audio Çıkışı
8. Hoparlör
9. Deklanşör Düğmesi
10. Yaklaştırma Düğmesi
11. Tripod soketi
12. Bellek kartı bölmesi
Pilin Takılması
1.
Pil kapağını resme göre açın.
2. Li-ion pili resme göre takın.
3. Pil kapağını kapatın.
Pilin Şarj Edilmesi
Lityum pili şarj etmek için birlikte verilen pil şarj cihazını kullanabilirsiniz.
Video Kameranın Açılması
Resim çekmeye ya da lm klibi kaydetmeye başlamadan önce, LCD Ekranı açın ve
döndürün.
Video kamerayı AÇMAK/KAPAMAK için Güç Düğmesine (6) basın.
Video Kamera Menülerinin Kullanılması
Ana OSD (Ekran Üzerinde Gösterim) menüsünü görüntülemek için Menü Düğmesine
basın. /// düğmeleri, OSD’de mevcut çeşitli menülere erişmenize olanak verir.
Bu video kamera dokunmatik bir ekrana sahiptir. İstenen seçeneğe dokunarak temel
ayarları doğrudan ekran üzerinde yapmak için kullanabilirsiniz.
Tarih ve Saatin Ayarlanması
1. Kamerayı ilk kez çalıştırdığınızda, Menü düğmesini (16) kullanın ve Ayar Moduna
geçmek için
simgesini seçin. Seçmek için / düğmesini hareket ettirerek
ya da ekrana dokunarak tarihi ve saati seçin.
2. Her bir sütunu vurgulamak için / düğmelerini kullanın. Sonra, sütunu seçmek
için / düğmelerine basın ya da ekrana dokunun.
3. Değeri ayarlamak için / düğmelerine basın. Değiştirdiğiniz değeri kaydetmek
için AYAR Düğmesine (17) basın. Ya da, değeri kaydetmek ve ayardan çıkmak
için AYAR Düğmesine (17) basmadan önce Yıl, Tarih ve Saati ayarlamak için
ekrana dokunun.
Dilin Ayarlanması
1. Video kamerayı çalıştırın, Menü düğmesine (16) basın ve Ayar Moduna geçmek
için
simgesini seçin. Dil öğesini vurgulamak için / düğmelerini kullanın
ve teyit etmek için AYAR düğmesine (17) basın. Ya da ekrana dokunun.
2. İstenen dili seçmek için /// düğmelerine basın ya da ekrana dokunun.
Video kameranın kullanılması
Video kamera 3 ana moda sahiptir: DV (video) modu, DSC (fotoğraf) modu
ve
ses kayıt modu. MOD düğmesini (19) kullanarak istediğiniz moda geçebilirsiniz.
Ekranın sol üst köşesindeki simgeler, seçilen modu belirtir.
Video Klip Kaydetme
1. Video kamerayı açın. Otomatik olarak varsayılan DV moduna ayarlanır.
2. Kaydetmeye başlamak ya da durdurmak için Kayıt Düğmesine (20) basın.
Video klip çözünürlük ayarına bağlı olarak LCD ekran oranı farklı olacaktır.
Ses Kaydı
1.
Video kamerayı açın.
2. Ses Kayıt Moduna geçmek için MOD düğmesine (19) basın ya da ekran kısa yol
tuşuna dokunun.
3. Ses kaydını başlatmak ya da durdurmak için Kayıt Düğmesine (20) basın.
Fotoğraf Çekme
1.
Video kamerayı açın.
2. DSC Moduna girmek için MOD düğmesine (19) basın ya da ekran kısa yol tuşuna
dokunun.
3. Fotoğraf çekmek için Deklanşör düğmesine (9) basın.
Film Klibi Oynatma / Ses Klibi Çalma
1.
Kaydettiğiniz video ve ses dosyalarını oynatmak/çalmak için, Film/Ses Kayıt
Modunda iken Gösterim düğmesine (21) basın.
2. İstenen dosyayı görüntülemek için /// düğmesine basın. Dosyayı
çalmak/oynatmak için AYAR düğmesine (17) basın ya da dosyanın çalınmasını/
oynatılmasını seçmek için ekrana dokunun.
3. Çalma/oynatmayı duraklatmak için Kayıt düğmesine (20) basın ya da
( ) ekran simgesine dokunun.
Fotoğraarın Gösterilmesi
1.
DSC Moduna girmek için MOD düğmesine (19) basın ve çekilen fotoğraarı
görüntülemek için Gösterim düğmesine (21) basın.
2. İstenen dosyayı görüntülemek için p/q/t/u düğmesine basın.
3. Görüntüyü tam ekran modunda görüntülemek için AYAR düğmesine (17) basın ya
da ekrana dokunun.
4. DSC Moduna dönmek için Gösterim düğmesine (21) tekrar basın.
Sil
1. Video kamerayı Gösterim Moduna ayarlayın.
2. Silinecek dosyayı seçmek ya da tüm dosyaları silmek için, MENÜ Düğmesine
basın ve sonra düğmesine basın ya da ekrana dokunun.
3. Alt-menüyü görüntülemek üzere “Birini sil” ya da “Tümünü Sil”i seçmek için
/// düğmesine basın ya da ekrana dokunun.
4. “O” Evet ya da “X” Hayır’ı seçmek için /// düğmesine basın ya da ekrana
dokunun ve dosyayı/dosyaları silmek için AYAR düğmesine basın.
Video Kameranın bir Bilgisayara Bağlanması
Fotoğraf, video ve ses dosyalarını bilgisayarınıza aktarabilirsiniz.
1. Video kamerayı, USB kablosu kullanarak bir bilgisayara bağlayın.
2. Video kamerayı açın.
3. Bilgisayar, video kamerayı tespit edecektir. Video kameranın dahili belleği ve
bellek kartı, bilgisayarda çıkarılabilir sürücüler olarak gösterilir.
13. Pil bölmesi
14. Makro Düğmesi
15. El kayışı
16. Menü Düğmesi
17. AYAR Düğmesi
18. LED gösterge
19. Mod Düğmesi (Video
/ Ses /
DSC )
20. Kayıt Düğmesi
21. Gösterim Düğmesi
21. Gösterim Düðmesi
1. Вспышка
2. Инфракрасный свет
3. Объектив
4. Индикатор автоспуска
5. Микрофон
6. Питание
7. USB/HD/TV/Аудио-выход
8. Динамик
9. Кнопка затвора
10. Кнопка уменьшения/увеличения
11. Гнездо штатива
Установка аккумулятора
1.
Откройте крышку отделения аккумулятора согласно иллюстрации.
2. Вставьте литий-ионный аккумулятор согласно иллюстрации.
3. Закройте крышку отделения аккумулятора.
Подзарядка аккумулятора
Для подзарядки литий-ионного аккумулятора вы можете воспользоваться заряд-
ным устройством.
Включение камеры
Перед тем, как делать снимки или записывать видео, откройте и поверните ЖК-
экран.
Нажмите кнопку питания (6) для ВКЛЮЧЕНИЯ/ВЫКЛЮЧЕНИЯ камеры.
Использование меню камеры
Нажмите кнопку меню для вывода главного ЭМ (экранного меню). Кнопки
/// дают вам доступ к различным меню, доступным из ЭМ.
У этой камеры есть сенсорный экран. Вы также можете настроить основные
параметры непосредственно на дисплее, касаясь нужного пункта.
Установка даты и времени
1. При включении камеры в первый раз используйте кнопку меню (16) и выбе-
рите значок
для переключения в режим настройки. Выберите дату и
время кнопками / или коснитесь экрана для выбора..
2. Нажмите / для выделения столбца.. Нажмите / или коснитесь экра-
на для выбора строки..
3. Нажмите / для установки значения. Нажмите кнопку SET (17) для сохра-
нения значения.. Или же коснитесь экрана для установки года, дня и време-
ни, а затем нажмите кнопку SET (17) для сохранения значения и выхода.
Установка языка
1. Включите камеру. нажмите кнопку меню (16) и выберите значок
для
переключения в режим настройки. Нажмите кнопку / для выделения
языка и нажмите кнопку SET (17) для подтверждения. Или коснитесь экрана
для выбора.
2. Нажмите кнопку /// или коснитесь экрана для выбора языка..
Использование камеры
У камеры есть 3 основных режима:
DV (видео), DSC (фото) и запись
голоса. Вы можете переключаться между ними с помощью кнопки режима MODE
(19).
Значок в верхнем левом углу экрана показывает выбранный режим.
Запись видео
1. Включите камеру По умолчанию она автоматически переходит в режим DV.
2. Для начала или остановки записи нажмите кнопку записи (20).
Формат ЖК-экрана может быть различным в зависимости от настройки
разрешения видео.
Запись звука
1. Включите камеру.
2. Нажмите кнопку режима MODE (19) для перехода в режим записи звука или
коснитесь горячей кнопки на экране.
3. Для начала или остановки записи звука нажмите кнопку записи (20).
Фотографирование
1. Включите камеру.
2. Нажмите кнопку режима MODE (19) для перехода в режим DSC или косни-
тесь горячей кнопки на экране.
3. Чтобы сделать снимок, нажмите кнопку затвора (9).
Проигрывание видео / звука
1. В режиме записи видео/звука нажмите кнопку воспроизведения (21) для
показа записанного видео или аудиофайла.
2. Нажмите кнопки /// для показа нужного файла.. Нажмите кнопку SET
(17) для воспроизведения или коснитесь экрана для выбора воспроизведе-
ния файла.
3. Для приостановки воспроизведения нажмите кнопку записи (20) или косни-
тесь значка ( ) на экране.
Показ фотографий
1. Нажмите кнопку MODE (19) для перехода в режим DSC или кнопку воспроиз-
ведения (21) для показа снимков.
2. Нажмите кнопки /// для показа нужного файла.
3. Нажмите кнопку SET (17) или коснитесь экрана для показа изображения в
полноэкранном режиме.
4. Нажмите снова кнопку воспроизведения (21) для возвращения в режим DSC.
Удаление
1. Перейдите в режим воспроизведения.
2. Нажмите кнопку MENU и кнопку или коснитесь экрана для выбора удаля-
емого файла или для удаления всех файлов.
3. Нажмите кнопку /// или коснитесь на экране «Удалить один» ил «Уда-
лить все» для вывода подменю.
4. Нажмите кнопку /// или коснитесь экрана для выбора «О» или «Х»,
нажмите кнопку SET для удаления файла(-ов).
Подключение камеры к ПК
Вы можете переносить снимки, видео и аудиофайлы на ваш ПК.
1. Подключите камеру к ПК USB-кабелем.
2. Включите камеру.
3. ПК распознает камеру. Внутренняя память камеры и карты памяти показы-
ваются на компьютере как съемные диски.
12. Отделение карты памяти
13. Отделение аккумулятора
14. Кнопка макросъемки
15. Ремешок
16. Кнопка меню
17. Кнопка SET
18. Светодиодный индикатор
19. Кнопка режима (Видео
/
Голос
/ DSC )
20. Кнопка записи
21. Кнопка воспроизведения
Microflex 102
5
6
7
1
2
3
4
11 12 12
13
14
15
8 9
10
16
17
18
19
20
21
快速入门指南
客户服务
关于 AgfaPhoto 数码相机产品的更多信息,请浏览网页 www.agfaphoto.com / www.
plawa.com.
服务及维修热线(美国/加拿大): 866-475-2605, www.plawausa.com
服务及维修热线(欧洲): 00800 752 921 00 (只适用于固定电话)
服务及维修热线(德国): 0900 1000 042 (1.49 欧元/分钟. 只适用于德国固定电
话)
服务及维修热线(香港): 852 3586 9168
网上支持服务/国际联络: [email protected]
制造商
plawa-feinwerktechnik GmbH & Co. KG, Bleichereistraße 18, 73066 Uhingen,
Germany
Regional office
plawa photo. digital (HK) Limited
香港九龙红磡民乐街23 号骏升中心 5 楼 D 室
AgfaPhoto 是由 Agfa-Gavaert NV & Co. KG. 或 Agfa-Gevaert NV.授权许可的产
品。Agfa-Gevaert NV& Co.KG. 或 Agfa-Gevaert NV.并非生产此产品的制造商,也不
提供任何保修及支持服务。顾客若需要任何技术支持及保修资料, 请联络分销商及有
关制造商。其他产品及品牌为其他公司所有
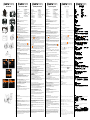
1. 闪光灯
2. 红外灯
3.
镜头
4. 自拍指示灯
5. 麦克风
6. 电源
7.
USB/HD/TV/音频输出
8. 扬声器
9. 快门按钮
10. 变焦按钮
11. 三脚架连接座
插入电池
1. 根据示意图打开电池盖。
2. 根据示意图插入锂电池。
3.
合上电池盖。
电池充电
可以使用提供的充电器为锂电池充电。
摄像机开机
在拍照或录制影片片段前,打开 LCD 显示屏并旋转显示屏。
按电源按钮 (6) 打开/关闭录像机。
使用摄像机菜单
按菜单按钮显示主 OSD(屏幕显示)菜单。 使用 /// 按钮可以访问各个 OSD
菜单。
本款摄像机采用触摸屏。 您也可以直接在显示屏上按所需的选项来调整基本设置。
设置日期和时间
1. 在首次开机时,使用菜单按钮 (16) 并选择 图标切换到设置模式。 移动
/ 按钮选择日期和时间,或触摸屏幕进行选择。
2. 按 / 高亮显示每一栏。 然后按 / 或触摸屏幕选定此栏。
3.
按/调整值。 按设置按钮 (17) 保存更改的值。 或在按设置按钮 (17) 前通过触
摸屏幕调整年份、日期和时间,来保存值并退出设置。
设置语言
1. 打开摄像机,按菜单按钮 (16) 并选择 图标切换到设置模式。 移动 /
按钮 来高亮显示语言项目,并按设置按钮 (17) 确认。 或通过触摸屏幕进行选
择。
2.
按 /// 按钮或触摸屏幕以选择所需语言。
使用摄像机
摄像机有 3 种主要模式: DV(视频)模式、 DSC(拍照)模式和 录音模
式。 使用模式按钮 (19) 可以切换到所需的模式。
显示屏左上角的图标指示选择的模式。
录制视频片段
1. 打开摄像机。 在默认情况下,摄像机自动设为 DV 模式。
2. 按录制按钮 (20) 开始录制或停止录制。
LCD 屏幕高宽比取决于视频片段的分辨率设置。
录音
1. 打开摄像机。
2. 按模式按钮 (19) 切换到录音模式或触摸屏幕热键。
3.
按录制按钮 (20) 开始录制或停止录音。
拍照
1. 打开摄像机。
2. 按模式按钮 (19) 进入 DSC 模式或触摸屏幕热键。
3. 按快门按钮 (9) 捕捉图像。
影片片段/语音片段回放
1. 在录影/录音模式中,按回放按钮 (21) 显示录制的视频和音频文件。
2. 按 /// 按钮显示所需文件。 按设置按钮 (17) 回放,或触摸屏幕选择文件
回放。
3. 要暂停回放,请按录制按钮 (20) 或触摸 ( ) 屏幕图标。
回放照片
1. 按模式按钮 (19) 进入 DSC 模式,并按回放按钮 (21) 显示捕捉的图像。
2. 按 /// 按钮显示所需文件。
3.
按设置按钮 (17) 或触摸屏幕,查看全屏图像。
4.
再次按回放按钮 (21) 返回 DSC 模式。
删除
1. 将相机设置为回放模式。
2. 按菜单按钮,并按 按钮;或触摸屏幕选择要删除的文件或删除所有文件。
3. 按 /// 按钮或触摸屏幕,选择“删除一项”或“全部删除”以显示子菜
单。
4. 按 /// 按钮或触摸屏幕,选择“O”是或“X”否,并按设置按钮删除文
件。
连接摄像机和 PC
您可以将照片、视频和音频文件传输到 PC 上。
1. 用一条 USB 线连接摄像机和 PC。
2.
打开摄像机。
3.
PC 检测摄像机。 摄像机的内部存储器和内存卡在电脑上显示为可移动磁盘。
12. 内存卡匣
13.
电池匣
14. 微距按钮
15.
腕带
16.
菜单按钮
17. 设置按钮
18. LED 指示灯
19. 模式按钮(视频
/ 音频 / DSC )
20. 录制按钮
21.
回放按钮
快速入門指南
客戶服務
關於 AgfaPhoto 數字相機之更多資訊 ,請瀏覽網頁 www.agfaphoto.com / www.plawa.com.
服務及維修熱線(美國/加拿大): 866-475-2605, www.plawausa.com
服務及維修熱線(歐洲): 00800 752 921 00 (只適用於固網電話)
服務及維修熱線(德國): 0900 1000 042 (1.49 歐元/分鐘. 只適用於德國固網電話)
服務及維修熱線(香港): 852 3586 9168
網上支持服務/國際聯絡: [email protected]
製造商
plawa-feinwerktechnik GmbH & Co. KG, Bleichereistraße 18, 73066 Uhingen, Germany
Regional Office: plawa photo. digital (HK) Limited
香港九龍紅磡民樂街23 號
駿升中心 5 樓 D 室
AgfaPhoto 是由 Agfa-Gavaert NV & Co. KG.或 Agfa-Gevaert NV.授權許可的產品。Agfa-
Gevaert NV & Co. KG.或 Agfa-Gevaert NV.並非生產此產品的製造商,也不提供任何保修
或支援服務。顧客若需要任何技術支援及保修資料 ,請聯絡分銷商及有關製造商。其他
產品及品牌為其他企業所擁有。產品的設計及功能可在未先行通知之情形下進行更改。
聯絡 : AgfaPhoto Holding GmbH.或瀏覽網頁 www.agfaphoto.com
1. 閃光燈
2. 紅外燈
3. 鏡頭
4. 自拍指示燈
5. 麥克風
6. 電源
7. USB/HD/TV/音訊輸出
8. 揚聲器
9. 快門按鈕
10. 變焦按鈕
11. 三腳架連接座
插入電池
1. 照圖示打開電池蓋。
2. 照圖示插入鋰電池。
3. 合上電池蓋。
電池充電
可以使用提供的充電器為鋰電池充電。
攝錄機開機
在拍照或錄製短片前,打開 LCD 顯示屏並旋轉顯示屏。
按電源按鈕 (6) 打開/關閉攝錄機。
使用攝錄機功能表
按功能表按鈕顯示主 OSD(螢幕顯示)功能表。使用 /// 按鈕可以訪問各個
OSD 功能表。
本攝錄機採用觸控式螢幕。您也可以直接在螢幕上輕觸所需的選項以調整基本設置。
設置日期和時間
1. 在首次開機時,使用功能表按鈕 (16) 並選擇 圖示切換到設置模式。移動
/ 按鈕選擇日期和時間,或觸控螢幕進行選擇。
2. 按 / 高亮顯示每一欄。然後按 / 或觸控螢幕選定此欄。
3. 按/調整值。按設置按鈕 (17) 保存更改的值。或在按設置按鈕 (17) 以保存值並
退出設置前觸控螢幕以調整年份、日期和時間。
設置語言
1. 打開攝錄機,按功能表按鈕 (16) 並選擇 圖示切換到設置模式。移動 /
按鈕來高亮顯示語言項目,並按設置按鈕 (17) 確認。或觸控螢幕進行選擇。
2. 按 /// 按鈕或觸控螢幕以選擇所需語言。
使用攝錄機
攝錄機有 3 種主要模式: DV(視頻)模式、 DSC(拍照)模式和 錄音模
式。使用模式按鈕 (19) 可以切換到所需的模式。
螢幕左上角的圖示指示已選擇的模式。
錄製短片
1. 打開攝錄機。攝錄機自動預設為 DV 模式。
2. 按錄製按鈕 (20) 開始錄製或停止錄製。
LCD 螢幕高寬比取決於短片的解像度設置。
錄音
1. 打開攝錄機。
2. 按模式按鈕 (19) 切換到錄音模式或觸控螢幕熱鍵。
3. 按錄製按鈕 (20) 開始錄音或停止錄音。
拍照
1. 打開攝錄機。
2. 按模式按鈕 (19) 進入 DSC 模式或觸控螢幕熱鍵。
3. 按快門按鈕 (9) 捕捉影像。
短片/語音片段播放
1. 在錄影/錄音模式中,按播放按鈕 (21) 顯示錄製的視頻和音訊檔。
2. 按 /// 按鈕顯示所需檔案。按設置按鈕 (17) 播放,或觸控螢幕選擇檔案播
放。
3. 要暫停播放,請按錄製按鈕 (20) 或觸控 ( ) 螢幕圖示。
播放照片
1. 按模式按鈕 (19) 進入 DSC 模式,並按播放按鈕 (21) 顯示已捕捉的影像。
2. 按 /// 按鈕顯示所需檔案。
3. 按設置按鈕 (17) 或觸控螢幕以全螢幕檢視影像。
4. 再次按播放按鈕 (21) 返回 DSC 模式。
刪除
1. 將相機設置為播放模式。
2. 按功能表按鈕,並按 按鈕;或觸控螢幕選擇要刪除的檔案或刪除所有檔案。
3. 按 /// 按鈕或觸控螢幕,選擇「刪除一項」或「刪除全部」以顯示子功能
表。
4. 按 /// 按鈕或觸控螢幕選擇「O」是或「X」否,並按設置按鈕刪除檔案。
連接攝錄機和 PC
您可以將照片、視頻和音訊檔案傳送到 PC。
1. 用一條 USB 線連接攝錄機和 PC。
2. 打開攝錄機。
3. PC 偵測攝錄機。攝錄機的內置記憶體和記憶體卡在電腦上顯示為御除式磁碟。
12. 記憶體卡匣
13. 電池匣
14. 微距按鈕
15. 手繩
16. 功能表按鈕
17. 設置按鈕
18. LED 指示燈
19. 模式按鈕(視頻
/ 音訊 / DSC )
20. 錄製按鈕
21. 重播按鈕
-
 1
1
-
 2
2


他の言語で
- italiano: AGFA Microflex 102 Guida Rapida
- español: AGFA Microflex 102 Guía de inicio rápido
- français: AGFA Microflex 102 Guide de démarrage rapide
- português: AGFA Microflex 102 Guia rápido
- Türkçe: AGFA Microflex 102 Hızlı başlangıç Kılavuzu