
GC1421, GC1420
4239.000.7159.1
www.philips.com
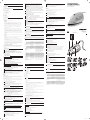
u
A
E F G
B C D
1
2 3 4 5
6
7 8 9
10 11
ENGLISH
Introduction
Congratulations on your purchase and welcome to Philips! To fully benet
from the support that Philips offers, register your product at www.philips.
com/welcome.
General description (Fig. 1)
A Cap of lling opening
B Steam control
-
1 = minimum steam
-
2 = maximum steam
-
t= no steam
-
u= Calc-Clean function
C Temperature light
D Mains cord
E Water tank
F Soleplate
G Temperature dial
Important
Read this user manual carefully before you use the appliance and save it for
future reference.
Danger
- Never immerse the iron in water.
Warning
- Check if the voltage indicated on the type plate corresponds to the
local mains voltage before you connect the appliance.
- Do not use the appliance if the plug, the mains cord or the appliance
itself shows visible damage, or if the appliance has been dropped or
leaks.
- If the mains cord is damaged, you must have it replaced by Philips, a
service centre authorised by Philips or similarly qualied persons in
order to avoid a hazard.
- Never leave the appliance unattended when it is connected to the
mains.
- This appliance is not intended for use by persons (including children)
with reduced physical, sensory or mental capabilities, or lack of
experience and knowledge, unless they have been given supervision or
instruction concerning use of the appliance by a person responsible for
their safety.
- Children should be supervised to ensure that they do not play with the
appliance.
- Do not let the mains cord come into contact with the hot soleplate of
the iron.
Caution
- If the appliance has an earthed plug, it must be plugged into an earthed
wall socket.
- Check the mains cord regularly for possible damage.
- The soleplate of the iron can become extremely hot and may cause
burns if touched.
- When you have nished ironing, when you clean the appliance, when
you ll or empty the water tank and also when you leave the iron even
for a short while: set the steam control to the ‘no steam’ position, put
the iron on its heel and remove the mains plug from the wall socket.
- Always place and use the iron on a stable, level and horizontal surface.
- This appliance is intended for household use only.
This Philips appliance complies with all standards regarding electromagnetic
elds (EMF). If handled properly and according to the instructions in this
user manual, the appliance is safe to use based on scientic evidence
available today.
Before first use
1 Remove any sticker or protective foil from the soleplate.
2 Let the iron heat up to maximum temperature.
3 Pass the iron over a piece of damp cloth for several minutes to
remove any residues from the soleplate.
Note: The iron may give off some smoke when you use it for the rst time. This
ceases after a short while.
Preparing for use
Filling the water tank
Never immerse the iron in water.
1 Make sure the appliance is unplugged.
2 Set the steam control to the ‘no steam’ position (Fig. 2).
3 Tilt the iron backwards.
4 Openthecaptheofllingopening(Fig.3).
5 Fill the water tank with tap water up to the maximum level. (Fig. 4)
DonotllthewatertankbeyondtheMAXindication.
Do not put perfume, vinegar, starch, descaling agents, ironing aids or other
chemicals in the water tank.
Note: If the tap water in your area is very hard, we advise you to mix it with an
equal amount of distilled water or to use distilled water only.
6 Closethecapofthellingopening.
Setting the temperature
1 Put the iron on its heel.
2 To set the required ironing temperature, turn the temperature dial to
the appropriate position (Fig. 5).
Check the laundry care label for the required ironing temperature:
1 Synthetic fabrics (e.g. acrylic, viscose, polyamide, polyester)
1 Silk
2 Wool
3 Cotton, linen
If you do not know what kind or kinds of fabric an article is made of,
determine the right ironing temperature by ironing a part that is not visible
when you wear or use the article.
Silk, woollen and synthetic materials: iron the reverse side of the fabric to
prevent shiny patches.
Start ironing the articles that require the lowest ironing temperature, such
as those made of synthetic bres.
3 Put the mains plug in an earthed wall socket.
, The temperature light goes on (Fig. 6).
4 When the temperature light has gone out, wait a while before you
start ironing.
The temperature light goes on from time to time during ironing.
Using the appliance
Steam ironing
1 Make sure that there is enough water in the water tank.
2 Select the recommended ironing temperature (see chapter ‘Preparing
for use’, section ‘Setting the temperature’).
3 Afterthetemperaturelighthasgoneout,setthesteamcontrolto
the appropriate steam position. Make sure that the steam setting you
select is suitable for the ironing temperature selected: (Fig. 7)
Temperature settings 2 to 3 for minimum steam 1.
Temperature settings 3 to MAX for maximum steam 2.
The iron starts to produce steam as soon as it reaches the set temperature.
Ironing without steam
1 Set the steam control to the ‘no steam’ position (Fig. 2).
2 Select the recommended ironing temperature (see chapter ‘Preparing
for use’, section ‘Setting the temperature’).
Cleaning and maintenance
After ironing
1 Remove the mains plug from the wall socket and let the iron cool
down.
2 Wipe scale and any other deposits off the soleplate with a damp cloth
and a non-abrasive (liquid) cleaner.
To keep the soleplate smooth, avoid hard contact with metal objects.
Never use a scouring pad, vinegar or other chemicals to clean the
soleplate.
3 Clean the upper part of the appliance with a damp cloth.
4 Regularly rinse the water tank with water. Empty the water tank after
cleaning.
Calc-Clean function
Use the Calc-Clean function once every two weeks. If the water in your
area is very hard (i.e. when akes come out of the soleplate during ironing),
use the Calc-Clean function more frequently.
1 Set the steam control to the ‘no steam’ position (Fig. 2).
2 SetthetemperaturedialtoMAX.
3 Fill the water tank to the maximum level.
Do not pour vinegar or other descaling agents into the water tank.
4 Put the mains plug in the wall socket.
5 Unplug the iron when the temperature light goes out.
6 Hold the iron over the sink and set the steam control to the Calc-
Clean position .
7 Hold the steam control at the Calc-Clean position and gently shake
the iron until all the water in the tank has been used up (Fig. 8).
, Steam and boiling water come out of the soleplate. Scale (if any) is
ushedout.
8 AfteryouhaveusedtheCalc-Cleanfunction,setthesteamcontrolto
the ‘no steam’ position.
9 Repeat the Calc-Clean process if the water that comes out of the
iron still contains scale particles.
After the Calc-Clean process
1 Connect the iron to the mains to let the soleplate dry.
2 Unplug the iron when the temperature light goes out.
3 Move the iron gently over a piece of used cloth to remove any water
stains that have formed on the soleplate.
4 Let the iron cool down before you store it.
Storage
1 Unplug the appliance and set the steam control to the ‘no steam’
position.
2 Empty the water tank (Fig. 9).
3 Wind the mains cord round the cord storage facility. (Fig. 10)
4 Store the iron on its heel in a safe and dry place.
Environment
- Do not throw away the appliance with the normal household waste
at the end of its life, but hand it in at an ofcial collection point for
recycling. By doing this, you help to preserve the environment (Fig. 11).
Guarantee & service
If you need service or information or if you have a problem, please visit
the Philips website at www.philips.com or contact the Philips Consumer
Care Centre in your country (you nd its phone number in the worldwide
guarantee leaet). If there is no Consumer Care Centre in your country, go
to your local Philips dealer.
Troubleshooting
This chapter summarises the most common problems you could encounter
with your iron. If you are unable to solve the problem, contact the
Consumer Care Centre in your country.
Problem Cause Solution
The iron is
plugged in but
the soleplate is
cold.
There is a
connection
problem.
Check the mains cord, the plug
and the wall socket.
The temperature
dial is set to MIN.
Set the temperature dial to the
required temperature.
The iron does
not produce any
steam.
There is not
enough water in
the water tank.
Fill the water tank (see chapter
‘Preparing for use’).
The steam control
is set to the ‘no
steam’ position.
Set the steam control to a
steam setting (see chapter
‘Using the appliance’).
Water leaks
from the
soleplate during
ironing.
The iron is not hot
enough.
Set the temperature dial to a
temperature suitable for steam
ironing ( 2 to MAX). Put the
iron on its heel and wait until
the temperature light goes out
before you start ironing.
Flakes and
impurities come
out of the
soleplate during
ironing.
You have used hard
water, which has
caused scale akes
to develop inside
the soleplate.
Use the Calc-Clean function
one or more times (see chapter
‘Cleaning and maintenance’).
Water leaks
from the
soleplate while
the iron cools
down or after it
has been stored.
You have put the
iron in horizontal
position while there
is still water in the
water tank.
Empty the water tank and set
the steam control to the ‘no
steam’ position before you store
the iron (see chapter ‘Storage’).
Store the iron on its heel.
ภาษาไทย
บทนำา
ขอแสดงความยินดีที่คุณสั่งซื้อและยินดีตอนรับสผลิตภัณฑของ Philips! เพื่อใหคุณไดรับประโยชนอยางเต็มที่จากบริการที่
Philips มอบให โปรดลงทะเบียนผลิตภัณฑของคุณที่ www.philips.com/welcome
สวนประกอบ (รูปที่ 1)
A ฝาครอบชองเติมน
B ปุ่มควบคุมพลังไอน
- 1 = พลังไอนตสุด
- 2 = พลังไอนสูงสุด
-
t= ไมมีพลังไอน
-
u= ฟงกชั่นขจัดคราบตะกรัน
C สัญญาณไฟแสดงอุณหภูมิ
D สายไฟ
E แทงคน
F แผนความรอน
G ปุ่มปรับอุณหภูมิ
ขอควรจำา
ควรอานคมืออยางละเอียดกอนใชงานและเก็บไวเพื่อใชอางอิงในครั้งตอไป
อันตราย
- ไมควรนำาเตารีดจมลงในน
คำาเตือน
- กอนใชงานโปรดตรวจสอบแรงดันไฟฟาที่ระบุบนผลิตภัณฑวาตรงกับแรงดันไฟฟาที่ใชภายในบานหรือไม
- หามใชงานเตารีดหากพบวาปลั๊กไฟ สายไฟ หรือตัวเครื่องเกิดชำารุดเสียหาย, หรือหากเตารีดไอนตกกระแทกหรือมีรอยรั่ว
- หากสายไฟชำารุด ควรนำาไปเปลี่ยนที่บริษัทฟลิปส หรือศูนยบริการที่ไดรับอนุญาตจากฟลิปส หรือบุคคลที่ผานการอบรมจ
ากฟลิปสดำาเนินการเปลี่ยนให เพื่อหลีกเลี่ยงอันตรายที่อาจเกิดขึ้นได
- หามเสียบปลั๊กไฟทิ้งไว
- ไมควรใหบุคคล (รวมทั้งเด็กเล็ก) ที่มีสภาพรางกายไมแข็งแรงหรือสภาพจิตใจไมปกติ หรือขาดประสบการณและความร
ความเขาใจ นำาอุปกรณนี้ไปใชงาน เวนแตจะอยในการควบคุมดูแลหรือไดรับคำาแนะนำาในการใชงานโดยผที่รับผิดชอบใ
นดานความปลอดภัย
- เด็กเล็กควรไดรับการดูแลเพื่อปองกันไมใหเด็กนำาอุปกรณนี้ไปเลน
- ไมควรใหสายไฟสัมผัสโดนแผนความรอนของเตารีด
ขอควรระวัง
- หากเตารีดมาพรอมกับปลั๊กไฟแบบตอสายดินเรียบรอยแลว สามารถเสียบปลั๊กไฟเขากับเตารับที่ตอสายดินไดทันที
- หมั่นตรวจสอบสายไฟใหอยในสภาพปกติ เพื่อหลีกเลี่ยงการชำารุด
- แผนความรอนของเตารีดมีความรอนสูง อาจทำาใหผิวหนังไหมพองไดหากสัมผัสโดน
- เมื่อรีดผาเสร็จ เมื่อทำาความสะอาดเตารีด เมื่อเติมนหรือเทนที่อยในชองเก็บนออก และเมื่อทิ้งเตารีดที่เสียบปลั๊กแลวไป
ทำาธุระอื่นชวงสั้นๆ ใหเลื่อนปุ่มควบคุมไอนมาที่ตำาแหนง ‘ไมมีไอน’ ตั้งเตารีดรอไว และถอดปลั๊กเตารีดออก
- วางและใชงานเตารีดบนพื้นที่เรียบและมั่นคงเทานั้น
- เครื่องใชไฟฟานี้เหมาะสำาหรับการใชงานในครัวเรือนเทานั้น
Electromagnetic fields (EMF)
ผลิตภัณฑของฟลิปสไดมาตรฐานดานคลื่นแมเหล็กไฟฟา (EMF) หากมีการใชงานอยางเหมาะสมและสอดคลองกับคำาแนะนำา
ในคมือนี้ คุณสามารถใชผลิตภัณฑไดอยางปลอดภัยตามขอพิสูจนทางวิทยาศาสตรในปจจุบัน
กอนใชงานครั้งแรก
1 ลอกสติ๊กเกอร หรือแผนฟอยลที่หมแผนทำ�คว�มรอนออก
2 ปลอยใหเต�รีดรอนจนถึงอุณหภูมิสูงสุด
3 ว�งเต�รีดลงบนผ�ที่เปยกชื้นสักคร เพื่อกำ�จัดสิ่งสกปรกที่ตกค�งออกจ�กแผนคว�มรอน
หมายเหตุ: อาจมีควันออกจากเตารีดเมื่อใชเตารีดเปนครั้งแรก ควันจะหายไปเองเมื่อเวลาผานไประยะหนึ่ง
การเตรียมตัวกอนใชงาน
การเติมนลงในแทงค
ไมควรนำ�เต�รีดจมลงในน
1 ควรถอดปลั๊กไฟออกกอน
2 ปรับปุ่มควบคุมพลังไอนไปที่ตำ�แหนง ‘ไมมีพลังไอน’ (รูปที่ 2)
3 เอียงเต�รีดไปด�นหลังเล็กนอย
4 เปดฝ�ครอบชองเติมนออก (รูปที่ 3)
5 เติมนลงในแทงคจนถึงขีดระดับสูงสุด (รูปที่ 4)
ห�มเติมนสูงกว�ระดับ MAX
ห�มใสนหอม, นสมส�ยชู, แปง, ส�รขจัดตะกรัน, ผลิตภัณฑสำ�หรับรีดผ�หรือส�รเคมีอื่นๆ ลงในแทงคน
หมายเหตุ: หากนประปาที่ใชอยมีความกระดางมาก ขอแนะนำาใหผสมนกลั่นในอัตราสวนที่เทากันหรือใชนกลั่น
แทน
6 ปดฝ�ครอบชองเติมน
การตั้งอุณหภูมิ
1 ตั้งเต�รีดขึ้น
2 ปรับปุ่มควบคุมระดับคว�มรอนไปยังระดับที่เหม�ะสม เพื่อตั้งอุณหภูมิก�รรีดที่ตองก�ร (รูปที่ 5)
ตรวจดูปายบนเสื้อผา เพื่อใหทราบถึงอุณหภูมิที่เหมาะสมในการรีด
1 ผาใยสังเคราะห (เชน อะคริลิก วิสคอส โพลีอาไมด โพลีเอสเตอร)
1 ผาไหม
2 ผาขนสัตว
3 ผาฝาย ผาลินิน
หากคุณไมทราบชนิดของเสนใยหรือเนื้อผา ใหเลือกอุณหภูมิที่ถูกตองในการรีด ดวยการลองรีดสวนใดสวนหนึ่งของเสื้อผาตัวนั้น
ณ จุดที่ไมสามารถมองเห็นไดขณะสวมใส
สำาหรับผาไหม ผาขนสัตวและเสนใยสังเคราะห ใหกลับตะเข็บรีดดานใน เพื่อปองกันผาขึ้นเงา
เริ่มรีดผาที่ตองใชความรอนตที่สุดกอน เชน ผาที่ทำาดวยเสนใยสังเคราะห
3 เสียบปลั๊กไฟในเต�รับที่ตอส�ยดินไวเรียบรอยแลว
, สัญญ�ณไฟแสดงอุณหภูมิจะสว�งขึ้น (รูปที่ 6)
4 เมื่อสัญญ�ณไฟแสดงอุณหภูมิดับลง รอสักครกอนเริ่มรีดผ�
ขณะรีดผาสัญญาณไฟแสดงอุณหภูมิจะสวางตลอดการใชงาน
การใชงาน
เตารีดไอน
1 ตรวจสอบใหแนใจว�มีนในแทงคเพียงพอ
2 เลือกระดับอุณหภูมิที่แนะนำ�ไว (ดูไดจ�กบท ‘ก�รเตรียมตัวกอนใช’ หัวขอ ‘ก�รตั้งอุณหภูมิ’)
3 หลังจ�กที่สัญญ�ณไฟแสดงอุณหภูมิดับลง ตั้งค�ควบคุมไอนต�มคว�มเหม�ะสม ตรวจดูใหแนใจว�เลือก
ระดับอุณหภูมิถูกตองและเหม�ะสมกับเนื้อผ�เรียบรอยแลว (รูปที่ 7)
ตั้งอุณหภูมิระหวาง 2 ถึง 3 สำาหรับพลังไอนตสุด 1
ตั้งอุณหภูมิระหวาง 3 ถึงสำาหรับพลังไอนสูงสุด 2
เตารีดเริ่มใชพลังไอนทันทีที่ถึงระดับอุณหภูมิที่ตั้งไว
การรีดโดยไมใชพลังไอน
1 ปรับปุ่มควบคุมพลังไอนไปที่ตำ�แหนง ‘ไมมีพลังไอน’ (รูปที่ 2)
2 เลือกระดับอุณหภูมิที่แนะนำ�ไว (ดูไดจ�กบท ‘ก�รเตรียมตัวกอนใช’ หัวขอ ‘ก�รตั้งอุณหภูมิ’)
การทำาความสะอาดและการบำารุงรักษา
หลังการรีดผา
1 ถอดปลั๊กไฟออกจ�กเต�รับบนผนังแลวปลอยใหเย็นลง
2 ใชผ�ชุบนย�ทำ�คว�มสะอ�ดที่ไมมีฤทธิ์กัดกรอนบิดพอหม�ด เช็ดคร�บตะกรันและสิ่งสกปรกอื่นๆ ออกจ�ก
แผนคว�มรอน
เพื่อใหแผนคว�มรอนเรียบลื่น ควรหลีกเลี่ยงก�รสัมผัสที่รุนแรงกับโลหะ ไมควรใชแผนใยขัดถู, นสมส�ยชู หรือ
ส�รเคมีใดๆ ทำ�คว�มสะอ�ดแผนคว�มรอน
3 ทำ�คว�มสะอ�ดสวนบนของเต�รีดดวยผ�ชุบนบิดพอหม�ด
4 ควรล�งแทงคนดวยนสะอ�ดอย�งสมเสมอ และเทนออกจ�กแทงคหลังทำ�คว�มสะอ�ดเรียบรอยแลว
ฟงกชั่นขจัดคราบตะกรัน
ใชฟงกชั่นขจัดตะกรันทุก 2 สัปดาห หากนที่ใชมีความกระดางมาก (คือ มีแผนคราบบางๆ หลุดออกมาจากแผนความรอนขณะ
รีดผา) ใหใชฟงกชั่นขจัดตะกรันบอยครั้งขึ้น
1 ปรับปุ่มควบคุมพลังไอนไปที่ตำ�แหนง ‘ไมมีพลังไอน’ (รูปที่ 2)
2 ปรับปุ่มควบคุมอุณหภูมิไปที่ MAX
3 เติมนลงในแทงคนจนถึงระดับสูงสุด
ห�มเทนสมส�ยชูหรือนย�ขจัดคร�บตะกรันอื่นๆ ลงในแทงคน
4 เสียบปลั๊กไฟเข�กับเต�รับบนผนัง
5 ถอดปลั๊กไฟออก เมื่อสัญญ�ณไฟแสดงอุณหภูมิดับลง
6 ถือเต�รีดเหนืออ�ง ตั้งปุ่มควบคุมไอนไปที่ระบบขจัดตะกรัน
7 ตั้งปุ่มควบคุมไอนไวที่ตำ�แหนง ขจัดคร�บตะกรัน และเขย�เต�รีดเบ�ๆ จนกว�จะใชนในแทงคจน
หมด (รูปที่ 8)
, ไอนและนเดือดจะไหลออกม�จ�กแผนคว�มรอน คร�บตะกรัน (ถ�มี) จะถูกชะล�งออกม�
8 หลังจ�กคุณใขฟงกชั่นขจัดตะกรันแลว ปรับปุ่มควบคุมพลังไอนไปที่ตำ�แหนง ‘ไมมีไอน’
9 ทำ�ขั้นตอนขจัดตะกรันซอีกครั้ง ห�กนที่ออกม�จ�กแผนคว�มรอนยังมีคร�บตะกรันออกม�อีก
หลังจากใชขั้นตอนขจัดคราบตะกรัน
1 เสียบปลั๊กไฟ เพื่อใหแผนคว�มรอนแหง
2 ถอดปลั๊กไฟออก เมื่อสัญญ�ณไฟแสดงอุณหภูมิดับลง
3 เลื่อนเต�รีดลงบนเศษผ�ที่ไมใชแลว เพื่อขจัดคร�บนที่เก�ะบนแผนคว�มรอน
4 ปลอยใหเต�รีดเย็นลงกอนทำ�ก�รจัดเก็บเข�ที่
การจัดเก็บ
1 ถอดปลั๊กเต�รีดและหมุนปุ่มควบคุมไอนไปที่ ‘ไมมีไอน’
2 เทนออกจ�กแทงค (รูปที่ 9)
3 มวนส�ยไฟเพื่อจัดเก็บไวในชองเก็บส�ยไฟ (รูปที่ 10)
4 ควรจัดเก็บเต�รีดในแนวตั้งแลวว�งในที่ปลอดภัยและแหง
สภาพแวดลอม
- หามทิ้งเครื่องรวมกับขยะในครัวเรือนทั่วไป เมื่อเครื่องหมดอายุการใชงานแลว ควรทิ้งลงในถังขยะสำาหรับนำากลับ
ไปใชใหมได (รีไซเคิล) เพื่อชวยรักษาสภาวะสิ่งแวดลอมที่ดี (รูปที่ 11)
การรับประกันและการบริการ
หากคุณตองการขอรับบริการหรือตองการทราบขอมูล โปรดเขาชมเว็บไซตของ Philips ไดที่ www.philips.com หรือติดตอ
ศูนยบริการดูแลลูกคาของบริษัท Philips ในประเทศของคุณ (หมายเลขโทรศัพทของศูนยบริการฯ อยในเอกสารแผนพับเกี่ยว
กับการรับประกันทั่วโลก) หากในประเทศของคุณไมมีศูนยบริการ โปรดติดตอตัวแทนจำาหนายผลิตภัณฑของบริษัท Philips ใน
ประเทศ
การแกปญหา
ในบทนี้ เราไดรวบรวมปญหาตางๆ ที่เกิดกับเตารีดของคุณมากที่สุด หากคุณไมสามารถแกปญหาได กรุณาติดตอที่ศูนยบริการลูก
คา (Customer Care Centre) ในประเทศของคุณ
ปญหา สาเหตุ การแกปญหา
เสียบปลั๊กไฟเตา
รีดเรียบรอยแลว
แตแผนความรอนไมรอน
มีปญหาเกี่ยวกับการตอ
สายไฟ
ตรวจสอบสายไฟ ปลั๊ก และเตารับบนผนัง
ปุ่มควบคุมอุณหภูมิตั้งอยที่
MIN
หมุนปุ่มควบคุมอุณหภูมิไปยังตำาแหนงที่ตองการ
เตารีดไมผลิตไอน มีนในแทงคไมเพียงพอ เติมนลงในแทงค (ดูไดจากบท ‘การเตรียมตัวกอนใช’)
ปุ่มควบคุมพลังไอนตั้งไวที่ต
ำาแหนง ‘ไมมีไอน’
ตั้งปุ่มควบคุมพลังไอนที่ (ดูจากบท ‘การใชงานเตารีด’)
มีนรั่วซึมออกมาจากแผนคว
ามรอนขณะรีดผา
เตารีดรอนไมเพียงพอ หมุนปุ่มปรับอุณหภูมิใหเหมาะสมกับการรีดผานั้นๆ ( 2
ถึง MAX) ตั้งเตารีดขึ้น จากนั้นรอจนกระทั่งสัญญาณไฟ
แสดงอุณหภูมิดับลงกอนเริ่มใชงาน
ขณะรีดผา มีคราบตะกรันแล
ะสิ่งสกปรกหลุดออกมาจากแ
ผนความรอน
คุณใชนที่มีความกระดางมา
ก เปนสาเหตุทำาใหมีแผนครา
บออกมาจากแผนความรอน
ใชฟงกชั่นขจัดตะกรันหนึ่งครั้งหรือมากกวา (ดูไดจากบท
‘การทำาความสะอาดและบำารุงรักษา’)
มีนรั่วซึมออกมาจากแผนคว
ามรอน ขณะเตารีดเย็นลงหรื
อหลังจากเก็บเตารีด
วางเตารีดในแนวนอน
ในขณะที่ยังมีนอยในแทงค
เทนออกจากแทงค ตั้งคาควบคุมไอนไปที่ตำาแหน
ง ‘ไมมีไอน’ กอนทำาการจัดเก็บเตารีด (ดูไดจากบท
‘การจัดเก็บรักษา’) จากนั้นวางเตารีดในแนวตั้ง
4239.000.7159.1.indd 1 26-02-09 14:59

繁體中文
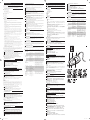
A
E F G
B C D
1
2 3 4 5
6
7 8 9
10 11
Pengenalan
Tahniah atas pembelian anda, dan selamat datang ke Philips! Untuk
mendapat manfaat sepenuhnya daripada sokongan yang ditawarkan oleh
Philips, daftarkan produk anda di www.philips.com/welcome.
Perihalan umum (Gamb. 1)
A Tukup bukaan isian
B Kawalan stim
-
1 = stim minimum
-
2 = stim maksimum
-
t = tiada stim
-
u = fungsi Pembersihan Kerak
C Lampu suhu
D Kord sesalur kuasa
E Tangki air
F Plat tapak
G Tombol suhu
Penting
Baca manual pengguna ini dengan berhati-hati sebelum anda menggunakan
perkakas dan simpannya untuk rujukan masa depan.
Bahaya
- Jangan sekali-kali tenggelamkan seterika di dalam air.
Amaran:
- Periksa sama ada voltan yang ditandakan di atas plat jenis sepadan
dengan voltan sesalur kuasa setempat sebelum anda menyambungkan
perkakas.
- Jangan gunakan perkakas jika plag, kord sesalur kuasa atau perkakas
itu sendiri menunjukkan kerosakan yang nyata, atau jika perkakas telah
terjatuh atau bocor.
- Jika kord sesalur rosak, ia mesti digantikan oleh Philips, pusat servis
yang dibenarkan oleh Philips atau pihak yang telah diluluskan bagi
mengelakkan bahaya.
- Jangan biarkan perkakas tanpa dijaga apabila ia bersambung dengan
sesalur kuasa.
- Perkakas ini tidak dimaksudkan untuk digunakan oleh orang (termasuk
kanak-kanak) yang kurang upaya dari segi zikal, deria atau mental, atau
kurang berpengalaman dan pengetahuan, kecuali mereka diawasi atau
diberi arahan berkenaan penggunaan perkakas ini oleh orang yang
bertanggungjawab atas keselamatan mereka.
- Kanak-kanak hendaklah diselia untuk memastikan mereka tidak bermain
dengan perkakas ini.
- Jangan biarkan tali aliran eletrik utama bersentuh dengan tapak plat
seterika yang panas.
Awas
- Jika perkakas disediakan dengan plag yang dibumikan, ia mesti
dipasangkan ke dalam soket dinding yang dibumikan.
- Periksa kord sesalur kuasa secara tetap untuk mencari apa-apa
kerosakan.
- Bahagian plat tapak seterika boleh menjadi amat panas dan mungkin
menyebabkan kelecuran jika tersentuh.
- Apabila anda selesai menyeterika, apabila anda membersihkan perkakas,
apabila anda mengisi atau mengosongkan tangki air dan juga apabila
anda meninggalkan seterika biarpun seketika: tetapkan kawalan stim
pada kedudukan ‘tiada stim’, dirikan seterika pada tumitnya dan cabut
plag sesalur daripada soket dinding.
- Sentiasa letak dan gunakan seterika pada permukaan yang stabil, rata dan
mendatar.
- Perkakas ini dimaksudkan untuk penggunaan rumah tangga sahaja.
Perkakas Philips ini mematuhi semua piawai yang berhubung dengan medan
elektromagnet (EMF). Jika dikendalikan dengan betul dan mematuhi arahan
dalam manual pengguna ini, perkakas selamat untuk digunakan menurut
bukti saintik yang boleh didapati pada masa ini.
Sebelum penggunaan pertama
1 Tanggalkan apa-apa pelekat atau kerajang pelindung dari plat tapak.
2 Biar seterika menjadi panas hingga ke suhu maksimum.
3 Lalukan seterika di atas sehelai kain lembap selama beberapa minit
untuk mengeluarkan sebarang sisa daripada plat tapak.
Nota: Seterika mungkin mengeluarkan sedikit asap semasa anda
menggunakannya pada kali pertama. Ini akan berhenti selepas beberapa
ketika.
Bersedia untuk menggunakannya
Jangan sekali-kali tenggelamkan seterika di dalam air.
1 Pastikan palam perkakas ditanggalkan.
2 Tetapkan kawalan stim pada kedudukan ‘tiada stim’ (Gamb. 2).
3 Condongkan seterika ke belakang.
4 Buka tukup bukaan isian (Gamb. 3).
5 Isikan tangki air dengan air paip sejuk sehingga paras
maksimum. (Gamb. 4)
JanganisikantangkiairmelepasitandaMAKSIMUM.
Jangan masukkan minyak wangi, cuka, kanji, agen penanggal kerak, bahan
bantu penyeterikaan atau bahan kimia lain ke dalam tangki air.
Nota: Jika air paip di kawasan anda ialah air yang amat keras, kami
menasihatkan anda supaya mencampurkannya dengan jumlah air suling yang
sama banyak atau gunakan air suling sahaja.
6 Tutup tukup bukaan isian.
1 Letak seterika pada tumitnya.
2 Untuk menetapkan suhu seterika yang dikehendaki, putar tombol suhu
ke kedudukan yang betul (Gamb. 5).
Periksa label penjagaan pada kain untuk mengetahui suhu penyeterikaan
yang diperlukan:
1 Fabrik sintetik (contohnya akrilik, viskos, poliamida, poliester).
1 Sutera
2 Wul
3 Kain kapas, linen
Jika anda tidak tahu jenis kain sesuatu pakaian itu diperbuat, tentukan suhu
penyeterikaan yang betul dengan menyeterika bahagian pakaian yang tidak
kelihatan apabila anda memakai atau menggunakan pakaian tersebut.
Bahan sutera, wul dan sintetik: seterika di bahagian belakang kain tersebut
untuk mencegah tompok-tompok berkilau.
Mula menyeterika bahan yang memerlukan suhu penyeterikaan yang paling
rendah, seperti pakaian yang diperbuat dari gentian sintetik.
3 Memasang palam wayar di soket dinding yang dibumikan.
, Lampu suhu menyala (Gamb. 6).
4 Apabilalampusuhupadam,tunggusebentarsebelumandamula
menyeterika.
Lampu suhu akan menyala dari masa ke masa semasa menyeterika.
Penyeterikaan stim
1 Pastikan air di dalam tangki air mencukupi.
2 Pilih suhu seterika yang disyorkan (lihat bab ‘Bersedia untuk
menggunakannya’, seksyen ‘Menetapkan suhu’).
3 Selepas lampu suhu padam, tetapkan kawalan stim ke kedudukan stim
yang sesuai. Pastikan tetapan stim yang anda pilih sesuai untuk suhu
penyeterikaan yang dipilih: (Gamb. 7)
Tetapan suhu 2 hingga 3 untuk stim minimum 1.
Tetapan suhu 3 hingga MAX untuk stim maksimum 2.
Seterika mula mengeluarkan stim sebaik saja ia mencapai suhu yang
ditetapkan.
Penyeterikaan tanpa stim
1 Tetapkan kawalan stim pada kedudukan ‘tiada stim’ (Gamb. 2).
2 Pilih suhu seterika yang disyorkan (lihat bab ‘Bersedia untuk
menggunakannya’, seksyen ‘Menetapkan suhu’).
Pembersihan dan penyelenggaraan
Selepas menyeterika
1 Cabut palam wayar dari soket dinding dan biarkan seterika menjadi
sejuk dahulu.
2 Mengelap kerak air dan mendapan lain daripada plat tapak dengan kain
yang lembap dan bahan pencuci (cecair) yang tidak melelas.
Agarplattapaksentiasalicin,elakkansentuhankuatdenganobjeklogam.
Jangan sekali-kali gunakan pad penyental, cuka atau bahan kimia yang lain
untuk membersihkan plat tapak.
3 Bersihkan bahagian atas perkakas dengan kain lembab.
4 Sering-seringmembasuhtangkiairdenganair.Kosongkantangkiair
setelah pembersihan.
Fungsi Pembersihan Kerak
Gunakan fungsi Pembersihan Kerak sekali setiap dua minggu. Jika air di
kawasan anda terlalu keras (iaitu serpihan keluar dari plat dasar semasa
menyeterika), anda harus menggunakan fungsi Pembersihan Kerak dengan
lebih kerap.
1 Tetapkan kawalan stim pada kedudukan ‘tiada stim’ (Gamb. 2).
2 TetapkansuhutombolpadaMAX.
3 Isikan tangki air sampai paras maksimum.
Jangan tuang cuka atau agen penanggal kerak yang lain ke dalam tangki air.
4 Masukkan plag utama ke dalam soket.
5 Cabut plag seterika apabila lampu suhu padam.
6 Pegang seterika di atas sinki dan tetapkan kawalan suhu ke kedudukan
PembersihanKerak.
7 TahankawalanstimpadakedudukanPembersihanKerakdangoncang
seterika perlahan-lahan sehingga semua air dalam tangki telah
digunakan (Gamb. 8).
, Stimdanairyangmendidihakankeluardaripadatapakplat.Kerak(jika
ada) akan dikumbah keluar.
8 SetelahandamenggunakanfungsiPembersihanKerak,tetapkan
kawalan stim pada kedudukan ‘tiada stim’.
9 UlangprosesPembersihanKerakjikaairyangkeluardaripadaseterika
masih mengandungi partikel kerak.
Selepas proses Pembersihan Kerak
1 Sambungkan seterika ke sesalur kuasa untuk membolehkan plat dasar
mengering.
2 Cabut plag seterika apabila lampu suhu padam.
3 Gerakkan seterika perlahan-lahan di atas sehelai kain terpakai untuk
mengeluarkan apa-apa kesan air yang telah terbentuk pada plat
tapaknya.
4 Biarkan seterika sehingga sejuk sebelum anda menyimpannya.
Penyimpanan
1 Cabut plag perkakas dan tetapkan kawalan stim pada kedudukan ‘tiada
stim’.
2 Kosongkantangkiair(Gamb.9).
3 Lilitkan kord sesalur di sekeliling bahagian penyimpanan
kord. (Gamb. 10)
4 Simpan seterika tegak di kakinya di tempat yang selamat dan kering.
Alam sekitar
- Jangan buang perkakas ke dalam tong sampah rumah apabila sampai
akhir hayatnya, tetapi bawanya ke pusat pungutan rasmi untuk dikitar
semula. Dengan melakukan sedemikian anda akan membantu
memelihara alam sekitar (Gamb. 11).
Jaminan dan servis
Jika anda memerlukan perkhidmatan atau maklumat atau jika anda
menghadapi masalah, sila lawati laman web Philips di www.philips.com
atau hubungi Pusat Layanan Pelanggan Philips di negara anda (anda
boleh mendapatkan nombor telefonnya di dalam risalah jaminan sedunia).
Jika Pusat Layanan Pelanggan tidak terdapat di negara anda, hubungi wakil
penjual Philips tempatan anda.
Bab ini meringkaskan masalah paling lazim yang mungkin anda hadapi dengan
seterika anda. Sekiranya anda tidak dapat menyelesaikan masalah, hubungi
Pusat Layanan Pelanggan di negara anda.
Masalah Sebab Penyelesaian
Alat seterika
disambung
tetapi plat
tapak dingin.
Terdapat masalah
sambungan.
Periksa kord sesalur kuasa, palam
dan soket dinding.
Tombol suhu
ditetapkan pada
MIN.
Tetapkan tombol kawalan suhu ke
suhu yang dikehendaki.
Seterika tidak
menghasilkan
stim.
Air di dalam
tangki air tidak
mencukupi.
Isikan tangki air (lihat bab ‘Bersedia
untuk menggunakannya’).
Kawalan stim
ditetapkan pada
kedudukan ‘tiada
stim’.
Tetapkan kawalan stim
pada tetapan stim (lihat bab
‘Menggunakan perkakas’).
Air bocor
dari plat
dasar semasa
menyeterika.
Panasnya alat
seterika kurang.
Tetapkan tombol suhu pada suhu
yang sesuai untuk penyeterikaan
stim ( 2 hingga MAX). Letakkan
seterika supaya ia berdiri pada
tumitnya dan tunggu sehingga
lampu suhu padam sebelum anda
mula menyeterika.
Emping dan
kotoran keluar
dari plat
tapak semasa
menyeterika.
Anda telah
menggunakan air
keras, yang telah
menyebabkan
serpihan kerak
terbentuk di dalam
plat tapak.
Gunakan fungsi Pembersihan Kerak
sekali atau beberapa kali (lihat bab
‘Membersih dan menyelenggara’).
Air bocor
daripada tapak
plat semasa
seterika sedang
menyejuk
atau selepas ia
disimpan.
Anda perlu
meletakkan
seterika pada
kedudukan
mendatar apabila
masih ada air di
dalam tangki air.
Kosongkan tangki air dan tetapkan
kawalan stim pada kedudukan
‘tiada stim’ sebelum menyimpan
seterika (lihat bab ‘Penyimpanan’).
Simpan seterika pada tumitnya.
簡介
恭喜您購買本產品並歡迎加入飛利浦!請於 www.philips.com/
welcome 註冊您的產品,以善用飛利浦提供的支援。
一般說明 (圖 1)
A 注水口蓋子
B 蒸汽控制鈕
-
1 = 最小蒸汽
-
2 = 最大蒸汽
-
t= 無蒸汽
- u= 除鈣清洗功能
C 溫度指示燈
D 電源線
E 水箱
F 底盤
G 溫度控制設定
重要事項
在使用本產品前,請先仔細閱讀本使用手冊,並保留說明以供日後
參考。
危險
- 請勿將熨斗浸泡在水中。
警示
- 在使用前,請先檢查標籤上所標示的電壓是否與當地的電源系統
電壓一致。
- 插頭、電線或產品本身受損時,或是產品曾摔落或漏電時,請勿
使用。
- 如果電線損壞,則必須交由飛利浦、飛利浦授權之服務中心,或
是具備相同資格的技師更換,以免發生危險。
- 當本產品連接到電源時,必須有人看顧。
- 基於安全考量,在缺乏監督及適當指示之下,本產品不適用於孩
童及任何身體、知覺、或心理功能障礙者,或缺乏使用經驗及知
識者。
- 請勿讓孩童將本產品當成玩具。
- 請勿讓電源線靠近接觸熨斗的熱底盤。
警告
- 如果產品有接地插頭,則必須插入吻合的接地插座上。
- 定期檢查電線是否受損。
- 熨斗的底盤可能會變得很燙,如果碰到可能會燙傷。
- 當您熨燙完畢、清理熨斗、倒乾水箱的水或加水,或即使短暫離
開熨斗時:請將蒸汽控制鈕設定到「無蒸汽」的位置,將熨斗直
立在其跟部上,並且將電源插頭從插座拔出。
- 請將熨斗放置在平穩的水平面上使用。
- 本產品僅供家用。
電磁波 (EMF)
本飛利浦產品符合電磁波 (Electromagnetic fields,EMF) 所有相關
標準。只要使用方式正確並依照本使用手冊之說明進行操作,根據
現有的科學研究資料,使用本產品並無安全顧慮。
第一次使用前
1 請撕下熨斗底盤上的任何貼紙或保護膜。
2 讓熨斗加熱達到最高溫度。
3 用熨斗熨燙濕布達數分鐘,以便去除底盤的殘留物。
注意:第一次使用時,熨斗可能會產生一些煙霧,煙霧會在不久後
消失。
使用前準備
加水至水箱內
請勿將熨斗浸泡在水中。
1 確定產品的插頭已經拔離電源插座。
2 將蒸汽控制鈕設定到「無蒸汽」的位置。(圖2)
3 將熨斗向後傾斜。
4 將注水口的蓋子打開。(圖3)
5 將自來水注滿到水箱最高刻度。(圖4)
切勿注入超過「MAX」的水位指示。
請勿將香水、醋、澱粉、除水垢劑、熨燙添加劑或其他化學物質加
入水箱中。
注意:如果在您居住地區的自來水質硬度很高,我們建議您用等量
的蒸餾水調合,或是僅使用蒸餾水。
6 蓋上加水蓋。
設定溫度
1 將熨斗直立。
2 將溫度控制設定轉到適當的位置來設定所需的熨燙溫度。(圖5)
關於適當的熨燙溫度,請檢查洗濯指示標籤:
1 合成纖維 (例如,壓克力纖維、人造絲、聚醯胺、聚酯纖維)
1 絲
2 毛料
3 棉、亞麻布
如果您不知道衣料是由哪一種纖維製成,請先在該衣料不起眼的部
份試燙,以判斷適當的熨燙溫度。
絲織品、毛料和合成纖維:請熨燙布料的背面,以防止留下亮面印
記。
請從需要最低溫的衣物開始熨燙,例如合成纖維製的衣料。
3 將電源線插頭插入接地插座中。
, 加熱指示燈會亮起。(圖6)
4 當溫度指示燈熄滅時,請先稍待一會兒再開始熨燙。
熨燙期間,指示燈會間歇性地亮起。
使用此產品
蒸汽熨燙
1 確認在水箱中有足夠的水。
2 選取有建議的熨燙溫度(請參閱「準備使用」的「設定溫度」之
說明)。
3 溫度指示燈熄滅後,將蒸汽控制設定到適當的蒸汽位置。選
擇適當的蒸汽設定,並確定您選擇的蒸汽設定適合熨燙的溫
度:(圖7)
溫度設定 2 到 3 ,提供最小蒸汽 1。
溫度設定 3 到 MAX,提供最大蒸汽 2。
到達設定溫度時,熨斗便會立即開始產生蒸汽。
無蒸汽熨燙
1 將蒸汽控制鈕設定到「無蒸汽」的位置。(圖2)
2 選取有建議的熨燙溫度(請參閱「準備使用」的「設定溫度」之
說明)。
清潔與維護
熨燙後
1 將電源插頭從插座上拔除並讓熨斗冷卻。
2 用濕布和非磨蝕性的(液體)清潔劑擦掉底盤上的水垢和其他任何
沈積物。
為保持底盤滑順,請避免底盤與金屬物品直接碰觸。禁止使用鋼絲
絨、醋或其他的化學物質清潔底盤。
3 請用溼布清潔熨斗上面的部份。
4 定期使用清水沖洗熨斗水箱。在清潔水箱後,請將水倒乾。
除鈣清洗功能
每兩週使用一次除鈣功能。如果居住地的水質非常硬 (亦即在熨燙過
程中有小薄片從底盤產生),則必須更頻繁地使用除鈣功能。
1 將蒸汽控制鈕設定到「無蒸汽」的位置。(圖2)
2 將溫度控制設定到「MAX」。
3 將水倒入水箱到最高的刻度。
切勿在水箱中倒入醋或其他除垢劑。
4 將電源插頭插入牆上插座。
5 溫度指示燈熄滅時,請拔除熨斗的插頭。
6 在洗手槽上握住熨斗,並將蒸汽控制設定到除鈣清洗的位置。
7 按住蒸汽控制鈕至除鈣清洗位置,並輕輕搖動熨斗,直到水箱中
所有的水都流盡。(圖8)
, 蒸汽和滾水會從底盤流出,水垢(如果有的話)會被沖出來。
8 使用完除鈣清洗功能後,請將蒸汽控制鈕設為「無蒸汽」的位
置。
9 假如從熨斗內流出的水仍含有水垢,請重複此除鈣清洗程序。
除鈣清洗之後
1 將熨斗連接到電源使底盤變乾。
2 溫度指示燈熄滅時,請拔除熨斗的插頭。
3 將熨斗輕輕地在用過的布料上摩擦,以將底盤上已形成的水漬擦
拭乾淨。
4 在您將熨斗收藏前,請先讓其冷卻。
收納
1 拔下產品插頭,並將蒸汽控制鈕設為「無蒸汽」的位置。
2 將水箱內的水倒光。(圖9)
3 將電源線捲繞在電源線收納裝置上。(圖10)
4 將直立在其跟部上的熨斗存放在一個安全且乾燥的地方。
環境保護
- 電器壽命結束時請勿與一般家庭廢棄物一併丟棄。請將該產品放
置於政府指定的回收站,此舉能為環保盡一份心力。 (圖 11)
保固與服務
若您需要相關服務或資訊,或是有任何問題,請瀏覽飛利浦網站,
網址為 www.philips.com,或連絡您當地的飛利浦顧客服務中心 (您
可以在全球保證書上找到連絡電話)。若您當地沒有顧客服務中心,
請洽詢當地的飛利浦經銷商。
故障排除
本章概述使用本熨斗最常會遇到的問題。詳情請參閱相關章節之說
明。如果問題無法解決,請與您所在國家的飛利浦消費者服務中心
聯繫。
問題 原因 解決方法
熨斗已經插
電,但是底盤
仍是冷的。
電源連接有問
題。
檢查電源線,插頭和插座。
溫度控制設定
設為 MIN。
將溫度控制設定轉到所需的溫
度。
熨斗不會產生
蒸汽。
水箱中的水量
不足。
加水至水箱 (請參閱「準備使
用」單元)。
蒸汽控制鈕設
為「無蒸汽」
的位置。
蒸汽控制鈕設為蒸汽設定 (請參
閱「使用此電器」單元)。
熨燙過程中有
水從底盤漏
出。
熨斗不夠燙。 將溫度控制設定到適合蒸汽熨燙
的溫度 (從 2 到 MAX)。將熨斗
直立在其跟部上,並靜待溫度指
示燈熄滅後再開始熨燙。
在熨燙過程中
會有小薄片和
雜質從底盤產
生。
您使用的是硬
水,所以會在
底盤上形成水
垢。
請使用除鈣清洗功能一次或數次
(請參閱「清潔與維護」)。
熨斗冷卻時,
或在收藏後,
底盤會漏水。
熨斗置於水平
位置時,水箱
仍然有水。
在收藏熨斗前 (請參閱「收藏」
單元),請將水箱清空,並設定蒸
汽控制鈕到「無蒸汽」的位置。
將熨斗直立收藏。
4239.000.7159.1.indd 2 26-02-09 14:59
-
 1
1
-
 2
2

