
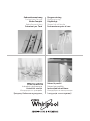
Gebrauchsanweisung
Instructions for use
Mode d’emploi
Gebruiksaanwijzing
Istruzioni per l’uso
Brugsanvisning
Bruksanvisning
Käyttöohje
Manual de utilização
Instrucciones para el uso
Instrukcje użytkowania
Használati utasítás
ИнструкциЯ за употреба
Návod k použití
Návod na použitie
Instruc∑iuni de utilizare
Инструкции по эксплуатации
Қолдану бойынша нұсқаулық
Інструкція з експлуатації

A
A
B
A
B
2
3
C
D
4
5
6
7
8
9
14
a
1
b
c
d
g
e
f
g
10
11
12
13
15
16

EN 1
INTENDED USE
This washing machine is exclusively destined to wash
and spin machine washable laundry in quantities
which are usual for private households.
• Observe the instructions given in these Instructions
for Use and the Programme Chart when using the
washing machine
• Keep these Instructions for Use and the
Programme Chart; if you pass on the washing
machine to another person, also give him/her
Instructions for Use and Programme Chart.
SAFETY AND GENERAL RECOMMENDATIONS
1. Safety instructions
• The washing machine is
appropriate for indoor use only.
• Do not store flammable fluids
near the appliance.
• Do not place electrical
appliances on the lid of your
washing machine.
• Children must be supervised to
ensure that they do not play with
the appliance.
• Children younger than 3 years
should be kept away from the
washing machine, unless they
are continuously supervised.
• The washing machine can
be operated by children from
the age of 8 years up, as well
as by people with reduced
physical, sensory or mental
capabilities or lack of experience
and knowledge, provided they
are supervised or instructed
regarding the safe use of the
washing machine and they
understand the dangers resulting
from the use. Children must not
play with the washing machine.
Care and maintenance works on
the washing machine must not
be carried out by children without
being supervised.
• Do not attempt to force the lid
open.
• If necessary, the power cable
may be replaced with an
identical one obtained from our
After-Sales Service. The power
cable must only be replaced by a
qualified technician.
• Before any cleaning or carrying
out maintenance switch off the
washing machine and disconnect
it from the mains supply.
• The ventilation openings in the
base of the washing machine
must not be obstructed by thick
carpet.
2. Packing
• The packaging materials are 100% recyclable
and bear the recycling symbol . Adhere to local
regulations when disposing of packaging material
3. Disposing of packaging and old
washing machines
• This appliance is marked according to the
European directive 2002/96/EC on Waste Electrical
and Electronic Equipment (WEEE). By ensuring
this product is disposed of correctly, you will help
prevent potential negative consquences for the
environment and human health, which could
otherwise be caused by inappropriate waste
handling of this product.
• The symbol on the product, or on the
documents accompanying the product, indicates
that this appliance may not be treated as
household waste. Instead it shall be handed over
to the applicable collection point for the recycling
of electrical and electronic equipment. Disposal
must be carried out in accordance with local
environmental regulations for waste disposal.
For more detailed information about treatment,
recovery and recycling of this product, please
contact your local city office, your household waste
disposal service or the shop where you purchased
the product.
• The washing machine is built from reusable
materials. It must be disposed of in compliance
with current local waste disposal regulations.
• Before scrapping, remove all detergent residues
and cut off the power cable so that the washing
machine is made unusable.
4. General recommendations
• Do not leave the washing machine connected
when not in use. Turn off the tap.

EN 2
5. EC Declaration of Conformity
• This washing machine has been designed,
constructed and distributed in compliance
with the safety requirements of EC Directives:
2006/95/EC Low Voltage Directive 2004/108/EC
Electromagnetic Compatibility Directive
The Manufacturer is not liable for any damage to
laundry resulting from inadequate or incorrect fabric
care instructions which have been provided with the
garment or article.
BEFORE USING THE WASHING MACHINE
1. Remove the packaging and check
a. Cut and remove the shrink-wrap.
b. Remove the top protection and the protective
corners.
c. Remove the bottom protection by tilting and
turning the washing machine on one rear
bottom corner. Make sure that the plastic part
of the bottom protection (if available on the
model) remains in the packing and not in the
machine bottom.
This is important, as otherwise the plastic part could
damage the washing machine during operation.
d. Open the lid by pressing it slightly down while
raising the handle. Remove the polystyrene
cushion (depending on model).
e. Remove the blue protective film from the panel
(depending on model).
• After unpacking, make sure that the washing
machine is undamaged. If in doubt, do not use the
washing machine. Contact After-Sales Service or
your local retailer.
• Keep the packaging materials (plastic bags,
polystyrene parts, etc.) out of reach of children;
they are potentially dangerous.
• If the appliance was exposed to the cold prior to
delivery, keep it at room temperature for a few
hours before operating.
2. Remove the transport bracket
• The washing machine is fitted with transport
screws and a transport bracket to prevent damage
during transport. Before using the washing
machine you must remove the transport
bracket (see “Installation”/“Removal of transport
bracket”).
3. Install the washing machine
• Place the washing machine on a flat and stable
floor surface.
• Adjust the feet to ensure that the machine is
stable and level (see “Installation”/“Adjust the
feet”).
• In case of wooden or so-called “floating floors” (for
instance certain parquet or laminate floors), place
the appliance on a sheet of plywood with a size of
at least 40 x 60 cm and thickness of at least 3 cm,
which is screwed to the floor.
• Make sure that the ventilation openings in the
base of your washing machine (if available on your
model) are not obstructed by a carpet or other
material.
4. Water supply
• Connect the water supply inlet hose in accordance
with the regulations of your local water company
(see “Installation”/“Connect the water inlet hose”).
• Water supply: Cold water only
• Tap: 3/4” threaded hose connection
• Pressure: 100-1000 kPa (1-10 bar).
• Only use new hoses for connecting the washing
machine to the water supply. Used hoses must not
be used anymore and should be discarded.
5. Drain hose
• Firmly connect the drain hose to the siphon or
another outlet for drain water. (see “Installation”/
Connect the water drain hose”).
• If the washing machine is connected to a built-in
drainage system, ensure the latter is equipped with
a vent to avoid simultaneous loading and draining
of water (siphoning effect).
6. Electrical connection
• Electrical connections must be carried out by a
qualified technician in compliance with the manu-
facturer’s instructions and the current standard
safety regulations.
• The technical data (voltage, power and fuses) are
given on the rating plate on the rear of the washing
machine.
• Do not use extension leads or multi sockets.
• Access to the mains plug or disconnection from
the mains supply via a double-pole switch must be
ensured at all times after the installation.
• Do not operate the washing machine if it has been
damaged during transport. Inform the After-Sales
Service.
• Mains cable replacement is only to be carried out
by After-Sales Service.
• The washing machine must be connected exclu-
sively by means of a socket with an earth connec-
tion, in compliance with the regulations in force. In
particular, washing machines installed in premises
containing a shower or a bath must be protected
by a differential residual current device of at least
30 mA. Earthing the washing machine is obliga-
tory under the law. The manufacturer declines all
liability for injury to persons or animals or damage
to property deriving either directly or indirectly from
failure to observe the directions in these Instruc-
tions for Use.
• When using a residual current circuit breaker
(RCCB), only use a model marked with .
Approximate dimensions:
Width: 400 mm
Height: 900 mm
Depth: 600 mm

EN 3
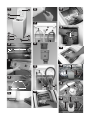
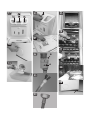
DESCRIPTION OF THE WASHING MACHINE (picture 1)
a. Lid
b. Detergent dispenser
c. Drum
d. Pump access behind filter
e. After-Sales Service sticker (behind the filter cover)
f. Mobility lever (depending on model). To move the
washing machine: pull the handle out a little bit by
hand and pull it out to the stop with the foot.
g. Adjustable feet
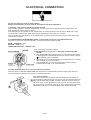
INSTALLATION
Removal of transport bracket
The washing machine is fitted with a transport bracket
to avoid any possible damage during transport.
IMPORTANT: Before using the washing machine,
the transport bracket at the back MUST be
removed.
1. Unscrew the two screws “A” and the four screws
“B” with a flat screwdriver or a No. 8 hex nut box
spanner (picture 2).
2. Remove the transport bracket (picture 3).
3. Replace the four outer screws “B” on the machine
and tighten them (picture 2).
4. Clip the two covers “C” supplied into the openings
“D” of the washing machine (picture 4).
Note: do not forget to replace and tighten the four
outer screws.
Adjust the feet (picture 5, 6)
Install the washing machine on a level surface, near
to electrical, water and drain connections.
If the floor is uneven, adjust the feet (do not insert
pieces of wood, cardboard etc. under the feet):
1. Screw out the washing machine´s feet by hand
with 2-3 clockwise turns and then slacken the
locknut by wrench.
2. Adjust the height of the feet by hand.
3. Retighten the locknut by turning it anti-clockwise
towards the washing machine’s bottom.
Make sure that the feet are resting correctly on the
floor and that the washing machine is perfectly
level and stable (use a spirit level).
The washing machine can be installed in an area 40
cm wide and 63 cm deep.
Note: if you install the machine on thick carpet, adjust
the feet to ensure that there is sufficient space under
the machine for the air to circulate.
Connect the water inlet hose (picture 7)
1. Carefully screw the water inlet hose to the valve
on the rear side of the washing machine (A); screw
the other end of the hose to the tap by hand.
2. Make sure there are no kinks in the hose.
3. Check water-tightness of tap and washing machine
connections by turning the tap completely on.
• If the hose is too short, replace it with a suitable
length of pressure resistant hose (1000 kPa min,
EN 61770 approved type).
• If you need a longer waterstop hose, contact our
After Sales Service or your dealer.
• Check the inlet hose regularly for brittleness and
cracks and replace if necessary.
• The washing machine can be connected without a
backflow valve.
Water stop anti-flooding system (picture 8)
(if available)
• Screw the hose to the water supply tap. Turn the
tap fully on and check the water-tightness of the
connection.
• The washing machine must not be connected to
the mixing tap of a non-pressurized water heater!
• Do not immerse the water stop device of the hose
into water; otherwise it will loose its protective
function.
• If the flexible hose is damaged, unplug the washing
machine from the mains immediately, turn off the
tap and replace the hose.
• If the flexible hose is too short, replace it with a 3
m Water Stop hose (available from After-Sales
Service or from your dealer).
Connect the water drain hose (picture 9)
Unhook the drain hose from the left clip, see arrow
“A” on picture.
Important:
Do NOT loosen the drain hose from the right con-
nection, see arrow “B” on picture. Otherwise, there
is the risk of leakage and of scalding with hot water.
Firmly connect the drain hose to the siphon or another
outlet for drain water.
If you need to add an extension, use a flexible hose
of the same size and secure the unions with screw-on
hose clips.
Maximum overall drain hose length: 2.50 m.
Maximum drain height: 100 cm.
Minimum drain height: 55 cm.
Important:
Make sure there are no kinks in the drain hose and
take precautions against it falling while the washing
machine is running.

EN 4
Do not use extension leads or multi sockets.
Electrical connections must be made in accordance with local regulations.
1) Warning - this washing machine must be earthed
This washing machine is normally supplied with a mains lead having a plug fitted in the factory which has
been checked for correct earth continuity.
If the fitted plug is not suitable for your socket outlet, or if the machine’s mains lead is not fitted with a plug,
you should fit a suitable new, good quality plug by following the instructions in (2) below.
Any unsuitable plug should be cut off and disposed of in order to avoid a possible shock hazard should it be
inserted into a socket.
2) CONNECTION TO A REWIRABLE PLUG - to be carried out only by a qualified electrician
The wires in the mains lead are coloured in accordance with the following code:
BLUE - “NEUTRAL” (“N”)
BROWN - “LIVE” (“L”)
GREEN AND YELLOW - “EARTH” (“E”)
To fit a new plug, proceed as follows:
2.1)Polarized Plugs (e.g. 3 pin, 13 amp plug conforming to BS
1363A)
a. The GREEN AND YELLOW wire must be connected to the terminal
in the plug which is marked with the letter “E” or by the Earth symbol
or coloured green and yellow.
b. The BLUE wire must be connected to the terminal which is marked
with the letter “N” or coloured blue.
c. The BROWN wire must be connected to the terminal which is
marked with the letter “L” or coloured brown.
2.2) Non-polarized plugs (e.g. 2 pin with side earth contact)
The wire which is coloured GREEN AND YELLOW must be connected to the earth contact. The other two
wires should be connected to the two pins, irrespective of colour.
FUSE REPLACEMENT
If the mains lead of this washing machine is fitted with a BS 1363A 13
amp fused plug, replace the fuse only with an A.S.T.A. approved type con-
forming to BS 1362 and proceed as follows: Remove the fuse cover (A)
and the fuse (B). Fit the replacement 13 A fuse into the fuse cover. Refit
both into the plug. For all other types of plug, the supply socket should be
protected by a 16 A fuse or circuit breaker at the distribution board.
ELECTRICAL CONNECTION

EN 5
BEFORE THE FIRST WASH CYCLE
To remove any residual water used in testing by the
manufacturer, we recommend that you carry out a
short wash cycle without laundry.
1. Open the tap.
2. Close the drum flaps.
3. Add a small amount of detergent (maximum
1/3 of the quantity the detergent manufacturer
recommends for lightly soiled laundry) to the main
wash chamber of the detergent dispenser.
4. Close the lid.
5. Select and start programme “Synthetics” at 60°C
(see separate the programme chart).
PREPARATION OF THE LAUNDRY
Sort the laundry
1. Sort the laundry according to…
• Type of fabric / care label symbol
Cottons, mixed fibres, easy care/synthetics, wool,
handwash items.
• Colour
Separate whites and coloureds. Wash new
coloured items separately.
• Size
Wash items of different sizes in the same load to
improve washing efficiency and distribution in the
drum.
• Fabric delicacy
Wash delicate articles separately: use a special
programme for Pure New Wool , curtains and
other delicates. Always remove curtain glides or
wash curtains with the glides inside a cotton bag.
Use the special programme for handwash fabrics.
Wash stockings, belts and other small items or
articles with hooks (e.g. bras) in special cotton
bags for washing machines or in zipped pillow
cases.
2. Empty pockets
Coins, safety pins and similar items can damage
your laundry as well as the washing machine’s
drum and tub.
3. Fasteners
Close zips and fasten buttons or hooks; loose belts
or ribbons should be tied together.
Stain remwoval
• Blood, milk, egg and other organic substances are
generally removed by the enzyme phase of the
programme.
• To remove red wine, coffee, tea, grass and
fruitstains etc. add a stain remover to the main
wash chamber of the detergent dispenser.
• Particularly stubborn stains should be treated
before the wash.
Dyeing and bleaching
• Only use dyes and bleaches that are suitable
forwashing machines.
• Follow the manufacturer’s instructions.
• Plastic and rubber parts of the machine may be
stained by dyes or bleaches.
Loading the laundry
1. Open the machine lid by pulling it upwards.
2. Open the drum
- by pushing the drum flap release (picture 10,11);
models as shown on picture 10 have a fixed
drum flap release which will not compress when
pushed.
- by holding the rear drum flap, sliding back the
slider into arrow direction and pushing the front
flap towards the inside of the drum until the
closing mechanism releases (picture 12).
3. Place the items of laundry into the drum one by
one. Do not exceed the maximum load of the
programmes indicated in the separate programme
chart.
- Overloading the machine will result in
unsatisfactory washing results and creased
laundry.
- Take care that the laundry does not overhang the
drum; if this is the case, push the laundry down
into the drum so that there is enough free space
to close the drum flaps properly.
- Do not use the flaps to push the laundry into the
drum.
4. To close the drum, hold both flaps in the middle
again (picture 13), the rear flap over the front flap.
ATTENTION: make sure that the drum flaps are
properly locked - depending on the model:
- all metal hooks must be properly hooked inside
the rear door flap - see picture 14.
- all metal hooks must be properly hooked inside
the rear door flap, and the button must overlap
the edge of the rear door flap see picture 15.
- the slider of the front flap must slightly overlap
the rear flap - see picture 16.
Check that no laundry gets stuck between the flaps,
or between flaps and drum.

EN 6
DETERGENTS AND ADDITIVES
Keep detergents and additives in a safe, dry
place out of the reach of children.
Do not use any solvents (e.g. turpentine,
benzene); do not machine wash fabrics that
have been treated with solvents or flammable
liquids.
Only use detergents and/or additives that are
specifically produced for domestic washing
machines. Observe the recommendations on the
care labels of your laundry.
The choice of detergent depends on:
• Type of fabric
• Colour
• Recommended wash temperature
• Degree and type of soiling
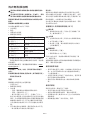
Laundry type Kind of detergent
White robust laundry
(cold-95°C):
heavy duty detergents with
bleach
White delicate laundry
(cold-40°C):
mild detergents with bleach
and/or optical brighteners
Light /pastel- shaded
colours (cold-60°C):
detergents with bleach and/
or optical brighteners
Intensive colours
(cold-60°C):
colour detergents without
bleach/optical brighteners
Black/dark
colours(cold-60°C):
special detergents for black/
dark laundry
For laundry requiring special treatment (e.g. wool
or microfibers), we recommend to use specialized
detergents, additives or pre-treatment available on the
market. Refer to internet link www.cleanright.eu for
more detailed information.
Do not use liquid detergent for the main wash
when having activated the “Prewash” option.
Do not use liquid detergent when selecting a
later cycle start / cycle end (depending on the
model).
Dosage
Follow the dosage recommendations on the detergent
pack. They depend on:
• degree and type of soiling
• size of wash
- full load: follow the detergent manufacturer’s
instructions;
- half load: 3/4 the amount used for a full load;
- minimum load (about 1 kg): half the amount used
for a full load
If there is no reference to a certain wash load on
the detergent pack: the detergent manufacturers
usually refer their dosing recommendations to 4.5
kg laundry for heavy duty detergent and 2.5 kg
laundry for delicate detergent.
• water hardness in your area (ask for information
from your water company). Soft water requires less
detergent than hard water.
Please note:
Too much detergent can result in excess foam
formation, which reduces washing efficiency. If the
washing machine detects too much foam, it may
prevent spinning, or prolong the programme duration
and increase the water consumption (see also
remarks on foam formation in the “Troubleshooting
Guide”). Insufficient detergent may result in grey
laundry and also calcifies the heating system, drum
and hoses.
Where to put detergents and additives
(picture 17)
Prewash chamber
• Detergent for the prewash phase (only if you
have activated “prewash” option)
Main wash chamber
• Detergent for the main wash phase (must be
added for all wash programmes)
• Additive for stain removal (optional)
• Water softener (optional; recommendable for
water hardness class 4 or more)
Softener chamber
• Fabric softener (optional)
• Starch dissolved in water (optional)
Do not exceed the “MAX” level mark when filling in
detergent, additives or softener.
For more information regarding the application of
detergent and fabric softener in the programmes,
have a look at the separate program chart.
Using chlorine bleach
• Wash your laundry in the desired programme
(Cotton, Synthetics), adding an appropriate amount
of chlorine bleach to the SOFTENER chamber
(close the lid carefully).
• Immediately after end of programme, start the
“Rinse and Spin” programme to eliminate any
residual bleach smell; if you want, you can add
softener.
• Never put both chlorine bleach and softener into
the softener chamber at the same time.
Using starch powder
• Wash your laundry in the desired wash
programme.
• Prepare the starch solution according to the starch
manufacturer’s instructions.
• Fill the prepared starch solution (maximum 100
ml) into the softener chamber of the detergent
dispenser.
• Close the lid and start programme “Rinse and
Spin”.

EN 7
CLEANING THE FILTER/ DRAINING RESIDUAL WATER
The washing machine is provided with a self-cleaning
pump. The filter keeps objects like buttons, coins,
safetypins etc. which have been left in the laundry.
We recommend to check and clean the filter regularly,
at least two or three times a year.
Especially:
• if the appliance is not draining properly or if it fails
to perform spin cycles.
• if the “Pump” indication lights up.
IMPORTANT: make sure the water has cooled
before draining the appliance.
Residual water must be drained also before transport-
ing the machine.
1. Unplug the washing machine.
2. Open the filter cover with a coin (picture 18).
3. Place a bowl beneath it.
4. Turn the filter slowly anti-clockwise until some
water starts to flow out; do not remove it as yet.
5. Wait until all the water has drained.
6. Now unscrew the filter completely and extract it
(picture 19).
7. Clean the filter and the filter chamber.
8. Make sure the pump impeller (in the housing
behind the filter) is not obstructed.
9. Insert the filter again and screw it in
completely in clockwise direction. Make
sure the filter is screwed in properly, as far
as it will go.
10. Pour approximately one litre of water into the
washing machine via the drum and check that
water does not leak from the filter.
11. Close the filter cover.
12. Reconnect the washing machine.
CARE AND MAINTENANCE
Always unplug the washing machine before doing any maintenance.
Detergent dispenser
Clean the detergent dispenser regularly, at least
three or four times a year, to prevent detergent
build-up:
1. Press the button to release the detergent dispenser
and remove it (picture 20). A small quantity of
water can remain in the dispenser, thus you should
carry it in an upright position.
2. Wash the dispenser using running water. You can
also remove the siphon cap on the back of the
dispenser for cleaning (picture 21).
3. Replace the siphon cap in the dispenser (if
removed)
4. Reinstall the dispenser by locating the dispenser’s
bottom tabs into the appropriate openings on the
lid, and by pushing the dispenser against the lid
until it locks into place.
Make sure that the detergent dispenser is
correctly reinstalled.
Water inlet hose filter
Check and clean regularly (at least two or three
times a year).
1. Unplug the washing machine.
2. Turn off the tap.
3. Unscrew the hose from the tap.
4. Carefully clean the filter located at the end of hose,
without disassembling it, for example with a tooth-
brush.
Note: Do not submerge the hose in water.
5. Screw the flexible hose back onto the tap by hand.
Do not use pliers (risk of squashing the joint).
6. Turn on the tap and check that the connections
are water-tight.
7. Plug the washing machine back in.
Water inlet hose
(picture 22, 23 or 24, depending on model)
Check the inlet hose regularly for brittleness and
cracks and replace it if necessary using a new hose of
the same type.
The inlet hose as shown on picture 22 has a safety
valve to prevent the appliance against uncontrolled
water inlet; if the safety valve inspection window (A) is
red, the safety valve has been activated and the hose
must be exchanged. Contact out After-Sales Service
or your specialist dealer to obtain a new inlet hose.
For unscrewing the inlet hose as shown on picture 22,
you must push down the release lever (B) (if available)
while unscrewing it.
If your inlet hose has a transparent hose coating
(picture 23), periodically check the colour of the
transparent coating. If the transparent hose shows a
local dark colour change, this is an indication that the
hose may have a leak and should be replaced.
Contact our After-Sales Service team or specialist
dealer to obtain a replacement hose.
Appliance exterior and control panel
• Clean with a soft damp cloth.
• If necessary, use some soapy water or a mild
neutral detergent (do not use detergents containing
solvents, abrasive detergents, window or general-
purpose cleaners - they may harm the surfaces).
Appliance interior
• After each washing, leave the lid open for some-
time to allow the inside of the appliance to dry.
• If you never or seldom wash your laundry at
95°C, we recommend to occasionally run a 95°C
programme without laundry, adding a small amount
of detergent, to keep the interior of the appliance
clean.
Lid seal
• Check the condition of the lid seal periodically and
clean it from time to time with a damp cloth.

EN 8
Water inlet hose(s)
• Check the hose regularly for brittleness and cracks.
Replace if necessary.
Filter
• Check and clean the filter regularly, at least 3 or
4 times a year (see “Cleaning the Filter/ Draining
Residual Water”).
Do not use flammable fluids for cleaning the
appliance.
Recovering an object that falls between
the drumand the tub
If an object accidentally falls between the drum and
the tub, you can recover it thanks to one of the remov-
able drum blades:
1. Unplug the washing machine.
2. Remove the laundry from the drum.
3. Close the drum flaps and turn the drum a
half-turn (picture 25).
4. Using a screw-driver, press on the plastic end while
sliding the blade from left to right (picture 26, 27).
5. It will fall into the drum.
6. Open the drum: you can recover the object
through the hole in the drum.
7. Refit the blade from inside the drum: Position the
plastic tip above the hole on the right side of the
drum (picture 28).
8. Then slide the plastic blade from right to left until
it clips.
9. Close the drum flaps again, turn the drum through
half a turn and check the positioning of the blade at
all its anchorage points.
10. Plug the washing machine in again.
REMAINING MOISTURE CONTENT OF THE LAUNDRY
AFTER SPINNING
The degree of moisture remaining in the laundry
after spinning mainly depends on the fabric type, the
selected programme and spin speed.
The lowest remaining moisture content can be
achieved using the wash programme referred to by
the Energy Label, with maximum spin speed. This
programme is marked in the separate programme
chart as “Reference programme for the Energy Label”.
Below a survey of the remaining moisture content
(in %) related to the various spin-drying efficiency
classes:
TRANSPORT AND HANDLING (picture 29)
1. Unplug the washing machine.
2. Turn off the tap.
3. Remove the water supply and drain hose.
4. Eliminate all water from the hoses and the washing
machine (see “Cleaning the Filter/ Draining
Residual Water”). Wait for the water to cool so as to
avoid any accidents.
5. To facilitate moving the machine, pull the handle
situated at the bottom front (if available on your
model) out a little by hand and pull it out to the stop
with the foot. Afterwards push the handle back into
the original stable position.
6. Fix the transport bracket again for transportation.
7. Transport the washing machine upright.
IMPORTANT: Do not use the washing machine while
the handle is pulled out.
AFTER-SALES SERVICE
Before contacting After-Sales Service:
1. Try to remedy the problem yourself (see
“Troubleshooting Guide”).
2. Restart the programme to check whether the
problem has solved itself.
3. If the washing machine continues to function
incorrectly, call After-Sales Service.
Specify:
• The nature of the problem.
• The exact model of the washing machine.
• The service code (number after the word
SERVICE).
The After-Sales Service sticker is situated
behind the filter cover or on the rear of the
machine.
• Your full address.
• Your telephone number and area code. As a
priority, you should contact the After-Sales Service
of the retailer who supplied you with the washing
machine.
Manufacturer:
Whirlpool Europe s.r.l.
Viale Guido Borghi 27
21025 Comerio (VA)
Italy
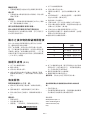
Spin-drying efficiency
class
Remaining moisture
content in %
A (= most efficient) less than 45
B 45 or more, but less than 54
C 54 or more, but less than 63
D 63 or more, but less than 72
E 72 or more, but less than 81

EN 9
TROUBLESHOOTING GUIDE
Your washing machine is equipped with automatic safety functions which detect and diagnose faults at an early
stage and allow you to react appropriately. These faults are frequently so minor that they can be removed within
a few minutes.
Problem Causes - Solutions - Tips
Appliance does not start,
no indicator lamps are on
• Plug is not properly inserted in socket.
• Socket or fuse does not function correctly (use a table lamp or similar
appliance to test it).
• The washing machine switched off automatically to save energy, before
programme start or after programme end. To switch on the washing
machine, turn the programme selector first to “Off/O” and then to the
desired programme again.
Appliance does not start
although “Start(Pause)”
has been pressed
• Lid is not properly closed.
• The “Child lock” function has been activated (if available on your
model). To unlock the buttons, push temperature and spin speed button
simultaneously and hold them at least for 3 seconds. The key symbol on
the display disappears and the programme can be started.
Appliance stops during the
programme, and the
“Start(Pause)” light blinks
• “Rinse hold” option is activated (if available on your model) - terminate
“Rinse hold” by pressing “Start(Pause)” or by choosing and starting
“Drain”.
• Programme has been changed - reselect desired programme and press
Start(Pause)”.
• Programme has been interrupted and eventually lid has been opened -
close lid and restart programme by pressing “Start(Pause)”.
• The appliance’s safety system has been activated (see “Description of
failure indicators”).
• Water tap is not opened or water inlet hose is kinked (“Water tap closed”
indicator lights up).
Detergent dispenser
contains residues from
detergent/additives at end
of wash
• Detergent dispenser is not properly installed, or detergent dispenser is
blocked (see “Care and Maintenance”).
• Filter in the water inlet hose is blocked (see “Care and Maintenance”).
Appliance vibrates during
spin cycle
• Washing machine is not level; the feet are not properly adjusted (see
“Installation”).
• The transport bracket has not been removed; before using the washing
machine, the transport bracket must be removed.
Final spin results are poor
• Unbalance during spinning prevented spin phase to protect the washing
machine (see “Unbalance during spinning”).
• Excessive foam formation prevented spinning; select and start “Rinse &
Spin” programme. Avoid excessive detergent dosing (see “Detergents
And Additives”).
• “Spin” button has been set to a low spin speed.
“Unbalance during spinning”
The “Spin/Drain” indicator
in the programme flow bar
blinks, or the spin speed on
the display blinks, or the spin
speed indicator blinks after
the end of the programme
(depending on the model).
The laundry is still very wet.
Unbalance of the laundry load during spinning prevented the spin phase
to avoid damages on the washing machine. This is why the laundry is still
very wet.
Reason for unbalance can be: small laundry loads (consisting of only few
quite big or absorbent items, e.g. towels), or big/heavy laundry items.
• If possible avoid small laundry loads.
• It is highly recommended that you add other laundry items of different
sizes when washing a big or heavy piece of laundry.
If you want to spin the wet laundry, add more laundry items of different
sizes, and subsequently select and start the “Rinse & Spin” programme.
Programme duration is
considerably longer or
shorter as indicated in the
“programme chart” or on
the display (if available)
Normal function of the washing machine to adapt to factors that can have
an effect on the programme duration, like excessive foam formation, load
unbalance due to heavy laundry items, prolonged heating time resulting
from low inlet water temperature etc.. Moreover, the sensing system of the
washing machine adapts the programme duration to the size of the wash
load.
Depending on these factors, the duration is recalculated during the
programme and updated if necessary; during such periods, an animation
appears on the display (if available). For small loads, the programme
time indicated in the “programme chart” may be reduced by up to 50%.

EN 10
Failure indicator
lights up
Indication on display
(if available)
Description - Causes - Solutions
“Service”
“bdd”
(in case your washing
machine has no display:
all lamps of the
programme flow bar light
up)
Appliance stops during the programme. “Drum flaps
open” (the drum flaps have not been closed properly).
Push the “Reset” button for at least 3 seconds and wait
until the “Door open” lights up. Open lid and close
drum flaps, then select and start desired programme
again. If fault persists, notify our After-Sales Service.
from “F02” to “F35”
(except “F09”)
“Electrical module fault”.
Select and start “Drain” programme or push “Reset”
button for at least 3 seconds.
“F09”
“Water level too high” (after programme cancellation or
false operating). Switch off appliance and then switch it
on again, select programme “Drain” and start within 15
sec.
“FA”
“Waterstop fault”
Switch off appliance, pull out mains plug and turn water
tap off. Tilt appliance forward carefully to allow collected
water to flow out from the bottom. Then:
• Plug in the appliance again.
• Turn the water tap on (if water immediately flows into
the appliance without the appliance being started,
there is a failure; turn off the tap and notify After-Sales
Service).
• Select and start the desired programme again.
“Fod”
“Overfoaming”
Too much foam interrupted the wash programme.
• Select and start “Rinse & Spin” programme.
• Afterwards select and start desired programme again,
using less detergent.
If faults persist, unplug the appliance, turn off the water
tap and contact our After-Sales Service
“Water tap
closed” −
Appliance has no or insufficient water supply. The “Start
(Pause)” light blinks. Check whether:
• Water tap is fully open and water supply pressure is
sufficient.
• Kinks are present in water inlet hose.
• Mesh filter of water supply hose is blocked (see “Care
and Maintenance”).
• Water hose is frozen up.
• Safety valve inspection window of your water supply
hose is red (provided your appliance has a water
supply hose as shown on picture 22 - see previous
chapter “Care and Maintenance”); replace the hose by
a new one available through our After-Sales Service or
your specialist dealer.
After problem has been removed, restart programme
by pressing “Start (Pause)”. If the fault occurs again,
contact our After-Sales Service.
“Clean pump”
−
Waste water is not pumped out. The appliance stops in
the corresponding programme step; unplug it and check
whether:
• Kinks are present in the drain hose.
• Filter or pump is blocked (see chapter “Cleaning the
Filter/ Draining Residual Water”; make sure the water
has cooled before draining the appliance).
• The drain hose is frozen up.
After problem has been removed, select and start “Drain”
programme or push “Reset” button for at least 3 seconds;
afterwards restart desired programme. If the fault occurs
again, contact our After-Sales-Service.
Description of failure indicators
If your washing machine has no display, check which of the previously described situations could be
the origin of the fault and follow the corresponding instructions.
F - 11/2014

ZT 1
預期用途
本洗衣機的設計只適用於私人家庭數量的可機洗衣
物的清洗和脫水。
• 使用洗衣機時,請遵守使用指示和程序圖表中
的說明。
• 請妥善保管本使用指示和程序圖表;若您將洗衣
機轉讓給別人,請連同本使用指示和程序圖表一
同交付給他/她。.
預防措施及一般建議
1. 安全指示
• 本洗衣機僅適合於室內使
用。
• 請勿在機器附近存放易燃液
體。
• 切勿將電子設備放置在洗衣
機的蓋子上。
• 兒童必須在監管下使用,以
保證他們不會玩耍洗衣機。
• 除非得到持續監護,否則3
歲以下兒童應遠離洗衣機。
• 對於8歲以上的兒童以及體
能、感官或心理能力存在缺
陷的或缺乏經驗和知識的人
員,如果給他們提供洗衣機
的相關使用說明並且他們明
白使用洗衣機可能導致的危
險,那麼他們就可以操作該
洗衣機。
勿讓兒童玩弄洗衣機。切勿
讓兒童在無監管的情況下對
洗衣機進行保養和維護。
• 請勿試圖強行打開機蓋。
• 若有必要,可使用售後服
務中心相同的電源線進行更
換。電源線必須由合格的技
工進行更換。
• 執行任何清潔工作或保養本
機之前,請關機並拔下電源
插頭。
2. 包裝
• 包裝材料為百分之百可回收利用,並標有回收符
號 。處置包裝材料時,請遵循當地規定。
3. 處置包裝材料和舊洗衣機
• 本洗衣機依照有關廢棄電氣和電子設備(WEEE)
的歐盟標準2002/96/EC標示。確定以正確的方
式廢棄本產品,可幫助避免不當的廢棄處理方式
對環境和人體健康造成潛在的負面影響。
• 產品或與產品隨附的文件上的符號 標示不可
將本設備當作家用廢棄物處理。應將它送到回收
電器和電子設備的適當收集處。如需有關處理、
修復或回收本產品的詳細資料,請聯絡您當地的
辦事處、家用廢棄物服務中心或是您購買本產品
的商店。
• 本洗衣機是由可再循環使用的材質製成。處理本
洗衣機的廢棄物時,必須依照當地現行廢棄物的
法規規定。
• 要廢棄洗衣機前,請先排走殘留的洗衣劑和切斷
電源線,令洗衣機變得無法使用。
4. 一般建議
• 不使用洗衣機時,請勿連接電源。關閉水龍頭。
5. 符合 EC 標準聲明
• 本洗衣機的設計、製造和銷售均符合EC指令的
安全要求:2006/95/EC低電壓指令2004/108/
EC電磁相容性指令
製造廠商對於因為服裝或說明文件所提供的衣料護
理指示不足或不正確而導致任何的衣物損毀不承擔
任何責任。

ZT 2
使用洗衣機之前
1. 拆除包裝並檢查
a. 剪開並拆除收縮膠膜。
b.拆除護頂和護邊材料。
c. 將洗衣機往其中一個底角傾斜並轉動和拆除護底
材料。確定護底材料(視乎機型而定)的塑膠部
份仍然保留在包裝中而不是在洗衣機底部。
這非常重要,否則塑膠部份會在操作期間損毀洗
衣機。
d.提起把手時輕按頂蓋將它打開。拆除聚苯乙烯墊
(視乎機型而定)。
e. 拆除控制板上的藍色保護膠薄膜(視乎機型而
定)。
• 拆除包裝後,確定洗衣機無損。如有疑問,請
勿使用洗衣機。請聯絡售後服務中心或當地經
銷商。
• 包裝材料(塑膠袋、聚苯乙烯部件等)可能會對
兒童造成危險,應存放在兒童無法觸及的地方。
• 若機器在發貨前被放置在寒冷的地方,請在運行
機器之前讓機器置於室溫下數小時。
2. 拆除搬運托板
• 本機配有搬運螺絲和搬運托板,可以防止在搬運
時造成損毀。使用洗衣機之前,您必須拆除搬運
托板。 (請參閱「安裝」/「拆除搬運托板」)。
3. 安裝洗衣機
• 將本機安裝於堅固平穩的地面上。
• 調整機腳,確保洗衣機穩固及水平(參閱「安
裝」/「調整機腳」)。
• 若是木質或所謂的「浮動地面」(例如某些木
質或薄板地面),請將設備放在一塊大小為40
x60cm,厚度至少3cm並鎖緊到地面的的夾
板上。
• 確定洗衣機底座的通風孔(若有)沒有被地毯或
其他材料阻塞。
4. 水源
• 根據當地供水公司的規定連接水管(參閱「安裝/
連接進水管」)。
• 水源:僅用冷水
• 水龍頭:3/4英吋螺紋供水管接頭
• 水壓:100至1000kPa(1至10巴)。
• 僅使用新的水管將洗衣機連接到水源。切勿再使
用用過的水管且應將它丟棄。
5. 排水管
• 將排水管牢固連接到虹吸管或其他排水口。(請
參閱「安裝」/「連接排水管」)。
• 若將洗衣機連接到內建排水系統,請確定該系
統配有排水口,以避免同時進水和排水(虹吸
效應)。
6. 電源連接
• 電源連接必須由持證技工遵循製造廠商指示和現
行的標準安全法規執行。
• 技術資料(電壓、耗電量及保險絲)標明在機背
銘牌上。
• 請勿使用延長線或多頭插座。
• 安裝後必須確保能隨時透過雙極開關連接電源插
座或切斷電源。
• 若洗衣機在搬運過程中受損,請勿操作洗衣機。
請通知售後服務中心。
• 只能由售後服務中心更換電纜。
• 本機必須透過接地符合現行法規的插座來連接電
源。尤其是當洗衣機安裝在住宅內淋浴間時,必
須有30毫安以上的差動剩餘電流裝置保護。依
法規定洗衣機必須安裝接地裝置。製造廠商對於
因為不遵循這些使用指示而直接或間接導致人身
或動物的傷害或財產損失不承擔任何責任。
• 使用剩餘電流斷路器(RCCB)時,僅使用標有
的機型。
近似尺寸:
寬度: 400mm
高度: 900mm
厚度: 600mm

ZT 3
洗衣機圖解
(圖 1)
a. 機蓋
b. 洗衣劑格
c. 洗衣槽
d. 從過濾器後方存取的泵
e. 售後服務標籤(位於過濾器蓋後方)
f. 活動桿(視乎機型而定)。若要移動洗衣機:
用手將把手稍微拉出,再用腳將洗衣機拉到停
止位置。
g. 可調機腳
安裝
拆除搬運托板
本洗衣機配備搬運托板,以防搬運時造成任何可能
的損毀。
重要事項:使用洗衣機之前,必須拆除搬運托板。
1. 用一字起子或8號內六角螺母板手,轉開兩顆螺
絲「A」和四顆螺絲「B」。(圖2)
2. 拆除搬運托板。(圖3)
3. 更換洗衣機上的四個外螺絲「B」並轉緊。(圖 2)
4. 將隨附的兩個密封蓋「C」,夾在洗衣機的開口
「D」處。(圖 4)
附註:請不要忘記裝回並轉緊四顆外部螺絲。
調整機腳(圖5, 6)
將洗衣機安裝在平穩的表面上,並靠近電源、水源
和排水連接。
若地板不平坦,可調整機腳(請勿在機腳下插入木
片、紙板等):
1. 用手按順時針方向轉動2-3圈將洗衣機的機腳轉
出,然後用扳鉗鬆開螺母。
2. 用手調整機腳高度。
3. 按逆時針方向朝洗衣機底部轉動以重新鎖緊螺
母。
請確定所有的機腳都平穩站立地面上,而且洗衣機
完全處於水平和穩定狀態(可使用水平儀測量)。
洗衣機可以安裝在40公分寬和63公分深的位置。
附註:若您在厚地毯上安裝洗衣機,請調整機腳,
以確保洗衣機底下有足夠的空間讓空氣流通。
連接進水管 (圖7)
1. 用手小心將進水管轉緊到洗衣機背面的閥門(
「A」)上;將水管的另一端)轉緊到水龍頭
上。
2. 確定水管沒有扭結。
3. 完全打開水龍頭,檢查水龍頭和洗衣機的連接位
是否漏水。
• 若水管太短,可用一條長度適合的耐高壓水管替
代(1000千帕以上,EN61770。
• 若您需要更長的防溢水管,請聯絡本公司的售後
服務中心或您的經銷商。
• 定期檢查進水管是否有脆裂和裂縫,必要時更
換。
• 連接洗衣機時可以不使用回流閥。
止水防溢系統 (圖 8) -視乎機型而定
• 將水管轉緊到供水水龍頭。完全打開水龍頭,檢
查連接位是否會漏水。
• 切勿將洗衣機連接到非耐壓熱水器的混合水龍
頭!
• 請勿將水管的防溢裝置浸在水中;否則,它將會
失去保護功能。
• 若伸縮水管已損毀,請立即拔下洗衣機電源插
頭,關閉水龍頭然後更換水管。
• 若伸縮水管過熱,請更換成3公尺的防溢水管(
可從售後服務中心或經銷商處購得)。
連接排水管 (圖 9)
將排水管從左邊的夾子取下,請參閱圖中的「A」
箭頭。
重要事項:
切勿鬆開右側排水管連接,請參閱圖中的「B」箭
頭。否則,可能會有漏水及熱水燙傷的危險。
將排水管牢固連接到虹吸管或其他排水口。
若您需要延長排水管,請使用相同大小的伸縮水
管,並用有螺絲的管箍鎖緊。
排水管最大總長度:2.50公尺
排水管最大高度:100公分
排水管最小高度:55公分
重要事項:
請確定排水管沒有扭結,並在洗衣機運轉時,小心
預防水管掉落。

ZT 4
第一次洗衣之前
為了清除製造廠商在測試洗衣機時遺留的積水,我
們建議您執行一次空機的短洗衣程序。
1. 轉開水龍頭。
2. 關上洗衣槽門扣。
3. 在洗衣機盒的主洗格內加入少量洗衣劑 (不
要超過洗衣劑製造廠商對於輕微骯臟衣物建議用
量的1/3)。
4. 關閉頂蓋。
5. 选择並執行「合成纤维60°C」程序(請參閱個
別的程序圖表)。
洗衣準備
分類衣物
1. 衣物分類如下...
• 衣料類型/護理標籤符號
棉、混紡、免燙/合成纖維、羊毛、手洗衣物。
• 顔色
請將白色衣物與顔色衣物分開,並將簇新的顔色
衣物分開清洗。
• 衣物大小
不同大小的衣物放在一起清洗時,可改善洗衣及
脫水的效率,並可使衣物在洗衣槽內的分佈更為
均勻。
• 纖幼衣物
請將纖幼衣物分開清洗:使用特別程序清洗純羊
毛衣物(PureNewWool) 、窗簾和其他纖幼
衣物。清洗窗簾時,務必將掛鉤取下或以棉袋套
起來清洗。使用特別程序清洗手洗衣物。洗滌襪
子、腰帶等小物件或如胸罩等帶鉤衣物時,請放
入洗衣機專用的棉袋或有拉鏈的枕頭套內清洗。
2. 清空衣物口袋
銀幣、別針等物品會損毀衣物、洗衣槽及洗衣
桶。
3. 將衣物扣好、繫緊
在洗衣前請將衣物的拉鏈拉上、扣好鉤或扣,並
將鬆開的腰帶及絲帶繫在一起。
除漬
• 由血漬、牛奶、雞蛋及其他有機物所留下的污
漬,一般而言,可在酵素的作用下自然分解。
• 若要清除紅酒、咖啡、茶、草或水果等所留下
的污漬 ,請在洗衣劑格的主洗格內加入去
污劑。
• 頑強污漬應在洗衣之前事先處理。
染色及漂白
• 請僅使用適合洗衣機的染色劑和漂白劑。
• 遵循製造廠商的指示。
• 洗衣機的塑膠和橡膠部件可能會被染色劑或漂白
劑染污。
放入要洗的衣物
1. 向上拉洗衣機的機蓋以將它打開。
2. 打開洗衣槽
- 透過按下洗衣槽門扣釋放鈕圖「10, 11」;圖
「10」上顯示的機型具有按下時不會壓縮的固
定洗衣槽門扣釋放鈕)
- 透過按住後方洗衣槽門扣,將滑桿向後滑入箭
頭方向,然後將前方門扣朝向洗衣槽的內部按
下直到關閉機制釋放(圖 12)
3. 將衣物逐件放入洗衣槽。請勿放入超過個別程序
圖表中標明的最大洗衣量。
-裝入過量衣物將導致洗衣效果不理想並使衣物
起皺。
-小心防止衣物懸掛在洗衣槽上;若出現此情
況,將衣物拉下放入洗衣槽,以便有足夠的自
由空間關閉洗衣槽門扣。
-請勿使用門扣將衣物拉入洗衣槽。
4. T若要關閉洗衣槽,請再次按住中間的兩個門扣
(圖「13」),使後方門扣在前方門扣上。
注意事項:請確定洗衣槽門扣正確鎖定–視乎機
型而定:
- 所有的金屬鉤必須正確鉤入後方門扣內-請參
閱圖「14」。.
- 所有的金屬鉤必須正確鉤入後方門扣內,而
底部必須與後方門扣的邊緣重疊-請參閱圖
「15」。
- 前方門扣的滑桿必須稍為重疊後方門扣-請參
閱圖「16」。
檢查並確定衣物沒有夾在門扣之間,或門扣與洗衣
槽之間。

ZT 5
洗衣劑和添加劑
請將洗衣劑和添加劑放置在乾燥並遠離兒童的
地方。
切勿使用任何溶劑(如鬆節油、汽油等);請勿
使用洗衣機清洗泡過溶劑或易燃液體的衣物。
請僅使用專為家用洗衣機而製造的洗衣劑和/或添
加劑。
請遵循衣物護理標籤上的建議
洗衣劑的選擇取決於以下因素:
• 衣料類型
• 顏色
• 建議的洗衣溫度
• 骯髒程度和類型
衣物類型 洗衣劑類型
白色堅固衣物(冷
水-95°C):
強力洗衣劑加漂白劑
白色纖幼衣物(冷
水-40°C):
溫和洗衣劑加漂白劑和/或
光鮮劑
淺色/柔和陰影色彩
(冷水-60°C):
洗衣劑加漂白劑和/或光
鮮劑
強烈顏色(冷
水-60°C):
顏色衣物洗衣劑,不加漂
白劑/光鮮劑。
黑色/深色(冷
水-60°C):
黑色/深色衣物的特殊洗
衣劑
對於需要特殊處理的衣物(例如羊毛或超細纖維)
,我們建議使用市場上銷售的專用洗衣劑、添加劑
或前處理。
如需更詳細的資訊,請瀏覽網際網路連結:www.
cleanright.eu。
若您啟動了「預洗」功能,請勿使用洗衣液進行
主洗。
若選擇延遲的程序啟動/程序結束(視乎機型而定)
,請勿使用洗衣液。
用量
請遵循洗衣劑包裝上的建議用量
。它們取決於:
• 骯髒程度和類型
• 洗衣量
- 全量:請遵循洗衣劑製造廠商的指示。
- 半量:全量的四分之三;
- 最少洗衣量(約1公斤):全量的二分之一
對於洗衣劑包裝上沒有提供參考之特定洗衣量的
說明:洗衣劑製造廠商提供的用量建議通常將極
端骯髒衣物參照4.5公斤洗衣量的洗衣劑用量,
以及將纖幼衣物參照2.5公斤洗衣量的洗衣劑用
量。
• 您所處地區的水質硬度(請洽詢您的供水公司)
。軟水較硬水所需的洗衣劑用量少。
請注意:
過多的洗衣劑會形成過多的泡沫並降低洗衣效率。
如洗衣機測出泡沫過多,將會阻止脫水運行,或延
長洗衣程序持續時間和增加耗水量(另請參閱「故
障排除指南」中有關形成泡沫的備註)。
洗衣劑不足會造成衣物變灰並造成加熱系統、滾筒
和水管形成水垢。
在哪裡注入洗衣劑和添加劑 (圖 17)
預洗室
• 預洗階段的洗衣液(只有在您已經啟動「預
洗」選項的情況下)
主洗室
• 主洗階段的洗衣液(所有洗衣方案都要新增)
• 去汙添加劑(可選)
• 軟水劑(可選;當水硬度等級達到4級或以
上時推薦使用)
柔軟劑室
• 織物柔軟劑(可選)
• 漿粉溶解在水中(可選)
所加入的洗衣液、添加劑或柔軟劑不得超過「最
大」標記符號。
欲瞭解更多有關洗衣液和織物柔軟劑使用相關程式
資訊,請參考程式框圖。
使用含氯漂白劑
• 使用所需的程序(棉質、合成纖維)清洗您的衣
物,在SOFTENER格中加入適量的氯漂白劑(
小心關閉機蓋)。
• 在程序完畢後立即執行「過水和脫水」程序來清
除任何殘留的漂白劑氣味。
• 請勿同時在柔軟劑格內加入含氯漂白劑和柔軟
劑。
使用衣漿粉
若使用衣漿粉,請執行以下步驟:
• 使用所需的洗衣程序清洗您的衣物。
• 依照衣漿製造廠商的指示,攪拌衣漿溶液。
• 將溶解的衣漿(最多100ml)注入洗衣劑格的
柔軟劑格。
• 關閉機蓋並啟動「洗衣及脫水」程序。

ZT 6
清潔過濾器/排出積水
洗衣機備有自我清潔的泵。過濾器會收集如鈕扣、
銀幣、別針等遺留在洗滌衣物中的物品。
我們建議每年至少定期檢查和清潔
過濾器兩至三次。
特別是發生以下情況時:
• 若洗衣機無法正常排水或不能脫水。
• 若「清潔過濾器」指示燈亮起:
重要事項:排出洗衣機內的積水之前,請確定水
已冷卻。
搬運洗衣機之前也必須將積水排出。
1. 拔下洗衣機電源插頭。
2. 用一枚銀幣打開過濾器蓋。(圖 18).
3. 在過濾器下放一個碗。
4. 按照逆時針方向慢慢旋轉篩過濾器直到有水
開始流出;當時不要拆除它。
5. 等待所有的水排出。
6. 現在將過濾器完全轉鬆並拉出。(圖19).
7. 清潔過濾器和過濾器格。
8. 確定排水泵葉輪(位於過濾器後方的遮罩
中)沒有堵塞。
9. 再次插入過濾器,按照順時針方向將其完全
擰緊。確認過濾器安裝正確,否則它會掉下
來。
10. 將大約一公升清水通過洗衣槽倒入洗衣機,
並檢查水是否會從過濾器漏出。
11. 關閉過濾器蓋。
12. 重新連接洗衣機電源插頭。
保養和維護
執行任何維護操作之前,請始終先拔下電源插頭。
洗衣劑格
每年至少定期清潔洗衣劑格三或四次,以防止洗衣
劑積聚。
1. 下按鈕釋放洗衣液分配器,將其拆除(圖20)
。分配器中可能會殘留少量的水,因此,移動
時,需要將其保持直立狀態。
2. 洗臉用自來水的飲水機。清潔時,您可能還需要
拆下分配器背面的虹吸蓋(圖 21).
3. 更換分配器上的虹吸管蓋(如需拆除)。
4. 將分配器頂部接頭插入蓋子上合適的開口裏,
重新安裝分配器,將分配器推向蓋子,直至鎖
定到位。
附註:請確定正確裝回洗衣劑格。
進水管過濾器
定期檢查並清潔(每年至少兩到三次)。
1. 拔下洗衣機電源插頭。
2. 關閉水龍頭。
3. 從水龍頭上轉鬆水管。
4. 請小心清潔水管末端的過濾器,例如使用牙刷,
但無須拆解。
附註:請勿將水管浸沒在水中。
5. 用手將伸縮水管轉回水龍頭。請勿使用鉗子(避
免壓壞接頭)。
6. 打開水龍頭並確定各連接位均完全不漏水。
7. 重新插回洗衣機電源插頭。
進水管(22、23 或 24 - 視乎機型而定)
定期檢查進水管是否脆弱和出現裂縫,並在必要時
用相同類型的新水管進行更換。
圖「22」顯示的進水管具有一個安全閥(A),可防
止進水失控;若安全閥觀察窗內出現紅色指示燈,
則表示安全閥已打開並且必須更換水管。請聯絡本
公司的售後服務中心或您的專業經銷商獲取新的進
水管。
若要如圖「22」所示轉鬆進水管,您必須在轉鬆時
按下釋放桿(B - 若有)。
若您的進水管具有透明的水管塗層(圖「23」),
請定期檢查透明塗層的顔色。若透明水管顯示局部
深色變化,即表示水管可能有漏洞並且應該更換。
請聯絡我們的售后服務中心或您的經銷商來獲得替
換水管。
洗衣機外部和控制板
• 請用柔軟的濕布清潔。
• 若有需要,可使用一些肥皂水或溫和的中性清
潔劑(請勿使用含有溶劑的清潔劑、腐蝕性的清
潔劑、窗口或通用清潔劑,它們會傷害洗衣機的
表面)。
洗衣機內部
• 每次洗衣之後,請將洗衣機蓋打開一段時間,讓
洗衣機內部乾燥。
• 若您從未或很少用95°C的水來清洗您的衣物,
建議您偶爾空機進行95°C的洗衣程序,並倒入
少量的清潔劑,以保持洗衣機內部清潔。

ZT 7
機蓋密封墊
• 定期檢查機蓋密封墊的狀況並偶爾用濕布清潔。
進水管
• 定期檢查進水管是否脆弱和出現裂縫。若有必要
請進行更換。
過濾器
• 每年至少定期檢查和清潔過濾器三或四次(請參
閱「清潔過濾器/排出積水」)。
請勿使用易燃液體來清潔本設備。
取出掉落在洗衣槽和洗衣桶之間的物品
若物品意外掉入洗衣槽和洗衣桶間,您可以利用可
拆式活門將物品取出:
1. 拔下洗衣機電源插頭
2. 從洗衣槽中取出衣物。
3. C關閉洗衣槽叩門,並將洗衣槽轉動半圈。(圖
25)
4. U使用螺絲起子,一邊按住塑膠頂,一邊將槳葉
從左向右滑動。(圖 26, 27)
5. 物品會掉入洗衣槽內。
6. 打開洗衣槽:您可以從洗衣槽的孔中取出物品。
7. 從洗衣槽內重新放置槳葉:將塑膠尖端放置在洗
衣槽右方孔的頂端。(圖 28)
8. 然後從右向左滑動塑膠槳葉直到卡入定位。
9. 再次關閉洗衣槽門扣,轉動洗衣槽半圈,並檢查
槳葉在所有固定點的位置。
10. 重新插回洗衣機電源插頭。
脫水之後衣物的保留潮濕程度
脫水之後衣物的保留潮濕程度主要取決於衣料類
型、選擇的程序和脫水轉速。
使用「能源標籤」參照的洗衣程序和最大脫水轉
速,可以實現最低的潮濕程度。此程序在個別的程
序圖表上標記為「能源標籤的參照程序」。以下提
供關於各種不同脫水烘乾效率等級之保留潮濕程度
(以%表示)的調查:
搬運及處理 (圖29)
1. 拔下洗衣機電源插頭。
2. 關閉水龍頭。
3. 拆除供水管和排水管。
4. 排除水管和洗衣機內所有積水(請參閱「清潔
過濾器/排除積水」)。請等待積水冷卻以免意外
發生。
5. 為了方便搬運洗衣機,請用手稍微拉出位於前端
底部的把手(視乎機型而定),再用腳將整個拉
出。完成後將把手推回原處。
6. 重新安裝運輸托板以方便搬運。
7. 搬運時請讓洗衣機保持直立。
重要事項:切勿在拉出把手時使用洗衣機。
售後服務
致電售後服務中心之前,請:
1. 嘗試自行解決問題(請參閱「故障排除指南」
)。
2. 重新啟動程序,檢查問題是否已自行解決。
3. 若洗衣機仍無法正常運作,請聯絡售後服務中
心。
請說明:
• 問題的情況,
• 洗衣機的確切機型。
• 服務碼( 「SERVICE」字樣後面的號碼)。
售後服務標籤位於過濾器蓋的後面或洗衣機的背
面。
• 您的完整地址。
• 您的電話號碼和區域代碼。您應該優先聯絡售買
洗衣機給您的經銷商之售後服務部門。
製造廠商:
Whirlpool Europe s.r.l.
Viale Guido Borghi 27
21025 Comerio (VA)
Italy
脫水烘乾效率等級 以 % 表示的保留潮濕
程度
A(=最高效率) 低於45
B 45或更高,但低於54
C 54或更高,但低於63
D 63或更高,但低於72
E 72或更高,但低於81

ZT 8
故障排除指南
您的洗衣機配備各種自動安全功能,可儘早偵測並診斷故障,讓您執行適當的處理。以下是可在數分鐘內
獲得解決的小問題。
問題 原因 - 解決方法 - 提示
機器無法啟動,指示燈未亮起
• 插頭沒有正確插在插座內。
• 插座或保險絲運作不良(利用臺燈或類似電器進行測試)。
• 為節約能源,程序開始或停止後,洗衣機會自動關機。若需打開洗
衣機,先將程序選擇旋鈕轉到「Off/O」,然後再轉到所需程序即
可。
雖然已按下「Start/Pause」
(開始/暫停),但洗衣機無
法啟動。
• 洗衣機門未正確關閉。
• 啟用了「兒童鎖」功能 (若您的機型配備此功能)。若要解除
鎖定該按鈕,可同時按下溫度和轉速按鈕,然後按住這兩個按鈕至
少3秒。顯示器上的鑰匙符號將會消失並程序可以啟動。
洗衣機在程序執行期間停止,
而且「Start/Pause」(開始/
暫停)指示燈閃爍
• 啟用了「延遲脫水」選項-按下「Start(Pause)」(開始/暫停)或
選擇並啟動「排水」程序以終止「延遲脫水」。
• 程序已變更-重新選擇所需程序並按下「Start(Pause)」(開始/暫
停)。
• 程序被中斷且最終打開機門–關閉機門並按下「Start(Pause)」(開
始/暫停)重新啟動程序。
• 啟用了洗衣機的安全系統(請參閱「故障指示描述」)。
• 水龍頭未打開或進水管扭結(「水龍頭關閉」指示燈亮起)。
洗衣之後,洗衣劑格內含有洗
衣劑/添加劑產品殘餘。
• 洗衣劑格未正確安裝,或洗衣劑格阻塞(請參閱「保養和維護」)。
• 進水管內的過濾器阻塞(請參閱「保養和維護」)。
脫水時機身震動
• 洗衣機不水平;機腳未正確調整(請參閱「安裝」)。
• 尚未拆除搬運托板;使用洗衣機之前,請務必拆除搬運托板。
最終脫水效果不理想
• 脫水期間的不平衡阻止了脫水階段保護洗衣機(請參閱「脫水期間
不平衡」)。
• 過量的泡沫會阻止脫水;選擇並啟動「過水和脫水」程序。避免使用
過量洗衣劑(請參閱「洗衣劑和添加劑」)。
• 將「脫水」按鈕設為低脫水轉速。
「脫水期間不平衡」程序流
程列中的「脫水/排水」指示
燈閃爍,或顯示器上的轉速閃
爍,或轉速指示燈在程序結束
之後閃爍(視乎機型而定)。
衣物仍非常潮濕。
脫水期間衣物量的不平衡阻止了脫水階段以避免損毀洗衣機。這就是衣
物仍非常潮濕的原因。
不平衡的原因包括:小洗衣量(僅包含幾件相當大或吸收性強的物件,
例如毛巾),或大件/沉重的衣物。
• 若有可能,避免小洗衣量。
• 極力建議您在清洗大件或沉重的衣物時,加入其他不同大小的衣物。
若您想要使潮濕衣物脫水,可以加入更多不同大小的衣物,然後選擇並
啟動「過水及脫水」程序。
按照程序圖表或顯示器(若
有)上的指示,程序持續時間
明顯過長或過短
這是洗衣機適應洗衣程序時間可能會受影響的因素的正常能力,例如:
泡沫過多,由於衣物過重而不平衡,由於降低供水溫度而導致加熱時
間延長。洗衣機的感應系統會將程序持續時間調整至適合洗衣裝載的
大小。
由於這些原因的影響,程序時間將會重新計算並在必要時更新;在這期
間,顯示器上會顯示動畫(若有)。對於小洗衣量,「程序圖表」中標
示的程序時間可能會減少高達50%。
ページが読み込まれています...
ページが読み込まれています...
ページが読み込まれています...
ページが読み込まれています...
-
 1
1
-
 2
2
-
 3
3
-
 4
4
-
 5
5
-
 6
6
-
 7
7
-
 8
8
-
 9
9
-
 10
10
-
 11
11
-
 12
12
-
 13
13
-
 14
14
-
 15
15
-
 16
16
-
 17
17
-
 18
18
-
 19
19
-
 20
20
-
 21
21
-
 22
22
-
 23
23
-
 24
24


他の言語で
- English: Whirlpool AWE 7085 N Owner's manual