
A-A’
A-A’
A-A’
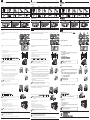
배수펌프 설치방법
부속품
배수펌프 행거플레이트 와이어 홀더 2 배수유연호스1 배수유연호스2
배수호스 단열재 밀봉스폰지 M4 X 10 나사 케이블타이 홀더 와이어 1
제품 타입 구별방법
A Type B Type C Type
배수소켓 및 러버 커버와이어의 위치를 확인하여 구분 하십시오. (이하 동일)
설치방법
1. 그림을 통해 배수소켓의 위치로 제품의 타입을 확인한 후 측면의 나사 2개를 풀어 주십시오.
(C 타입 제외)
A Type B Type C Type
2. 행거 플레이트를 제품 측면에 그림과 같이 나사 3개를 이용하여 고정해 주십시오.
3. 배수펌프 키트의 후크 부분을 그림과 같이 행거 플레이트에 걸고 나사 2개를 이용하여 고정해
주십시오.
4. 다음과 같이 배수호스를 연결 하십시오.
1) 배수호스를 그림과 같이 장착해주십시오. 호스가 소켓에 그림과 같이 들어가도록 삽입하되 한번에
과도한 힘을 주지 않도록 하십시오.
2) 그림과 같이 배수호스가 분리되지 않도록 클램프를 조여 고정해 주십시오.
3) 밀봉스폰지를 사용하여 배수호스를 감싸주십시오.
4) 케이블 타이를 이용하여 배수호스 단열재를 고정해주십시오.
5) ①,②번 연결은 배수 유연호스2를 사용하시고, ③번은 배수 유연호스1을 사용하여 연결하여주십시오.
배수호스 단열재
클램프
배수소켓
펌프
배수호스
케이블타이
③
②
①
5. 그림을 통해 제품의 타입을 확인한 후 배수펌프 연결선 및 플로팅 스위치 연결선을
연결하십시오.
A Type
• 커버를 분리한 후 배수펌프 연결선 및 플로팅 스위치 연결선을 제품 옆의 러버
커버와이어에 통과 시킨 후 각각의 색과 일치하는 단자에 연결하여 주십시오.
B Type
• 커버를 분리 한 후 커버의 러버 커버와이어에 통과 시킨 후 연결선을 연결하여 주십시오.
그림을 참조하여 설치환경과 상황에 맞게 적절한 방법을 선택하여 배수펌프 연결선 및
플로팅 스위치 연결선을 각각의 색과 일치하는 단자에 장착하여 주십시오.
방법 ① : 적절한 도구를 이용하여 연결선 끝을 잡고 연결하십시오.
방법 ② : 단자대가 부착되어 있는 커버를 분리 한 후 연결하십시오.
A Type B/C Type
①
단자대
②
• 배수펌프 연결선은 노란색 단자입니다.
• 플로팅 스위치 연결선은 검은색 단자입니다.
주의
6. 각 타입별로 연결선 장착 후 연결선 정형은 홀더 와이어
①
,
②
를 이용하여 다음의 위치에
고정하십시오.
A Type B Type
②① ②①
7. 실내기 옵션설정에 진입합니다. (SEG8)
배수펌프(SEG8)는 "2" : "사용 + 3분 지연"으로 설정합니다.
C Type
• 옵션은 다음과 같이 정의 합니다.
0 : 미사용 / 1 : 사용 / 2 : 실내기 정지 시 배수펌프 3분간 작동
주의
8. 다음과 같이 누수검사를 하십시오.
1) 전원을 투입하십시오.
2) 실내기 배수판에 2L정도의 물을 그림과 같이 부어주십시오.
3) 냉방운전을 하여 배수펌프가 바르게 작동하는지 확인하십시오.
4) 누수가 발생하였을 경우, 실내기의 수평여부, 배수호스 접속부분, 배수관 연결부분, 배수펌프
연결등이 바르게 되었는지 점검하여 반드시 조치를 취하여 주십시오.
• 배수펌프 설치 완료 후 반드시 배수 시험을 진행하시기 바랍니다.
주의
주의
• 배수펌프 설치는 반드시 설치전문가에 의해 설치되어야 합니다.
• 배수펌프 설치 전 반드시 전원을 차단하여 주십시오.
• 배수펌프는 반드시 당사 제품을 사용해야 합니다.
• 배수펌프 임의 개조로 인한 소비자 클레임에 대해서는 당사가 책임을 지지않습니다.
Installing a drain pump
Components
Drain pump Plate hanger Wire holder 2 Flexible drain hose 1 Flexible drain hose 2
Drain hose insulation Sealing sponge M4 x 10 screw Cable tie Holder wire 1
Verifying product type
A Type B Type C Type
Verify the product type by checking the location of drain socket and rubber wire cover. (The same as below)
Installation
1. After verifying the product type by the location of the drain socket as shown in the picture,
loosen the 2 screws on the side of the product. (Except C Type)
A Type B Type C Type
2. Fix the plate hanger on the side of the product with the 3 screws as shown in the picture.
3. Hang the hooks of the drain pump kit on the plate hanger and then x it with the 2 screws as
shown in the picture.
4. Connect the drain hose as below.
1) Install the drain hose as shown in the picture. Do not apply excessive force when inserting the hose
to the socket.
2) Fix the drain hose with a clamp as shown in the picture to prevent the drain hose from detaching.
3) Wrap the drain hose with a sealing sponge.
4) Fix the drain hose insulation with a cable tie.
5) Use Flexible drain hose 2 to link in place ①,②, use Flexible drain hose 1 in place ③.
Drain hose insulation
Clamp
Drain socket
Pump
Drain hose
Cable tie
③
②
①
5. After verifying the product type by the picture, connect the drain pump connection wire and
oating switch connection wire.
A Type
• After detaching the cover, connect the drain pump connection wire and oating switch
connection wire by passing them through the rubber wire cover on the side of the product.
B Type
• After detaching the cover, connect the wires by passing them through the rubber wire cover
on the cover. Depending on the installation condition, select a correct method to connect
the drain pump connection wire and oating switch connection wire. When connecting the
wires, match the colors between the wires and their corresponding terminals.
Option ① : Pick up the connection wires with a tool and then connect it without detaching
the terminal board.
Option ②: After detaching the terminal board, connect the wires.
A Type B/C Type
①
Terminal board
②
• The color of drain pump connection wire is for yellow terminal.
• The color of oating switch connection wire is black terminal.
Caution
6. After connecting the wires for each product type, arrange and x the wires on the side of the
product with wire holder
①
,
②
as shown in the piture.
A Type B Type
②① ②①
7. Enter the indoor unit option setting stage. Set the drain pump(SEG8) to "2" : "Use + 3 minutes delay".
C Type
• Setting values are described as below.
0 : Disuse / 1 : Use / 2 : Operates the drain pump for 3 minutes when an indoor
unit is turned o
Caution
8. Check for water leakage as below.
1) Turn on the product.
2) Pour about 2 liters of water into the indoor unit drain plate.
3) Check whether the drain pump works correctly by operating cool mode.
4) If water leaks, check whether the indoor unit is installed on level ground and connection of drain
hose, drain pipe, drain pump is correct. If not, proper action should be taken.
• After completing the drain pump installation, drainage test should be
performed.
Caution
Caution
• Drain pump should be installed by a qualied installer.
• Before installing the drain pump, the product should be turned o.
• The drain pump manufactured by Samsung should be used only.
• Manufacturing company is not responsible for the claims caused by the drain pump which is modied at one's own discretion.
排水泵安装方法
配件
排水泵 悬板 接线座 2 排水软管1 排水软管2
排水软管隔热材料 密封海绵 M4 x 10 螺丝 扎带 线卡 1
产品类型区分方法
A 类型 B 类型 C 类型
通过排水接头和橡胶覆盖线的位置来区分。 (下同)
安装方法
1. 如图,通过排水接头的位置确定产品类型后,拧开侧面的两个螺丝。 (C 类型除外)
A 类型 B 类型 C 类型
2. 如图将悬板用三个螺丝固定在产品侧面。
3. 如图所示,将排水泵套件的弯曲处挂在悬板上,用两个螺丝固定。
4. 如下所示,连接好排水软管。
1) 如图所示,安装好排水软管。 如图所示,将软管完全插入接头处,请注意插入时不要一次性用力过猛。
2) 如图所示,以防排水软管脱落,请用卡箍扣紧固定。
3) 用密封海绵包住排水软管。
4) 用扎带将排水软管隔热材料捆绑固定。
5) ①,②处使用排水软管2连接,③处使用排水软管1连接。
排水软管隔热材料
卡箍
排水接头
泵
排水软管
扎带
③
②
①
5. 如图,确定产品类型后,请将排水泵连接线和浮控开关连接线连接。
A 类型
· 将外壳拿掉后,使排水泵连接线和浮控开关连接线穿过产品旁边的橡胶覆盖线,连接到与各自
颜色一致的插口上。
B 类型
· 将外壳拿掉, 穿过橡胶覆盖线,接好连接线。 参考图示,根据不同的安装条件及环境情况,
选择适当的方法,将排水泵连接线和浮控开关连接线连接到与各自颜色一致的插口上。
方法 ① : 用适当的工具拉住连接线的尾部并连接。
方法 ② : 将附着有插口的外壳分离之后连接。
· 排水泵连接线的插口是黄色的。
· 浮控开关连接线的插口是黑色的。
注意
A 类型 B/C 类型
①
插口
②
6. 根据类型安装好连接线后,将连接线固定好,将接线座
①
,
②
固定在下面的位置上。
A 类型 B 类型
②① ②①
7. 进入室内机的选项设定。 (SEG8)
排水泵(SEG8)为 "2" : 设置成"使用 + 3分延迟 "。
· 选项设定如下所示
0 : 未使用 / 1 : 使用 / 2 : 室内机停止时排水泵还将运行3分钟
注意
C 类型
8. 如下所示检查是否漏水。
1) 接通电源。
2) 如图所示,在室内机排水板上倒上 2L 左右的水。
3) 运行冷气,以确认排水泵是否正常运转。
4) 发生漏水时,请检查室内机是否处于水平状态、排水软管的连接处、排水管的连接处、排水泵的连接情
况,以采取相应措施。
· 安装好排水泵后,请务必要进行排水试验。
注意
注意
· 排水泵安装务必在安装专家指导下进行。
· 排水泵安装前务必要切断电源。
· 排水泵务必要使用本公司产品。
· 因随意改装排水泵导致的消费者纠纷,本公司不承担责任。
DB68-04724A-01
KO EN ZH
실
내
기
Indoor
Unit
室
内
机
• 배수호스 연결 시 클램프 장착 부위는 접착제를 사용하지 마십시오.
누수의 원인이 될 수 있습니다.
주의
• Do not use adhesives on the clamp part of drain hose connection.
Otherwise, it may cause water leakage.
Caution
· 连接排水软管时,卡箍固定的部位勿使用粘合剂。
否则会导致漏水。
注意
① ②
① ②
① ②
-
 1
1
