
ENGLISH
Introduction
Congratulations on your purchase and welcome to Philips! To fully
benet from the support that Philips oers, register your product
at www.philips.com/welcome.
This Philips Avance slow juicer helps you to get all the goodness
of fruits and vegetables into your glass, so that you can enjoy tasty
and healthy juices every day. Its innovative technology allows you
to extract up to the maximum of fruits and vegetables and to
quickly clean the appliance in less than 1 minute. The fully
integrated design was developed to take up little space and to
give you great results.
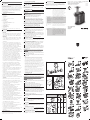
General description (Fig. 1)
A Juicing unit
- 1 Pusher
- 2 Berry tray
- 3 Feeding tube
- 4 Drip stop
- 5 Spout
- 6 Black two-part lter for clear juice
- 7 Juicing screw
- 8 Pulp outlet
B Motor unit
- 9 Locking clamp
- 10 On/o button with power-on light
- 11 Reverse/Pre-clean button
- 12 Mains cord
- 13 Cord storage facility
- 14 Pulp container
- 15 Safety pins
C Jug (HR1891 only)
- 16 Juice jug
Not shown: grey two-part lter for bre juice (HR1891 only)
Important
Read this user manual carefully before you use the appliance
and save it for future reference.
Danger
- Do not immerse the motor unit in water or
any other liquid. Do not rinse it under the
tap and do not clean it in the dishwasher.
Warning
- Check if the voltage indicated on the base
of the appliance corresponds to the local
mains voltage before you connect the
appliance.
- Do not use the appliance if the plug, the
mains cord or other parts are damaged. If
the mains cord is damaged, you must have
it replaced by Philips, a service centre
authorised by Philips or similarly qualied
persons in order to avoid a hazard.
- This appliance is intended for household
use only. If the appliance is used improperly
or for professional or semi-professional
purposes or if it is not used according to the
instructions in the user manual, the
guarantee becomes invalid and Philips
refuses any liability for damage caused.
- This appliance is not intended for use by
persons (including children) with reduced
physical, sensory or mental capabilities, or
lack of experience and knowledge, unless
they have been given supervision or
instruction concerning use of the appliance
by a person responsible for their safety.
- Children should be supervised to ensure
that they do not play with the appliance.
- Keep the appliance and its cord out of the
reach of children.
- Never reach into the feeding tube with your
ngers or an object while the appliance is
operating. Only use the pusher for this
purpose.
- Always disconnect the appliance from the
mains if you leave it unattended or before
you assemble, disassemble or clean it.
- Always unwind the mains cord completely
before you switch on the appliance.
- Never let the appliance operate unattended.
Caution
- Never use any accessories or parts from
other manufacturers or that Philips does
not specically recommend. If you use such
accessories or parts, your guarantee
becomes invalid.
- Always place the appliance on a stable,
level and horizontal surface.
- Do not use the appliance outdoors.
- Avoid contact with moving parts.
- Make sure all parts are assembled properly
before you switch on the appliance.
- Only use the appliance when the locking
clamp is in locked position.
- Only unlock the locking clamp after you
have switched o the appliance and the
juicing screw has stopped rotating.
- Do not remove the pulp container when the
appliance is operating.
- Cut large ingredients into pieces that t into
the feeding tube. Remove stones, cores,
seeds and thick peels from fruits or
vegetables before juicing.
- Do not exert too much pressure on the
pusher to avoid damage.
- Food colouring can discolour parts. This is
normal and has no impact on the
performance of the appliance.
- To optimise the lifetime of the appliance, do
not use it continuously for more than 30
minutes.
Built-in safety lock
The appliance is equipped with a built-in safety lock. The two
safety pins on the motor unit ensure that you can only switch on
the appliance if you have placed the juicing unit and the pulp
container on the motor unit correctly.
Electromagnetic elds (EMF)
This Philips appliance complies with all applicable standards and
regulations regarding exposure to electromagnetic elds.
Before first use
Thoroughly clean all parts before you use the appliance for the
rst time (see chapter ‘Cleaning’).
Note: Make sure all parts are completely dry before you start
using the appliance.
Preparing for use
Assembling the juicing unit
Always unwind the mains cord completely before you switch on
the appliance.
1 Attach the pulp outlet to the juicing unit and turn it
clockwise until the arrow (Á) points to the ‘locked’
indication. (Fig. 2)
2 Insert the juicing screw into the juicing unit (Fig. 3).
3 Assemble the two parts of the lter (Fig. 4).
4 Place the two-part lter over the juicing screw (Fig. 5).
Tip: Use the black two-part filter for clear juice. If you prefer
cloudy juice with more fibres in it, use the grey two-part filter.
5 Attach the spout to the juicing unit and turn it clockwise
until the arrow ( Á) points to the ‘locked’ indication. (Fig. 6)
Important: Do not attach or detach the spout when the juicing
unit is mounted on the motor unit. Always take o the juicing
unit from the motor unit before assembling or disassembling.
6 Place the berry tray on the feeding tube (Fig. 7).
Placing the juicing unit onto the motor unit
1 Place the assembled juicing unit onto the motor unit, with
the pulp outlet tting into the opening on the motor
unit (Fig. 8).
2 Align the projections on the juicing unit with the recesses in
the motor unit. Slide the juicing unit onto the motor unit
until it locks into place. (Fig. 9)
3 Press the juicing unit onto the motor unit (1) and then close
the locking clamp (2). (Fig. 10)
Note: If the locking clamp cannot be closed, check if the juicing
unit is positioned properly with the projections on the juicing
unit into the recesses of the motor unit.
4 Slide the pulp container into the motor unit (Fig. 11).
Using the appliance
The appliance only functions if the juicing unit and the pulp
outlet are assembled correctly and the locking clamp is locked
properly.
1 Wash the fruit and/or vegetables. If necessary, cut them into
pieces that t into the feeding tube.
Note: Remove stones and thick peels of the fruits you would
not eat, for example from oranges, pomegranates etc.
2 Place a jug or a glass under the spout (Fig. 12).
3 Press the on/o button to switch on the appliance (Fig. 13).
4 Put the pieces of fruit or vegetables in the feeding tube and
gently press them down towards the juicing screw with the
pusher (Fig. 14).
Never insert your ngers or an object into the feeding tube or
juicing unit.
5 When the juice ow has stopped, switch o the appliance
and wait until the juicing screw has stopped rotating.
6 Press the pre-clean button to remove the last drops of juice
from the juicing unit (Fig. 15).
7 To prevent juice from dripping onto the table, press the drip
stop (Fig. 16).
Tips
- Use fresh fruit and vegetables, as they contain more juice.
Pineapples, beetroots, celery stalks, apples, cucumbers,
carrots, spinach, melons, tomatoes, pomegranates and
grapes are particularly suitable for processing in the juicer.
- You do not have to remove thin peels or skins. Only remove
peels which you would not eat, e.g. those of oranges,
pineapples, kiwis, melons and uncooked beetroots.
- If you want to juice fruits with stones, such as peaches, plums
or cherries, remove the stones before juicing.
- When you prepare apple juice, remember that the thickness
of the apple juice depends on the kind of apple you use. The
juicier the apple, the thinner the juice. Choose a kind of apple
that produces the type of juice you prefer.
- Apple juice turns brown very quickly. To slow down this
process, add a few drops of lemon juice.
- This juicer can handle starchy fruits such as bananas and
mangoes. You can add milk or water directly through the
feeding tube.
- Citrus fruits can also be processed with the juicer, remove the
white pith of citrus fruits because it has a bitter taste.
Cleaning (Fig. 17)
- The appliance is easier to clean if you do so immediately after
use. Look at the cleaning table to see how all parts can be
cleaned.
Never use scouring pads, abrasive cleaning agents or aggressive
liquids such as alcohol, petrol or acetone to clean the
appliance.
Note: All detachable parts are dishwasher-safe and can be
safely cleaned under the tap.
1 Switch o the appliance and remove the plug from the wall
socket.
2 Open the locking clamp (Fig. 18).
3 Slide the juicing unit o the motor unit (Fig. 19).
4 Remove the pulp container from the motor unit (Fig. 20).
5 Empty the pulp container and rinse it under the tap.
Disassembling and cleaning the juicing unit
1 Remove the pusher from the feeding tube (Fig. 21).
2 Remove the berry tray from the feeding tube (Fig. 22).
3 Turn the juice collector anticlockwise until the arrow ( Á)
points to the ‘open’ indication and remove it from the juicing
unit. (Fig. 23)
4 Remove the two-part lter and disassemble it (Fig. 24).
5 Remove the juicing screw (Fig. 25).
6 Turn the pulp outlet anticlockwise until the arrow ( Á) points
to the ‘open’ indication and remove it from the juicing
unit. (Fig. 26)
Storage
1 Wind the mains cord around the cord storage facility in the
base of the motor unit (Fig. 27).
2 You can store the pusher, the juice jug, and the berry tray in
the pulp container (Fig. 28).
Recycling
Do not throw away the product with the normal household waste
at the end of its life, but hand it in at an ocial collection point
for recycling. By doing this, you help to preserve the
environment.
Ordering accessories
To buy accessories or spare parts, visit www.shop.philips.com/
service or go to your Philips dealer. You can also contact the
Philips Consumer Care Centre in your country.
Guarantee and support
If you need information or support, please visit www.philips.
com/support or read the separate worldwide guarantee leaet.
Troubleshooting
This chapter summarises the most common problems you could
encounter with the appliance. If you are unable to solve the
problem with the information below, visit www.philips.com/
support for a list of frequently asked questions or contact the
Consumer Care Centre in your country.
Problem Solution
The appliance
does not work.
The appliance is equipped with two
safety pins. If either the juicing unit or the
pulp container has not been placed on
the motor unit properly, the appliance
does not work. Check whether these parts
have been assembled in the right way
(see chapter ‘Preparing for use’), but
switch o the appliance before you do so.
The motor unit
gives o an
unpleasant smell
the rst few times
the appliance is
used.
This is not unusual. If the appliance
continues to give o this smell after a few
times, check the quantities you are
processing and the processing time.
The juicing unit
cannot be placed
onto the motor
unit.
Check if the spout is properly attached to
the juicing unit. Make sure that the
projections on the juicing unit are aligned
with the recesses in the motor unit (see
g. 9).
The juicing unit is
blocked.
Press the pre-clean button for a few
seconds. If the juicing unit is still blocked,
then switch o the appliance, remove the
juicing unit and disassemble all parts.
Remove the fruit that is blocking the
juicing unit. Then process a smaller
quantity.
Question?
有疑问?
Contact Philips
请联系飞利浦
HR1890
HR1891
HR1892
Always here to help you/始终如一地为您提供帮助
Register your product and get support at /
请登录以下网址并得到相应的帮助
www.philips.com/welcome
出版日期: 2016-07-19
使用产品前请仔细阅读
本使用说明书
保留备用
1
3
4
A
CB
10
15
11
1213
14
16
9
6 7
8
5
2
1
17
3000 001 04541 C
1
2
2 3 4
5
1
2
6 7
8 9
1
2
10
11 12 13
14 15 16
18
1
2
19 20
21 22
2
1
23
24 25
1
2
26
27 28

繁體中文
簡介
恭
喜您購買本產品並歡迎加入飛利浦!請於
www.philips.com/welcome
註冊您的產品, 以善用飛利浦
提供的支援。 飛利浦
Avance
慢速果菜機可讓您輕鬆榨取所有
蔬果精華, 讓您每天都有健康美味的果汁可以飲用。 本產品
的創新技術能夠充分萃取蔬果汁, 並可快速完成清潔, 不到
1
分鐘就能搞定。 精心研發的完全整合式設計, 不僅佔用空
間小, 效能更是一流。
一般說明
(
圖
1)
A
榨汁裝置
-
1
進料棒
-
2
莓果盤
-
3
進料管
-
4
防漏設計
-
5
壺嘴
-
6
黑色兩件式鮮純果汁濾網
-
7
榨汁螺芯
-
8
果渣出水口
B
馬達座
-
9
鎖定扣夾
-
10
開關按鈕, 附電源指示燈
-
11
反轉
/
預先清潔按鈕
-
12
電源線
-
13
電源線收納裝置
-
14
果渣槽
-
15
安全銷
C
果汁壺
(
僅限
HR1891)
-
16
果汁壺
圖中未顯示 : 灰色兩件式高纖果汁濾網
(
僅限
HR1891)
重要事項
在使用本產品前, 請先仔細閱讀本使用手冊, 並保留使用手
冊以供日後參考。
危險
-
請勿將馬達座浸入水中或其他液體中, 也不要在水龍頭下
沖洗或放入洗碗機清洗。
警示
-
插電之前請先確認本產品所標示的電壓, 是否與本地所使
用的電壓相符。
-
插頭、 電源線或其他零件受損時, 請勿使用本產品。 如
果電源線損壞,必須交由飛利浦、飛利浦授權之服務中心,
或是具備相同資格的人員進行更換, 以免發生危險。
-
本產品僅供家用。 如果不當使用本產品、 作為
(
半
)
專業
用途, 或未依照使用手冊操作, 保固將無效, 且飛利浦
將不擔負任何損壞賠償責任。
-
本產品不適合供下列人士
(
包括孩童
)
使用 : 身體官能或
心智能力退化者, 或是經驗與使用知識缺乏者。 他們需要
有負責其安全的人員在旁監督, 或指示產品的使用方法,
方可使用。
-
請勿讓孩童使用本產品或將本產品當成玩具。
-
請勿讓孩童接觸產品與電線。
-
當本產品在運轉時, 請勿將手指或其他物品伸入進料管。
此時僅可使用進料棒。
-
在無人看顧的情況下, 或在組裝、 拆解與清洗前, 請務
必拔除產品電源。
-
請務必完全拉出電源線後再開啟產品電源。
-
不可在無人看顧的情況下任由產品運作。
警告
-
請勿使用其他製造商的任何配件或零件, 或非飛利浦建議
之配件或零件。 如果您使用此類配件或零件, 保固即會失
效。
-
請將本產品放置在平穩的水平面上。
-
請勿在戶外使用本產品。
-
請避免碰觸運轉中的零件。
-
請在開啟產品電源前, 先確認所有零件皆已正確組裝。
-
請僅於鎖定扣夾位於鎖定位置時再使用本產品。
-
請在產品電源關閉且榨汁螺芯停止旋轉之後, 再鬆開鎖定
扣夾。
-
產品運轉時, 請勿取下果渣槽。
-
將大塊食材切成小塊, 以方便放入進料管。 榨汁前, 請
先為蔬果去除果核、 果心、 果仁、 渣籽及厚皮。
-
用進料棒推送時不要過度用力, 以免受損。
-
食物色素可能會讓零件變色。 這是正常現象, 並不影響產
品的效能。
-
為有效延長產品的使用壽命, 請勿連續使用本產品超過
30
分鐘。
內建安全鎖
本產品內建安全鎖。 馬達座上的兩個安全銷可確保只有在榨汁
裝置與果渣槽已正確放置在馬達座上時, 您才能開啟產品電
源。
電磁波
(EMF)
本飛利浦產品符合所有電磁波暴露的相關適用標準和法規。
第一次使用前
第一次使用本產品時, 請先徹底清潔所有零件
(
請參閱 「清
潔」 單元
)
。
注意 :
請先確認所有零件均已完全乾燥, 然後再開始使用本
產品。
使用前準備
組裝榨汁裝置
請務必完全拉出電源線後再開啟產品電源。
1
將果渣出水口接上榨汁裝置, 並以順時針方向轉動, 直到
箭頭
(
Á
)
指向 「已鎖定」 標示。
(
圖
2)
2
將榨汁螺芯插入榨汁裝置。
(
圖
3)
3
組裝兩個濾網零件。
(
圖
4)
4
將兩件式濾網放到榨汁螺芯上方。
(
圖
5)
提示 :
請使用黑色兩件式鮮純果汁濾網。 如果想要喝到更富
纖維的濃稠果汁, 請使用灰色兩件式濾網。
5
將壺嘴接上榨汁裝置, 並以順時針方向轉動, 直到箭頭
(
Á
)
指向 「已鎖定」 標示。
(
圖
6)
重要 :
當榨汁裝置已經安裝在馬達座上時, 請勿組裝或拆卸
壺嘴。 組裝或拆卸壺嘴前請務必將榨汁裝置從馬達座上取下。
6
將莓果盤放到進料管。
(
圖
7)
將榨汁裝置裝到馬達座
1
請以果渣出水口對準馬達座上的開孔, 將組裝完成的榨汁
裝置裝到馬達座。
(
圖
8)
2
將榨汁裝置的凸出部分對準馬達座上的凹槽, 將榨汁裝置
推入馬達座, 直到卡入定位。
(
圖
9)
3
壓下榨汁裝置以裝上馬達座
(1)
, 然後關上鎖定扣夾
(2)
。
(
圖
10)
注意 :
如果鎖定扣夾無法關上, 請檢查榨汁裝置的凸出部分
是否對準馬達座上的凹槽, 確認榨汁裝置已正確安裝。
4
將果渣槽推入馬達座。
(
圖
11)
使用本產品
唯有在榨汁裝置和果渣出水口均已正確組裝, 且鎖定扣夾已正
確鎖定的情況下, 本產品才會開始運作。
1
請清洗水果和
/
或蔬菜, 並視需要切成可裝入進料管的大
小。
注意 : 將不要食用的水果果核和厚皮去除, 例如柳橙、 石榴
等。
2
將果汁壺或玻璃杯置於壺嘴底下。
(
圖
12)
3
按下開關按鈕, 開啟產品電源。
(
圖
13)
4
將切好的水果或蔬菜放入進料管, 然後使用進料棒輕輕地
將蔬果向下推入榨汁螺芯。
(
圖
14)
請勿將手指或其他物品放入進料管或榨汁裝置。
5
果汁流完後,請關閉產品電源,並等待榨汁螺芯停止旋轉。
6
按下預先清潔按鈕,清除榨汁裝置中所殘留的果汁。
(
圖
15)
7
為避免果汁滴到桌面, 請按下防漏設計。
(
圖
16)
提示
-
請使用新鮮的蔬果,因為新鮮蔬果含有較多的汁液。鳳梨、
甜菜根、 芹菜莖、 蘋果、 黃瓜、 紅蘿蔔、 菠菜、 瓜類、
蕃茄、 石榴和葡萄都特別適合以果菜機來處理。
-
您不需要先去皮。 只需去除無法食用的果皮, 例如柳橙、
鳳梨、 奇異果、 瓜類, 以及沒煮過的甜菜根。
-
如果要為帶有果核的水果榨汁, 例如蜜桃、 梅子或櫻桃,
榨汁前請先去核。
-
在榨取蘋果汁時, 請記得, 蘋果汁的濃度取決於您使用的
蘋果。 蘋果的汁液越豐富, 果汁就越稀。 請按照個人的
果汁濃度喜好來選擇蘋果種類。
-
蘋果汁會很快的氧化成棕色。 您可以在蘋果汁中加入幾滴
檸檬汁, 以便延緩它的氧化速度。
-
這台果菜機能夠處理富含澱粉的水果, 例如香蕉與芒果。
您可以透過進料管直接加入牛奶或水。
-
柑橘類水果也可以使用這台果菜機來處理。 請拿掉柑橘類
水果的白色果皮纖維, 因為纖維帶有苦味。
清潔
(
圖
17)
-
使用後立即清潔, 比較容易將產品清洗乾淨。 請查看清潔
表格, 瞭解如何清潔所有零件。
切勿使用鋼絲絨、 磨蝕性的清潔劑或侵蝕性的液體
(
例如酒
精、 汽油或丙酮
)
清潔本產品。
注意 :
所有可拆卸的零件均可放入洗碗機清洗, 也可放在水
龍頭下安全地清洗。
1
請關閉產品電源, 並將插頭從牆上插座拔下。
2
打開鎖定扣夾。
(
圖
18)
3
將榨汁裝置從馬達座上推出。
(
圖
19)
4
自馬達座拆下果渣槽。
(
圖
20)
5
清空果渣槽, 並置於水龍頭下沖洗。
拆卸並清潔榨汁裝置
1
從進料管取出進料棒。
(
圖
21)
2
從進料管取出莓果盤。
(
圖
22)
3
以逆時針方向轉動果汁壺嘴, 直到箭頭
(
Á
)
指向 「開啟」
標示, 然後將其從榨汁裝置取下。
(
圖
23)
4
取下並拆卸兩件式濾網。
(
圖
24)
5
取下榨汁螺芯。
(
圖
25)
6
以逆時針方向轉動果渣出水口,直到箭頭
(
Á
)
指向 「開啟」
標示, 然後將其從榨汁裝置取下。
(
圖
26)
收納
1
將電源線捲繞在馬達座基座的電源線收納裝置上。
(
圖
27)
2
您可以將進料棒、 果汁壺及莓果盤收納到果渣槽。
(
圖
28)
回收
本產品使用壽命結束時, 請勿與一般家庭廢棄物一併丟棄。
請將該產品送至政府指定的回收點或進行回收。
此舉能為環
保盡一份心力。
訂購配件
若要購買配件或備用零件, 請造訪
www.shop.philips.com/
service
, 或者洽詢您的飛利浦經銷商。 您也可以聯絡您所在
國家
/
地區的飛利浦客戶服務中心。
保固與支援
如果您需要資訊或支援, 請造訪 :
www.philips.com/
support
, 或另行參閱全球保證書。
疑難排解
本單元概述您使用本產品時最常遇到的問題。 如果您無法利
用以下資訊解決您遇到的問題, 請造訪
www.philips.com/
support
, 上面列有常見問題清單, 或聯絡您所在國家
/
地
區的客戶服務中心。
問題 解決方法
本產品無法運作。 本產品附有兩個安全銷。 如果榨汁裝置或
果渣槽未正確放置在馬達座上, 本產品將
無法運作。 請檢查這些零件是否已正確組
裝
(
請參閱 「使用前準備」 單元
)
, 然而
進行這些操作前, 請先將本產品的電源關
閉。
在前幾次使用時, 馬
達座將會散發出異
味。
這是正常現象。 如果果菜機在幾分鐘後仍
舊持續發出這種味道, 請檢查處理的食材
量及處理時間。
榨汁裝置無法裝到馬
達座。
檢查壺嘴是否已正確接上榨汁裝置。 務請
確認榨汁裝置的凸出部分已對準馬達座上的
凹槽
(
見圖
9)
。
榨汁裝置阻塞。 按下預先清潔按鈕數秒鐘。 如果榨汁裝置
依然阻塞, 則關閉產品電源, 取下榨汁裝
置並拆解所有零件, 接著清除阻塞榨汁裝
置的水果, 然後減少處理的食材量。
产品 :飞利浦慢汁机
型号 :HR1891
额定电压 :220V~
额定频率 :50Hz
额定输入功率 :190 W
生产日期 :请见产品本体
产地 :中国广东深圳
飞利浦(中国)投资有限公司
上海市天目西路218号1602-1605
全国顾客服务热线:4008 800 008
本产品根据国标GB4706.1-2005,
GB4706.30-2008, 制造
产品 :飞利浦慢汁机
型号 :HR1890
额定电压 :220V~
额定频率 :50Hz
额定输入功率 :190 W
生产日期 :请见产品本体
产地 :中国广东深圳
飞利浦(中国)投资有限公司
上海市天目西路218号1602-1605
全国顾客服务热线:4008 800 008
本产品根据国标GB4706.1-2005,
GB4706.30-2008, 制造
简体中文
简介
感谢您的惠顾,欢迎光临飞利浦!为了您能充分享受飞利浦提
供的支持,请在
www.philips.com/welcome
上注册您的产
品。这款飞利浦 Avance 慢速榨汁机可帮助您将果蔬的全部
营养成份榨入杯中,让您每天尽享美味健康的果汁。创新技术
让您可以榨取更多的果蔬汁,1 分钟内快速清洁产品。完全集
成设计,占用空间更少,榨汁效果更出色。
基本说明 ( 图 1)
A 榨汁装置
-
1 推杆
-
2 浆果盘
-
3 加料管
-
4 防滴漏按钮
-
5 出汁口
-
6 两段式黑色果汁滤清阀(滤清果汁)
-
7 榨汁螺杆
-
8 果渣出口
B 马达组件
-
9 锁定夹
-
10 带电源指示灯的开关按钮
-
11 反转 / 预清洁按钮
-
12 电源线
-
13 电源线存储装置
-
14 果渣储藏罐
-
15 安全销
C 果汁杯(仅限于 HR1891)
-
16 果汁杯
未显示 :灰色果汁滤清阀(仅限于 HR1891)
注意事项
使用本产品之前,请仔细阅读本使用说明书,并妥善保管以备
日后参考。
危险
-
请勿将马达组件浸入水中或任何其他液体中。请勿在水龙头下
冲洗且请勿用洗碗机清洗。
警告
-
在将产品连接电源之前,请检查产品底部所标电压是否与
当地电源电压相符。
-
如果插头、电源线或其他部件已损坏,请勿使用本产品。如
果电源线已损坏,必须由飞利浦、飞利浦授权的服务中心或
同等资格的专业人员来更换,以免发生危险。
-
本产品仅限于家用。如果本产品使用不当、用于专业或半专
业用途或未按用户手册中的说明进行操作,则本产品的保
修将会失效,并且对于因此而造成的损失,飞利浦拒绝承
担任何责任。
-
产品不建议由有肢体、感官或精神能力缺陷或缺少使用经
验和知识的人(包括儿童)使用,除非有负责他们安全的人
对他们进行与产品使用有关的监督或指导。
-
请照看好儿童,本产品不能用于玩耍。
-
将产品及其线缆放在儿童接触不到的地方。
-
榨汁机运转时,切勿将手指或其它物体伸入加料管。只有
推杆可伸入加料管。
-
产品无人看管时或拆装、清洁之前,务必断开产品电源。
-
务必完全解开电源线后再打开产品。
-
切勿让儿童在无人看管的情况下使用本产品。
注意
-
切勿使用其它制造商生产的或未经飞利浦特别推荐的附件
或部件。如果您使用了此类附件或部件,则本产品的保修将
会失效。
-
本产品一定要放置在稳定、平坦的水平表面上。
-
切勿在室外使用本产品。
-
避免接触活动部件。
-
确保正确组装所有部件后再打开产品。
-
仅当锁定夹处于锁定位置时才能使用产品。
-
只有在关闭产品且榨汁螺杆已经停转之后,才能打开锁定
夹。
-
榨汁机正在运行时,不要将果渣储藏罐拿走。
-
将大块原料切成能放入加料管的小块。榨汁前,去除水果
或蔬菜的硬核、果心、籽和厚皮。
-
按压推杆时不要太过用力,以免损坏。
-
食品的颜色可能会使部件变色。这是正常现象,不会影响
产品的性能。
-
为优化产品的寿命,连续使用时间不要超过 30 分钟。
内置安全锁
产品配有内置式安全锁。马达组件上的两个安全销可确保 :仅
当您将榨汁装置和果渣储藏罐正确置于马达组件上时才能打开
产品。
电磁场 (EMF)
本飞利浦产品符合所有有关暴露于电磁场的适用标准和法规。
首次使用之前
首次使用产品前,请彻底清洁所有部件(请参阅“清洁”一章)。
注意 : 使用本产品之前,确保所有部件都已完全干燥。
使用准备
组装榨汁装置
务必完全解开电源线后再打开产品。
1
将果渣出口安装在榨汁装置上并顺时针转动,直至箭头 (
Á
)
指向“锁定”位置。( 图 2)
2 将榨汁螺杆插入榨汁装置。( 图 3)
3 组装两段式果汁滤清阀。( 图 4)
4 将两段式果汁滤清阀安装在榨汁螺杆上。( 图 5)
提示 :使用黑色两段式果汁滤清阀滤清果汁。如果您喜欢带有
更多纤维的稠果汁,则可使用灰色两段式滤清阀。
5 将出汁口安装在榨汁装置上并顺时针转动,直至箭头 (
Á
) 指
向“锁定”位置。( 图 6)
重要 :当榨汁装置安装在马达组件上时,请不要组装或拆卸出
汁口。组装或拆卸出汁口之前请务必将榨汁装置从马达组件上
取下。
6 将浆果盘安装在加料管上。( 图 7)
将榨汁装置安装在马达组件上
1 将组装好的榨汁装置安装在马达组件上,果渣出口安装在马
达组件的开口上。( 图 8)
2 将榨汁装置上的凸缘与马达组件中的凹槽对准。将榨汁装置
滑至马达组件上,直至其锁定到位。( 图 9)
3 将榨汁装置按到马达组件上 (1),然后合上锁定夹 (2)。( 图 10)
注意 :如果无法合上锁定夹,请检查榨汁装置是否正确放置 :
榨汁装置上的凸缘是否进入马达组件的凹槽。
4 将果渣储藏罐滑入马达组件中。 ( 图 11)
使用本产品
只有榨汁装置和果渣出口均已正确组装且锁定夹已正确锁定,
产品才能工作。
1 将水果和 / 或蔬菜洗净。如有必要,将其切成能放入加料管
的小块。
注意 :取出您不食用的水果果核和厚皮(例如桔子和石榴等水
果的果核和厚皮)。
2 将果汁杯或玻璃杯放在出汁口下方。 ( 图 12)
3 按开 / 关按钮启动产品。 ( 图 13)
4 将小块水果或蔬菜放入加料管中,用推杆轻轻下压至榨汁螺
杆。 ( 图 14)
切勿将手指或物体伸入加料管或榨汁装置中。
5 当汁液不再流出时,关闭产品并等到榨汁螺杆停止旋转。
6 按下预清洁按钮,清除榨汁装置中的最后一滴果汁。 ( 图 15)
7 为防止果汁滴到桌上,请按防滴漏按钮。 ( 图 16)
提示
-
请使用新鲜果蔬,因为其中含有更多汁液。菠萝、甜菜根、
芹菜茎、苹果、黄瓜、胡萝卜、菠菜、瓜类、西红柿、石榴
和葡萄特别适合用榨汁机榨汁。
-
无需去掉薄皮。仅需去掉不可食用的果皮即可,例如橘子皮、
菠萝皮、猕猴 桃皮、瓜 皮以及 生甜菜 根 皮。
-
如果您要对桃、李子或樱桃等带硬核的水果榨汁,请先去除
硬 核 再 榨汁。
-
榨苹果汁时,果汁的稀稠取决于苹果的品种。苹果含的果汁
越多,榨出的果汁越稀。请根据您的喜好选择苹果的品种。
-
苹果汁会很快变黄,若要减缓变黄时间,可滴几滴柠檬汁。
-
本榨汁机可加工香蕉、芒果等富含淀粉的水果。您可以直接
通过加料管加入奶或水。
-
榨汁机也可以加工柑橘类水果,但要将柑橘类水果的白丝需
要去掉,否则会有苦味。
清洁 ( 图 17)
-
如果使用后立即清洁产品,则更容易清洁。查看清洁表可了
解所有部件的清洁方法。
切勿使用钢丝绒、研磨性清洁剂或腐蚀性液体(例如酒精、汽
油或丙酮)来清洁产品。
注意 : 所有可拆卸部件均可用洗碗机清洗,并可放心在水龙头
下清洗。
1 关闭产品并从电源插座上拔下插头。
2 打开锁定夹。( 图 18)
3 将榨汁装置滑出马达组件。( 图 19)
4 从马达组件上取下果渣储藏罐。( 图 20)
5 倒空果渣储藏罐,在水龙头下冲洗。
拆卸并清洁榨汁装置
1 从加料管中取出推杆。( 图 21)
2 从加料管上取下浆果盘。( 图 22)
3
逆时针转动出汁口,直至箭头 (
Á
) 指向 “开”标示,然后将其从
榨汁 装 置上 取下。 ( 图 23)
4 取出两段式果汁滤清阀并将其 拆 开。 ( 图 24)
5 取出榨汁螺杆。( 图 25)
6
逆时针转动果渣出口,直至箭头 (
Á
) 指向“开”标示,然后将其
从榨 汁 装 置 上 取下。 ( 图 26)
存储
1 将电源线缠绕在马达组件底座中的电源线存储装置上。
( 图 27)
2 您可以将推杆、果汁杯和浆果盘存放在果渣储藏罐中。( 图 28)
回收
弃置产品时,请不要将它与一般生活垃圾一同丢弃,应将其交
给官方指定的回收中心。 这样做有利于环保。
订购附件
要购买附件和备件,请访问
www.shop.philips.com/service
或 联系飞利浦经销商。您也可以联系您所在国家 / 地区的飞利
浦客户服务中心。
保修和支持
如果您需要信息或支持,请访问
www.philips.com/support
或阅读单独的全球保修卡。
故障种类和处理方法
本章归纳了使用本产品时最常见的一些问题。如果您无法根据以下
信息解决问题,请访问
www.philips.com/support
查阅常见问题
列表,或联系您所在国家 / 地区的客户服务中心。
问题 解决方法
产品不能工作。 产品配有两个安全销。如果榨汁装置或果
渣储藏罐未正确安装在马达组件上,则产
品不会工作。检查这些部件是否组装正确
(请参阅“使用准备”一章),但检查前要
先关闭产品。
最开始几次使用设备
时,马达组件发出难闻
的气味。
这并非异常现象。如果多次使用后,产品
仍会发出此气味,则检查其加工量和加工
时间。
榨汁装置无法安装到马
达组件上。
检查出汁口是否正确安装在榨汁装置上。
确保榨汁装置上的凸缘与马达组件中的凹
槽对准(请参阅图
9)。
榨汁装置堵塞。 按预清洁按钮,持续几秒钟。如果榨汁装
置仍堵塞,则关闭产品,取下榨汁装置并
拆卸所有部件。取出堵塞榨汁装置的水果,
然后减少加工量。
产品中有害物质的名称及含量
部件名称
有害物质
铅
(Pb) 汞(Hg) 镉(Cd)
六价铬
(Cr VI)
多溴联苯
(PBB)
多溴二苯醚
(PBDE)
榨汁装置 O O O O O O
马达组件 X O O O O O
果汁杯 O O O O O O
本表格依据
SJ/T 11364
的规格编制。
O:
表示该有害物质在该部件所有均质材料中的含量均在
GB/T 26572
规定的限量要求以下。
X:
表示该有害物质至少在该部件的某一均质材料中的含量超出
GB/T 26572
规定的限量要求。
-
 1
1
-
 2
2


他の言語で
- English: Philips HR1890/80 User manual