3
2
1
4
English
Before using, please read this owner’s manual, and
use this product in a safe and proper manner. Par-
ticularly in the case of children and young users, par-
ents or an instructor should teach the children the
proper manner in which to use the device.
PRECAUTIONS
WARNING
If this symbol is ignored and the equipment is used improperly, fatal injury to per-
sons or serious damage could occur.
If this product is used with a hi-hat stand, do not place a stand on a sloping, unstable surface, or on steps.
The stand may overturn or be damaged, resulting in injury.
If this product is used with a hi-hat stand, make sure all bolts are tightened firmly. Also, when adjusting the
height or angle, do not suddenly loosen the bolts. Loose bolts may result in the stand overturning or parts
dropping, causing injury.
Please be careful when children are close to or touching the product. Careless movement around the product
may result in injury.
When setting the product, please pay close attention to the handling and setting of cables. Carelessly placed
cables may cause the user and others to trip and fall.
Do not alter the product. Doing so may result in injury or damage/deterioration to the product.
CAUTION
If this symbol is ignored and the equipment is used improperly, there is a danger
or injury to persons handling the equipment, and material damage could occur.
Do not step on or place heavy objects on the product. It may result in damage.
Do not use or keep the product in places with extremely high temperature (places in direct sunlight, close to
a heater, in a closed car, etc.) or high humidity (bathroom, outside on a rainy day, etc.). Doing so may result
in deformation, discoloration, damage or deterioration.
When cleaning the product, do not use benzine, thinner or alcohol as it may result in discoloration or defor-
mation. Please wipe with a soft cloth or a damp cloth that has been wrung out thoroughly. If the product is
soiled or sticky, use a neutral detergent on a cloth then wipe with a damp cloth that has been wrung out thor-
oughly to remove any remaining detergent. Also pay close attention so as not to let the water and detergent
come into contact with the cushions used in the product; doing so may result in deterioration.
Make sure you hold onto the plug, not the cable, when connecting or disconnecting the cable. Also, never
place any heavy or sharp objects on the cable. Applying excessive force to the cable may result in damage
to the cable, such as the wires being severed, etc.
To prevent against accidents and injury
Please follow the cautions listed below.
Caution (including danger, or warning). This
mark indicates cautions to which you should pay
close attention.
Actions indicated with this icon are prohibited
and should not be attempted.
Deutsch
Bitte lesen Sie vor Gebrauch diese Be-
dienungsanleitung, und verwenden Sie
das Produkt sicher und auf geeignete
Weise. Besonders für Kinder und jünge-
re Anwender sollten die Eltern oder ein
Lehrer den Kindern die richtige Art und
Weise zeigen, in der das Produkt ange-
wendet werden sollte.
VORSICHTSMASSNAHMEN
WARNUNG
Wenn dieses Symbol ignoriert und das Produkt falsch angewendet wird, kön-
nen schwere Personenschäden oder Sachschäden eintreten.
Wenn dieses Produkt mit einem Hi-Hat-Ständer verwendet wird, stellen Sie den Ständer nicht auf eine schie-
fe, unstabile Oberfläche oder auf Stufen usw. Der Ständer könnte umkippen und beschädigt werden und da-
bei Verletzungen verursachen.
Wenn dieses Produkt mit einem Hi-Hat-Ständer verwendet wird, achten Sie darauf, dass alle Bolzen festge-
zogen sind. Wenn Sie Höhe oder Neigungswinkel einstellen, achten Sie darauf, nicht versehentlich die Bol-
zen zu lösen. Lose Bolzen können bewirken, dass der Ständer umfällt und beschädigt wird sowie
Verletzungen verursacht.
Bitte seien Sie vorsichtig, wenn Kinder in der Nähe sind oder das Produkt berühren. Sorglose Bewegungen
in der Nähe des Produkts können Verletzungen verursachen.
Achten Sie beim Einstellen der Pads bitte sorgfältig auf die Handhabung der Kabel und die Kabelführung.
Achtlos platzierte Kabel können dazu führen, dass der Anwender oder Andere stolpern und hinfallen.
Modifizieren Sie das Produkt nicht. Dadurch können Verletzungen auftreten oder das Produkt beschädigt
oder beeinträchtigt werden.
VORSICHT
Wenn dieses Symbol ignoriert und das Produkt falsch angewendet wird, be-
steht Verletzungsgefahr für Personen, die mit dem Produkt umgehen, oder es
können Sachschäden entstehen.
Treten Sie nicht auf das Produkt und stellen Sie keine schweren Gegenstände darauf ab. Dadurch kann das
Produkt beschädigt werden.
Lagern oder verwenden Sie das Produkt nicht an Orten mit extrem hoher Temperatur (in direktem Sonnen-
licht, in Nähe einer Heizung, in einem geschlossenen Fahrzeug usw.) oder hoher Luftfeuchtigkeit (Badezim-
mer, draußen im Regen usw.). Dadurch könnte das Instrument beschädigt, verfärbt, verformt oder sonstwie
beeinträchtigt werden.
Verwenden Sie kein Benzin, Lösemittel oder Alkohol, um das Produkt zu reinigen, da dies zu Verfärbung
oder Verformung führen kann. Bitte wischen Sie das Produkt mit einem weichen oder leicht angefeuchtetem
und gut ausgewrungenem Tuch sauber. Wenn das Produkt stark verschmutzt ist, verwenden Sie ein Tuch
mit einem neutralen Reinigungsmittel, und wischen Sie das Produkt mit einem leicht angefeuchtetem und
gut ausgewrungenem Tuch sauber, so dass kein Reinigungsmittel auf dem Produkt verbleibt. Achten Sie
auch besonders darauf, dass kein Wasser und Reinigungsmittel in Kontakt mit den Kissen des Produkts ge-
rät; dadurch wird das Produkt beeinträchtigt.
Vergewissern Sie sich, dass Sie am Stecker ziehen und nicht am Kabel, wenn Sie dieses anschließen oder
entfernen. Platzieren Sie auch keine schweren oder scharfen Gegenstände auf dem Kabel. Anwendung
übermäßiger Kraft auf das Kabel kann dieses beschädigen, z. B. durchtrennte Leiter usw.
Zur Vorbeugung gegen Unfälle und Verletzungen
Befolgen Sie bitte die unten aufgeführten Vorsichtsmaßnahmen.
Vorsicht (einschließlich Gefahr, oder Warnung). Dieses
Symbol markiert Vorsichtsmaßnahmen, die Sie genau be-
achten sollten.
Aktionen, die mit diesem Symbol versehen sind, sind unzu-
lässig und sollten nicht ausgeführt werden.
Français
Veuillez lire ce mode d’emploi en tout
premier, afin d’utiliser ce produit de ma-
nière correcte et sans danger. Les pa-
rents ou les instructeurs sont invités à
enseigner aux enfants et aux jeunes uti-
lisateurs la manière correcte d’utiliser
cet instrument.
PRÉCAUTIONS D’USAGE
AVERTISSEMENT
Si ce symbole est ignoré et l’équipement utilisé de manière incorrecte, cela
pourra exposer les personnes à des blessures mortelles ou entraîner de gra-
ves dommages.
Si ce produit est utilisé avec un support pour charleston, ne placez pas celui-ci sur une surface inclinée ou
instable ou sur des marches. Le support risque de se renverser ou de s’endommager, en provoquant des
blessures.
Si ce produit est utilisé avec un support pour charleston, vérifiez que tous les boulons sont fermement res-
serrés. Lorsque vous réglez la hauteur ou l’angle, ne desserrez pas brusquement les boulons. Des boulons
desserrés peuvent provoquer le renversement du support ou la chute de pièces, causant des blessures.
Soyez très vigilant avec les enfants lorsqu’ils s’approchent du produit ou cherchent à le toucher. Tout mou-
vement inconsidéré autour du produit risque d’entraîner des blessures.
Lors du réglage des pads, soyez attentif à la manipulation et à la configuration des câbles. Des câbles dis-
posés n’importe comment peuvent provoquer le trébuchement et la chute de l’utilisateur ainsi que d’autres
personnes.
Ne modifiez pas le produit. Cela pourrait l’endommager, le détériorer ou provoquer des blessures.
ATTENTION
Si ce symbole est ignoré et l’équipement utilisé de manière incorrecte, cela
pourra exposer les personnes manipulant l’équipement à des blessures ou
entraîner des dommages matériels.
Ne marchez pas sur le produit et ne placez pas dessus des objets lourds. Cela pourrait l’endommager.
N’utilisez pas et ne conservez pas le produit dans des lieux à température très élevée (à la lumière directe
du soleil, à proximité d’un radiateur ou dans une voiture fermée à clé, etc.) ou à forte humidité (salle de bain,
à l’extérieur par une journée pluvieuse, etc.). Cela pourrait entraîner sa déformation et sa décoloration, et
l’endommager ou le détériorer.
Pour nettoyer le produit, n’utilisez pas de benzène, de diluant ou d’alcool au risque de provoquer sa décolo-
ration ou sa déformation. Essuyez-le avec un chiffon sec et doux ou un tissus humide ayant été très bien
essoré. Si le produit est sale ou collant, nettoyez-le avec un tissus imbibé de détergent neutre puis essuyez-
le avec un chiffon humide ayant été préalablement bien essoré afin d’en retirer toute trace de détergent.
Veillez à ne pas laisser l’eau ou le détergent entrer en contact avec les coussins utilisés dans le produit, car
cela pourrait le détériorer.
Assurez-vous de tenir la prise et non le câble lors de la connexion ou déconnexion du câble. Veillez égale-
ment à ne pas poser sur le câble des objets lourds ou pointus. L’application d’une force excessive sur le
câble peut entraîner des dommages au câble, notamment aux fils.
Pour prévenir les accidents et les blessures
Veuillez respecter les précautions listées ci-dessous.
Attention (y compris danger ou avertissement). Ce symbole
indique les précautions à prendre sérieusement en considé-
ration.
Les actions signalées par cette icône sont interdites et ne
devraient être à aucun moment envisagées.
Português
Antes de usar, leia este manual do proprietário e
use este produto de maneira segura e apropria-
da. Particularmente no caso de crianças e usu-
ário jovens, pais ou um instrutor devem ensinar
a criança a maneira apropriada de usar o dispo-
sitivo.
PRECAUCIONES
ADVERTÊNCIA
Se este símbolo for ignorado e o equipamento for utilizado inadequadamente,
poderão ocorrer ferimentos fatais ou graves danos.
Se este produto for usado com um suporte para chimbal, não coloque um suporte sobre superfícies inclina-
das, instáveis nem com degraus. O suporte pode virar ou ser danificado, causando ferimentos.
Se este produto for usado com um suporte para chimbal, certifique-se de que os parafusos estejam bem
apertados. Além disso, ao ajustar a altura ou o ângulo, não solte repentinamente os parafusos. Soltar os
parafusos pode provocar a queda do suporte ou das peças, causando ferimentos.
Tome cuidado quando houver crianças próximas ou ao tocar o produto. Um movimento descuidado próximo
do produto pode causar ferimentos.
Ao instalar o produto, preste bastante atenção ao manuseio e à disposição dos cabos. Cabos mal colocados
podem provocar tropeços e quedas do usuário e de outras pessoas.
Não altere o produto. Isso pode causar ferimentos ou dano/deterioração do produto.
CUIDADO
Se este símbolo for ignorado e o equipamento for usado indevidamente, as
pessoas estarão sujeitas a perigos ou ferimentos ao manusear o equipamen-
to, podendo ocorrer danos materiais.
Não pise nem coloque objetos pesados sobre o produto. Isso pode danificá-lo.
Não use nem mantenha o produto em locais com temperatura muito alta (sob incidência direta de luz do sol,
próximo a aquecedores, em carros fechados etc.) ou alta umidade (banheiros, ao ar livre em dias chuvosos
etc.). Isso pode causar deformação, descoloração, dano ou deterioração.
Ao limpar o produto, não use benzina, solvente nem álcool, pois esses produtos podem causar descolora-
ção ou deformação. Limpe usando pano macio ou umedecido e bem torcido. Se o produto estiver empoei-
rado ou pegajoso, use um pano com detergente neutro e limpe usando um pano umedecido e bem torcido
para remover resíduos do detergente. Também preste bastante atenção para não permitir que água e de-
tergente entrem em contato com os acolchoamentos usados no produto, pois isso pode causar deteriora-
ção.
Ao conectar ou desconectar o plugue, segure pelo plugue, e não pelo cabo. Além disso, jamais coloque ob-
jetos pesados ou pontiagudos sobre o cabo. A aplicação de força excessiva ao cabo pode danificá-lo; por
exemplo, com o rompimento dos fios etc.
Para evitar acidentes e ferimentos
Siga os cuidados listados abaixo.
Cuidado (inclusive perigo ou advertência). Esta
marca indica cuidados a que você deve prestar mui-
ta atenção.
As ações indicadas com esse ícone são proibidas e
não devem ser tentadas.
* To customers who purchased a Pads Set, please refer to the attached “Accessories List” sheet included
with the Pads Set when confirming package contents.
RHH135: z RHH135 main unit × 1 ( : Main unit × 1, : Clamp base assembly × 1, : Stand base × 1),
x Stereo phone cable × 2, c Cable band × 1 , v Owner’s Manual (this sheet) × 1
* Kunden, die ein Pads-Set erworben haben, beachten bitte das Blatt „Zubehörliste“, das mit dem Pads-Set
geliefert wurde, um den Lieferumfang zu prüfen.
RHH135: z RHH135-Haupteinheit × 1 ( : Haupteinheit × 1, : Klemmen-Einheit × 1, : Standfuß × 1),
x Stereo-Klinkenkabel × 2, c Kabelbinder × 1, v Bedienungsanleitung (dieses Blatt) × 1
* Pour les clients qui achètent un jeu de pads, veuillez consulter la fiche intitulée « Liste des accessoires »
fournie avec ce produit, pour la vérification du contenu de l’emballage.
RHH135: z Unité principale RHH135 × 1 ( : Unité principale × 1, : Embase de pince assemblée × 1,
: Base de support × 1), × Câble stéréo × 2, c Bande de câble × 1,
v Mode d’emploi (cette fiche) × 1
* Para clientes que tenham comprado um conjunto de pads, consulte o folheto anexo “Lista de acessórios”
que o acompanha para confirmar o conteúdo da embalagem.
RHH135: z 1 unidade principal RHH135 ( : 1 unidade principal,
: 1 montagem para a base da braçadeira, : 1 base do suporte), x 2 cabos estereofônicos,
c uma faixa para cabo, v 1 Manual do Proprietário (este folheto)
Package Contents
Lieferumfang
Contenu de l’emballage
Conteúdo da embalagem
a
c
a
b
c
a
b
c
z
c
x
b
a c
Using the two supplied stereo phone cables, connect the RHH135’s output jacks to the input jacks on your DTX
Series Drum Trigger Module.
First, connect the RHH135’s [PAD] output jack to the module’s [HI HAT] input jack, then the RHH135’s [HI-HAT
CONTROL] output jack to the module’s [HI HAT CONTROL] input jack. The L-shaped connectors should be
connected to the RHH135.
* The RHH135 incorporates switches in its edge and controller sections. Make sure that a stereo phone cable
is used when making connections between the RHH135 and the module. The RHH135 will not operate using
a mono phone cable.
Module Settings
The functions that the pad can perform will depend on which of your drum module’s trigger input jacks it is con-
nected to. A chart showing the pad functions available with various input jack types can be accessed from the
web site shown below.
https://download.yamaha.com/
Verbinden Sie mit den zwei beiliegenden Stereo-Klinkenkabeln die Ausgangsbuchsen des RHH135 mit den
Eingangsbuchsen am Drum-Trigger-Modul der DTX-Serie.
Verbinden Sie als erstes die Ausgangsbuchse [PAD] des RHH135 mit der Eingangsbuchse [HI HAT] des Mo-
duls und dann die Ausgangsbuchse [HI-HAT CONTROL] des RHH135 mit der Eingangsbuchse [HI HAT CON-
TROL] des Moduls. Die L-förmigen Anschlüsse sollten an das RHH135 angeschlossen werden.
* Das RHH135 ist am Rand- und Controller-Bereich mit Schaltern ausgestattet. Achten Sie darauf, ein Stereo-
Klinkenkabel zu verwenden, wenn Sie Verbindungen zwischen RHH135 und Modul herstellen. Das RHH135
kann nicht über ein Mono-Klinkenkabel betrieben werden.
Moduleinstellungen
Die Funktionen, die das Pad erfüllen kann, hängen davon ab, an welcher Trigger-Eingangsbuchse des Schlag-
zeugmoduls es angeschlossen ist. Eine Tabelle mit den verfügbaren Pad-Funktionen bei verschiedenen An-
schlussarten ist auf der unten angegebenen Website zu finden.
https://download.yamaha.com/
Servez-vous des deux câbles stéréo fournis pour connecter les prises d’entrée de l’unité RHH135 aux prises
d’entrée de votre système Drum Trigger Module de série DTX.
Connectez d’abord la prise de sortie [PAD] de l’unité RHH135 à la prise d’entrée [HI HAT] du module, puis reliez
la prise de sortie [HI-HAT CONTROL] de l’unité RHH135 à la prise d’entrée [HI HAT CONTROL] du module.
Les connecteurs en L doivent être branchés à l’unité RHH135.
* L’unité RHH135 comprend des commutateurs au niveau de ses sections de périphérie et de contrôleur. As-
surez-vous d’utiliser un câble stéréo lorsque vous effectuez des connexions entre l’unité RHH135 et le mo-
dule. L’unité RHH135 ne fonctionne pas à l’aide d’un câble mono.
Réglages du module
Les fonctions exécutées par le pad varient selon la prise d'entrée de déclenchement à laquelle le module de
batterie est connecté. Vous pouvez accéder au tableau des fonctions de pad disponibles avec les divers types
de prise d'entrée sur le site Web, à l'adresse suivante :
https://download.yamaha.com/
Connections
Anschlüsse und Verbindungen
Connexions
Lors de l’utilisation de l’unité RHH135, si vous rencontrez l’un des problèmes listés ci-dessous, vérifiez d’abord
les points suivants avant de contacter votre revendeur pour solliciter de l’aide.
Aucun son, volume faible
Le pad est-il connecté au numéro d’entrée adéquat du système Drum Trigger Module de série DTX à l’aide
du câble stéréo fourni ? (Reportez-vous à la section « Connexions » ci-dessus). L’unité RHH135 ne fonction-
ne pas lorsqu’un câble mono est utilisé.
Un capteur intégré de pad de cymbale est situé à proximité du logo Yamaha présent sur la surfacesupérieure.
Pour tirer pleinement parti de votre pad, positionnez celui-ci de façon à pouvoir frapper facilement la surface
autour du logo.
Un seul coup produisant plusieurs sons (déclenchement en double)
Veillez à configurer correctement les réglages de rejet sur le modèle Drum Trigger Module de série DTX que
vous utilisez.
La cymbale de charleston ne se ferme correctement que lorsque vous appuyez avec
force sur la pédale du support pour charleston.
Le disque de feutre se trouve-t-il encore sous la base du support ? Essayez de retirer le disque fourni avec
le support pour charleston et réinstallez la base de celui-ci sans le disque. (Reportez-vous à la section
« Configuration ».)
Consultez également le mode d’emploi fourni avec votre système Drum Trigger Module de série DTX pour ob-
tenir plus d’informations sur les problèmes décrits plus haut ainsi que tout autre problème éventuel auquel vous
auriez à faire face. Si aucune solution ne peut être trouvée au problème après consultation des manuels,
contactez le revendeur auprès duquel vous avez acheté le produit.
Se ocorrer o problema a seguir quando o RHH135 for usado, verifique os seguintes pontos antes de solicitar
assistência ao revendedor.
Sem som, volume baixo
O pad está conectado ao número de entrada correto do Módulo acionador de bateria série DTX por meio do
cabo estereofônico fornecido? (Consulte “Conexões” acima.) O RHH135 não funcionará com um cabo mo-
nofônico.
O sensor interno do pad do prato está localizado próximo do logotipo da Yamaha na superfície superior. Para
obter o melhor desempenho do pad, posicione-o de forma que a área em torno do logotipo possa ser facil-
mente atingida.
Uma batida no pad produz vários sons (disparo duplo)
Não se esqueça de definir corretamente as configurações de rejeição no Módulo acionador de bateria série
DTX.
O som do chimbal fechado não sairá, a menos que o pedal do chimbal seja pisado com
força.
A arruela de feltro ainda está sob a base do suporte? Tente remover o feltro que acompanha o suporte para
chimbal e reinstalar a base do suporte sem ele. (Consulte “Instalação”.)
Além disso, consulte o Manual do Proprietário que acompanha o Módulo acionador de bateria série DTX para
obter mais informações a respeito dos problemas descritos acima e de outros problemas que talvez você esteja
enfrentando. Se não encontrar uma solução para o problema após consultar os manuais, entre em contato com
o revendedor de quem você comprou o produto.
Résolution des problèmes
Solução de problemas
Before setting up the RHH135, prepare a hi-hat stand (Yamaha HS series stands, etc.), then follow the proce-
dures below to set up the RHH135.
Make sure the stand is set up in a stable and secure manner. If the clamp bolts, etc. are not tightened
securely, the pad or stand can fall over causing injury. Also, placing the rack or stand on an unstable
surface, etc., can cause the pad or stand to fall over, resulting in injury.
NOTE: Since hi-hat stands made by other manufacturers may not be compatible with the RHH135, we rec-
ommend that a Yamaha hi-hat stand be used. (Recommended: HS650A, HS740A)
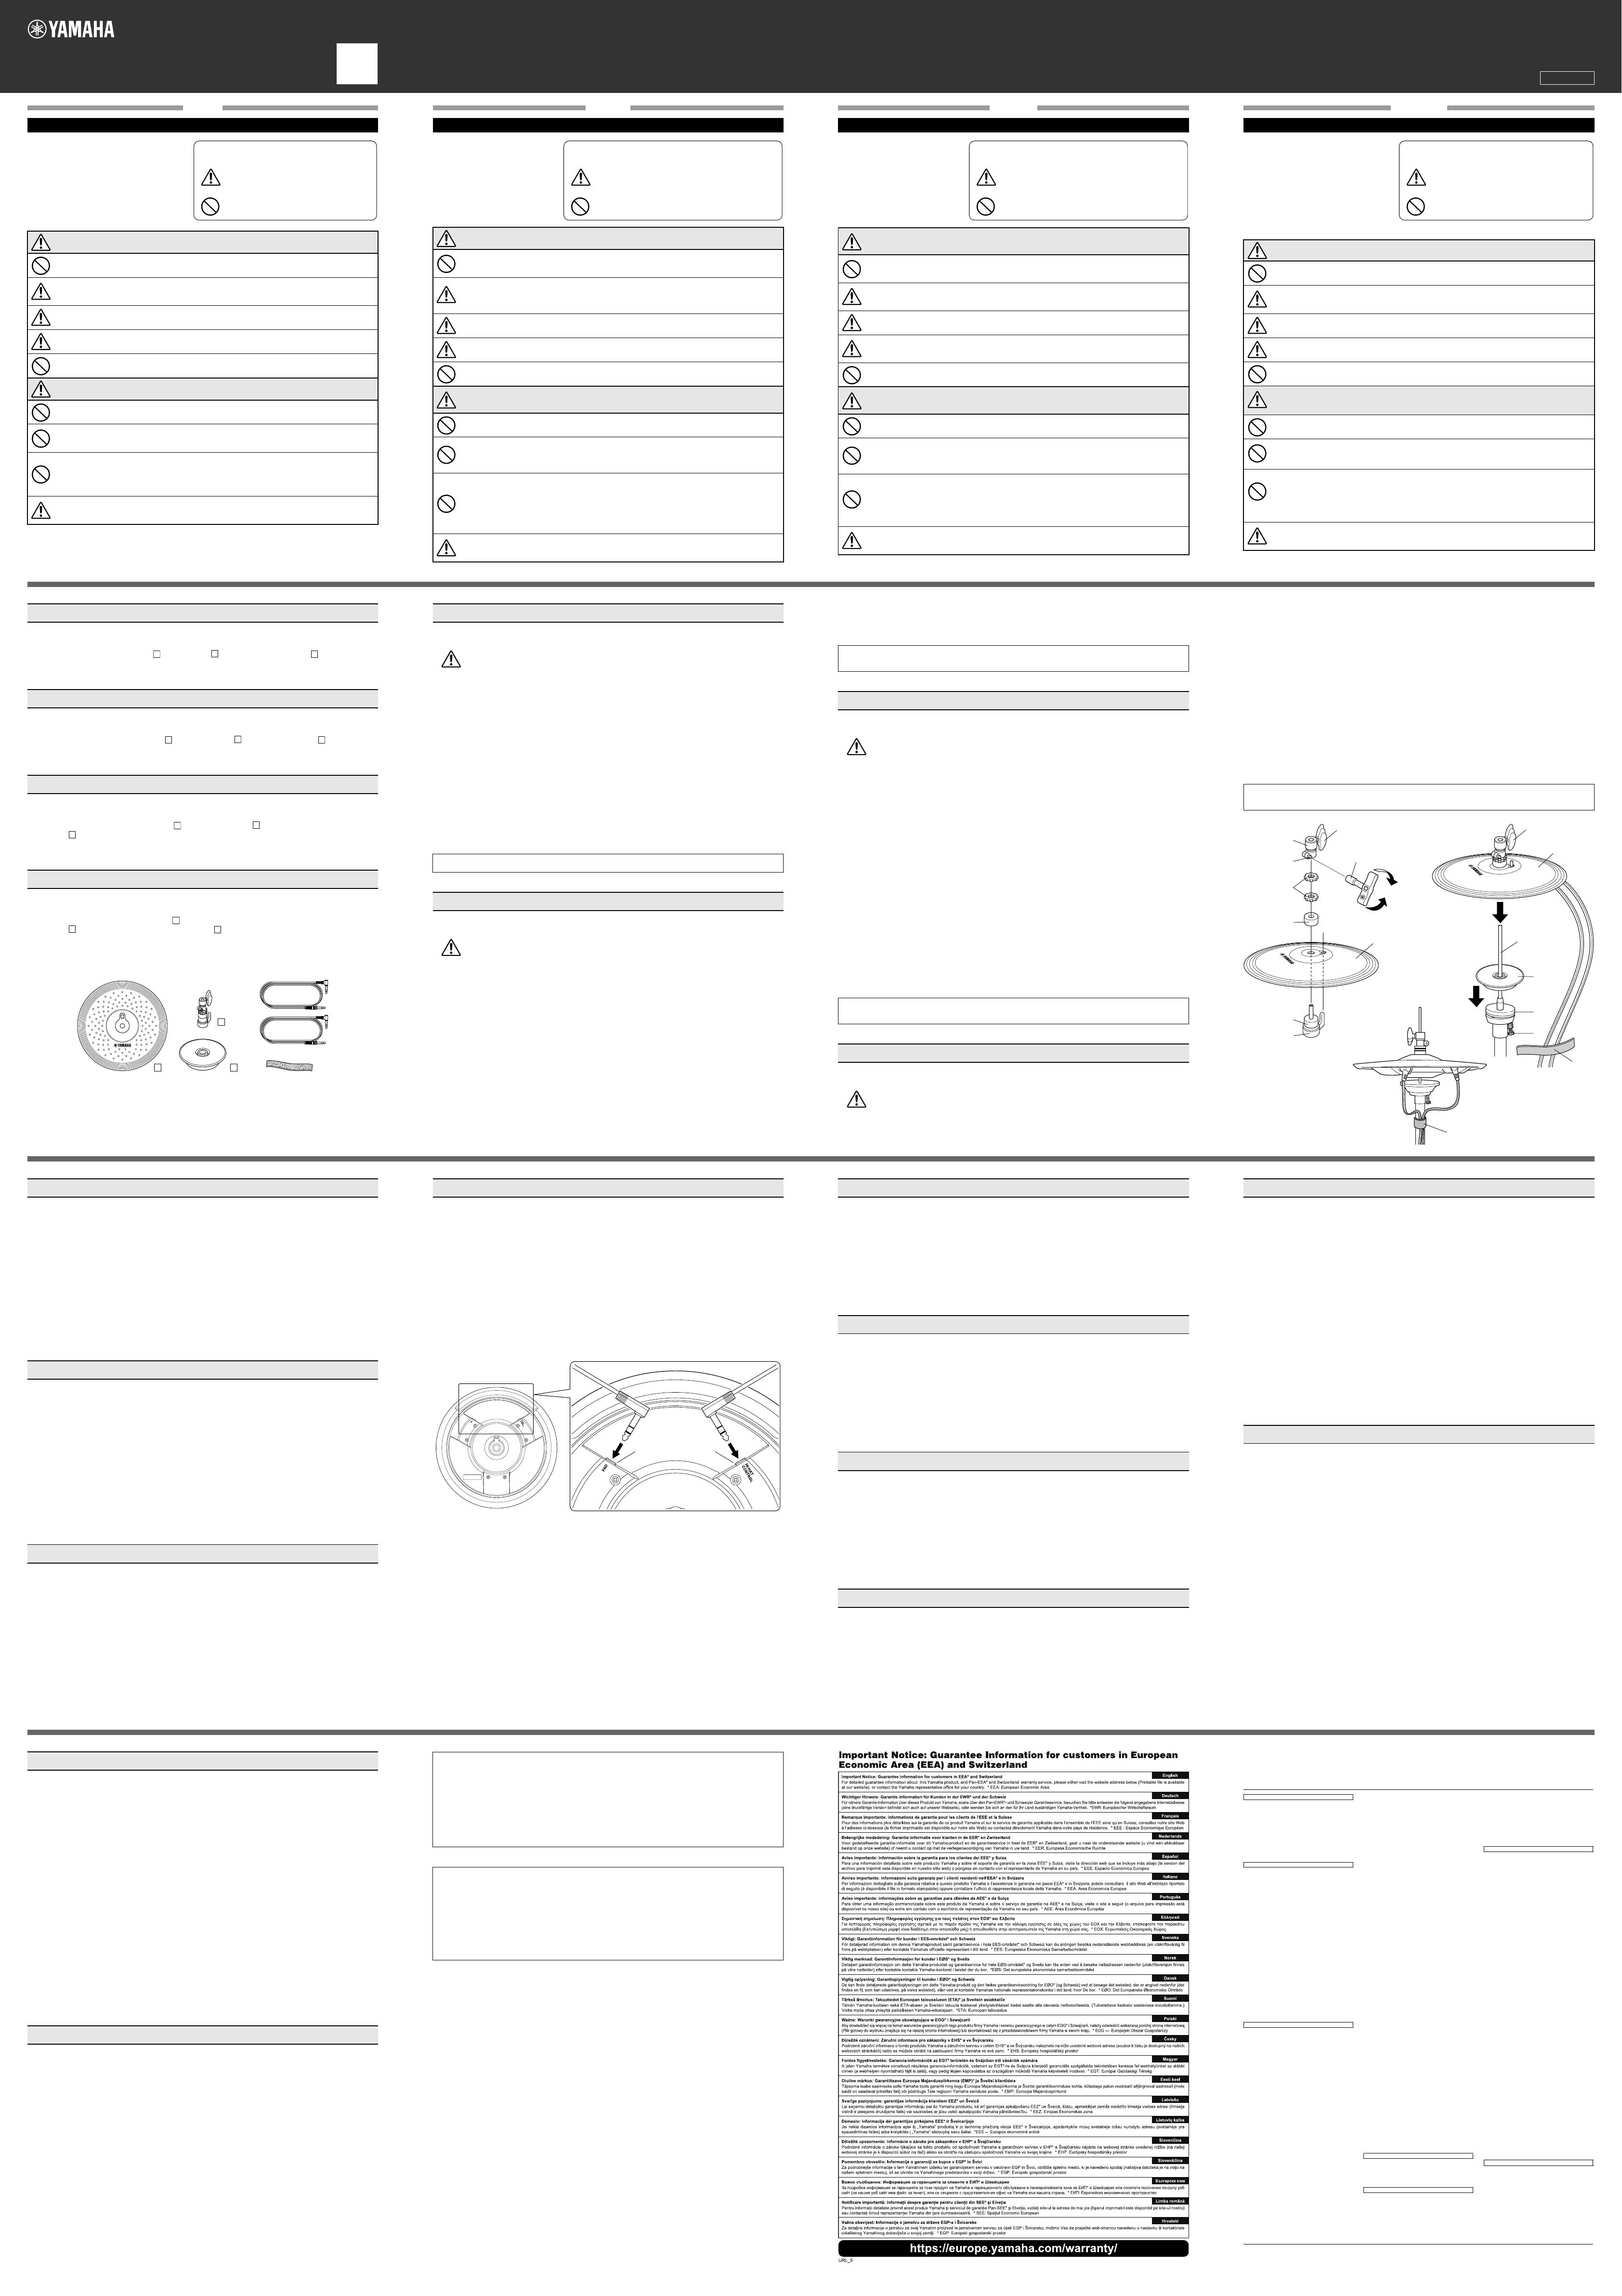
1. After loosening the keybolt q of the hi-hat clutch using the tuning key w, remove the clutch head e, lock
nuts r and felt washer t (as shown).
* Leave felt washer y on top of stopper u (as shown).
2. Place the RHH135 pad onto the stopper u, aligning the rods with the holes.
3. Fix the felt washer t, lock nuts r and clutch head onto the stopper bolt in order (as shown), tightening all
parts firmly so that the hi-hat and clutch head assembly are secure.
4. Fix the drum keybolt q tightly using the tuning key w.
5. Set the hi-hat stand on a stable surface. Remove the hi-hat clutch and felt that came with the hi-hat stand.
(The clutch is not needed when using the RHH135; however, keep it in a safe place for future use.)
To adjust the support plate o horizontally, use the knob bolt i located on the underside of the support plate.
6. Slide the stand base !0 onto the hi-hat stand shaft !1.
7. After loosening the wing bolt !2 on the RHH135, slide the RHH135 onto the hi-hat stand shaft !1 then set
the RHH135 so that YAMAHA logo mark appears in front.
8. Raise the RHH135 to a suitable height, and tighten the wing bolt !2 to secure the hi-hat shaft !1 to the clutch
base. As the upper position of the clutch base determines the open hi-hat position (the space between the
open cymbals), set the clutch base position according to your playing preference.
* Make sure to tighten the hi-hat shaft so that it doesn’t turn. This prevents the RHH135 from moving and
possibly entangling and damaging the cable.
* Secure the cables to the assembly using the cable band !3 as shown in Fig. A.
Bereiten Sie vor der Einrichtung des RHH135 einen Hi-Hat-Ständer vor (Ständer der Serie Yamaha HS usw.)
und folgen Sie dann dem nachstehenden Verfahren zur Einrichtung des RHH135.
Stellen Sie sicher, dass der Ständer stabil und sicher steht. Wenn die Klemmbolzen nicht richtig an-
gezogen sind, können Pad oder Ständer umkippen und Verletzungen verursachen. Wenn Sie das
Rack oder den Ständer auf eine instabile Unterlage usw. stellen, können Pad oder Ständer umkippen
und Verletzungen verursachen.
HINWEIS: Da Hi-Hat-Ständer anderer Hersteller möglicherweise nicht mit dem RHH135 kompatibel sind,
empfehlen wir die Verwendung eines Hi-Hat-Ständers von Yamaha. (Empfohlen: HS650A, HS740A)
1. Entfernen Sie nach dem Lösen des Schlüsselbolzens q der Hi-Hat-Klemme mit dem Stimmschlüssel w
den Klemmenkopf e, die Sperrmuttern r und die Filz-Unterlegscheibe t (wie gezeigt).
* Lassen Sie die Filz-Unterlegscheibe y oben auf dem Stopper u liegen (wie gezeigt).
2. Platzieren Sie das Pad RHH135 auf den Stopper u, wobei Sie die Löcher auf die Stangen ausrichten.
3. Stecken Sie die Filz-Unterlegscheibe t, die Sperrmuttern r und den Klemmenkopf in dieser Reihenfolge
(wie gezeigt) auf den Stopperbolzen, und achten Sie bei jedem Teil auf festen Sitz, so dass die Hi-Hat und
der Klemmenkopf sicher und fest sitzen.
4. Ziehen Sie den Schlüsselbolzen q mit dem Stimmschlüssel gut fest w.
5. Stellen Sie den Hi-Hat-Ständer auf eine stabile Oberfläche. Entfernen Sie die Hi-Hat-Klemme und den Filz,
welche mit dem Hi-Hat-Ständer ausgeliefert wurden. (Die Klemme wird bei Verwendung des RHH135 nicht
benötigt; bewahren Sie sie jedoch für späteren Gebrauch an einem sicheren Ort auf.)
Zur horizontalen Einstellung der Stützplatte o verwenden Sie den Knopfbolzen i an der Unterseite der
Stützplatte.
6. Schieben Sie die Basis des Ständers !0 auf den Schaft des Hi-Hat-Ständers !1.
7. Nachdem Sie die Flügelschraube !2 am RHH135 gelöst haben, schieben Sie das RHH135 auf den Schaft
!1 des Hi-Hat-Ständers und justieren das RHH135 so, dass das YAMAHA-Logo vorne erscheint.
8. Heben Sie das RHH135 auf eine geeignete Höhe und ziehen Sie die Flügelschraube !2 fest, um den Hi-
Hat-Schaft !1 sicher mit der Klemmen-Einheit zu verbinden. Da die obere Stellung der Klemmen-Einheit die
Setting Up
* When not playing or using the RHH135, make sure to leave space between the pad and the stand base !0.
Resting the pad on the stand base for extended periods of time may result in response problems.
Spielvorbereitungen
Usando os dois cabos estereofônicos fornecidos, conecte as saídas do RHH135 às entradas do Módulo acio-
nador de bateria série DTX.
Primeiro conecte a saída do [PAD] do RHH135 à entrada [HI HAT] do módulo e a saída [HI-HAT CONTROL]
do RHH135 à entrada [HI HAT CONTROL] do módulo. Os conectores em “L” devem estar conectados ao
RHH135.
* O RHH135 conta com chaves nas seções da borda e do controlador. Certifique-se de que um cabo estereo-
fônico seja usado ao estabelecer conexões entre o RHH135 e o módulo. O RHH135 não funcionará com um
cabo monofônico.
Configurações do módulo
As funções que o pad pode executar dependerão da entrada do acionador do módulo da bateria a que ele es-
tiver conectado. É possível acessar um quadro que mostra as funções de pad disponíveis com diversos tipos
de entrada no site mostrado abaixo.
https://download.yamaha.com/
Conexões
PAD HI-HAT CONTROL
offene Hi-Hat-Position darstellt (den Zwischenraum zwischen den offenen Beckentellern), justieren Sie bitte
die Position der Klemmen-Einheit Ihrem Spielstil entsprechend.
* Achten Sie darauf, den Hi-Hat-Schaft so festzuziehen, dass er sich nicht dreht. Das verhindert, dass sich
das RHH135 bewegt und möglicherweise das Kabel eindreht und beschädigt.
* Befestigen Sie die Kabel an der Einheit mit dem Kabelbinder !3, wie in Abb. A gezeigt.
Avant de configurer l’unité RHH135, apprêtez le support pour charleston (supports pour la série Yamaha HS),
puis suivez les procédures ci-dessous pour installer l’unité.
Assurez-vous que le support est installé de manière stable et sécurisée. Si les boulons de pince et
autres éléments ne sont pas fermement resserrés, le pad ou le support pourra se renverser et pro-
voquer des blessures. De la même façon, si le rack ou le support est placé sur une surface instable
ou inappropriée, il pourra tomber par terre et causer des blessures.
NOTE: les supports pour charleston fabriqués par des tiers peuvent être incompatibles avec l’unité
RHH135. Par conséquent, nous vous recommandons d’utiliser un support pour charleston Yamaha.
(Recommandé : HS650A, HS740A).
1. Après avoir desserré le boulon à clavette q de la vis à réglage du charleston à l’aide de la clef d’accord w,
retirez la tête de la vis de réglage e, les vis de serrage r et le disque de feutre t (tel qu’indiqué).
* Laissez le disque de feutre y en haut de la butée u (tel qu’indiqué).
2. Placez le pad RHH135 sur la butée u, en alignant les tiges sur les trous.
3. Fixez le disque de feutre t, les vis de serrage r et la tête de la vis de réglage sur le boulon de la butée
dans l’ordre indiqué, en resserrant fermement toutes les parties de sorte que l’assemblage du charleston et
de la tête de la vis de réglage soit sécurisé.
4. Fixez fermement le boulon à clavette de la batterie q à l’aide de la clef d’accord w.
5. Installez le support pour charleston sur une surface stable. Retirez la vis à réglage du charleston et le feutre
fourni avec le support de charleston. (La vis à réglage n’est pas nécessaire lors de l’utilisation du RHH135
; cependant, il convient de la conserver dans un endroit sûr en vue de s’en servir ultérieurement.)
Pour ajuster la plaque du support o horizontalement, servez-vous du boulon du bouton i situé sous la
plaque du support.
6. Faites glisser la base du support !0 sur la tige du support pour charleston !1.
7. Après avoir desserré le boulon à oreilles !2 sur le RHH135, faites glisser le RHH135 sur la tige du support
pour charleston !1 puis réglez le RHH135 de sorte que la marque sur le logo de YAMAHA apparaisse à
l’avant.
8. Soulevez le RHH135 à une hauteur appropriée puis resserrez le boulon à oreilles !2 pour fixer la tige de
charleston !1 sur l’embout de la vis de réglage. La position supérieure de l’embout de la vis de réglage dé-
termine la position de la cymbale charleston ouverte (espace entre les cymbales ouvertes). Par conséquent,
il convient de régler l’embout de la vis de réglage conformément à votre style de jeu préféré.
* Veillez à bien resserrer la tige de charleston afin de l’empêcher de tourner. Ceci évite au RHH135 tout
mouvement et protège le câble contre l’éventualité d’un entremêlement et d’un endommagement.
* Fixez les câbles sur l’assemblage à l’aide de la bande de câble !3, tel qu’indiqué sur la Fig. A.
Antes de instalar o RHH135, prepare um suporte para chimbal (suporte Yamaha série HS etc.) e siga os pro-
cedimentos abaixo para instalar o RHH135.
Certifique-se de que o suporte esteja instalado de maneira estável e segura. Se os parafusos da bra-
çadeira etc. não estiverem bem apertados, o pad ou o suporte poderão cair, causando ferimentos.
Além disso, colocar o rack ou o suporte em uma superfície instável etc. pode fazer o pad ou o su-
porte cair, causando ferimentos.
OBSERVAÇÃO:
Como suportes para chimbal de outros fabricantes podem ser incompatíveis com o RHH135,
é recomendável usar um suporte para chimbal Yamaha. (Recomendados: HS650A, HS740A)
* Wenn Sie das RHH135 nicht spielen bzw. verwenden, achten Sie darauf, dass zwischen dem Pad und der
Basis des Ständers !0 genügend Platz ist. Wenn das Pad längere Zeit auf der Basis des Ständers liegt,
kann dies zu Problemen mit der Spielgenauigkeit führen.
Configuration
* Lorsque vous n’utilisez pas le RHH135, assurez-vous de laisser suffisamment d’espace libre entre le pad
et la base du support !0. Le fait de laisser le pad reposer sur la base du support pendant des périodes de
temps prolongées peut entraîner des problèmes de réponse.
Instalação
1. Depois de soltar o parafuso principal q do engate do chimbal usando a chave de afinação w, remova a
cabeça do engate e, as porcas travantes r e a arruela de feltro t (conforme mostrado).
* Deixe a arruela de feltro y sobre o anteparo u (conforme mostrado).
2. Coloque o pad RHH135 sobre o anteparo u, alinhando as hastes com os furos.
3. Prenda a arruela de feltro t, as porcas travantes r e a cabeça do engate no parafuso do anteparo na
ordem (conforme mostrado), apertando bem todas as peças de maneira que o chimbal e a montagem da
cabeça do engate fiquem presos.
4. Aperte bem o parafuso principal da bateria q usando a chave de afinação w.
5. Coloque o suporte para chimbal sobre uma superfície estável. Remova o engate do chimbal e o feltro que
acompanha o suporte para chimbal. (O engate não é necessário quando se usa o RHH135. Porém, guarde-
o em um lugar seguro para usá-lo futuramente.)
Para ajustar a placa de suporte o horizontalmente, use o parafuso do botão giratório i localizado sob a
placa de suporte.
6. Deslize a base do suporte !0 até o eixo do suporte para chimbal !1.
7. Depois de soltar a porca borboleta !2 do RHH135, deslize o RHH135 até o eixo do suporte para chimbal
!1 e ajuste o RHH135 de maneira que a marca do logotipo YAMAHA fique visível.
8.
Levante o RHH135 até uma altura apropriada e aperte a porca borboleta
!2
para prender o eixo do chimbal
!1
à base do engate. Como a posição superior da base do engate determina a posição aberta do chimbal (o es-
paço entre os pratos abertos), ajuste a posição da base do engate de acordo com a sua preferência ao tocar.
* Não se esqueça de apertar o eixo do chimbal de maneira que ele não vire. Isso evita que o RHH135 se
mova e possa se enrolar e danificar o cabo.
* Prenda os cabos à montagem usando a faixa para cabo !3 conforme mostrado na Fig. A.
* Quando não estiver tocando ou usando o RHH135, não se esqueça de deixar espaço entre o pad e a base
do suporte !0. Deixar o pad sobre a base do suporte por períodos prolongados pode resultar em proble-
mas na resposta.
w
!2
e
y
q
u
t
r
RHH135
!1
!2
RHH135
!0
o
i
!3
CANADA
Yamaha Canada Music Ltd.
135 Milner Avenue, Toronto, Ontario M1S 3R1,
Canada
Tel: +1-416-298-1311
U.S.A.
Yamaha Corporation of America
6600 Orangethorpe Avenue, Buena Park, CA 90620,
U.S.A.
Tel: +1-714-522-9011
MEXICO
Yamaha de México, S.A. de C.V.
Av. Insurgentes Sur 1647 Piso 9, Col. San José
Insurgentes, Delegación Benito Juárez, México, D.F.,
C.P. 03900, México
Tel: +52-55-5804-0600
BRAZIL
Yamaha Musical do Brasil Ltda.
Rua Fidêncio Ramos, 302 – Cj 52 e 54 – Torre B –
Vila Olímpia – CEP 04551-010 – São Paulo/SP,
Brazil
Tel: +55-11-3704-1377
ARGENTINA
Yamaha Music Latin America, S.A.,
Sucursal Argentina
Olga Cossettini 1553, Piso 4 Norte,
Madero Este-C1107CEK,
Buenos Aires, Argentina
Tel: +54-11-4119-7000
PANAMA AND OTHER LATIN
AMERICAN COUNTRIES/
CARIBBEAN COUNTRIES
Yamaha Music Latin America, S.A.
Edificio Torre Davivienda, Piso: 20
Avenida Balboa, Marbella, Corregimiento de Bella
Vista, Ciudad de Panamá, Rep. de Panamá
Tel: +507-269-5311
THE UNITED KINGDOM/IRELAND
Yamaha Music Europe GmbH (UK)
Sherbourne Drive, Tilbrook, Milton Keynes,
MK7 8BL, U.K.
Tel: +44-1908-366700
GERMANY
Yamaha Music Europe GmbH
Siemensstrasse 22-34, 25462 Rellingen, Germany
Tel: +49-4101-303-0
SWITZERLAND/LIECHTENSTEIN
Yamaha Music Europe GmbH, Branch
Switzerland in Thalwil
Seestrasse 18a, 8800 Thalwil, Switzerland
Tel: +41-44-3878080
AUSTRIA/CROATIA/
CZECH REPUBLIC
/
HUNGARY/ROMANIA/SLOVAKIA/SLOVENIA
Yamaha Music Europe GmbH, Branch Austria
Schleiergasse 20, 1100 Wien, Austria
Tel: +43-1-60203900
POLAND
Yamaha Music Europe GmbH
Sp.z o.o. Oddział w Polsce
ul. Wielicka 52, 02-657 Warszawa, Poland
Tel: +48-22-880-08-88
BULGARIA
Dinacord Bulgaria LTD.
Bul.Iskarsko Schose 7 Targowski Zentar Ewropa
1528 Sofia, Bulgaria
Tel: +359-2-978-20-25
MALTA
Olimpus Music Ltd.
Valletta Road, Mosta MST9010, Malta
Tel: +356-2133-2093
NETHERLANDS/BELGIUM/LUXEMBOURG
Yamaha Music Europe, Branch Benelux
Clarissenhof 5b, 4133 AB Vianen, The Netherlands
Tel: +31-347-358040
FRANCE
Ya ma h a M u s i c Eu r o p e
7 rue Ambroise Croizat, Zone d'activités de Pariest,
77183 Croissy-Beaubourg, France
Tel: +33-1-6461-4000
ITALY
Yamaha Music Europe GmbH, Branch Italy
Via Tinelli N.67/69 20855 Gerno di Lesmo (MB),
Italy
Tel: +39-039-9065-1
SPAIN/PORTUGAL
Yamaha Music Europe GmbH Ibérica, Sucursal en
España
Ctra. de la Coruña km. 17,200, 28231
Las Rozas de Madrid, Spain
Tel: +34-91-639-88-88
GREECE
Philippos Nakas S.A. The Music House
19th klm. Leof. Lavriou 190 02 Peania – Attiki,
Greece
Tel: +30-210-6686260
SWEDEN
Yamaha Music Europe GmbH Germany filial
Scandinavia
JA Wettergrensgata 1, 400 43 Göteborg, Sweden
Tel: +46-31-89-34-00
DENMARK
Yamaha Music Denmark,
Fillial of Yamaha Music Europe GmbH, Tyskland
Generatorvej 8C, ST. TH., 2860 Søborg, Denmark
Tel: +45-44-92-49-00
FINLAND
F-Musiikki Oy
Antaksentie 4
FI-01510 Vantaa, Finland
Tel: +358 (0)96185111
NORWAY
Yamaha Music Europe GmbH Germany -
Norwegian Branch
Grini Næringspark 1, 1332 Østerås, Norway
Tel: +47-6716-7800
ICELAND
Hljodfaerahusid Ehf.
Sidumula 20
IS-108 Reykjavik, Iceland
Tel: +354-525-5050
CYPRUS
Nakas Music Cyprus Ltd.
Nikis Ave 2k
1086 Nicosia
Tel: + 357-22-511080
Major Music Center
21 Ali Riza Ave. Ortakoy
P.O.Box 475 Lefkoşa, Cyprus
Tel: (392) 227 9213
RUSSIA
Ya ma h a M u s i c (R u s s i a ) LL C .
Room 37, entrance 7, bld. 7, Kievskaya street,
Moscow, 121059, Russia
Tel: +7-495-626-5005
OTHER EUROPEAN COUNTRIES
Yamaha Music Europe GmbH
Siemensstrasse 22-34, 25462 Rellingen, Germany
Tel: +49-4101-303-0
Ya ma h a M u s i c G ul f F Z E
JAFZA-16, Office 512, P.O.Box 17328,
Jebel Ali FZE, Dubai, UAE
Tel: +971-4-801-1500
TURKEY
Yamaha Music Europe GmbH
Merkezi Almanya Türkiye İstanbul Şubesi
Mor Sumbul Sokak Varyap Meridian Business 1.Blok
No:1 113-114-115
Bati Atasehir Istanbul, Turkey
Tel: +90-216-275-7960
ISRAEL
RBX International Co., Ltd.
P.O Box 10245, Petach-Tikva, 49002
Tel: (972) 3-925-6900
OTHER COUNTRIES
Ya m a h a M u s ic G u l f F Z E
JAFZA-16, Office 512, P.O.Box 17328,
Jebel Ali FZE, Dubai, UAE
Tel: +971-4-801-1500
THE PEOPLE’S REPUBLIC OF CHINA
Yamaha Music & Electronics (China) Co., Ltd.
2F, Yunhedasha, 1818 Xinzha-lu, Jingan-qu,
Shanghai, China
Tel: +86-400-051-7700
HONG KONG
Tom Lee Music Co., Ltd.
11/F., Silvercord Tower 1, 30 Canton Road,
Tsimshatsui, Kowloon, Hong Kong
Tel: +852-2737-7688
INDIA
Yamaha Music India Private Limited
P-401, JMD Megapolis, Sector-48, Sohna Road,
Gurugram-122018, Haryana, India
Tel: +91-124-485-3300
INDONESIA
PT. Yamaha Musik Indonesia (Distributor)
Yamaha Music Center Bldg. Jalan Jend. Gatot
Subroto Kav. 4, Jakarta 12930, Indonesia
Tel: +62-21-520-2577
KOREA
Yamaha Music Korea Ltd.
11F, Prudential Tower, 298, Gangnam-daero,
Gangnam-gu, Seoul, 06253, Korea
Tel: +82-2-3467-3300
MALAYSIA
Yamaha Music (Malaysia) Sdn. Bhd.
No.8, Jalan Perbandaran, Kelana Jaya, 47301
Petaling Jaya, Selangor, Malaysia
Tel: +60-3-78030900
SINGAPORE
Yamaha Music (Asia) Private Limited
Block 202 Hougang Street 21, #02-00,
Singapore 530202, Singapore
Tel: +65-6740-9200
TAI WAN
Yamaha Music & Electronics Taiwan Co., Ltd.
2F., No.1, Yuandong Rd., Banqiao Dist.,
New Taipei City 22063, Taiwan (R.O.C.)
Tel: +886-2-7741-8888
THAILAND
Siam Music Yamaha Co., Ltd.
3, 4, 15, 16th Fl., Siam Motors Building,
891/1 Rama 1 Road, Wangmai,
Pathumwan, Bangkok 10330, Thailand
Tel: +66-2215-2622
VIETNAM
Yamaha Music Vietnam Company Limited
15th Floor, Nam A Bank Tower, 201-203 Cach Mang
Thang Tam St., Ward 4, Dist.3,
Ho Chi Minh City, Vietnam
Tel: +84-28-3818-1122
OTHER ASIAN COUNTRIES
https://asia-latinamerica-mea.yamaha.com/index.html
AUSTRALIA
Yamaha Music Australia Pty. Ltd.
Level 1, 80 Market Street, South Melbourne,
VIC 3205 Australia
Tel: +61-3-9693-5111
NEW ZEALAND
Music Works LTD
P.O.BOX 6246 Wellesley, Auckland 4680,
New Zealand
Tel: +64-9-634-0099
COUNTRIES AND TRUST
TERRITORIES IN PACIFIC OCEAN
https://asia-latinamerica-mea.yamaha.com/index.html
NORTH AMERICA
CENTRAL & SOUTH AMERICA
EUROPE
AFRICA
MIDDLE EAST
ASIA
OCEANIA
For details of products, please contact your nearest Yamaha representative or the
authorized distributor listed below.
Die Einzelheiten zu Produkten sind bei Ihrer unten aufgeführten Niederlassung und bei
Yamaha Vertragshändlern in den jeweiligen Bestimmungsländern erhältlich.
Pour plus de détails sur les produits, veuillez-vous adresser à Yamaha ou au distributeur le
plus proche de vous figurant dans la liste suivante.
Para obter detalhes de produtos, entre em contato com o representante mais próximo da
Yamaha ou com o distribuidor autorizado relacionado a seguir.
关于各产品的详细信息,请向就近的 Yamaha 代理商或下列经销商询问。
DMI27 Head Office/Manufacturer: Yamaha Corporation 10-1, Nakazawa-cho, Naka-ku, Hamamatsu, 430-8650, Japan
(For European Countries) Importer: Yamaha Music Europe GmbH Siemensstrasse 22-34, 25462 Rellingen, Germany
Owner’s Manual / Benutzerhandbuch
Mode d’emploi / Manual do Proprietário
Adjust the level of the trigger output from the RHH135 with the Gain parameter of Trigger Setup Edit display on
the particular DTX Series Drum Trigger Module you are using.
NOTE: When the RHH135 is used with a DTX Series Drum Trigger Module, enter the module’s Trigger Setup
Edit display and set the Gain (pad input level) parameter so that the display reads 90–95% when the
pad is struck strongly. Refer to the Owner’s Manual that came with your module for more informa-
tion.
If the output level is too high, the pad’s dynamic range (the difference between loud and soft sounds)
will be reduced and problems such as double triggering (multiple triggers being produced by a sin-
gle stroke) may occur.
Stellen Sie den Trigger-Ausgangspegel des RHH135 im Zusammenspiel mit dem Gain-Parameter im Trigger-
Setup-Edit-Display Ihres Drum-Trigger-Modul der DTX-Serie ein.
HINWEIS: Wenn das RHH135 mit einem Drum-Trigger-Modul der DTX-Serie verwendet wird, gehen Sie in das
Trigger-Setup-Edit-Display und stellen Sie den Parameter Gain (Pad-Eingangspegel) so ein, dass
das Display 90–95% anzeigt, wenn das Pad hart angeschlagen wird. Für nähere Informationen le-
sen Sie die Bedienungsanleitung, die mit Ihrem Modul geliefert wurde.
Wenn der Ausgangspegel zu hoch ist, ist der Dynamikbereich (der Unterschied zwischen lauten
und leisen Tönen) des Pads reduziert, und es können vermehrt Probleme wie Doppeltriggerung
(mehrfache Triggerauslösung durch einen einzelnen Schlag) auftreten.
Réglez le niveau de sortie de déclenchement à partir du RHH135 à l’aide du paramètre Gain dans l’écran d’édi-
tion du système Drum Trigger Module de série DTX dont vous disposez.
NOTE: Lorsque l’unité RHH135 est utilisée avec un système Drum Trigger Module de série DTX, accédez à
l’écran Trigger Setup Edit du module afin de régler le paramètre Gain (niveau d’entrée du pad) de
sorte que l’écran affiche 90–95 % lorsque le pad est frappé avec une grande force. Reportez-vous au
mode d’emploi fourni avec votre module pour plus d’informations à ce sujet.
Si le niveau de sortie est trop élevé, la plage dynamique du pad (la différence entre les tonalités for-
tes et faibles) sera réduite, ce qui pourra occasionner des déclenchements en double (plusieurs dé-
clenchements produits par un seul coup).
Ajuste o nível de saída do acionador do RHH135 usando o parâmetro de ganho do visor Trigger Setup Edit
(Edição da configuração do acionador) do Módulo acionador de bateria série DTX que você estiver usando.
OBSERVAÇÃO: Quando o RHH135 for usado com um Módulo acionador de bateria série DTX, veja o visor
Trigger Setup Edit do módulo e defina o parâmetro de ganho (nível de entrada do pad) de
maneira que o visor indique 90 a 95% quando se bater no pad com força. Consulte o Manual
do Proprietário que acompanha o módulo para obter mais informações.
Se o nível de saída estiver muito alto, a faixa dinâmica do pad (a diferença entre sons altos
e baixos) será reduzida, podendo haver problemas como disparo duplo (vários disparos
produzidos por uma única batida).
Output Level Adjustment
Einstellen des Ausgangspegels
Réglage du niveau de sortie
Ajuste do nível de saída
EN DE
FR PT
RHH135
ELECTRONIC DRUM PAD
PAD DE BATTERIE ÉLECTRONIQUE
Manual Development Group
© 2019 Yamaha Corporation
Published 06/2019
2019
6 发行
POMA*.* - * * A0
VCV2150
If the following trouble occurs when the RHH135 is used, please check the following points before asking your
dealer for assistance.
No Sound, Volume is Low
Is the pad connected to the correct input number of the DTX Series Drum Trigger Module using the supplied
stereo phone cable? (See “Connections” above.) The RHH135 will not operate using a mono phone cable.
A cymbal pad’s built-in sensor is located close to the Yamaha logo found on the top surface. In order to
achieve the best performance from your pad, position it such that the area around the logo can be easily
struck.
Hitting the pad once produces multiple sounds (double triggering)
Make sure to properly set the rejection settings on your DTX Series Drum Trigger Module.
The Closed Hi-hat voice does not sound unless the hi-hat pedal is pressed down
strongly.
Is the felt washer still under the stand base? Try removing the felt that came with the hi-hat stand and install
the stand base again without it. (See “Setting Up.”)
Also, please refer to the Owner’s Manual that came with your DTX Series Drum Trigger Module for more infor-
mation regarding the problems described above and any other problems that you may be experiencing. If a so-
lution cannot be found to the problem after consulting the manuals, please contact the dealer from whom you
purchased the product.
Falls bei Verwendung des Pedals RHH135 eines der folgenden Probleme auftritt, prüfen Sie bitte folgende
Punkte, bevor Sie Ihren Händler um Rat oder Hilfe fragen.
Kein Ton; die Lautstärke ist zu niedrig
Ist das Pad am Drum-Trigger-Modul der DTX-Serie über ein Stereo-Klinkenkabel am Eingang mit der rich-
tigen Nummer angeschlossen? (Siehe “Anschlüsse und Verbindungen” weiter oben.) Das RHH135 kann
nicht über ein Mono-Klinkenkabel betrieben werden.
Der eingebaute Sensor eines Becken-Pads befindet sich in Nähe des Yamaha-Logos auf der Oberseite. Um
die beste Leistung aus Ihrem Pad herauszuholen, positionieren Sie es so, dass der Bereich in Nähe des Lo-
gos einfach angeschlagen werden kann.
Einmaliges Anschlagen des Pads produziert den Sound mehrfach (Doppeltriggerung)
Achten Sie darauf, die Rejection-Einstellungen in Ihrem Drum-Trigger-Modul der DTX-Serie richtig einzustel-
len.
Das Hi-Hat-Becken schließt nicht richtig, wenn nicht das Pedal des Hi-Hat-Ständers
stark heruntergedrückt wird.
Befindet sich die Filz-Unterlegscheibe immer noch unter der Basis des Ständers? Probieren Sie aus, den mit
dem Hi-Hat-Ständer gelieferten Filz abzunehmen und die Basis des Ständers ohne die Filzscheibe aufzuset-
zen. (Siehe “Spielvorbereitungen”.)
Lesen Sie bitte auch die Bedienungsanleitung, die mit Ihrem Drum-Trigger-Modul der DTX-Serie geliefert wur-
de, um weitere Informationen zu den oben beschriebenen und weiteren möglichen Problemen zu erhalten.
Wenn das Problem auch nach Lektüre der Bedienungsanleitungen nicht gelöst wurde, wenden Sie sich bitte an
den Händler, bei dem Sie das Produkt erworben haben.
Troubleshooting
Fehlerbehebung
Specifications
RHH135 Real Hi-hat Pad
Size: ø329 × 61 (H) mm (hi-hat clutch not included)
Weight: 1.4 kg (hi-hat clutch included)
Sensor System: Trigger sensor (piezo) × 1, switch × 1 (edge)
Controller Type: Multi-step Switch
Output jack: Standard stereo phone jack × 2
* Specifications are subject to change without notice.
Especificações
Pad para chimbal RHH135 Real
Tamanho: ø329 × 61 (H) mm (engate do chimbal não incluído)
Peso: 1,4 kg (engate do chimbal incluído)
Sistema sensor: 1 sensor de disparo (piezo), 1 chave (borda)
Tipo de controlador: chave em várias etapas
Saída: 2 saídas para fone estereofônicas padrão
* As especificações estão sujeitas à alteração sem aviso prévio.

