
jabra.com/pro920
NEED MORE HELP?
For all support go to jabra.com/support
81-03148 J
Jabra
PRO 920

Quick start guide
Jabra
PRO 920

© 2015 GN Audio A/S (GN Netcom A/S). All rights reserved. Jabra
®
is a trademark
of GN Audio A/S.
MADE IN CHINA
MODEL: WHB003BS/ WHB003HS
www.jabra.com


LANGUAGES
ENGLISH / EN 2
FRANÇAIS / FR 12
DEUTSCH / DE 22
ESPAÑOL / ES 32
繁體中文 / CHT 42
PACKAGE CONTENTS
Optional accessories

2
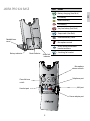
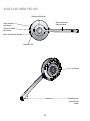
JABRA PRO 920 HEADSET
Speaker
Noise-cancelling
microphone
Speaker volume down
Speaker volume up
Mute
Microphone boom arm
Multi-function buttton
LED indicator

3
EN
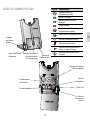
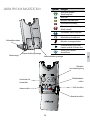
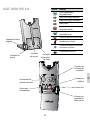
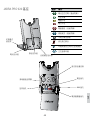
JABRA PRO 920 BASE
1
Mute indicator
Audio link
indicator
Battery indicator
Power adapter port
Telephone port
Handset port
Clear dial tone
switch
AUX port
Microphone
volume controls
Foldable base
stand
Icon Event
Battery charging (slow ash)
Full battery
Medium battery
Low battery
Very low battery (fast ash)
Sleep mode (slow ash)
Unknown battery status
Microphone muted
Active audio link between
headset and base
Searching for headset

4
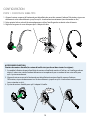
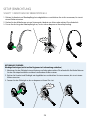
SETUP
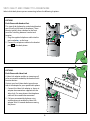
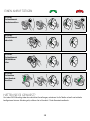
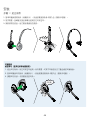
STEP 1: ATTACH THE HEADBAND
1. Align the headset and the headband wearing-style attachment, as illustrated, and press firmly together until
they click into place (snap-to-click).
2. Rotate the microphone boom arm for left or right ear use.
3. Adjust the length of the headband to fit snug against the head.
CLICK
OPTIONAL ACCESSORIES
Attaching the earhook (not supplied in all regions)
1. Assemble the earhook wearing-style attachment for left or right ear use. If necessary, remove the earbud
and replace with another size for best t.
2. Align the headset and the earhook wearing-style attachment, as illustrated, and press firmly together until
they click into place (snap-to-click).
3. Shape the earhook to t snug around the ear.
CLICK

5
EN
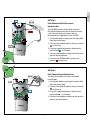
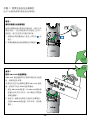
STEP 2: UNFOLD THE BASE
The Jabra PRO base stand can be
folded into three positions: open,
closed, and standing position.
CLICK

6
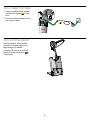
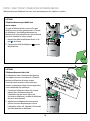
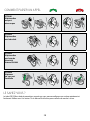
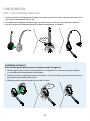
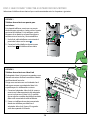
STEP 3: SELECT AND CONNECT TO A DESK PHONE
Select which desk phone you are connecting to from the following 4 options:
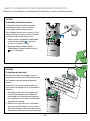
OPTION 1
Desk Phone with Headset Port
This type of desk phone has a dedicated headset
port (usually at the back of the phone). These
phones typically have a button on the front
panel for switching between handset and
headset.
1. Plug the supplied telephone cable into the
port marked
on the base.
2. Connect the telephone cable to the headset
port
on the desk phone.
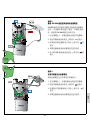
OPTION 2
Desk Phone with Jabra Link
A Jabra Link adapter enables an incoming call
to be answered or ended by the headset multi-
function button.
Contact your local Jabra dealer to purchase a
Jabra Link adapter for your specic desk phone.
1. Connect the Jabra Link adapter as shown in
adapter documentation supplied with the
Jabra Link. On some phones the telephone
cable will also need to be connected.
2. Call your connected desk phone using
another phone to enable the Jabra Link
adapter. Wait 10 seconds before answering
the phone.
Refer to Jabra Link
documentation
or
or

7
EN
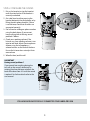
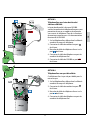
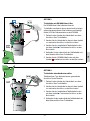
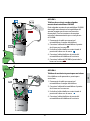
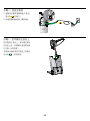
OPTION 3
Desk Phone with GN1000 remote
Handset Lifter
The GN1000 remote handset lifter manually
lifts the desk phone handset to make or answer
a call. For mounting instructions refer to
documentation supplied with the GN1000.
1. On the desk phone, unplug the handset cable
from the phone body.
2. Connect the handset cable to the port marked
on the base.
3. Plug the supplied telephone cable into the
port marked
on the base.
4. Connect the telephone cable into the handset
port on the desk phone.
5. Connect the GN1000 cable into the port
marked
on the base.
OPTION 4
Desk Phone without Headset Port
This desk phone does not have a dedicated
headset port.
1. On the desk phone, unplug the handset cable
from the phone body.
2. Connect the handset cable to the port marked
on the base.
3. Plug the supplied telephone cable into the
port marked
on the base.
4. Connect the telephone cable into the handset
port on the desk phone.
or
or

8
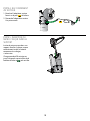
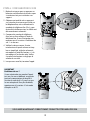
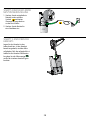
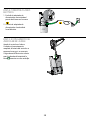
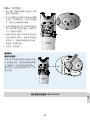
STEP 4: CONNECT TO POWER
1. Plug the supplied power adapter
into the port marked
on the
base.
2. Connect the power adapter to the
mains power socket.
STEP 5: DOCK THE HEADSET
Dock the headset. When docked
correctly the headset battery will
begin charging, if needed.
Charge for 20 minutes or until the
battery indicator on the base
is
steady green.

9
EN
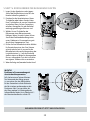
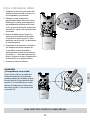
STEP 6: CONFIGURE THE SOUND
1 Put on the headset, or tap the headset
multi-function button if the headset is
currently undocked.
2 Get a dial tone by either pressing the
headset button on the desk phone, or by
lifting the desk phone handset. If there
is no dial tone, check that all cables are
connected correctly.
3 Dial a friend or colleagues phone number
using the desk phone. If you cannot
hear anything refer to ‘Having sound
problems?’ below.
4 Check your speaking volume. If the
listener says your speaking volume is too
quiet or too loud, adjust the microphone
volume using the microphone + / -
volume buttons on the back of the base.
Ensure the listener does not adjust their
own volume.
5 When nished, end the call.
IMPORTANT
Having sound problems?
If you cannot hear anything during the
test call, or the sound is distorted, try
rotating the clear dial tone switch on the
back of the base from A-G until the sound
is optimal. For further details refer to the
user manual.
YOU HAVE NOW SUCCESSFULLY CONNECTED YOUR JABRA PRO 920
CLICK

10
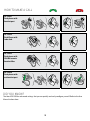
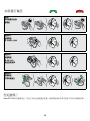
HOW TO MAKE A CALL
OPTION 1
Desk phone with
headset port
OPTION 2
Desk Phone with
Jabra Link
OPTION 3
Desk phone with
GN1000 remote
handset lifter
OPTION 4
Desk phone with-
out headset port
DID YOU KNOW?
The Jabra PRO 920 has advanced settings that you can quickly and easily congure yourself. Refer to the User
Manual to learn how.

11
EN

12
MICRO-CASQUE JABRA PRO 920
Haut-parleur
Microphone
anti-bruit
Bouton de réduction
du volume
Bouton d’augmentation
du volume
Bouton Muet
Bras articulé du microphone
Bouton multifonction
Voyant lumineux

FR
13
BASE DU JABRA PRO 920
1
Voyant d’activation/
de désactivation
du microphone
Voyant de
liaison audio
Voyant d’état de
la batterie
Port de
l’adaptateur
secteur
Port du
téléphone
Port du combiné
Commutateur
de tonalité
Port AUX
Réglage du volume
du microphone
Support
de la base
pliable
Icône Événement
Batterie en charge
(clignotement lent)
Batterie chargée
Batterie moyennement
chargée
Batterie faible
Batterie très faible
(clignotement rapide)
Mode veille (clignotement lent)
État de la batterie inconnu
Microphone désactivé
Liaison audio active entre le
micro-casque et la base
Recherche du micro-casque
en cours

14
CONFIGURATION
ÉTAPE 1 : FIXATION DU SERRE-TÊTE
1. Alignez le micro-casque et la fixation de port d’oreillette du serre-tête, comme l’indique l’illustration, et pressez
doucement sur les deux éléments jusqu’à ce qu’ils s’enclenchent correctement (vous entendez un clic).
2. Faites pivoter le bras articulé du microphone pour utiliser l’oreille gauche ou droite selon le besoin.
3. Réglez la longueur du serre-tête pour qu’il s’adapte à la tête.
CLIC
ACCESSORIES EN OPTION
Fixation du contour d’oreille (le contour d’oreille n’est pas fourni dans toutes les régions)
1. Assemblez la xation de port d’oreillette du contour d’oreille de manière à l’utiliser sur l’oreille gauche ou
droite. Si nécessaire, retirez l’embout d’écouteur et remplacez-le par un embout d’une autre taille pour
qu’il s’ajuste correctement.
2. Alignez le micro-casque et la fixation de port d’oreillette du contour d’oreille, comme l’indique
l’illustration, et pressez doucement sur les deux éléments jusqu’à ce qu’ils s’enclenchent correctement
(vous entendez un clic).
3. Ajustez le contour d’oreille pour qu’il s’adapte à l’oreille.
CLIC

FR
15
ÉTAPE 2 : OUVERTURE
DE LA BASE
Le support de la base Jabra PRO
possède trois positions : ouverte,
fermée et entrouverte.
CLIC

16
ÉTAPE 3 : SÉLECTION ET CONNEXION À UN TÉLÉPHONE FIXE
Sélectionnez à quel téléphone fixe vous vous connectez parmi les 4options suivantes:
OPTION1
Téléphone xe avec port dédié à au
micro-casque
Ce type de téléphone xe est muni d’un port
dédié au micro-casque (généralement à l’arrière
du téléphone). Il possède généralement un
bouton situé sur le panneau avant qui permet de
passer du combiné au micro-casque.
1. Branchez le câble de téléphone fourni sur le
port
de la base.
2. Connectez le câble de téléphone
port du
téléphone xe.
OPTION2
Téléphone xe avec Jabra Link
Un adaptateur Jabra Link permet de répondre
à un appel entrant ou d’y mettre n à l’aide du
bouton multifonction du micro-casque.
Contactez votre revendeur Jabra local pour
acheter un adaptateur Jabra Link correspondant
à votre téléphone xe spécique.
1. Connectez l’adaptateur Jabra Link comme
indiqué dans la documentation de
l’adaptateur fournie avec le Jabra Link.
Sur certains téléphones, le câble de téléphone
doit aussi être connecté.
2. Appelez votre téléphone xe connecté en
utilisant un autre téléphone pour activer
l’adaptateur Jabra Link. Attendez 10secondes
avant de répondre au téléphone.
Reportez-vous à la
documentation
Jabra Link
ou
ou
ページが読み込まれています...
ページが読み込まれています...
ページが読み込まれています...
ページが読み込まれています...
ページが読み込まれています...
ページが読み込まれています...
ページが読み込まれています...
ページが読み込まれています...
ページが読み込まれています...
ページが読み込まれています...
ページが読み込まれています...
ページが読み込まれています...
ページが読み込まれています...
ページが読み込まれています...
ページが読み込まれています...
ページが読み込まれています...
ページが読み込まれています...
ページが読み込まれています...
ページが読み込まれています...
ページが読み込まれています...
ページが読み込まれています...
ページが読み込まれています...
ページが読み込まれています...
ページが読み込まれています...
ページが読み込まれています...
ページが読み込まれています...
ページが読み込まれています...
ページが読み込まれています...
ページが読み込まれています...
ページが読み込まれています...
ページが読み込まれています...
ページが読み込まれています...
ページが読み込まれています...
ページが読み込まれています...
-
 1
1
-
 2
2
-
 3
3
-
 4
4
-
 5
5
-
 6
6
-
 7
7
-
 8
8
-
 9
9
-
 10
10
-
 11
11
-
 12
12
-
 13
13
-
 14
14
-
 15
15
-
 16
16
-
 17
17
-
 18
18
-
 19
19
-
 20
20
-
 21
21
-
 22
22
-
 23
23
-
 24
24
-
 25
25
-
 26
26
-
 27
27
-
 28
28
-
 29
29
-
 30
30
-
 31
31
-
 32
32
-
 33
33
-
 34
34
-
 35
35
-
 36
36
-
 37
37
-
 38
38
-
 39
39
-
 40
40
-
 41
41
-
 42
42
-
 43
43
-
 44
44
-
 45
45
-
 46
46
-
 47
47
-
 48
48
-
 49
49
-
 50
50
-
 51
51
-
 52
52
-
 53
53
-
 54
54


