Note: The receiver can be removed and stored in the battery compartment
while not in use.
A A
A A
2
1
USB Port Nano receiver
12
Take out the receiver Store the receiver Low Power Indicator
EN EN EN EN
EN
システム要件
ハードウェア
オペレーティングシステム
インテリジェントパワーセービング(IPS)
再接続
注意事項
DPIの切替
電池残量表示
電池の装填
Cordless Mouse
User Manual
Model: M002
DE ESFR ITEN JP
System Requirements:
To use this mouse, your computer must meet the following hardware
requirements and run one of the operating systems listed below.
Operating System:
• Windows 2000, 2003, XP, Vista, Win7, Win8, Win8.1, Win10, macOS, Linux
Note: The scroll wheel only works under the operating systems listed above.
If you use the mouse under a different operating system, the mouse may
either not work or lose its enhanced features.
Intelligent Power Saving (IPS):
The mouse is equipped with Intelligent Power Saving (IPS) function.
• When the USB Nano receiver is disconnected or the PC is switched off, the
mouse will be switched off automatically for the purpose of power-saving.
• When your mouse is not operated for 10 seconds, it will automatically drop
to the first level of IPS. To wake the mouse, click any button.
• When your mouse is not operated for 8 minutes, it will automatically drop
to the second level of IPS. To wake the mouse, click any button.
Reconnection:
There is a connection code for this Mouse. High temperatures, electro-mag-
netic fields or vibration may influence the code signal and the Mouse may
need to be reconnected. Both Mouse and Nano Receiver have a built-in code
and one Mouse can be connected to one receive, or several Mice to one
Nano Receiver. The Mouse and Nano Receiver may need to be reconnected if
subjected to high temperature, electromagnetic fields or strong vibrations.
Attention:
1. To maximize battery life, it is recommended to use the mouse on a white
or light-coloured surface.
2. If not used, the mouse will drop into an auto-sleeping mode within 3
seconds. Press any key or scroll wheel to activate the mouse.
3. Do not use the mouse on a glass or mirrored surface, as these surfaces will
cause the mouse to fail temporarily.
4. The mouse might not work smoothly on some special surfaces, such as
smooth, dark or black, reflecting and 3D mouse pads surfaces.
5. Avoid using the mouse on a metal surface. Metals, such as iron, aluminum
or copper, shield the radio frequency transmission and may slow down the
mouse presenter’s response time or cause the mouse to fail temporarily.
6. If your PC has a metal case that contains aluminium or magnesium, use the
mouse to the side. The display panel may interfere with the radio
frequency signal if you use the mouse directly in front of the PC.
FAQ:
1. What should I do if the mouse does not work?
• Make sure that the polarity of the batteries is correct. The positive (+) and
negative (-) ends of each battery must match the positive (+) and negative
(-) markings in the battery housing.
• Make sure the batteries are not discharged.
• Please try to remove the batteries, and reinstall the batteries again.
• Verify that your computer's power management features are turned off.
2. The USB Nano receiver is recognized by Windows (2000, 2003, XP, Vista,
Win7, Win8, Win8.1, Win10) but the cursor does not move?
• Check whether the low power indicator on the top of the mouse lights up. If
the sensor lights up, it is likely that the batteries are discharged. Please
replace them.
• If replacing the batteries does not help, it is likely that the mouse is not
connected to the receiver. Please try reconnection and ensure that the
mouse is within the optimal operational working distance (1.5m) from its
USB Nano receiver.
1. Ensure the battery voltage is correct; if the voltage is low, replace the
batteries.
2. Press the right button and middle button (under the scroll wheel)
simultaneously (Do not release both buttons until you have completed
step 3).
3. Plug the USB Nano receiver into a free USB port of your computer within
15 seconds.
4. Then release both buttons.
DPI Switch:
Press the DPI button to cycle through 6 DPI levels.
Low Battery Power Indicator:
The mouse is equipped with a low power indicator. When the battery power
gets low during the period of use, the Indicator under the Scroll wheel will
flash. Please replace the battery.
Note: We recommend you use AA alkaline dry cell batteries.
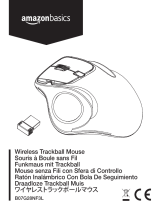
Receiver Connection:
Take out the USB Nano receiver and plug it into a free USB port in your
computer. The Plug & Play function of your system will detect that a new
device has been connected and install it automatically
レシーバー接続:
Instructions:
Battery Installation
The optical mouse uses two AA batteries (not included).
1. Open the battery cover.
2. Insert the batteries into the compartment, ensuring they correspond with
the polarity marking.
3. Close the battery cover.
4. Switch on the mouse by adjusting the power switch underneath the
mouse. The power indicator LED at the top of the mouse will flash.
Note: Make sure that the polarity of the batteries is correct. The positive (+)
and negative (-) ends of each battery must match the positive (+) and
negative (-) markings in the battery housing.
Hardware:
• PC with a Pentium processor or equivalent AMD processors
• USB 2.0
Button Count:
Operating Frequency:
Receiver Interface:
Battery Type:
Operating Voltage:
Stand by Current:
Sleep Current:
Transmission Power:
6 buttons
2.4GHz
USB version 2.0
2 x AA Batteries
3.0V
<0.8mA
0.05mA
1.5dBm
Technical Specifications:
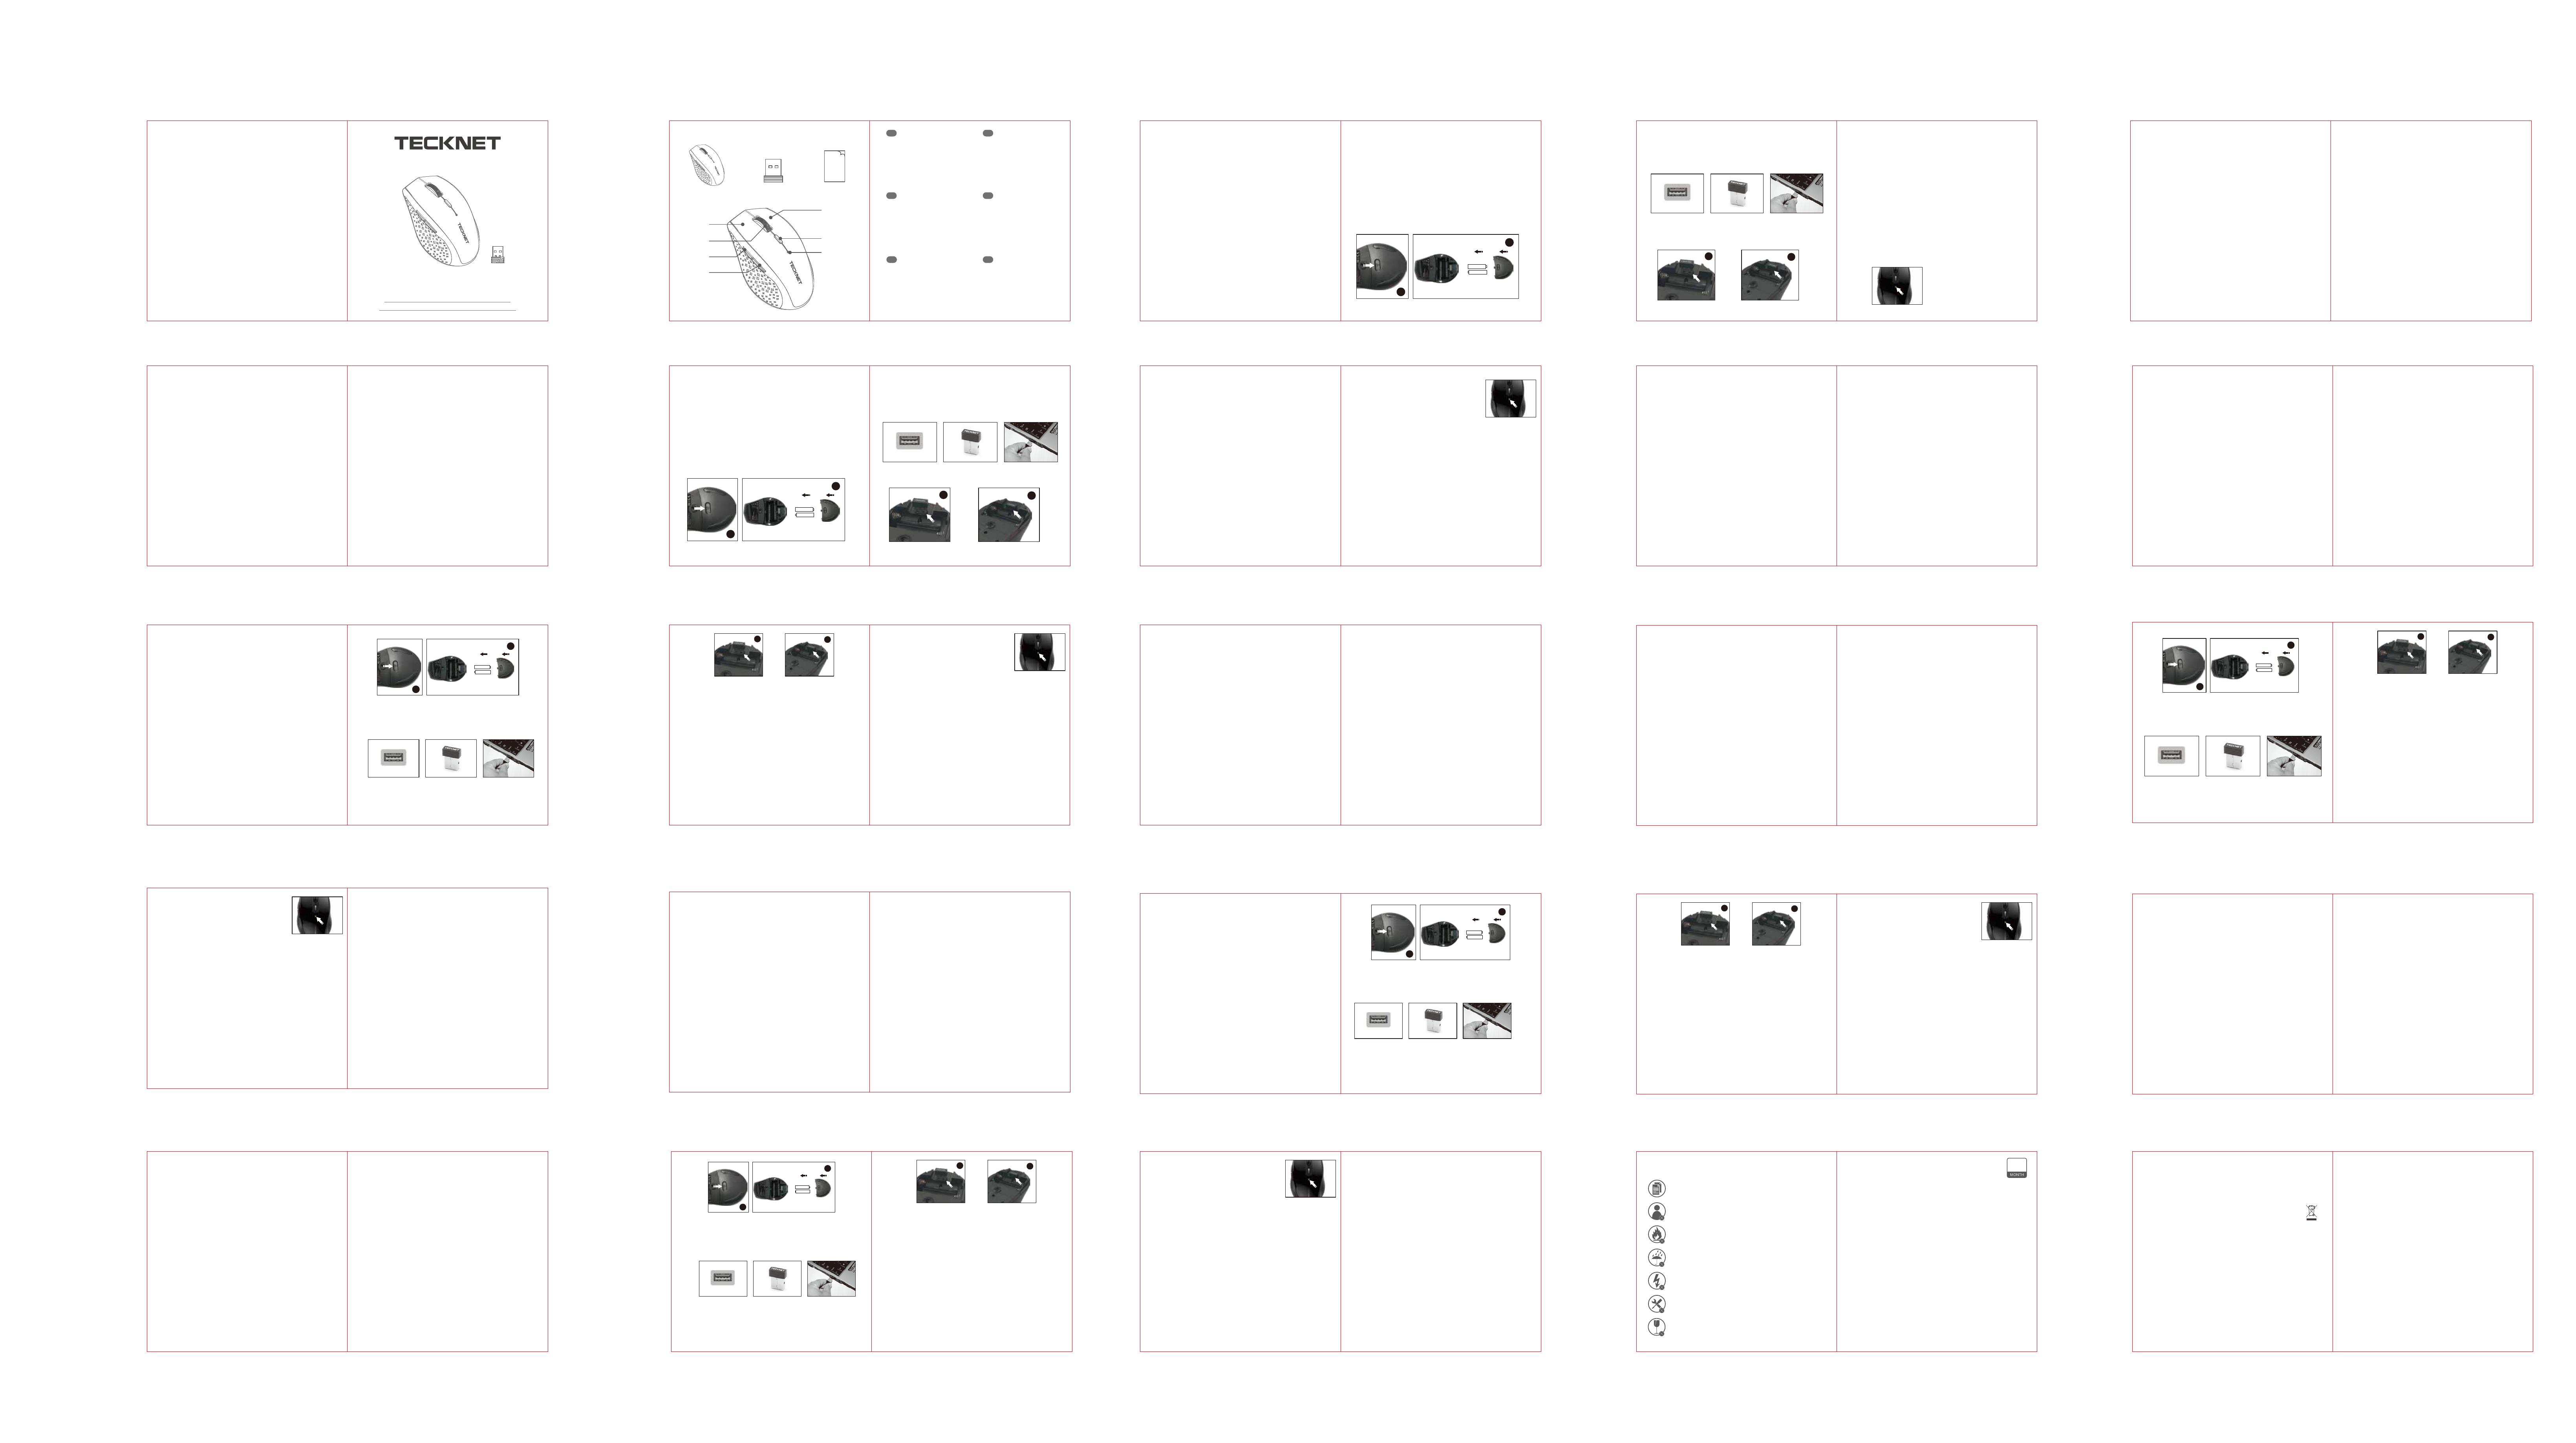
Package Contents:
Product Layout:
①
⑥
⑦
③
②
④
⑤
User
Manual
x 1 x 1 x 1
1. Left Click Button
2. Scroll Wheel
3. Forward Button
4. Backward Button
5. Right Click Button
6. DPI Switch Button
7. Low Battery Indicator
EN
1. Links Taste
2. Scrollrad
3. Vorwärtstaste
4. Rückwärtstaste
5. Rechts Taste
6. DIP Schalter-Druckknopf
7. Leistungsschwach Indikator
DE
1. Bouton de clic gauche
2. Molette de défilement
3. Bouton Avant
4. Bouton Arrière
5. Bouton de clic droit
6. Bouton de commutation DPI
7. Voyant de batterie faible
FR
1. Botón de retroceso
2. Botón de avance
3. Botón de clic izquierdo
4. Rueda de desplazamiento
5. Botón de clic derecho
6. Botón de cambio de DPI
7. Indicador de batería baja
ES
1. Tasto Indietro
2. Rotellina di Scorrimento
3. Tasto Avanti
4. Tasto Sinistro
5. Tasto Destro
6. Tasto Interruttore DPI
7. Spia Batteria Scarica
Note: Batteries NOT included
IT
1. 左クリックボタン
2. スクロールホイール
3. フォワード(前進)ボタン
4. バックワード(戻る)ボタン
5. 右クリックボタン
6. DPI切替ボタン
7. 電池残量表示
JP
EN EN
• Check the Nano receiver's USB connector is firmly attached to the USB port
of your computer.
Remarque: Le récepteur peut être retiré et stocké à côté du compartiment de
la batterie lorsqu'il n'est pas utilisé.
A A
A A
2
1
Port USB Nano récepteur
12
Sortez le récepteur Stockez le récepteur
Indicateur de faible puissance
FR FR FR FR FR
Configuration système requise:
Pour utiliser cette souris, votre ordinateur doit répondre aux exigences
matérielles suivantes et fonctionner sous l'un des systèmes d'exploitation
énumérés ci-dessous.
Système d'exploitation:
• Windows 2000, 2003, XP, Vista, Win7, Win8, Win8.1, Win10, macOS, Linux
Remarque: La roulette de défilement ne fonctionne que sous les systèmes
d'exploitation énumérés ci-dessus. Si vous utilisez la souris sous un autre
système d'exploitation, la souris peut ne pas fonctionner ou perdre ses
fonctionnalités améliorées.
Économie d'énergie intelligente (IPS):
La souris est équipée d'une fonction d'économie d'énergie intelligente (IPS).
• Lorsque le Nano récepteur USB est déconnecté ou que l'ordinateur est
éteint, la souris sera automatiquement désactivée pour économiser
l'énergie.
• Lorsque la souris ne fonctionne pas pendant 10 secondes, elle tombera
automatiquement au premier niveau d'IPS. Pour réveiller la souris, cliquez
sur n'importe quel bouton.
• Lorsque la souris ne fonctionne pas pendant 8 minutes, elle tombera
automatiquement au deuxième niveau d'IPS. Pour réveiller la souris, cliquez
sur n'importe quel bouton.
Reconnexion:
Il existe un code de connexion pour cette souris. Des températures élevées,
des champs électromagnétiques ou des vibrations peuvent influencer le
signal de code et la souris peut devoir être reconnectée. La souris et le Nano
récepteur ont un code intégré et une souris peut être connectée à un seul
récepteur, ou plusieurs souris à un Nano récepteur. La souris et le Nano
récepteur doivent être reconnectés s'ils sont soumis à des températures
élevées, à des champs électromagnétiques ou à de fortes vibrations.
Attention:
1. Pour maximiser la durée de vie de la batterie, il est recommandé d'utiliser
la souris sur une surface de couleur blanche ou claire.
2. Si elle n'est pas utilisée, la souris tombera en mode veille automatique en 3
secondes. Appuyez sur n'importe quelle bouton ou la molette de
défilement pour activer la souris.
3. N'utilisez pas la souris sur une surface de verre ou un miroir, car la souris
risque de ne pas fonctionner sur ces surfaces.
4. La souris pourrait ne pas fonctionner aisément sur certaines surfaces
spéciales telles que des surfaces lisses, foncées ou noires, réfléchissantes
et un tapis de souris 3D.
5. Évitez d'utiliser la souris sur une surface métallique. Les métaux, tels que le
fer, l'aluminium ou le cuivre, empêchent la transmission par
radiofréquence et ralentissent le temps de réponse du pointeur de la
souris ou provoquent l'échec temporaire de la souris.
6. Si votre ordinateur possède un boîtier en métal contenant de l'aluminium
ou du magnésium, utilisez la souris du côté de l'ordinateur. Le panneau
d'affichage peut interférer avec la radiofréquence si vous utilisez la souris
directement devant l'ordinateur.
FAQ:
1. Que dois-je faire si la souris ne fonctionne pas?
• Assurez-vous que la polarité des piles est correcte. Les polarités positives
(+) et négatives (-) de chaque batterie doivent correspondre aux marques
positives (+) et négatives (-) dans le compartiment de la batterie.
2. Le Nano récepteur USB est détecté par Windows (2000, 2003, XP, Vista,
Win7, Win8, Win8.1, Win10) mais le curseur ne bouge pas.
• Vérifiez si le voyant de faible puissance en haut de la souris s'allume. Si le
voyant s'allume, il est probable que les piles sont déchargées. Veuillez les
remplacer.
• Si le remplacement des piles ne va pas, il est probable que la souris n'est
pas connectée au récepteur. Essayez la reconnexion et assurez-vous que la
souris se trouve à une distance de fonctionnement optimale (1,5 m) du
Nano récepteur USB.
1. Assurez-vous que la tension de la batterie est correcte; si la tension est
faible, remplacez les piles.
2. Appuyez simultanément sur le bouton droit et le bouton du milieu (sous la
molette de défilement) (Ne relâchez pas les deux boutons jusqu'à ce que
vous arriviez à l'étape 3).
3. Branchez le Nano récepteur USB dans un port USB disponible de votre
ordinateur dans les 15 secondes.
4. Ensuite relâchez les deux boutons.
Commutation DPI:
Appuyez sur le bouton DPI pour faire défiler les 6 niveaux DPI.
Voyant de faible puissance de la batterie:
La souris est équipée d'un voyant de faible puissance.
Lorsque la puissance de la batterie est faible au cours
d'utilisation, le voyant sous la molette de défilement
clignotera. Veuillez remplacer la batterie.
Remarque: Nous vous recommandons d'utiliser une
pile alcaline AA.
Connexion du récepteur:
Retirez le Nano récepteur USB et branchez-le dans un port USB disponible de
votre ordinateur. La fonction Plug & Play de votre système détectera qu'un
nouveau périphérique est connecté et le installera automatiquement.
Instructions:
Installation des piles
La souris optique utilise deux piles AA (non fournies).
1. Ouvrez le couvercle du compartiment.
2. Insérez les piles dans le compartiment, veillant à ce qu'elles correspondent
aux marques de polarité.
3. Remettez le couvercle du compartiment.
4. Activez la souris en réglant l'interrupteur d'alimentation situé sur le fond
de la souris. Le voyant d'alimentation LED en haut de la souris clignotera.
Remarque: Assurez-vous que la polarité des piles est correcte. Les polarités
positive (+) et négative (-) de chaque pile doivent correspondre aux marques
positive (+) et négative (-) dans le compartiment de la batterie.
Matériel:
• Ordinateur avec un processeur Pentium ou un processeur AMD équivalent
• USB 2.0
Tastenanzahl:
Betriebsfrequenz:
Empfänger-Schnittstelle:
Batterietyp:
Betriebsspannung:
Betriebsstrom:
Schlafstrom:
Puissance de transmission:
6 Tasten
2.4GHz
USB-Version 2.0
2 x AA Batterien
3.0V
<0.8mA
0.05mA
1.5dBm
Technische Daten:
FR
FR
Nota: El receptor se puede quitar y guardar en el compartimento de la
batería mientras no se usa.
A A
A A
2
1
Puerto USB Receptor Nano
12
Retire el receptor Almacenar el receptor
Indicador de
baja potencia
ES ES
ES ES ES
Requisitos del sistema:
Para usar este ratón, su computadora debe cumplir con los siguientes
requisitos de hardware y ejecutar uno de los sistemas operativos enumera-
dos a continuación.
Sistema operativo:
• Windows 2000, 2003, XP, Vista, Win7, Win8, Win8.1, Win10, macOS, Linux
Nota: La rueda de desplazamiento solo funciona en los sistemas operativos
enumerados anteriormente. Si usa el ratón en un sistema operativo diferente,
es posible que no funcione o pierda sus características mejoradas.
Ahorro inteligente de energía (IPS):
El ratón está equipado con la función de ahorro de energía inteligente (IPS).
• Cuando el receptor USB Nano se desconecta o la PC se apaga, el ratón se
apagará automáticamente para ahorrar energía.
• Cuando el ratón no se utiliza durante 10 segundos, caerá automáticamente
al primer nivel de IPS. Para activar el ratón, haga clic en cualquier botón.
• Cuando el ratón no se utiliza durante 8 minutos, se colocará automática-
mente en el segundo nivel de IPS. Para activar el ratón, haga clic en
cualquier botón.
Reconexión:
Hay un código de conexión para este ratón. Las altas temperaturas, los
campos electromagnéticos o la vibración pueden influir en la señal del
código y es posible que sea necesario volver a conectar el ratón.
Tanto el ratón como el nano receptor tienen un código incorporado y un
ratón se puede conectar a un receptor, o varios ratones a un nano receptor.
Es posible que sea necesario volver a conectar el ratón y el nano receptor si
se somete a altas temperaturas, campos electromagnéticos o fuertes
vibraciones.
Atención:
1. Para maximizar la vida útil de la batería, se recomienda usar el ratón sobre
una superficie blanca o de color claro.
2. Si no se usa, el ratón se colocará en modo de suspensión automática en 3
segundos. Presione cualquier tecla o rueda de desplazamiento para activar
el ratón.
3. No use el ratón sobre una superficie de vidrio o espejo, ya que estas
superficies harán que el ratón falle temporalmente.
4. Es posible que el ratón no funcione correctamente en algunas superficies
especiales, como superficies lisas, oscuras o negras, reflectantes y
almohadillas de ratón 3D.
5. Evite usar el ratón sobre una superficie metálica. Los metales, como el
hierro, el aluminio o el cobre protegen la transmisión de radiofrecuencia y
pueden ralentizar el tiempo de respuesta del cursor del ratón o hacer que
el ratón falle temporalmente.
6. Si su PC tiene una carcasa metálica que contiene aluminio o magnesio, use
el ratón en el costado. El panel de la pantalla puede interferir con la señal
de radiofrecuencia si usa el ratón directamente frente a la PC.
Preguntas frecuentes:
1. ¿Qué debo hacer si el ratón no funciona?
• Asegúrese de que la polaridad de las baterías sea correcta. Los extremos
positivo (+) y negativo (-) de cada batería deben coincidir con las marcas
positivas (+) y negativas (-) en la carcasa de la batería.
• Asegúrese de que las baterías no estén descargadas.
2. Windows reconoce el receptor nano USB (2000, 2003, XP, Vista, Win7,
Win8, Win8.1, Win10) pero el cursor no se mueve.
• Compruebe si el indicador de baja potencia en la parte superior del ratón
se ilumina. Si el sensor se ilumina, es probable que las baterías estén
descargadas. Por favor reemplácelas.
• Si reemplazar las baterías no ayuda, es probable que el ratón no esté
conectado al receptor. Intente la reconexión y asegúrese de que el ratón se
encuentre dentro de la distancia de trabajo operativa óptima (1,5 m) desde
su receptor USB Nano.
1. Asegúrese de que el voltaje de la batería sea correcto; si el voltaje es bajo,
reemplace las baterías.
2. Presione el botón derecho y el botón central (debajo de la rueda de
desplazamiento) simultáneamente (No suelte ambos botones hasta que
haya completado el paso 3).
3. Enchufe el receptor USB Nano en un puerto USB libre de su computadora
en 15 segundos.
4. Luego suelte ambos botones.
Interruptor DPI:
Presione el botón DPI para recorrer los 6 niveles de DPI.
Indicador de batería baja:
El ratón está equipado con un indicador de baja potencia.
Cuando la energía de la batería está baja durante el
período de uso, el indicador debajo de la rueda de
desplazamiento parpadeará. Por favor reemplace la
batería.
Nota: Recomendamos que use baterías alcalinas secas AA.
Conexión del receptor:
Retire el receptor USB Nano del compartimiento de la batería y conéctelo a
un puerto USB disponible en su computadora. La función Plug & Play de su
sistema detectará que se ha conectado un nuevo dispositivo y lo instalará
automáticamente
Instrucciones:
Instalación de la batería
El ratón óptico utiliza dos baterías AA (no incluidas).
1. Abra la tapa de la batería.
2. Inserte las baterías en el compartimento, asegurándose de que se
corresponden con la marca de polaridad.
3. Vuelva a colocar la tapa de la batería.
4. Encienda el ratón ajustando el interruptor de encendido debajo del ratón.
El LED indicador de encendido en la parte superior del ratón parpadeará.
Nota: Asegúrese de que la polaridad de las baterías sea correcta. Los
extremos positivo (+) y negativo (-) de cada batería deben coincidir con las
marcas positivas (+) y negativas (-) en la carcasa de la batería.
Hardware:
• PC con un procesador Pentium o procesadores AMD equivalentes
• USB 2.0
Recuento de botones:
Frecuencia de operación:
Interfaz del receptor:
Tipo de batería:
Voltaje de operación:
Corriente en stand by:
Corriente de reposo:
Poder de transmision:
6 botones
2.4GHz
USB versión 2.0
2 pilas AA
3.0V
<0.8mA
0.05mA
1.5dBm
Especificaciones técnicas:
ES ES
Nota: si può rimuovere il ricevitore e conservarlo nel vano batteria quando
non è in uso.
A A
A A
2
1
Porta USB Ricevitore Nano
12
Rimuovere il Ricevitore Conservare il Ricevitore
Indicatore scarsità di energia
IT IT IT IT IT
Requisiti di Sistema:
Per usare questo mouse, il computer deve soddisfare i seguenti requisiti
hardware ed eseguire uno dei sistemi operativi indicati di seguito.
Sistema Operativo:
• Windows 2000, 2003, XP, Vista, Win7, Win8, Win8.1, Win10, macOS, Linux
Nota: La rotellina di scorrimento funziona solamente con i sistemi operativi
sopra indicati. Se si usasse il mouse con un sistema operativo diverso, il
mouse potrebbe non funzionare o perdere le sue funzionalità avanzate.
Risparmio Energetico Intelligente (IPS, Intelligent Power Saving):
Il mouse è provvisto della funzione Intelligent Power Saving (IPS).
• Quando il ricevitore USB Nano è scollegato o il PC è spento, il mouse si
spegne automaticamente per risparmiare l’energia.
• Quando il mouse non funziona per 10 secondi, scende automaticamente al
primo livello di IPS. Per riattivare il mouse, basta fare clic su un tasto
qualsiasi.
• Quando il mouse non viene usato per 8 minuti, scende automaticamente al
secondo livello di IPS. Per riattivare il mouse, basta fare clic su un tasto
qualsiasi.
Riconnessione:
C'è un codice di connessione per questo mouse. Le alte temperature, i campi
elettromagnetici o le vibrazioni potrebbero influenzare il segnale del codice
e potrebbe essere necessario riconnettere il mouse.
Sia il mouse sia il ricevitore nano hanno un codice integrato e un mouse
potrebbe essere collegato a un ricevitore o a più mouse a un ricevitore nano.
Potrebbe essere necessario ricollegare il mouse e il nano ricevitore se
soggetti ad alte temperature, campi elettromagnetici o forti vibrazioni.
Attenzione:
1. Per far sì che la batteria duri più a lungo, si consiglia di utilizzare il mouse
su una superficie bianca o chiara.
2. Se non venisse usato, il mouse andrà automaticamente in modalità sleep
entro 3 secondi. Premere un tasto qualsiasi o la rotellina di scorrimento
per riattivare il mouse.
3. Non usare il mouse su una superficie di vetro o a specchio, in quanto
queste superfici causeranno un malfunzionamento temporaneo del
mouse.
4. Il mouse potrebbe non funzionare fluidamente su alcune particolari
superfici, come superfici lisce, scure o nere, riflettenti e cuscinetti per
mouse 3D.
5. Evitare di usare il mouse su una superficie metallica. I metalli, quali il ferro,
l'alluminio o il rame schermano la trasmissione a radiofrequenza e
potrebbero rallentare il tempo di risposta del cursore del mouse o causare
un malfunzionamento temporaneo del mouse.
6. Se il PC avesse una custodia in metallo contenente alluminio o magnesio,
usare il mouse sul lato. Il pannello di visualizzazione potrebbe interferire
con il segnale di radiofrequenza se si usasse il mouse direttamente davanti
al PC.
FAQ:
1. Cosa dovrei fare se il mouse non funzionasse?
• Assicurarsi che la polarità delle batterie sia corretta. I poli positivo (+) e
negativo (-) di ogni batteria devono corrispondere ai segni positivi (+) e
negativi (-) nel vano batteria.
2. Cosa dovrei fare se ricevitore USB Nano fosse riconosciuto da Windows
(2000, 2003, XP, Vista, Win7, Win8, Win8.1, Win10), ma il cursore non si
muove?
• Controllare se la spia di bassa potenza sulla parte superiore del mouse si
illumina. Se il sensore si accendesse, è probabile che le batterie siano
scariche. Si prega di sostituirle.
• Se la sostituzione delle batterie non risolvesse il problema, è probabile che
il mouse non sia collegato al ricevitore. Provare a ricollegare e assicurarsi
che il mouse si trova entro la distanza di lavoro operativa ottimale (1,5
metro) dal ricevitore USB Nano.
1. Assicurarsi che la tensione della batteria sia corretta; se la tensione fosse
bassa, sostituire le batterie.
2. Premere contemporaneamente il tasto destro e il tasto centrale (sotto la
rotellina di scorrimento) (non rilasciare entrambi i tasti fino a quando non
è stato completato il passaggio 3).
3. Collegare il ricevitore Nano USB a una porta USB libera del computer entro
15 secondi.
4. Quindi rilasciare entrambi i tasti.
Interruttore DPI:
Premere il pulsante DPI per scorrere 6 livelli DPI.
Indicatore di Batteria Scarica:
Il mouse ha una spia a scarsità di energia. Quando la
carica della batteria si sta esaurendo nel corso del
periodo di utilizzo, l'indicatore sotto la rotella di
scorrimento lampeggia. Si prega di sostituire la
batteria.
Nota: Si consiglia di usare delle batterie alcaline a
secco AA.
Collegare il Ricevitore:
Rimuovere il ricevitore USB Nano dal vano batteria e collegarlo a una porta
USB disponibile nel computer. La funzione Plug & Play del sistema rileverà
che un nuovo dispositivo è stato collegato e lo installerà in automatico.
Istruzioni:
Installazione della Batteria
Il mouse ottico usa due batterie AA (non incluse).
1. Aprire il coperchio del vano batteria.
2. Inserire le batterie nel vano, assicurandosi che corrispondano ai segni della
polarità.
3. Rimettere il coperchio del vano batteria.
4. Accendere il mouse regolando l'interruttore di alimentazione sotto il
mouse. Il LED dell'indicatore di alimentazione nella parte superiore del
mouse lampeggerà.
Nota: Assicurarsi che la polarità delle batterie sia corretta. I poli positivi (+) e
negativi (-) di ogni batteria devono corrispondere ai segni più (+) e meno (-)
nel vano batteria.
Hardware:
• PC con processore Pentium o processori AMD equivalenti
• USB 2.0
Numero Tasti: 6 tasti
Frequenza di Funzionamento: 2.4 GHz
Interfaccia Ricevitore: USB versione 2.0
Tipo di Batteria: 2 Batterie AA
Tensione di Funzionamento: 3.0V
Tensione in Standby: 0.05mA
Potenza di trasmissione: 1.5dBm
Specifiche Tecniche:
IT IT
A A
A A
2
1
USB
12
JP JP JP JP
JP JP
Hinweis: Der Empfänger kann entfernt und im Batteriefach aufbewahrt
werden während nicht in Gebrauch.
A A
A A
2
1
USB-Anschluss Nano-Empfänger
12
Nehmen Sie den Empfänger heraus Bewahren Sie den Empfänger auf
Low Power Anzeige
DE DE DEDE DE DE
Systemanforderungen:
Um diese Maus zu benutzen, muss Ihr Computer die folgenden Hardwarean-
forderungen erfüllen und eines der unten aufgeführten Betriebssysteme
ausführen.
Betriebssystem :
• Windows 2000, 2003, XP, Vista, Win7, Win8, Win8.1, Win10, macOS, Linux
Hinweis: Das Scrollrad funktioniert nur unter den oben aufgeführten
Betriebssystemen. Wenn Sie die Maus unter einem anderen Betriebssystem
benutzt, kann die Maus entweder nicht funktionieren oder ihre erweiterten
Funktionen verlieren.
Intelligente Energieeinsparung (IPS):
Die Maus ist mit der Funktion von intelligenter Energieeinsparung (IPS)
ausgestattet.
• Wenn der USB-Nano-Empfänger abgetrennt oder der PC ausgeschaltet ist,
wird die Maus zum Zwecke der Stromsparfunktion automatisch
ausgeschaltet.
• Wenn Ihre Maus 10 Sekunden lang nicht betätigt wird, wird sie automatisch
auf die erste Stufe von IPS fallen. Um die Maus zu wecken, klicken Sie auf
eine beliebige Taste.
• Wenn Ihre Maus 8 Minuten nicht betätigt wird, wird sie automatisch auf die
zweite Stufe von IPS fallen. Um die Maus zu wecken, klicken Sie auf eine
beliebige Taste.
Wieder verbinden:
Es gibt einen Verbindungscode für diese Maus. Hohe Temperaturen,
elektromagnetische Felder oder Vibrationen können das Codesignal
beeinflussen und die Maus muss eventuell wieder angeschlossen werden..
Sowohl Maus als auch Nano-Empfänger haben einen eingebauten Code und
eine Maus kann mit einem Empfang verbunden werden, oder mehrere
Mäuse zu einem Nano-Empfänger. Der Maus- und Nano-Empfänger müssen
eventuell wieder angeschlossen werden, wenn sie hohen Temperaturen,
elektromagnetischen Feldern oder starken Vibrationen ausgesetzt ist.
Achtung:
1. Um die Batterielebensdauer zu maximieren, empfiehlt es sich, die Maus auf
einer weißer oder heller Farbe Oberfläche zu verwenden.
2. Wenn nicht verwendet, wird die Maus innerhalb von 3 Sekunden in den
automatischen Schlafmodus fallen. Drücken Sie eine beliebige Taste oder
Scrollrad, um die Maus zu aktivieren.
3. Verwenden Sie die Maus nicht auf einem Glas oder einer verspiegelter
Oberfläche, da diese Flächen die Maus vorübergehend ausfallen lassen.
4. Die Maus funktioniert möglicherweise nicht reibungslos auf einigen
speziellen Oberflächen, wie glatten, dunklen oder schwarzen, reflektieren-
den und 3D-Mauspads Oberflächen.
5. Vermeiden Sie es, die Maus auf einer Metalloberfläche zu benutzen.
Metalle wie Eisen, Aluminium oder Kupfer schirmt die Hochfrequenzüber-
tragung ab und kann die Reaktionszeit des Maus-Moderators verlang-
samen oder die Maus vorübergehend ausfallen lassen.
6. Wenn Ihr PC ein Metallgehäuse hat, indem das Aluminium oder
Magnesium enthält, verwenden Sie die Maus zur Seite. Das Display kann
das Hochfrequenzsignal stören, wenn man die Maus direkt vor dem PC
benutzt.
Häufig gestellte Fragen:
1. Was soll ich tun, wenn die Maus nicht funktioniert?
• Stellen Sie sicher, dass die Polarität der Batterien korrekt ist. Die positiven
(+) und negativen (-) Enden jeder Batterie müssen mit den positiven (+) und
negativen (-) Markierungen im Batteriegehäuse übereinstimmen.
• Stellen Sie sicher, dass die Batterien nicht entladen sind.
• Bitte versuchen Sie, die Batterien zu entfernen und die Batterien erneut zu
installieren
• Stellen Sie sicher, dass die Funktion der Stromverwaltung Ihres Computers
deaktiviert sind.
• Überprüfen Sie, ob der Nano-Empfänger des USB-Anschlusses fest am
USB-Anschluss Ihres Computers angeschlossen ist.
• Check the Nano receiver's USB connector is firmly attached to the USB port
of your computer.
2. Der USB-Nano-Empfänger wird von Windows (2000, 2003, XP, Vista,
Win7, Win8, Win8.1, Win10) erkannt, aber der Cursor bewegt sich nicht?
• Prüfen Sie, ob die Niedrigleistungsanzeige oben auf der Maus leuchtet auf.
Wenn der Sensor aufleuchtet, ist es wahrscheinlich, dass die Batterien
entladen sind. Bitte ersetzen Sie sie.
• Wenn das Ersetzen der Batterien nicht hilft, ist es wahrscheinlich, dass die
Maus nicht mit dem Empfänger verbunden ist. Bitte versuchen Sie es erneut
und stellen Sie sicher, dass die Maus innerhalb des optimalen Arbeitsab-
standes (1,5 m) vom USB-Nano-Empfänger liegt.
1. Stellen Sie sicher, dass die Batteriespannung korrekt ist. Wenn die
Spannung niedrig ist, ersetzen Sie die Batterien.
2. Drücken Sie die rechte Taste und die mittlere Taste (unter dem Scrollrad)
gleichzeitig (Lassen Sie beide Tasten nicht los, bis Sie Schritt 3 abgeschlos-
sen haben).
3. Stecken Sie den USB-Nano-Empfänger innerhalb von 15 Sekunden in einen
freien USB-Port Ihres Computers.
4. Dann beide Tasten loslassen.
DPI Schalter:
Drücken Sie die DPI-Taste, um durch 6 DPI-Stufen zu schalten.
Niedrige Batterieanzeige:
Die Maus ist mit geringer Stromanzeige ausgestat-
tet.Wenn die Batteriespannung während des
Betriebszeitraums niedrig wird, wird die Anzeige unter
dem Scrollrad blinken. Bitte ersetzen Sie die Batterien.
Hinweis: Wir empfehlen Ihnen, eine alkalische
Trockenbatterie zu verwenden.
Anschluss des Empfängers:
Nehmen Sie den USB-Nano-Empfänger heraus und stecken Sie ihn in einen
freien USB-Port Ihres Computers. Wenn die Plug & Play-Funktion Ihres
Systems erkennt, dass ein neues Gerät angeschlossen wurde, wird sie
automatisch installieren.
Anleitungen :
Batterieinstallation
Die optische Maus verwendet zwei AA-Batterien (nicht im Lieferumfang
enthalten).
1. Öffnen Sie den Batteriefachdeckel.
2. Legen Sie die Batterien ins Abteil ein und stellen Sie sicher, dass sie mit der
Polaritätsmarkierung übereinstimmen.
3. Ersetzen Sie die Batterieabdeckung
4. Schalten Sie die Maus ein, indem Sie den Netzschalter unter die Maus
stellen. Die LED der Netzanzeige an der Oberseite der Maus blinkt.
Hinweis: Stellen Sie sicher, dass die Polarität der Batterien korrekt ist. Die
positiven (+) und negativen (-) Enden jeder Batterie müssen mit den positiven
(+) und negativen (-) Markierungen im Batteriegehäuse übereinstimmen.
Hardware :
• PC mit einem Pentium-Prozessor oder gleichwertigen AMD-Prozessoren
• USB 2.0
Tastenanzahl:
Betriebsfrequenz:
Empfänger-Schnittstelle:
Batterietyp:
Betriebsspannung:
Betriebsstrom:
Schlafstrom:
übertragungsleistung:
6 Tasten
2,4 GHz
USB-Version 2.0
2 x AA Batterien
3,0 V
<0,8mA
0,05mA
1.5dBm
Technische Daten :
DE DE
技術仕様 IMPORTANT SAFETY INSTRUCTIONS-CAREFULLY
FOLLOW THESE INSTRUCTIONS.
1. SAVE THESE INSTRUCTIONS - This sheet contains important
safety and operating instructions.
2. Before using the product, read all instructions and caution
markings on the product, accessories and device using our
product.
3. This appliance is not intended for use by persons (including
children) with reduced physical, sensory or mental capabilities, or
lack of experience and knowledge, unless they have been given
supervision or instruction concerning use of the appliance by a
person responsible for their safety.
4. Children should be supervised to ensure that they do not play
with the appliance.
5. Keep the product away from fire or explosion may occur.
6. Do not place the product in or near any inflammable, explosive
or hazardous object.
7. Do not place in or near water, rain, excess moisture or extreme
heat.
8. Do not operate the product with damaged cord or plug.
9. Do not operate the product if it has been damaged in any way.
10. Do not disassemble the product. Disassembly may result in a
risk of safety hazards.
11. Do not throw or shake the product.
Limited 12-Month Warranty
What this warranty covers.
Shenzhen Unichain Technology Co., LTD. (Manufacturer: “Unichain”) warrants
to the original purchaser of this TECKNET product that the product shall be
free of defects in design, assembly, material, or workmanship.
What the period of coverage is.
Unichain warrants the TECKNET product for 12 Months.
What will we do to correct problems?
Unichain will repair or replace, at its option, any defective product free of
charge (except for shipping charges for the product).
What is not covered by this warranty?
All above warranties are null and void if the TECKNET product is not provided
to Unichain for inspection upon Unichain’s request at the sole expense of the
purchaser, or if Unichain determines that the TECKNET product has been
improperly installed, altered in any way, or tampered with. The TECKNET
Product Warranty does not protect against acts of God such as flood,
earthquake, lightning, war, vandalism, theft, normal-use wear and tear,
erosion, depletion, obsolescence, abuse, damage due to low voltage
disturbances (e.g. brownouts or sags), non-authorized program, or system
equipment modification or alteration.
How to claim the warranty
Please contact retailers or visit TECKNET website or email support@teckne-
tonline.com for more information. To extend the warranty period, please
visit TECKNET website and register your TECKNET products within 90 days of
purchase.
Disclaimer
Every effort has been made to ensure that the information and procedures in
this guide are accurate and complete, no liability can be accepted for any
errors or omissions and we reserve the right to make any changes without
further notice to any products mentioned herein.
SIMPLIFIED EU DECLARATION OF CONFORMITY:
Hereby, Shenzhen Unichain Technology Co., Ltd. declares that the product type
M002 is in compliance with Directive 2014/53/EU.
The full text of the EU declaration of conformity is available at the following
internet address: https://eu.tecknetonline.com/
• Assurez-vous que les piles ne sont pas déchargées.
• Essayez de retirer les piles et de les réinstaller.
• Vérifiez que la fonction de gestion d'alimentation de votre ordinateur est
désactivée.
• Vérifiez si le connecteur USB du Nano récepteur est bien branché au port
USB de votre ordinateur.
• Intente quitar las baterías y vuelva a instalarlas.
• Verifique que las funciones de administración de energía de su computado-
ra estén apagadas.
• Verifique que el conector USB del receptor nano esté firmemente
conectado al puerto USB de su computadora.
• Assicurarsi che le batterie non si siano scaricate.
• Provare a rimuovere le batterie e reinstallarle di nuovo.
• Verificare che le funzionalità di risparmio energia del computer siano
disattivate.
• Controllare che il connettore USB del ricevitore Nano sia saldamente
attaccato alla porta USB del computer.
Correct Disposal of This Product
( Waste Electrical& Electronic Equipment )
This Marking shown on the product or its literature, indicate that it should not
be disposed with other household wastes at the end of its working life.
To prevent possible harm to the environment or human health from
uncontrolled waste disposal, please separate this from other types of wastes
and recycle it responsibly to promote the sustainable reuse of material
resources.Household user should contact either the retailer where they
purchased this product, or their local government office, for details of where
and how they can take this item for environmentally safe recycling.
Business users should contact their supplier and check the terms and conditions
of the purchase contact. This product should not be mixed with other
commercial wastes for disposal.
FCC Statement
This device complies with Part 15 of the FCC Rules. Operation is subject to
the following two conditions:
(1) This device may not cause harmful interference, and
(2) This device must accept any interference received, including interfer-
ence that may cause undesired operation.
Warning: Changes or modifications not expressly approved by the party
responsible for compliance could void the user's authority to operate the
equipment.
NOTE: This equipment has been tested and found to comply with the limits
for a Class B digital device, pursuant to Part 15 of the FCC Rules. These
limits are designed to provide reasonable protection against harmful
interference in a residential installation. This equipment generates uses and
can radiate radio frequency energy and, if not installed and used in
accordance with the instructions, may cause harmful interference to radio
communications. However, there is no guarantee that interference will not
occur in a particular installation. If this equipment does cause harmful
interference to radio or television reception, which can be determined by
turning the equipment off and on, the user is encouraged to try to correct
the interference by one or more of the following measures:
~ Increase the separation between the equipment and receiver.
~ Connect the equipment into an outlet on a circuit different from that to
which the receiver is connected.
~ Consult the dealer or an experienced radio/TV technician for help.
FCC Radiation Exposure Statement:
This equipment complies with FCC radiation exposure limits set forth for an
uncontrolled environment. This equipment should be installed and
operated with minimum distance 20cm between the radiator & your body.
12