EN EN EN EN EN
Technical Specifications
Button Count: 6 buttons
Operating Frequency: 2.4GHz
Resolution: 800/1200/1600/2400/3200/4800DPI, Default 1200DPI
Receiver Interface: USB version 2.0
Battery Type: 2 x AA Batteries
Battery Life: 30 months
Operating Voltage: 3.0V
Operating Current: <5mA
Stand by Current: < 0.8mA
Sleep Current: 0.05mA
Sensor: P3212
Transmission Power: 1.5dBm
Package Contents
1 x Cordless Mouse
1 x USB Nano Receiver
1 x User Manual
Note: Batteries NOT included
System Requirements
To use this mouse, your computer must meet the following hardware requirements and run
one of the operating systems listed below.
Hardware
• PC with a Pentium processor or equivalent AMD processors
• USB 2.0
Operating System
• Windows XP, Vista, Win7, Win8, Win8.1, Win10
Note: The scroll wheel only works under the operating systems listed above. If you use the
mouse under a different operating system, the mouse may either not work or lose its
enhanced features.
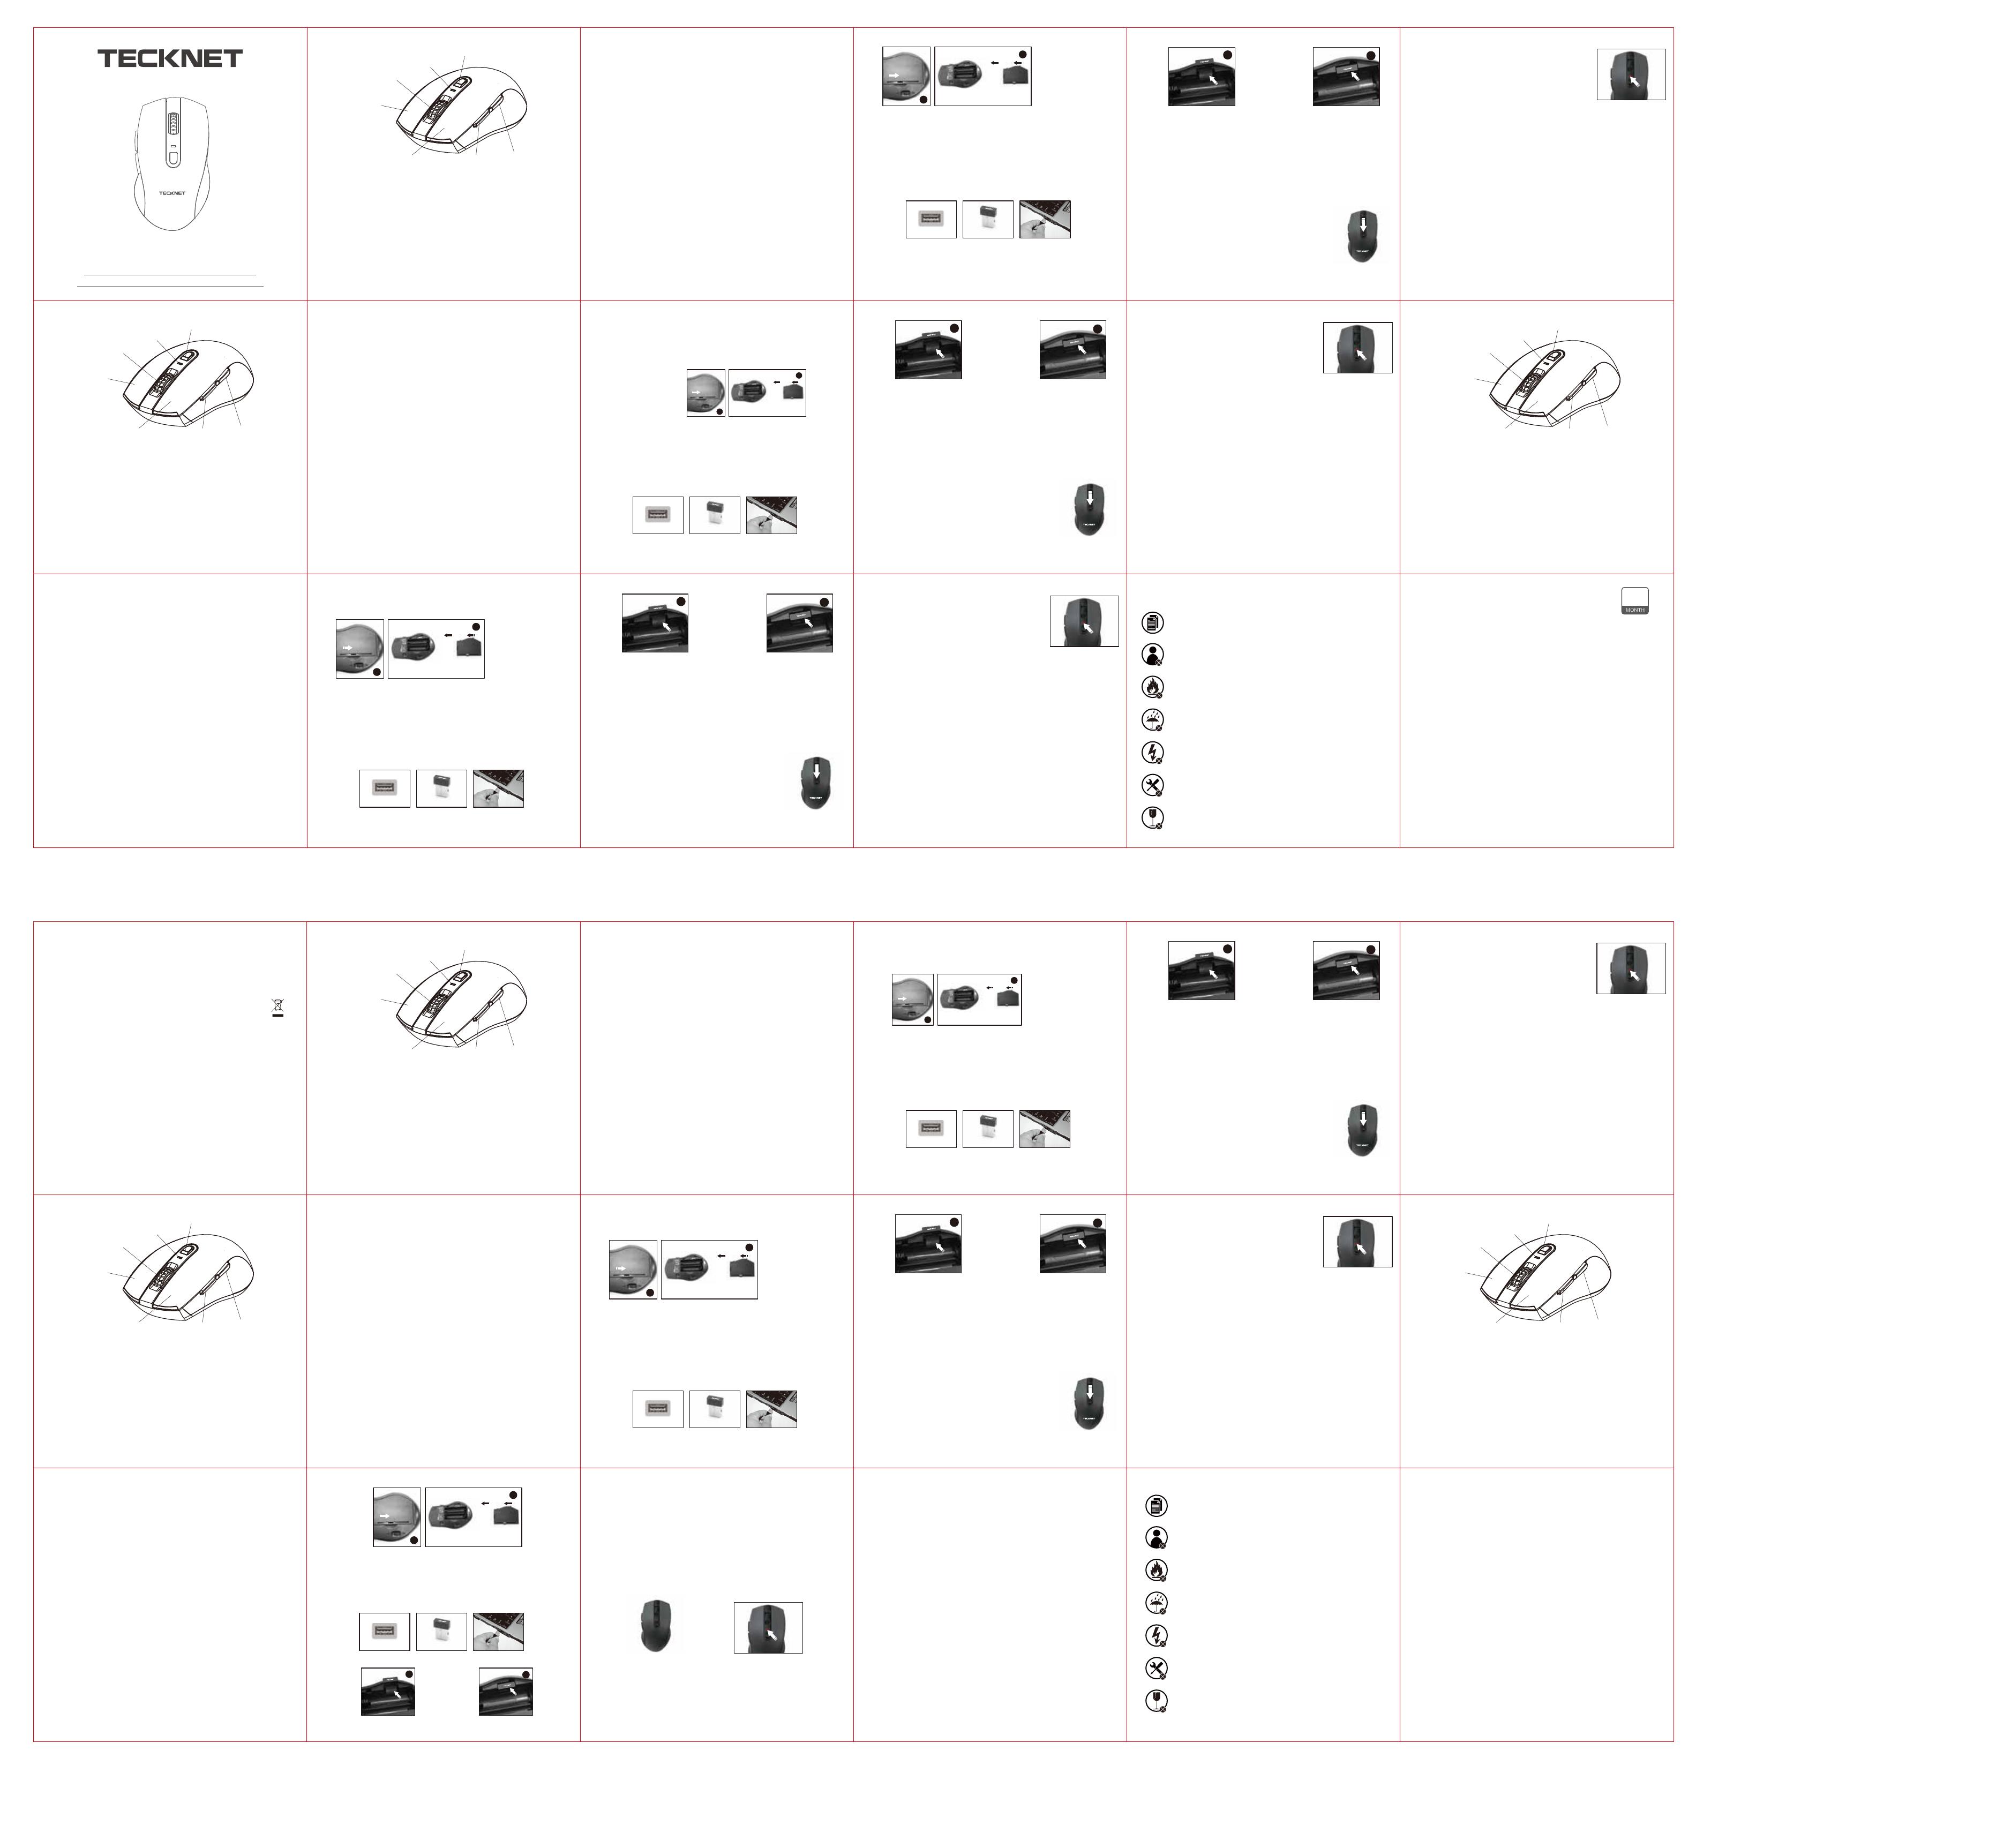
Inserting the Batteries
The optical mouse uses two AA batteries (not included).
1. Open the battery cover.
2. Insert the batteries into the compartment, ensuring they correspond with the polarity
markings.
3. Close the battery cover.
4. Switch on the mouse by adjusting the power switch underneath the mouse. The Red LED
of the power indicator at the top of the mouse will flash.
Note: Make sure that the polarity of the batteries is correct. The positive (+) and negative (-)
ends of each battery must match the positive (+) and negative (-) markings in the battery
housing.
30-Month Battery Life
The mouse consumes little power and offers a long battery life of up to 30 months without
changing batteries. However please note that the actual battery life may vary based on
user and computing conditions.
Receiver Connection
Take out the USB Nano receiver and plug it into a free USB port on your computer. The
Plug &Play function of your system will detect that a new device has been connected and
install it automatically.
Intelligent Power Saving (IPS)
The mouse is equipped with Intelligent Power Saving (IPS) function.
• When the USB Nano receiver is disconnected or the PC is switched off, the mouse will
be switched off automatically for the purpose of power-saving.
• When your mouse is not operated for 10 seconds, it will automatically drop to the
first level of IPS. To wake the mouse, click any button.
• When your mouse is not operated for 8 minutes, it will automatically drop to the
second level of IPS. To wake the mouse, click any button.
Low Battery Power Indicator
The mouse is equipped with a low power indicator. When the
battery power gets low during the period of use, the Indicator
under the scroll wheel will flash. Please replace the batteries.
Note: We recommend you use AA alkaline dry cell batteries.
FAQ
1.What should I do if the mouse does not work?
• Make sure that the polarity of the batteries is correct. The positive (+) and negative (-)
ends of each battery must match the positive (+) and negative (-) markings in the battery
housing.
• Make sure the batteries are not discharged.
• Please try to remove the batteries, and reinstall the batteries again.
• Verify that your computer's power management features are turned off.
•Check the Nano receiver's USB connector is firmly attached to the USB port of your
computer.
2.The USB Nano receiver is recognized by Windows (2000, 2003, XP, Vista, Win7, Win8,
Win8.1, Win10) but the cursor does not move?
• Check whether the low power indicator on the top of the mouse lights up. If the sensor
lights up, it is likely that the batteries are discharged. Please replace them.
• If replacing the batteries does not help, it is likely that the mouse is not connected to the
receiver. Please try reconnection and ensure that the mouse is within the optimal
operational working distance (1.5m) from its USB Nano receiver.
DPI Switch
The mouse supports six levels of DPI:
800/1200/1600/2400/3200/4800DPI. The default DPI is 1200. Press
the DPI button, DPI will raise to 1600, LED indicator will flash three
times. Press the DPI button for each time, the DPI will raise to the
next level, and the DPI LED light will flash one more time.
Note: The receiver can be removed and stored in the battery compartment while not in
use.
Left Click Button
Scroll Wheel
Low Battery Indicator
DPI Switch Button
Right Click Button
Forward Button Backward Button
Product Layout
DE DE
Technische Spezifikationen
Tastenanzahl: 6 Tasten
Betriebsfrequenz: 2,4 GHz
Auflösung: 800/1200/1600/2400/3200/4800 DPI, Standard 1200 DPI
Empfängerschnittstelle: USB-Version 2.0
Batterietyp: 2 x AA Batterien
Batterielebensdauer: 30 Monate
Betriebsspannung: 3.0 V
Betriebsstrom: <5 mA
Standby Strom: <0.8 mA
Schlafstrom: 0,05 mA
Sensor: P3212
übertragungsleistung: 1.5dBm
Das inhalt
1 x schnurlose maus
1 x usb - empfänger
1 x bedienungsanleitung
anmerkung: die batterien nicht enthalten
Systemanforderungen
die maus zu verwenden, muss ihr computer erfüllen folgende anforderungen an die
hardware und einer der unten genannten betriebssysteme.
Hardware
• PC mit einem pentium - prozessor oder gleichwertigen amd - prozessoren
• USB 2.0
Betriebssystem
• windows xp, vista, win7, win8, win8.1, win10
hinweis: das mausrad funktioniert nur unter den betriebssystemen aufgelistet.wenn sie mit
der maus unter einem anderen betriebssystem, die maus kann entweder nicht oder verlieren
ihre erweiterte funktionen.
Einlegen der Batterien
Die optische Maus verwendet zwei AA-Batterien (nicht im Lieferumfang enthalten).
1. Öffnen Sie die Batterieabdeckung.
2. Legen Sie die Batterien in das Fach ein und achten Sie dabei auf die richtige
Polarität
Markierungen.
3. Schließen Sie die Batterieabdeckung.
4. Schalten Sie die Maus ein, indem Sie den Netzschalter unter der Maus
betätigen. Die rote LED der Betriebsanzeige oben an der Maus blinkt.
Links-Klick-Taste
Scrollrad
Niedrigspannungsanzeige
DPI-Taste
Rechts-Klick-Taste
Vorwärts-Taste Rückwärts-Taste
Product Layout
FR
Spécifications techniques
Nombre de boutons : 6 boutons
Fréquence de fonctionnement : 2.4GHz
Résolution : 800/1200/1600/2400/3200/4800DPI, Par défaut 1200DPI
Interface du récepteur : USB version 2.0
Type de batterie : 2 x piles AA
Durée de vie de la batterie : 30 mois
Tension de fonctionnement : 3.0V
Courant de fonctionnement : <5mA
Courant en standby : < 0.8mA
Courant de veille : 0.05mA
Capteur : P3212
Puissance de transmission: 1.5dBm
Cliquez avec le bouton gauche
Scrollrad
Niedrigspannungsanzeige
Liaison DPI
Le bouton de clic droit
Vorwärts-Taste Le bouton
Présentation de produit
2
1
USB Port Nano receiver
2
1
Take out the receiver Store the receiver Low Power Indicator
DE
Niedrigspannungsanzeige
Die Maus ist mit einer Niedrigleistungsanzeige ausgestattet.
Wenn die Batterieleistung während der Nutzungsdauer absinkt,
blinkt die Anzeige unter dem Scrollrad. Bitte ersetzen Sie die
Batterien.
Hinweis: Wir empfehlen die Verwendung von Alkali-Trockenbat-
terien der Größe AA.
FAQ
1. Was soll ich tun, wenn die Maus nicht funktioniert?
• Vergewissern Sie sich, dass die Polarität der Batterien korrekt ist. Die positiven (+) und
negativen (-) Enden jeder Batterie müssen mit den positiven (+) und negativen (-)
Markierungen im Batteriegehäuse übereinstimmen.
• Stellen Sie sicher, dass die Batterien nicht entladen sind.
• Bitte versuchen Sie, die Batterien zu entfernen, und installieren Sie die Batterien erneut.
• Vergewissern Sie sich, dass die Energiesparfunktionen Ihres Computers ausgeschaltet
sind.
• Überprüfen Sie, ob der USB-Anschluss des Nano-Receivers fest mit dem USB-Anschluss
Ihres Computers verbunden ist.
2. Der USB Nano-Empfänger wird von Windows erkannt (2000, 2003, XP, Vista, Win 7, Win
8, Win 8.1, Win 10), aber der Cursor bewegt sich nicht?
• Überprüfen Sie, ob die Niedrigspannungsanzeige an der Oberseite der Maus aufleuchtet.
Wenn der Sensor aufleuchtet, sind die Batterien wahrscheinlich entladen. Bitte ersetzen Sie
sie.
• Wenn das Ersetzen der Batterien nicht hilft, ist es wahrscheinlich, dass die Maus nicht mit
dem Empfänger verbunden ist. Bitte versuchen Sie es erneut und stellen Sie sicher, dass
sich die Maus im optimalen Arbeitsabstand (1,5 m) von ihrem USB-Nano-Empfänger
befindet.
Low Power Indicator
DPI Switch
DE
Intelligente Energieeinsparung (IPS)
Die Maus ist mit der Intelligent Power Saving (IPS)-Funktion ausgestattet.
• Wenn der USB-Nano-Empfänger getrennt oder der PC ausgeschaltet ist, wird die Maus
automatisch ausgeschaltet, um Energie zu sparen.
• Wenn Ihre Maus 10 Sekunden lang nicht benutzt wird, fällt sie automatisch auf die erste
IPS-Ebene. Um die Maus aufzuwecken, klicken Sie auf eine beliebige Schaltfläche.
• Wenn Ihre Maus 8 Minuten lang nicht bedient wird, fällt sie automatisch auf die zweite
Ebene von IPS. Um die Maus aufzuwecken, klicken Sie auf eine beliebige Schaltfläche.
DPI-Schalter
Die Maus unterstützt sechs DPI-Ebenen:
800/1200/1600/2400/3200/4800 DPI. Die Standard-DPI ist 1200. Drücken
Sie die DPI-Taste ein Mal, wird die DPI auf 1600 erhöht, und die
LED-Anzeige wird dreimal blinken. Drücken Sie die DPI-Taste ein weiteres
Mal, wird die DPI auf die nächste Stufe angehoben, und die
DPI-LED-Leuchte wird noch einmal blinken.
2
1
Take out the receiver Store the receiver
DPI Switch
A A
A A
DE
30-monatige Batterielaufzeit
Die Maus verbraucht wenig Strom und bietet eine lange Akkulaufzeit von bis zu 30
Monaten, ohne dass die Batterie gewechselt werden muss. Beachten Sie jedoch, dass die
tatsächliche Akkulaufzeit je nach Benutzer und Computerbedingungen variieren kann.
Einlegen der Batterien
Die optische Maus verwendet zwei AA-Batterien (nicht im Lieferumfang enthalten).
1. Öffnen Sie die Batterieabdeckung.
2. Legen Sie die Batterien in das Fach ein und achten Sie dabei auf die richtige Polarität
Markierungen.
3. Schließen Sie die Batterieabdeckung.
4. Schalten Sie die Maus ein, indem Sie den Netzschalter unter der Maus betätigen. Die rote
LED der Betriebsanzeige oben an der Maus blinkt.
Empfängerverbindung
Nehmen Sie den USB-Nano-Empfänger heraus und stecken Sie ihn in einen freien
USB-Anschluss Ihres Computers. Die Plug & Play-Funktion Ihres Systems erkennt, dass
ein neues Gerät angeschlossen wurde und installiert es automatisch.
Hinweis: Der Empfänger kann entfernt und im Batteriefach aufbewahrt werden, wenn er
nicht benutzt wird.
USB Port Nano receiver
2
1
A A
A A
FR
Contenu des colis
1 x, souris sans fil
1 x usb nano - receveur
1 x manuel utilisateur
Note: piles non comprises
les exigences du système
pour utiliser cette souris, votre ordinateur doit répondre aux exigences suivantes de matériel
et l'un des systèmes d'exploitation énumérés ci - dessous.
Le matériel
• PC avec processeur pentium ou équivalent et les transformateurs
• USB 2.0
Le système d'exploitation
• windows xp, vista, win7, win8, win8.1, win10
Note: le parchemin volant fonctionne sous le système d'exploitation énumérés ci - dessus.si
vous utilisez la souris dans un autre système d'exploitation, la souris peut soit ne pas
travailler ou perdre ses caractéristiques améliorées.
Instructions battery installation
la souris utilise deux piles aa optique (non inclus).
1.ouvrez le couvercle.
2.ajouter les piles dans le compartiment, en veillant à ce qu'elles correspondent aux marques
de polarité.
3.remplacer la batterie.
4.allume la souris en ajustant l'interrupteur en dessous de la souris.la diode rouge de
l'indicateur au sommet de la souris est flash.
IT
Specifiche Tecniche
Numero Pulsanti: 6 pulsanti
Frequenza Funzionamento: 2.4GHz
Risoluzione: 800/1200/1600/2400/3200/4800DPI, Default 1200DPI
Interfaccia Ricevitore: USB versione 2.0
Tipo Batteria: 2 Batterie AA
Vita Batteria: 30 mesi
Tensione Funzionamento: 3.0V
Corrente Funzionamento: <5mA
Stand: < 0.8mA
Sleep: 0.05mA
Sensore: P3212
Potenza di trasmissione: 1.5dBm
Pulsante sinistro
Rotella di Scorrimento
Indicatore Batteria Scarica
Pulsante Interruttore DPI
Pulsante destro
Pulsante Avanti Pulsante indietro
Présentation de produit
ES
Especificaciones técnicas
Cantidad de botones: 6
Frecuencia operativa: 2.4GHz
Resolución: 800/1200/1600/2400/3200/4800DPI, por defecto 1200DPI
Interfaz del receptor: USB versión 2.0
Tipo de batería: 2 x AA
Vida útil de la batería: 30 meses
Voltaje: 3.0V
Corriente operativa: <5mA
Corriente en Stand by: < 0.8mA
Corriente en reposo: 0.05mA
Sensor: P3212
Poder de transmision: 1.5dBm
Botón izquierdo
Rueda de desplazamiento
Indicador de batería baja
Botón de cambio de DPI
Botón derecho
Botón para avanzar Botón para retroceder
Présentation de produit
IT
Pacchetto Contenuto
1 x mouse senza filo
1 x usb nano - ricevitore
1 x manuale utente
Nota: le batterie non incluse
I requisiti di sistema
usare il mouse, il computer deve soddisfare i seguenti requisiti hardware e gestire uno dei
sistemi operativi elencati di seguito.
Hardware
• pc con un processore pentium o equivalente amd processori
• usb 2.0
Il sistema operativo
• windows xp, vista, win7, win8, win8.1, win10
Nota: la rotellina funziona solo con i sistemi operativi di cui sopra.se vuoi usare il mouse in
un sistema operativo diverso, il mouse può non funzionare o perdere le sue caratteristiche
rafforzata.
Istruzioni di installazione della batteria
il mouse ottico utilizza due pile (non incluso).
1.apri la batteria.
2.inserisci le batterie nel compartimento, assicurando che corrispondono con la polarità dei
segni.
3.sostituire la batteria.
4.passa il mouse regolando il potere passa sotto il mouse.il led rosso del potere indicatore in
cima il topo flash.
FR
FAQ
1. Que dois-je faire si la souris ne fonctionne pas ?
. Assurez-vous que les polarités des piles sont correctes. Le pôle positif (+) et négatif (-) de
chaque pile doit correspondre aux indications (+) et (-) du compartiment des piles.
. Vérifiez que les piles ne sont pas déchargées.
. Essayez de retirer les piles et de les remettre.
. Vérifiez que les fonctions de gestion énergétique de votre ordinateur sont désactivées.
. Vérifiez que le connecteur du nano récepteur USB est bien branché au port USB de votre
ordinateur.
. Ça ne fonctionne toujours pas ? Veuillez essayer "Reconnexion"
2. Le nano récepteur est reconnu par Windows (2000, 2003, XP, Vista, Win7, Win8, Win8.1,
Win10), mais le curseur ne bouge pas.
. Vérifiez si l'indicateur de batterie faible situé sur le dessus de la souris s'allume. Si le
capteur s'allume, les piles sont sans doute déchargées. Veuillez remplacer les piles.
. Si le remplacement des piles n'a pas fonctionné, la souris n'est sans doute pas bien
connectée au récepteur. Veuillez essayer la reconnexion et assurez-vous que la souris est
dans le champ de fonctionnement optimal (1,5m) du nano récepteur USB.
Indicateur batterie faible
La souris est équipée d'un voyant de batterie faible. Lorsque la
batterie s'affaiblit pendant l'utilisation, le voyant sous la molette
de défilement va se mettre à clignoter. Veuillez remplacer la pile.
Remarque : Nous vous conseillons d'utiliser des piles alcaline
AA.
Low Power Indicator
FR
Économies d'énergie intelligentes (IPS)
Cette souris est équipée d'une fonction d'économie d'énergie intelligente (IPS).
• Lorsque le Nano récepteur USB n'est pas branché ou si l'ordinateur est éteint, la souris va
automatiquement s'éteindre pour économiser l'énergie.
• Si la souris n'est pas utilisée pendant 10 secondes, elle va automatiquement se mettre au
premier niveau d'IPS. Pour réactiver la souris, cliquez sur n'importe quel bouton.
• Si la souris n'est pas utilisée pendant 8 minutes, elle va automatiquement se mettre au
second niveau d'IPS, c.à.d. mode veille. Pour réactiver la souris, cliquez sur n'importe quel
bouton.
Interrupteur DPI
La souris fonctionne avec six niveaux de DPI :
800/1200/1600/2400/3200/4800DPI. Le DPI par défaut est 1200. Appuyez
sur le bouton DPI, le DPI va passer à 1600, le voyant LED va clignoter
trois fois. À chaque fois que vous appuyez sur le bouton DPI, le DPI va
passer au niveau suivant, et le voyant LED DPI va clignoter une fois de
plus.
2
1
Take out the receiver Store the receiver
DPI Switch
IT
FAQ – Domande Frequenti
1. Cosa dovrei fare nel caso il mouse non funzionasse?
• Assicurarsi che la polarità delle batterie sia corretta. Le estremità positive (+) e negative (-)
di ogni batteria devono corrispondere ai segni positivo (+) e negativo (-) nel vano batteria.
• Assicurarsi che le batterie non siano scariche.
• Si prega di provare a rimuovere le batterie e reinstallare nuovamente le batterie.
• Verificare che le funzioni di risparmio energetico del computer siano disattivate.
• Controllare che il connettore USB del ricevitore Nano sia saldamente collegato alla porta
USB del computer.
2. Il ricevitore Nano USB è riconosciuto da Windows (2000, 2003, XP, Vista, Win7,Win8,
Win8.1, Win10) ma il cursore non si muove. Cosa devo fare?
• Verificare che l'indicatore di scarsa energia sulla parte superiore del mouse si accenda. Se
l'indicatore si accende, è probabile che le batterie siano scariche. Si prega di sostituire le
batterie.
•Se la sostituzione delle batterie non è di aiuto, è probabile che il mouse non sia collegato al
ricevitore. Si prega provare a riconnettere ed assicurarsi che il mouse si trovi entro la
distanza operativa ottimale (1,5 m.) dal suo ricevitore Nano USB.
Indicatore di Batteria Scarica
Il mouse è dotato di indicatore di bassa potenza. Quando la
batteria si scarica durante l'uso, l'indicatore sotto la rotella di
scorrimento lampeggerà. Si prega di sostituire la batteria.
Nota: Si consiglia di usare batterie AA alcaline a secco.
Low Power Indicator
IT
Risparmio Energetico Intelligente (IPS, Intelligent Power Saving)
Il mouse è dotato di una funzione intelligente di risparmio energetico (IPS, Intelligent Power
Saving).
• Quando il ricevitore USB Nano è disconnesso o il PC viene spento, il mouse si spegnerà
automaticamente per risparmiare l’energia.
•Quando il mouse non viene azionato per 10 secondi, verrà automaticamente fatto scendere
al primo livello IPS. Per riattivare il mouse, far clic su qualsiasi pulsante.
•Quando il mouse non viene utilizzato per 8 minuti, verrà automaticamente fatto scendere al
secondo livello IPS. Per riattivare il mouse, far clic su qualsiasi pulsante.
Interruttore DPI
Il mouse supporta sei livelliDPI:
800/1200/1600/2400/3200/4800DPI. Il DPI preimpostato è 1200.Premere
il pulsante DPI, DPI salirà a 1600, l'indicatore LED lampeggerà tre volte.
Per ogni volta il tasto che si preme il pulsante DPI, il DPI si alza al livello
successivo e la luce del LED DPI lampeggerà un'altra volta.
2
1
Take out the receiver Store the receiver
DPI Switch
FR
Durée de vie de la batterie : 30 mois
La souris consomme très peu d'énergie et ce qui permet à la batterie de durer jusqu'à 30
mois sans la changer. Cependant, il se peut que la durée de vie réelle de la batterie varie
selon l'utilisateur et les conditions informatiques.
Note: assurez - vous que la polarité des batteries est correcte.le positif (+) et négatifs (-), à
la fin de chaque batterie doit correspondre aux positifs (+) et négatifs (-) les marques dans le
batteryhousing.
Connexion du récepteur
Sortez le nano récepteur USB et branchez-le dans un port USB de votre ordinateur. La
fonction Plug & Play de votre système va détecter qu'un nouvel appareil a été connecté et
va l'installer automatiquement.
Remarque : Le récepteur peut être retiré et rangé près du compartiment des piles lorsqu'il
n'est pas utilisé.
USB Port Nano receiver
2
1
A A
A A
IT
Durata Batteria di 30 Mesi
Il mouse consuma poca potenza e offre una lunga durata della batteria fino a 30 mesi senza
dover sostituire la batteria. Tuttavia si prega di notare che la durata effettiva della batteria
potrebbe variare in base alle condizioni utente e al computing.
Collegare il Ricevitore
Rimuovere il ricevitore Nano USB e collegarlo a una porta USB libera del computer. La
funzione Plug & Play del tuo sistema rileva che è stato collegato un nuovo dispositivo e lo
installa automaticamente.
Nota: assicurati che la polarità delle batterie è corretta.il positivo (+) o negativo (-) alla fine di
ogni batteria deve corrispondere il positivo (+) o negativo (-) scritte in batteryhousing.
Nota: il ricevitore può essere rimosso e conservato accanto al vano batteria mentre non è
in uso.
USB Port Nano receiver
2
1
A A
A A
contenidos del paquete
1 x ratón inalámbrico
1 x receptor nano USB
1 x manual de usuario
Nota: Pilas NO incluidas
Requisitos del sistema
Para usar este ratón, su computadora debe cumplir con los siguientes requisitos de
hardware y ejecutar uno de los sistemas operativos que se enumeran a continuación.
Hardware
• PC con procesador Pentium o procesadores AMD equivalentes
• USB 2.0
Sistema operativo
• Windows XP, Vista, Win7, Win8, Win8.1, Win10
Nota: la rueda de desplazamiento solo funciona bajo los sistemas operativos mencionados
anteriormente. Si usa el ratón en un sistema operativo diferente, es posible que el ratón no
funcione o pierda sus funciones mejoradas.
Instrucciones de instalación de la pila
El ratón óptico usa dos pilas AA (no incluidas).
1. Abra la tapa de la pila.
2. Inserte las pilas en el compartimiento, asegurándose de que correspondan con las
marcas de polaridad.
3. Vuelva a colocar la tapa de la pila.
4. Encienda el ratón ajustando el interruptor de encendido debajo del ratón. El LED rojo del
indicador de encendido en la parte superior del ratón parpadeará.
ES
Cordless Mouse
User Manual
Model: M006
DE ESFREN IT JP
ES
Duración de la pila: 30 meses
El ratón consume poca energía y tiene una larga duración de la pila de hasta 30 meses sin
cambiarla. Sin embargo, tenga en cuenta de que la duración real de la pila puede variar en
función de las condiciones de uso y de la computadora.
Conexión del receptor
Retire el receptor USB Nano y conéctelo a un puerto USB libre en su computadora.
Encienda el ratón. La función Plug & Play de su sistema detectará que se ha conectado un
nuevo dispositivo y lo instalará automáticamente.
Nota: asegúrese de que la polaridad de las pilas es correcta. Los extremos positivo (+) y
negativo (-) de cada pila deben coincidir con las marcas positiva (+) y negativa (-) en el
alojamiento de la pila.
Nota: El receptor se puede quitar y almacenar al lado del compartimiento de la pila
mientras no esté en uso.
USB Port Nano receiver
2
1
A A
A A
ES
Preguntas frecuentes
1. ¿Qué debo hacer si el ratón no funciona?
• Controle que la polaridad de las baterías sea correcta. Los extremos positivos (+) y
negativos (-) de cada batería deben coincidir con las marcas positivas (+) y negativas (-) en
la carcasa de la batería.
• Controle que las baterías no estén descargadas.
• Intente quitarlas y volver a instalarlas.
• Verifique que las funciones de administración de energía de su computadora estén
apagadas.
• Verifique que el conector USB del receptor Nano esté firmemente conectado al puerto USB
de su computadora.
2. El receptor USB Nano es reconocido por Windows (2000, 2003, XP, Vista, Win7,Win8,
Win8.1, Win10) ¿pero el cursor no se mueve?
• Verifique si el indicador de baja batería en la parte superior del ratón se ilumina. Si el
sensor se enciende, es probable que las baterías estén descargadas. Por favor reemplace
las baterías.
• Si sigue sin funcionar luego de reemplazar las baterías, es probable que el ratón no esté
conectado al receptor. Por favor, intente con la reconexión y asegúrese de que el ratón esté
dentro de la distancia operativa óptima (1,5m) de su receptor USB Nano.
Low Power Indicator
ES
Ahorro de energía (IPS)
El ratón está equipado con la función de Ahorro de energía (IPS).
• Cuando el receptor USB Nano está desconectado o la PC se apaga, el ratón se apagará
automáticamente para ahorrar energía.
• Cuando su ratón no se usa durante 10 segundos, caerá automáticamente al
primer nivel de IPS. Para reactivar el ratón, haga clic en cualquier botón.
• Cuando su ratón no se usa durante 8 minutos, caerá automáticamente al
segundo nivel de IPS. Para reactivar el ratón, haga clic en cualquier botón.
Interruptor DPI
El ratón admite seis niveles de DPI: 800/1200/1600/2400/3200/4800DPI.
La configuración predeterminada es 1200 DPI.
Presione el botón DPI y el DPI subirá a 1600, la luz LED parpadeará tres
veces. Presione el botón DPI cada vez, el DPI subirá al siguiente nivel y la
luz LED parpadeará una vez más.
2
1
Take out the receiver Store the receiver
DPI Switch
Indicador de baja batería
El ratón viene con indicador de baja batería. Cuando el indicador
de batería está bajo durante el uso, el indicador debajo de la
rueda e desplazamiento parpadeará. Por favor, reemplace la
batería.
Nota: Recomendamos que use pilas alcalinas AA de pila seca.
JP
JP JP JP JP
製 品 デ ザ イン
2
1
USB
2
1
A A
A A
技術仕様
パッケージ内容 インテリジェントパワーセービング(IPS) FAQ
JP
DPIの切替
電池残量表示
システム要件
ハードウェア 電池寿命30ヶ月
オペレーティングシステム
電池装填ガイド
Limited 12-Month Warranty
What this warranty covers.
Shenzhen Unichain Technology Co., LTD. (Manufacturer: “Unichain”) warrants to the
original purchaser of this TECKNET product that the product shall be free of defects in
design, assembly, material, or workmanship.
What the period of coverage is.
Unichain warrants the TECKNET product for 12 Months.
What will we do to correct problems?
Unichain will repair or replace, at its option, any defective product free of charge (except
for shipping charges for the product).
What is not covered by this warranty?
All above warranties are null and void if the TECKNET product is not provided to Unichain
for inspection upon Unichain’s request at the sole expense of the purchaser, or if Unichain
determines that the TECKNET product has been improperly installed, altered in any way,
or tampered with. The TECKNET Product Warranty does not protect against acts of God
such as flood, earthquake, lightning, war, vandalism, theft, normal-use wear and tear,
erosion, depletion, obsolescence, abuse, damage due to low voltage disturbances (e.g.
brownouts or sags), non-authorized program, or system equipment modification or
alteration.
How to claim the warranty
for more information. To extend the warranty period, please visit TECKNET website and
register your TECKNET products within 90 days of purchase.
Disclaimer
Every effort has been made to ensure that the information and procedures in this guide
are accurate and complete, no liability can be accepted for any errors or omissions and
we reserve the right to make any changes without further notice to any products
mentioned herein.
IMPORTANT SAFETY INSTRUCTIONS-CAREFULLY
FOLLOW THESE INSTRUCTIONS.
1. SAVE THESE INSTRUCTIONS - This sheet contains important safety and
operating instructions.
2. Before using the product, read all instructions and caution markings on the
product, accessories and device using our product.
3. This appliance is not intended for use by persons (including children) with
reduced physical, sensory or mental capabilities, or lack of experience and
knowledge, unless they have been given supervision or instruction concerning
use of the appliance by a person responsible for their safety.
4. Children should be supervised to ensure that they do not play with the
appliance.
5. Keep the product away from fire or explosion may occur.
6. For proper insertion, please observe polarity indicators ( +/-).
7. Remove the batteries if the product is not going to be used for a long period of
time.
8. Do not place the product in or near any inflammable, explosive or hazardous
object.
9. Do not place in or near water, rain, excess moisture or extreme heat.
10. Do not operate the product with damaged cord or plug.
11. Do not operate the product if it has been damaged in any way.
12. Do not disassemble the product. Disassembly may result in a risk of safety
hazards.
13. Do not throw or shake the product.
14. To reduce the risk of electric shock, unplug the product from the power supply
when not in use or switch off the power supply.
安全に関する重要なガイド-ガイドをよくお読みください。
12
Hereby, Shenzhen Unichain Technology Co., Ltd. declares that the product type
M006 is in compliance with Directive 2014/53/EU.
The full text of the EU declaration of conformity is available at the following
internet address: https://eu.tecknetonline.com/
SIMPLIFIED EU DECLARATION OF CONFORMITY
( Waste Electrical& Electronic Equipment )
This Marking shown on the product or its literature, indicate that it should not be
disposed with other household wastes at the end of its working life.
To prevent possible harm to the environment or human health from uncontrolled
waste disposal, please separate this from other types of wastes and recycle it
responsibly to promote the sustainable reuse of material resources.Household
user should contact either the retailer where they purchased this product, or their
local government office, for details of where and how they can take this item for
environmentally safe recycling.
Business users should contact their supplier and check the terms and conditions of
the purchase contact. This product should not be mixed with other commercial
wastes for disposal.
Correct Disposal of This Product
M006
This device complies with Part 15 of the FCC Rules. Operation is subject to the
following two conditions:
(1) This device may not cause harmful interference, and
(2) This device must accept any interference received, including interference that
may cause undesired operation.
Warning: Changes or modifications not expressly approved by the party
responsible for compliance could void the user's authority to operate the
equipment.
NOTE: This equipment has been tested and found to comply with the limits for a
Class B digital device, pursuant to Part 15 of the FCC Rules. These limits are
designed to provide reasonable protection against harmful interference in a
residential installation. This equipment generates uses and can radiate radio
frequency energy and, if not installed and used in accordance with the
instructions, may cause harmful interference to radio communications. However,
there is no guarantee that interference will not occur in a particular installation. If
this equipment does cause harmful interference to radio or television reception,
which can be determined by turning the equipment off and on, the user is
encouraged to try to correct the interference by one or more of the following
measures:
~ Increase the separation between the equipment and receiver.
~ Connect the equipment into an outlet on a circuit different from that to which
the receiver is connected.
~ Consult the dealer or an experienced radio/TV technician for help.
FCC Radiation Exposure Statement:
This equipment complies with FCC radiation exposure limits set forth for an
uncontrolled environment. This equipment should be installed and operated with
minimum distance 20cm between the radiator & your body.
FCC STATEMENT: