Samsung QE82N クイックセットアップガイド

タイプ
クイックセットアップガイド

Samsung QE82N

Samsung QE82Nは、ユーザーのライフスタイルに合わせて、さまざまなエンターテイメントコンテンツを楽しむのに最適なテレビです。高画質で美しい映像と、クリアなサウンドで、まるで映画館にいるかのような臨場感が味わえます。また、スマート機能搭載で、さまざまなアプリをダウンロードして利用できるので、オンライン動画の視聴や音楽の再生も簡単です。さらに、ゲームモードを搭載しており、遅延のない滑らかなゲームプレイを楽しむことができます。

さまざまなコンテンツを美しい映像とクリアなサウンドで楽しめるSamsung QE82Nで、おうち時間を充実させましょう。

Samsung QE82N

Samsung QE82Nは、ユーザーのライフスタイルに合わせて、さまざまなエンターテイメントコンテンツを楽しむのに最適なテレビです。高画質で美しい映像と、クリアなサウンドで、まるで映画館にいるかのような臨場感が味わえます。また、スマート機能搭載で、さまざまなアプリをダウンロードして利用できるので、オンライン動画の視聴や音楽の再生も簡単です。さらに、ゲームモードを搭載しており、遅延のない滑らかなゲームプレイを楽しむことができます。

さまざまなコンテンツを美しい映像とクリアなサウンドで楽しめるSamsung QE82Nで、おうち時間を充実させましょう。

* Recommended hours of use per day of this product is under 16 hours. If the product is used for longer than 16 hours a
day, the warranty may be void.
* The colour and the appearance may differ depending on the product, and the content in the manual is subject to change
without prior notice to improve the performance.
* Download the user manual from the website for further details.
http://www.samsung.com/displaysolutions
* Il est recommandé d'utiliser ce produit moins de 16 heures par jour. L'utilisation quotidienne du produit pendant une
durée supérieure à 16 heures peut entraîner l'annulation de la garantie.
* La couleur et l’aspect du produit peuvent varier en fonction du modèle, et le contenu dans le manuel peut être modifié
sans préavis pour des raisons d’amélioration des performances.
* Téléchargez le manuel utilisateur du site Web pour obtenir plus de détails.
The terms HDMI and HDMI High-Definition Multimedia
Interface, and the HDMI Logo are trademarks or registered
trademarks of HDMI Licensing LLC in the United States
and other countries.
BN68-09326B-00
Quick Setup Guide
Guide de configuration rapide
Warranty card
(Not available in some locations)
Carte de garantie
(Non disponible dans certains pays)
Regulatory guide
Guide réglementaire
Power cord
Cordon d’alimentation
Batteries (AAA x 2)
(Not available in some locations)
Batteries (AAA x 2)
(Non disponible dans certains pays)
Remote Control
Télécommande
RS232C(IN) adapter
Adaptateur RS232C(IN)
HOLDER-CABLE
PORTE-CÂBLE
Holder-Ring x 4
Anneau de maintien x 4
Stand
Support
English
Contact the vendor where you purchased the product if
any components are missing.
The pictures may look different from the actual components.
Français
S’il manque le moindre composant, contactez le revendeur
auprès duquel vous avez acheté le produit.
Les représentations peuvent ne pas correspondre aux
composants.
Português
Contacte o vendedor onde adquiriu o produto caso haja
componentes em falta.
As imagens podem ter um aspeto diferente dos
componentes reais.
Tiếng Việt



繁體中文
如有任何元件遺漏,請聯絡您購買產品的供應商。
圖片看起來可能和實際元件不盡相同。



Checking the Components
Verification des composants
Ports
Ports
English
1
Remote sensor
Press a button on the remote control pointing at the bottom of the product face to perform the function.
The remote control sensor is located on the bottom of the product.
* Using other display devices in the same space as the remote control of this product can cause the other display
devices to be inadvertently controlled.
2
Power button
Turns the product on or off.
Parts
Pièces
Français
1
Capteur de la télécommande
Appuyez sur un bouton de la télécommande tout en pointant la base de la face du produit pour exécuter la fonction.
Le capteur de télécommande se trouve à la base du produit.
* Si vous utilisez la télécommande de ce produit dans le même espace que d'autres périphériques d'affichage, il se
peut que ces derniers soient commandés par mégarde.
2
Bouton d'alimentation
Permet d’activer ou de désactiver le produit.
Português
1
Sensor do telecomando
Prima um botão do telecomando apontando para a parte inferior da frente do produto para executar a função.

* 
controlar estes outros dispositivos acidentalmente.
2
Botão de alimentação
Liga e desliga o produto.
Tiếng Việt
1



* 

2


繁體中文
1
遙控感測器
對著產品正面的底部按下遙控器上的按鈕,執行相應功能。 遙控器感測器位於產品的底部。
*
在相同地點與本產品的遙控器一併使用其他顯示裝置,可能會導致其他顯示裝置發生未能如預期受控制。
2
電源按鈕
開啟或關閉產品。

1 






2 

繁體中文
1
連接至 USB 記憶裝置。
* 本產品上的 USB 連接埠接受最大恆定電流 1.0A。 若超過最大值,USB 連接埠可能無法運作。
2
使用 LAN 纜線連接至 MDC。(10/100 Mbps)
3
使用 RS232C 轉接器連接至 MDC。
4
DVI: 使用 DVI 纜線或 HDMI-DVI 纜線連接至訊號源裝置。
MAGICINFO IN: 若要使用 MagicInfo,請確保已連接 DP-DVI 纜線。
5
使用 HDMI 纜線或 HDMI-DVI 纜線連接至訊號源裝置。
6
透過音訊纜線從來源裝置接收聲音。
7
透過音訊纜線將聲音輸出到音訊裝置。
8
使用 RS232C 轉接器連接至 MDC。
9
連接至 USB 記憶裝置。
* 本產品上的 USB 連接埠接受最大恆定電流 0.5A。 若超過最大值,USB 連接埠可能無法運作。

1 .USB
.USB1.0

USB
2 MDC
3 .RS232C
MDC
4 .HDMI-DVIDVIDVI
.DP-DVIMagicInfo
5 .HDMI-DVIHDMI
6 
7 
8 .RS232C
MDC
9 .USB
.USB0.5

USB
Tiếng Việt
1

* 

2

3

4


5

6

7

8

9

* 

Português
1

* 
podem não funcionar.
2

3

4


5

6

7

8

9

* 
podem não funcionar.
Français
1
Permet de se connecter à un périphérique de mémoire USB.
* 
les ports USB ne fonctionneront pas.
2

3

4


5

6

7

8

9
Permet de se connecter à un périphérique de mémoire USB.
* 
les ports USB ne fonctionneront pas.
English
1
Connect to a USB memory device.
* The USB ports on the product accept a maximum constant current of 1.0A. If the maximum value is exceeded, USB
ports may not work.
2

3

4


5

6
Receives sound from a source device via an audio cable.
7
Outputs sound to an audio device via an audio cable.
8

9
Connect to a USB memory device.
* 
ports may not work.
2
3
4
6
7
8
9
5
1
1, 2
Speaker
Haut-parleur
Web site: http://www.samsung.com
Contact SAMSUNG WORLD WIDE
Comment contacter Samsung dans le monde
Area Customer Care Centre
ALGERIA 3004
ANGOLA 917 267 864
AUSTRALIA 1300 362 603
BAHRAIN 
BANGLADESH
09612300300
08000300300 (Toll free)
BURUNDI 200


1800-20-3232 (Toll free)
 
COTE D’ IVOIRE 8000-00-77
DRC 499999
EGYPT
08000-7267864

GHANA 0800-100-077
HONG KONG 3698 4698
INDIA 
INDONESIA


IRAN 
IRAQ 80010080
ISRAEL *6963
Area Customer Care Centre
JORDAN
0800-22273

KENYA 
KUWAIT 
LAOS 
LEBANON 1299
 0800 333

1800-88-9999
+603-7713 7420 (Overseas contact)
 
 
 847267864
 
 08197267864
NEPAL


 0800 726 786
NIGERIA 0800-726-7864
 
PAKISTAN 0800-Samsung (72678)
PHILIPPINES



Area Customer Care Centre
QATAR 
 
RWANDA 9999
SAUDI ARABIA 
SENEGAL 800-00-0077
SINGAPORE 
 
SRI LANKA



SUDAN 1969
SYRIA 
TAIWAN 0800-32-9999
 0800 780 089
THAILAND
0-2689-3232 (OTH products)
1800-29-3232 (Toll free)
TUNISIA 80 100 012
U.A.E 
UGANDA 0800 300 300
 
 3434
 
Quick Setup Guide
Guide de conguration rapide
QE82N
BN68-09326B-00_QSG_QEN_ASIA_MENA_L06.indb 1 2018-09-04 오후 6:49:12
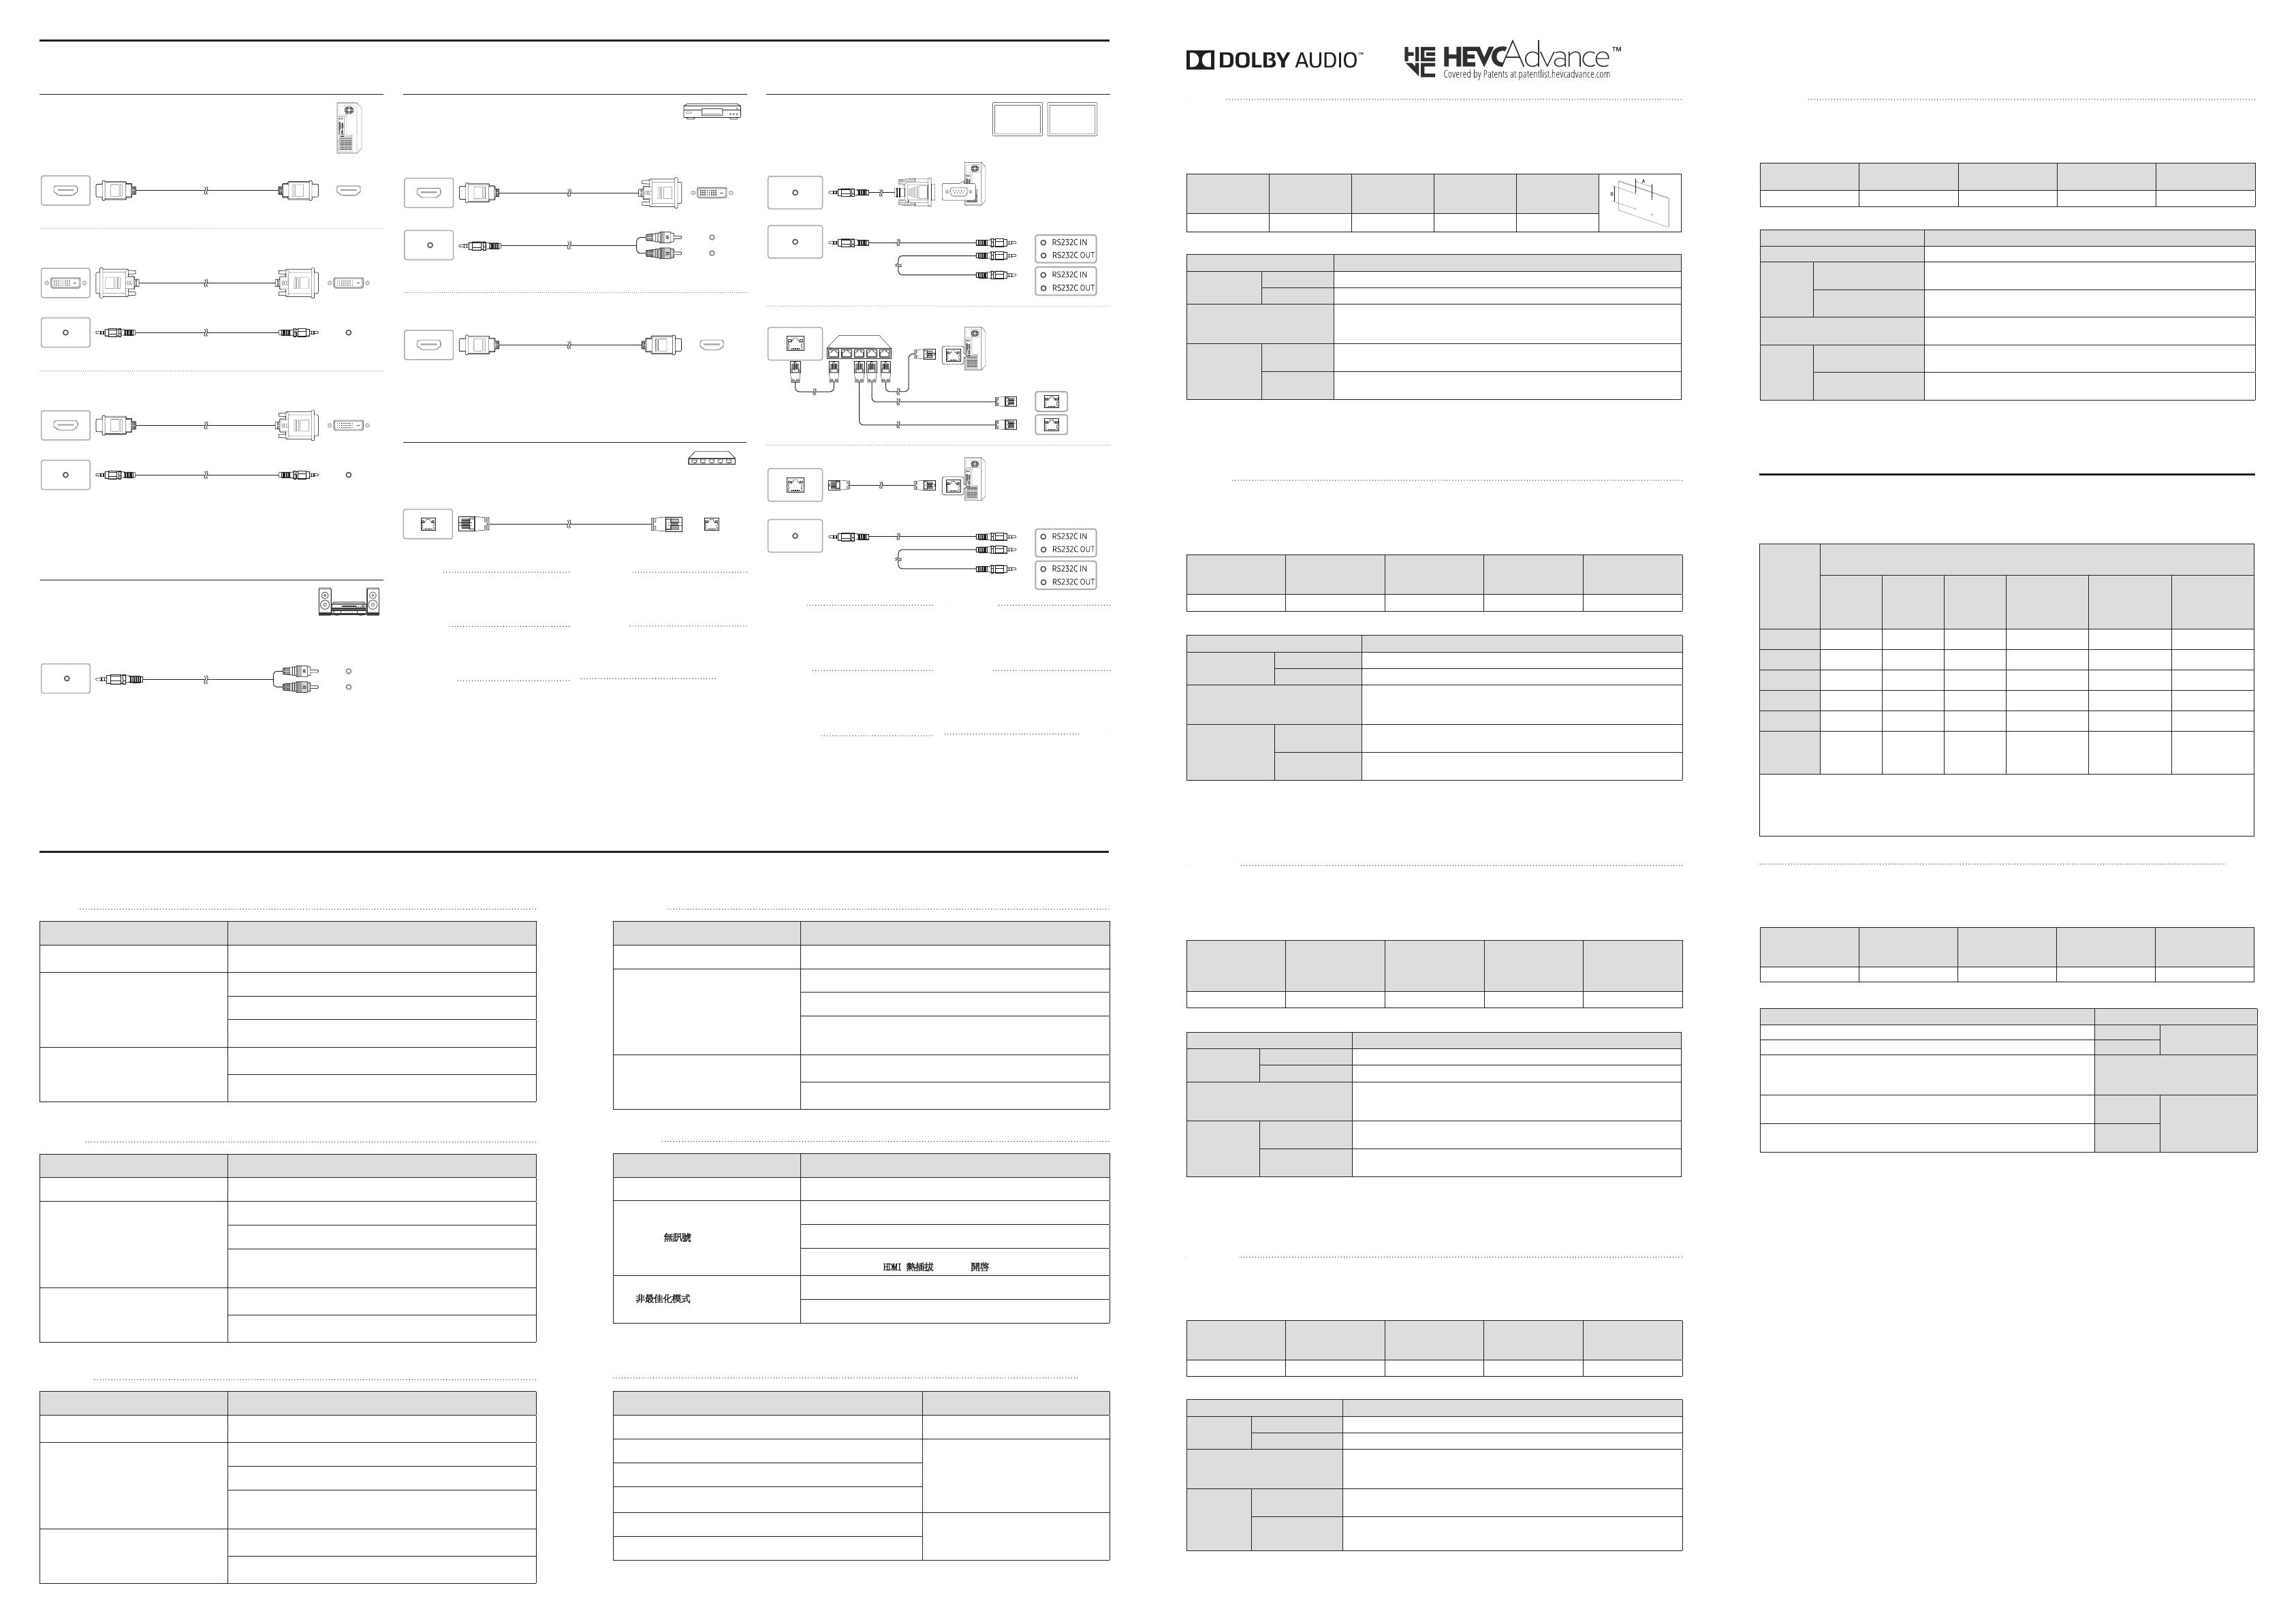
Connecting and Using a Source Device
Connexion et utilisation d'un périphérique source
Français
Spécifications du kit de montage mural (VESA)
Lors de l'installation d'un kit de montage mural, nous vous recommandons de fixer les quatre vis VESA.
Si vous souhaitez installer un kit de montage mural qui se fixe au mur au moyen de deux vis supérieures uniquement, veillez
à utiliser un kit de montage mural Samsung compatible avec ce type d'installation. (Il se peut que ce type de kit de montage
mural ne soit pas disponible à l'achat dans certaines régions.)
Nom du modèle
Spécifications des
trous de vis VESA
(A * B) en millimètres
Profondeur de vis Vis standard Quantité
QE82N 600 x 400   4
Caractéristiques technique
s
Nom du modèle QE82N
Panneau
Taille 
Surface d'affichage 
Alimentation

Reportez-vous à l'étiquette apposée au dos du produit, car la tension
standard peut varier en fonction du pays.
Considérations
environnementales


Humidité: 10% à 80%, sans condensation
Stockage


* Ce produit est de classe A. Dans un environnement domestique, ce produit peut provoquer des interférences radio,
auquel cas l’utilisateur sera amené à prendre des mesures appropriées.
* Pour les spécifications détaillées de l'appareil, veuillez visiter le site Web de Samsung Electronics.
Português
Especificações do kit de montagem na parede (VESA)
Quando instalar um kit de montagem na parede recomendamos que aperte os quatros parafusos VESA.
Se quiser instalar um kit de montagem que se fixa à parede apenas com dois parafusos na parte superior, utilize um kit


Nome do modelo
Especificações para os

VESA (A * B) em

Profundidade do
parafuso
Parafuso padrão Quantidade
QE82N 600 x 400   4
Características té
cnicas
Nome do modelo QE82N
Painel
Tamanho 
polegadas
/ 207,1 cm)
Área de visualização 


Consulte a etiqueta na parte posterior do produto pois a tensão padrão pode


ambientais


Humidade: 10% - 80%, sem condensação
Armazenamento


* 

* Para obter mais informações sobre as especificações do dispositivo, visite o website da Samsung Electronics.
Tiếng Việt
Thông s k thut ca b gi treo tưng (VESA)






milimet
  
QE82N 600 x 400   4
Cc thông s k thut
 QE82N

 
 












* 

* 
繁體中文
掛牆套件規格 (VESA)
安裝壁掛架組時,建議將四個 VESA 螺絲鎖緊。
如果您只要使用兩個上方螺絲安裝壁掛架組,請務必使用支援此類安裝的 Samsung 壁掛架組 (依地理位置而定,您可能無
法購買此型的壁掛架組)。
型號名稱
VESA 螺絲孔規格
(A * B)(公釐)
螺絲深度 標準螺絲 數量
QE82N 600 x 400 43-45 M8 4
規格
型號名稱 QE82N
指定型號名稱 LH82QENE
面板
大小
(
需沿屏幕表面测量对角
)
81.5 英吋 (207.1 公分)
可視面積
(
需沿屏幕表面测量
)
1805.76 公釐 (水平) x 1015.74 公釐 (垂直)
電源
AC100-240V~ 50/60Hz
請參閱產品後方的標籤,不同國家地區的標準電壓不盡相同。
環境因素
工作
溫度: 0 °C - 40 °C (32 °F - 104 °F)
濕度: 10% - 80%,無冷凝
存放
溫度: -20 °C - 45 °C (-4 °F - 113 °F)
濕度: 5% - 95%,無冷凝
*
警告使用者:此為甲類資訊技術設備,於居住環境中使用時,可能會造成射頻擾動,在此種情況下,使用者會被要求採
取某些適當的對策。
*
如需詳細的裝置規格,請造訪三星電子網站。
*
QE82N:耗電量 (額定):300 W

(VESA)

Samsung



  



45-43M84

QE82N

207.181.582 

1015.741805.76 





10432400



113-445-20
955



.

English
Wall Mount Kit Specifications (VESA)
When installing a wall mount kit, we recommend you fasten all four VESA screws.
If you want to install a wall mount kit that attaches to the wall using two top screws only, be sure to use a Samsung wall
mount kit that supports this type of installation. (You may not be able to purchase this type of wall mount kit, depending on
the geographical region.)

VESA screw hole
specs (A * B) in
millimetres
Screw Depth Standard Screw Quantity
QE82N 600 x 400   4
Specifications
 QE82N
Panel
Size 
Display area 
Power Supply

Refer to the label at the back of the product as the standard voltage can vary in
different countries.
Environmental
considerations
Operating

Humidity: 10% – 80%, non-condensing
Storage


* This is a class A product. In a domestic environment this product may cause radio interference in which case the user
may be required to take adequate measures.
* 
Troubleshooting Guide
Guide de depannage

 
 
No Signal



HDMI Hot Plug
On.
Not Optimum Mode




Français
Problèmes Solutions
Lécran s’allume et s’éteint continuellement. 
Aucun signal s’affiche à l’écran.

Assurez-vous que le périphérique connecté à lappareil est sous tension.
Selon le type de périphérique externe, l'écran peut ne pas s'afficher
correctement. Dans ce cas, connectez-le avec la fonction Connexion HDMI mise
sur Activé.
Mode non optimal est affiché.
Ce message s’affiche lorsqu’un signal émis par la carte graphique est
supérieur à la fréquence et la résolution maximales de l’appareil.
Consultez le tableau des modes de signal standard et réglez la fréquence
et la résolution maximales conformément aux spécifications de l’appareil.
English
Issues Solutions
The screen keeps switching on and off.
Check that the cable between the product and the PC is connected
correctly.
No Signal is displayed on the screen.
Check that the product is connected correctly with a cable.
Check that the device connected to the product is powered on.
Depending on the type of external device, the screen may not display
properly. In this case, connect it with the HDMI Hot Plug function turned On.
Not Optimum Mode is displayed.
This message is displayed when a signal from the graphics card exceeds
the product’s maximum resolution and frequency.

and frequency according to the product specifications.
繁體中文
問題 解決方案
螢幕不斷開啟和關閉。 檢查產品與電腦之間的纜線是否正確連接。
螢幕上顯示
無訊號
檢查產品是否已經使用纜線正確連接。
檢查連接至產品的裝置是否已經開啟電源。
根據外部裝置類型,螢幕可能無法正常顯示。
在此情況下,請於
HDMI 熱插拔
功能為
開啟
時進行連接。
顯示
非最佳化模式
圖形卡所發出的訊號超過產品的最大解析度和頻率時,就會顯示此訊息。
請參閱「標準訊號模式表」,並根據產品規格設定最大解析度與頻率。
Português
Problemas Soluções

desligar.

A mensagem Sem sinal é exibida no ecrã.


Consoante o tipo de dispositivo externo, o ecrã pode não ser apresentado
corretamente. Neste caso, ligue-o com a função Lig.Instantânea HDMI
definida como Ligado.
A mensagem Modo inadequado é exibida.


Consulte a Tabela do modo de sinal padrão e defina a resolução e a


 
 






.HDMI


.



Connecting to a PC
Connexion à un PC
Connecting the LAN Cable
Connexion du câble LAN
Connecting to a Video Device
Connexion à un appareil vidéo
Connecting to MDC
Connexion à MDC
English

refer to Help after installing the programme.

website.
Français
Pour obtenir des détails sur la manière

l'Aide après avoir installé le programme.

Português

consulte a Ajuda depois de instalar o programa.

Tiếng Việt




繁體中文
關於如何使用 MDC 程式的詳細資訊,請在
安裝該程式後參見說明。
MDC 程式可在網站上取得。



MDC
MDC
HDMI IN
DP IN
DVI/MAGICINFO IN
DVI/HDMI AUDIO IN
HDMI IN
DVI/HDMI AUDIO IN
DVI/PC/MAGICINFO IN
DVI/HDMI AUDIO IN
HDMI IN
DP IN
DVI/MAGICINFO IN
DVI/HDMI AUDIO IN
HDMI IN
DVI/HDMI AUDIO IN
DVI/PC/MAGICINFO IN
DVI/HDMI AUDIO IN
HDMI IN
DP IN
DVI/MAGICINFO IN
DVI/HDMI AUDIO IN
HDMI IN
DVI/HDMI AUDIO IN
DVI/PC/MAGICINFO IN
DVI/HDMI AUDIO IN
HDMI IN
DVI/HDMI AUDIO IN
AUDIO OUT
HDMI IN
DP IN
DVI/MAGICINFO IN
DVI/HDMI AUDIO IN
HDMI IN
DVI/HDMI AUDIO IN
DVI/PC/MAGICINFO IN
DVI/HDMI AUDIO IN
Connecting to an Audio System
Branchement à un système audio
HDMI IN
DVI/HDMI AUDIO IN
AUDIO OUT
RS232C OUT
RJ45
RS232C IN
RS232C OUT
RJ45
HUB
RS232C OUT
RJ45
RS232C IN
RS232C OUT
RJ45
HUB
RS232C OUT
RJ45
RS232C IN
RS232C OUT
RJ45
HUB
English
Use Cat7(*STP Type) cable for the

*Shielded Twist Pair
Français
Util

à paire torsadée
Português
Utilize um cabo Cat 7 (*tipo STP) para a

*Par trançado blindado
Tiếng Việt



繁體中文
使用 Cat 7(*STP 類型)纜線進行連接。
(10/100 Mbps)
*屏蔽雙絞線。




RJ45
設備名稱:彩色顯示器
Equipment name
型號(型式):LH82QENE
Type designation (Type)
單元
Unit
限用物質及其化學符號
Restricted substances and its chemical symbols
Lead
(Pb)

(Hg)
Cadmium
(Cd)
六價鉻
Hexavalent
chromium
(Cr
+6
)
多溴聯苯
Polybrominated
biphenyls
(PBB)
多溴二苯醚
Polybrominated
diphenyl ethers
(PBDE)
電路板
O O O O O
外殼
O O O O O
金屬零件
O O O O O
玻璃面板
O O O O O
揚聲器
O O O O O O
配件
(例:線材,
遙控器)
O O O O O
備考1.〝
O
〞係指該項限用物質之百分比含量未超出百分比含量基準值。

of presence.
備考2.〝
〞係指該項限用物質為排除項目。
N

RoHS
BN68-09326B-00_QSG_QEN_ASIA_MENA_L06.indb 2 2018-09-04 오후 6:49:15
  • Page 1 1
  • Page 2 2

Samsung QE82N クイックセットアップガイド

タイプ
クイックセットアップガイド

Samsung QE82N

Samsung QE82Nは、ユーザーのライフスタイルに合わせて、さまざまなエンターテイメントコンテンツを楽しむのに最適なテレビです。高画質で美しい映像と、クリアなサウンドで、まるで映画館にいるかのような臨場感が味わえます。また、スマート機能搭載で、さまざまなアプリをダウンロードして利用できるので、オンライン動画の視聴や音楽の再生も簡単です。さらに、ゲームモードを搭載しており、遅延のない滑らかなゲームプレイを楽しむことができます。

さまざまなコンテンツを美しい映像とクリアなサウンドで楽しめるSamsung QE82Nで、おうち時間を充実させましょう。