

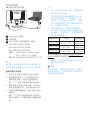
目录
1. 重要 ..........................................................1
1.1 安全措施与维修 ...........................................1
1.2 标志说明 ..........................................................2
1.3 产品和包装材料的废弃 ..........................3
2. 设置显示器 ............................................4
2.1 安装 .......................................................................4
2.2 卸下底座支撑臂和底座 ..........................7
3. USB显示器操作 ....................................9
3.1 简介 .......................................................................9
3.2 安装DisplayLink Graphics软件 ..............9
3.3 如何控制显示器 ........................................10
4. 技术规格...............................................15
4.1 分辨率和预设模式 ..................................16
5. 管制信息...............................................17
6. 客户服务与保修 .................................22
6.1 飞利浦平板显示器像素缺陷规定 22
6.2 客户服务与保修 ........................................24
7. 故障排除和常见问题解答 ...............27
7.1 故障检修.........................................................27
7.2 一般常见问题解答 ..................................28
7.3 USB显示器常见问题 ..............................28

1
1. 重要
1. 重要
此电子版用户指南适合使用 Philips 显示器
的所有用户。请在使用您的显示器之前花
点时间阅读本 User Manual ( 用户手册 ) 。它
包含与使用显示器相关的重要信息和注意
事项。
产品享受飞利浦保修须符合下列条件:产
品适当用于其设计目的、符合操作说明、
返修时提供原始帐单或付款收据,帐单或
收据应载明购货日期、销售商名称、产品
型号及生产号。
1.1 安全措施与维修
警告
使用本文档中未介绍的控制、调整或过程
可能导致碰撞、电气危险和 / 或机械危险。
连接和使用电脑显示器时,请阅读并遵循
以下说明。
操作:
• 请使显示器远离阳光直接照射、明亮强
光线、以及任何其他热源。长期暴露于此
类环境可能导致显示器褪色和损坏。
• 移开任何可能掉入通风孔的物品或者会
妨碍显示器电子器件正常冷却的物品。
• 请勿堵塞机壳上的通风孔。
• 放置显示器时,确保电源插头和插座便
于插拔。
• 如果通过拔掉电源线或直流电源线关闭
显示器电源,则在重新连接电源线或直
流电源线以进行正常操作之前,必须等
待 6 秒钟。
• 请务必使用由 Philips 提供的经过认可的
电源线。如果电源线缺失,请与您当地的
服务中心联系。(请参见“消费者信息中
心”)
• 在使用过程中,请勿让显示器受到剧烈
震动或碰撞。
• 在使用或运输期间,不要敲打显示器或
使显示器掉落。
维护
• 为保护显示器以避免可能的损坏,请勿过
分施力于LCD面板。移动显示器时,抓住
边框将其抬起;抬起时,不要将手或手指
放在LCD面板上。
• 长时间不使用显示器时,应拔掉显示器
电源插头。
• 使用略微蘸湿的布清洁显示器时,应拔
掉显示器电源线插头。电源关闭时,可以
使用干布擦拭屏幕。但是,切勿使用有
机溶剂(如酒精)或含氨水的液体清洁
显示器。
• 为避免电击或本机永久性损坏,不要在
多尘、下雨、水附近或过分潮湿的环境
中使用显示器。
• 如果显示器被弄湿了,应尽快用软布擦
拭干净。
• 如果异物或水进入显示器,请立即关闭
电源,并拔掉电源线。然后,取出异物
或擦干水,并送到维修中心进行检修。
• 请勿在炎热、阳光直接照射或严寒的地
方存放或使用显示器。
• 为了保持显示器的最佳性能并延长使用
寿命,请在符合下列温度和湿度条件的
地方使用显示器。
• 温度: 0-40°C 32-95°F
• 湿度: 20-80% RH
关于图像烙印 / 重影的重要信息
• 显示器无人看管时务必启动移动的屏幕
保护程序。如果显示器将显示静止不变
的内容,请务必启用屏幕定期刷新应用程
序。长时间不间断显示静止或静态图像
可能会在屏幕上造成“烙印”,也称“残
像”或“余像”。
• “烙印“、”残像“或”余像“是液晶面板
技术的一种常见现象。多数情况下,关掉
电源一定时间后,“烙印”、“残像”或“
余像”会逐渐消失。

2
1. 重要
警告
若不激活屏幕保护程序或者屏幕定期刷新
应用程序,可能导致严重的“烙印”、“残
像”或“重影”现象,这些现象可能不会
消失,也无法修复。上面提到的损坏不在
保修范围内。
维修
• 只有专业的维修人士可以打开机壳盖。
• 如果在维修或集成时需要任何文档,请
与您当地的服务中心联系。(请参见“消
费者信息中心”一章)
• 关于运输信息,请参见“技术规格”。
• 不要将显示器放在阳光直接照射的车
内。
注
如果显示器工作不正常,或者当您参照本
手册中的操作说明而不知道应执行哪个步
骤时,请与服务技术人员联系。
1.2 标志说明
以下分节描述使用于此文件的标志惯例。
注、注意、警告
在此指南中,文字段落配有图标并以黑体
或斜体书写。这些段落含有 “注”、“注
意”或“警告”字句。其使用如下:
注
此图标显示重要信息和提示,以助你更好
地使用你的电脑系统。
注意
此图标显示的信息提醒你如何避免硬体的
潜在损害或数据丢失。
警告
此图标显示对身体伤害的可能性,并警告
你如何避免此问题。
某些小心警告可能以不同格式出现,也可
能不带任何图标。在此类情况下,小心警
告的具体显示由管理机关规定。

3
1. 重要
1.3 产品和包装材料的废弃
废旧电气和电子设备 - WEEE
This marking on the product or on its
packaging illustrates that, under European
Directive 2002/96/EC governing used electrical
and electronic appliances, this product may
not be disposed of with normal household
waste. You are responsible for disposal of
this equipment through a designated waste
electrical and electronic equipment collection.
To determine the locations for dropping off
such waste electrical and electronic, contact
your local government office, the waste disposal
organization that serves your household or the
store at which you purchased the product.
Your new monitor contains materials that can
be recycled and reused. Specialized companies
can recycle your product to increase the
amount of reusable materials and to minimize
the amount to be disposed of.
All redundant packing material has been
omitted. We have done our utmost to make the
packaging easily separable into mono materials.
Please find out about the local regulations on
how to dispose of your old monitor and packing
from your sales representative.
Recycling Information for Customers
Your display is manufactured with high quality
materials and components which can be
recycled and reused.
To learn more about our recycling program
please visit
www.philips.com/about/sustainability/recycling.

4
2. 设置显示器
2. 设置显示器
2.1 安装
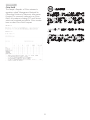
包装箱内物品
Register your product and get support at
www.philips.com/welcome
Quick
Start
U
221S3
2
0
1
2
K
o
n
i
n
k
l
i
j
k
e
P
h
i
l
i
p
s
E
l
e
c
t
r
o
n
i
c
s
,
N
.
V
.
A
l
l
r
i
g
h
t
s
r
e
s
e
r
v
e
d
.
U
n
a
u
t
h
o
r
i
z
e
d
d
u
p
l
i
c
a
t
i
o
n
i
s
a
v
i
o
l
a
t
i
o
n
o
f
a
p
p
l
i
c
a
b
l
e
l
a
w
s
.
M
a
d
e
a
n
d
p
r
i
n
t
e
d
i
n
C
h
i
n
a
.
DisplayLink Driver
USB线(Y型)
安装底座支撑臂
1. 将显示器正面朝下放在柔软平滑的表面
上,避免刮擦或损坏屏幕。
2. 用双手拿住显示器底座支撑臂,用力将
底座支撑臂插入底座支撑柱。
3. 将显示器底座支撑臂装到底座支撑柱
上,固定底座支撑臂。
注意
在牢固固定底座支撑臂前,请勿从底座支
撑柱上松开高度调整栓锁。
请勿

5
2. 设置显示器
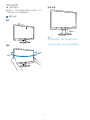
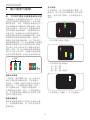
连接到笔记本电脑
1
2
2
3
3
1
Kensington 防盗锁
2
USB 连接
3
5V/3A 交流 - 直流适配器(选件)
DSA-20PFE-05 FEU 050300
DSA-20PFE-05 FCH 050300
DSA-20PFE-05 FUS 050300
规格: 100-240VAC,50/60Hz(输入),
0.7A;5VDC,3A(输出)
制造商:DEE VAN ENTERPRISE CO., LTD.
注
请注意,在开始使用 USB 显示器之前,必
须先在笔记本电脑中安装 DisplayLink 软件。
连接到笔记本电脑
1. 在笔记本电脑中安装DisplayLink软件。
2. 使用随附的USB “Y”线连接笔记本
电脑和显示器。单接头连接到显示
器,“Y”双接头连接到笔记本电脑。
3. 操作系统会识别USB显示器,Windows
安装完驱动程序后,显示器自动开启。
4. USB显示器准备就绪,可作为第二显示
器使用
5. 两个“Y”接头应连接到笔记本电脑上
的2xUSB端口,以确保为显示器稳定供
电。
注
1. 为了正确识别USB显示器,可能需要重
新启动笔记本电脑。
2. 许多新的笔记本电脑能够通过1x USB
端口提供足够电力;在此情况下,如
有必要,可以省出1x USB端口。 如果
在1xUSB连接情况下显示器闪烁或者不
亮,请使用2xUSB端口。
3. 在极少数情况下,您笔记本电脑的
2xUSB端口可能无法为显示器提供足够
电力输出;在此情况下,您需要购买选
购的直流适配器。
Philips部件号 说明 适配器型号
080G L19 41DV1
专用适配器
5V 15W(中国)
DSA-20PFE-05
FCH 050300
080G L19 41DV2
专用适配器5V/3A
15W(美国)
DSA-20PFE-05
FUS 050300
080G L19 41DV3
专用适配器
5V 15W(欧洲)
DSA-20PFE-05
FEU 050300
有关的详细信息,请访问 www.philips.com/
support 或联系当地的显示器技术支持。
4. 请注意,USB显示器不能作为主显示器
连接到独立的PC
警告
除非有资格,否则切勿卸下机盖。本机内
部有危险电压。只应使用在用户说明书中
列出的直流适配器。

6
2. 设置显示器
分辨率通知
根据设计,此显示器在其固有分辨率 1920
x 1080 @ 60 Hz 时性能最佳。
物理功能
倾斜
旋转
-65
65
高度调整
70mm
注
在调整高度前,卸下高度调整栓锁。
在提起显示器前,插入高度调整栓锁。

7
2. 设置显示器
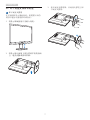
2.2 卸下底座支撑臂和底座
卸下底座支撑臂
在开始拆卸显示器底座前,请遵循下面的
说明以避免可能的损坏或伤害。
1. 将显示器底座展开至最大高度。
2. 将显示器正面朝下放在柔软平滑的表面
上,避免刮擦或损坏屏幕。
3. 松开底座支撑臂锁,从底座支撑柱上卸
下底座支撑臂。

8
2. 设置显示器
卸下底座
条件:
• 适合 VESA 标准装配情况。
1. 取下 8 个螺丝盖。
2. 拧下 4 个螺丝,然后从显示器上卸下
底座。
注
此显示器可使用 100mm x 100mm VESA- 标
准的装配接口。
100mm
100mm

9
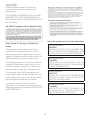
3. USB 显示器操作
3. USB显示器操作
3.1 简介
利用 USB 显示器,您只需将 USB 线连接到
笔记本电脑,即可在笔记本电脑和显示器
之间共享图像。这样,不用另外准备电源
线或视频线,只需一根线,就能在笔记本
电脑和显示器之间建立超低功率的连接。
3.2 安装DisplayLink Graphics软件
为了将您的 USB 显示器用作第二显示器,
需要在您的 Windows 系统中安装 DisplayLink
Graphics 软件。通过此软件,您还可以在观
看图像时方便地调整首选项。此驱动程序
与 Microsoft Windows 系统(包括 Microsoft
Windows 7、Vista 和 XP)兼容。 请注意,
此显示器在 DOS 下不能使用。
安装步骤:
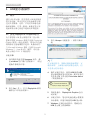
1. 双击随附光盘中的 Setup.exe 文件,弹
出 windows 用户帐户控制窗口。(若已
在操作系统中启用)
Do you want to allow the following program to make changes to this
computer?
Removable media on this computer
DisplayLink Core Software
DISPLAYLINK
Change when these notifications appear
Yes No
?
Show details
Program name:
User Account Control
Verified publisher:
File origin:
2. 单击 Yes(是),打开 DisplayLink 软件
最终用户许可协议窗口。
3. 单击 I Accept(我接受),软件开始安
装
注
在安装过程中,屏幕可能闪烁或黑屏。安
装结束时,上面的安装对话框会消失,但
不会显示任何消息。
4. 软件安装完毕后,使用 USB 线将 USB
显示器连接到笔记本电脑,随后任务栏
中会显示如下所示的 Found new device
(发现新设备)。
Found new device
DisplayLink Display Adapter (0395)
i
5. 发现设备后,DisplayLink Graphics 会自
动安装。
6. 安装完毕后,笔记本电脑会提示您重新
启动系统,以便开始使用 USB 显示器。
7. Windows 完成启动过程后,您就会在
USB 显示器上看到画面。

10
3. USB 显示器操作
3.3 如何控制显示器
Windows 7 系统
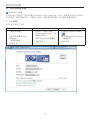
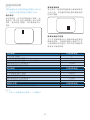
在 Windows 7 系统中,您可以通过 Windows Display Properties(WDP)来配置 DisplayLink 设备。
WDP 提供一种简单的方法,可连接、旋转、复制或扩展屏幕、以及修改屏幕分辨率。
1. 打开 WDP
WDP 有多种打开方法。
A B C
1. 右键单击桌面。
2. 在菜单中选择 Screen
Resolution
(屏幕分辨率)。
3. WDP打开。
1. 从Start(开始)菜单
>Devices and Printers(设
备和打印机)。
2. 双击DisplayLink设备图标。
3. WDP打开。
1. 右键单击DisplayLink图标
。
2. 单击Advanced Configuration
(高级配置)。
3. WDP打开。

11
3. USB 显示器操作
2. 设置显示
按照下述步骤设置显示。
设置显示
2.1. 打开 Screen Resolution(屏幕分辨率)。
2.2. 设置显示选项。关于每个选项的详细说明,请参见下表。
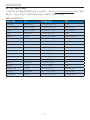
菜单选项 子菜单选项 说明
Display
(显示器)
使用下拉列表选择要配置的显示器。
Resolution
( 分辨率 )
使用下拉列表和滑块选择分辨率。
Orientation
(方向,当升级
为人机工程学底
座时使用此功
能)
Landscape(横向) 将显示器设成横向观看
Portrait(纵向) 将显示器设成纵向模式
Landscape (flipped)
(横向,翻转)
将显示器设成上下倒置横向模式
Portrait (flipped)
(纵向,翻转)
将显示器设成上下倒置纵向模式
Multiple displays
(多个显示器)
Duplicates these displays
(复制这些显示)
在第二个显示器上再现主显示。
Extend these displays
(扩展这些显示)
将主显示扩展至第二个显示器。
Show Desktop only on 1
(仅在 1 上显示桌面)
桌面出现在标记为 1 的显示器上。标记为 2 的显示
器黑屏。
Shows Desktop only on 2
(仅在 2 上显示桌面)
桌面出现在标记为 2 的显示器上。标记为 1 的显示
器黑屏。
表1: WDP选项
为控制所连接的 DisplayLink 显示器的运行方式,还可以使用 Windows Key+P 显示一个菜单(并
以循环方式)来切换模式。
3. 控制显示器
3.1. 选择 Windows Key+P。显示下面的菜单。
3.2. 单击其中一个选项。显示器更新以反映您所作的选择。
DisplayLink 图标应用程序
您可以通过任务栏中的 DisplayLink 图标应用程序(若存在)来配置 DisplayLink USB Graphics 的
运行方式。

12
3. USB 显示器操作
4. 显示 DisplayLink Manager 菜单
4.1. 在任务栏中,单击显示隐藏图标箭头以显示所有可用的图标。
4.2. 单击 DisplayLink 图标 ,显示包含如下选项的菜单
DisplayLink Manager
Check for updates
Optimize for Video
Fit to TV...
Advanced Configuration...
关于每个选项的详细说明,请参见下表:
菜单 说明
DisplayLink Manager 打开 Windows 显示设置窗口
Check for updates
(检查更新)
连接到 Windows 更新,检查是否有新版本;若有,下载新版本。
Optimize for Video
(视频优化)
选择此选项时,可在启用 DisplayLink 的显示器上取得更好的视频播放
效果。仅在播放视频内容时选择此选项。
注: 启用时,文本清晰度可能下降。
Fit to TV(适合电视)如果 Windows 桌面在显示器上显示不全,可以使用此选项来调整
Windows 桌面的尺寸(屏幕分辨率)。
Advanced
Configuration
(高级配置)
打开 Windows Display Properties(WDP)。

13
3. USB 显示器操作
Windows Vista 和 Windows XP 系统
当 USB 显示器连接到 Windows Vista 和 Windows XP 系统的笔记本电脑时,任务栏中会显示
DisplayLink 图标。您可以通过它来访问 DisplayLink Manager 菜单。
使用 DisplayLink Manager 菜单
1. 单击任务栏中的 DisplayLink 图标 。
出现如下所示的菜单。
2. 关于每个选项的详细说明,请参见下表。
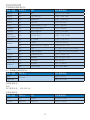
菜单选项 子菜单选项 说明
DisplayLink
Manager
打开 Windows 显示设置窗口
Updates(更新)
Check Now
(立即检查)
连接到更新服务器,检查是否有新的驱动程序版本;若
有,下载新版本。
Configure
(配置)
打开更新选项窗口,在此窗口中配置自动更新。
Screen Resolution
(屏幕分辨率)
显示可用分辨率的列表。(1920 x 1080)
在镜像模式下,分辨率被定义为主显示器的分辨率,因
此不能使用此选项。

14
3. USB 显示器操作
菜单选项 子菜单选项 说明
Screen Rotation
(屏幕方向 )
( 当升级为人机工
程学底座时使用
此功能)
Normal(正常) DisplayLink 显示不旋转
Rotated Left
(向左旋转)
将扩展或镜像显示旋转 270 度。
Rotated Right
(向右旋转)
将扩展或镜像显示旋转 90 度。
Upside-Down
(上下倒置)
将扩展或镜像显示旋转 180 度。
Extend To
(扩展至)
Right(右侧) 扩展主显示右侧的显示。
Left(左侧) 扩展主显示左侧的显示。
Above(上方) 扩展主显示上方的显示。
Below(下方) 扩展主显示下方的显示。
Extend(扩展) 将桌面扩展到第二个显示器。
Set as Main
Monitor
(设为主显示器)
将第二个显示器设为主显示。
Notebook Monitor
Off(笔记本电脑
显示器关闭)
关闭所连接的笔记本电脑的显示器,将 DisplayLink 显示设
为主显示。
Mirror(镜像) 复制主显示上的内容,在第二显示器上再现出来。
Off ( 关 ) 关闭第二显示器
Optimize for Video
( 优化视频 )
( 仅限 Vista 和
Windows 7)
选择此选项时,可在启用 DisplayLink 的显示器上取得更好
的视频播放效果。仅在播放视频内容时选择此选项。注:
启用时,文本清晰度可能下降。
Fit to TV
(适合电视)
如果 Windows 桌面在显示器上显示不全,可以使用此选
项来调整 Windows 桌面的尺寸。有关如何配置此功能 Fit
to TV(屏幕分辨率)的详细说明,请参见“适合电视”。
注
有关 DisplayLink 软件更新的详细信息,请访问 DisplayLink 网站
http://www.displaylink.com/support/downloads.php。

15
4. 技术规格
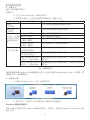
4. 技术规格
图片 / 显示
显示器面板类型 TFT-LCD
背光 LED
面板尺寸 21.5" ( 54.6cm)
宽高比 16:9
像素点距 0.2842 x 0.2842 mm
亮度 150 cd/m²
对比度(典型) 1000:1
响应时间(典型) 5ms
最佳分辨率 1920 x 1080 @ 60Hz
视角 160° (H) / 150° (V) @ C/R > 10
显示颜色数 1670 万
连接性
视频信号输入 USB 2.0
方便性
其他便利性 Kensington 锁
底座
倾斜 -5 / +20
旋转 -65 / +65
高度调整: 70mm
电源
电源输入 USB 2.0
工作模式 9 W(典型) (USB 2.0)
待机模式 0.3 W(典型)
关 0 W
电源适配器(选件)
型号
DSA-20PFE-05 FEU 050300
DSA-20PFE-05 FCH 050300
DSA-20PFE-05 FUS 050300
规格
输入: 100-240VAC,50/60Hz,0.7A
输出: 5 VDC,3A
外形尺寸
产品(含底座)(WxHxD) 507 x 400 x 220 mm
产品(不含底座)(WxHxD) 507 x 323 x 59 mm
重量
产品(含底座) 4.55kg
产品(不含底座) 2.91kg
产品(含包装) 6.12kg

16
4. 技术规格
运行条件
温度范围(运行) 0
°C
到 40
°C
温度范围
(不运行)
-20
°C
到 60
°C
相对湿度 20% 到 80%
海拔高度
操作: + 12,000 英尺 (3,658 米 )
不运行: + 40,000 英尺 (12,192 米 )
MTBF 30,000 小时
环境
ROHS 是
包装 100% 可回收
符合性和标准
管制认证 CE Mark、FCC Class B、UL/cUL、GOST
机壳
颜色 黑色 / 黑色、银色 / 黑色
表面处理 纹理
注
1. 此数据如有变更,恕不另行通知。访问 www.philips.com/support 下载最新版本的宣传页。
4.1 分辨率和预设模式
推荐分辨率
1920 x 1080 @ 60 Hz
注
USB 显示器的数据传输速度是 USB 2.0 480 Mbps。

17
5. 管制信息
5. 管制信息
Lead-free Product
Lead free display promotes
environmentally sound recovery
and disposal of waste from electrical
and electronic equipment. Toxic
substances like Lead has been eliminated and
compliance with European community’s
stringent RoHs directive mandating restrictions
on hazardous substances in electrical and
electronic equipment have been adhered to
in order to make Philips monitors safe to use
throughout its life cycle.
CE Declaration of Conformity
This product is in conformity with the following
standards
• EN60950-1:2006 (Safety requirement of
Information Technology Equipment).
• EN55022:2006 (Radio Disturbance
requirement of Information Technology
Equipment).
• EN55024:1998+A1:2001+A2:2003
(Immunity requirement of Information
Technology Equipment).
• EN61000-3-2:2006 (Limits for Harmonic
Current Emission).
• EN61000-3-3:1995+A1:2001+A2:2005
(Limitation of Voltage Fluctuation and
Flicker) following provisions of directives
applicable.
• 2006/95/EC (Low Voltage Directive).
• 2004/108/EC (EMC Directive).
• 2005/32/EC (EuP Directive, EC No.
1275/2008 mplementing Directive
for Standby and Off mode power
consumption) and is produced by a
manufacturing organization on ISO9000
level.
Federal Communications Commission (FCC)
Notice (U.S. Only)
This equipment has been tested and found
to comply with the limits for a Class B digital
device, pursuant to Part 15 of the FCC
Rules. These limits are designed to provide
reasonable protection against harmful
interference in a residential installation.
This equipment generates, uses and can
radiate radio frequency energy and, if not
installed and used in accordance with the
instructions, may cause harmful interference
to radio communications.
However, there is no guarantee that
interference will not occur in a particular
installation. If this equipment does cause
harmful interference to radio or television
reception, which can be determined by
turning the equipment off and on, the
user is encouraged to try to correct
the interference by one or more of the
following measures:
• Reorient or relocate the receiving antenna.
• Increase the separation between the
equipment and receiver.
• Connect the equipment into an outlet on
a circuit different from that to which the
receiver is connected.
• Consult the dealer or an experienced
radio/TV technician for help.
Changes or modifications not expressly
approved by the party responsible for
compliance could void the user's authority
to operate the equipment.

18
5. 管制信息
Use only RF shielded cable that was supplied
with the monitor when connecting this monitor
to a computer device.
To prevent damage which may result in fire or
shock hazard, do not expose this appliance to
rain or excessive moisture.
THIS CLASS B DIGITAL APPARATUS MEETS
ALL REQUIREMENTS OF THE CANADIAN
INTERFERENCE-CAUSING EQUIPMENT
REGULATIONS.
FCC Declaration of Conformity
Declaration of Conformity for Products Marked
with FCC Logo,
United States Only
This device complies with Part 15 of the FCC
Rules. Operation is subject to the following two
conditions: (1) this device may not cause harmful
interference, and (2) this device must accept any
interference received, including interference that
may cause undesired operation.
Commission Federale de la Communication
(FCC Declaration)
Cet équipement a été testé et déclaré
conforme auxlimites des appareils
numériques de class B,aux termes de
l'article 15 Des règles de la FCC. Ces
limites sont conçues de façon à fourir
une protection raisonnable contre les
interférences nuisibles dans le cadre d'une
installation résidentielle.
CET appareil produit, utilise et peut émettre
des hyperfréquences qui, si l'appareil n'est
pas installé et utilisé selon les consignes
données, peuvent causer des interférences
nuisibles aux communications radio.
Cependant, rien ne peut garantir l'absence
d'interférences dans le cadre d'une
installation particulière. Si cet appareil est
la cause d'interférences nuisibles pour
la réception des signaux de radio ou de
télévision, ce qui peut être décelé en
fermant l'équipement, puis en le remettant
en fonction, l'utilisateur pourrait essayer de
corriger la situation en prenant les mesures
suivantes:
• Réorienter ou déplacer l’antenne de
réception.
• Augmenter la distance entre
l’équipement et le récepteur.
• Brancher l’équipement sur un autre
circuit que celui utilisé par le récepteur.
• Demander l’aide du marchand ou d’un
technicien chevronné en radio/télévision.
Toutes modifications n'ayant pas reçu
l'approbation des services compétents
en matière de conformité est susceptible
d'interdire à l'utilisateur l'usage du présent
équipement.
ページが読み込まれています...
ページが読み込まれています...
ページが読み込まれています...
ページが読み込まれています...
ページが読み込まれています...
ページが読み込まれています...
ページが読み込まれています...
ページが読み込まれています...
ページが読み込まれています...
ページが読み込まれています...
ページが読み込まれています...
ページが読み込まれています...
-
 1
1
-
 2
2
-
 3
3
-
 4
4
-
 5
5
-
 6
6
-
 7
7
-
 8
8
-
 9
9
-
 10
10
-
 11
11
-
 12
12
-
 13
13
-
 14
14
-
 15
15
-
 16
16
-
 17
17
-
 18
18
-
 19
19
-
 20
20
-
 21
21
-
 22
22
-
 23
23
-
 24
24
-
 25
25
-
 26
26
-
 27
27
-
 28
28
-
 29
29
-
 30
30
-
 31
31
-
 32
32


