
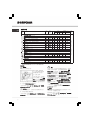
1
使用說明書(中文)
Scholtès 嵌入式洗衣乾衣機
目錄
安裝須知,2-5
拆卸包裝及穩定機身
接駁電源及用水供應
首次洗衣程序
產品規格
技工指引
保養及維修,6
切斷用水或電源供應
清潔洗衣乾衣機
清潔洗衣粉分配格
保養機門及洗衣滾筒
清潔泵機
檢查進出水軟管
注意事項及提示,7
安全須知
棄置須知
手動打開機門
洗衣乾衣機說明,8-9
控制面板
顯示螢幕
洗衣及乾衣程序說明,10
洗衣程序及功能,11
洗衣程序表
洗衣功能
洗衣粉及洗衣,12
洗衣粉分配格
洗衣前準備
特別洗衣程序
載重平衡系統
疑難排解,13
客戶服務,14
附加資料,14
香港地區適用
中文
SDLE 129 HK
此標誌提醒您必須閱讀本使用說明手冊。
重要安全指引。
請小心閱讀及保留作日後參考。
注意︰本產品可供八歲或以上兒童,或體能、
感知或智力較弱者,或缺乏經驗、認識的人士
使用,但該類人士必須經協助或已接受有關使
用指導,並明白本產品的使用方法及理解不當
使用所帶來的危險,方可使用本產品。不應讓
兒童把玩該設備。沒有監督的情況下,不可讓
兒童進行清潔和保養工作。請監督兒童,以確
保他們不會把玩爐具。

2
安裝須知
!本使用說明書應保存在安全的地方以供日後
參考。如將洗衣乾衣機出售、轉讓或搬遷時,
請確保本說明書與本機一同交給新用戶,以熟
悉本機的操作及功能。
!仔細閱讀說明:說明包括有關安裝的安全須
知及操作設備時的重要資料。
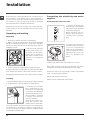
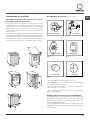
拆卸包裝及穩定機身
拆卸包裝
1. 拆除洗衣乾衣機機身外的包裝。
2. 確保洗衣乾衣機沒有在運輸過程中損壞。如
有損壞,請與零售商聯繫, 並停止任何安
裝程序。
3. 拆除 4 顆保護螺絲
(於運輸過程中使用)
及位於後方的橡膠墊
片(見圖)。
4. 使用提供的塑膠塞封閉開孔。
5. 請將所有零件保存於安全地方:洗衣乾衣機
需遷至另一位置時,需再次使用。
!請勿將包裝材料供兒童玩耍。
穩定機身
1. 請將洗衣乾衣機安裝於平坦及堅固的地面。
不可將機體安裝於墻壁、傢具的櫃子或其他
物體。
2. 如地面並不平坦,
請調節前腳的鬆緊度
以彌補地面不平 (見圖
示) ;與工作平面所形
成的傾斜角,角度不
得超過 2°。
為避免引起震盪和過大噪音,以及防止運作時
移動,請正確穩定機身。如放置於地毯上,請
調整機腳,以確保洗衣乾衣機下方有足夠空間
作通風。
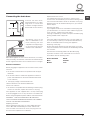
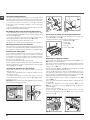
接駁電電源及用水
接駁水進水軟管
1. 利用¾ 螺紋連接,
將進水軟管接駁到冷
水出水位置(見圖
示) 。 連接前,請確
保流出的用水是完全
清澈。
2. 將進水軟管妥善
接駁到洗衣乾衣機右
邊頂部後方位置的進
水位置 (見圖示) 。
3. 請確保軟管沒有摺疊或屈曲。
!出水位置之水壓必須符合技術規格所顯示的
數值範圍內 (見下頁)。
!如進水軟管長度不足,請聯繫專門店或認可
技術人員。
!請勿使用二手軟管。
!請使用隨機提供的軟管。
中文

3
安裝須知
接駁排水管
將排水管接駁至排水
道或牆上排水系統,
接駁位置的高度及要
求為離地 65 至 100 厘
米的直身、未有屈曲
水管。
或者,將機體置於洗
臉盆或浴缸側,然後
接駁排水管至用水供
應位置 (見圖示) 。軟
管開端不應在設置於
水面下。
!我們不建議使用加長軟管。如必需加長長
度,所加長的軟管直徑必須與原件相同及長度
不得超過 150 厘米。
接駁電源
在將插頭插入插座前 ,確保:
插座接有地線並符合所有適用法例;
插座能承受產品規格表上顯示的最大電力負
荷裝置 (見右表);
電源電壓值在產品規格表上顯示的範圍內
(見右表);
插座是與洗衣乾衣機的插頭相容的。倘若不
是如此,更換插座或插頭。
!洗衣乾衣機不可安裝在戶外,即使是有蓋的
地方。讓機器暴露在風雨和其他天氣情況下是
非常危險的。
!當洗衣乾衣機安裝好時,電插座必須在伸手
可及的範圍內。
!切勿使用廷長電線或萬能蘇。
!電線不可扭曲或受壓。
!供電電線必須由認可技工更換。
警告!不遵從這些規定導致的後果,本公司不
負責。
首次洗衣程序
當安裝妥當,在您首次洗衣前,用洗衣粉及空
機進行洗衣程序
。
產品規格
型號
SDLE 129 HK
尺寸
寬 59.5 厘米
高 81.5 厘米
深 54.5 厘米
容量
洗衣程式 從 1 至 7 公斤
乾衣程式 從 1 至 5 公斤
電源接駁
請參閱貼在機身的產品規格牌
用水接駁
最高水壓 1 兆帕 (10 巴)
最低水壓 0.05 兆帕 (0.5 巴)
洗衣槽容量 52 公升
旋轉速度
最高 1200 轉/分鐘
根據 E N
50229 法
規的額定
能源項目
洗衣: 程式 (首次按下按鈕) ;
溫度 60°C; 使用載重 7 公斤。
乾衣: 首個輕載量乾衣程序,包
括 2 張牀單、1 個枕頭套及 1 條
手巾,須選擇乾衣程序中的“熨
乾”模式運行;而其餘的載重量
則使用乾洗程序中的“快乾”模
式運行。
本設置遵照下列歐盟指令:
- 2004/108/EC (電磁兼容)
- 2006/95/EC(低電壓)
- 2002/96/EC
中文

4
安裝須知
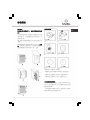
技工指引
將木制面板安裝到門上,然後將機器安裝於櫃
內:
在木制面板安裝後,若在機器必須運送才作最後
安裝的情況下,我們建議將其留在原包裝內。本
包裝的設計能
讓它安裝木制面板到機器上而沒有完全移除 (見
下圖)。
覆蓋機器表面的木製面板,厚度必須不少於 18 亳
米,並能扣在左邊或右邊。為方便使用本機器,
我們建議面板扣在機門的同一邊 — 左邊。
機門裝置配件 (圖 1-2-3-4-5).
- 6 號 A 型自攻螺絲 l =13 毫米
- 2 號 B 型公制平頭螺絲 l =25 毫米; 固定磁石板。
- 4 號 C 型公制螺絲 l =15 毫米; 給櫃安裝鉸座。
- 4 號 D 型公制螺絲 l =7 毫米; 安裝鉸在座上。
固定到機器表面的部件
- 在裝置前面板安裝鉸座, 將圖 1 箭頭所示的孔定
位而令它在前面板內側。用 C 型螺絲在表面之間安
裝間隔 (圖 4/B )。
- 用 B 型螺絲安裝磁石板在另一邊的頂端,安裝間
隔 (圖 4/B )在磁石板和表面之間。
中文

5
安裝須知
使用鑽孔模板
- 找出面板左邊孔位置,對齊鑽孔模板至面板左邊,並
找出末端作為參考。
- 找出面板右邊孔的位置,對齊鑽孔模板至面板右邊,
找出末端作為參考。
- 用適當大小的工具為兩個鉸、膠塞和磁石磨孔。
安裝部件到木面板上 ( 門 )
- 將門鉸插入孔隙 (可移動門鉸部分必須背著板面) 及
以 4A 型螺絲緊固。
- 將磁石插入門鉸反面頂端的孔隙,並用兩個 B 型螺
絲緊固。
- 將膠塞插入門鉸底部孔隙後,可將面板安裝到機器
上。
將面板安裝至機器
將門鉸尖頭插入 (如圖 2 箭頭示) 門鉸孔隙中,並將面
板推至機器前面。用 D 型螺絲緊固門鉸。
緊固基底
如機器安裝於一套組件的櫃子末端,安裝一個或兩個
基底於底部 (如圖 8 示)。調節在底部基底位置的深度,
如有需要,緊固底部基底 (圖 9),這是如何裝配基底。
用螺絲 R 用角 P 緊固,將基底 Q 插入特殊的插槽,一
旦它處於所需位置,用螺絲 R 用角 P 鎖緊它。
把機器嵌入櫃子
- 將機器推入櫃子的開孔並與櫃子對齊 (圖 6)。
- 調節可調較的機腳,提高至適當的高度。
- 用螺絲 C 和 D 調整木板垂直和水平位置,如圖 7
示。
重要:關閉裝置前面的底部以確保基底靠著地板。
提供高度調節的配件
下列物件可在聚苯乙烯蓋子找到 (圖 10) 2 支橫閂
(G), 1 支橫帶 (M) 。下列物品可在裝置的洗衣槽內找
到:
4 額外機腳 (H),
4 螺絲 (I),
4 螺絲 (R),
4 絲帽 (L),
2 基底 (Q),
調節裝置高度
本裝置高度可通過旋轉 4 個機腳作調整(從 815 毫米
至 835 毫米)。
如要把裝置調至超過上述高度,請利用下列配件作調
整,以提高至 870 毫米:
2 支橫閂 (G) ; 4 隻機腳 (H) ; 4 個螺絲 (I) ; 4 個絲帽
(L),然後執行下列操作程序﹝圖 11﹞:
拆除 4 隻原配機腳,把橫閂 G 置於裝置前,用螺絲 I
緊固後(鎖在原機腳位置),將新機腳 H 插入。於裝置
背面重複操作程序。調整機腳 H 以提高或降低裝置,
從 835 毫米至 870 毫米。 到達所需高度後,將絲帽
L 鎖到橫閂 G。
調整裝置到 870 毫米至 900 毫米之間的高度,必須
安裝橫帶 M,以調節機腳 H 至所需高度。
插入橫帶 M :鬆開 3 個位於機頂前的螺絲 N, 如圖
12 所示,插入橫帶 M,再收緊螺絲 N。
中文

6
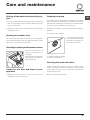
保養及維修
切斷用水或電源供應
每次洗衣完畢,關閉水龍頭,這將減少洗衣
乾衣機中的液壓系統磨損,並且防止洩漏。
在所有保養及維修時,將洗衣乾衣機插頭拔
掉。
清潔洗衣乾衣機
本裝置的外部及橡膠成分可用在肥皂溫水中泡
浸的軟布清潔。不可使用溶劑或磨料。
清潔洗衣粉分配格
提起及拉出分配格 (見
圖示)。
在流水中清潔;本操
作應經常反覆重做多
次。
保養機門及洗衣滾筒
為了防止形成令人不雅的氣味,常常微開觀察
窗門。
清潔泵機
洗衣乾衣機裝有自動清潔泵,無需任何維修。
有時小物件 (如硬幣或鈕扣) 可能掉進在機地部
保護泵的前箱。
!確保洗衣程序完畢才移除裝置。
檢查前方空間:
1. 逆時針方向轉動前
蓋,並打開 (見左圖):
可能會有少許水流出,
這是完全正常的;
2. 徹底清潔內部;
3. 裝回前蓋;
檢查進出水軟管
每年最少檢查一次進水軟管。如有任何裂縫,
請立即更換;在洗衣過程中若水壓過強,軟管
裂縫會容易裂開。
!切勿使用二手軟管。
中文

7
注意事項及提示
!本洗衣乾衣機是按照國際安全規則設計及製
造。下列資料提供安全理由,必須小心閱讀。
安全須知
本裝置僅為家居使用而設計。
本產品可供八歲或以上兒童,或體能、感知或智
力較弱者,或缺乏經驗、認識的人士使用,但該
類人士必須經協助或已接受有關使用指導,並明
白本產品的使用方法及理解不當使用所帶來的危
險,方可使用本產品。應監督兒童,以確保他們
不會把玩爐具。 沒有監督的情況下,不可讓兒
童進行清潔和保養工作。
- 請勿將未洗的衣物放入乾衣機。
- 沾有烹調油、 丙酮、 酒精、 汽油、 煤油、 去
污點、 松節油、 蠟水、 蠟去除劑等物質的衣
物,應用額外清潔劑以熱水洗淨,才放入乾衣
機。
- 泡沫橡膠 (乳膠泡沫)、淋浴帽、防水紡織品、
橡膠製品和衣物或裝有泡沫橡膠墊的枕頭,不可
在滾動乾衣機烘乾。
- 根據指定織物柔軟劑說明,使用織物柔軟劑或
類似的產品。
- 乾衣程序的最後階段會停止加熱 (冷卻程序),
以確保衣物留在滾筒內不會因高溫受損。
警告:在乾衣程序結束前,切勿終止乾衣程序。
如須終止程序,請確保所有衣物不會留在滾筒
內,並盡快散開衣物使熱力消失。
當赤腳或手濕時,切勿接觸裝置。
需移除裝置上的插頭時,切勿拉扯電線。請抓緊
插頭,然後從插座拔出。
機器運作中,切勿打開洗衣粉分配格。切勿接觸
排出的水,因排出水份之溫度可能極高。
請勿強行打開機門。這可能會令用作防止意外打
開機門的安全鎖定機制設計受到破壞。
如裝置損壞,在任何情況下請勿嘗試自行修復及
檢查內部機制。
本裝置運作時,確保兒童遠離裝置。
於洗衣過程中,機門會變得很熱。
如需移動裝置,應由兩至三人負責。因為裝置沉
重,切勿獨自移動。
將衣物放入機前,確保洗衣槽是空的。
在乾衣期間,門往往會變得很熱。
請勿使用本裝置替被易燃溶劑 (如三氯乙烯) 清洗
過的衣物乾衣。
請勿使用本裝置替泡沫橡膠或類似的彈性物品乾
衣。
確保在乾衣過程中,進水龍頭保持開啟。
棄置須知
棄置包裝材料:遵照當地法規,令包裝材料可循環再
用。
按歐盟電子電氣廢棄物 2002/96/CE 號指令,要求舊家
電產品不可棄置在未被分類的市政廢物中。舊家電必
須分開收集,以確保可回收和循環再用物料及減少對
人類健康和環境的影響。在產品之“打交叉垃圾桶”
圖示,於棄置電氣時可作為必須分開收集的提示。
消費者應聯絡當地有關部門或零售商有關正確處置舊
家電的資訊。
手動打開機門
因電源切斷而未能打開機門的情況下,如需取出衣物
時,請依下列程序進行操作:
1. 拔除插座上的插頭。
2. 確保機內的水位低於機門;如水位過高,請使用
排水軟管將多餘的水抽出,並收集在存儲桶中。
3. 按圖所示,將塑膠拉籤拉出,直至脫離其原位。
將塑膠拉籤向下拉同時,請打開機門。
中文

8
洗衣乾衣機說明
洗衣粉分配格:用來分配洗衣粉和洗衣添加劑
(見“洗衣粉和洗衣”)。
開/關 (ON/OFF) 按鈕 :簡單地按此按鈕開啟
或關閉機器。開始/暫停 (START/PAUSE) 的綠色
指示燈慢慢地閃爍顯示機器已開啟。在洗衣過
程中關閉洗衣乾衣機,按住按鈕大約 2 秒鐘;
如果簡單地或意外地按下按鈕,機器是不會關
掉的。如果機器在洗衣過程中關機,此洗衣程
序會被取消。
洗衣程序選擇 (WASH CYCLE SELECTOR) 按
鈕:用於設置所需洗衣程序 (詳見“洗衣程序
表”)。
記憶體 (MEMORY) 按鈕 :按住記憶體按鈕存儲
您自己首選的程序設定於機中的記憶體。按備
忘錄即可檢看之前的存儲程序。
功能 (FUNCTION) 按鈕:按下按鈕以選擇所需
功能。在顯示螢幕相應的指示燈會開啟。
旋轉 (SPIN) 按鈕 :按下按鈕以減少或完全暫
停旋轉程序- 數值顯示在顯示螢幕。
溫度 (TEMPERAUTRE) 按鈕 :按下按鈕以降
低溫度,數值顯示在顯示螢幕。
控制面板鎖 (CONTROL PANEL LOCK) 按鈕 :
啟動 (activate) 控制面板鎖,長按按鈕約 2 秒。標
誌 亮起後,控制面板被鎖定 (不同於使用開/關
按鈕),以防止洗衣程序被意外修改,特別是家中
兒童。停用 (deactivate) 控制面板鎖,長按按鈕約
2 秒。
延遲啟動 (DELAYED START) 按鈕 :按下按鈕
設置延遲啟動所選擇的洗衣程序時間。延遲時間
將顯示於顯示螢幕上。
乾衣 (DRYING) 按鈕 :按下按鈕設置乾衣程
序。
開始/暫停 (START/PAUSE) 按鈕及指示燈:錄色指
示燈緩慢閃爍時,按下按鈕開始洗衣程序。程序
開始後,指示燈會保持亮著。暫停洗 衣程
序,可再次按按鈕;橙色指示燈會閃爍。如 標誌
不會發亮,可能是機門被打開。再次按下按鈕,
洗衣程序會從被暫停時再開始。
待機模式
本洗衣機符合新的節能規例,裝有自動備用系
統,待機模式於檢測沒有活動約 30 分鐘後啟動。
按 開/關 (ON-OFF) 按鈕,並等待機器再次啟動。
關機模式耗電量:0.5瓦 (0.5W)
待機模式耗電量:0.5瓦 (0.5W)
中文
控制面板

9
洗衣乾衣機說明
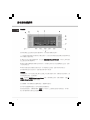
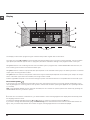
當需要於機器上設定程式或提供大量資料時,可利用顯示螢幕方便操作。
上方 A 和 B 項是用來顯示所選的洗衣或乾衣程序、目前洗衣程序階段 (選定的乾衣程度或時間) 及
所有有關程序進度的狀況。
C 項顯示目前洗衣程序的剩餘時間。如已設定 延遲開啟 (DELAYED START), 所顯示之時間為開
始已選洗衣程序的剩餘時間。
D 項顯示為最高旋轉速度 (根據洗衣程序而決);如所選洗衣程序並不包括旋轉速度之設定,此顯
示保持為未使用。
E 項顯示為最高溫度 (根據洗衣程序而決)。如未能修改洗衣溫度,此顯示保持為未使用。
當所選的功能相容於洗衣程序,相對功能的顯示燈 F 會亮著。
門鎖標誌
如標誌燈亮起,表示洗衣乾衣機之機門已被鎖上以免機門被意外打開。為避免發生任何損失,請
等待標誌燈熄滅後,才打開機門。
注意:如已開啟 延遲開啟 (DELAYED START) 功能,機門側無法打開;如需打開機門,請按 開
啟/暫停 (START/PAUSE) 按鈕暫停機器。
首次開機時,顯示螢幕為語言選擇功能表,請選擇所需語言。
按 X 和 Y 按鈕選擇所需語言;按 Z 按鈕確定所選擇語言。
如需更改所選語言,於關機狀態時,同時按住 L 所指示之三個按鈕至到提示音響發出。再次開
機,顯示螢幕會再次顯示出語言選擇功能表。
顯示螢幕
中文

10
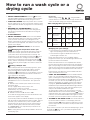
洗衣及乾衣程序說明
1. 開機。 按下按鈕 ;歡迎 (WELCOME) 字樣會
在顯示螢幕出現,開始/暫停 (START/PAUSE) 綠色指
示燈亦會慢慢閃爍。
2. 放入衣服。打開機門並放入衣服,請確保不超過
下頁程序表上所列出之最高載重量。
3. 按量放入洗衣粉。拉出洗衣粉分配格,按“洗衣
粉和洗衣”部份所示,將洗衣粉放入相關間隔。
4. 關閉機門。
5. 選擇洗衣程序。按其中一項 洗衣程序選擇
(WASH CYCLE SELECTOR) 按鈕,選擇所需洗衣程
序;程序名稱會於螢幕出現。洗衣程序的溫度和旋
轉速度為預設,可調節。所需洗衣時間亦會顯示於
螢幕上。
6. 設定洗衣程序。使用相關按鈕:
修改溫度和 / 或旋轉速度。機器為洗衣程序
自動選擇最高的溫度和旋轉速度設定,因此預設值
不能增加。降低溫度可按 按鈕設置,並可設定為
為冷水洗衣 "關閉" (OFF) 。按 按鈕可調低旋轉
速,並可設定為沒有旋轉 (設置為 "關閉" (OFF) )。如
再次按下,會回復最高值。
設置延遲開啟。
要為所選程序設置延遲開啟,反復按相應的按鈕,
直到所需的延遲時間到達。當啟用此選項時, 標
誌將於顯示螢幕上亮著。要取消延遲開啟功能,按
下按鈕至顯示螢幕上出現 "關閉"(OFF) 字樣。
設置乾衣程序。
所需的乾衣程序可按 乾衣 (DRYING) 按鈕 一次或數
次,有兩項可供選擇:
A – 基於要乾的衣服濕度而定:
熨乾: 微濕的衣服,容易熨乾。
晾乾: 收起的乾衣服。
快乾: 非常乾的衣服,建議毛巾和浴袍。
B – 基於時間:從 40 至 180 分鐘。
取消乾衣階段,按相關的按鈕至螢幕出現 "關
閉"(OFF) 字樣。
如所需洗衣量及乾衣量大於所列之最高值 (見鄰表)
進行洗衣程序,於程序完畢後,衣物分開以數次乾
衣程序處理,將部份衣服放回洗衣滾筒。請依下列
指引使用“"只限乾衣"(DRYING ONLY) 的程序。重
複程序至完成所有衣物。
附注:降溫時段設於每個乾衣程序結束後。
只限乾衣
根據物料種類,使用洗衣程序選擇 (WASH CYCLE
SELECTOR)按鈕,選擇乾衣設定 ( ) ,
按 乾衣 (DRYING) 按鈕選擇所需乾衣類型。
乾衣時間表 (建議)
更改程序設置
按下按鈕啟用功能 ,相關指示燈會亮著。
再次按下按鈕取消功能 ,相關指示燈會關掉。
!如所選之功能不相容與程式化的洗衣程序,指示燈
會閃爍,所選功能不會被啟動。
!如較後選定之功能與較先所設置之功能不相容,較
先選定之功能指示燈會閃爍,較後選定的功能會被啟
動 ,已啟用之功能,其相應指示燈將持續亮起。
!功能可能受建議的負重量和/或程序時間所影響。
7. 啟動程式。按 開始 / 暫停(START/PAUSE) 按鈕。
有關綠色指示燈會持續亮著,機門會被鎖上 (門鎖
(DOOR LOCKED) 標誌會亮著)。洗衣過程中,
進行階段名稱將顯示於螢幕上。
程式進行中,若要更改洗衣程式,按 開啟/暫停
(START/PAUSE) 按鈕 (開始/暫停 (START/PAUSE) 橙
色指示燈慢慢閃爍) 暫停洗衣乾衣機運行,選擇所需
程式,完成後按 開始/暫停 (START/PAUSE) 按鈕。
程式進行中,如需打開機門,請按 開始/暫停
(START/PAUSE) 按鈕 。如 門鎖 (DOOR LOCKED) 標
誌燈熄滅,可打開機門。再次按下 開始/暫停(START/
PAUSE) 按鈕,程式會從被暫停點重新開始。
8. 洗衣程序結束。顯示螢幕上出現“程序完畢”
(END OF CYCLE) 字樣,當 門鎖 (DOOR LOCKED)
標誌熄掉,可打開機門取出衣服及關機。
!如需取消進行中之洗衣程序,按住 按鈕,程序
會被中止,機器亦會關上。
中文
布料
類型
裝載類型
最高載
重 (公斤)
快乾 晾乾 熨乾
棉質
不同尺寸衣
服、毛巾織物
5 180 170 160
合成
材料
床單、襯衫、
睡衣、襪子等
3 180 170 160
羊毛
針織、套頭毛
衣等
1.5 150 140 130

11
洗衣程序及功能
洗衣功能
加強除污
本功能針對清除頑固污漬。
放置外加間隔 3 (隨機器提
供)。加入漂白劑時注意不要
超過中軸所標示的 "最高
(max)" 位置 (見圖)。
若只進行漂白程序,可將漂白
劑加入外加間隔 3,設定 沖洗
(Rinse) 程式及啟動 除污 (Stain
removal) 程式。如需於洗衣過
程中漂白,加入洗衣粉及所需的柔順劑,設定所需洗衣程
序,並啟用 除污 (Stain removal) 功能。
!程序不能與 , , , , 泵出 (Pump out) 及 乾衣程
式 (Drying programmes) 一同使用。
加強沖洗
此選項可增加洗滌效率,並保證洗衣粉發揮最佳除污功
能。特別針對敏感皮膚很有用。
!程序不能與 , , 泵出 (Pump out) 及 乾衣程式 (Drying
programmes) 一同使用。
易熨
使用此功能時,洗衣程序和旋轉速度會被修改,減少皺
紋形成。於程序結束時,洗衣滾筒會緩慢旋轉 。易熨
(EASY IRON) 指示燈亮起,橙色 開始 / 暫停 (START/
PAUSE) 指示燈會閃爍,而 程序結束 (END OF CYCLE)
字樣亦出現於顯示螢幕上。如需結束程序,按 開始 / 暫
停 (START/PAUSE) 按鈕或 易熨 (EASY IRON) 按鈕。
絲綢 / 窗簾程序於浸洗衣物時,機器會結束程序,易熨
(EASY IRON) 指示燈亮起,橙色 開始/暫停 (START/
PAUSE) 指示燈閃爍,停止用水 (STOP WITH WATER) 字
樣出現於顯示螢幕上。按 開始 / 暫停 (START / PAUSE)
按鈕或 易熨 (EASY IRON) 按鈕,排走水份並取出衣物。
!程序未能與 , , , 及 乾衣程式 (Drying
programmes) 一同使用。
低載量
如載量相等於最高建議載重量(見洗衣程序表)的一半或
少於一半時,建議選用此功能。
程序不能與 , , , , 泵出 (Pump out) 及 乾衣程式
(Drying programmes) 一同使用。
洗衣程序表
洗
衣
程
序
洗衣程序說明
最高
溫度
(⁰C)
最高
速度
(轉/
分鐘)
乾
衣
洗衣粉 最高載量 (公斤)
所需
程序
時間
漂
白
洗
衣
衣物
柔順
正
常
最低載重
日常洗衣程序 (每日)
所
需
的
洗
衣
程
序
時
間
,
可
於
螢
幕
顯
示
上
查
看
。
棉質(*)(第一按按鈕):特別污漬 90⁰ 1200 ˙ ˙ ˙ ˙ 7 3
棉質 (第二按按鈕):嚴重污漬及頑固顏色 60⁰ 1200 ˙ ˙ ˙ ˙ 7 3
棉質 (第三按按鈕):嚴重污漬及柔弱顏色 40⁰ 1200 ˙ ˙ ˙ ˙ 7 3
合成物 (第一按按鈕):嚴重污漬及頑固顏色 60⁰ 800 ˙ ˙ ˙ ˙ 3 1.5
合成物 (第二按按鈕):輕微污漬及頑固顏色 40⁰ 800 ˙ ˙ ˙ ˙ 3 1.5
混合 30 分鐘 (第一按按鈕):快速輕刷沾污衣物 (不適用於
羊毛、絲綢和需手洗衣物)。
30⁰ 800 ˙ - ˙ ˙ 3 -
混合 15 分鐘 (第二按按鈕):快速輕刷沾污衣物 (不適用於
羊毛、絲綢和需手洗衣物)。
30⁰ 800 ˙ - ˙ ˙ 1.5 -
絲綢/窗簾:絲綢及人造絲,女裝內衣服裝 30⁰ 0 - - ˙ ˙ 1 1
記憶:可存儲任何洗衣程序
羊毛:羊毛、羊絨等 40⁰ 800 ˙ - ˙ ˙ 1.5 1
乾衣程式
棉質乾衣(第一按按鈕) - - ˙ - - - 5 -
合成物料乾衣(第二按按鈕) - - ˙ - - - 3 -
羊毛乾衣(第三按按鈕) - - ˙ - - - 1.5 -
部分洗衣程序
旋轉 - 1200 ˙ - - - 7 -
沖洗 (第一按按鈕) - 1200 ˙ ˙ - ˙ 7 3
泵出 (第二按按鈕) - 0 - - - - 7 -
* 洗衣程序測試是根據法規 EN 50229: 在 60°C 溫度下設置洗衣程序。
中文

12
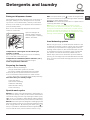
洗衣粉及洗衣
洗衣粉分配格
良好洗滌效果取決於正確劑量的洗衣粉:使用過
多洗衣粉,未必能達致有效的洗滌效果,相反,
可能令裝置內積聚洗衣粉及造成環境污染。
!切勿使用手洗的洗衣粉,避免造成過多泡沫。
打開洗衣粉分配格和加
入洗衣粉或洗衣添加劑
如下。
間格 1 :用於洗衣程序的洗衣粉 (粉狀或液體)
洗衣液應在開始洗衣程序之前即時加入。
間格 2 :添加劑 (織物柔軟劑等)
衣物柔順劑不應溢出間隔外。
外加間隔 3: 漂白
洗衣前準備
衣物分類根據:
- 織物類型/標籤上的標誌。
- 顏色:將白色衣物從有顏色衣物中分開。
檢查所有衣物口袋及檢查鈕扣。
切勿超出洗衣乾衣機所列的重量數值 (請參
閱洗衣程序表)。
您的洗衣量有多重?
1 張床單 400-500 克
1 個枕頭套 150-200 克
1 張桌布 400-500 克
1 件浴衣 900-1200 克
1 條毛巾 150-250 克
特別洗衣程序
混合 30 分鐘 :本洗滌程序專為快速洗滌輕微污
漬而設計;只需 30 分鐘洗滌時間,可節省能源
及時間。選擇此洗滌程序 ( 在 30°C ),可洗
滌不同衣料 (除了羊毛及絲綢物料外),最高負
重為 3 公斤。
混合 15 分鐘 :本洗滌程序專為快速洗滌輕微污
漬而設計;只需 15 分鐘洗滌時間,可節省能源
及時間。選擇此洗滌程序 ( 在 30°C ),可洗
滌不同衣料 (除了羊毛及絲綢物料外),最高負
重為 1.5 公斤。
絲綢:使用特別洗滌程序 洗滌絲綢類服裝。
建議使用專為精緻衣服洗滌用的特別洗衣粉。
窗簾:折疊窗簾後,將窗簾放入枕套或網袋
中。使用洗滌程序
。
羊毛:此設備的羊毛洗衣程序獲國際羊毛局
(The Woolmark Compan) 認證。這表示標籤為
「只限手洗」的羊毛物料衣物,亦可放於此設
備洗滌。但有關衣物的
洗滌設定及過程必須依
照羊毛衣物上指引及此
設備的有關指 (M1126)。
載量平衡系統
於每次旋轉程序前,為避免過度振動及平衡分
布衣物,洗衣槽會持續旋轉,轉動速度比洗衣
程序稍大一點。如經多次嘗試後,也不能正確
平衡負載,機器旋轉速度會減慢,如過分不平
衡負載,洗衣乾衣機會執行分布程序代替旋
轉。為鼓勵改進負載分配和平衡,我們建議將
大小衣服混合一起清洗。
中文

13
疑難排解
洗衣乾衣機無法運作時,請於聯繫技術支援中心前,先以依照下列方法解決。如問題仍然出現,
請聯繫技術支援中心 (見第 14 頁內“尋求協助”部份)。
疑難: 可能原因 / 解決方法:
洗衣乾衣機未有開啟。 裝置的插頭未有完全插入插座或未有接觸。
屋內沒有電源。
洗衣程序未有開始。 洗衣乾衣機機門未有妥當關上。
沒有按開/關 (ON/OFF) 按鈕。
沒有按開始/暫停 (START/PAUSE) 按鈕。
水龍頭未有開啟。
已設定延遲開始 (見第 8 頁內“洗衣及乾衣程序說明”部份)。
洗衣乾衣機未有進水 (在顯
示螢幕上出現“沒有水,檢
查進水”( NO WATER,
CHECK SUPPLY))。
進水軟管未有接駁到供水位置。
軟管被屈曲。
出水口未有開啟。
屋內未有用水供應。供應水壓過低。
未有按開始/暫停 (START/PAUSE) 按鈕。
洗衣乾衣機持續進水及排
水。
排水管未有正確安裝於距離地面 65 至 100 厘米的高度 (見第 3 頁內
“安裝須知”部份)。
軟管開端設置於水面下 (見第 3 頁內“安裝須知”部份)。
牆上排水系統未有安裝呼吸管。
即使在檢查後如果問題仍然存在, 關閉水龍頭、關掉裝置電源及
聯繫支援服務。
如果該住宅為建築物上層之一,可能與排水道有關,導致洗衣乾衣
機裝滿水和連續排水。特別的防排水閥可在商店中找到,並有助於
避免由此引起的不便。
洗衣乾衣機未能排水或旋
轉。
洗衣程序不包括排水:部份洗衣程序需手動排水程序 。
已啟動易熨 (EASY IRON) 功能:完成洗衣程序,按開始/停止
(START/PAUSE) 按鈕 (見第 8 頁內“洗衣及乾衣程序說明”部份)。
排水軟管出現屈曲 (見第 3 頁內“安裝須知”部份)。
排水管出現阻塞。
洗衣乾衣機在旋轉程序時出
現強烈震動。
洗衣槽於安裝時沒有正確解鎖 (見第 2 頁內“安裝須知”部份)。
洗衣乾衣機機身不穩 (見第 5 頁內“安裝須知”部份)。
洗衣乾衣機被夾在牆與櫃之間 (見第 5 頁內“安裝須知”部份)。
洗衣乾衣機出現漏水情況。 進水管沒有適當擰緊 (見第 3 頁內“安裝須知”部份)。
洗衣粉分配格阻塞 (見第 6 頁內“保養及維修”部份)。
排水軟管沒有適當固定 (見第 3 頁內“安裝須知”部份)。
洗衣乾衣機被鎖上,顯示面
板閃爍並顯示出錯誤代碼
﹝例如 F-01, F-...﹞。
關機及拔掉插頭,等待約 1 分鐘再插回插座。
如問題仍然出現,請與技術支援服務聯繫。
清潔泡沫過多。 洗衣粉或洗潔劑不適合洗衣機 (應顯示“洗衣乾衣”(for washer
dryers) 或“手洗和機洗”(hand and machine wash)等文字,或類似文
字)。
使用過多洗衣粉。
洗衣乾衣機未能乾衣。 機門未有將插頭插進插座,或沒有足夠接觸。
電力出現故障。
機門未有妥善關上。
已設置延遲開始。
乾衣 (DRYING) 程序停留於關閉 (OFF) 位置。
中文

14
尋求協助
致電協助前:
檢查所出現問題是否可自行解決(請參閱"疑難排解") ;
重新運行程序,並檢查問題是否已解決 ;
如仍未能解決,請致電認可的技術支援中心。
!需要時請向認可技術人員尋求協助。
請準備下列資料:
問題類型;
機器型號 (Mod.);
機身編號 (S/N).
所需資料可於洗衣乾衣機後方的規格名牌上找到,或打開機門後,於機器前方找到。
中文
接駁 13 安培三腳插頭
如設備的電源供應插頭與當地家用的供電插座不相配,或因任何
原因被移除,請參考以下步驟為設備安裝符合安全標準 (BS 546
或 BS 1363)的 13A 三腳插頭。安裝時,請確保電源線妥當安裝及
固定於線夾下。
地線必須連接到插頭內的地線端子 (字母 E 標示)。
中線必須連接到插頭內的中線端子 (字母 N 標示)。
火線必須連接到插頭內的火線端子 (字母 L 標示)。
線夾
地線
火線
13A 保險絲
中線
附加資料

GB
15
English
Contents
Installation, 16-17-18-19-20
Unpacking and levelling
Connecting the electricity and water supplies
The first wash cycle
Technical data
Instructions for the fitter
Description of the washer dryer, 21-22
Control panel
Display
How to run a wash cycle or a drying cycle, 23
Wash cycles and functions, 24
Table of wash cycles
Wash functions
Detergents and laundry, 25
Detergent dispenser drawer
Preparing the laundry
Special wash cycles
Load balancing system
Precautions and tips, 26
General safety
Disposal
Care and maintenance, 27
Cutting off the water or electricity supply
Cleaning the washer dryer
Cleaning the detergent dispenser drawer
Caring for the door and drum of your appliance
Cleaning the pump
Checking the water inlet hose
Troubleshooting, 28
Service, 29
GB
SDLE 129
Instructions for use
WASHER DRYER
! This symbol reminds you to read this instruction manual.

16
GB
Installation
! This instruction manual should be kept in a safe place for
future reference. If the washer dryer is sold, transferred or
moved, make sure that the instruction manual remains with
the machine so that the new owner is able to familiarise
himself/herself with its operation and features.
! Read these instructions carefully: they contain vital infor-
mation relating to the safe installation and operation of the
appliance.
Unpacking and levelling
Unpacking
1. Remove the washer dryer from its packaging.
2. Make sure that the washer dryer has not been damaged
during the transportation process. If it has been damaged,
contact the retailer and do not proceed any further with the
installation process.
3. Remove the 4 protective
screws (used during tran-
sportation) and the rubber
washer with the correspon-
ding spacer, located on the
rear part of the appliance
(see figure).
4. Close off the holes using the plastic plugs provided.
5. Keep all the parts in a safe place: you will need them again
if the washer dryer needs to be moved to another location.
! Packaging materials should not be used as toys for children.
Levelling
1. Install the washer dryer on a flat sturdy floor, without resting
it up against walls, furniture cabinets or anything else.
2. If the floor is not perfectly
level, compensate for any
unevenness by tightening
or loosening the adjustable
front feet (see figure); the an-
gle of inclination, measured
in relation to the worktop,
must not exceed 2°.
Levelling the machine cor-
rectly will provide it with
stability, help to avoid vibra-
tions and excessive noise and prevent it from shifting while
it is operating. If it is placed on carpet or a rug, adjust the
feet in such a way as to allow a sufficient ventilation space
underneath the washer dryer.
Connecting the electricity and water
supplies
Connecting the water inlet hose
1. Connect the supply pipe
by screwing it to a cold water
tab using a ¾ gas threaded
connection (see figure).
Before performing the con-
nection, allow the water to
run freely until it is perfectly
clear.
2. Connect the inlet hose to
the washer dryer by screwing
it onto the corresponding
water inlet of the appliance,
which is situated on the top
right-hand side of the rear
part of the appliance (see
figure).
3. Make sure that the hose is not folded over or bent.
! The water pressure at the tap must fall within the values
indicated in the Technical details table (see next page).
! If the inlet hose is not long enough, contact a specialised
shop or an authorised technician.
! Never use second-hand hoses.
! Use the ones supplied with the machine.

GB
17
65 - 100 cm
Connecting the drain hose
Connect the drain hose,
without bending it, to a drai-
nage duct or a wall drain
located at a height between
65 and 100 cm from the floor;
alternatively, rest it on the
side of a washbasin or ba-
thtub, fastening the duct
supplied to the tap (see figu-
re). The free end of the hose
should not be underwater.
! We advise against the use of hose extensions; if it is abso-
lutely necessary, the extension must have the same diameter
as the original hose and must not exceed 150 cm in length.
Electric connection
Before plugging the appliance into the mains socket, make
sure that:
• the socket is earthed and in compliance with the appli-
cable law;
• the socket is able to sustain the appliance’s maximum
power load indicated on the Technical Data Plate fixed
on the machine;
• the supply voltage is included within the
values indicated on the Technical Data Plate
fixed on the machine.
• the socket is compatible with the washing machine’s plug.
If this is not the case, replace the socket or the plug.
Your appliance is now supplied with a 13 amp fused plug
it can be plugged into a 13 amp socket for immediate use.
Before using the appliance please read the instructions below.
WARNING - THIS APPLIANCE MUST BE EARTHED.
THE FOLLOWING OPERATIONS SHOULD BE CARRIED
OUT BY A QUALIFIED ELECTRICIAN.
Replacing the fuse:
When replacing a faulty fuse, a 13 amp ASTA approved
fuse to BS 1362 should always be used, and the fuse
cover re-fitted. If the fuse cover is lost, the plug must not
be used until a replacement is obtained.
Replacement fuse covers:
If a replacement fuse cover is fitted, it must be of the
correct colour as indicated by the coloured marking or the
colour that is embossed in words on the base of the plug.
Replacements can be obtained directly from your nearest
Service Depot.
Removing the plug:
If your appliance has a non-rewireable moulded plug and
you should wish to re-route the mains cable through parti-
tions, units etc., please ensure that either:
the plug is replaced by a fused 13 ampere rewireable plug
bearing the BSI mark of approval.
or:
the mains cable is wired directly into a 13 amp cable out-
let, controlled by a switch, (in compliance with BS 5733)
which is accessible without moving the appliance.
Disposing of the plug:
Ensure that before disposing of the plug itself, you make
the pins unusable so that it cannot be accidentally inserted
into a socket.
Instructions for connecting cable to an alternative plug:
Important: the wires in the mains lead are coloured in
accordance with the following code:
Green & Yellow Earth
Blue Neutral
Brown Live

18
GB
As the colours of the wires in the lead may not correspond
with the coloured markings identifying the terminals in your
plug, proceed as follows:
Connect Green & Yellow wire to terminal marked E or
or coloured Green or Green & Yellow.
Connect Brown wire to terminal marked L or coloured
Red.
Connect Blue wire to terminal marked N or coloured Black.
If a 13 amp plug (BS 1363) is used it must be fitted with a
13 amp fuse, either in the plug or adaptor or at the distri-
bution board.
If you are in any doubt regarding the electrical supply to
your machine, consult a qualified electrician before use.
How to connect an alternative plug:
The wires in this mains lead are coloured in accordance
with the following code:
BLUE NEUTRAL (N)
BROWN LIVE (L)
GREEN & YELLOW EARTH (E)
Disposing of the appliance:
When disposing of the appliance please remove the plug
by cutting the mains cable as close as possible to the plug
body and dispose of it as described on the previous page.
! The washing machine should not be installed in an ou-
tdoor environment, not even where the area is sheltered,
because it may be very dangerous to leave it exposed to
damp, rain and thunderstorms.
! When the washing machine is installed, the mains socket
must be within easy reach.
! Do not use extensions or multiple sockets.
! The power supply cable must never be bent or dange-
rously compressed.
! The power supply cable must only be replaced by an
authorised serviceman.
Warning! The company denies all liability if and when these
norms are not respected.
The first wash cycle
Once the appliance has been installed, and before you use it for
the first time, run a wash cycle with detergent and no laundry,
using the wash cycle .
GREEN &
YELLOW
BROWN
BLUE
13 ampere fuse
CROSS-BAR
CORD GRIP
Technical data
Model
SDLE 129
Dimensions
width 59,5 cm
height 81.5 cm
depth 54.5 cm
Capacity
from 1 to 7 kg for the wash pro-
gramme;
from 1 to 5 kg for the drying pro-
gramme
Electrical
connections
please refer to the technical data plate
fixed to the machine
Water connec-
tion
maximum pressure 1 MPa (10 bar)
minimum pressure 0.05 MPa (0.5 bar)
drum capacity 52 litres
Spin speed
up to 1200 rotations per minute
Energy rated
programmes
according to
regulation
EN 50229
Wash: programme (1st press of
the button); temperature 60°C; run
with a load of 7 kg.
Drying: the smaller load must be
dried by selecting the “IRON DRY”
dryness level. The load must con-
sist of 2 sheets, 1 pillowcase and
1 hand towel; the remainder of the
load must be dried by selecting the
“CUPBOARD DRY” dryness level.
This appliance conforms to the
following EC Directives:
- 2004/108/EC (Electromagnetic
Compatibility)
- 2012/19/EU
- 2006/95/EC Low Voltage)

GB
19
Instructions for the fitter
Mounting the wooden panel onto the door and in-
serting the machine into cabinets:
In the case where the machine must be shipped for final
installation after the wooden panel has been mounted, we
suggest leaving it in its original packaging. The packaging
was designed to make it possible to mount the wooden
panel onto the machine without removing it completely (see
figures below).
The wooden panel that covers the face of the machine must
not be less than 18 mm in thickness and can be hinged on
either the right or left. For the sake of practicality when using
the machine, we recommend that the panel be hinged on
the same side as the door for the machine itself - the left.
A
B
C
D
E
Tur seite
Door Mounting Accessories (Fig. 1-2-3-4-5).
Fig. 1
N° 2 Hinges
N° 1 Magnet N° 1 Magnet plate
N° 1 Rubber plug
N° 2 Hinge Supports
N° 4 Spacers
Fig. 2
Fig. 3 Fig. 4
Fig. 5
Fig. 4/B
- No. 6 type A self-threading screws, l =13 mm.
- No. 2 type B metric, countersunk screws, l =25; for fastening
the magnet plate to the cabinet.
- No. 4 type C metric screws, l =15 mm; for mounting the
hinge supports to the cabinet.
- No. 4 type D metric screws, l =7 mm; for mounting the
hinges on the supports.
Mounting the Parts onto the Face of the Machine.
- Fit the hinge supports to the appliance front panel, positioning
the hole marked with an arrow in fig. 1 so that it is on the inner
side of the front panel. Fit a spacer (fig. 4/B) between the
surfaces using type C screws.
- Fit the magnet plate at the top of the opposite side, using
type B screws to fix two spacers (fig. 4/B) between the plate
and the surface.

20
GB
Using the Drilling Template.
- To trace the positions of the holes on the left-hand side of
the panel, align the drilling template to the top left side of the
panel using the lines traced on the extremities as a reference.
- To trace the positions of the holes on the right-hand side
of the panel, align the drilling template to the top right side
of the panel.
- Use an appropriately sized router to mill the holes for the two
hinges, the rubber plug and the magnet.
Mounding the Parts onto the Wooden Panel (Door).
- Insert the hinges into the holes (the movable part of the hinge
must be positioned facing away from the panel) and fasten them
with the 4 type A screws.
- Insert the magnet into the top hole on the opposite side of
the hinges and fasten it with the two type B screws.
- Insert the rubber plug into the bottom hole.
The panel is now ready to be mounted onto the machine.
Mounting the Panel into the machine.
Insert the nib of the hinge (indicated by the arrow in fig. 2) into
the hole for the hinge and push the panel towards the front of
the machine. Fasten the two hinges with the type D screws.
Fastening the plinth guide.
If the machine is installed at the end of a set of modular ca-
binets, mount either one or both of the guides for the base
molding (as shown in fig. 8). Adjust them for depth based on
the position of the base molding, and, if necessary, fasten
the base to the guides (fig. 9).
This is how to assemble the plinth guide (fig. 8):
Fasten angle P using screw R, insert plinth guide Q into the
special slot and once it is in the desired position, lock it in place
using angle P and screw R.
Inserting the machine into the Cabinet.
- Push the machine into the opening, aligning it with the
cabinets (fig. 6).
- Regulate the adjustable feet to raise the machine to the
appropriate height.
- To adjust the position of the wooden panel in both the
vertical and horizontal directions, use the C and D screws,
as shown in fig. 7.
Important: close the lower part of the appliance front by ensuring
that the plinth rests against the floor.
Fig. 8 Fig. 9
Accessories provided for the height adjustment.
The following can be found inside the polystyrene lid (fig. 10):
2 crossbars (G), 1 strip (M)
the following can be found inside the appliance drum:
4 additional feet (H),
4 screws (I),
4 screws (R),
4 nuts (L),
2 plinth guides (Q)
Adjusting the appliance height.
The height of the appliance can be adjusted (from 815 mm to
835 mm), by turning the 4 feet.
Should you require the appliance to be placed higher than the
above height, you need to use the following accessories to
raise it to up to 870 mm:
The two crossbars (G); the 4 feet (H); the 4 screws (I); the 4 nuts (L)
then perform the following operations (fig. 11):
remove the 4 original feet, place a crossbar G at the front of
the appliance, fastening it in place using screws I (screwing
them in where the original feet were) then insert the new feet H.
Repeat the same operation at the back of the appliance.
Now adjust feet H to raise or lower the appliance from 835
mm to 870 mm.
Once you have reached the desired height, lock nuts L onto
crossbar G.
To adjust the appliance to a height between 870 mm and
900 mm, you need to mount strip M, adjusting feet H to the
required height.
Insert the strip as follows:
loosen the three screws N situated at the front of the Top
cover of the appliance, insert strip M as shown in fig. 12, then
fasten screws N.
D
C
C
570
min
815
540
595
820 ÷ 900
600 min
Fig. 6 Fig. 7
L
I
H
G
M
Fig. 11 Fig. 12
Fig. 10
ページが読み込まれています...
ページが読み込まれています...
ページが読み込まれています...
ページが読み込まれています...
ページが読み込まれています...
ページが読み込まれています...
ページが読み込まれています...
ページが読み込まれています...
ページが読み込まれています...
ページが読み込まれています...
ページが読み込まれています...
ページが読み込まれています...
-
 1
1
-
 2
2
-
 3
3
-
 4
4
-
 5
5
-
 6
6
-
 7
7
-
 8
8
-
 9
9
-
 10
10
-
 11
11
-
 12
12
-
 13
13
-
 14
14
-
 15
15
-
 16
16
-
 17
17
-
 18
18
-
 19
19
-
 20
20
-
 21
21
-
 22
22
-
 23
23
-
 24
24
-
 25
25
-
 26
26
-
 27
27
-
 28
28
-
 29
29
-
 30
30
-
 31
31
-
 32
32


他の言語で
- English: Scholtes SDLE 129 HK User guide
その他のドキュメント
-
Philips DDL602PLKACG/93 ユーザーマニュアル
-
-
Indesit RDPG 96407 D AUS ユーザーガイド
-
-
-
-
-
Bauknecht WBKI75430 Setup and user guide
-
Candy CBWD 8514DC-66 ユーザーマニュアル
-
Whirlpool WFCI75430 Washer Dryer インストールガイド