
User Manual
3.5" SATA to USB 3.0 & eSATA External Enclosure
3.5" SATA vers USB 3.0 & eSATA Boîtier Externe
RX-358 U3C

RX-358 U3C user manual
3.5" SATA to USB 3.0 & eSATA External Enclosure
3.5" SATA vers USB 3.0 & eSATA Boîtier Externe
CONTENTS
English
Enclosure Figure Description
User Assembly Guide
HDD Formatting Guide
1
2
5
Français
Description de l’illustration du boîtier
Guide d’assemblage
7
8
11
12
15
16
19
20
23
24
27
28
Deutsch
Beschreibende Abbildung des Gehäuses
Montageanleitung
Español
Descripción de la figura de la carcasa
Guía de montaje del usuario
Português
Descrição da imagem da caixa
Guia de montagem
繁體中文
外觀說明
使用者組裝指南
简体中文
外观说明
使用者组装指南

RX-358 U3C user manual
3.5" SATA to USB 3.0 & eSATA External Enclosure
3.5" SATA vers USB 3.0 & eSATA Boîtier Externe
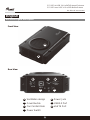
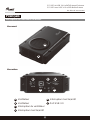
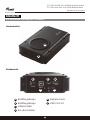
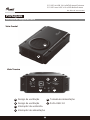
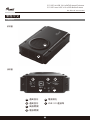
Enclosure Figure Description
Front View
Rear View
A
B
C
D
E
F
G
A
B
C
D
E
F
G
Ventilation design
Cover Buckle
Fan Control Knob
Power Switch
Power Jack
USB3.0 Port
eSATA Port
1
English

RX-358 U3C user manual
3.5" SATA to USB 3.0 & eSATA External Enclosure
3.5" SATA vers USB 3.0 & eSATA Boîtier Externe
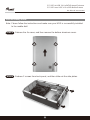
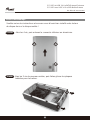
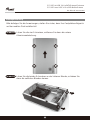
User Assembly Guide
Please follow the instructions and make sure your HDD is successfully installed
to the mobile disk!
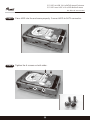
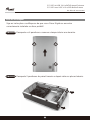
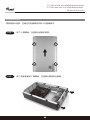
Release the 4 screws, and then remove the bottom aluminum cover.
Note:
STEP1
2
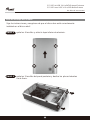
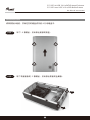
Release 2 screws from back panel, and then slide out the side plates.
STEP2

RX-358 U3C user manual
3.5" SATA to USB 3.0 & eSATA External Enclosure
3.5" SATA vers USB 3.0 & eSATA Boîtier Externe
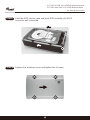
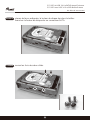
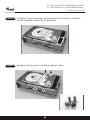
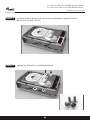
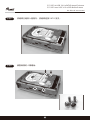
Place HDD into the enclosure properly. Connect HDD to SATA connector.
STEP3
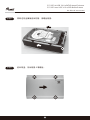
Tighten the 4 screws on both sides.
STEP4
3

RX-358 U3C user manual
3.5" SATA to USB 3.0 & eSATA External Enclosure
3.5" SATA vers USB 3.0 & eSATA Boîtier Externe
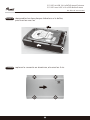
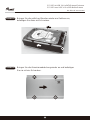
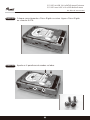
Slide the HDD into the case and push HDD inwardly until SATA
connector well connected.
STEP5
Replace the aluminum cover and tighten the 4 screws.
STEP6
4

RX-358 U3C user manual
3.5" SATA to USB 3.0 & eSATA External Enclosure
3.5" SATA vers USB 3.0 & eSATA Boîtier Externe
HDD Formatting Guide
*
Please make sure your External Enclosure is turned on and connected to the
C before formatting the Hard Drive.
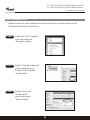
Right-click “My Computer”
icon and select the
“Manage” column.
STEP1
Select “Disk Management”
and you will see your
External HDD showed
“Unallocated”
STEP2
Right-click on the
“Unallocated”
block and selects
“New Partition”.
STEP3
5

RX-358 U3C user manual
3.5" SATA to USB 3.0 & eSATA External Enclosure
3.5" SATA vers USB 3.0 & eSATA Boîtier Externe
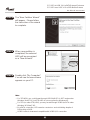
The “New Partition Wizard”
will appear. Please follow
the instruction of the wizard
to complete.
STEP4
When new partition is
completed, the external
HDD will be recognized
as a “New Volume”.
STEP5
Double-click “My Computer”.
You will see the new volume
appears on your PC.
STEP6
6
For 3TB HDD, you could format through USB3.0/eSATA in GPT mode under
Windows Vista/7 OS, but 3TB HDD is not recognized by Windows XP.
For 2TB (or under 2TB) HDD, you may format through USB3.0/eSATA under
Windows XP/Vista/7 OS.
By eSATA connection, LED remains constant on and not blinking despite of
R/W activity of HDD.
USB3.0 cable is downward compatible with USB2.0/1.1 connection.
Note
*
*
*
*

RX-358 U3C user manual
3.5" SATA to USB 3.0 & eSATA External Enclosure
3.5" SATA vers USB 3.0 & eSATA Boîtier Externe
Description de l’illustration du boîtier
Vue avant
Vue arrière
A
B
C
D
E
F
Ventilateur
Ventilateur
Interrupteur du ventilateur
Interrupteur marche/arrêt
Interrupteur marche/arrêt
Port USB 3.0
7
Français
A
B
C
D
E
F
G

RX-358 U3C user manual
3.5" SATA to USB 3.0 & eSATA External Enclosure
3.5" SATA vers USB 3.0 & eSATA Boîtier Externe
Guide d’assemblage
Veuillez suivre les instructions et assurez-vous d’avoir bien installé votre lecteur
de disque dur sur le disque mobile !
ôtez les 4 vis, puis enlevez le couvercle inférieur en aluminium.
ÉTAPE1
8
ôtez les 2 vis du panneau arrière, puis faites glisser les plaques
latérales pour les retirer.
ÉTAPE2

RX-358 U3C user manual
3.5" SATA to USB 3.0 & eSATA External Enclosure
3.5" SATA vers USB 3.0 & eSATA Boîtier Externe
placez de façon adéquate, le lecteur de disque dur dans le boîtier.
branchez le lecteur de disque dur au connecteur SATA.
ÉTAPE3
serrez les 4 vis des deux côtés.
ÉTAPE4
9

RX-358 U3C user manual
3.5" SATA to USB 3.0 & eSATA External Enclosure
3.5" SATA vers USB 3.0 & eSATA Boîtier Externe
réassemblez les deux plaques latérales sur le boîtier,
puis fixez-les avec les
ÉTAPE5
replacez le couvercle en aluminium, et serrez les 4 vis.
ÉTAPE6
10

RX-358 U3C user manual
3.5" SATA to USB 3.0 & eSATA External Enclosure
3.5" SATA vers USB 3.0 & eSATA Boîtier Externe
A
B
C
D
E
F
G
Beschreibende Abbildung des Gehäuses
Vorderansicht
Rückansicht
A
B
C
D
E
F
Belüftungsdesign
Belüftungsdesign
Lüfterschalter
Ein-/Ausschalter
Netzanschluss
USB 3.0-Port
11
Deutsch

RX-358 U3C user manual
3.5" SATA to USB 3.0 & eSATA External Enclosure
3.5" SATA vers USB 3.0 & eSATA Boîtier Externe
Montageanleitung
Bitte befolgen Sie die Anweisungen; stellen Sie sicher, dass Ihre Festplatte erfolgreich
auf der mobilen Disk installiert ist!
Lösen Sie die vier Schrauben, entfernen Sie dann die untere
Aluminiumabdeckung.
SCHRITT1
SCHRITT2
Lösen Sie die beiden Schrauben an der hinteren Blende; schieben Sie
dann die seitlichen Blenden heraus.
12

RX-358 U3C user manual
3.5" SATA to USB 3.0 & eSATA External Enclosure
3.5" SATA vers USB 3.0 & eSATA Boîtier Externe
Platzieren Sie die Festplatten ordnungsgemäß im Gehäuse. Verbinden
Sie die Festplatte mit dem SATA-Anschluss.
Befestigen Sie die vier Schrauben an beiden Seiten.
SCHRITT3
SCHRITT4
13

RX-358 U3C user manual
3.5" SATA to USB 3.0 & eSATA External Enclosure
3.5" SATA vers USB 3.0 & eSATA Boîtier Externe
Bringen Sie die seitlichen Blenden wieder am Gehäuse an;
befestigen Sie diese mit Schrauben.
Bringen Sie die Aluminiumabdeckung wieder an und befestigen
Sie sie mit vier Schrauben.
SCHRITT5
SCHRITT6
14

RX-358 U3C user manual
3.5" SATA to USB 3.0 & eSATA External Enclosure
3.5" SATA vers USB 3.0 & eSATA Boîtier Externe
A
B
C
D
E
F
G
Descripción de la figura de la carcasa
Vista frontal
Vista posterior
A
B
C
D
E
F
Diseño de ventilación
Diseño de ventilación
Conmutador del ventilador
Interruptor de alimentación
Conector de alimentación
Puerto USB 3.0
Español
15

RX-358 U3C user manual
3.5" SATA to USB 3.0 & eSATA External Enclosure
3.5" SATA vers USB 3.0 & eSATA Boîtier Externe
Guía de montaje del usuario
Siga las instrucciones y asegúrese de que el disco duro está correctamente
instalado en el disco móvil
quite los 4 tornillos y retire la tapa inferior de aluminio.
PASO 1
PASO 2
quite los 2 tornillos del panel posterior y deslice las placas laterales
hacia fuera.
16

RX-358 U3C user manual
3.5" SATA to USB 3.0 & eSATA External Enclosure
3.5" SATA vers USB 3.0 & eSATA Boîtier Externe
coloque el disco duro en la carcasa correctamente. Inserte el disco
duro en el conector SATA.
apriete los 4 tornillos en ambos laterales.
PASO 3
PASO 4
17

RX-358 U3C user manual
3.5" SATA to USB 3.0 & eSATA External Enclosure
3.5" SATA vers USB 3.0 & eSATA Boîtier Externe
vuelva a montar las dos placas laterales en la carcasa y fíjela
con tornillos.
vuelva a colocar la tapa de aluminio y apriete los 4 tornillos.
PASO 5
PASO 6
18
ページが読み込まれています...
ページが読み込まれています...
ページが読み込まれています...
ページが読み込まれています...
ページが読み込まれています...
ページが読み込まれています...
ページが読み込まれています...
ページが読み込まれています...
ページが読み込まれています...
ページが読み込まれています...
ページが読み込まれています...
ページが読み込まれています...
ページが読み込まれています...
-
 1
1
-
 2
2
-
 3
3
-
 4
4
-
 5
5
-
 6
6
-
 7
7
-
 8
8
-
 9
9
-
 10
10
-
 11
11
-
 12
12
-
 13
13
-
 14
14
-
 15
15
-
 16
16
-
 17
17
-
 18
18
-
 19
19
-
 20
20
-
 21
21
-
 22
22
-
 23
23
-
 24
24
-
 25
25
-
 26
26
-
 27
27
-
 28
28
-
 29
29
-
 30
30
-
 31
31
-
 32
32
-
 33
33


他の言語で
その他のドキュメント
-
 FITUEYES Mobile TV Stand ユーザーマニュアル
-
Akasa AK-TL3SEB-BK データシート
-
Cooler Master X Craft 350 Lite, Silver 仕様
-
-
-
Thermaltake Level 10 GT Battle Edition ユーザーマニュアル
-
ASROCK CoreHT クイックスタートガイド
-
-
-
Stardom 3.5" SATA Enclosure ユーザーマニュアル
