“B-”
“B-B-”
“B-B-B-”
“B-B-B-B-”
“B——”
“B——B-”
1
2
3
4
5
6
Brake Type
Brake Force
Voltage Cutoff Type
LiPo Cells
Cutoff Voltage
Start-up Mode
(1 Short B)
(2 Short Bs)
(3 Short Bs)
(4 Short Bs)
(1 Long B)
(1 Long B & 1 Short B)
“B——B-B-”
“B——B-B-B-”
“B——B-B-B-B-”
“B——B——”
“B——B——B-”
7
8
9
10
11
Timing
Active Freewheeling
Search Mode
Factory Reset
Exit
(1 Long B & 2 Short Bs)
(1 Long B & 3 Short Bs)
(1 Long B & 4 Short Bs)
(2 Long Bs)
(2 Long Bs & 1 Short B)
02
Features
01
Warnings
03
Specifications
04
User Guide
05
ESC Programming
Thank you for purchasing this HOBBYWING product! Brushless power
systems can be very dangerous. Any improper use may cause personal
injury and damage to the product and related devices. We strongly
recommend reading through this user manual before use. Because we
have no control over the use, installation, or maintenance of this
product, no liability may be assumed for any damages or losses resulting
from the use of the product. We do not assume responsibility for any
losses caused by unauthorized modifications to our product. Besides, we
have the right to modify our product design, appearance, features and
usage requirements without notification. We, HOBBYWING, are only
responsible for our product cost and nothing else as result of using our
product.
CAUTIONS
ATTENTION
ESC/Radio Calibration
2
Connections
1
06
Programmable Items
07
Troubleshooting & Multiple Protections
Normal Start-up Process
3
Program your ESC with a LED Program Box
1
• Read through the manuals of all power devices and aircraft and ensure the power configuration is rational before using this unit.
• Ensure all wires and connections are well insulated before connecting the ESC to related devices, as short circuit will damage your ESC . Ensure all devices are well connected, in order to
prevent poor connections that may cause your aircraft to lose control or other unpredictable issues like damage to the device. If necessary, please use a soldering iron with enough
power to solder all input/output wires and connectors.
• Never get the motor locked up during high-speed rotation, otherwise the ESC may get destroyed and may also get your motor damaged. (Note: move the throttle stick to the bottom
position or disconnect the battery immediately if the motor really gets locked up.)
• Never use this unit in the extremely hot weather or continue to use it when it gets really hot. Because high temperature will activate the ESC thermal protection or even damage your ESC.
• Always disconnect and remove batteries after use, as the ESC will continue to consume current if it`s still connected to batteries. Long-time contact will cause batteries to completely
discharge and result in damage to batteries or/and ESC. This will not be covered under warranty.
1). Plug the programming cable (on your ESC) into the programming port on the LED program box.
Note: Need plug the throttle signal cable into the power port on the LED program box and the programming wire ( yellow wire ) into the programming port on the LED program box.
2). (With a battery connected to your ESC), after connected a LED program box to the ESC, you need to disconnect the battery first and then reconnect it to the ESC to enter the programming
mode, check and set parameters.
The portable program box is an optional accessory applicable for field use. Its friendly interface makes the ESC programming easy and quick. Connect a battery to your ESC after
connecting a LED program box to the ESC, all programmable items will show up a few seconds later. You can select the item you want to program and the setting you want to choose via
“ITEM” & “VALUE” buttons on the program box, and then press the “OK” button to save all new settings to your ESC.
• ESC which features a high performance 32-bit microprocessor (with a running frequency of up to 96MHz) is compatible with various brushless motors.
• DEO (Driving Efficiency Optimization) Technology greatly improves throttle response & driving efficiency and reduces ESC temperature.
• Separate programming cable for connecting ESC to a LED program box and allows users to program the ESC anytime, anywhere. (For detailed info, please refer to the user manual of
HOBBYWING LED program box.)
• Normal/Reverse brake modes (esp. reverse brake mode) can effectively shorten the landing distance for the aircraft.
• Search mode can help users find the aircraft by the alarm beeps after the aircraft falls into the complex environment.
• Multiple protection features like start-up, ESC thermal, capacitor thermal, over-current, over-load, abnormal input voltage and throttle signal loss effectively prolong the service life of the ESC.
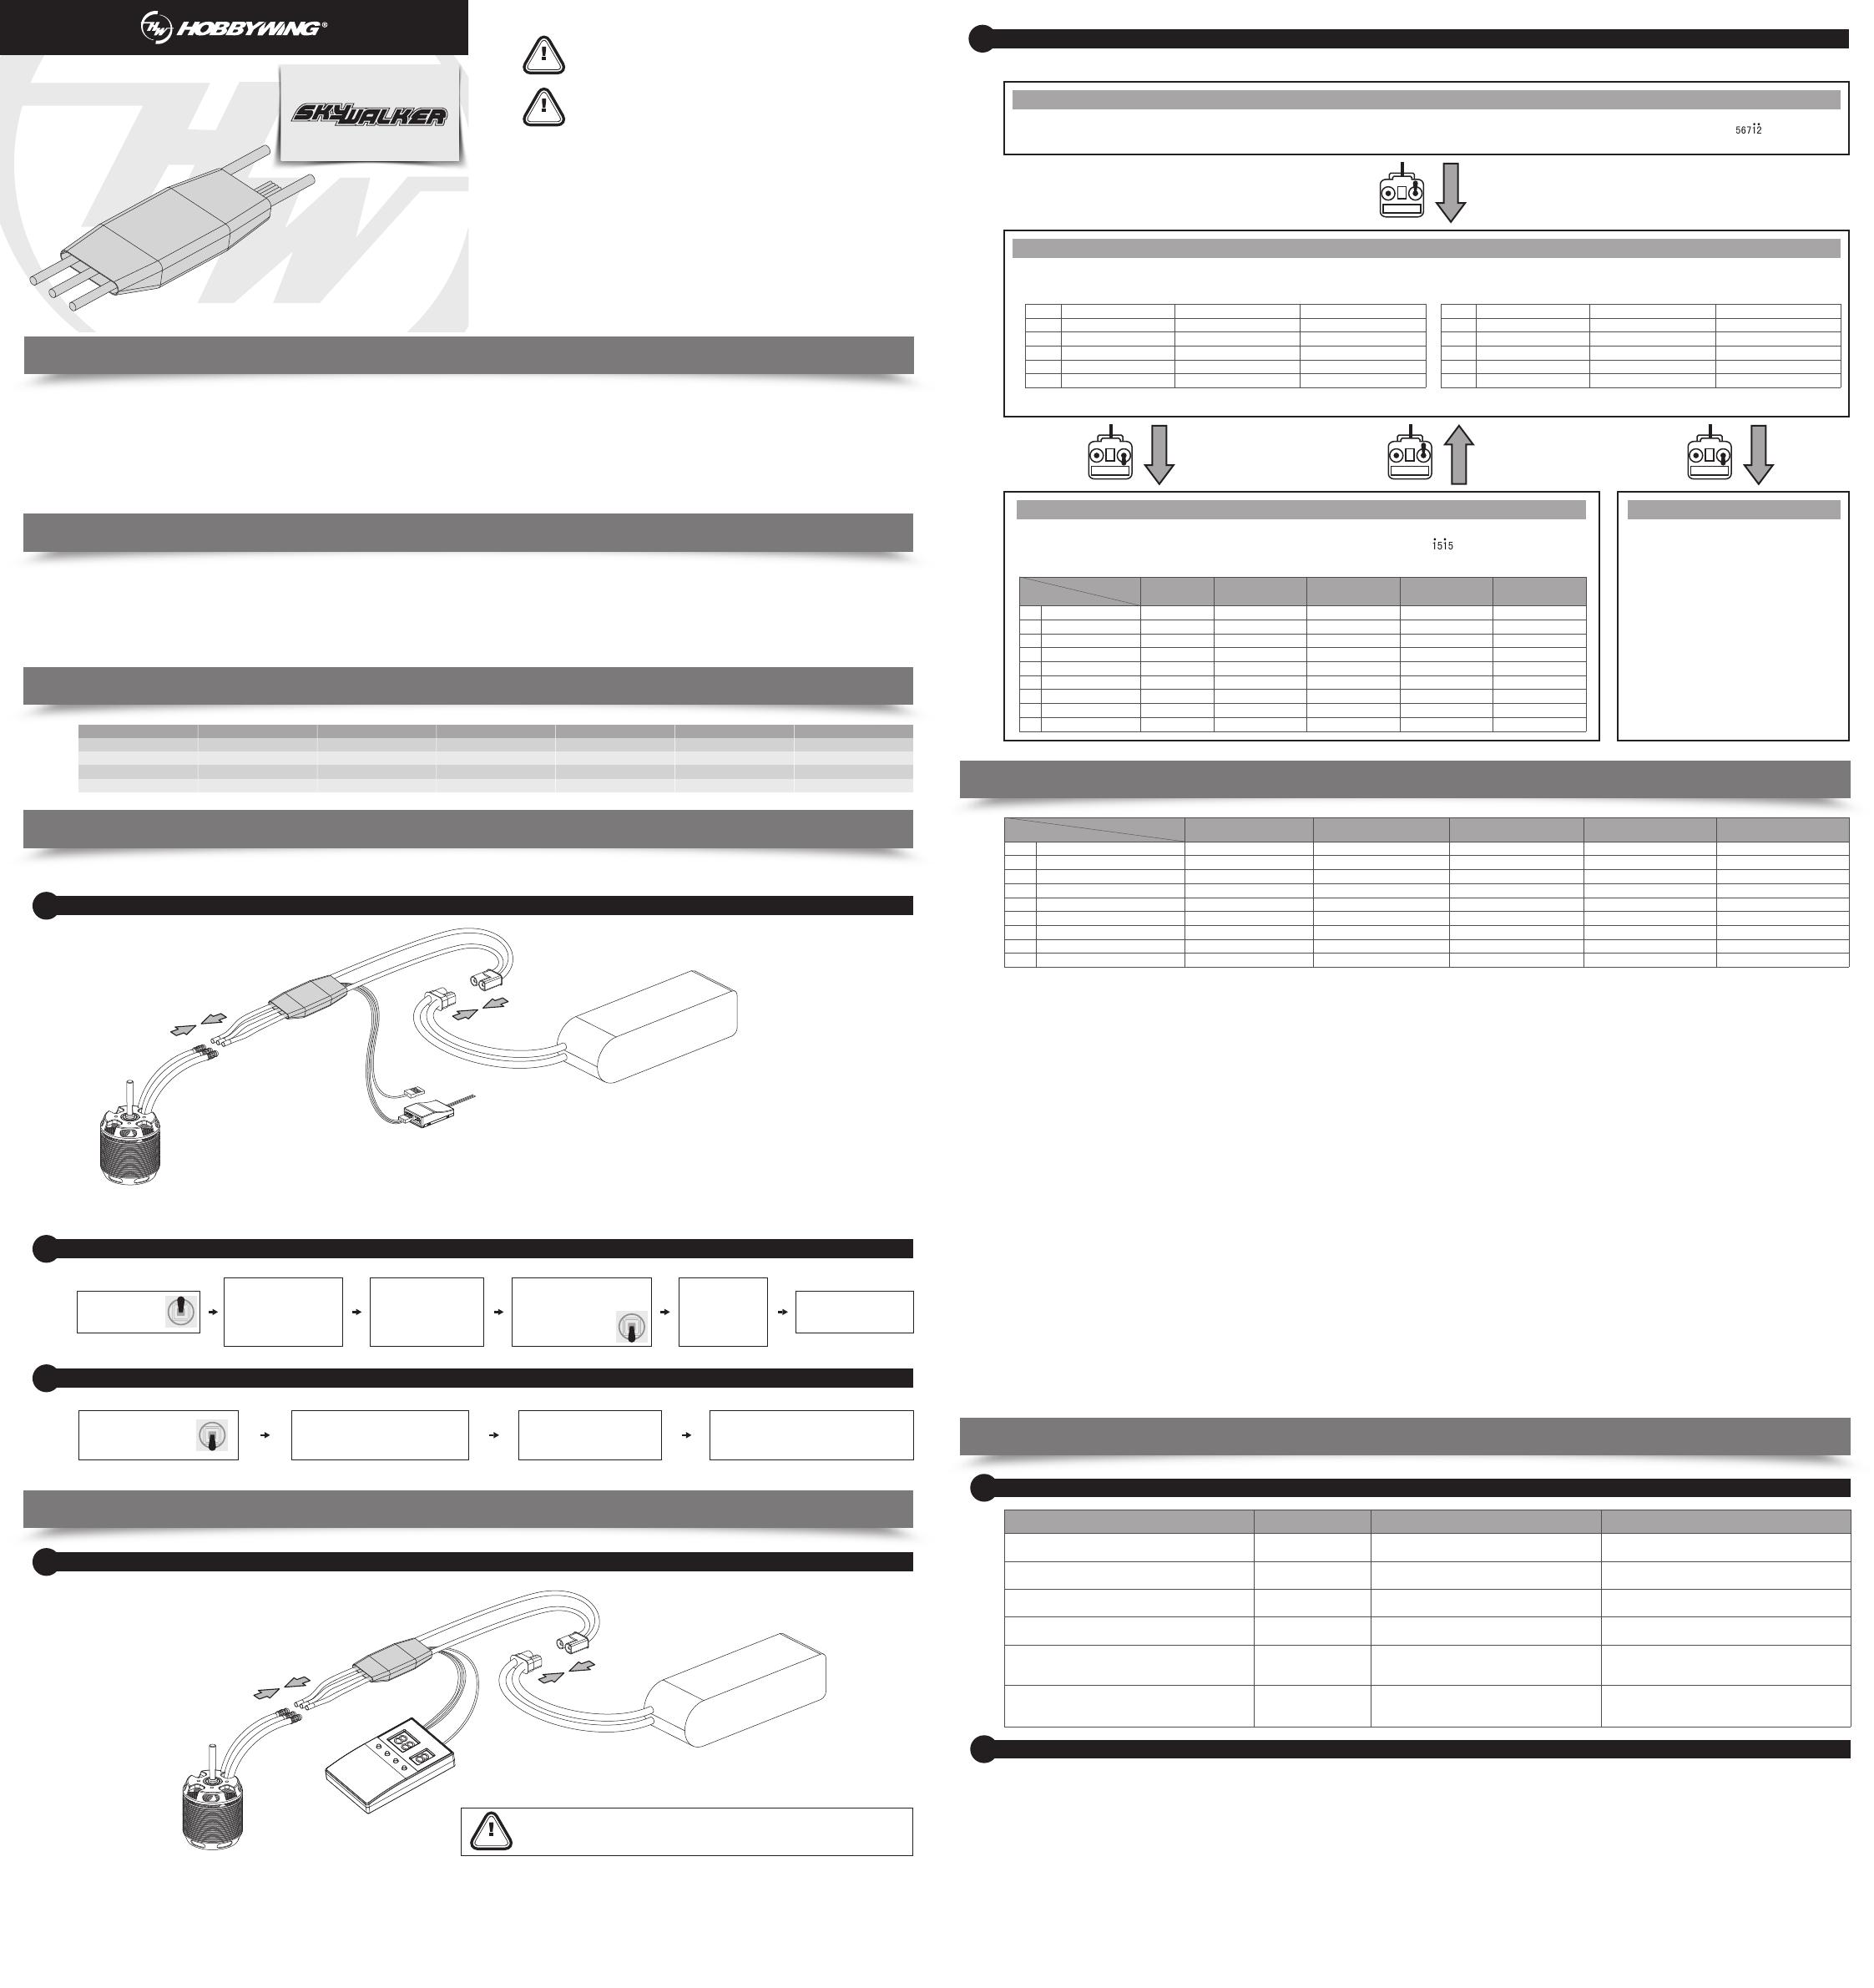
1. Wiring
Signal cable description:
Throttle Signal Cable (White/Red/Black Tri-color Cable): plug it into the TH channel on the receiver or flight controller. The White wire is for transmitting
throttle signals, the Red & Black wires are BEC output wires.
Reverse Brake Signal Wire (Yellow Wire): it must be plugged into any vacant channel on the receiver (when using the Reverse Brake mode) to control the ON/OFF
of the Reverse Brake function.
Programming Cable (Yellow Cable): connect it to a LED program box if users want to program the ESC.
Program your ESC with the Transmitter
2
Troubleshooting
1
Multiple Protections
2
Turn on the transmitter, and
then move the throttle stick
to the bottom position.
After connected the ESC to a battery, the
motor will emit “ 123” indicating the ESC
is normally powered on.
The motor will emit several
beeps to indicate the number of
LiPo cells.
The motor emits a long beep to indicate the
ESC is ready to go.
Skywalker 40A V2
Skywalker 50A V2
Skywalker 80A V2
Skywalker 100A V2
Model (Regular)
40A
50A
80A
100A
Cont. Current
60A
70A
100A
120A
Peak Current
3-4S LiPo
3-4S LiPo
3-6S LiPo
3-6S LiPo
Input Voltage
5V @ 5A (Switch-mode)
5V @ 5A (Switch-mode)
5V @ 7A (Switch-mode)
5V @ 7A (Switch-mode)
BEC Output
36g
36g
79g
92g
Weight
60 x 25 x 8mm
60 x 25 x 8mm
85 x 36 x 9mm
85 x 36 x 9mm
Size (L x W x H)
20221221
USER MANUAL
Skywalker V2
Brushless Electronic Speed Controller
Attention! The default throttle range of this ESC is from 1100µs to 1940µs (Futaba’s standard); users need to calibrate the throttle range when they start to use a new SKYWALKER
brushless ESC or another transmitter.
Motor
Battery
Skywalker V2
Connect a battery to the
ESC; the motor will sound
“123” to indicate the
ESC is normally powered
on.
Then the motor will beep
two short beeps to indicate
the maximum throttle
endpoint is accepted.
The motor will beep
“Number” beeps to
indicate the number
of LiPo cells you have
plugged in.
The motor will beep a long
beep to indicate the
calibration is complete.
Turn on the transmitter
and move the throttle
stick to the top position.
Move the throttle stick to the bottom
position within 5 seconds after the two
short beeps, the minimum
throttle position will be
accepted 1 second later.
Items
Brake Type
Brake Force
Voltage Cutoff Type
LiPo Cells
Cutoff Voltage
Start-up Mode
Timing
Active Freewheeling
Search Mode
1
2
3
4
5
6
7
8
9
Values 1 2 3
*Disabled
*Low
*Soft
*Auto Calc.
Disabled
*Normal
Low
*On
*Off
Normal
Medium
Hard
3S
Low
Soft
*Medium
Off
5min
Reverse
High
4S
*Medium
Very Soft
High
10min
4
Linear Reverse
5S
High
15min
5
6S
Troubles
The ESC didn’t work after it was powered on while the motor
kept beeping.
The ESC didn’t work after it was powered on while the motor
kept beeping.
The ESC didn’t work after it was powered on while the motor
kept beeping.
The ESC didn’t work after the throttle calibration while the
motor kept beeping.
The ESC output suddenly reduced to 50% during the flight, the
motor kept beeping after the flight completed but the battery
was still connected to the ESC.
The ESC output suddenly reduced to 50% during the flight, the
motor kept beeping after the flight completed but the battery
was still connected to the ESC.
The input voltage was beyond the operating voltage range
of the ESC.
The ESC didn’t receive any throttle signal from the receiver.
The throttle stick has not been moved to the bottom
position.
The throttle range you set was too narrow.
The ESC thermal protection has been activated.
The low-voltage cutoff protection has been activated.
Adjust the power-on voltage and ensure it’s in the operating
voltage range of the ESC.
Check if the transmitter and receiver are well bound, if any poor
connection exists between the ESC and receiver.
Move the throttle stick to the bottom position and calibrate the
throttle range.
Re-calibrate the throttle range.
Improve the heat dissipating condition (i.e. add a cooling fan)
or reduce the ESC load.
Change another pack; lower down the cutoff voltage or disable
the LVC protection (we do not recommend this).
“BB, BB, BB……”
“B-, B-, B-, B-……”
“B, B, B, B……”
“B, B, B, B……”
“BB, BB, BB……”
“BBB, BBB, BBB……”
Warning Tones Causes Solutions
It consists of 4 steps:
Enter the programming Select parameter items Select parameter values Exit the programming
Note: Those values marked with * in the form below are the factory default settings.
1. Brake Type
1.1 Normal Brake
After selected this option, the brake function will be activated when you move the throttle stick to the bottom position. In this mode, the brake amount equals to the brake force you’ve preset.
1.2 Reverse Brake
After selected this option, the Reverse Brake signal wire (its signal range must be the same as the throttle range) must to be plugged into any vacant channel on the receiver, and you can control the motor direction via
that channel. The channel range of 0-50% is the default motor direction, and the channel range of 50% to 100% will cause the motor to spin counterclockwise. The channel stick should be within the channel range of
0-50% (0 would be better) when the first time you power on the ESC. After the Reverse function is activated, the motor will stop first and then spin in the reversed direction and then increase to the speed corresponding
to the throttle input. Either signal loss, no matter reverse brake signal loss or throttle signal loss during the flight, can cause the throttle signal loss protection to be activated.
1.3 Linear Reverse Brake
After selected this option, the Reverse Brake signal wire must to be plugged into any vacant channel on the receiver, and you can control the motor direction via that channel. This channel should be set to a linear switch
(usually a knob on the transmitter).Turn the linear channel switch to activate the reverse function. The speed of the motor is controlled by the linear channel switch. When reversed, the initial throttle value is started at
10%, and the throttle stroke of the linear switch is cured to 1.34ms-1.79ms. The channel stick should be at 0% throttle position when the first time you power on the ESC. Either signal loss, no matter reverse brake
signal loss or throttle signal loss during the flight, can cause the throttle signal loss protection to be activated.
2. Brake Force
This item is only effect in the “Normal brake” mode ,The higher the level, the stronger the braking effect , where the low/medium/high corresponds to the braking force: 60%/90%/100%
3. Voltage Cutoff Type
3.1 Soft Cutoff
After selected this option, the ESC will gradually reduce the output to 60% of the full power in 3 seconds after the low-voltage cutoff protection is activated.
3.2 Hard Cutoff
After selected this option, the ESC will immediately cut off the output when the low-voltage cutoff protection is activated.
4. LiPo Cells
The ESC will automatically calculate the number of LiPo cells you have plugged in as per the “3.7V/Cell” rule if “Auto Calc.” is selected, or you can set this item manually.
5. Cutoff Voltage
If set off, the low-voltage protection function is disabled. In addition, the protection voltage value of the low-voltage protection function corresponding to the low/medium/three modes is about 2.8V/ section, 3.0V/ section
and 3.4V/ section. This value is the voltage of a single battery, multiplied by the number of lithium batteries automatically identified by the electronic governor or the number of lithium batteries manually set, which is the
protection voltage value of the battery. (For example, if the low voltage protection threshold of 3 lithium batteries is medium, the protection voltage of the batteries is 3X3.0=9.0V)
6. Start-up Mode
This is used to adjust the throttle response time of ESC acceleration from 0% to 100%. Normal/Soft/Very Soft correspond to approximately 200ms/500ms/800ms respectively
7. Timing
Can adjust the drive motor timing value. The low / Medium and high are respectively: 5°/15°/25°.
8. Active Freewheeling (DEO)
This item is adjustable between “Enabled” and “Disabled”, and it is enabled by default. With it enabled, you can have better throttle linearity or smoother throttle response.
9. Search Mode
After selected this option, ESC will drive the motor chirping prompt when the throttle is keep 0% and continues to the set time.
1. Start-up Protection:
The ESC will monitor the motor speed during the start-up process. When the speed stops increasing or the speed increase is not stable, the ESC will take it as a start-up failure. At that time, if the throttle amount is less than
15%, the ESC will try to restart automatically; if it is larger than 20%, you need to move the throttle stick back to the bottom position first and then restart the ESC. (Possible causes of this problem: poor connection/
disconnection between the ESC and motor wires, propellers are blocked, etc.)
2. ESC Thermal Protection:
The ESC will gradually reduce the output but won’t cut it off when the ESC temperature goes above 120 . For ensuring the motor can still get some power and won’t cause crashes, so the maximum reduction is about 60%
of the full power. (Here we are describing the ESC’s reaction in soft cutoff mode, while if in hard cutoff mode; it will immediately cut off the power.)
3. Throttle Signal Loss Protection:
When the ESC detects loss of signal for over 0.25 second, it will cut off the output immediately to avoid an even greater loss which may be caused by the continuous high-speed rotation of propellers or rotor blades. The ESC
will resume the corresponding output after normal signals are received.
4. Overload Protection:
The ESC will cut off the power/output or automatically restart itself when the load suddenly increases to a very high value. (Possible cause to sudden load increase is that propellers are blocked.)
5. Low Voltage protection:
When the battery voltage is lower than the cutoff voltage set by the ESC, the ESC will trigger the low-voltage protection. If the battery voltage is set to soft cutoff, the battery voltage will be reduced to a maximum of 60% of
the full power. When set to hard cutoff, the output is cutoff immediately. After the throttle returns to 0%, the ESC will drive the motor to sound the alarm.
6. Abnormal voltage input protection:
When the battery voltage is not within the input voltage range supported by the ESC, the ESC will trigger the Abnormal input voltage protection, ESC will drive the motor to sound the alarm.
Turn on the transmitter, move the throttle stick to the top position, and connect a battery to the ESC, 2 seconds later, the motor will beep ”B-B-” first, then emit 5 seconds later to
indicate that you are in the ESC programming mode.
I. Enter the Programming
After entering the programming, you’ll hear the following 12 kinds of beeps circularly. Move the throttle stick to the bottom position within 3 seconds after you hear some kind of beeps,
you’ll enter the corresponding parameter item.
II. Select Parameter Items
Note: A long “B——” equals to 5 short “B-”, so a long “B——” and a short “B-” represent the 6th item in “Select Parameter Items”.
Move the throttle stick to the bottom position within 3
seconds after you hear “Two long and One short
beeps” (emitting from the motor) can get you exit the
programming mode. The motor beeps “Number”
beeps to indicate the number of LiPo cells you have
plugged in, and then a long beep to indicate the
power system is ready to go.
VI. Exit the Programming
Items
Brake Type
Brake Force
Voltage Cutoff Type
LiPo Cells
Cutoff Voltage
Start-up Mode
Timing
Acitve Freewheeling
Search Mode
1
2
3
4
5
6
7
8
9
Values (Bs) 1
B-
2
B-B-
3
B-B-B-
5
B--
Disabled
Low
Soft
Auto Calc.
Disabled
Normal
Low
On
Off
Normal
Medium
Hard
3S
Low
Soft
Medium
Off
5min
Reverse
High
4S
Medium
Very Soft
High
10min
4
B-B-B-B-
Linear Reverse
5S
High
15min
6S
III. Select Parameter Values
The motor will beep different kinds of beeps circularly, move the throttle stick to the top position after you hear some kind of
beeps will get you to the corresponding parameter value, then you’ll hear the motor emit “ ” to indicate the value is
saved, then get back to “
Select Parameter Items
” and continue to select other parameter items that you want to adjust.
Motor
Battery
Skywalker V2
ATTENTION
You need to power your ESC off and then on after adjusting parameters. Otherwise,
new parameters won’t take effect.


